TOYOTA PRIUS 2008 2.G Quick Reference Guide
PRIUS 2008 2.G
TOYOTA
TOYOTA
https://www.carmanualsonline.info/img/14/6583/w960_6583-0.png
TOYOTA PRIUS 2008 2.G Quick Reference Guide
Trending: oil pressure, stop start, key fob, washer fluid, ignition, brake light, transmission
Page 21 of 32
19
OVERVIEW BASIC HYBRID VEHICLE OPERATIONFEATURES/OPERATIONS SAFETY AND EMERGENCY FEATURES
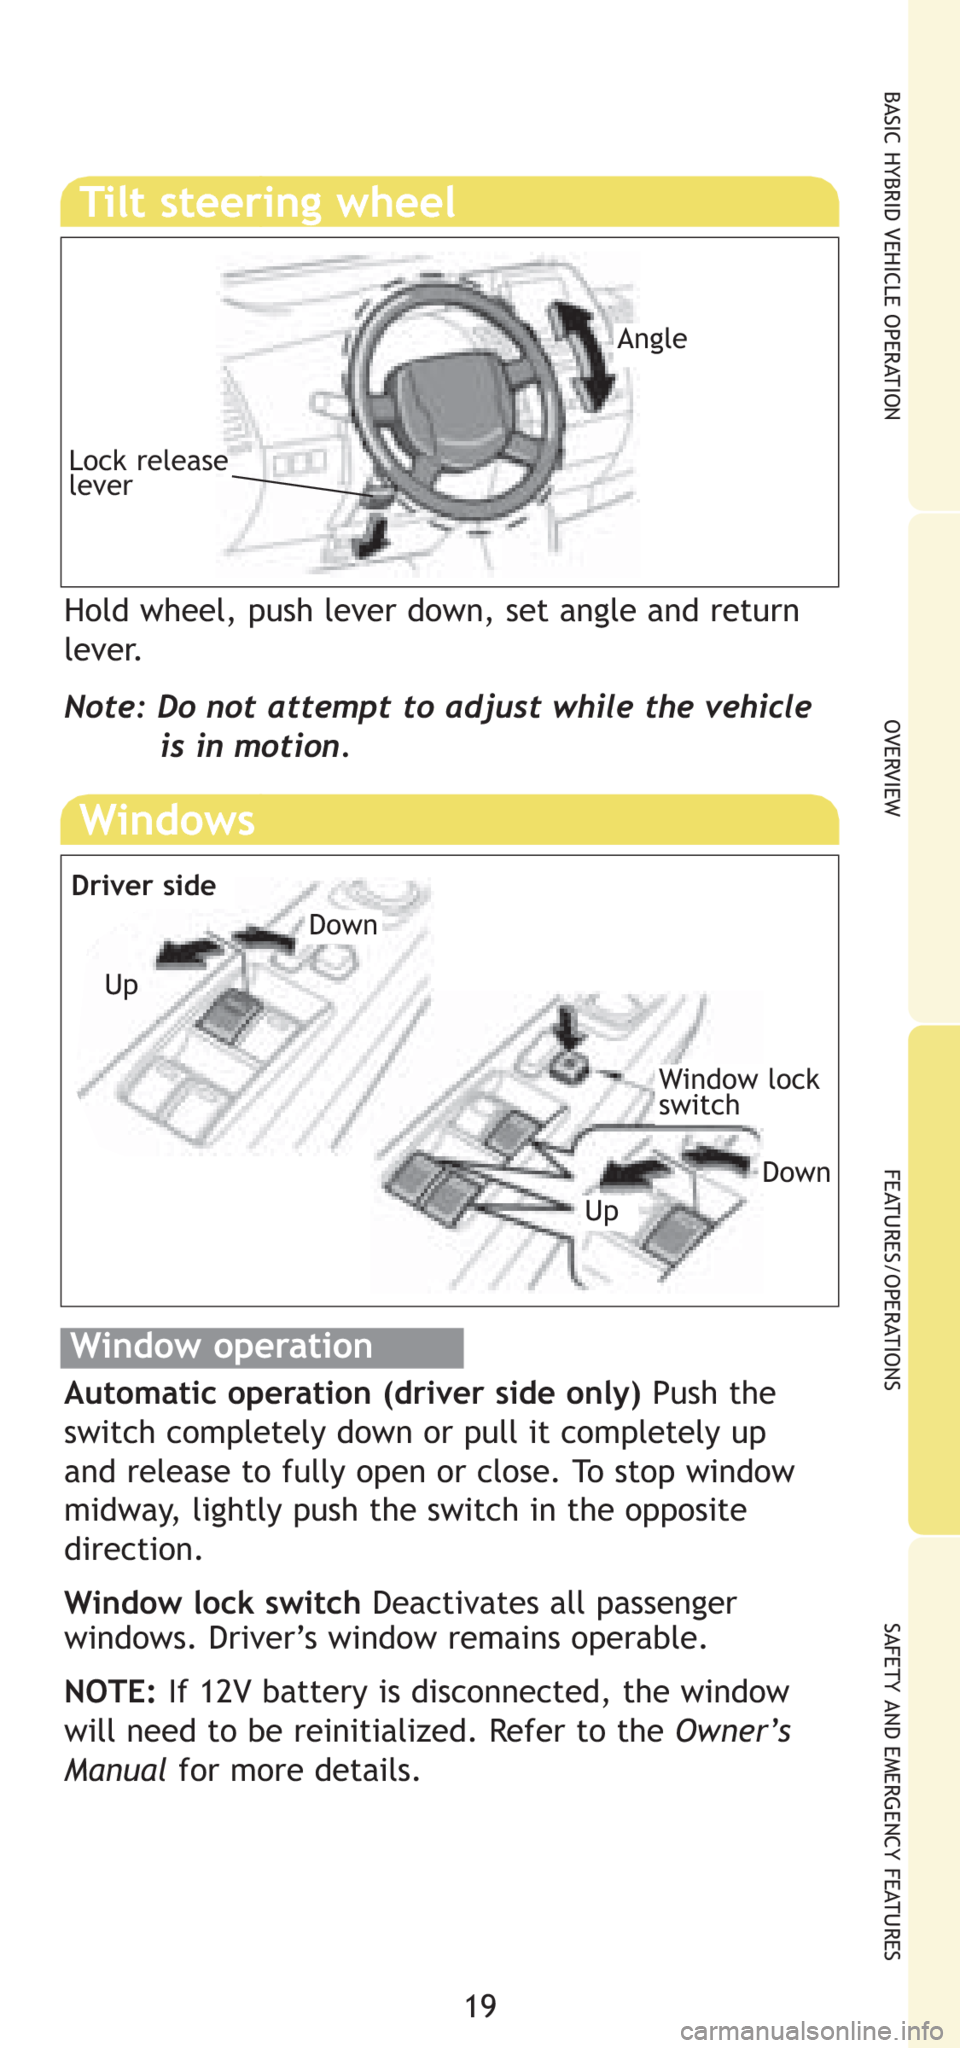
Windows
Window operation
Automatic operation (driver side only) Push the
switch completely down or pull it completely up
and release to fully open or close. To stop window
midway, lightly push the switch in the opposite
direction.
Window lock switch Deactivates all passenger
windows. Driver’s window remains operable.
NOTE:If 12V battery is disconnected, the window
will need to be reinitialized. Refer to the Owner’s
Manual for more details.
Window lock
switch
Up
Down
Driver side
Down
Up
Tilt steering wheel
Hold wheel, push lever down, set angle and return
lever.
Note: Do not attempt to adjust while the vehicle
is in motion.
Angle
Lock release
lever
Page 22 of 32
20
FEATURES/OPERATIONS
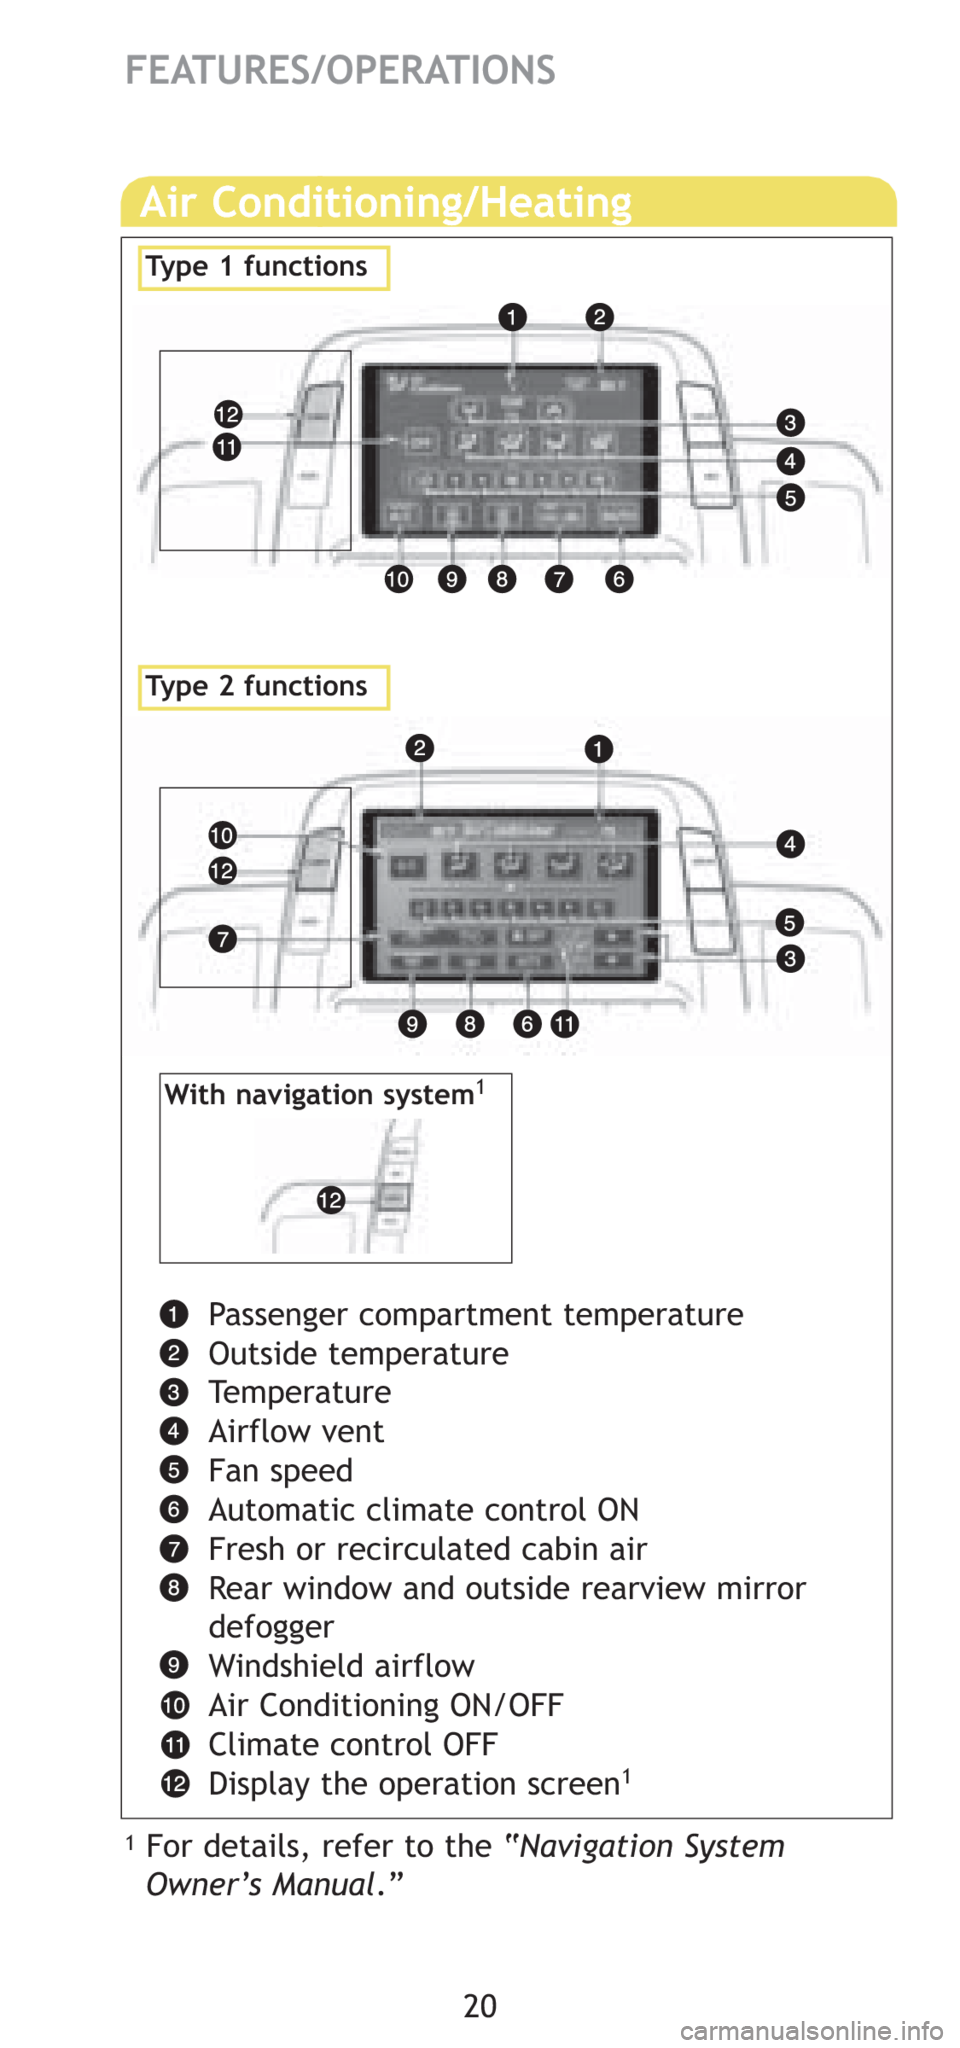
Passenger compartment temperature
Outside temperature
Temperature
Airflow vent
Fan speed
Automatic climate control ON
Fresh or recirculated cabin air
Rear window and outside rearview mirror
defogger
Windshield airflow
Air Conditioning ON/OFF
Climate control OFF
Display the operation screen
1
Air Conditioning/Heating
1For details, refer to the “Navigation System
Owner’s Manual.”
With navigation system1
Type 2 functions
Type 1 functions
Page 23 of 32
BASIC HYBRID VEHICLE OPERATION
21
OVERVIEW
FEATURES/OPERATIONS
SAFETY AND EMERGENCY FEATURES
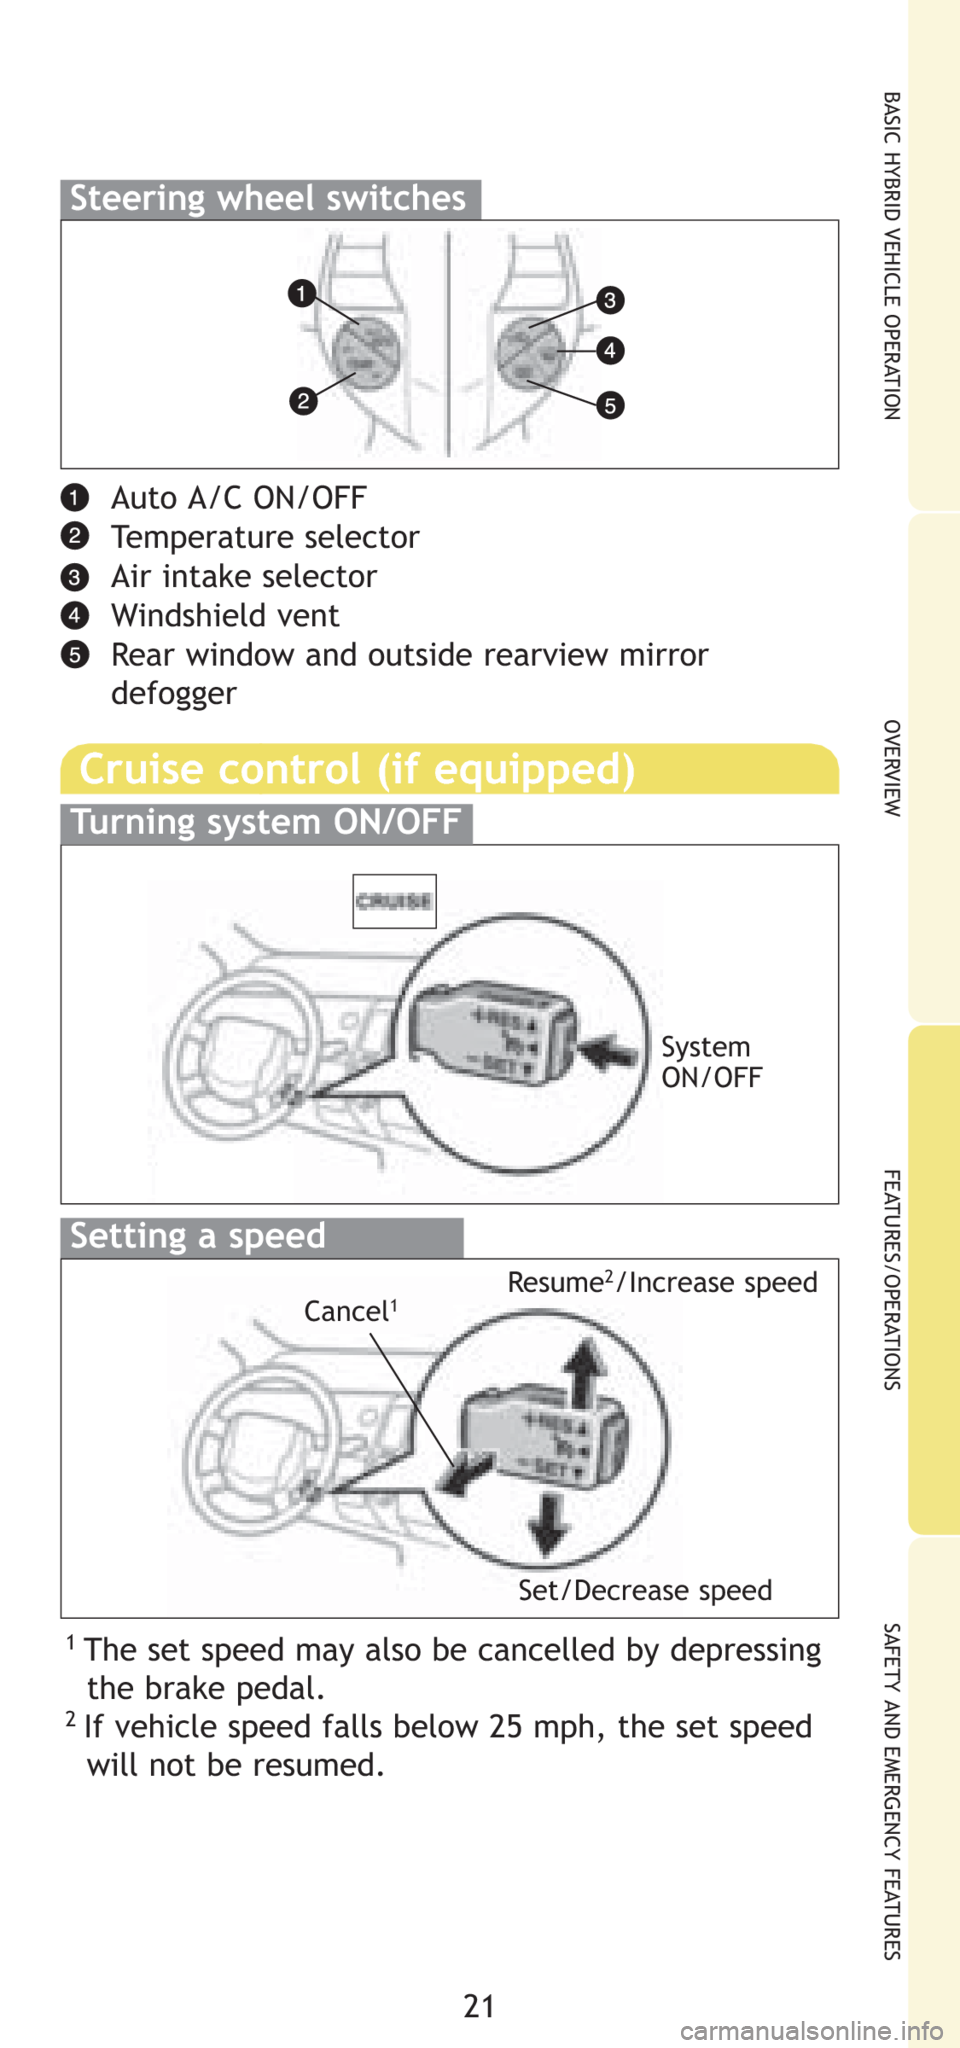
Setting a speed
System
ON/OFF
Resume
2/Increase speed
Cancel1
Set/Decrease speed
Cruise control (if equipped)
Auto A/C ON/OFF
Temperature selector
Air intake selector
Windshield vent
Rear window and outside rearview mirror
defogger
1 The set speed may also be cancelled by depressing
the brake pedal.
2 If vehicle speed falls below 25 mph, the set speed
will not be resumed.
Turning system ON/OFF
Steering wheel switches
Page 24 of 32
22
FEATURES/OPERATIONS
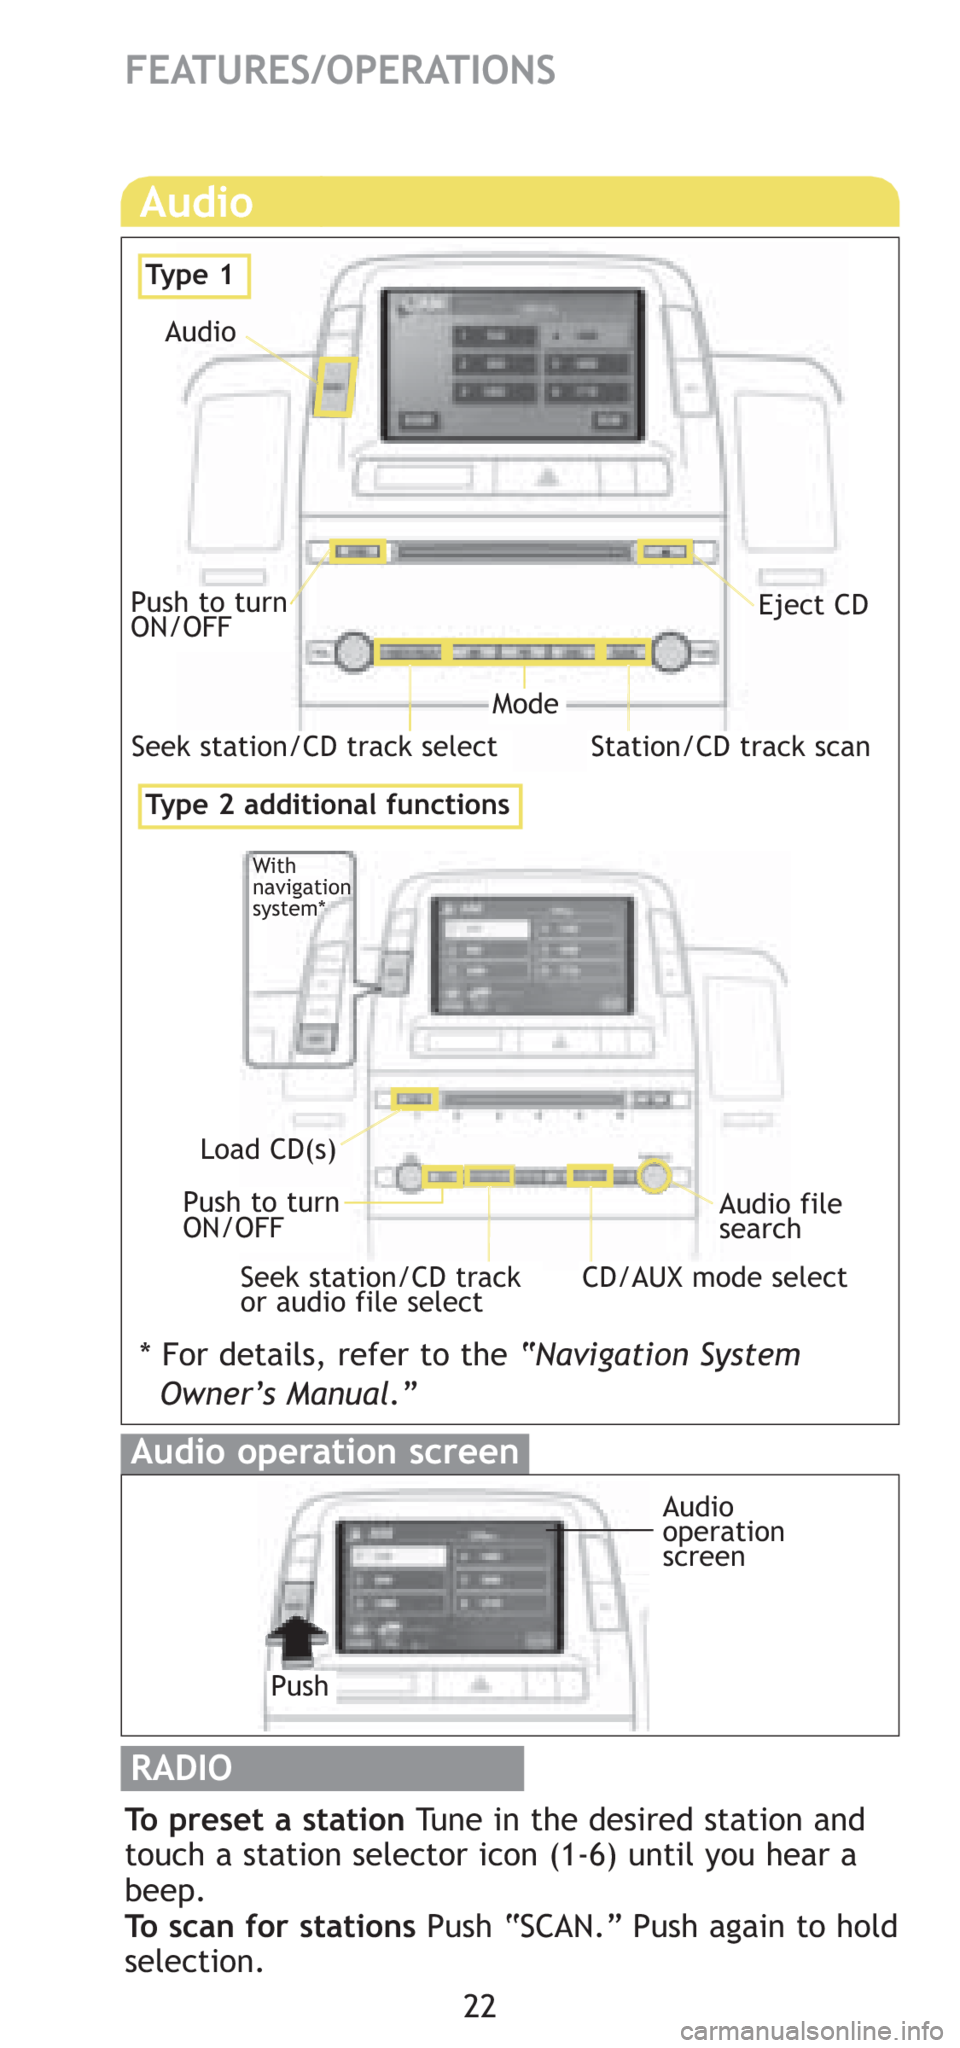
RADIO
To preset a station Tune in the desired station and
touch a station selector icon (1-6) until you hear a
beep.
To scan for stationsPush “SCAN.” Push again to hold
selection.
Audio
Audio operation screen
Push
Audio
operation
screen
Ty p e 1
Eject CDPush to turn
ON/OFF
Audio
Type 2 additional functions
Audio file
search
With
navigation
system*
Load CD(s)
Push to turn
ON/OFF
Mode
Station/CD track scanSeek station/CD track select
Seek station/CD track
or audio file selectCD/AUX mode select
* For details, refer to the“Navigation System
Owner’s Manual.”
Page 25 of 32
23
OVERVIEW BASIC HYBRID VEHICLE OPERATION
FEATURES/OPERATIONS
SAFETY AND EMERGENCY FEATURES
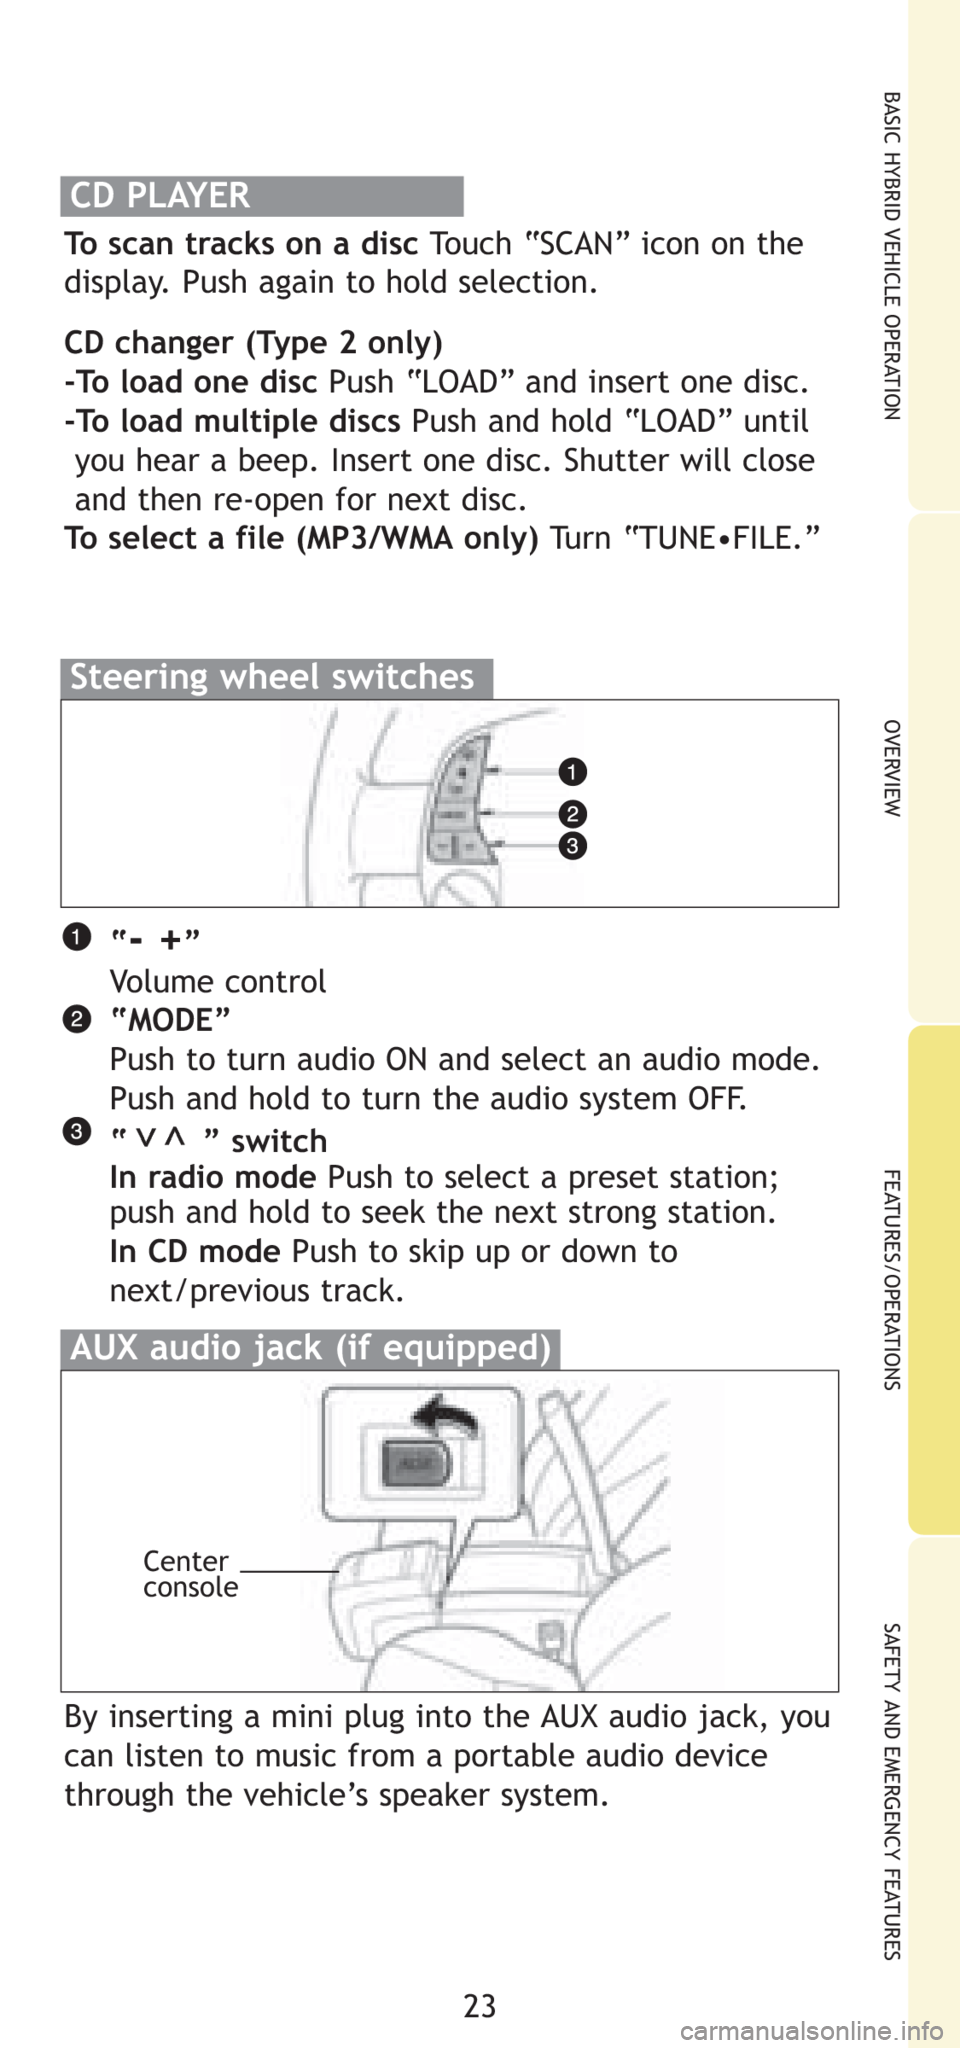
CD PLAYER
To scan tracks on a disc Touch “SCAN” icon on the
display. Push again to hold selection.
CD changer (Type 2 only)
-To load one disc Push “LOAD” and insert one disc.
-To load multiple discs Push and hold “LOAD” until
you hear a beep. Insert one disc. Shutter will close
and then re-open for next disc.
To select a file (MP3/WMA only) Turn “TUNE•FILE.”
“
- +”
Volume control
“MODE”
Push to turn audio ON and select an audio mode.
Push and hold to turn the audio system OFF.
“ ” switch
In radio modePush to select a preset station;
push and hold to seek the next strong station.
In CD modePush to skip up or down to
next/previous track.
>>
Steering wheel switches
By inserting a mini plug into the AUX audio jack, you
can listen to music from a portable audio device
through the vehicle’s speaker system.
AUX audio jack (if equipped)
Center
console
Page 26 of 32
24
FEATURES/OPERATIONS
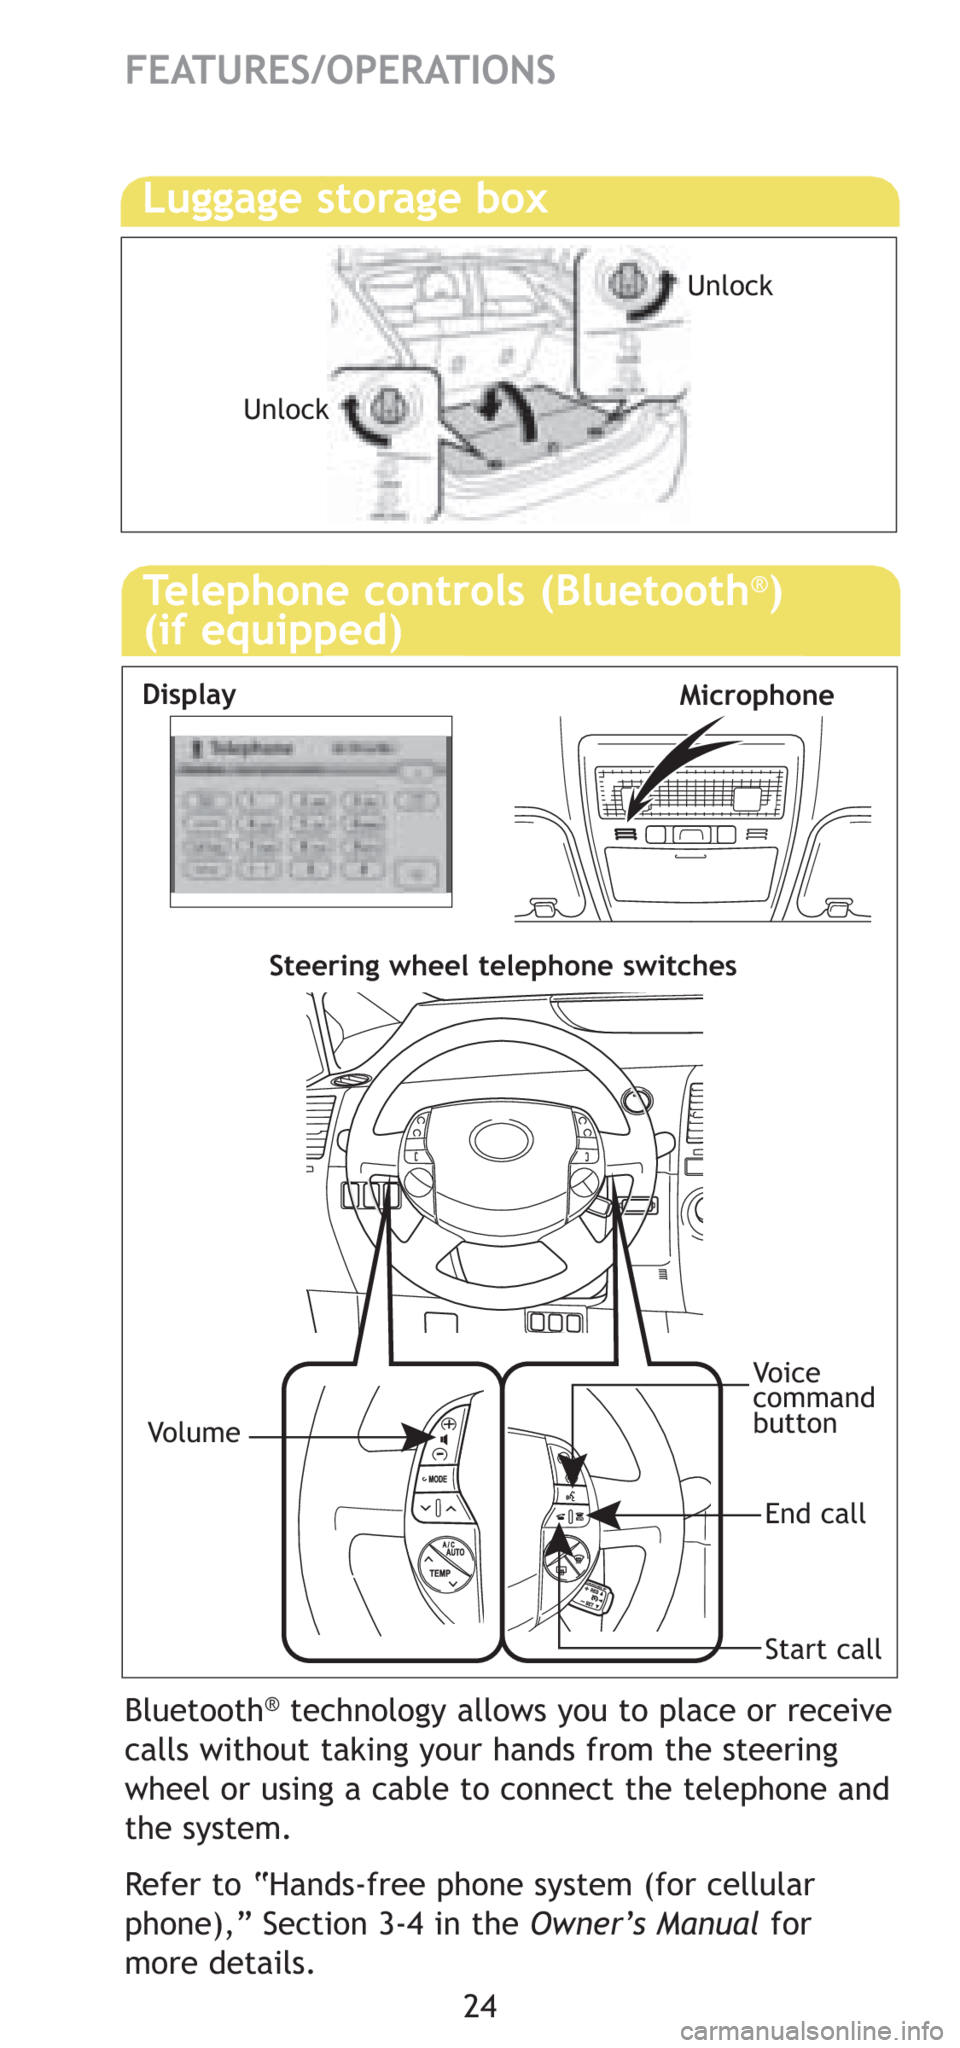
Luggage storage box
Unlock
Unlock
Bluetooth®technology allows you to place or receive
calls without taking your hands from the steering
wheel or using a cable to connect the telephone and
the system.
Refer to “Hands-free phone system (for cellular
phone),” Section 3-4 in the Owner’s Manualfor
more details.
Telephone controls (Bluetooth®)
(if equipped)
MicrophoneDisplay
Steering wheel telephone switches
Vo l u m e
Start call
End call
Vo i c e
command
button
Page 27 of 32
OVERVIEW BASIC HYBRID VEHICLE OPERATION
FEATURES/OPERATIONS
SAFETY AND EMERGENCY FEATURES
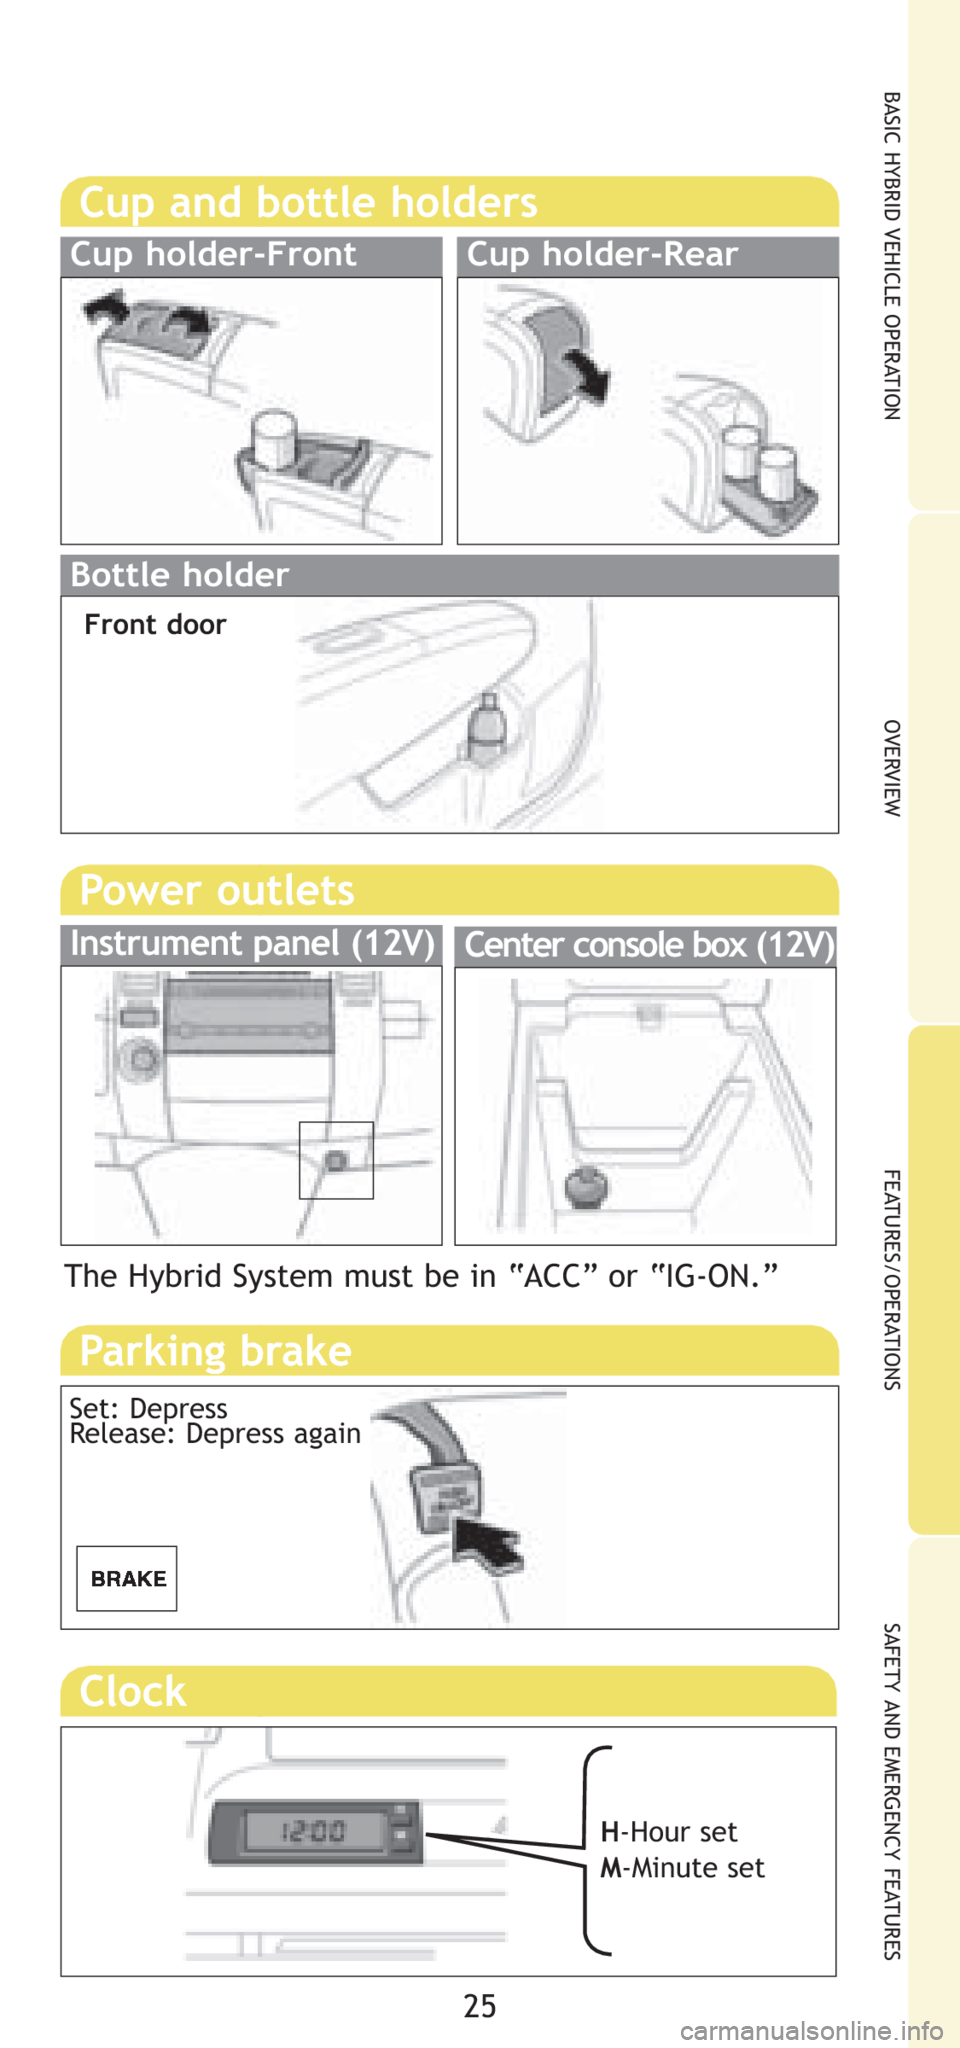
Clock
25
H-Hour set
M-Minute set
Cup and bottle holders
Cup holder-Front Cup holder-Rear
Bottle holder
Front door
Power outlets
Instrument panel (12V)Center console box (12V)
The Hybrid System must be in “ACC” or “IG-ON.”
Parking brake
Set: Depress
Release: Depress again
Page 28 of 32
26
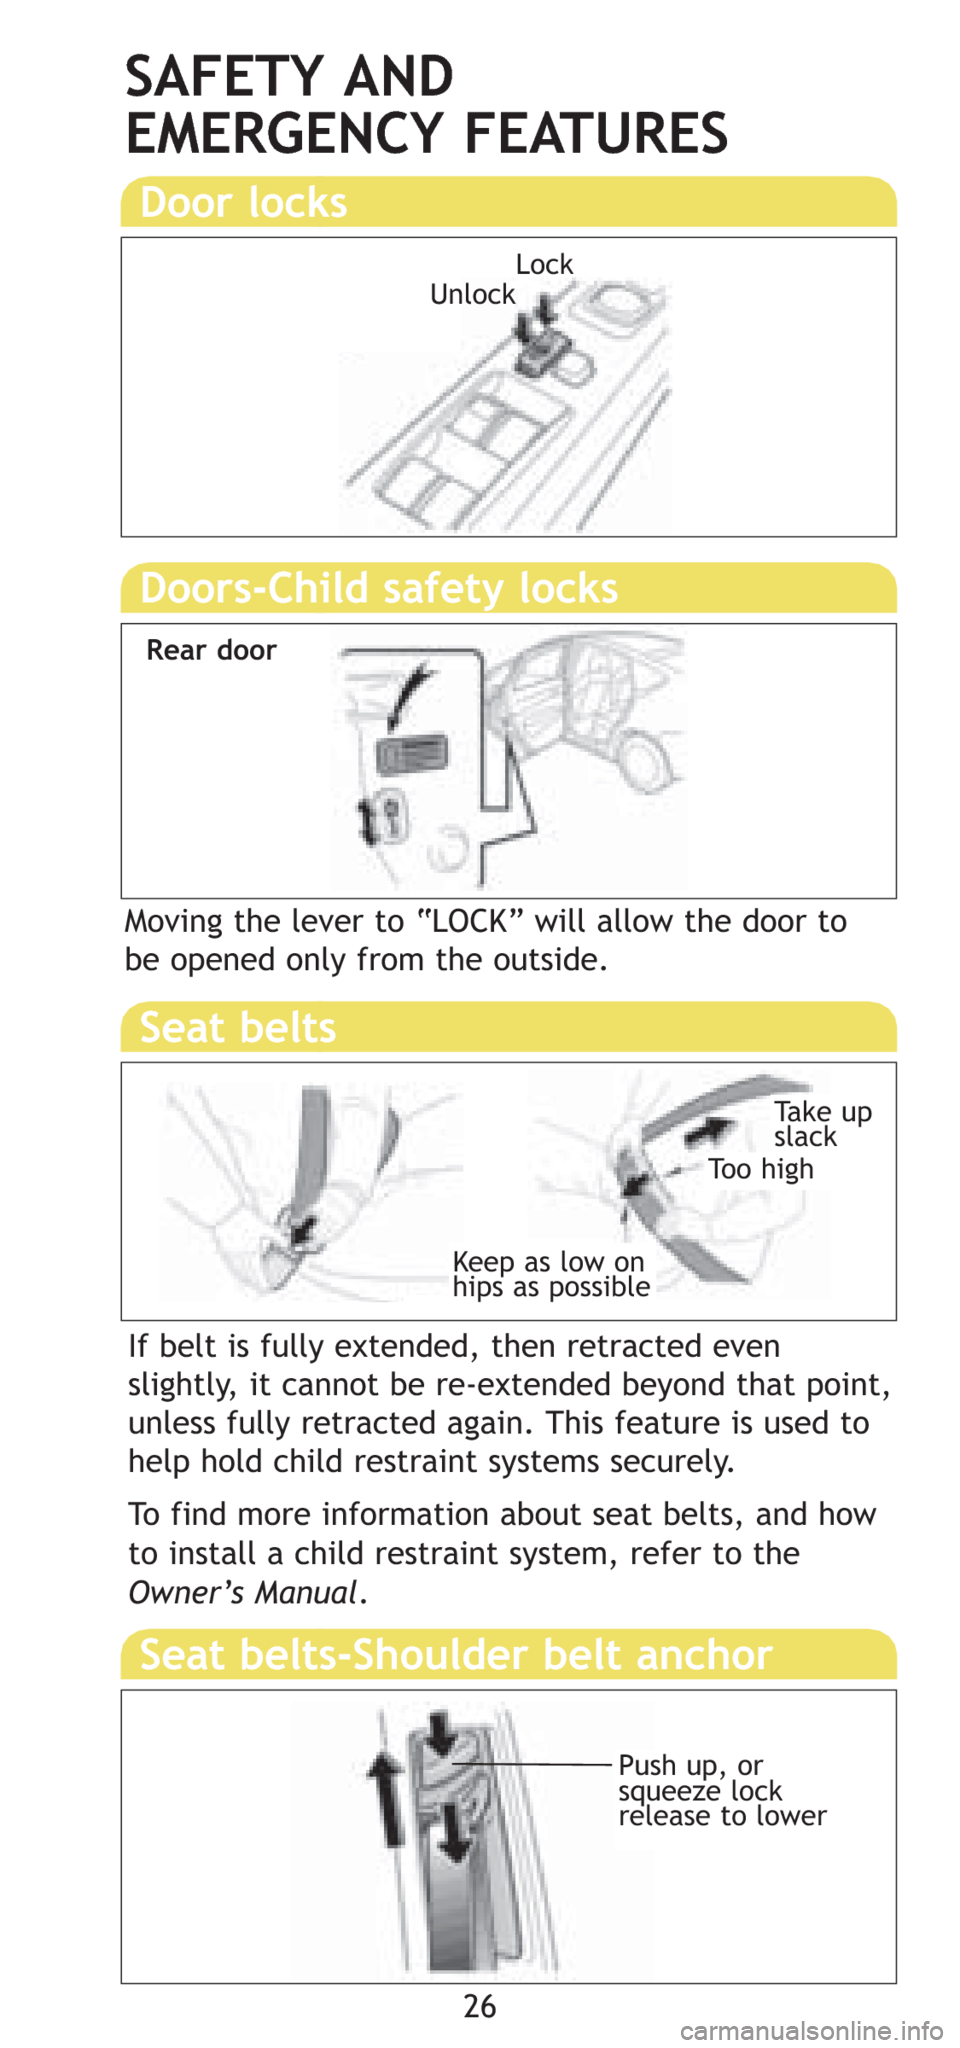
SAFETY AND
EMERGENCY FEATURES
If belt is fully extended, then retracted even
slightly, it cannot be re-extended beyond that point,
unless fully retracted again. This feature is used to
help hold child restraint systems securely.
To find more information about seat belts, and how
to install a child restraint system, refer to the
Owner’s Manual.
Keep as low on
hips as possible
Take up
slack
Too high
Seat belts
Moving the lever to “LOCK” will allow the door to
be opened only from the outside.
Doors-Child safety locks
Door locks
Seat belts-Shoulder belt anchor
Unlock
Rear door
Push up, or
squeeze lock
release to lower Lock
Page 29 of 32
27
OVERVIEW BASIC HYBRID VEHICLE OPERATIONFEATURES/OPERATIONS SAFETY AND EMERGENCY FEATURES
27
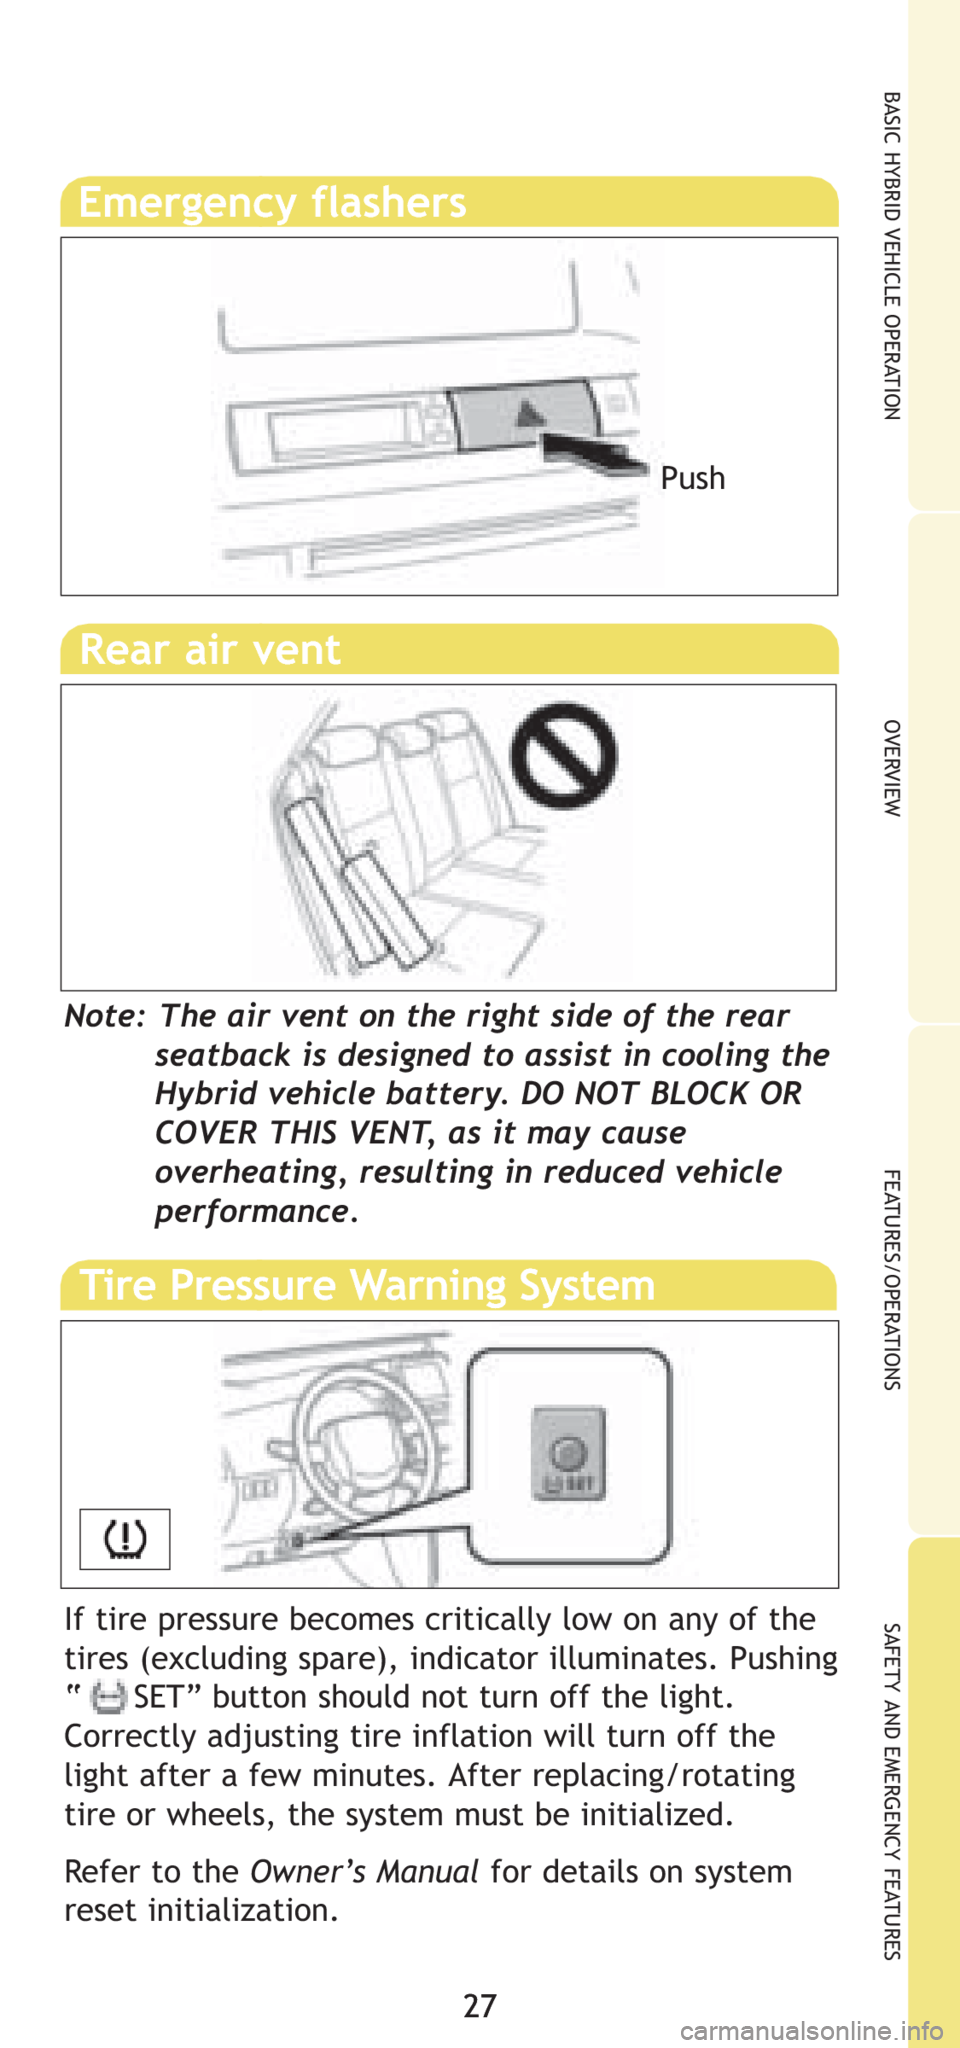
Emergency flashers
Note: The air vent on the right side of the rear
seatback is designed to assist in cooling the
Hybrid vehicle battery. DO NOT BLOCK OR
COVER THIS VENT, as it may cause
overheating, resulting in reduced vehicle
performance.
Rear air vent
Push
Tire Pressure Warning System
If tire pressure becomes critically low on any of the
tires (excluding spare), indicator illuminates. Pushing
“ SET” button should not turn off the light.
Correctly adjusting tire inflation will turn off the
light after a few minutes. After replacing/rotating
tire or wheels, the system must be initialized.
Refer to the Owner’s Manualfor details on system
reset initialization.
Page 30 of 32
28
SAFETY AND EMERGENCY FEATURES
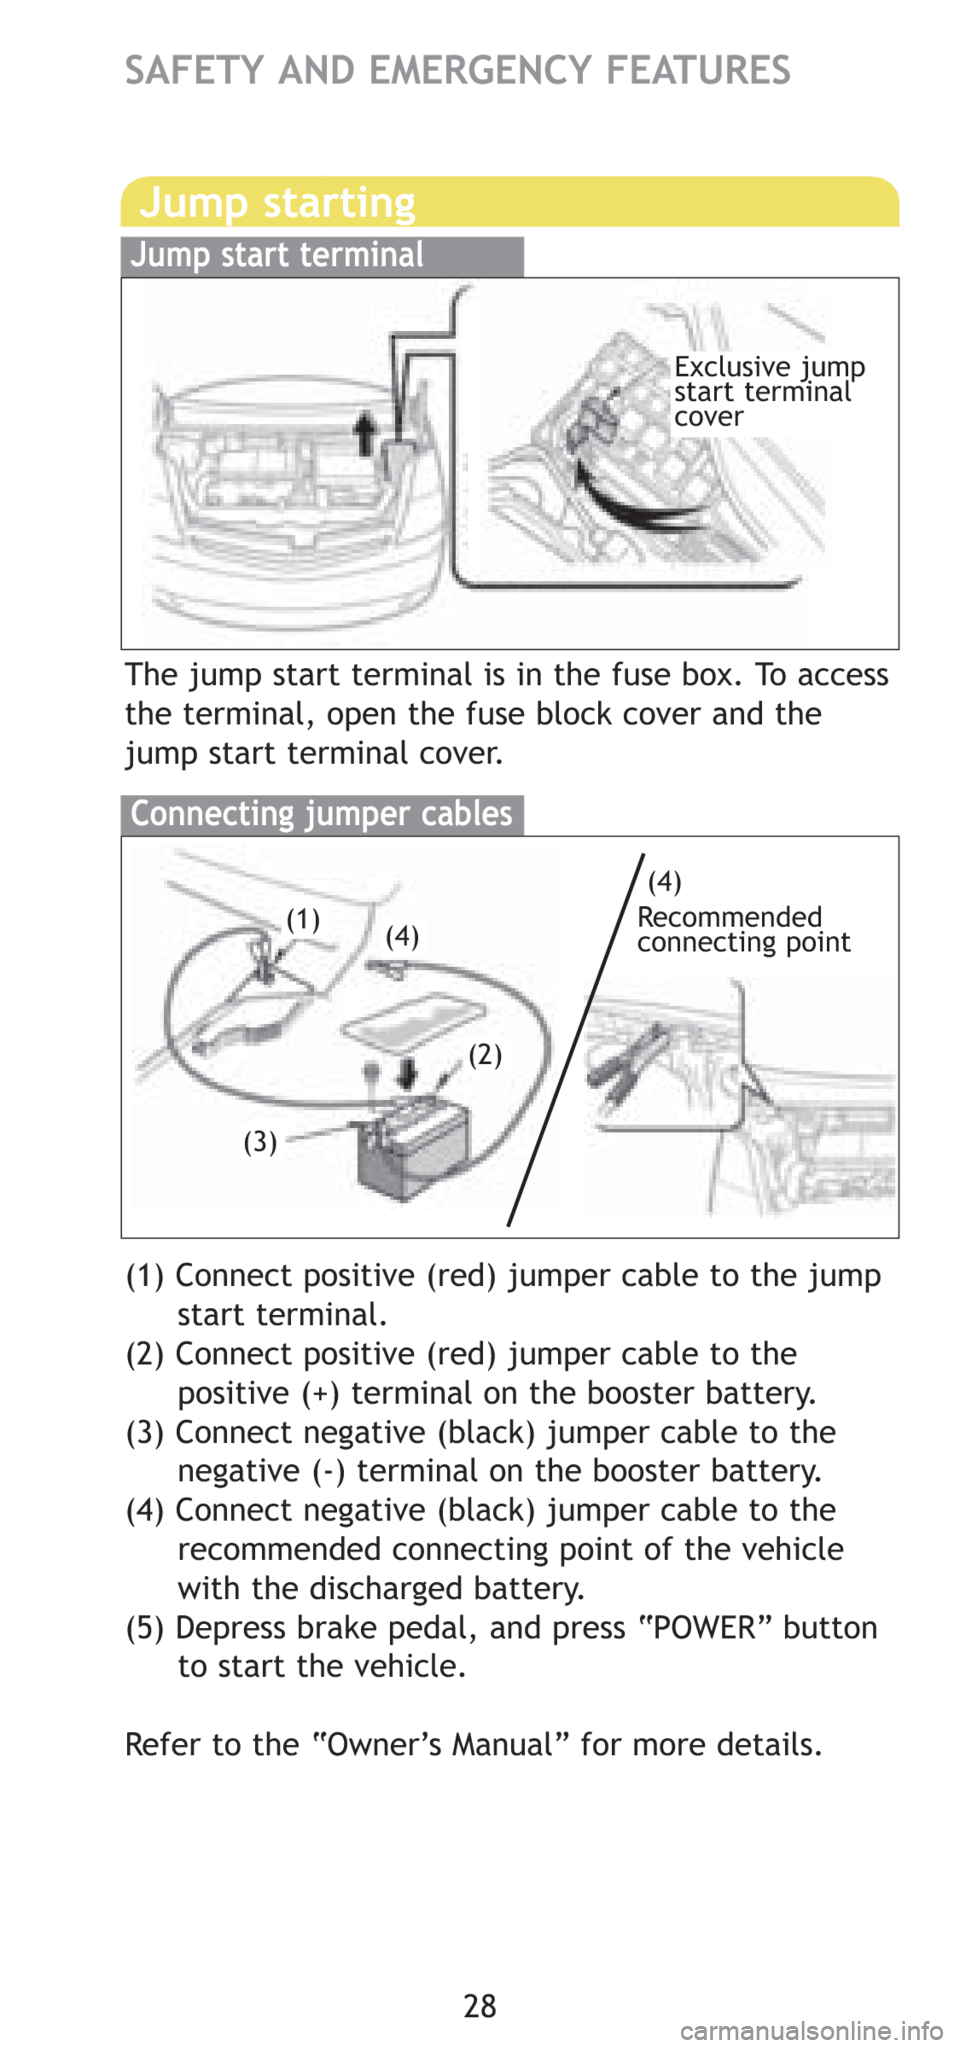
Jump starting
Jump start terminal
Connecting jumper cables
The jump start terminal is in the fuse box. To access
the terminal, open the fuse block cover and the
jump start terminal cover.
Recommended
connecting point
Exclusive jump
start terminal
cover
(1) Connect positive (red) jumper cable to the jump
start terminal.
(2) Connect positive (red) jumper cable to the
positive (+) terminal on the booster battery.
(3) Connect negative (black) jumper cable to the
negative (-) terminal on the booster battery.
(4) Connect negative (black) jumper cable to the
recommended connecting point of the vehicle
with the discharged battery.
(5) Depress brake pedal, and press “POWER” button
to start the vehicle.
Refer to the “Owner’s Manual” for more details.
(1)
(3)
(2)
(4)
(4)
Trending: navigation system, fuel cap, lights, hood release, open hood, fuel pressure, AUX
