turn signal TOYOTA PRIUS 2009 2.G Owners Manual
[x] Cancel search | Manufacturer: TOYOTA, Model Year: 2009, Model line: PRIUS, Model: TOYOTA PRIUS 2009 2.GPages: 508, PDF Size: 6.84 MB
Page 2 of 508
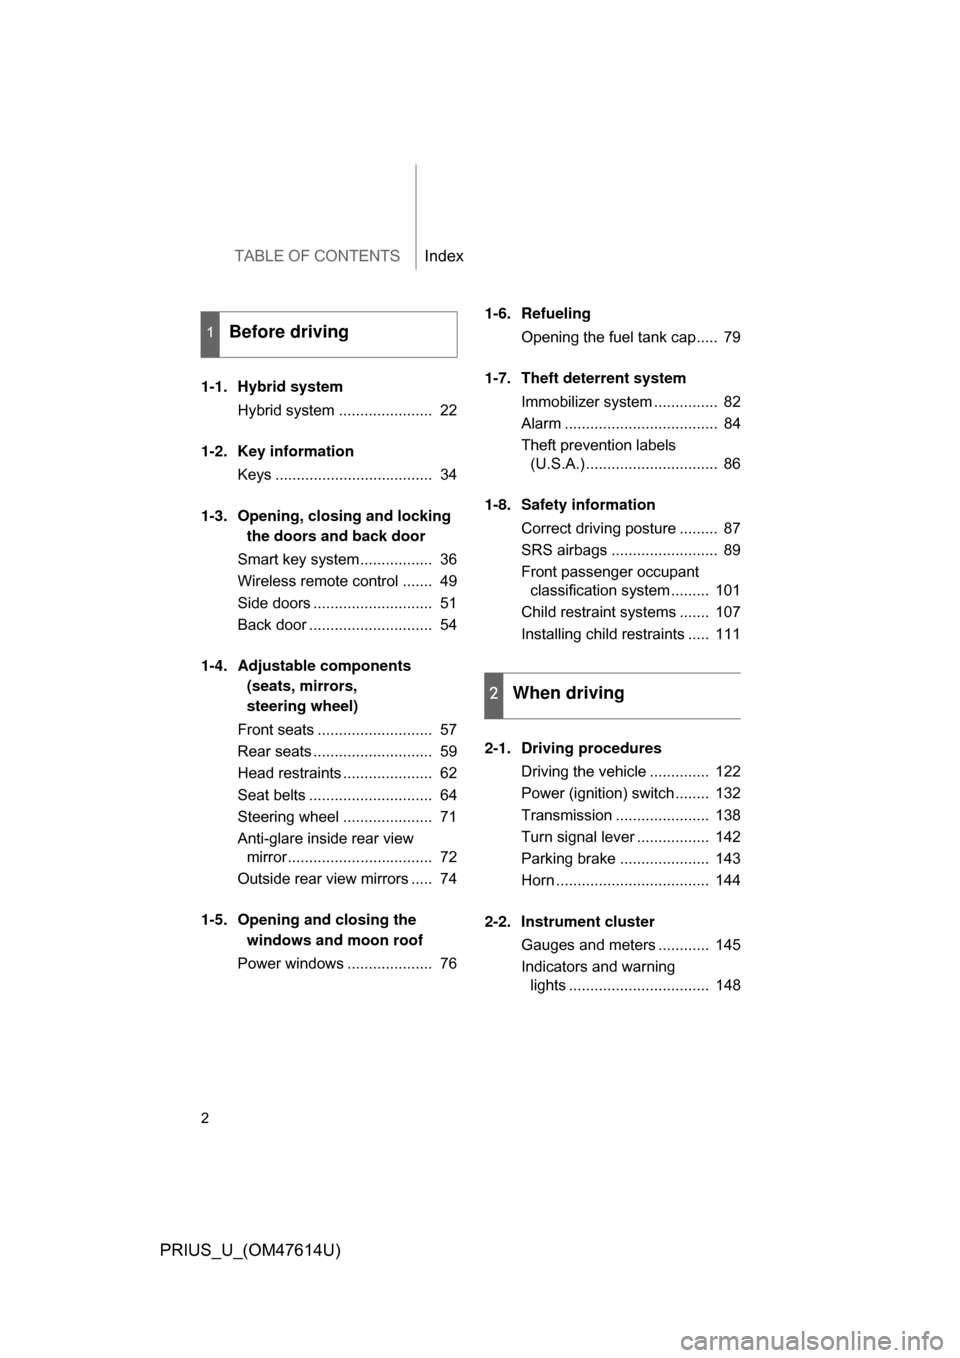
TABLE OF CONTENTSIndex
2
PRIUS_U_(OM47614U)
1-1. Hybrid systemHybrid system ...................... 22
1-2. Key information Keys ..................................... 34
1-3. Opening, closing and locking the doors and back door
Smart key system................. 36
Wireless remote control ....... 49
Side doors ............................ 51
Back door ............................. 54
1-4. Adjustable components (seats, mirrors,
steering wheel)
Front seats ........................... 57
Rear seats ............................ 59
Head restraints ..................... 62
Seat belts ............................. 64
Steering wheel ..................... 71
Anti-glare inside rear view mirror .................................. 72
Outside rear view mirrors ..... 74
1-5. Opening and closing the windows and moon roof
Power windows .................... 76 1-6. Refueling
Opening the fuel tank cap..... 79
1-7. Theft deterrent system Immobilizer system ............... 82
Alarm .................................... 84
Theft prevention labels (U.S.A.) ............................... 86
1-8. Safety information Correct driving posture ......... 87
SRS airbags ......................... 89
Front passenger occupant classification system ......... 101
Child restraint systems ....... 107
Installing child restraints ..... 111
2-1. Driving procedures Driving the vehicle .............. 122
Power (ignition) switch........ 132
Transmission ...................... 138
Turn signal lever ................. 142
Parking brake ..................... 143
Horn .................................... 144
2-2. Instrument cluster Gauges and meters ............ 145
Indicators and warning lights ................................. 148
1Before driving
2When driving
Page 6 of 508
6
PRIUS_U_(OM47614U)
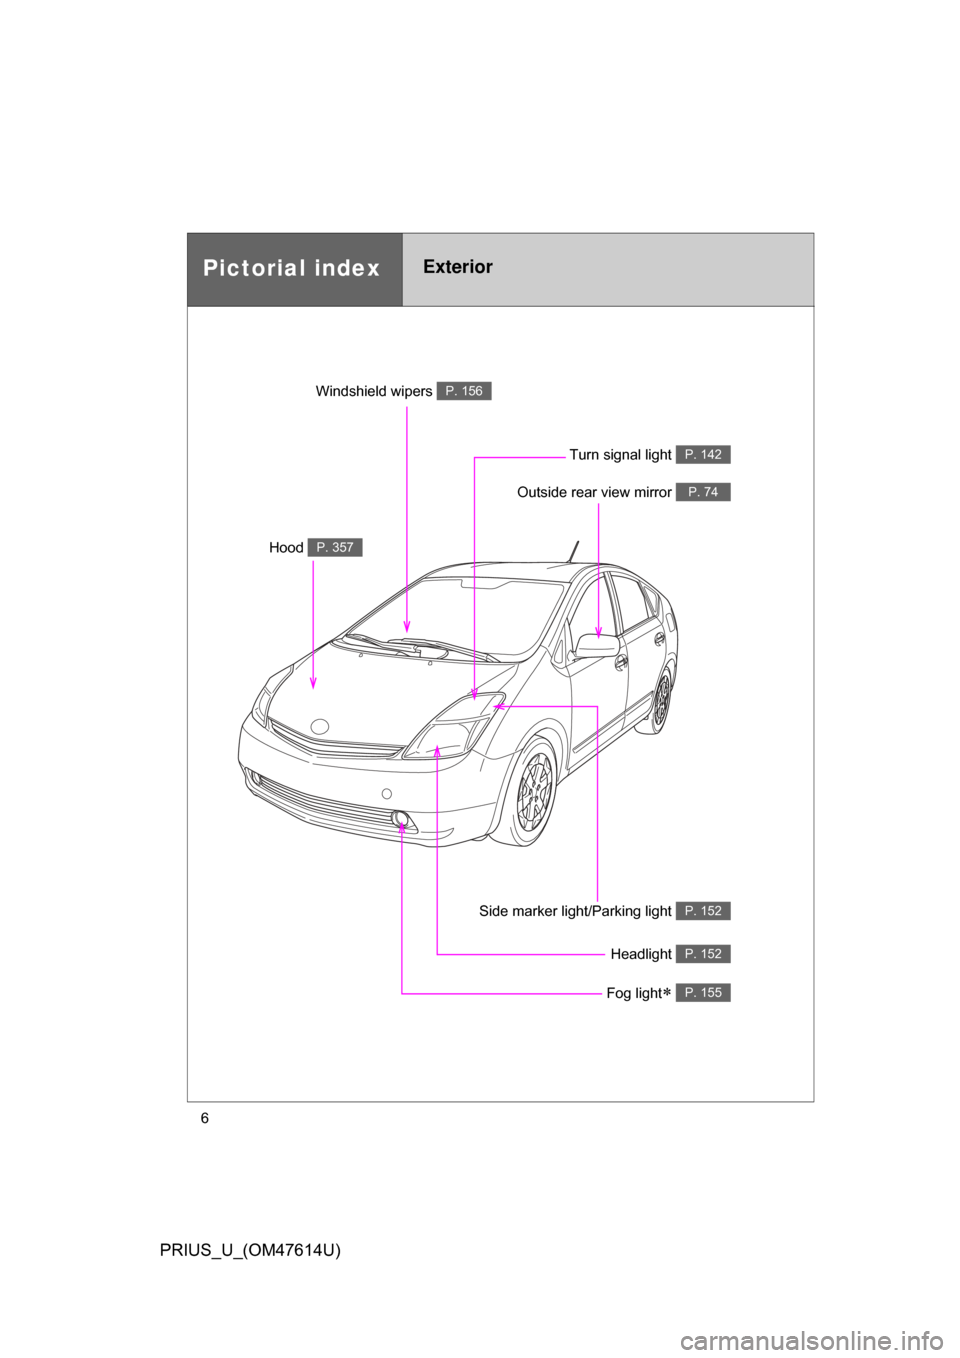
Headlight P. 152
Pictorial indexExterior
Turn signal light P. 142
Fog light P. 155
Side marker light/Parking light P. 152
Hood P. 357
Windshield wipers P. 156
Outside rear view mirror P. 74
Page 7 of 508
7
PRIUS_U_(OM47614U)
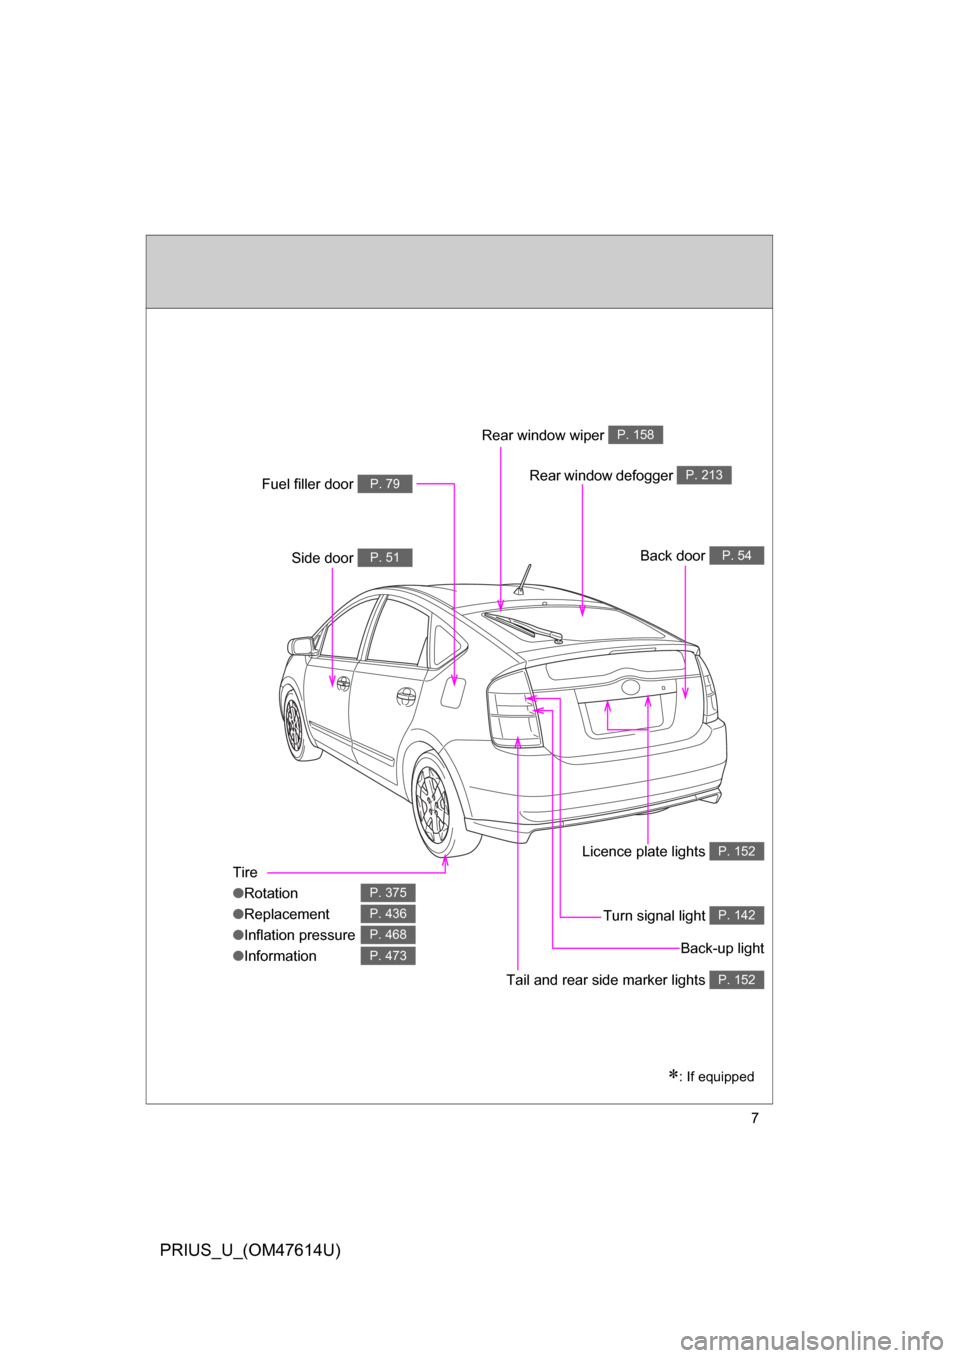
Tire
●Rotation
● Replacement
● Inflation pressure
● Information
P. 375
P. 436
P. 468
P. 473
Tail and rear side marker lights P. 152
Back door P. 54Side door P. 51
Fuel filler door P. 79
Turn signal light P. 142
: If equipped
Rear window wiper P. 158
Back-up light
Licence plate lights
P. 152
Rear window defogger P. 213
Page 12 of 508
12
PRIUS_U_(OM47614U)
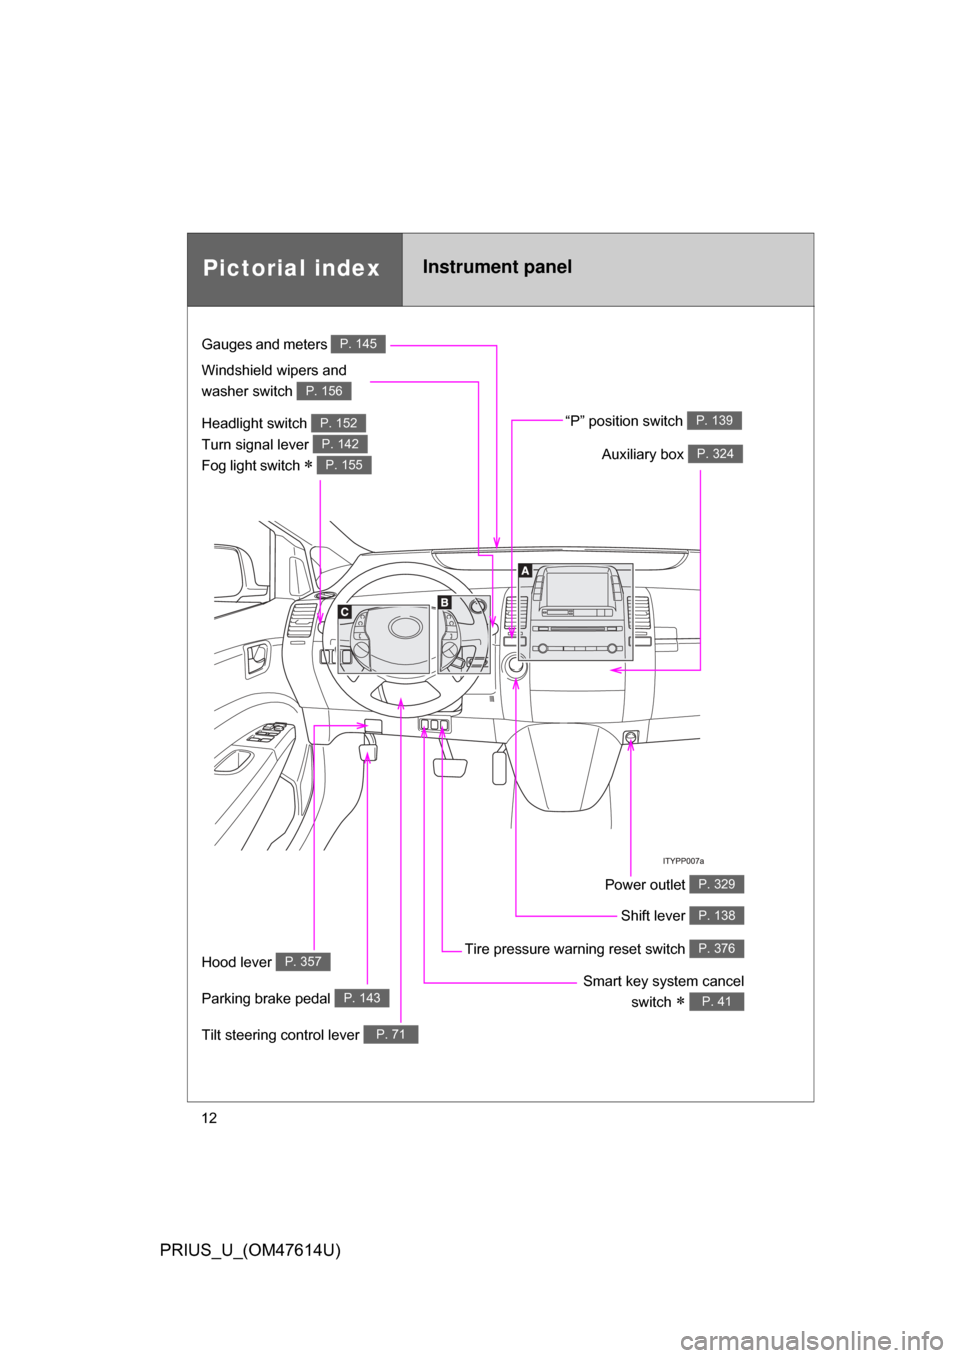
Pictorial indexInstrument panel
Headlight switch
Turn signal lever
Fog light switch
P. 152
P. 142
P. 155
Gauges and meters P. 145
Windshield wipers and
washer switch
P. 156
“P” position switch P. 139
Auxiliary box P. 324
Hood lever P. 357
Parking brake pedal P. 143
Power outlet P. 329
Smart key system cancelswitch
P. 41
Tire pressure warning reset switch P. 376
Tilt steering control lever P. 71
Shift lever P. 138
Page 121 of 508
When driving2
121
PRIUS_U_(OM47614U)
2-1. Driving proceduresDriving the vehicle............ 122
Power (ignition) switch ..... 132
Transmission.................... 138
Turn signal lever .............. 142
Parking brake ................... 143
Horn ................................. 144
2-2. Instrument cluster Gauges and meters ......... 145
Indicators and warning lights .............................. 148 2-3. Operating the lights and
windshield wipers
Headlight switch ............... 152
Fog light switch ................ 155
Windshield wipers and washer ........................... 156
Rear window wiper and washer ........................... 158
2-4. Using other driving systems
Cruise control ................... 159
Rear view monitor system ........................... 163
Driving assist systems ..... 166
2-5. Driving information Cargo and luggage .......... 169
Vehicle load limits ............ 172
Winter driving tips ............ 173
Trailer towing ................... 177
Dinghy towing .................. 178
Page 142 of 508
142
2-1. Driving procedures
PRIUS_U_(OM47614U)
Tur n signal lever
■Turn signals can be operated when
The “POWER” switch is in ON mode.
■ If the indicators flash faster than usual
Check that a light bulb in the front or rear turn signal lights has not burned
out.
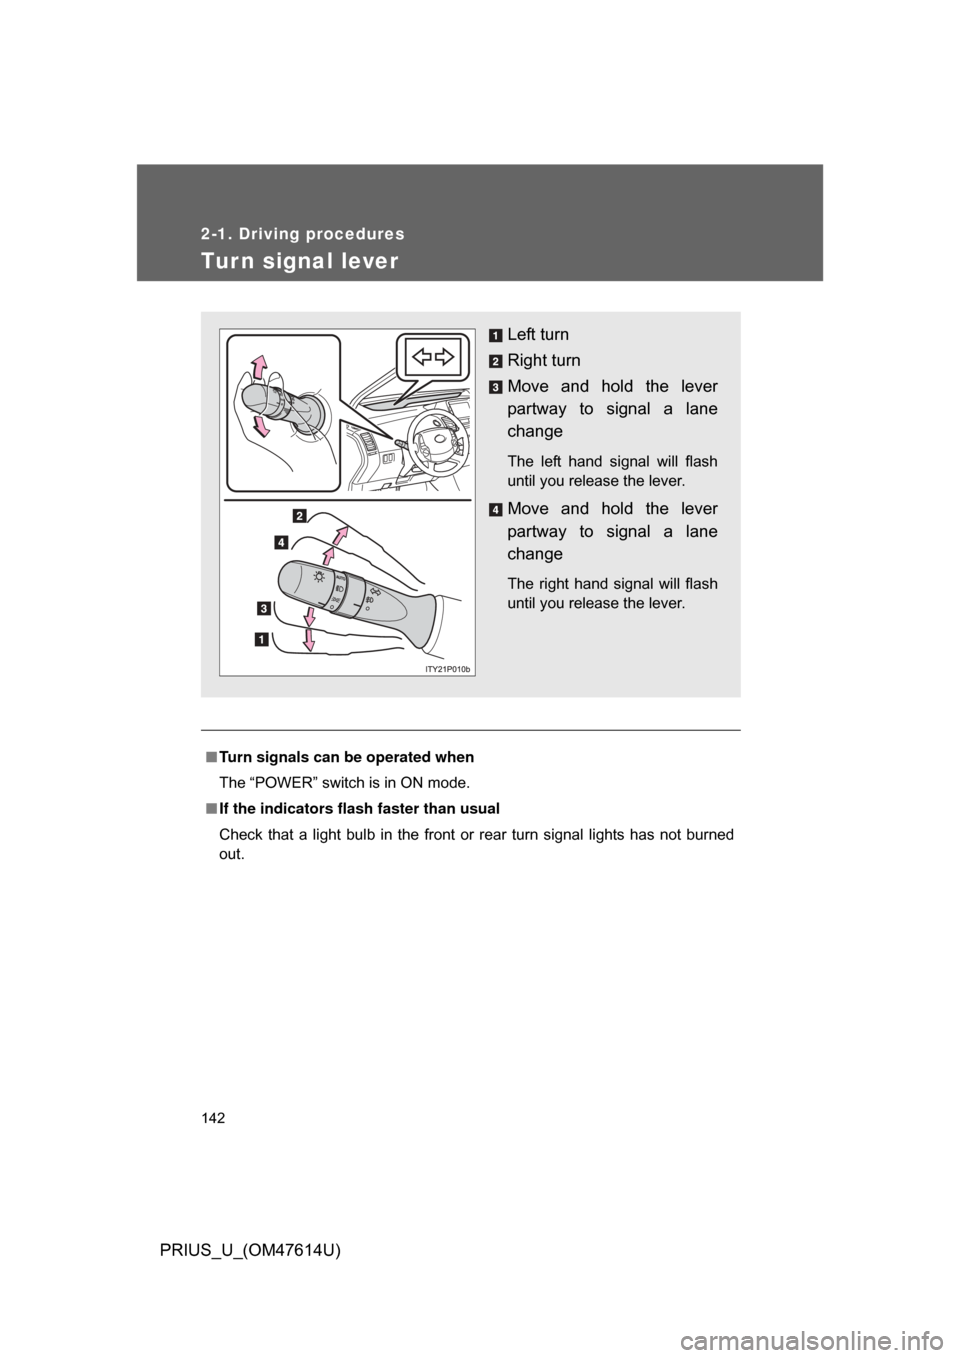
Left turn
Right turn
Move and hold the lever
partway to signal a lane
change
The left hand signal will flash
until you release the lever.
Move and hold the lever
partway to signal a lane
change
The right hand signal will flash
until you release the lever.
Page 150 of 508
150 2-2. Instrument cluster
PRIUS_U_(OM47614U)
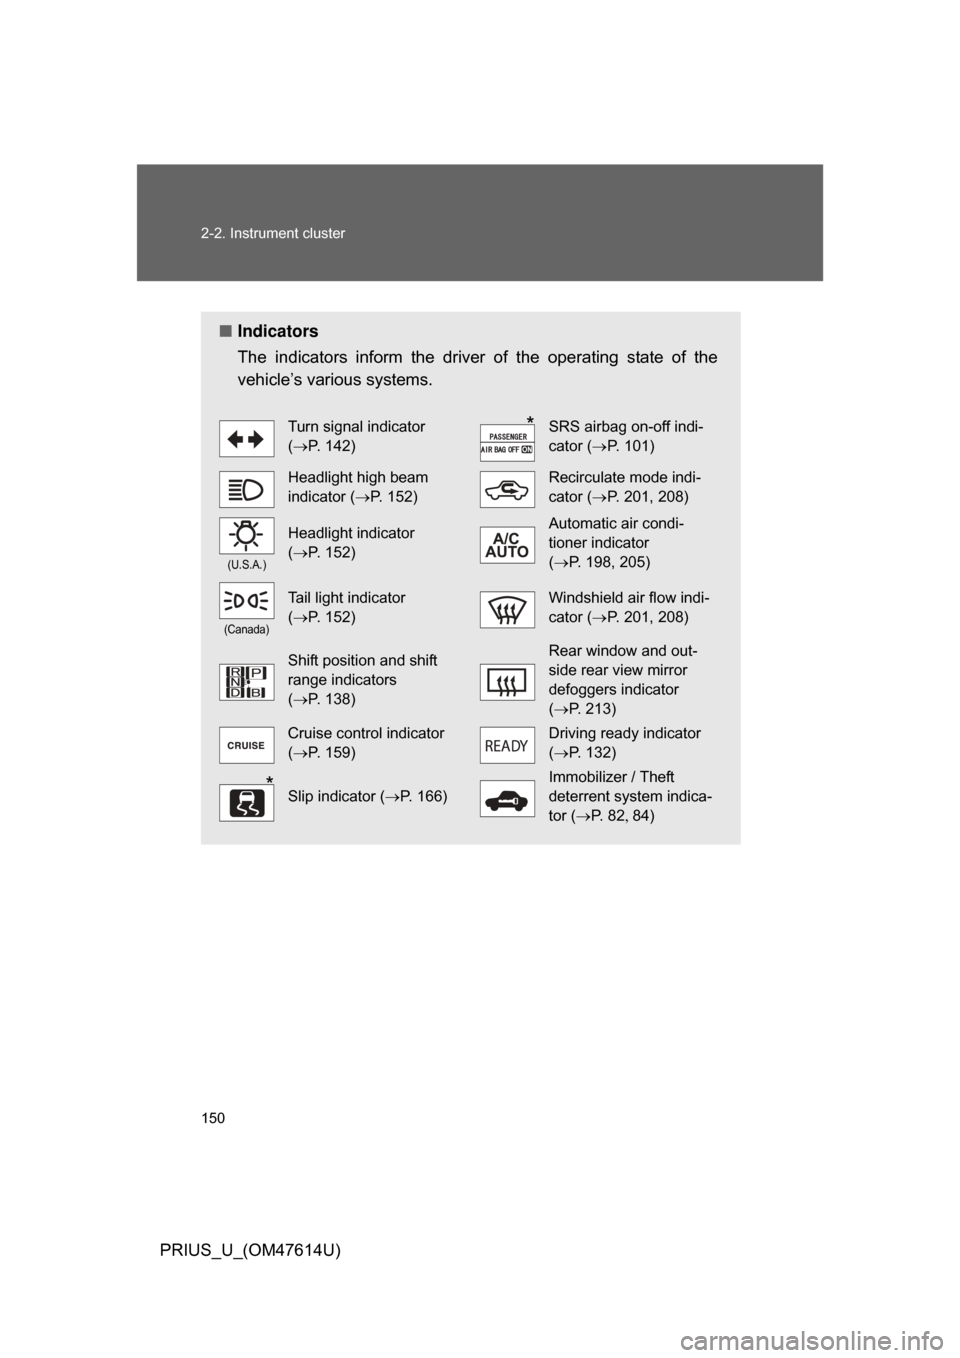
■Indicators
The indicators inform the driver of the operating state of the
vehicle’s various systems.
Turn signal indicator
(P. 142)SRS airbag on-off indi-
cator ( P. 101)
Headlight high beam
indicator ( P. 152)Recirculate mode indi-
cator (P. 201, 208)
(U.S.A.)
Headlight indicator
(P. 152)Automatic air condi-
tioner indicator
(P. 198, 205)
(Canada)
Tail light indicator
(P. 152)Windshield air flow indi-
cator ( P. 201, 208)
Shift position and shift
range indicators
(P. 138)Rear window and out-
side rear view mirror
defoggers indicator
(P. 213)
Cruise control indicator
(P. 159)Driving ready indicator
(P. 132)
Slip indicator ( P. 166)
Immobilizer / Theft
deterrent system indica-
tor (P. 8 2 84)
*
*
Page 228 of 508
228 3-3. Using the audio system
PRIUS_U_(OM47614U)
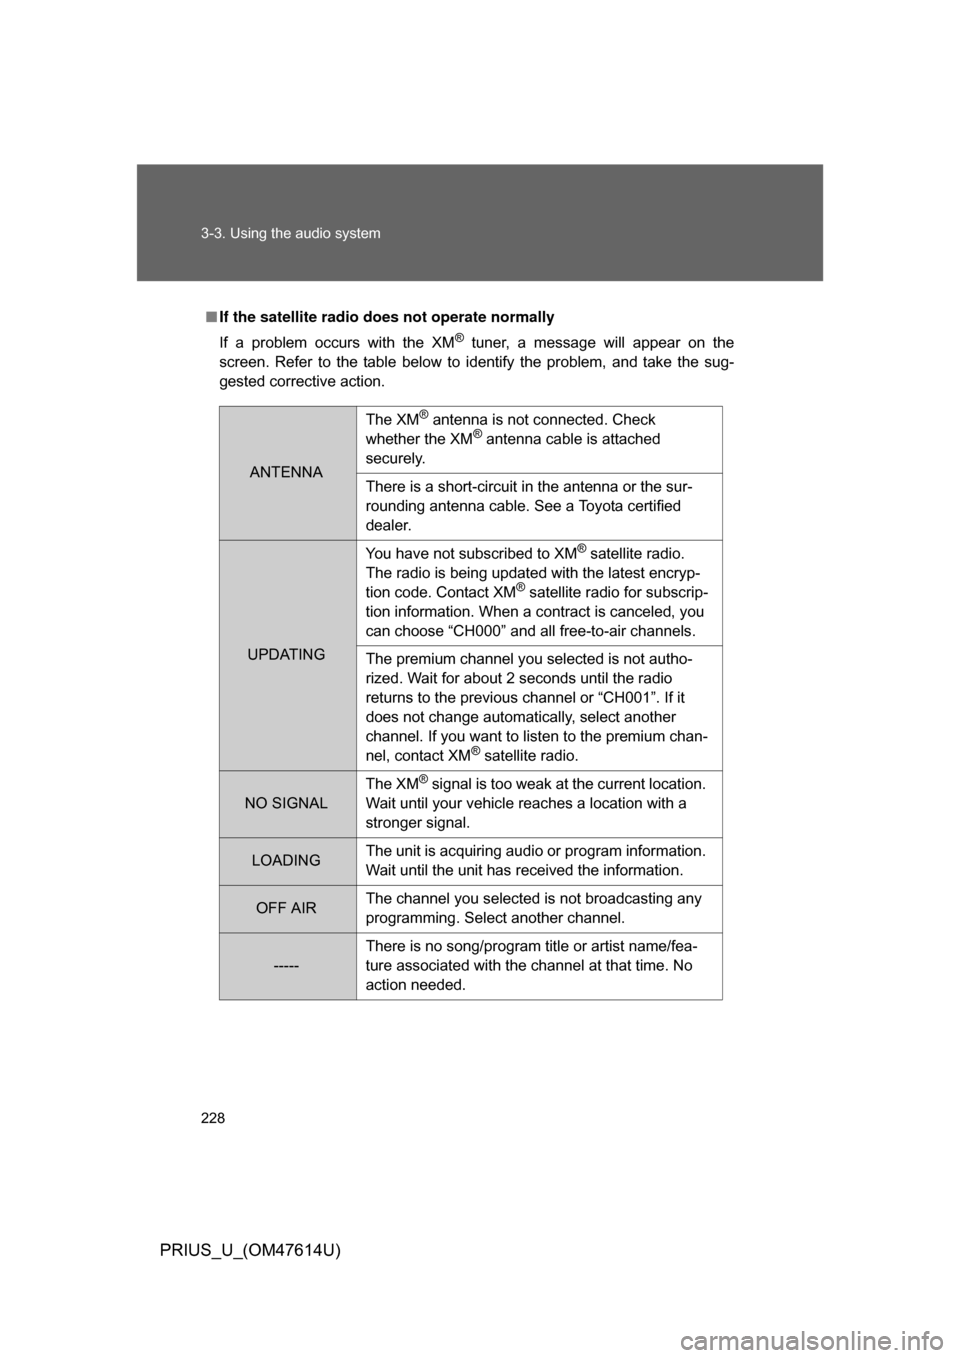
■If the satellite radio does not operate normally
If a problem occurs with the XM
® tuner, a message will appear on the
screen. Refer to the table below to identify the problem, and take the sug-
gested corrective action.
ANTENNA
The XM® antenna is not connected. Check
whether the XM® antenna cable is attached
securely.
There is a short-circuit in the antenna or the sur-
rounding antenna cable. See a Toyota certified
dealer.
UPDATING You have not subscribed to XM
® satellite radio.
The radio is being updated with the latest encryp-
tion code. Contact XM
® satellite radio for subscrip-
tion information. When a contract is canceled, you
can choose “CH000” and all free-to-air channels.
The premium channel you selected is not autho-
rized. Wait for about 2 seconds until the radio
returns to the previous channel or “CH001”. If it
does not change automatically, select another
channel. If you want to listen to the premium chan-
nel, contact XM
® satellite radio.
NO SIGNAL The XM
® signal is too weak at the current location.
Wait until your vehicle reaches a location with a
stronger signal.
LOADING The unit is acquiring audio or program information.
Wait until the unit has received the information.
OFF AIRThe channel you selected is not broadcasting any
programming. Select another channel.
-----There is no song/program title or artist name/fea-
ture associated with the channel at that time. No
action needed.
Page 276 of 508
276 3-4. Using the hands-free system (for cellular phone)
PRIUS_U_(OM47614U)
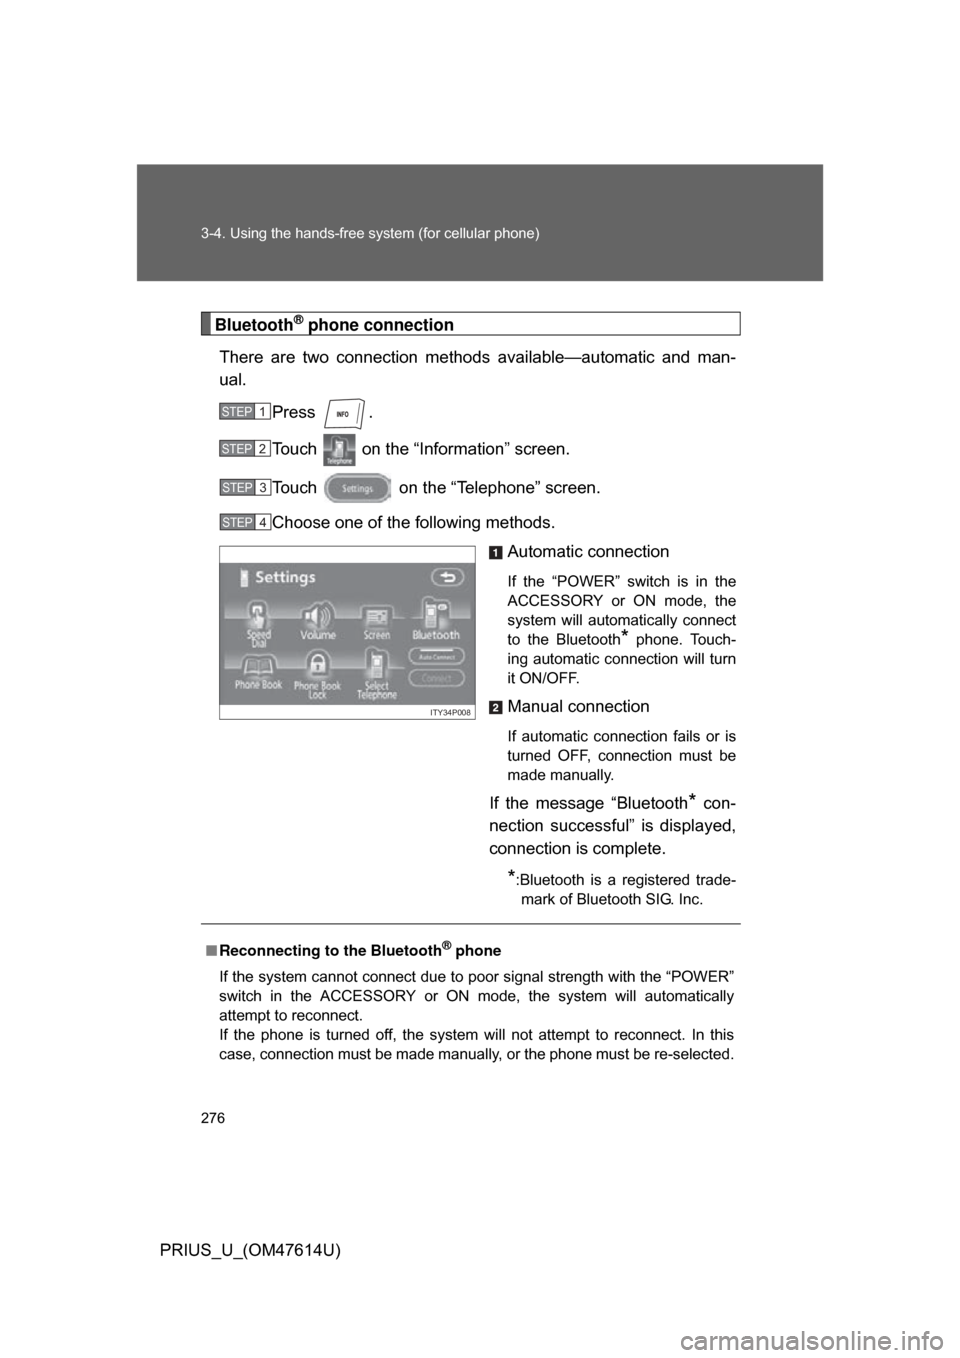
Bluetooth® phone connection
There are two connection method s available—automatic and man-
ual.
Press .
Touch on the “Inf ormation” screen.
Touch on the “Telephone” screen.
Choose one of the following methods. Automatic connection
If the “POWER” switch is in the
ACCESSORY or ON mode, the
system will automatically connect
to the Bluetooth
* phone. Touch-
ing automatic connection will turn
it ON/OFF.
Manual connection
If automatic connection fails or is
turned OFF, connection must be
made manually.
If the message “Bluetooth* con-
nection successful” is displayed,
connection is complete.
*:Bluetooth is a registered trade- mark of Bluetooth SIG. Inc.
STEP1
STEP2
STEP3
STEP4
ITY34P008
■ Reconnecting to the Bluetooth® phone
If the system cannot connect due to poor signal strength with the “POWER”
switch in the ACCESSORY or ON mode, the system will automatically
attempt to reconnect.
If the phone is turned off, the system will not attempt to reconnect. In this
case, connection must be made manually, or the phone must be re-selected.
Page 339 of 508
339
3-7. Other interior features
3
Interior features
PRIUS_U_(OM47614U)
Test the operation of the HomeLink
by pressing the newly
programmed button. Check to see if the gate/device operates
correctly.
Repeat the steps above to program another device for each of
the remaining HomeLink
buttons.
■ Programming other devices
To program other devices such as home security systems, home
door locks or lighting, contact your authorized Toyota dealer for
assistance.
■ Reprogramming a button
The individual HomeLink
buttons cannot be erased but can be
reprogrammed. To reprogram a button, follow the “Basic program-
ming” instructions.
Operating the HomeLink
Press the appropriate HomeLink button. The HomeLink indicator
light on the HomeLink transceiver should turn on.
The HomeLink continues to send a signal for up to 20 seconds as long
as the button is pressed.
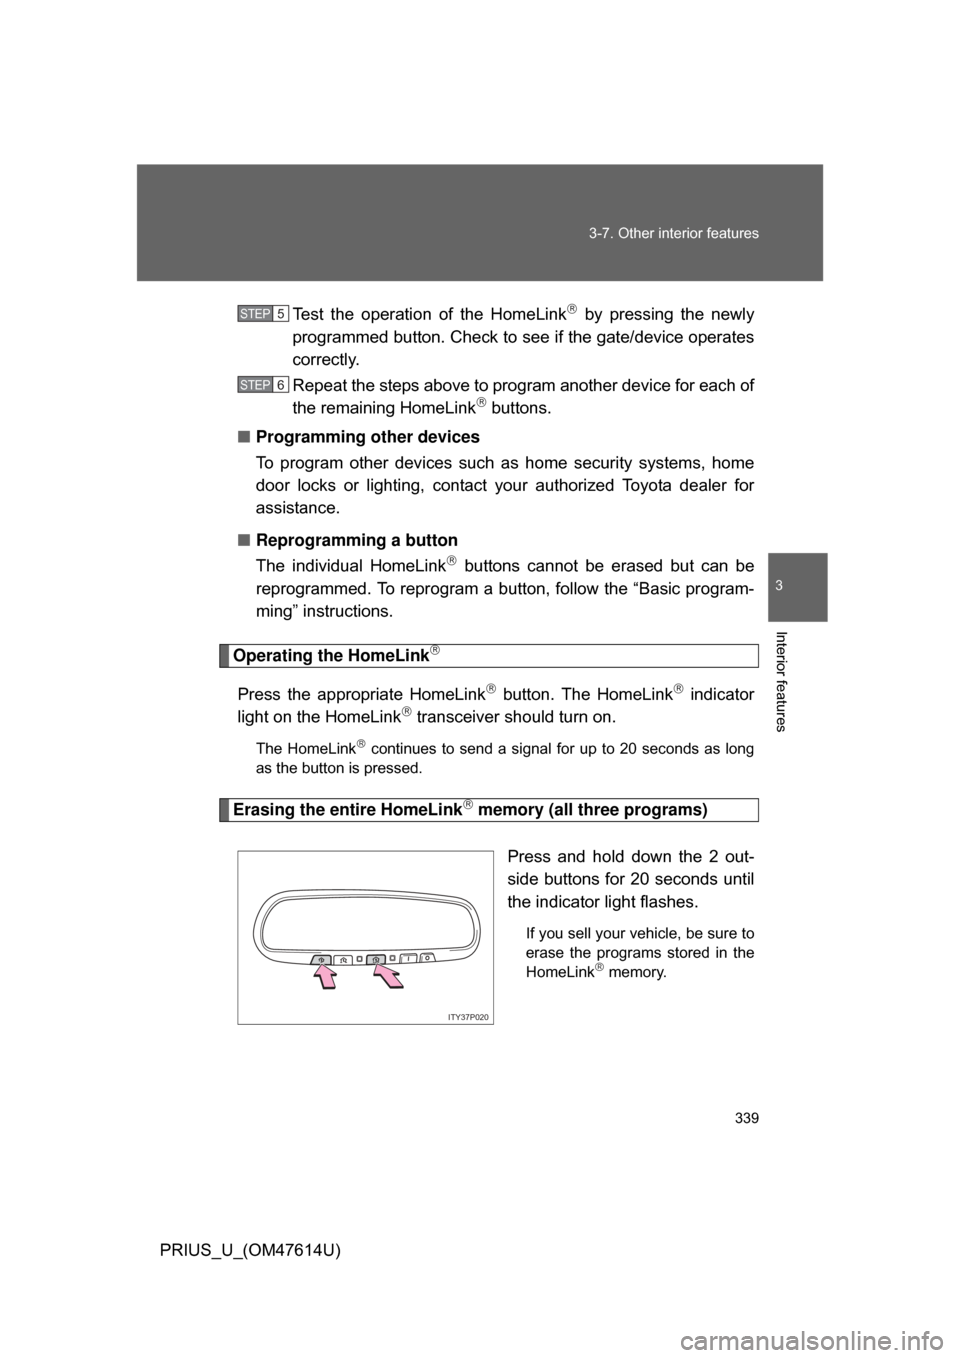
Erasing the entire HomeLink memory (all three programs)
Press and hold down the 2 out-
side buttons for 20 seconds until
the indicator light flashes.
If you sell your vehicle, be sure to
erase the programs stored in the
HomeLink
memory.
STEP5
STEP6
ITY37P020