TOYOTA PRIUS 2010 3.G Service Manual
PRIUS 2010 3.G
TOYOTA
TOYOTA
https://www.carmanualsonline.info/img/14/6590/w960_6590-0.png
TOYOTA PRIUS 2010 3.G Service Manual
Page 462 of 616
462
4-3. Do-it-yourself maintenance
PRIUS_U (OM47668U) U.S.A.
Checking and replacing fuses
If any of the electrical components do not operate, a fuse may have
blown. If this happens, check and replace the fuses as necessary.
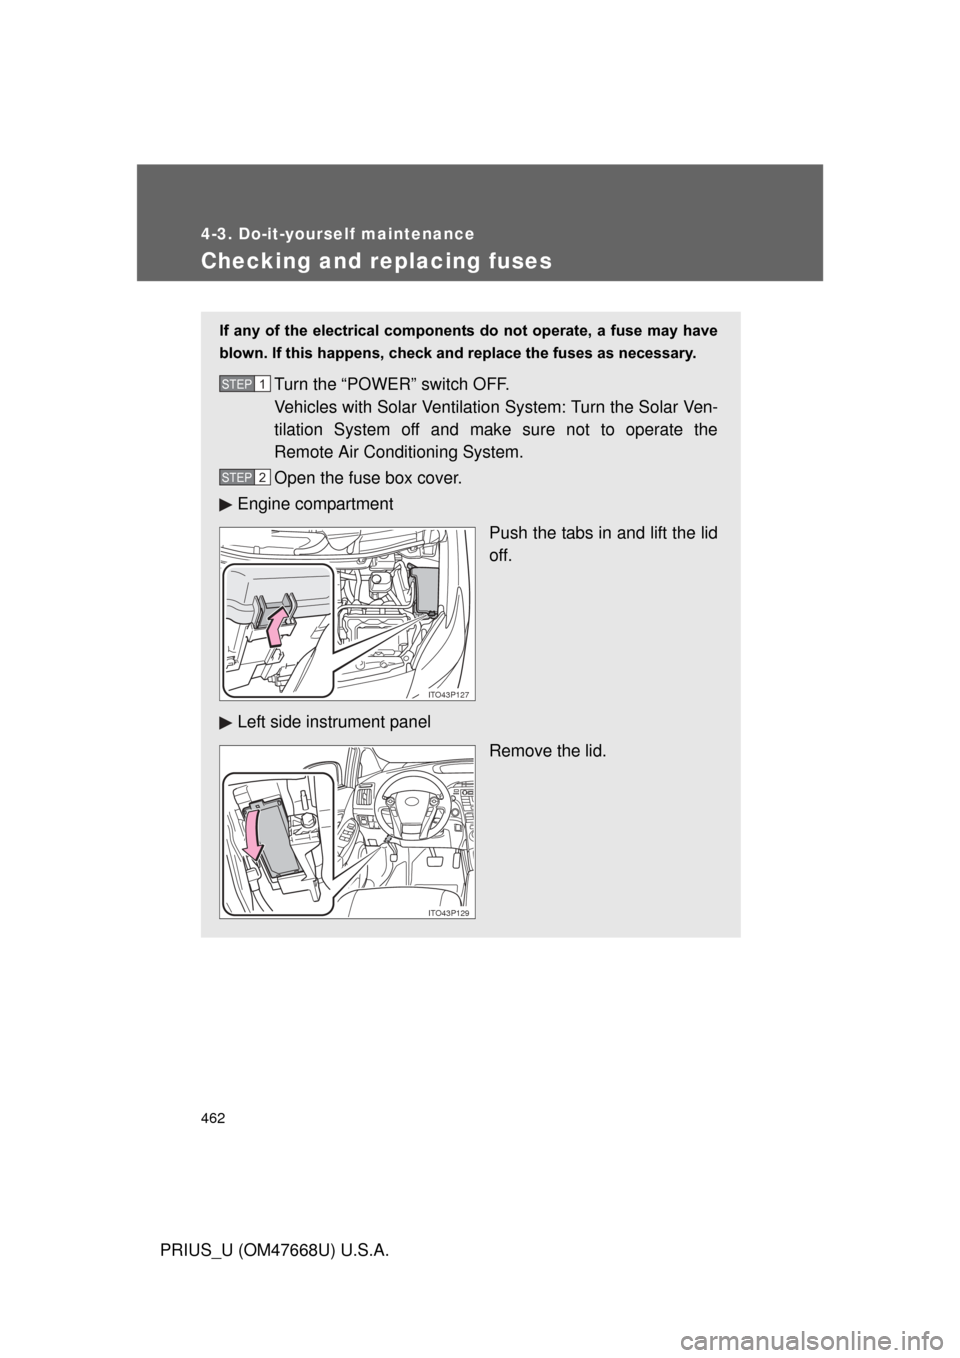
Turn the “POWER” switch OFF.
Vehicles with Solar Ventilation System: Turn the Solar Ven-
tilation System off and make sure not to operate the
Remote Air Conditioning System.
Open the fuse box cover.
Engine compartment
Push the tabs in and lift the lid
off.
Left side instrument panel Remove the lid.STEP1
STEP2
ITO43P127
ITO43P129
Page 465 of 616
465
4-3. Do-it-yourself maintenance
4
Maintenance and care
PRIUS_U (OM47668U) U.S.A.
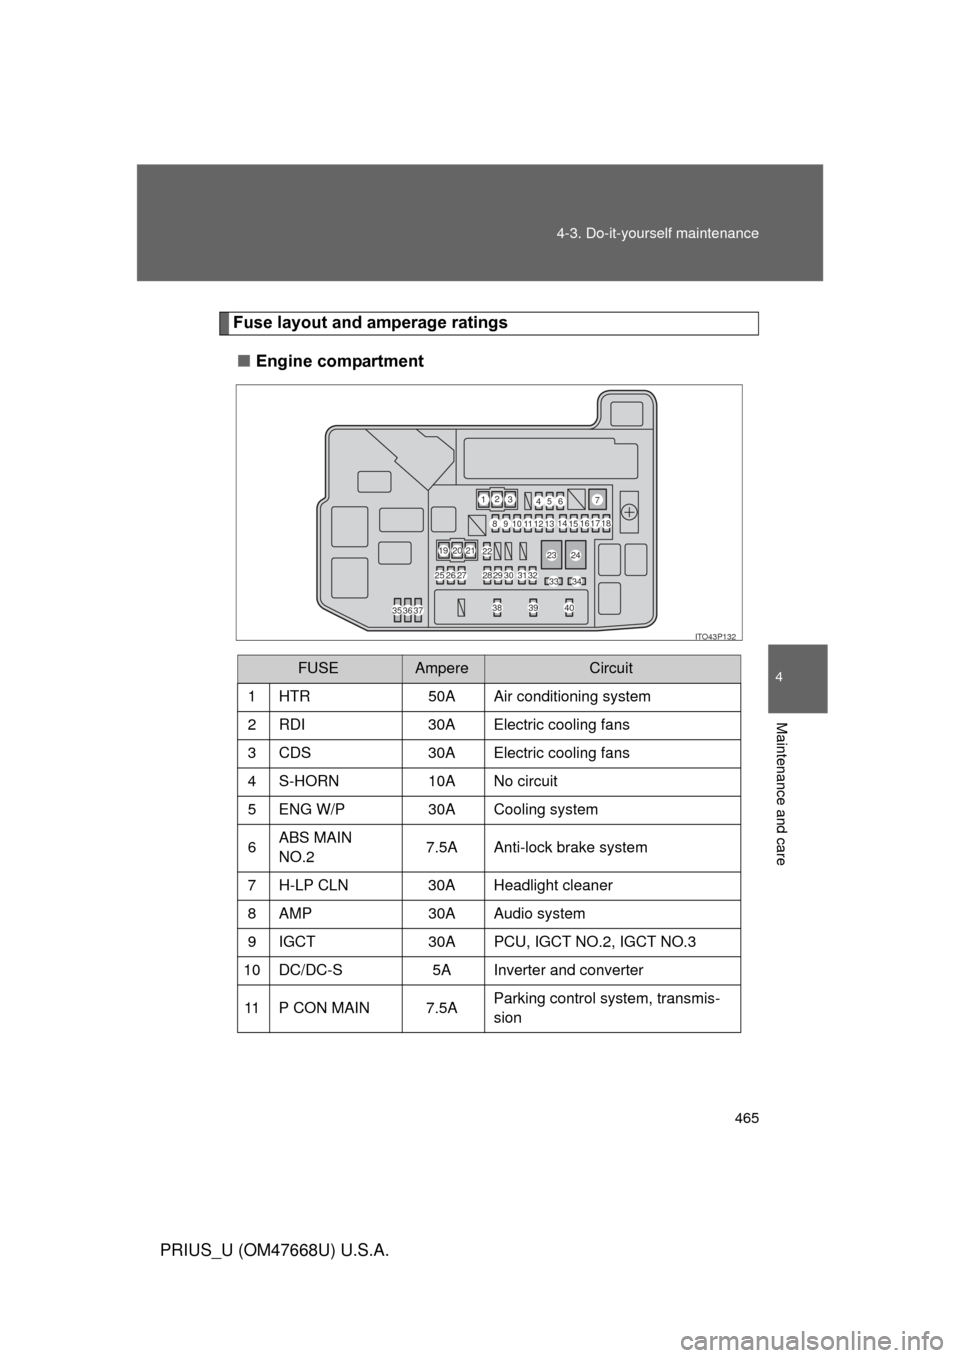
Fuse layout and amperage ratings
■ Engine compartment
FUSEAmpereCircuit
1 HTR 50A Air conditioning system
2 RDI 30A Electric cooling fans
3 CDS 30A Electric cooling fans
4 S-HORN 10A No circuit
5 ENG W/P 30A Cooling system
6 ABS MAIN
NO.2 7.5A Anti-lock brake system
7 H-LP CLN 30A Headlight cleaner
8 AMP 30A Audio system
9 IGCT 30A PCU, IGCT NO.2, IGCT NO.3
10 DC/DC-S 5A Inverter and converter
11 P CON MAIN 7.5A Parking control system, transmis-
sion
ITO43P132
1
2
3
456 7
891011 12
13 14
15 16
17 18
19 20 21 22
2324
25 26 27 28 29 30 31 32 33 34
35 36 37 38 39 40
Page 474 of 616
474 4-3. Do-it-yourself maintenance
PRIUS_U (OM47668U) U.S.A.
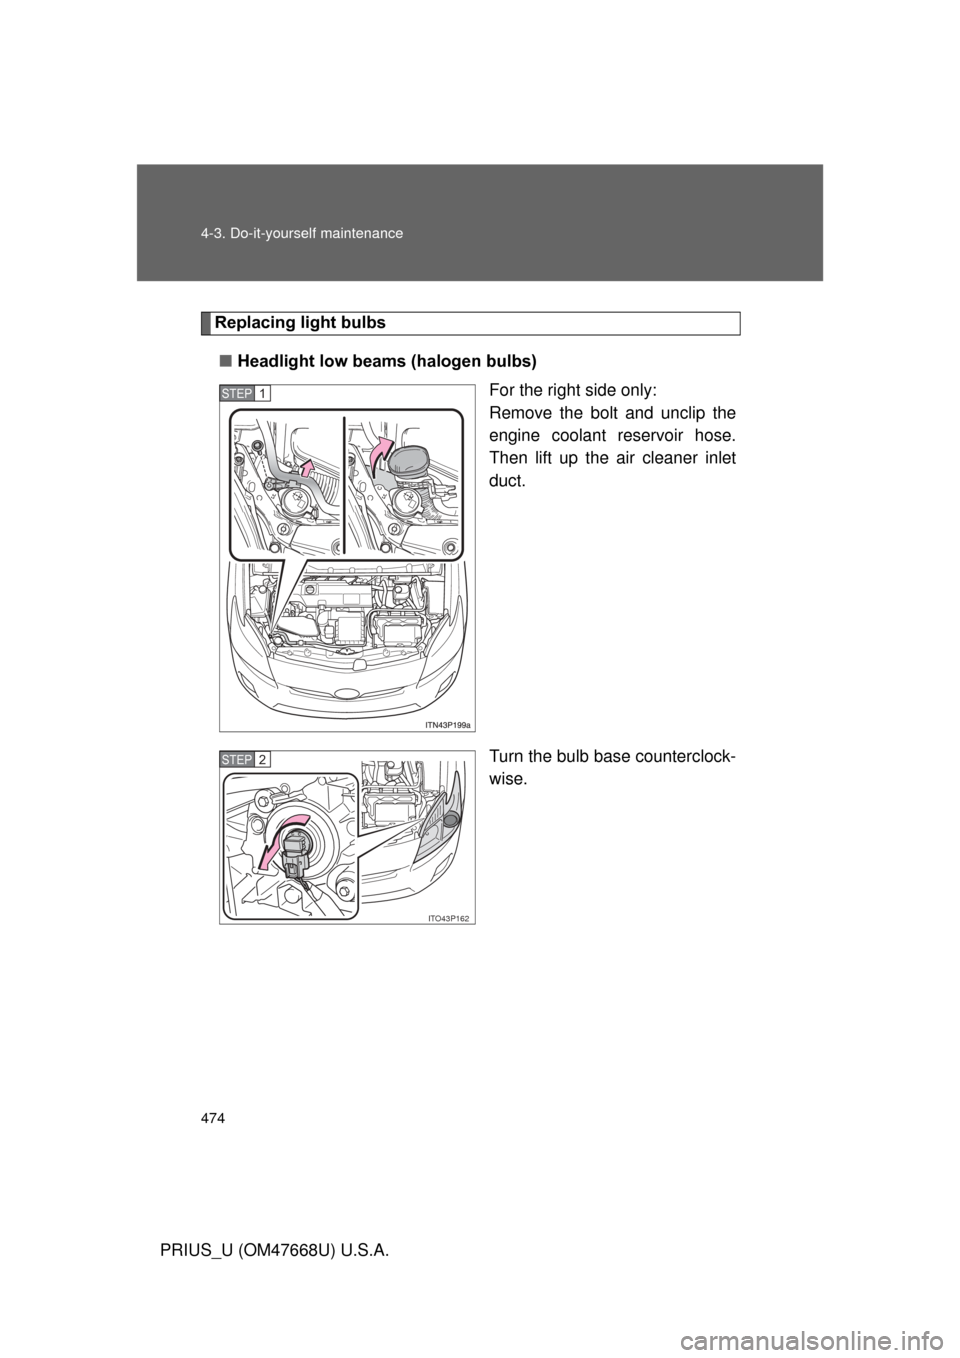
Replacing light bulbs■ Headlight low beams (halogen bulbs)
For the right side only:
Remove the bolt and unclip the
engine coolant reservoir hose.
Then lift up the air cleaner inlet
duct.
Turn the bulb base counterclock-
wise.
STEP1
ITO43P162
STEP2
Page 476 of 616
476 4-3. Do-it-yourself maintenance
PRIUS_U (OM47668U) U.S.A.■
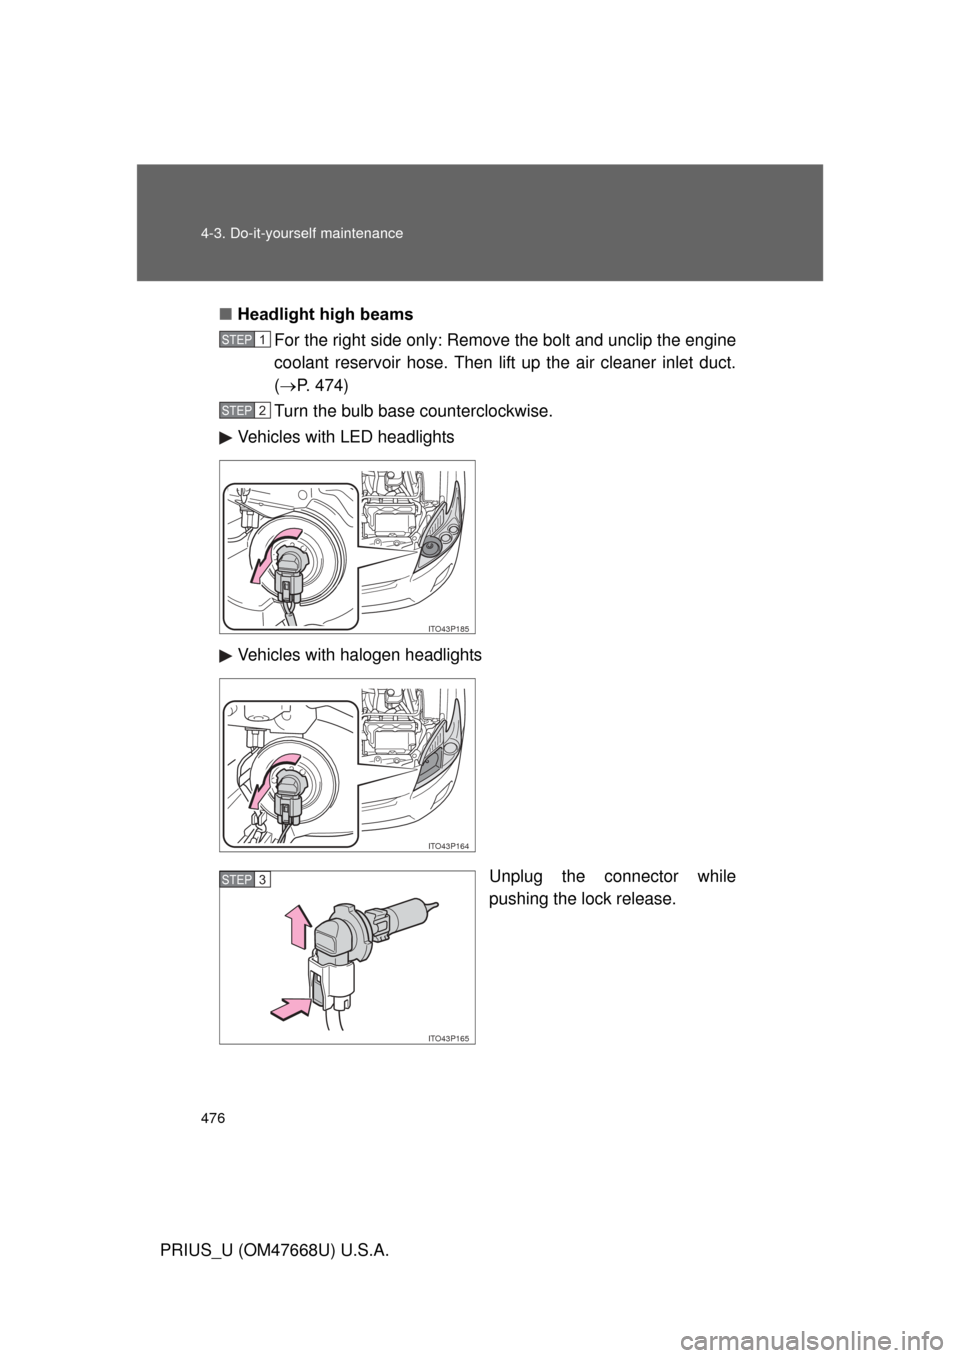
Headlight high beams
For the right side only: Remove the bolt and unclip the engine
coolant reservoir hose. Then lift up the air cleaner inlet duct.
( P. 474)
Turn the bulb base counterclockwise.
Vehicles with LED headlights
Vehicles with halogen headlights
Unplug the connector while
pushing the lock release.
STEP1
STEP2
ITO43P185
ITO43P164
ITO43P165
STEP3
Page 477 of 616
477
4-3. Do-it-yourself maintenance
4
Maintenance and care
PRIUS_U (OM47668U) U.S.A.
■
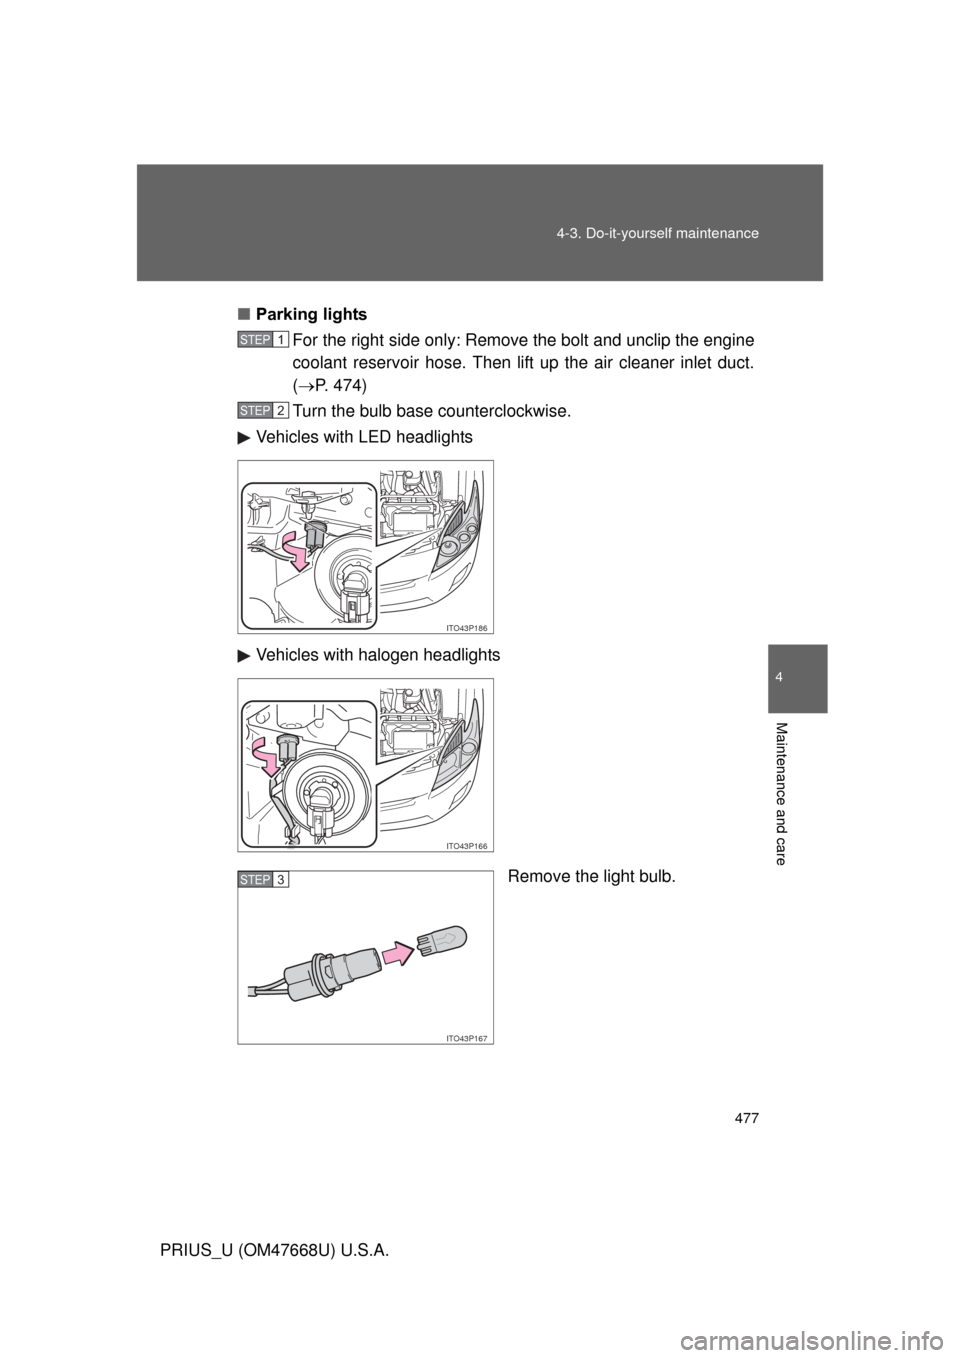
Parking lights
For the right side only: Remove the bolt and unclip the engine
coolant reservoir hose. Then lift up the air cleaner inlet duct.
( P. 474)
Turn the bulb base counterclockwise.
Vehicles with LED headlights
Vehicles with halogen headlights
Remove the light bulb.
STEP1
STEP2
ITO43P186
ITO43P166
ITO43P167
STEP3
Page 478 of 616
478 4-3. Do-it-yourself maintenance
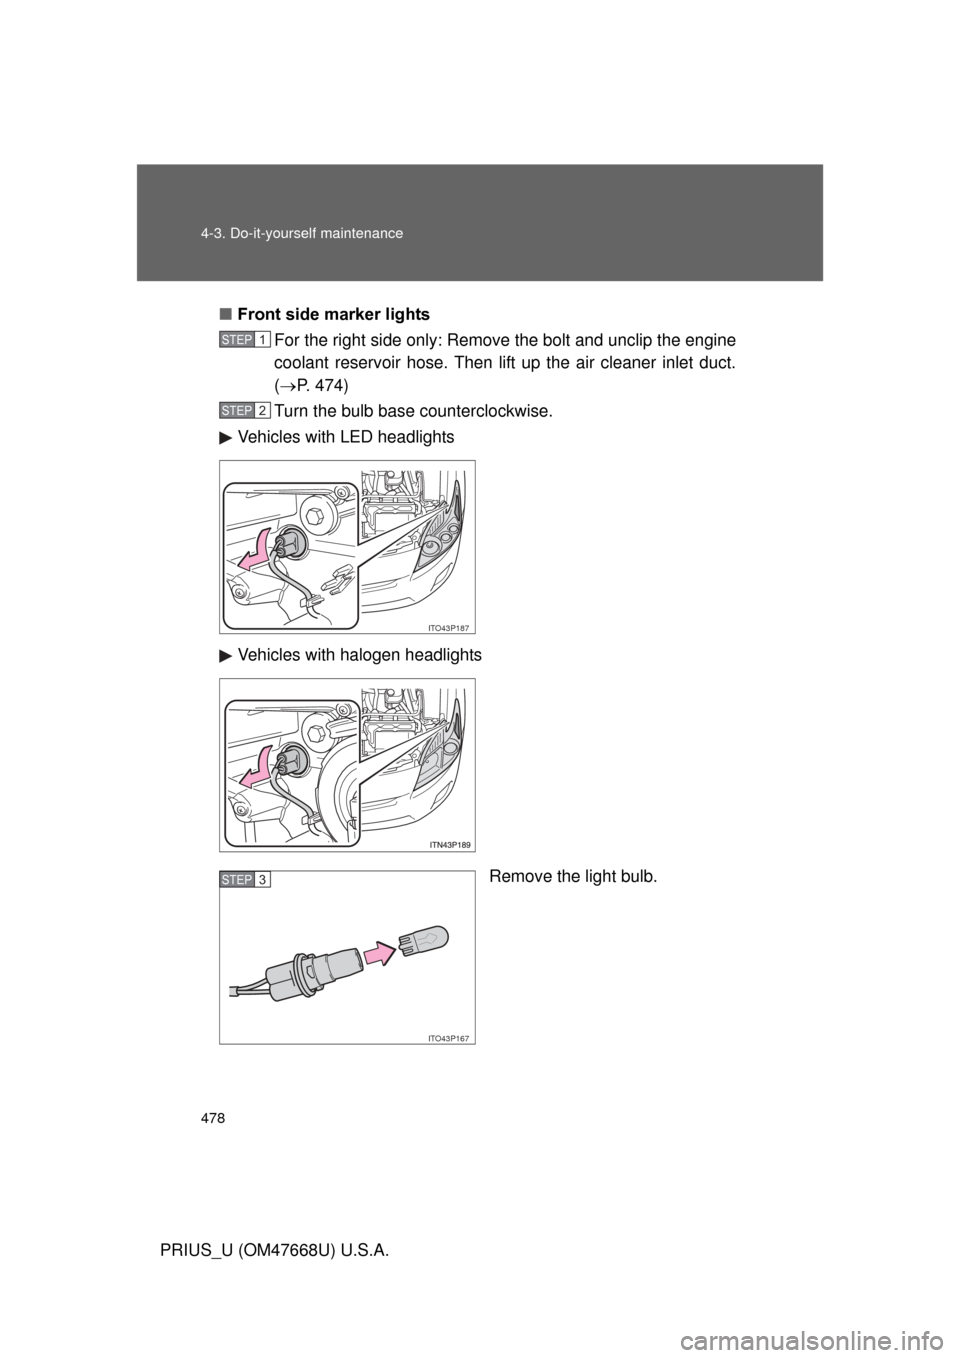
PRIUS_U (OM47668U) U.S.A.■
Front side marker lights
For the right side only: Remove the bolt and unclip the engine
coolant reservoir hose. Then lift up the air cleaner inlet duct.
( P. 474)
Turn the bulb base counterclockwise.
Vehicles with LED headlights
Vehicles with halogen headlights
Remove the light bulb.
STEP1
STEP2
ITO43P187
ITO43P167
STEP3
Page 479 of 616
479
4-3. Do-it-yourself maintenance
4
Maintenance and care
PRIUS_U (OM47668U) U.S.A.
■
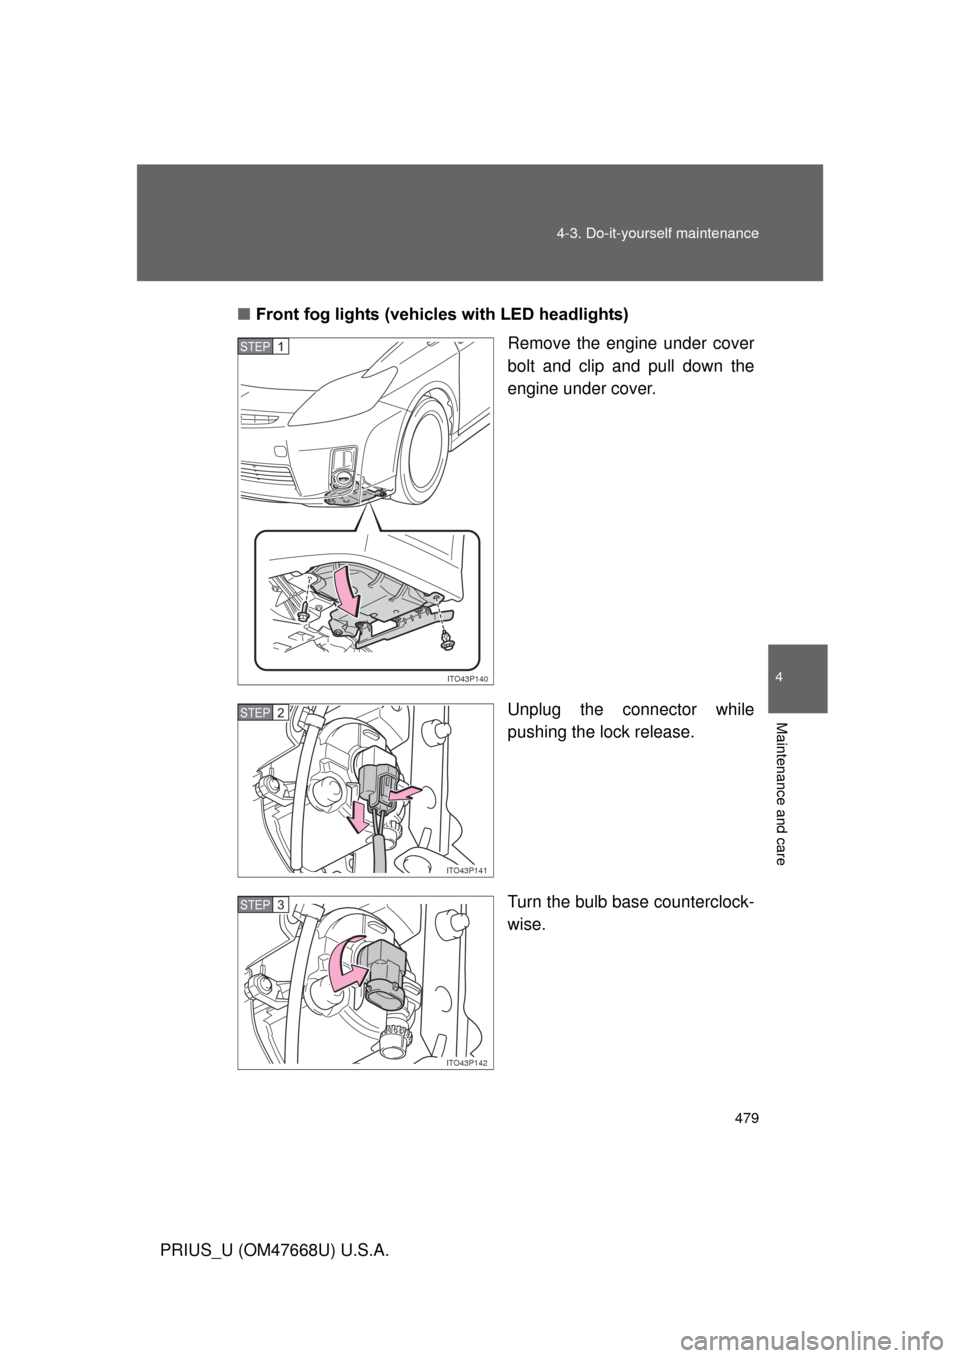
Front fog lights (vehicles with LED headlights)
Remove the engine under cover
bolt and clip and pull down the
engine under cover.
Unplug the connector while
pushing the lock release.
Turn the bulb base counterclock-
wise.
ITO43P140
STEP1
ITO43P141
STEP2
ITO43P142
STEP3
Page 480 of 616
480 4-3. Do-it-yourself maintenance
PRIUS_U (OM47668U) U.S.A.■
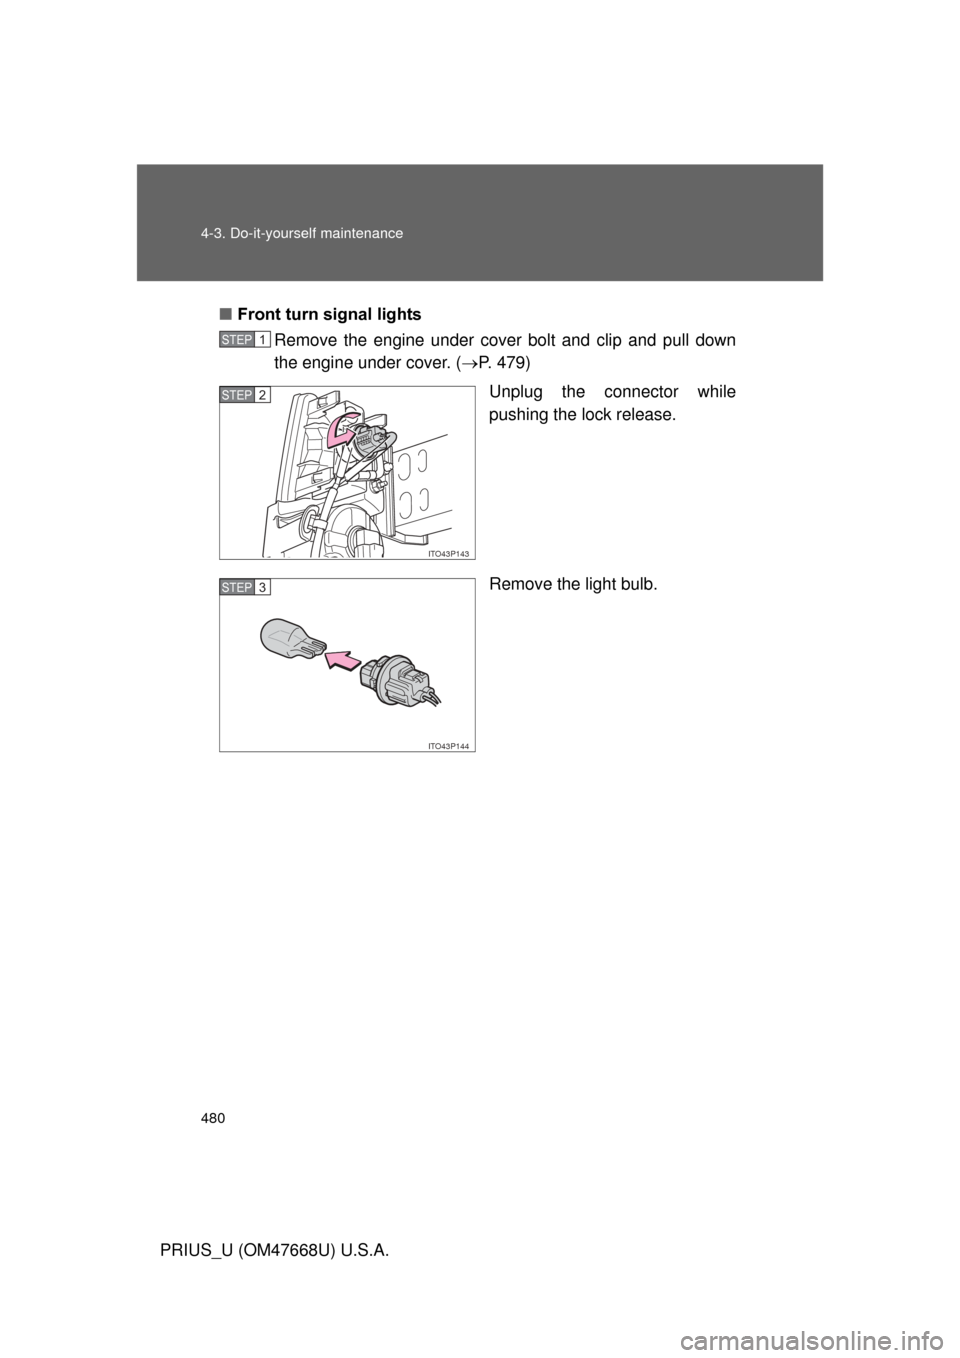
Front turn signal lights
Remove the engine under cover bolt and clip and pull down
the engine under cover. ( P. 479)
Unplug the connector while
pushing the lock release.
Remove the light bulb.
STEP1
ITO43P143
STEP2
ITO43P144
STEP3
Page 483 of 616
483
4-3. Do-it-yourself maintenance
4
Maintenance and care
PRIUS_U (OM47668U) U.S.A.
■
Condensation build-up on th e inside of the lens
Contact your Toyota dealer for more information in the following situations.
Temporary condensation build-up on the inside of the headlight lens does
not indicate a malfunction.
● Large drops of water are built up on the inside of the lens.
● Water has built up inside the headlight.
■ LED lights
The headlight low beams (LED type), stop/tail lights and high mounted
stoplight consist of a number of LEDs. If any of the LEDs burn out, take your
vehicle to your Toyota dealer to have the light replaced.
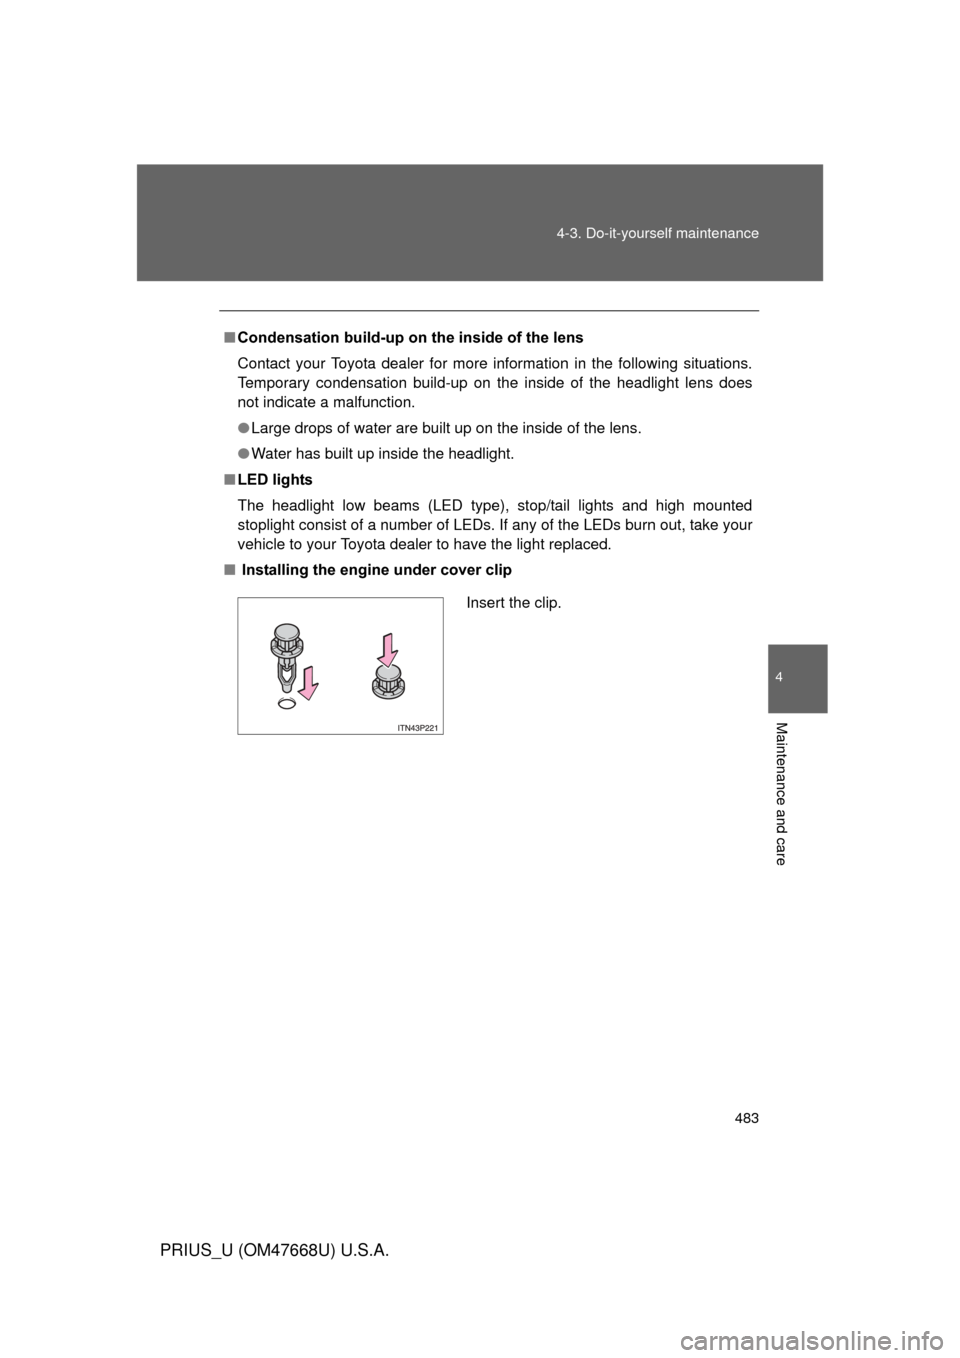
■ Installing the engine under cover clip
Insert the clip.
Page 493 of 616
5
When trouble arises
493
5-1. Essential information
PRIUS_U (OM47668U) U.S.A.
If you think something is wrong
If you notice any of the following symptoms, your vehicle probably
needs adjustment or repair. Contact your Toyota dealer as soon as
possible.
■ Visible symptoms
●Fluid leaks under the vehicle
(Water dripping from the air cond itioning after use is normal.)
● Flat-looking tires or uneven tire wear
■ Audible symptoms
●Changes in exhaust sound
● Excessive tire squeal when cornering
● Strange noises related to the suspension system
● Pinging or other noises related to the hybrid system
■ Operational symptoms
●Engine missing, stumbling or running rough
● Appreciable loss of power
● Vehicle pulls heavily to one side when braking
● Vehicle pulls heavily to one side when driving on a level road
● Loss of brake effectiveness, s pongy feeling, pedal almost
touches the floor
