remain on TOYOTA PRIUS 2012 3.G User Guide
[x] Cancel search | Manufacturer: TOYOTA, Model Year: 2012, Model line: PRIUS, Model: TOYOTA PRIUS 2012 3.GPages: 636, PDF Size: 11.02 MB
Page 292 of 636
292 2-4. Using other driving systems
CAUTION
■Turn the LKA off while driving in any of the following conditions
Do not use LKA in any of the following situations.
Otherwise, the system may not function correctly and could result in an acci-
dent.
● When driving with snow tires, snow chains, a spare tire, or similar equip-
ment.
● When driving with non-standard parts or aftermarket equipment installed.
(including modified tires and suspensions, etc.)
● When there are objects or structures along the roadside that might be mis-
interpreted as lane markers. (such as guardrails, curb, reflector posts, etc.)
● When there are wheel ruts, icy trademar ks, etc. or if snow remains on the
road surface.
● When there are shadows on the road r unning parallel with lane markers,
or if a shadow covers the lane markers.
● When there are visible lines on the pavement from road repairs, or if the
remains of old lane markers are still visible on the road.
● When driving on slippery roads, such as those covered with rain, ice or
snow.
● When driving in a lane other than the driving or passing lanes on a freeway
or highway.
● When driving on a road with lane closures due to maintenance, or when
driving in a temporary lane.
● When driving on winding roads or roads that are rough or uneven.
Page 301 of 636
301
2-4. Using other driving systems
2
When driving
Hill-start assist control
■Hill-start assist control can be operated when
●The shift position is in a position other than P.
● The parking brake is not applied.
● The accelerator pedal is not depressed.
■ Hill-start assist control
●While hill-start assist control is operating, the brakes remain automati-
cally applied after the driver releases the brake pedal. The stop lights and
the high mounted stoplight turn on.
● Hill-start assist control operates for about 2 seconds after the brake pedal
is released.
● If the slip indicator does not flash and the buzzer does not sound when
the brake pedal is further depressed, slightly reduce the pressure on the
brake pedal (do not allow the vehicl e to roll backward) and then firmly
depress it again. If the system still does not operate, check if the operat-
ing conditions explained above have been met.
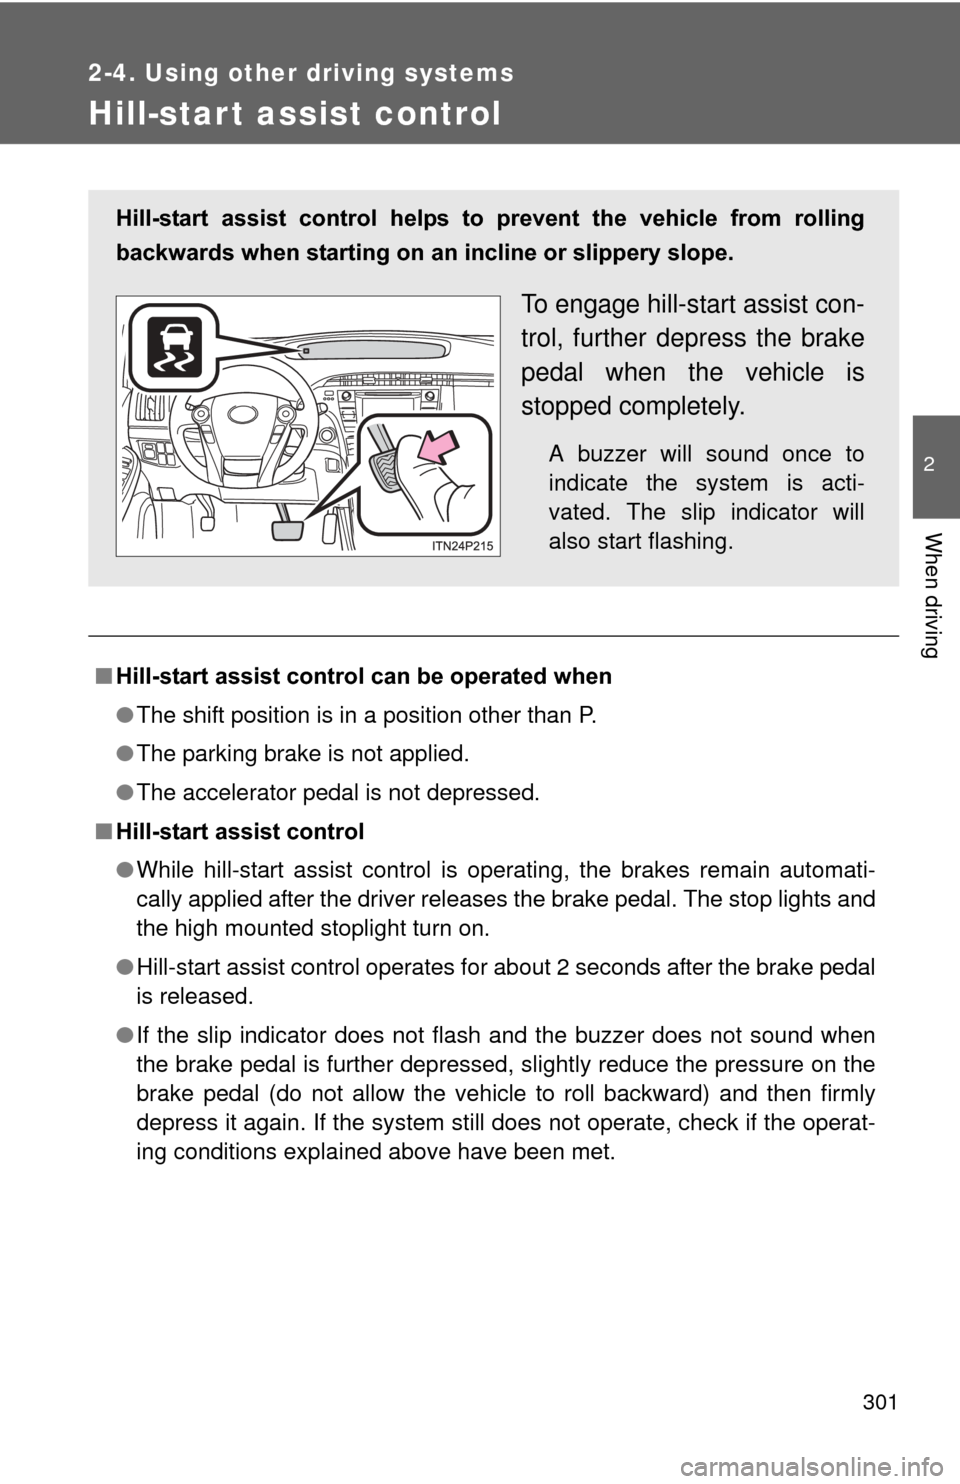
Hill-start assist control helps to prevent the vehicle from rolling
backwards when starting on an incline or slippery slope.
To engage hill-start assist con-
trol, further depress the brake
pedal when the vehicle is
stopped completely.
A buzzer will sound once to
indicate the system is acti-
vated. The slip indicator will
also start flashing.
Page 309 of 636
309
2-4. Using other
driving systems
2
When driving
CAUTION
■Limitations of the pre-collision system
Do not overly rely on the pre-collision system. Always drive safely, taking
care to observe your surroundings and checking for any obstacles or other
road hazards.
Failure to do so may cause an accident resulting in death or serious injury.
■ Cautions regarding the assist contents of the system
By means of alarms and brake control, the pre-collision system is intended
to assist the driver in avoiding collisions through the process of LOOK-
JUDGE-ACT. There are limits to the degree of assistance the system can
provide, so please keep in mind the following important points.
●Assisting the driver in watching the road
The pre-collision system is only able to detect obstacles directly in front of
the vehicle, and only within a limited range. It is not a mechanism that
allows careless or inattentive driving, and it is not a system that can assist
the driver in low-visibility conditions. It is still necessary for the driver to
pay close attention to the vehicle’s surroundings.
● Assisting the driver in making correct judgement
When attempting to estimate the possibility of a collision, the only data
available to the pre-collision system is that from obstacles it has detected
directly in front of the vehicle. Therefore, it is absolutely necessary \
for the
driver to remain vigilant and to determine whether or not there is a possi-
bility of collision in any given situation.
● Assisting the driver in taking action
The pre-collision system’s braking assist feature is designed to help
reduce the severity of a collision, and so only acts when the system has
judged that a collision is unavoidable. This system by itself is not capable
of automatically avoiding a collision or bringing the vehicle to a stop safely.
For this reason, when encountering a dangerous situation the driver must
take direct and immediate action in order to ensure the safety of all
involved.
Page 340 of 636

340 3-1. Using the air conditioning system and defogger
■Operating conditions
The Solar Ventilation System may not operate under the following circum-
stances due to a lack of power from the solar panel:
●Low amount of sunlight
● Ever when a part of the solar panel is cast by a shadow.
● Ever when a part of the solar panel is covered by fallen leaves or dirt.
● The solar panel is not at a high temperature.
■ Before using the Solar Ventilation System
Remove dirt or fallen leaves from the solar panel in order to ensure sufficient
electrical output.
■ Efficient use of the So lar Ventilation System
Efficient control of temperature increase can be achieved by using the sys-
tem in conjunction with the Remote Air Conditioning System. ( P. 342)
■ When using the Sola r Ventilation System
● Make sure that the “POWER” switch is in ON mode when turning the
ventilation switch on. If the ventilation switch is turned on while the
“POWER” switch is OFF, the air mode and the status of the air vents will
remain unchanged.
● If the Solar Ventilation System is not needed, be sure to turn the ventila-
tion switch off.
Dirty air and exhaust fumes from other vehicles may be drawn from out-
side. Also, use in winter may cause heated interior air to leave the vehi-
cle, thus leading to a drop in temperature.
■ Sounds when using the Solar Ventilation System
If the amount of sunlight is insufficient, you may hear a sound coming from
the air conditioning system. This is the sound of a control function to pre-
serve the fan and does not indicate a malfunction.
Page 341 of 636
341
3-1. Using the air conditioning system
and defogger
3
Interior features
CAUTION
■Solar Ventilation System precautions
●Do not use the system if people are inside the vehicle.
The Solar Ventilation System is not intended to ensure the performance of
the air conditioning system. Do not leave children or pets in the vehicle.
The temperature of the interior will remain high, possibly resulting in heat-
stroke, dehydration, or even death.
● This system should be used only for the relief of discomfort when entering
the vehicle, and should not be used for other purposes.
■ Precautions for moon roof with Solar Panel
P. 129
Page 349 of 636
349
3-2. Using the audio system
3
Interior features
■
About Bluetooth® (vehicles with Display Audio system)
CAUTION
■Certification for the Display Audio system
FCC ID: ACJ932CQ-US70G0
●Part 15 of the FCC Rules
FCC Warning:
Any unauthorized changes or modifications to this equipment will void the
user’s authority to operate this device.
● Laser products
• Do not take this unit apart or attempt to make any changes by yourself.
This is an intricate unit that uses a laser pickup to retrieve information
from the surface of compact discs. The laser is carefully shielded so
that its rays remain inside the cabinet. Therefore, never try to disas-
semble the player or alter any of its parts since you may be exposed to
laser rays and dangerous voltages.
• This product utilizes a laser. Use of controls or adjustments or performance of procedures other
than those specified herein may result in hazardous radiation expo-
sure.
Bluetooth is a registered trade mark of
Bluetooth SIG. Inc.
The Bluetooth word mark and logos are
owned by the Bluetooth SIG, Inc. and any
use of such marks by Panasonic Corpo-
ration is under license.
Other trademarks and trade names are
those of their respective owners.
Page 356 of 636
356 3-3. Using the interior lights
■Illuminated entry system
The lights automatically turn on/off according to “POWER” switch mode, the
presence of the electronic key, whether the doors are locked/unlocked, and
whether the doors are opened/closed.
■ To prevent 12-volt battery discharge
If the interior lights remain on when the door is not fully closed and the inte-
rior light switch (door position on/off) is on, the lights will go off automatically
after 20 minutes.
■ Customization
Setting (e.g. The time elapsed before lights turn off) can be changed.
(Customizable features P. 594)
NOTICE
■To prevent 12-volt battery discharge
Do not leave the lights on longer than necessary when the hybrid system is
off.
Rear interior light
Page 381 of 636
381
3-5. Other interior features
3
Interior features
■
Programming HomeLink®
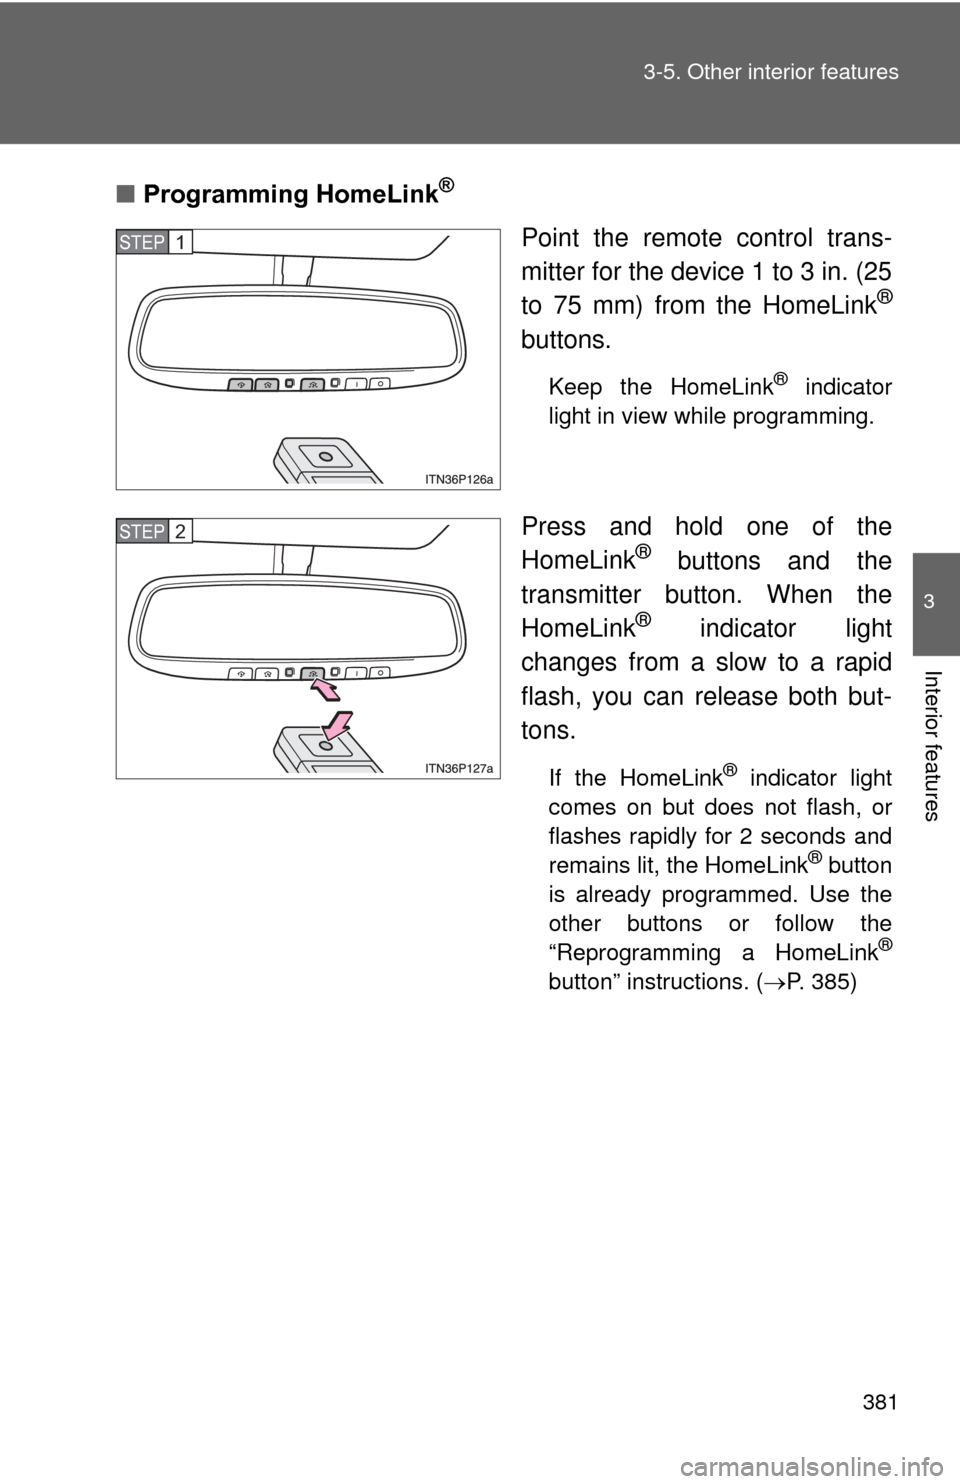
Point the remote control trans-
mitter for the device 1 to 3 in. (25
to 75 mm) from the HomeLink
®
buttons.
Keep the HomeLink® indicator
light in view while programming.
Press and hold one of the
HomeLink® buttons and the
transmitter button. When the
HomeLink
® indicator light
changes from a slow to a rapid
flash, you can release both but-
tons.
If the HomeLink® indicator light
comes on but does not flash, or
flashes rapidly for 2 seconds and
remains lit, the HomeLink
® button
is already programmed. Use the
other buttons or follow the
“Reprogramming a HomeLink
®
button” instructions. ( P. 385)
STEP 1
STEP 2
Page 382 of 636
382 3-5. Other interior features
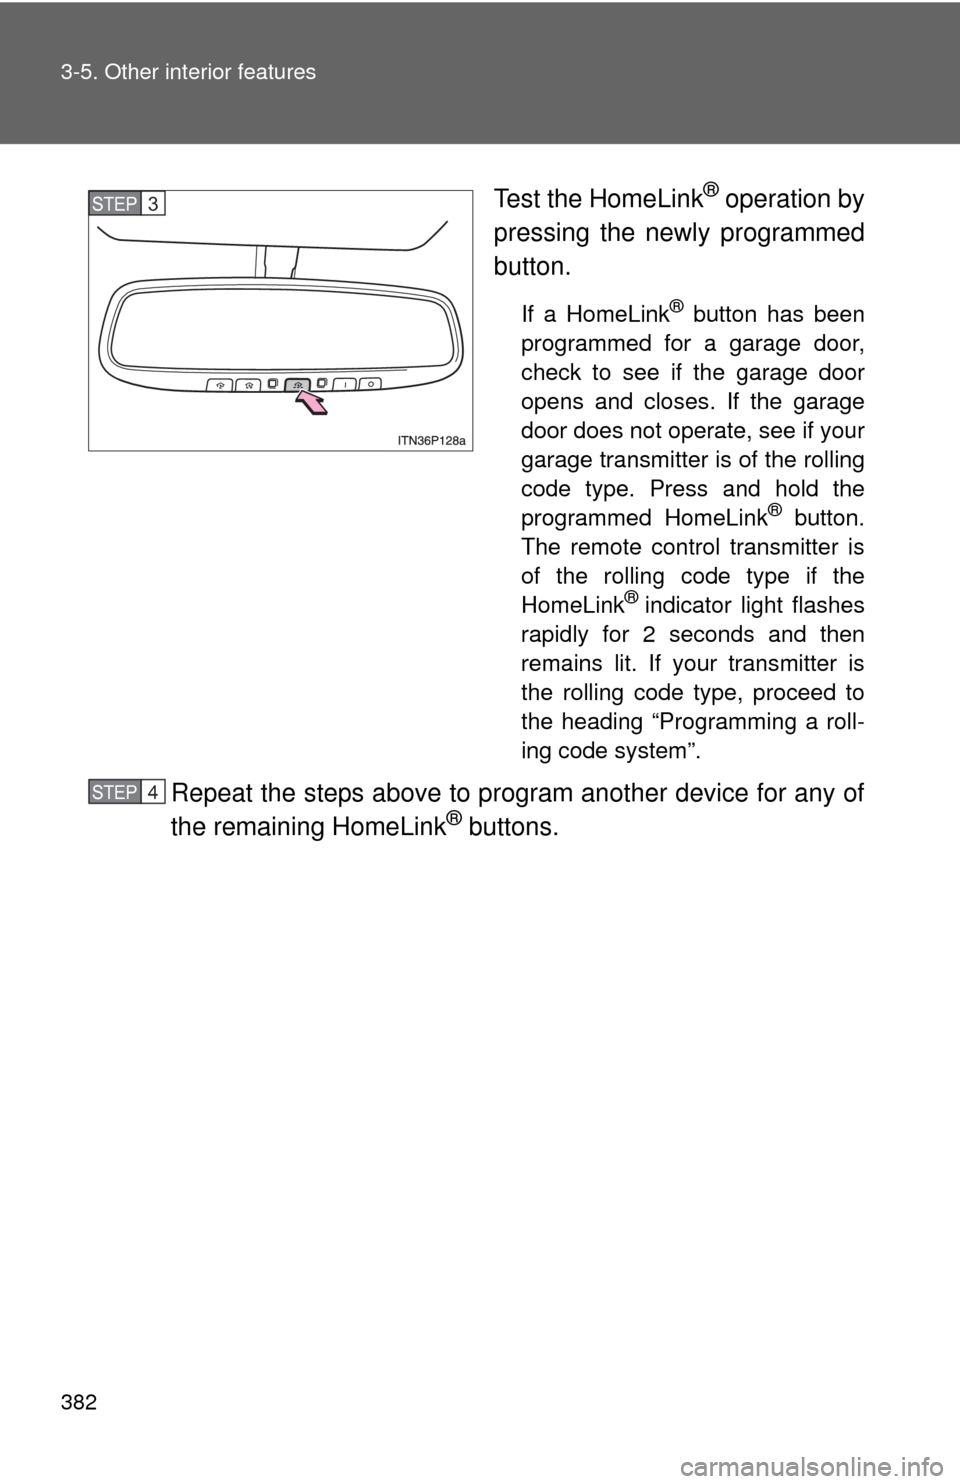
Test the HomeLink® operation by
pressing the newly programmed
button.
If a HomeLink® button has been
programmed for a garage door,
check to see if the garage door
opens and closes. If the garage
door does not operate, see if your
garage transmitter is of the rolling
code type. Press and hold the
programmed HomeLink
® button.
The remote control transmitter is
of the rolling code type if the
HomeLink
® indicator light flashes
rapidly for 2 seconds and then
remains lit. If your transmitter is
the rolling code type, proceed to
the heading “Programming a roll-
ing code system”.
Repeat the steps above to program another device for any of
the remaining HomeLink® buttons.
STEP 3
STEP 4
Page 383 of 636
383
3-5. Other interior features
3
Interior features
■
Programming a rolling code s ystem (for U.S.A. owners)
If your device is rolling code e quipped, follow the steps under the
heading “Programming HomeLink
®” before proceeding with the
steps listed below.
Locate the training button on the ceiling mounted garage door
opener motor. The exact location and color of the button may
vary by brand of garage door opener motor.
Refer to the operation manual supplied with the garage door opener
for the location of the training button.
Press the training button.
Following this step, you have 30 seconds in which to initiate step 3
below.
Press and hold the vehicle’s programmed HomeLink® button
for 2 seconds and release it. Repeat this step once again. The
garage door may open.
If the garage door opens, the programming process is complete. If
the door does not open, press and hold the button a third time, and
release after 2 seconds. This third press and release will complete
the programming process by opening the garage door.
The ceiling mounted garage door opener motor should now recog-
nize the HomeLink
® signal and operate the garage door.
Repeat the steps above to prog ram another rolling code sys-
tem for any of the remaining HomeLink® buttons.
STEP 1
STEP 2
STEP 3
STEP 4