TOYOTA PRIUS 2013 3.G Owners Manual
PRIUS 2013 3.G
TOYOTA
TOYOTA
https://www.carmanualsonline.info/img/14/6602/w960_6602-0.png
TOYOTA PRIUS 2013 3.G Owners Manual
Trending: wheel bolts, keyless, garage door opener, bluetooth, No. 1 bulb, engine overheat, engine filter
Page 531 of 640
5
When trouble arises
531
5-2. Steps to take in an emergency
PRIUS_OM_OM47791U_(U)
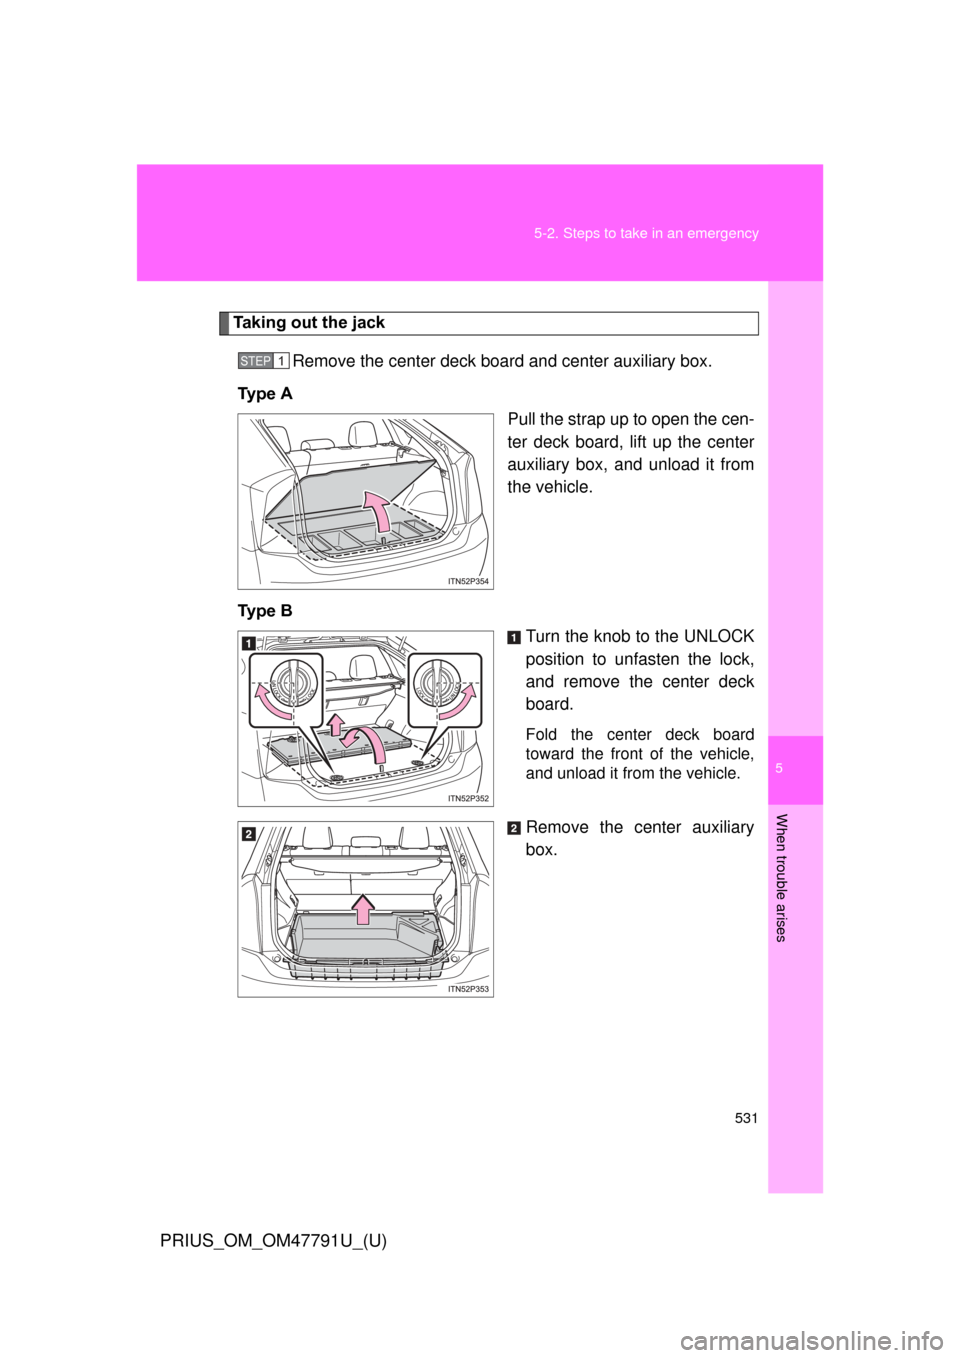
Taking out the jack
Remove the center deck board and cent er auxiliary box.
Ty p e A Pull the strap up to open the cen-
ter deck board, lift up the center
auxiliary box, and unload it from
the vehicle.
Ty p e B Turn the knob to the UNLOCK
position to unfasten the lock,
and remove the center deck
board.
Fold the center deck board
toward the front of the vehicle,
and unload it from the vehicle.
Remove the center auxiliary
box.
STEP 1
Page 532 of 640
532 5-2. Steps to take in an emergency
PRIUS_OM_OM47791U_(U)
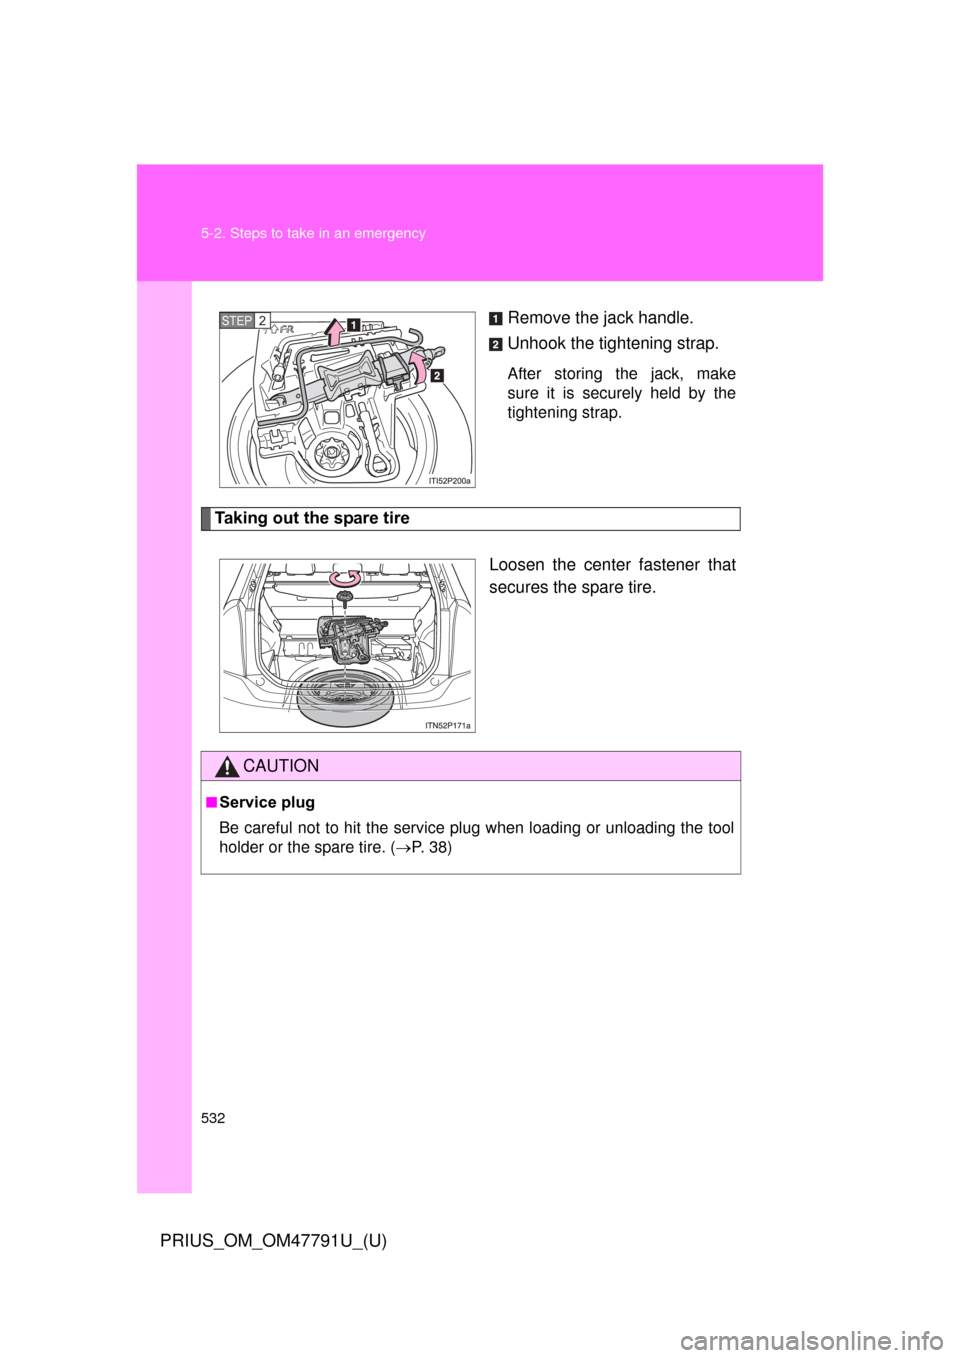
Remove the jack handle.
Unhook the tightening strap.
After storing the jack, make
sure it is securely held by the
tightening strap.
Taking out the spare tireLoosen the center fastener that
secures the spare tire.
STEP 2
CAUTION
■Service plug
Be careful not to hit the service plug when loading or unloading the tool
holder or the spare tire. (P. 3 8 )
Page 533 of 640
5
When trouble arises
533
5-2. Steps to take in an emergency
PRIUS_OM_OM47791U_(U)
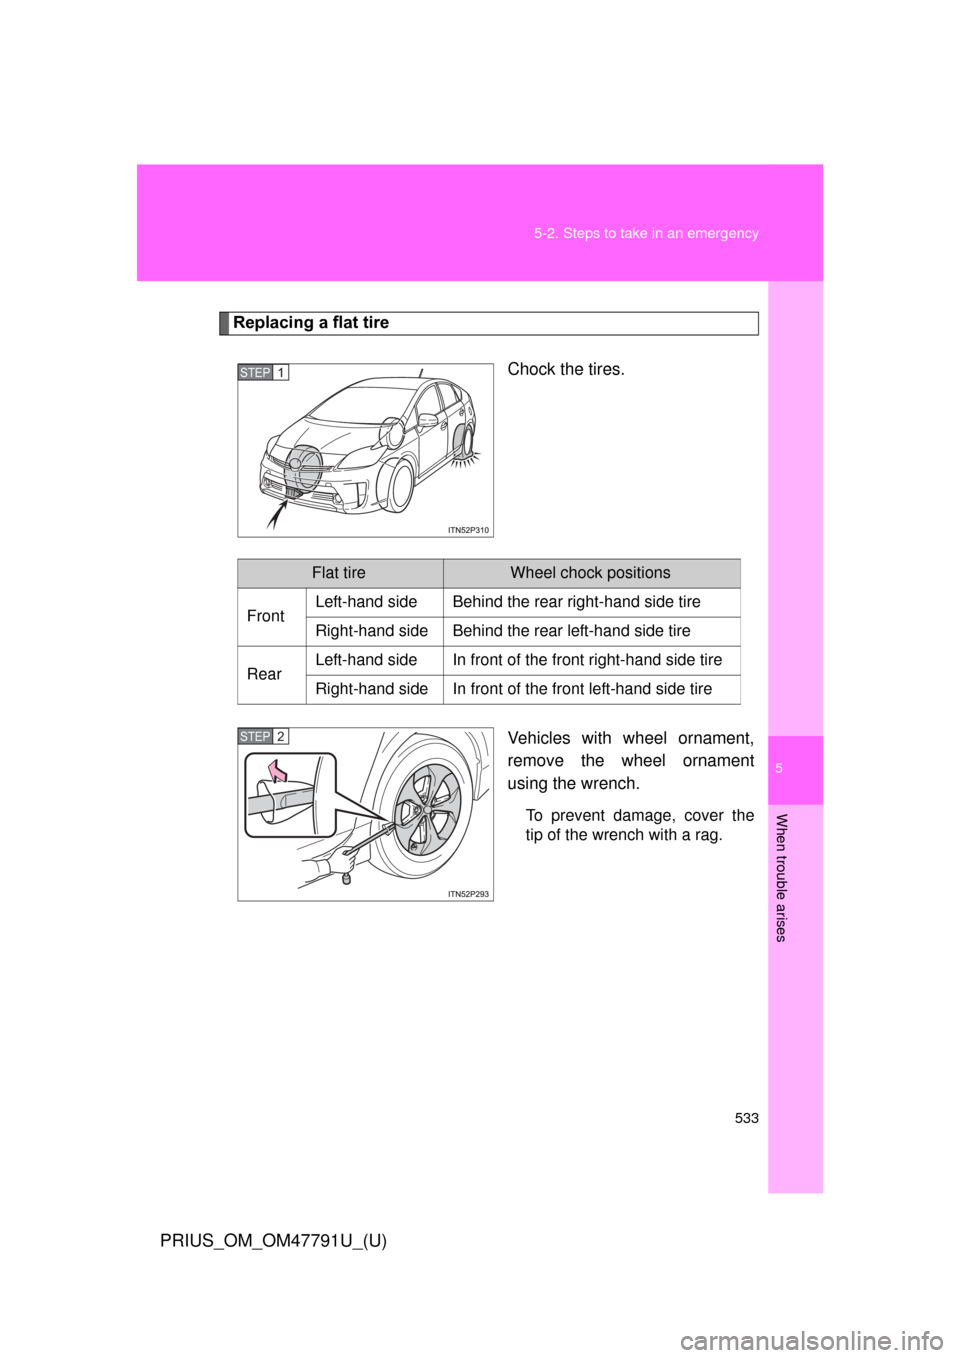
Replacing a flat tire
Chock the tires.
Vehicles with wheel ornament,
remove the wheel ornament
using the wrench.
To prevent damage, cover the
tip of the wrench with a rag.
STEP 1
Flat tireWheel chock positions
Front Left-hand side Behind the rear right-hand side tire
Right-hand side Behind the rear left-hand side tire
Rear Left-hand side In front of the front right-hand side tire
Right-hand side In front of the front left-hand side tire
STEP 2
Page 534 of 640
534 5-2. Steps to take in an emergency
PRIUS_OM_OM47791U_(U)
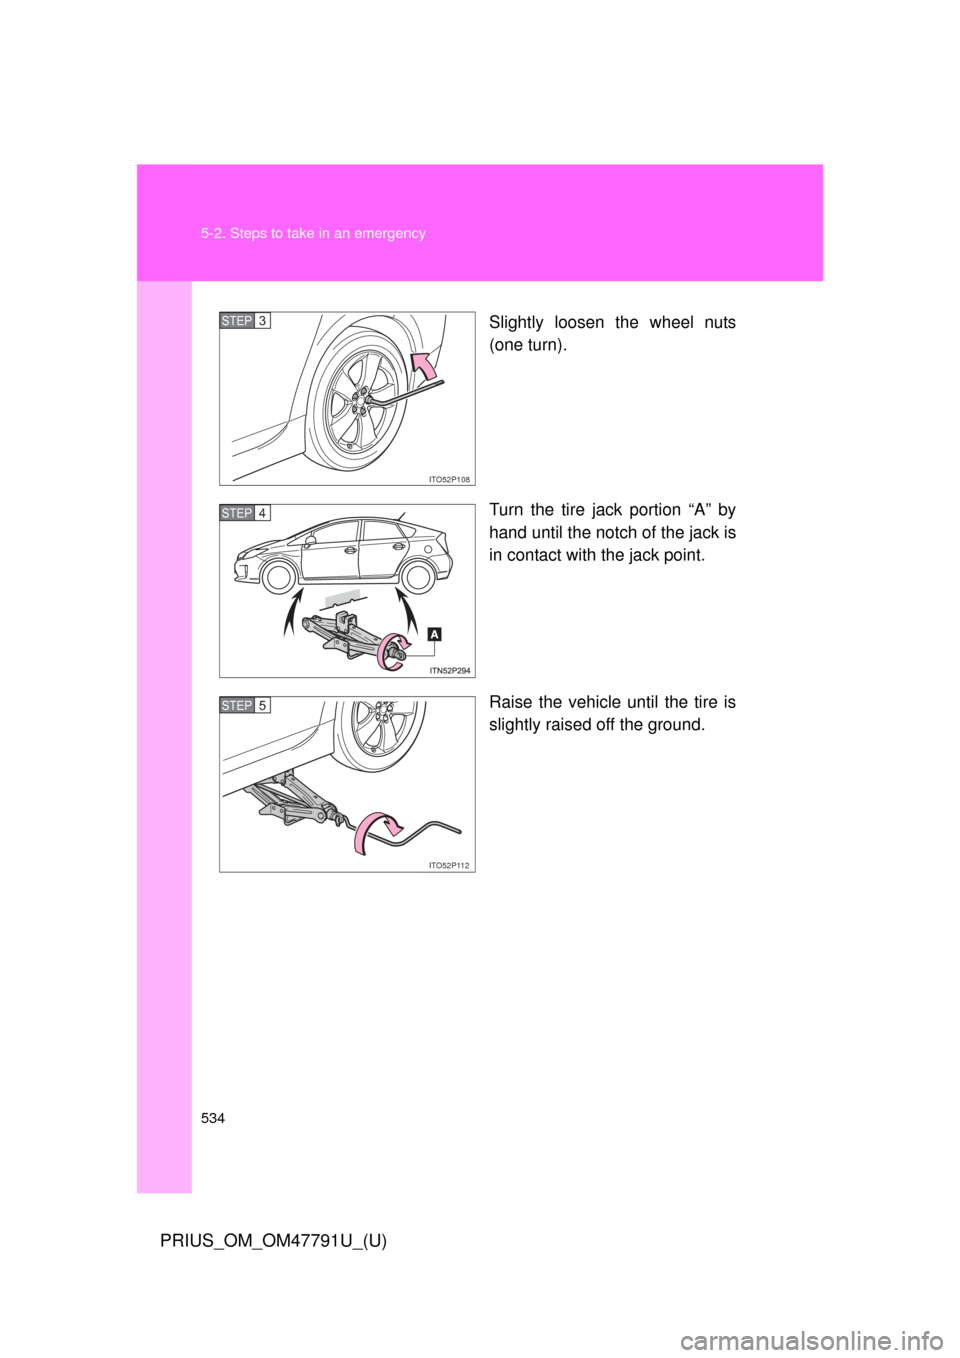
Slightly loosen the wheel nuts
(one turn).
Turn the tire jack portion “A” by
hand until the notch of the jack is
in contact with the jack point.
Raise the vehicle until the tire is
slightly raised off the ground.
ITO52P108
STEP 3
STEP 4
ITO52P112
STEP 5
Page 535 of 640
5
When trouble arises
535
5-2. Steps to take in an emergency
PRIUS_OM_OM47791U_(U)
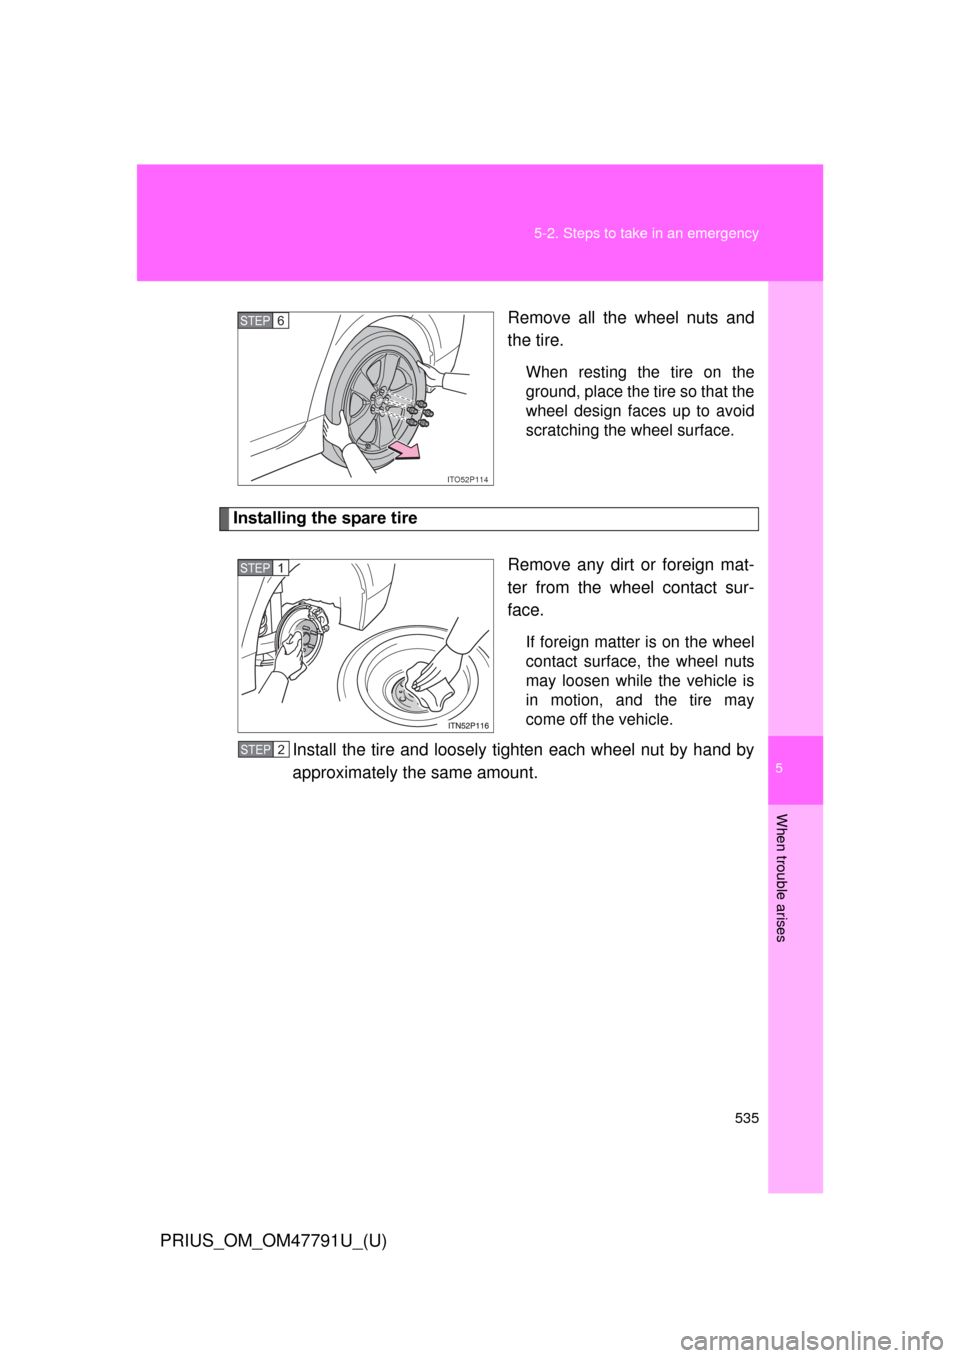
Remove all the wheel nuts and
the tire.
When resting the tire on the
ground, place the tire so that the
wheel design faces up to avoid
scratching the wheel surface.
Installing the spare tire
Remove any dirt or foreign mat-
ter from the wheel contact sur-
face.
If foreign matter is on the wheel
contact surface, the wheel nuts
may loosen while the vehicle is
in motion, and the tire may
come off the vehicle.
Install the tire and loosely tighten each wheel nut by hand by
approximately the same amount.
ITO52P114
STEP 6
STEP 1
STEP 2
Page 536 of 640
536 5-2. Steps to take in an emergency
PRIUS_OM_OM47791U_(U)
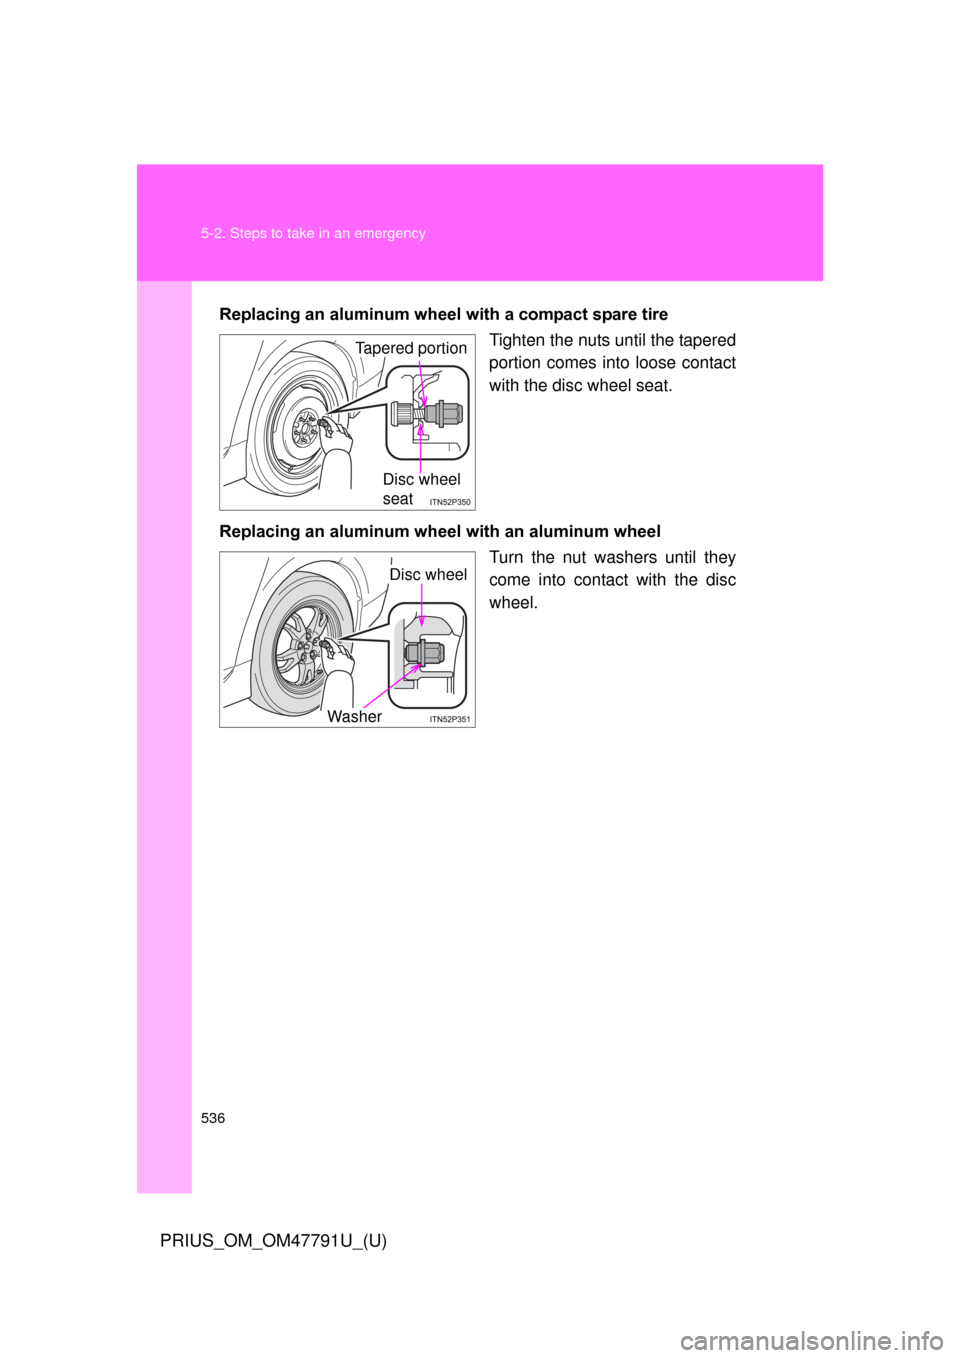
Replacing an aluminum wheel with a compact spare tire
Tighten the nuts until the tapered
portion comes into loose contact
with the disc wheel seat.
Replacing an aluminum wheel with an aluminum wheel
Turn the nut washers until they
come into contact with the disc
wheel.
Tapered portion
Disc wheel
seat
Disc wheel
Washer
Page 537 of 640
5
When trouble arises
537
5-2. Steps to take in an emergency
PRIUS_OM_OM47791U_(U)
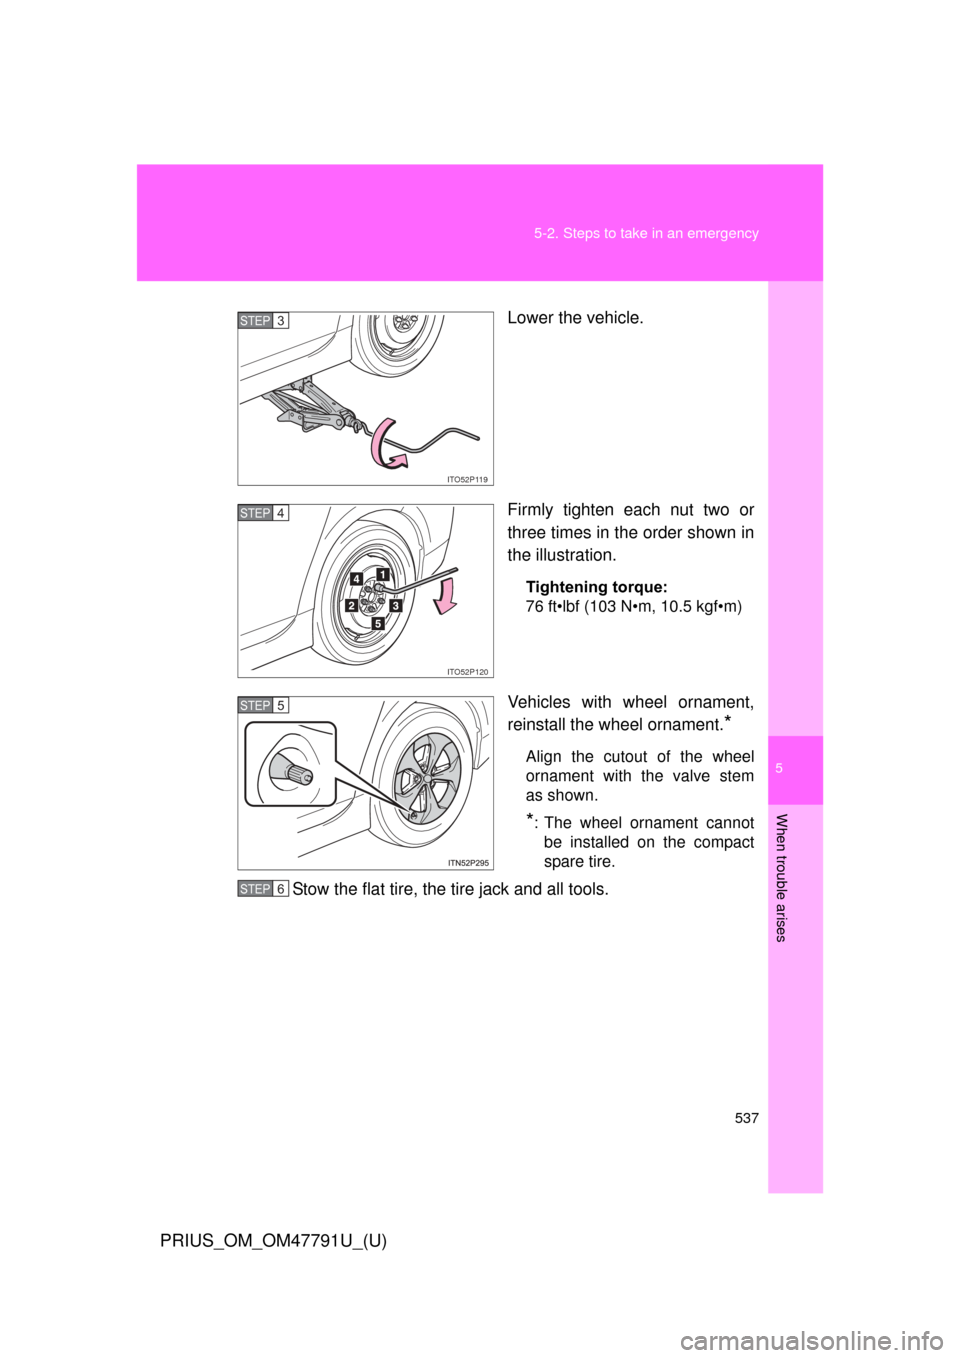
Lower the vehicle.
Firmly tighten each nut two or
three times in the order shown in
the illustration.
Tightening torque:
76 ft•lbf (103 N•m, 10.5 kgf•m)
Vehicles with wheel ornament,
reinstall the wheel ornament.
*
Align the cutout of the wheel
ornament with the valve stem
as shown.
*: The wheel ornament cannot
be installed on the compact
spare tire.
Stow the flat tire, the tire jack and all tools.
ITO52P119
STEP 3
ITO52P120
STEP 4
STEP 5
STEP 6
Page 538 of 640
538 5-2. Steps to take in an emergency
PRIUS_OM_OM47791U_(U)
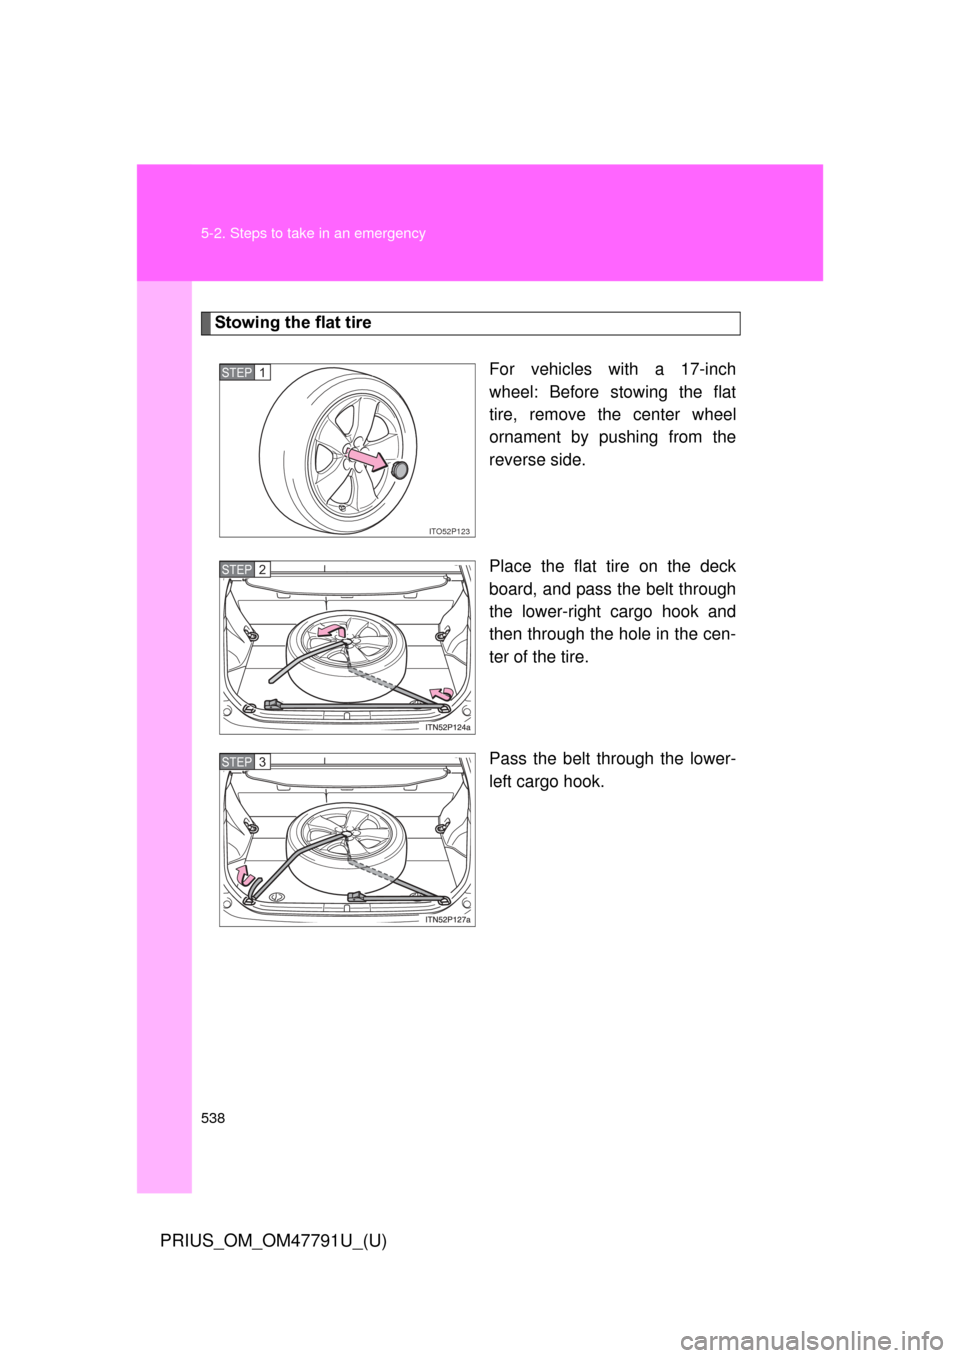
Stowing the flat tireFor vehicles with a 17-inch
wheel: Before stowing the flat
tire, remove the center wheel
ornament by pushing from the
reverse side.
Place the flat tire on the deck
board, and pass the belt through
the lower-right cargo hook and
then through the hole in the cen-
ter of the tire.
Pass the belt through the lower-
left cargo hook.
ITO52P123
STEP 1
STEP 2
STEP 3
Page 539 of 640
5
When trouble arises
539
5-2. Steps to take in an emergency
PRIUS_OM_OM47791U_(U)
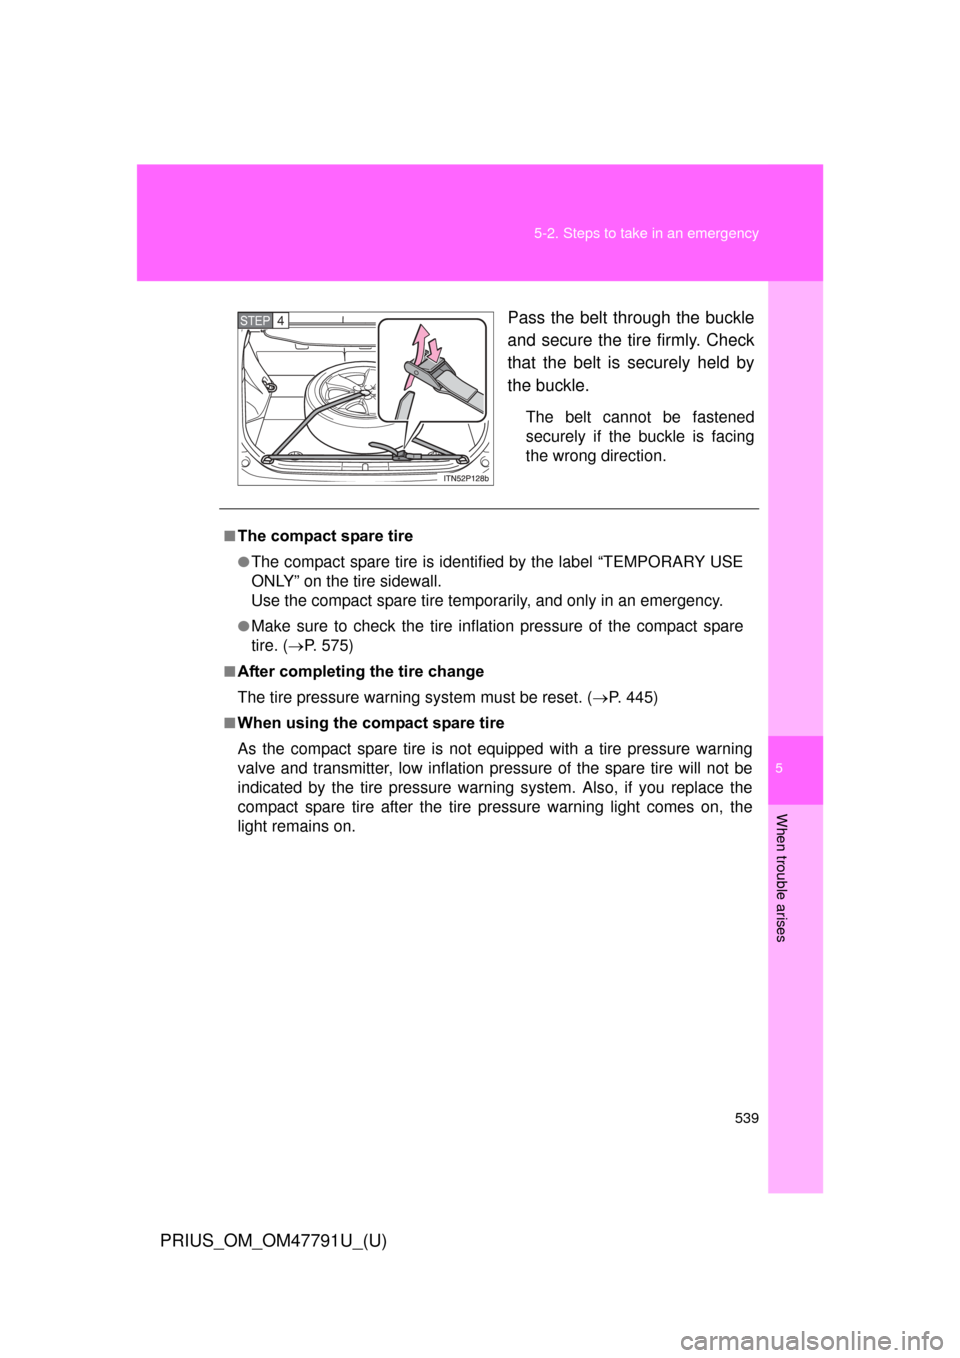
Pass the belt through the buckle
and secure the tire firmly. Check
that the belt is securely held by
the buckle.
The belt cannot be fastened
securely if the buckle is facing
the wrong direction.
STEP 4
■The compact spare tire
●The compact spare tire is identifi
ed by the label “TEMPORARY USE
ONLY” on the tire sidewall.
Use the compact spare tire temporarily, and only in an emergency.
●Make sure to check the tire inflation pressure of the compact spare
tire. ( P. 575)
■After completing the tire change
The tire pressure warning system must be reset. (P. 445)
■When using the compact spare tire
As the compact spare tire is not equipped with a tire pressure warning
valve and transmitter, low inflation pressure of the spare tire will not be
indicated by the tire pressure warning system. Also, if you replace the
compact spare tire after the tire pressure warning light comes on, the
light remains on.
Page 540 of 640
540 5-2. Steps to take in an emergency
PRIUS_OM_OM47791U_(U)
■If you have a flat front tire on a road covered with snow or ice
Install the compact spare tire on one of the rear wheels of the vehicle.
Perform the following steps and fit tire chains to the front tires:
Replace a rear tire with the compact spare tire.
Replace the flat front tire with the tire removed from the rear of
the vehicle.
Fit tire chains to the front tires.
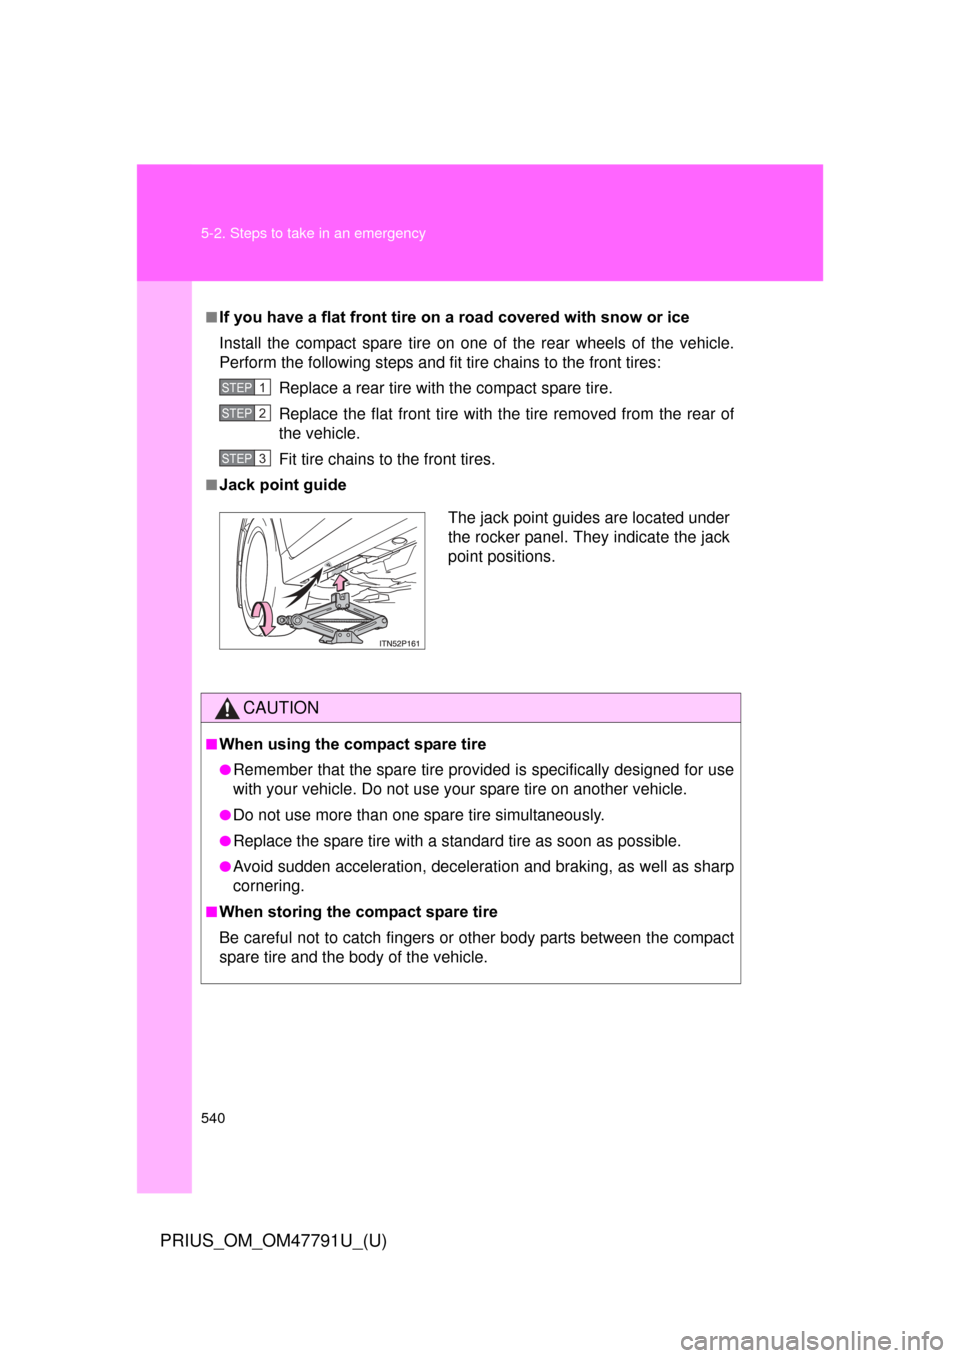
■Jack point guide
CAUTION
■When using the compact spare tire
●Remember that the spare tire provid ed is specifically designed for use
with your vehicle. Do not use your spare tire on another vehicle.
●Do not use more than one spare tire simultaneously.
●Replace the spare tire with a standard tire as soon as possible.
●Avoid sudden acceleration, deceleration and braking, as well as sharp
cornering.
■When storing the compact spare tire
Be careful not to catch fingers or other body parts between the compact
spare tire and the body of the vehicle.
STEP 1
STEP 2
STEP 3
The jack point guides are located under
the rocker panel. They indicate the jack
point positions.
Trending: lumbar support, ABS, CD player, warning light, transmission, jacking, height adjustment
