maintenance TOYOTA PRIUS 2017 4.G Repair Manual
[x] Cancel search | Manufacturer: TOYOTA, Model Year: 2017, Model line: PRIUS, Model: TOYOTA PRIUS 2017 4.GPages: 796, PDF Size: 20.13 MB
Page 618 of 796
618
PRIUS_OM_OM47B54U_(U)
7-3. Do-it-yourself maintenance
■When replacing wheels
The wheels of your vehicle are equipped with tire pressure warning
valves and transmitters that allow the tire pressure warning system to
provide advance warning in the event of a loss in tire inflation pressure.
Whenever wheels are replaced, tire pressure warning valves and trans-
mitters must be installed. ( →P. 606)
WARNING
■When replacing wheels
●Do not use wheels that are a different size from those recommended in
the Owner’s Manual, as this may result in a loss of handling control.
●Never use an inner tube in a leak ing wheel which is designed for a
tubeless tire. Doing so may result in an accident, causing death or seri-
ous injury.
■When installing the wheel nuts
●Never use oil or grease on the wheel bolts or wheel nuts.
Oil and grease may cause the wheel nuts to be excessively tightened,
leading to bolt or disc wheel damage. In addition, the oil or grease can
cause the wheel nuts to loosen and the wheel may fall off, causing an
accident and resulting in death or serious injury. Remove any oil or
grease from the wheel bolts or wheel nuts.
■Use of defective wheels prohibited
Do not use cracked or deformed wheels.
Doing so could cause the tire to leak air during driving, possibly causing
an accident.
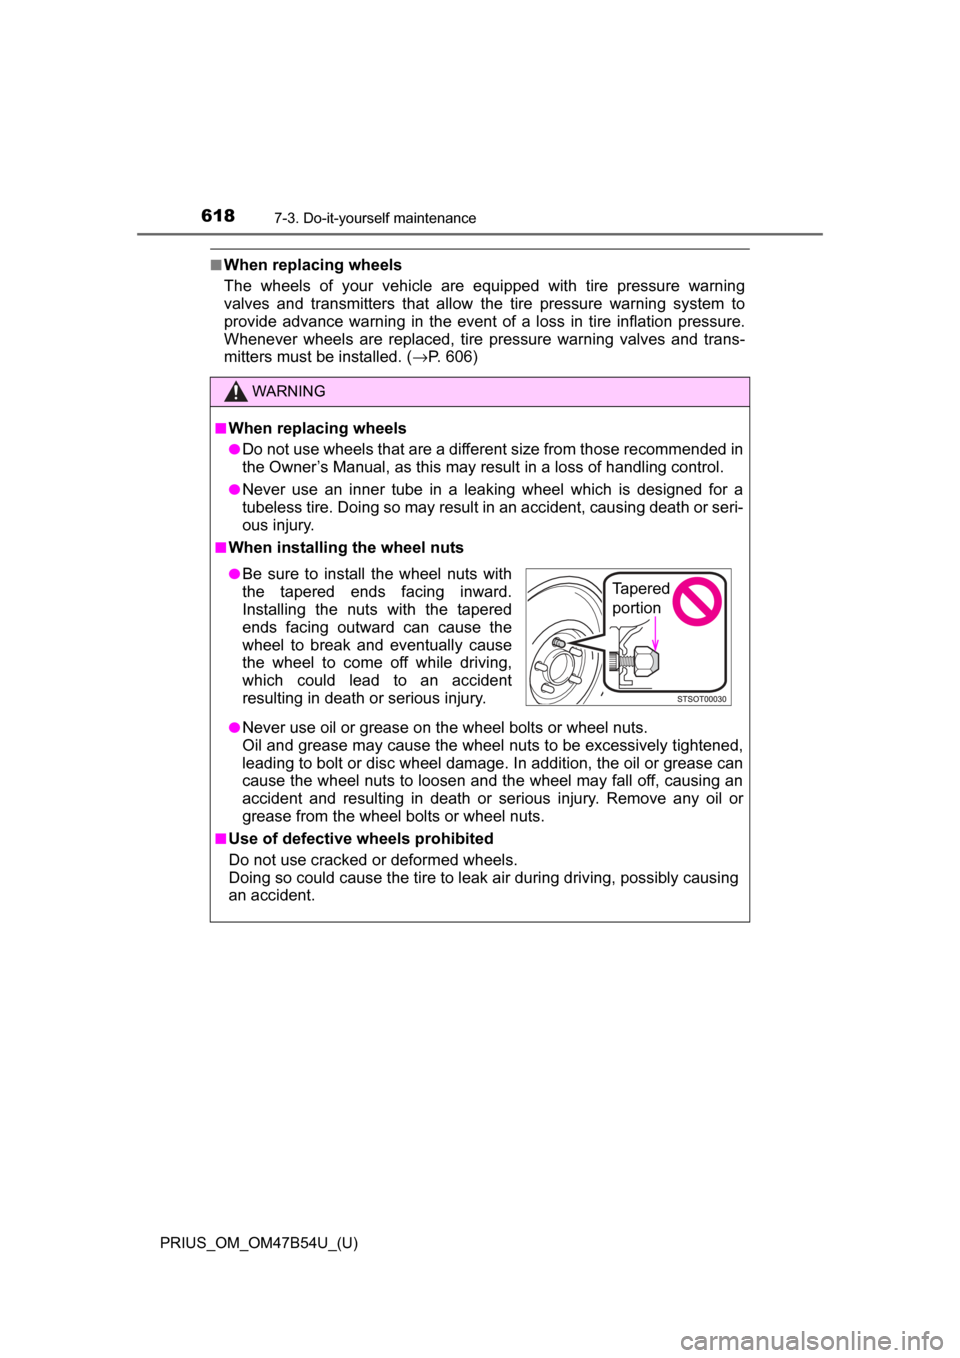
●Be sure to install the wheel nuts with
the tapered ends facing inward.
Installing the nuts with the tapered
ends facing outward can cause the
wheel to break and eventually cause
the wheel to come off while driving,
which could lead to an accident
resulting in death or serious injury.Tapered
portion
Page 619 of 796
PRIUS_OM_OM47B54U_(U)
6197-3. Do-it-yourself maintenance
7
Maintenance and care
NOTICE
■Replacing tire pressure warning valves and transmitters
●Because tire repair or replacement may affect the tire pressure warn-
ing valves and transmitters, make sure to have tires serviced by your
Toyota dealer or other qualified service shop. In addition, make sure to
purchase your tire pressure warning valves and transmitters at your
Toyota dealer.
●Ensure that only genuine Toyota wheels are used on your vehicle.
Tire pressure warning valves and transmitters may not work properly
with non-genuine wheels.
Page 620 of 796
620
PRIUS_OM_OM47B54U_(U)
7-3. Do-it-yourself maintenance
Air conditioning filter
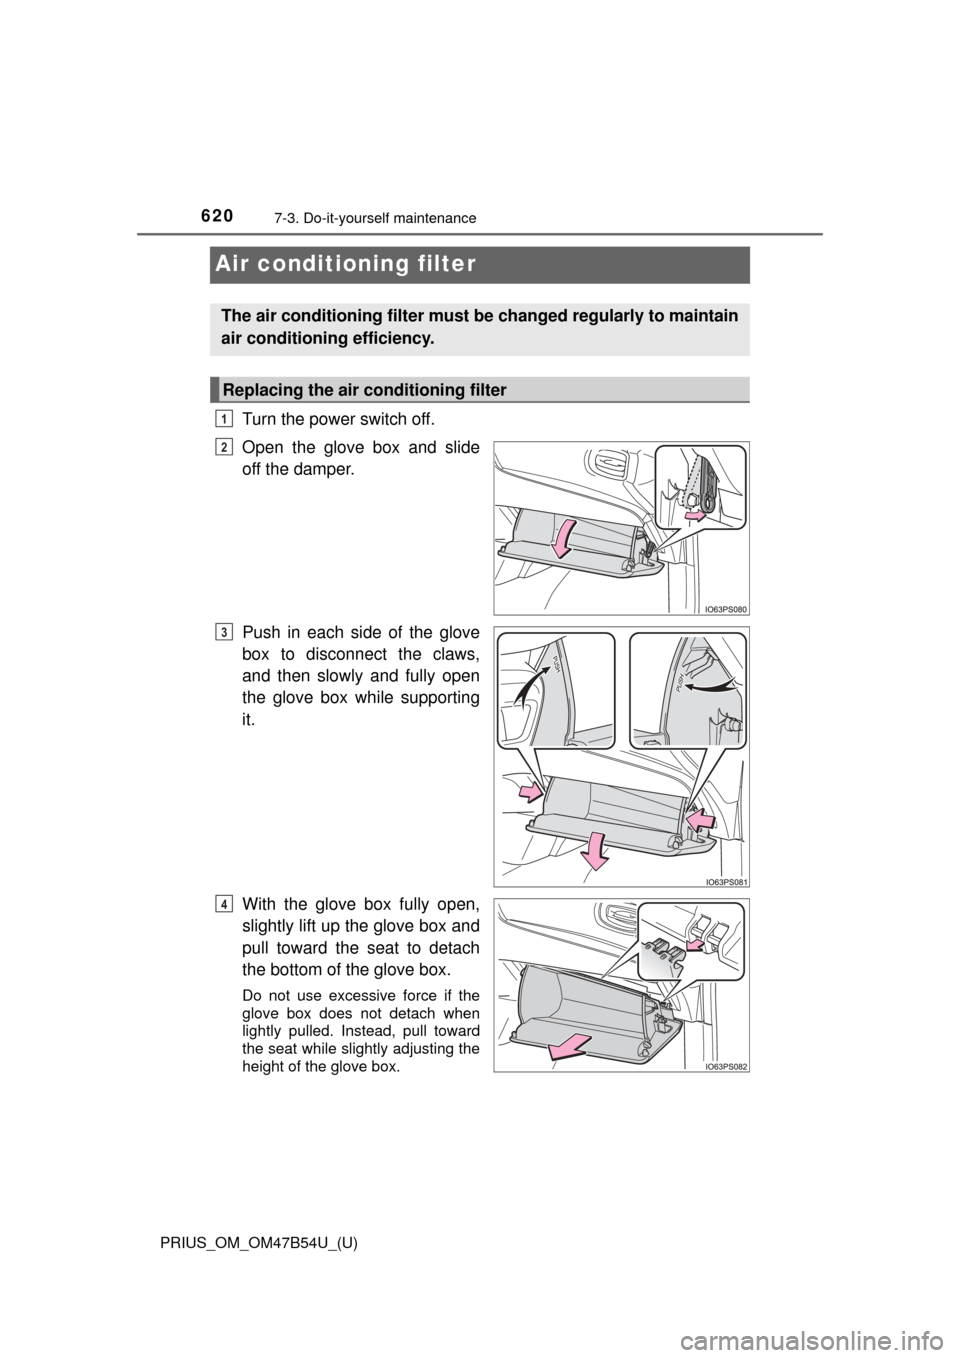
Turn the power switch off.
Open the glove box and slide
off the damper.
Push in each side of the glove
box to disconnect the claws,
and then slowly and fully open
the glove box while supporting
it.
With the glove box fully open,
slightly lift up the glove box and
pull toward the seat to detach
the bottom of the glove box.
Do not use excessive force if the
glove box does not detach when
lightly pulled. Instead, pull toward
the seat while slightly adjusting the
height of the glove box.
The air conditioning filt er must be changed regularly to maintain
air conditioning efficiency.
Replacing the air conditioning filter
1
2
3
4
Page 621 of 796
PRIUS_OM_OM47B54U_(U)
6217-3. Do-it-yourself maintenance
7
Maintenance and care
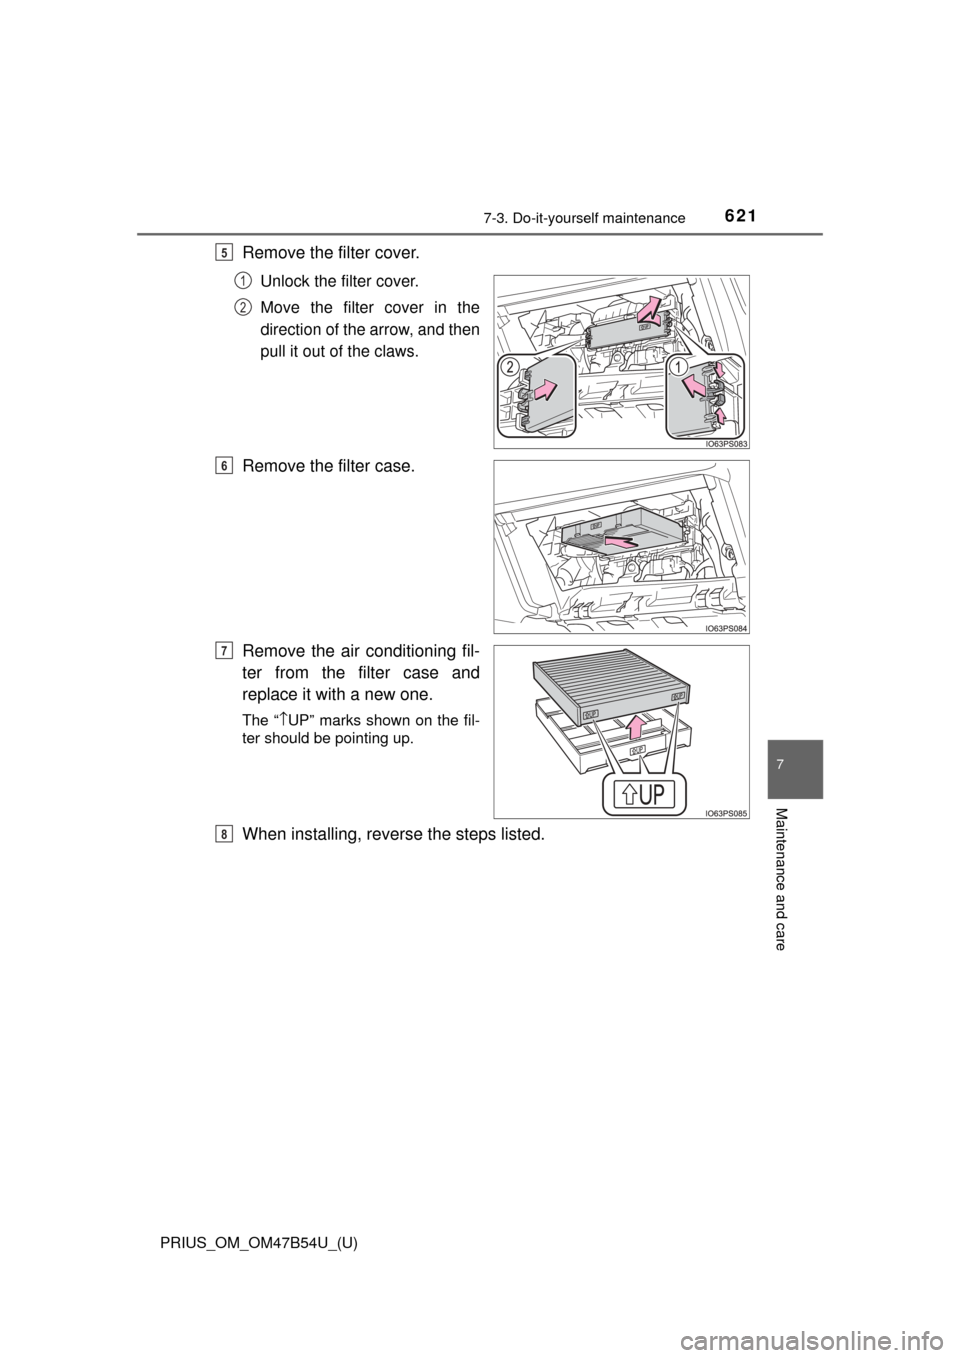
Remove the filter cover.
Unlock the filter cover.
Move the filter cover in the
direction of the arrow, and then
pull it out of the claws.
Remove the filter case.
Remove the air conditioning fil-
ter from the filter case and
replace it with a new one.
The “↑UP” marks shown on the fil-
ter should be pointing up.
When installing, reve rse the steps listed.
5
1
2
6
7
8
Page 622 of 796
622
PRIUS_OM_OM47B54U_(U)
7-3. Do-it-yourself maintenance
■Checking interval
Inspect and replace the air conditioning filter according to the maintenance
schedule. In dusty areas or areas with heavy traffic flow, early replacement
may be required. (For scheduled maintenance information, please refer to the
“Scheduled Maintenance Guide” or “Owner’s Manual Supplement”.)
■ If air flow from the vents decreases dramatically
The filter may be clogged. Check the filter and replace if necessary.
■ Air conditioning filter with deodorizing function
When fragrances are placed in your vehicle, the deodorizing effect may
become significantly weakened in a short period.
When an air conditioning odor comes out continuously, replace the air condi-
tioning filter.
NOTICE
■When using the air conditioning system
Make sure that a filter is always installed.
Using the air conditioning system without a filter may cause damage to the
system.
■ When removing the glove box
Always follow the specified procedure to remove the glove box ( →P. 620). If
the glove box is removed without following the specified procedure, the
hinge of the glove box may become damaged.
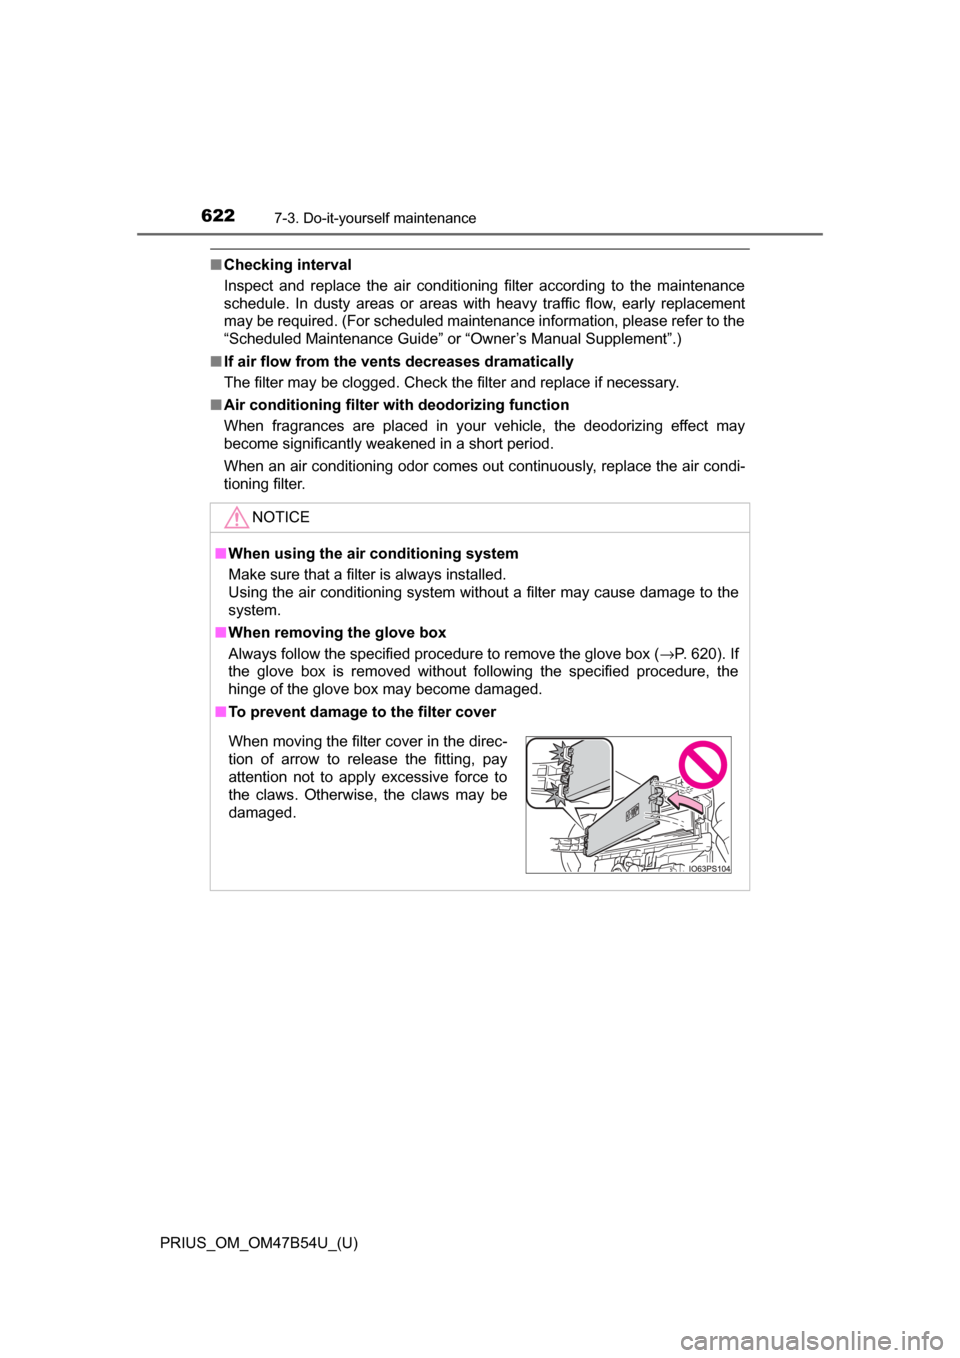
■ To prevent damage to the filter cover
When moving the filter cover in the direc-
tion of arrow to release the fitting, pay
attention not to apply excessive force to
the claws. Otherwise, the claws may be
damaged.
Page 623 of 796
623
PRIUS_OM_OM47B54U_(U)
7-3. Do-it-yourself maintenance
7
Maintenance and care
Wiper rubber replacement
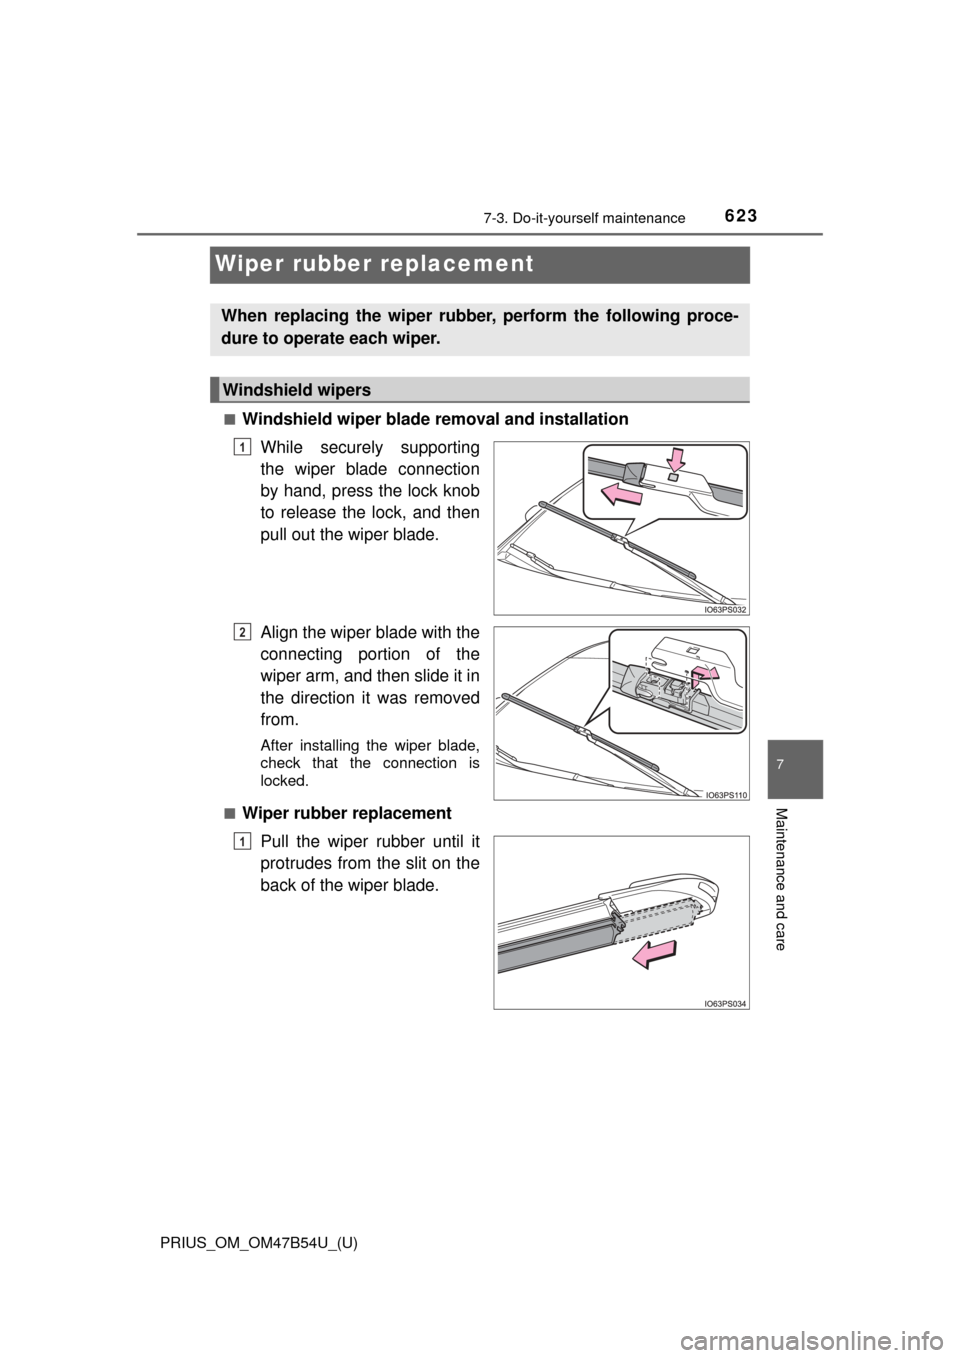
■Windshield wiper blade removal and installationWhile securely supporting
the wiper blade connection
by hand, press the lock knob
to release the lock, and then
pull out the wiper blade.
Align the wiper blade with the
connecting portion of the
wiper arm, and then slide it in
the direction it was removed
from.
After installing the wiper blade,
check that the connection is
locked.
■
Wiper rubber replacement Pull the wiper rubber until it
protrudes from the slit on the
back of the wiper blade.
When replacing the wiper rubber, perform the following proce-
dure to operate each wiper.
Windshield wipers
1
2
1
Page 624 of 796
624
PRIUS_OM_OM47B54U_(U)
7-3. Do-it-yourself maintenance
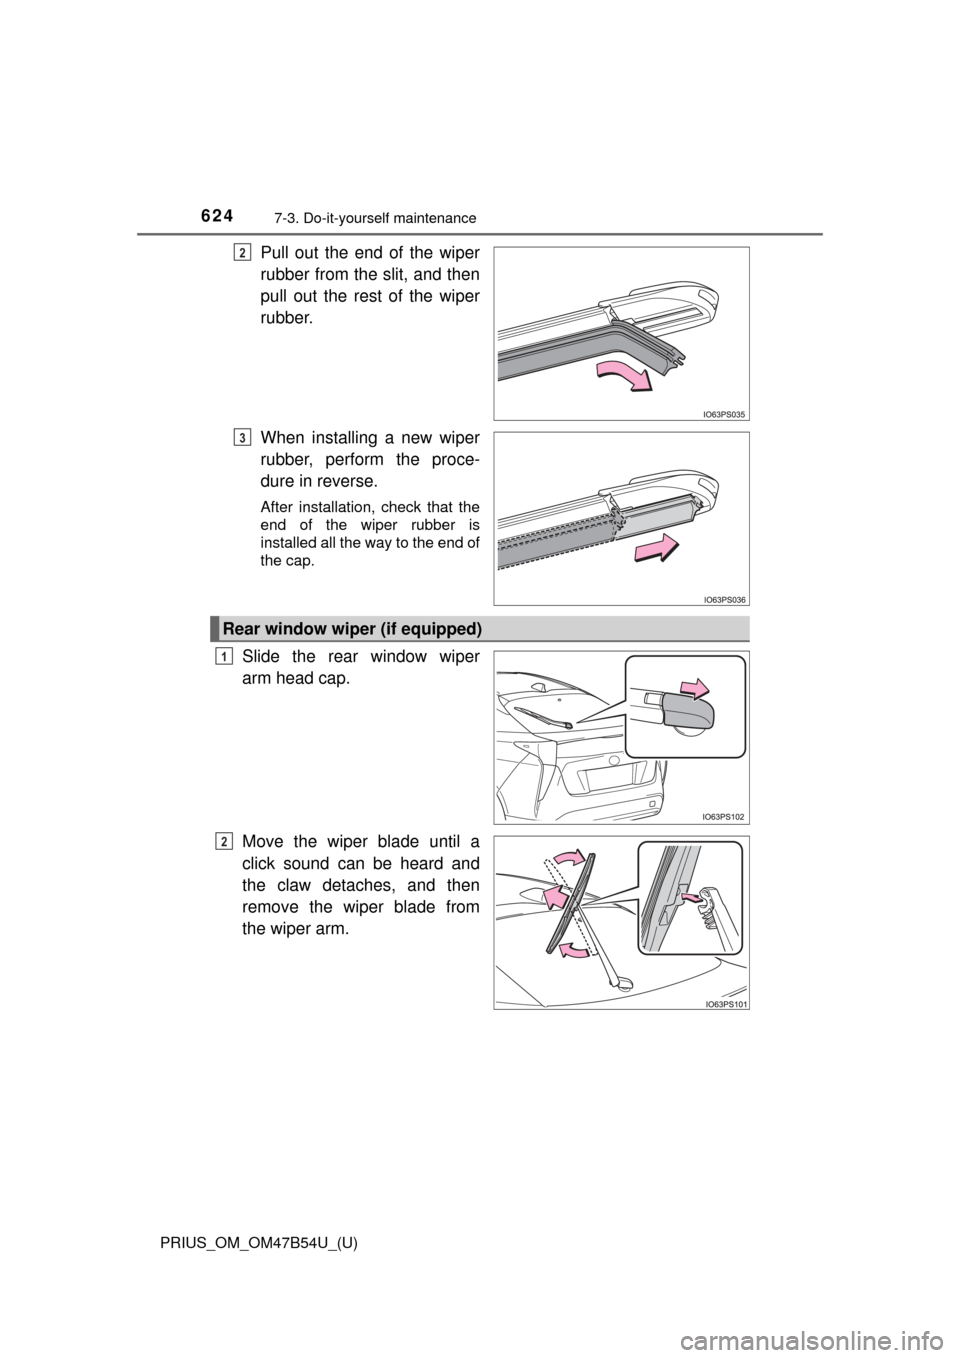
Pull out the end of the wiper
rubber from the slit, and then
pull out the rest of the wiper
rubber.
When installing a new wiper
rubber, perform the proce-
dure in reverse.
After installation, check that the
end of the wiper rubber is
installed all the way to the end of
the cap.
Slide the rear window wiper
arm head cap.
Move the wiper blade until a
click sound can be heard and
the claw detaches, and then
remove the wiper blade from
the wiper arm.
2
3
Rear window wiper (if equipped)
1
2
Page 625 of 796
PRIUS_OM_OM47B54U_(U)
6257-3. Do-it-yourself maintenance
7
Maintenance and care
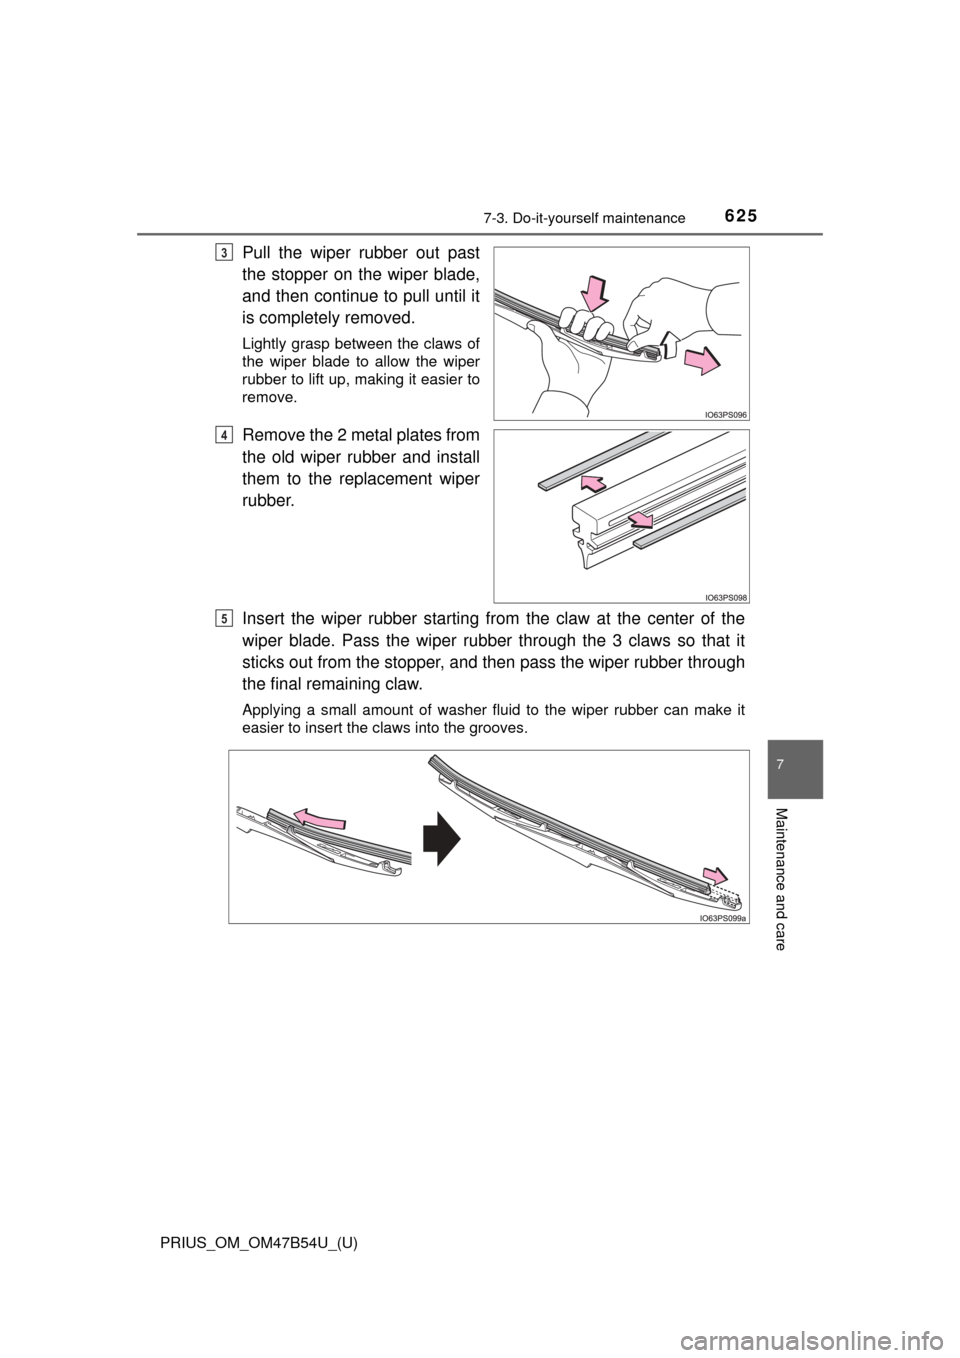
Pull the wiper rubber out past
the stopper on the wiper blade,
and then continue to pull until it
is completely removed.
Lightly grasp between the claws of
the wiper blade to allow the wiper
rubber to lift up, making it easier to
remove.
Remove the 2 metal plates from
the old wiper rubber and install
them to the replacement wiper
rubber.
Insert the wiper rubber starting from the claw at the center of the
wiper blade. Pass the wiper rubber through the 3 claws so that it
sticks out from the stopper, and then pass the wiper rubber through
the final remaining claw.
Applying a small amount of washer fluid to the wiper rubber can make it
easier to insert the claws into the grooves.
3
4
5
Page 626 of 796
626
PRIUS_OM_OM47B54U_(U)
7-3. Do-it-yourself maintenance
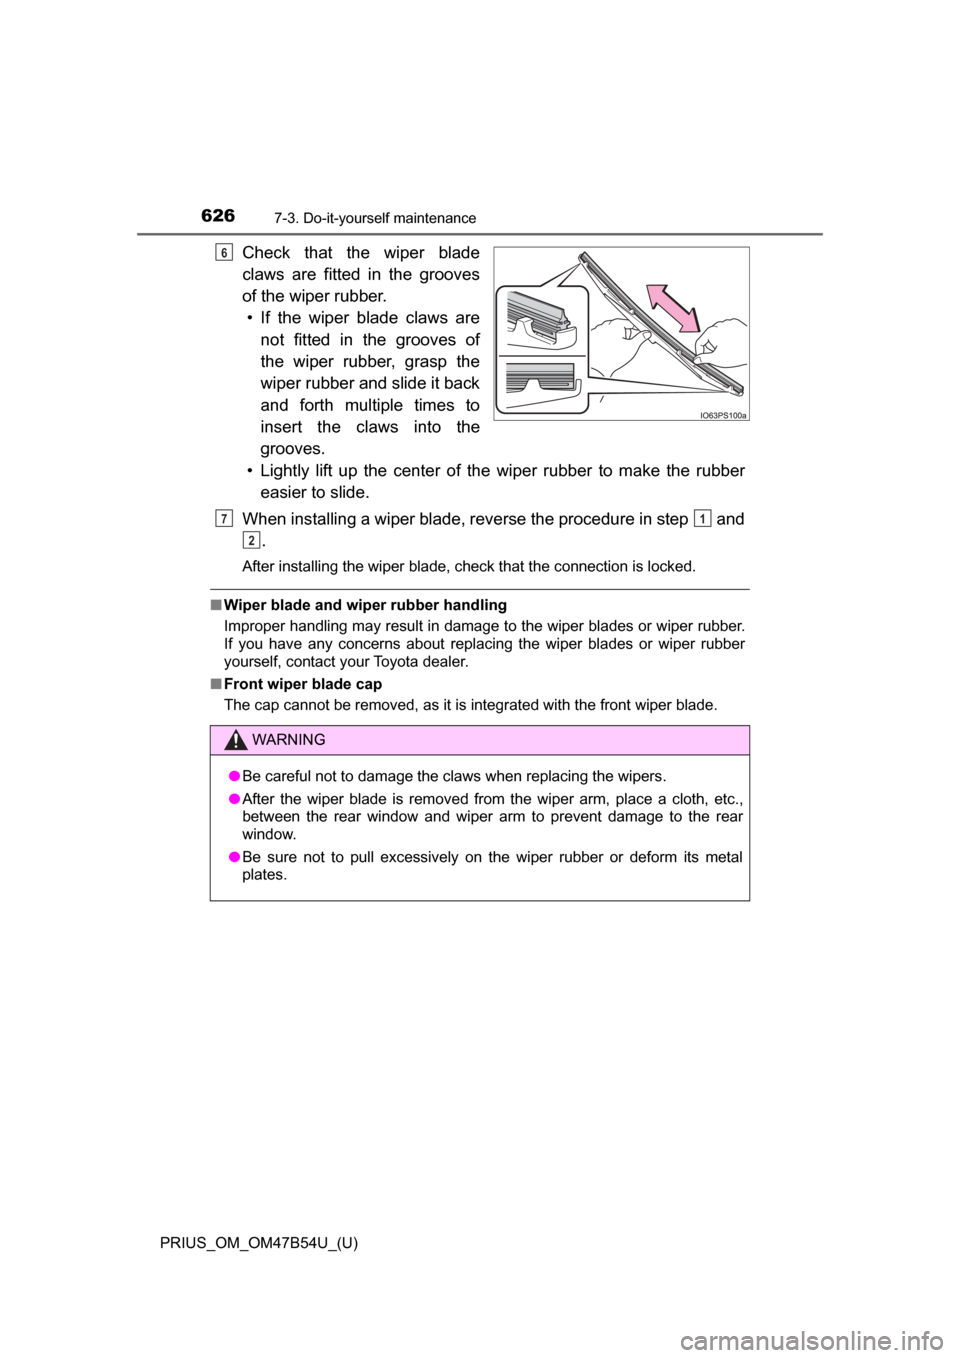
Check that the wiper blade
claws are fitted in the grooves
of the wiper rubber.• If the wiper blade claws are not fitted in the grooves of
the wiper rubber, grasp the
wiper rubber and slide it back
and forth multiple times to
insert the claws into the
grooves.
• Lightly lift up the center of the wiper rubber to make the rubber easier to slide.
When installing a wiper blade, reverse the procedure in step and .
After installing the wiper blade, check that the connection is locked.
■Wiper blade and wiper rubber handling
Improper handling may result in damage to the wiper blades or wiper rubber.
If you have any concerns about replacing the wiper blades or wiper rubber
yourself, contact your Toyota dealer.
■ Front wiper blade cap
The cap cannot be removed, as it is integrated with the front wiper blade.
6
WARNING
●Be careful not to damage the claws when replacing the wipers.
● After the wiper blade is removed from the wiper arm, place a cloth, etc.,
between the rear window and wiper arm to prevent damage to the rear
window.
● Be sure not to pull excessively on the wiper rubber or deform its metal
plates.
71
2
Page 627 of 796
627
PRIUS_OM_OM47B54U_(U)
7-3. Do-it-yourself maintenance
7
Maintenance and care
Electronic key batter y
●Flathead screwdriver
● Lithium battery CR2032
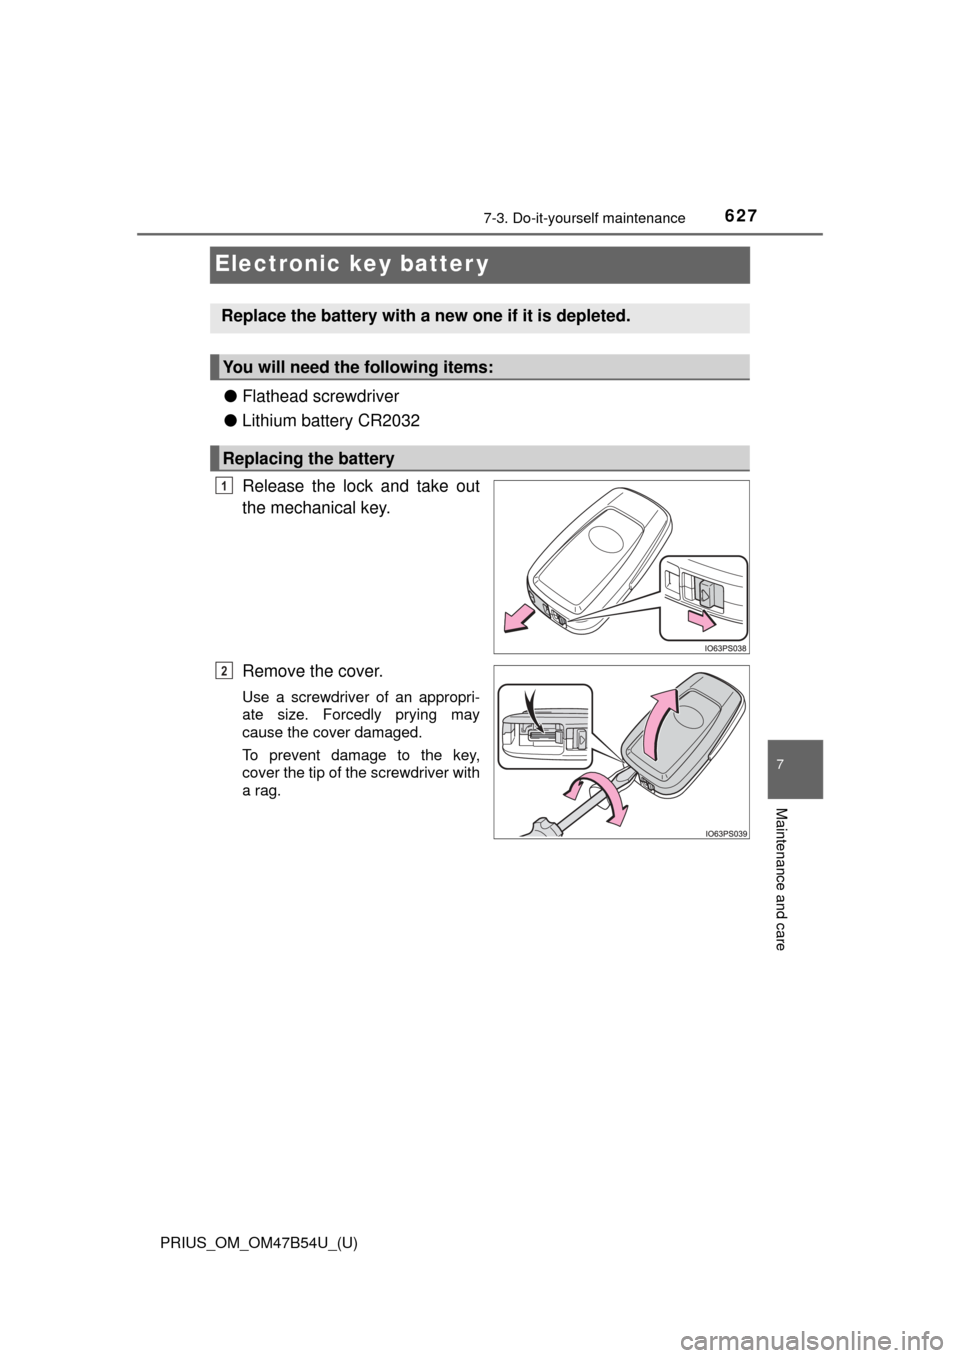
Release the lock and take out
the mechanical key.
Remove the cover.
Use a screwdriver of an appropri-
ate size. Forcedly prying may
cause the cover damaged.
To prevent damage to the key,
cover the tip of the screwdriver with
a rag.
Replace the battery with a new one if it is depleted.
You will need the following items:
Replacing the battery
1
2