TOYOTA PRIUS 2018 Owners Manual (in English)
PRIUS 2018
TOYOTA
TOYOTA
https://www.carmanualsonline.info/img/14/42636/w960_42636-0.png
TOYOTA PRIUS 2018 Owners Manual (in English)
Trending: low beam, fuses, AUX, checking oil, fuse box, change language, change wheel
Page 651 of 820
PRIUS_OM_OM47B89U_(U)
6517-3. Do-it-yourself maintenance
7
Maintenance and care
■After a fuse is replaced
●If the lights do not turn on even after the fuse has been replaced, a bulb may
need replacement. ( →P. 654)
● If the replaced fuse blows again, have the vehicle inspected by your Toyota
dealer.
■ If there is an overload in a circuit
The fuses are designed to blow, protecting the wiring harness from damage.
■ When replacing light bulbs
Toyota recommends that you use genuine Toyota products designed for this
vehicle. Because certain bulbs are connected to circuits designed to prevent
overload, nongenuine parts or parts not designed for this vehicle may be
unusable.
WARNING
■To prevent system breakdowns and vehicle fire
Observe the following precautions.
Failure to do so may cause damage to the vehicle, and possibly a fire or
injury.
● Never use a fuse of a higher amperage rating than that indicated, or use\
any other object in place of a fuse.
● Always use a genuine Toyota fuse or equivalent.
Never replace a fuse with a wire, even as a temporary fix.
● Do not modify the fuses or fuse boxes.
NOTICE
■Before replacing fuses
Have the cause of electrical overload determined and repaired by your
Toyota dealer as soon as possible.
Page 652 of 820
652
PRIUS_OM_OM47B89U_(U)
7-3. Do-it-yourself maintenance
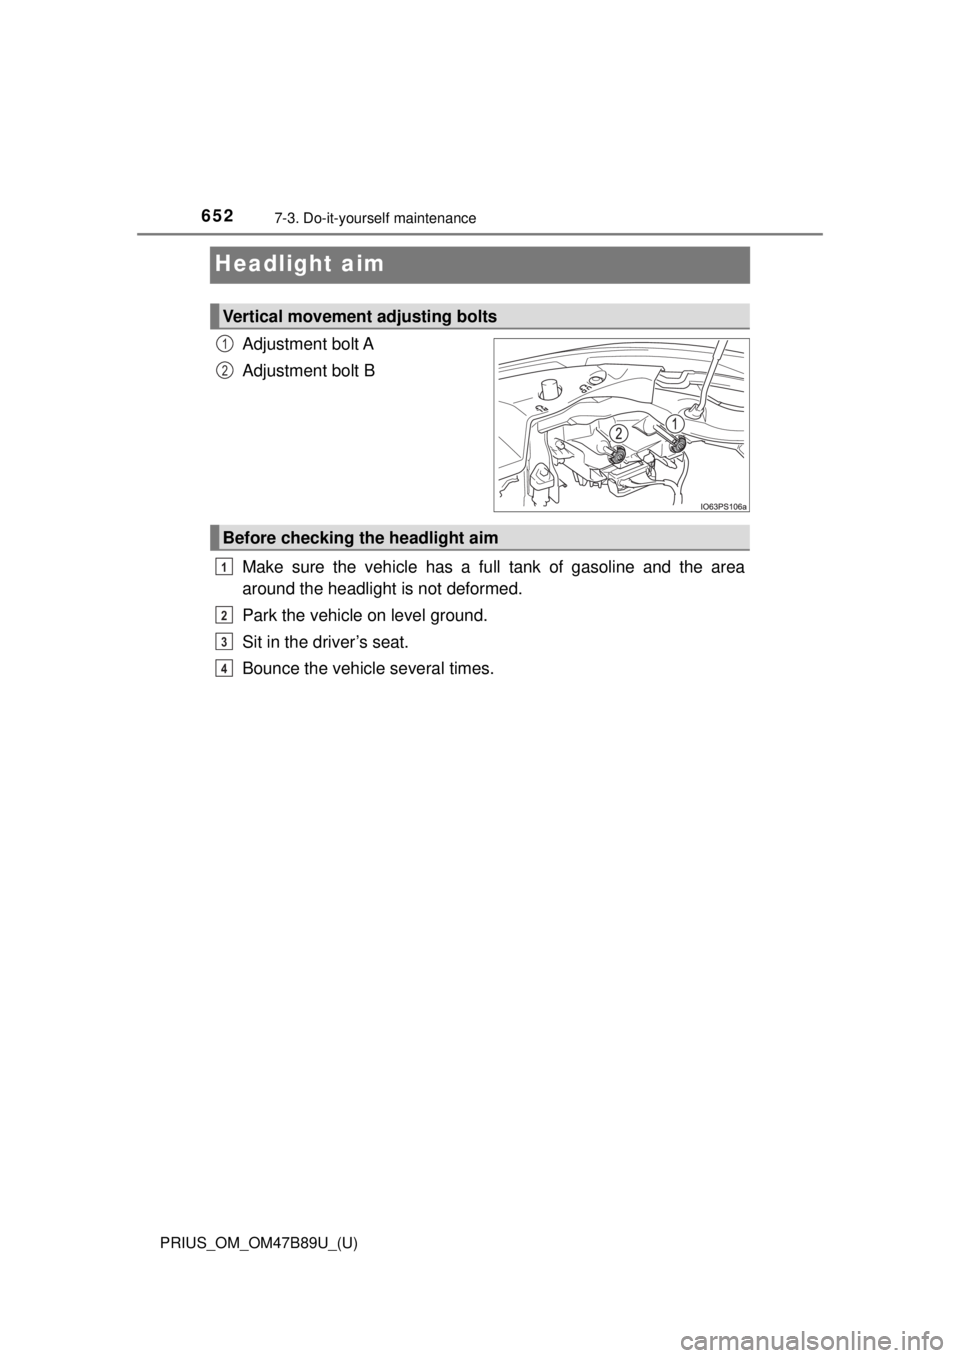
Headlight aim
Adjustment bolt A
Adjustment bolt B
Make sure the vehicle has a full tank of gasoline and the area
around the headlight is not deformed.
Park the vehicle on level ground.
Sit in the driver’s seat.
Bounce the vehicle several times.
Vertical movement adjusting bolts
1
2
Before checking the headlight aim
1
2
3
4
Page 653 of 820
PRIUS_OM_OM47B89U_(U)
6537-3. Do-it-yourself maintenance
7
Maintenance and care
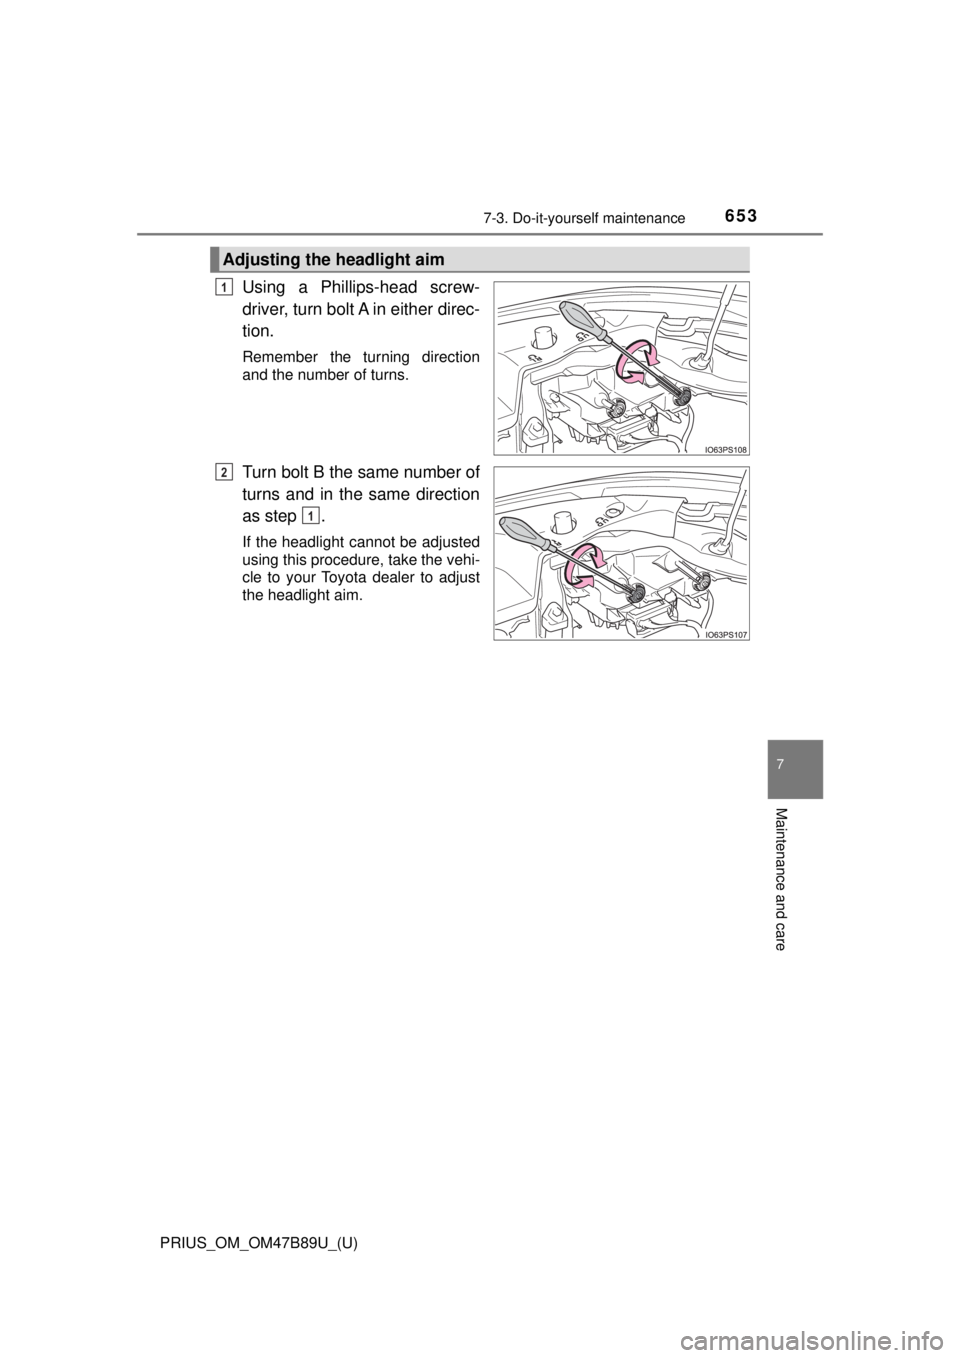
Using a Phillips-head screw-
driver, turn bolt A in either direc-
tion.
Remember the turning direction
and the number of turns.
Turn bolt B the same number of
turns and in the same direction
as step .
If the headlight cannot be adjusted
using this procedure, take the vehi-
cle to your Toyota dealer to adjust
the headlight aim.
Adjusting the headlight aim
1
2
1
Page 654 of 820
654
PRIUS_OM_OM47B89U_(U)
7-3. Do-it-yourself maintenance
Light bulbs
Check the wattage of the light bulb to be replaced. (→P. 754)
You may replace the following bulbs by yourself. The difficulty
level of replacement varies de pending on the bulb. If necessary
bulb replacement seems difficul t to perform, contact your
Toyota dealer.
For more information about replacing other light bulbs, contact
your Toyota dealer.
Preparing for light bulb replacement
Page 655 of 820
PRIUS_OM_OM47B89U_(U)
6557-3. Do-it-yourself maintenance
7
Maintenance and care
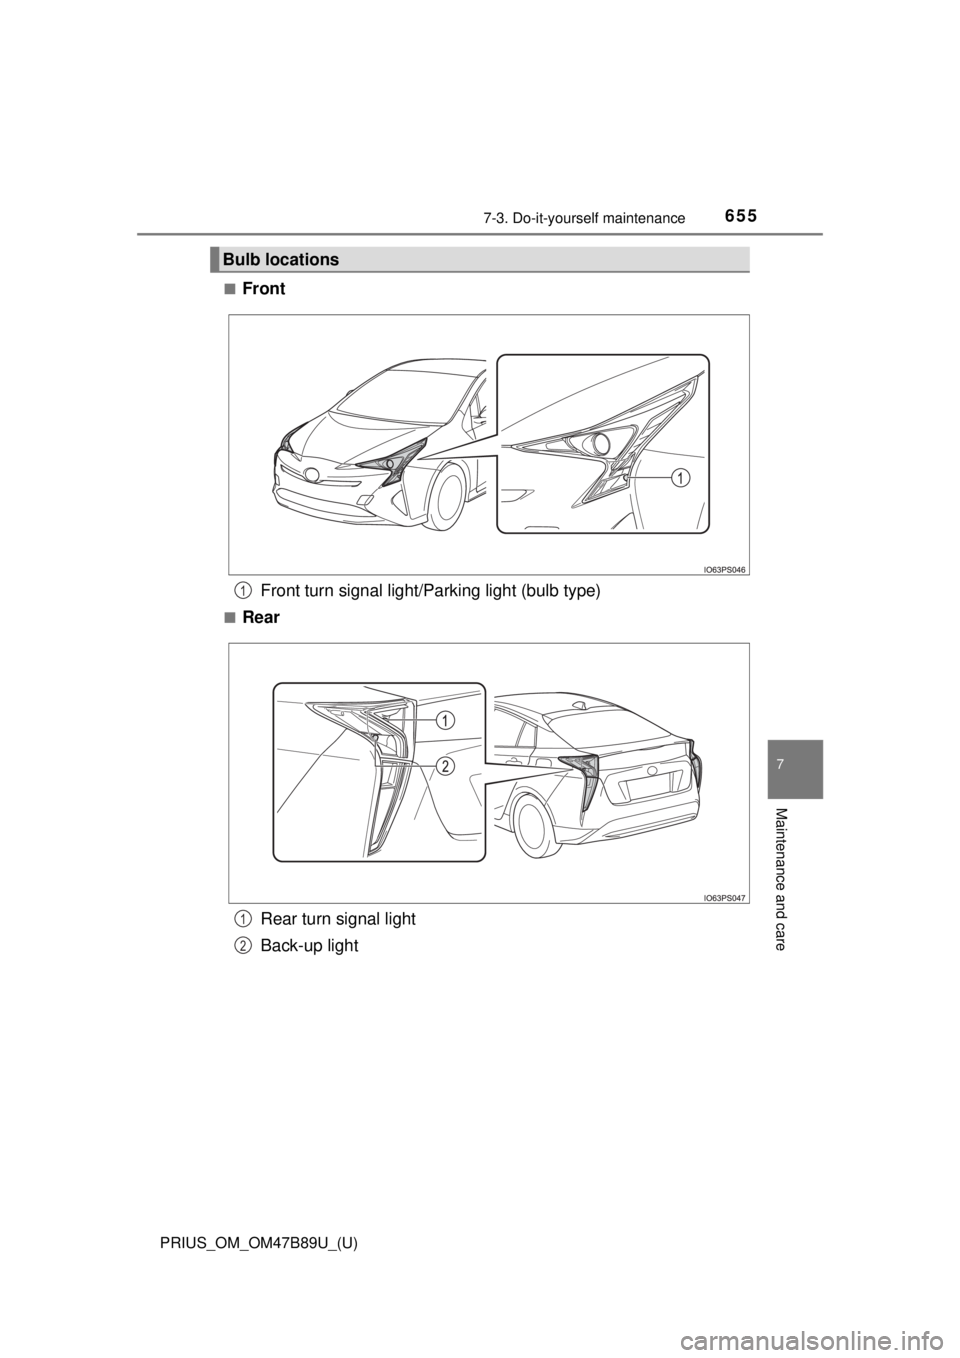
■FrontFront turn signal light/Parking light (bulb type)
■Rear
Rear turn signal light
Back-up light
Bulb locations
1
1
2
Page 656 of 820
656
PRIUS_OM_OM47B89U_(U)
7-3. Do-it-yourself maintenance
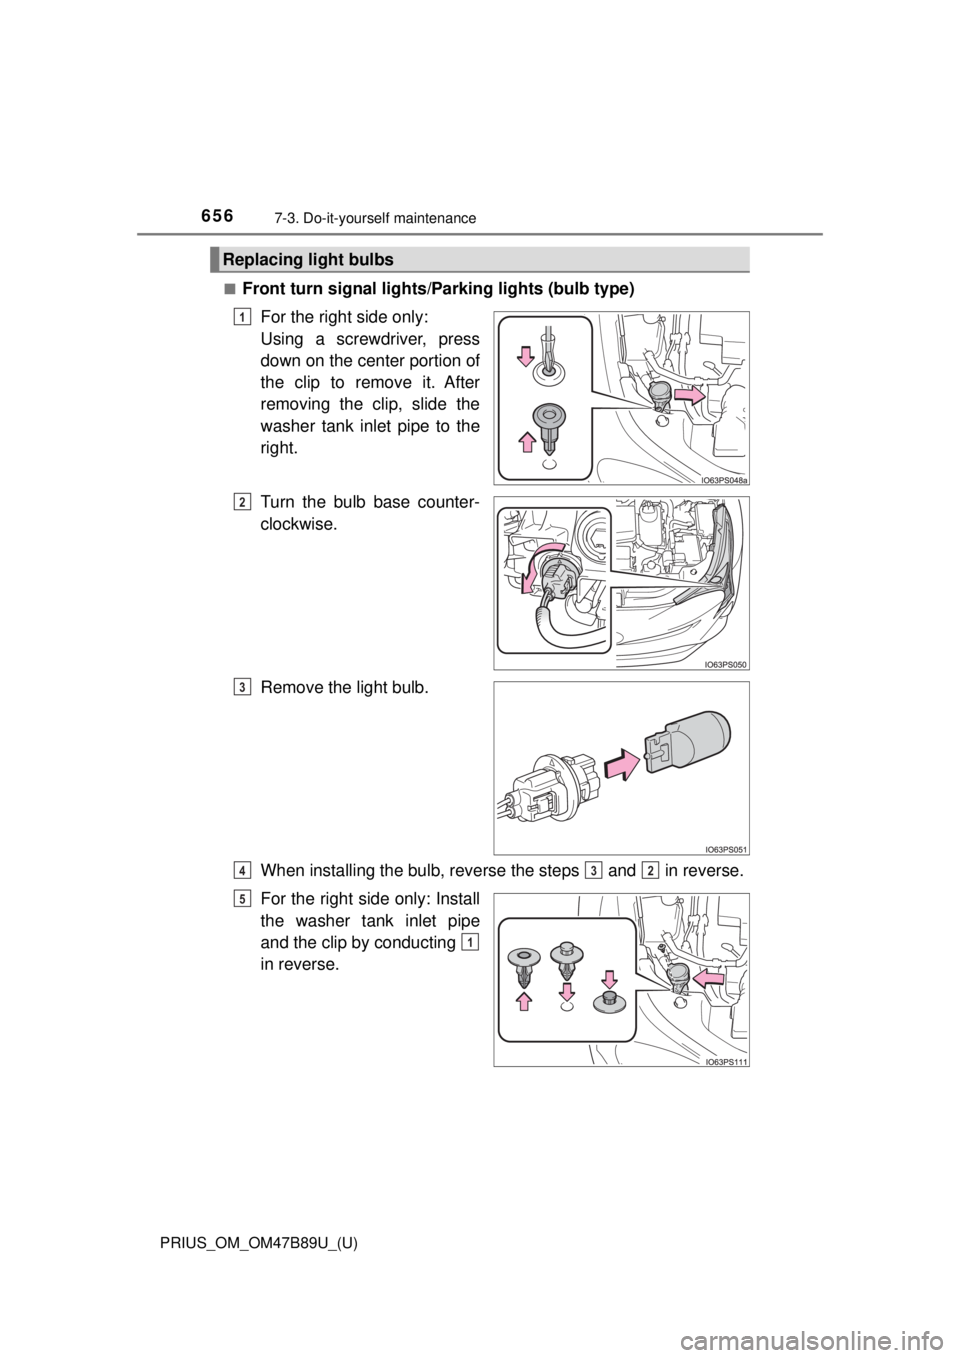
■Front turn signal lights/Parking lights (bulb type)
For the right side only:
Using a screwdriver, press
down on the center portion of
the clip to remove it. After
removing the clip, slide the
washer tank inlet pipe to the
right.
Turn the bulb base counter-
clockwise.
Remove the light bulb.
When installing the bulb, reverse the steps and in reverse.
For the right side only: Install
the washer tank inlet pipe
and the clip by conducting
in reverse.
Replacing light bulbs
1
2
3
432
5
1
Page 657 of 820
PRIUS_OM_OM47B89U_(U)
6577-3. Do-it-yourself maintenance
7
Maintenance and care
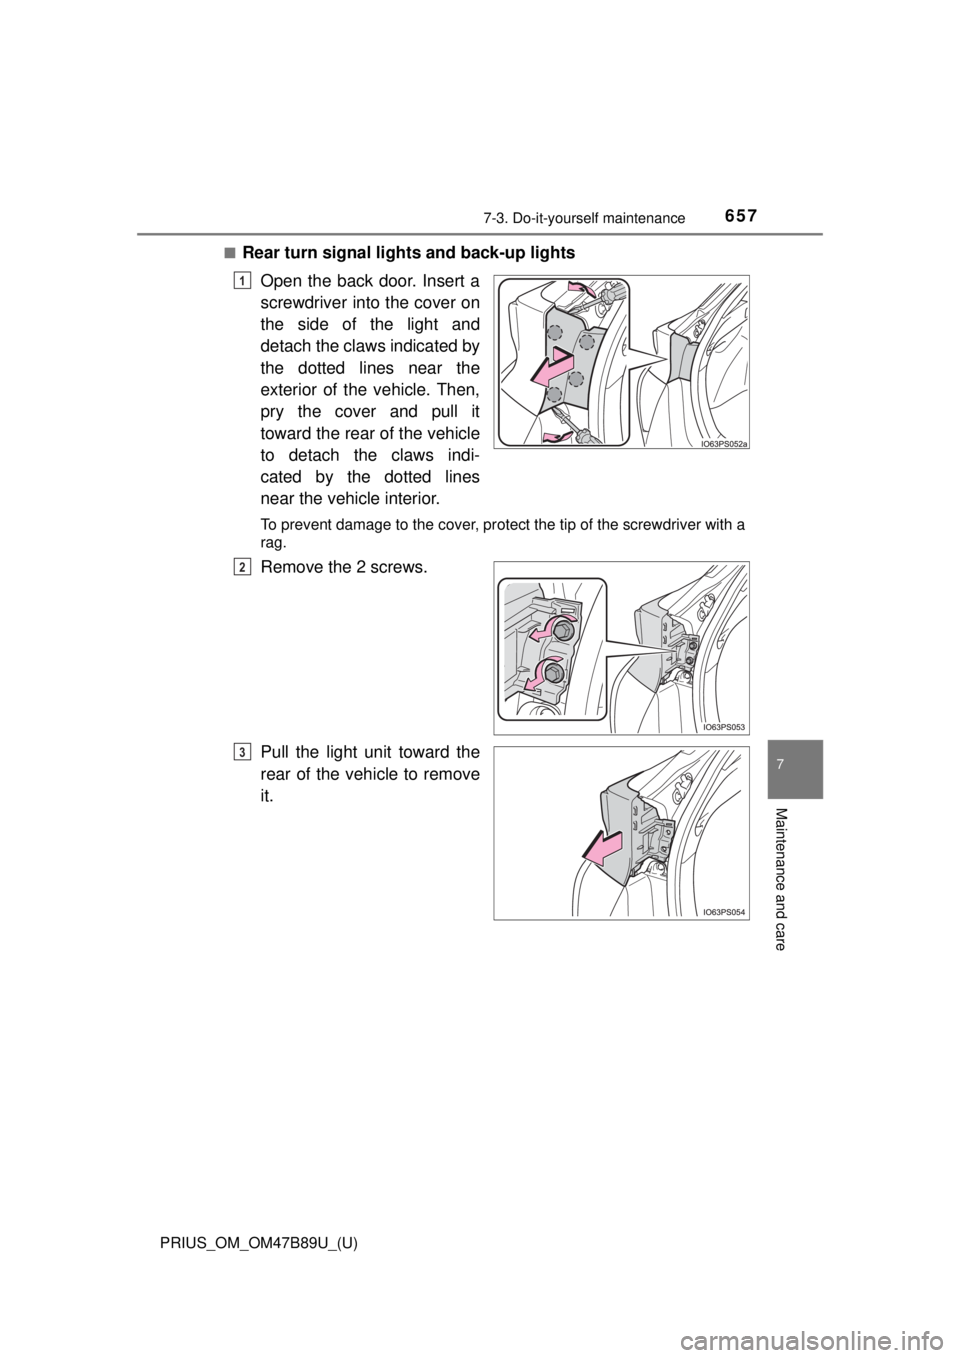
■Rear turn signal lights and back-up lightsOpen the back door. Insert a
screwdriver into the cover on
the side of the light and
detach the claws indicated by
the dotted lines near the
exterior of the vehicle. Then,
pry the cover and pull it
toward the rear of the vehicle
to detach the claws indi-
cated by the dotted lines
near the vehicle interior.
To prevent damage to the cover, protect the tip of the screwdriver with a
rag.
Remove the 2 screws.
Pull the light unit toward the
rear of the vehicle to remove
it.
1
2
3
Page 658 of 820
658
PRIUS_OM_OM47B89U_(U)
7-3. Do-it-yourself maintenance
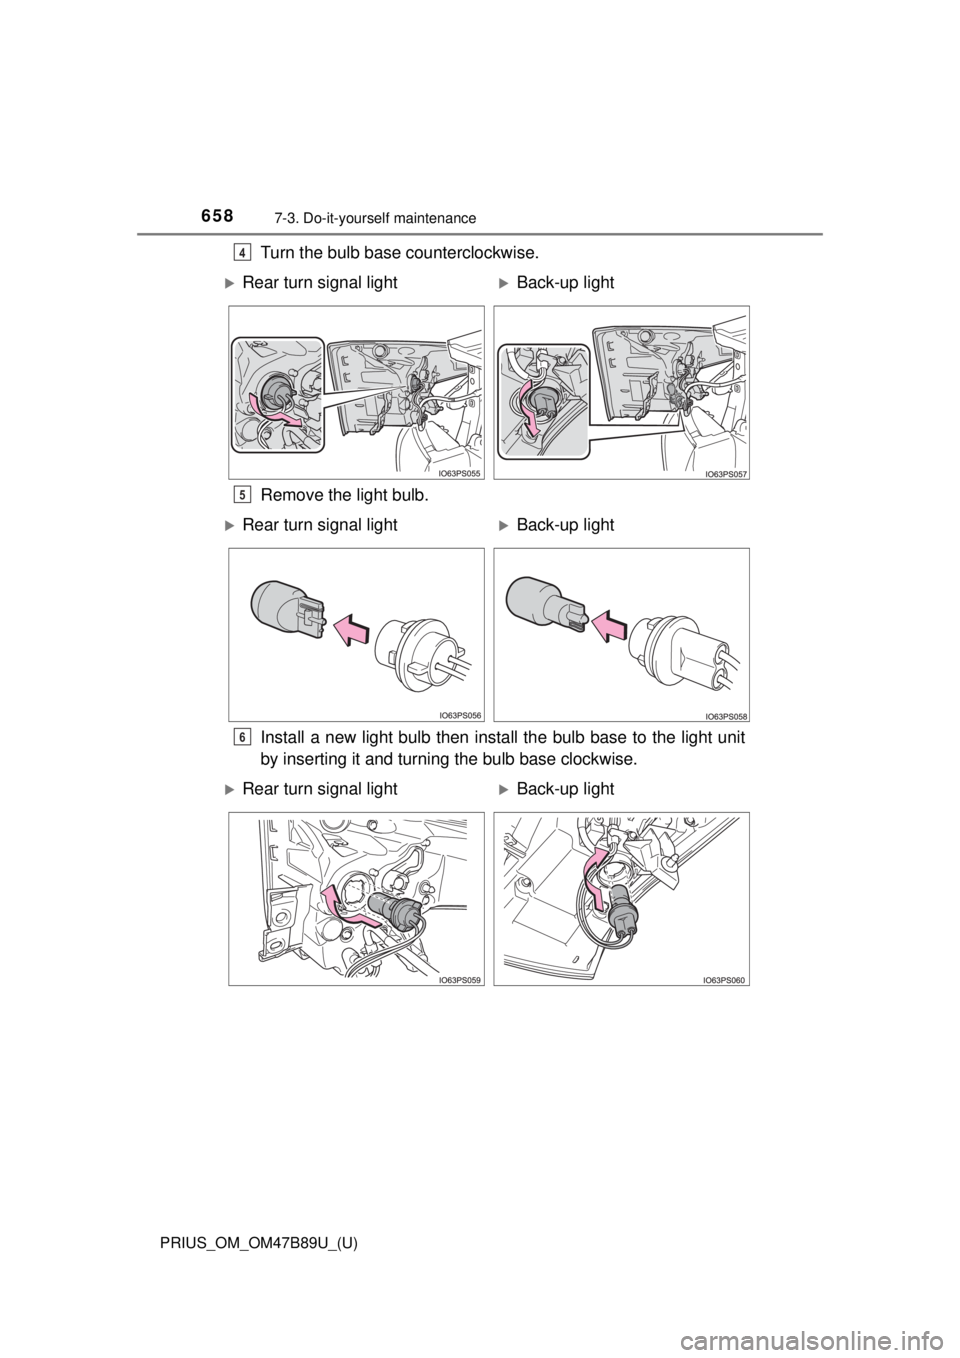
Turn the bulb base counterclockwise.
Remove the light bulb.
Install a new light bulb then install the bulb base to the light unit
by inserting it and turning the bulb base clockwise.4
Rear turn signal lightBack-up light
5
Rear turn signal lightBack-up light
6
Rear turn signal lightBack-up light
Page 659 of 820
PRIUS_OM_OM47B89U_(U)
6597-3. Do-it-yourself maintenance
7
Maintenance and care
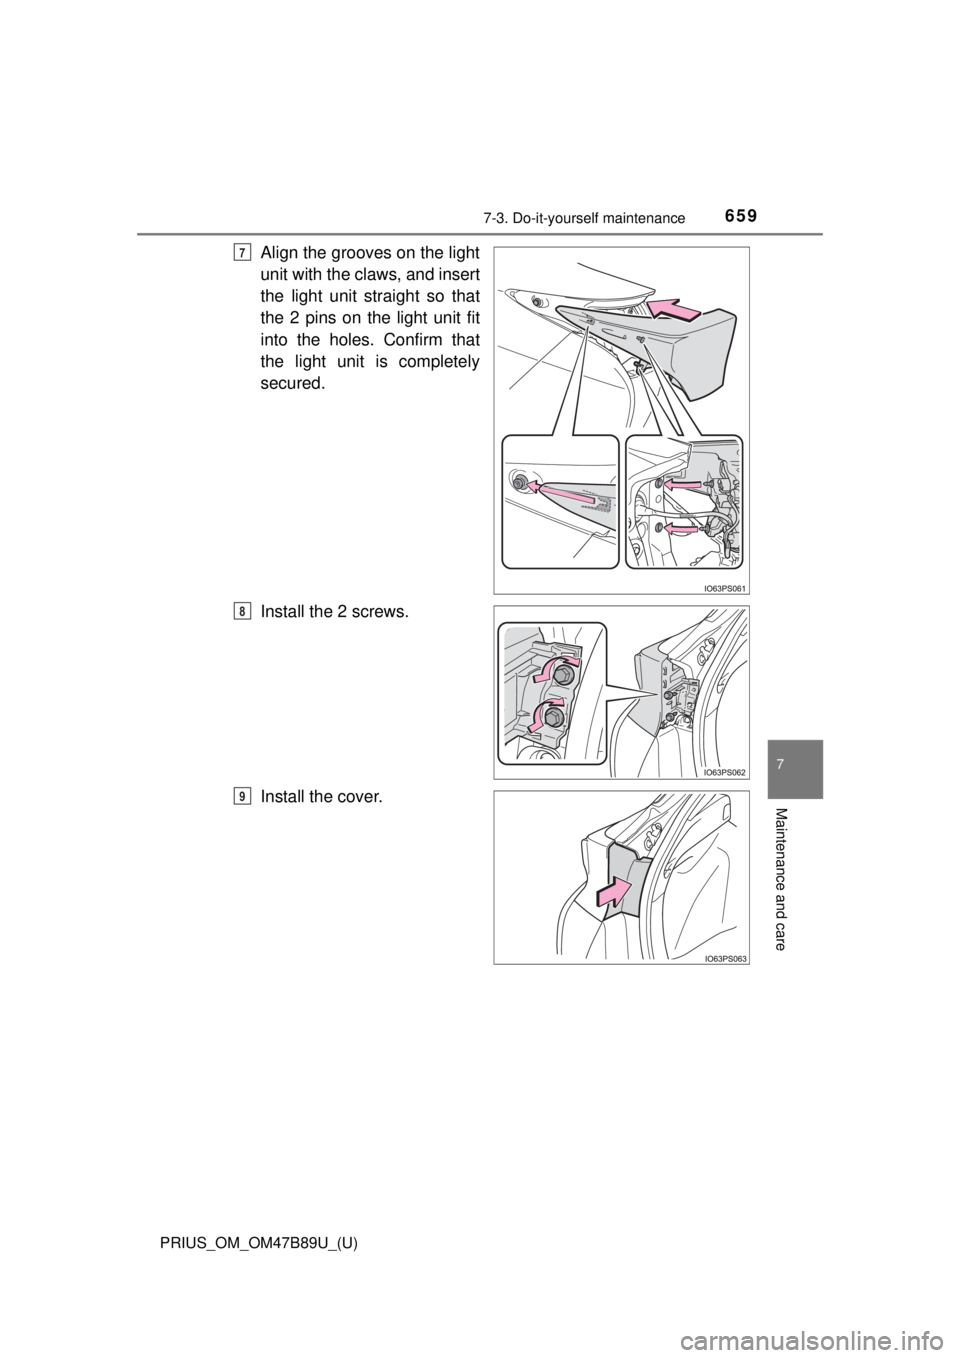
Align the grooves on the light
unit with the claws, and insert
the light unit straight so that
the 2 pins on the light unit fit
into the holes. Confirm that
the light unit is completely
secured.
Install the 2 screws.
Install the cover.7
8
9
Page 660 of 820

660
PRIUS_OM_OM47B89U_(U)
7-3. Do-it-yourself maintenance
■Replacing the following bulbs
If any of the lights listed below has burnt out, have it replaced by
your Toyota dealer.
● Headlights and daytime running lights
● Front side marker lights
● Parking lights (LED type: if equipped)
● Fog lights
● Rear side marker/tail lights
● Stop lights
● High mounted stoplight
● License plate lights
■LED lights
The lights other than the parking lights (bulb type: if equipped), front turn sig-
nal lights, rear turn signal lights and back-up lights each consist of a number
of LEDs. If any of the LEDs burn out, take your vehicle to your Toyota dealer
to have the light replaced.
■ Condensation build-up on the inside of the lens
Temporary condensation build-up on the inside of the headlight lens does not
indicate a malfunction. Contact your Toyota dealer for more information in the
following situations:
●Large drops of water have built up on the inside of the lens.
● Water has built up inside the headlight.
■ When replacing light bulbs
→P. 651
Trending: climate control, wiper size, wiper blades, sensor, transmission fluid, fuel filter, display

