inflation pressure TOYOTA PRIUS 2022 Owner's Manual
[x] Cancel search | Manufacturer: TOYOTA, Model Year: 2022, Model line: PRIUS, Model: TOYOTA PRIUS 2022Pages: 744, PDF Size: 14.35 MB
Page 617 of 744

6177-2. Steps to take in an emergency
PRIUS_OM_OM47F01U_(U)
7
When trouble arises
Check the specified tire inflation
pressure.
Tire inflation pressure is specified
on the label on the driver’s side
pillar as shown. (P. 6 6 8 )
Start the hybrid system. ( P. 2 3 9 )
To inject the sealant and inflate
the tire, turn the compressor
switch on.
11
12
13
Page 618 of 744

6187-2. Steps to take in an emergency
PRIUS_OM_OM47F01U_(U)
Inflate the tire until the specified air pressure is reached.The sealant will be injected
and the pressure will spike to
between 44 psi (300 kPa,
3.0 kgf/cm
2 or bar) and
58 psi (400 kPa, 4.0 kgf/cm2
or bar), then gradually
decrease.
The air pressure gauge will
display the actual tire infla-
tion pressure about 1 to 5
minutes after the switch is
turned on.
• Turn the compressor switch off and then check the tire
inflation pressure. Being
careful not to over inflate,
check and repeat the inflation
procedure until the specified
tire inflation pressure is
reached.
• The tire can be inflated for about 5 to 20 minutes (depending on
the outside temperature). If the t ire inflation pressure is still lower
than the specified point after inflation for 25 minutes, the tire is
too damaged to be repaired. Turn the compressor switch off and
contact your Toyota dealer.
• If the tire inflation pressure exceeds the specified air press ure, let
out some air to adjust the tire inflation pressure. ( P. 621, 668)
With the compressor switch off, disconnect the hose from the va lve
on the tire and then pull out the power plug from the power out let
socket.
Some sealant may leak when the hose is removed.
Install the valve cap onto the valve of the emergency repaired tire.
14
1
2
15
16
Page 619 of 744

6197-2. Steps to take in an emergency
PRIUS_OM_OM47F01U_(U)
7
When trouble arises
Attach the air release cap to the
end of the hose.
If the air release cap is not
attached, the sealant may leak
and the vehicle may get dirty.
Temporarily store the bottle in the luggage compartment while i t is
connected to the compressor.
To spread the liquid sealant evenly within the tire, immediatel y drive
safely for about 3 miles (5 km) below 50 mph (80 km/h).
After driving, s top your vehicle
in a safe place on a hard, flat
surface and reconnect the
repair kit.
Remove the air release cap from
the hose before reconnecting the
hose.
Turn the compressor switch on and wait for several seconds, then
turn it off. Check the t ire inflation pressure.
If the tire inflation pressure is
under 19 psi (130 kPa,
1.3 kgf/cm
2 or bar): The
puncture cannot be repaired.
Contact your Toyota dealer.
If the tire inflation pressure is
19 psi (130 kPa, 1.3 kgf/cm
2
or bar) or higher, but less
than the specified air pres-
sure: Proceed to step .
If the tire inflation pressure is the specified air pressure ( P. 668):
Proceed to step .
17
18
19
20
21
1
2
22
3
23
Page 621 of 744

6217-2. Steps to take in an emergency
PRIUS_OM_OM47F01U_(U)
7
When trouble arises
■If the tire is inflated to more than the specified air pressure
Disconnect the hose from the valve.
Disconnect the hose from the valv e, remove the air release cap from
the hose and then reconnect the hose.
Turn the compressor switch on and wait for several seconds, and then
turn it off. Check that the air pressure indicator shows the sp ecified air
pressure. ( P. 668)
If the air pressure is under the designated pressure, turn the compres-
sor switch on again and repeat the inflation procedure until th e speci-
fied air pressure is reached.
■The valve of a tire that has been repaired
After a tire is repaired with the emergency tire puncture repai r kit, the
valve should be replaced.
■After a tire is repaired with the emergency tire puncture repai r kit
●The tire pressure warning valve and transmitter should be replaced.
●Even if the tire inflation pressure is at the recommended level, the tire
pressure warning light may come on/flash.
■Note for checking the emergency tire puncture repair kit
Check the sealant expiry date occasionally.
The expiry date is shown on the bottle. Do not use sealant whos e expiry
date has already passed. Otherwise, repairs conducted using the emer-
gency tire puncture repair kit may not be performed properly. Install the air release cap to the end of
the hose and push the protrusion on
the air release cap into the tire valve
to let some air out.
1
2
3
4
Page 624 of 744

6247-2. Steps to take in an emergency
PRIUS_OM_OM47F01U_(U)
WARNING
■When fixing the flat tire
●Stop your vehicle in a safe and flat area.
●Do not touch the wheels or the area around the brakes immediate ly
after the vehicle has been driven.
After the vehicle has been driven, the wheels and the area arou nd the
brakes may be extremely hot. Touching these areas with hands, f eet or
other body parts may result in burns.
●Connect the valve and hose securely with the tire installed on the vehi-
cle. If the hose is not properly connected to the valve, air le akage may
occur as sealant may be sprayed out.
●If the hose comes off the valve while inflating the tire, there is a risk
that the hose will move abruptly due to air pressure.
●After inflation of the tire has completed, the sealant may spla tter when
the hose is disconnec ted or some air is let out of the tire.
●Follow the operation procedure to repair the tire. If the proce dures not
followed, the sealant may spray out.
●Keep back from the tire while it is being repaired, as there is a chance
of it bursting while the repair operation is being performed. I f you
notice any cracks or deformation of the tire, turn off the compressor
switch and stop the repair operation immediately.
●The repair kit may overheat if operated for a long period of ti me. Do not
operate the repair kit continuous ly for more than 40 minutes.
●Parts of the repair kit become hot during operation. Be careful handling
the repair kit during and after operation. Do not touch the met al part
connecting the bottle and the compressor. It will be extremely hot.
●Do not attach the vehicle speed warning sticker to an area other than
the one indicated. If the sticker is attached to an area where an SRS
airbag is located, such as the pad of the steering wheel, it ma y prevent
the SRS airbag from operating properly.
Page 625 of 744

6257-2. Steps to take in an emergency
PRIUS_OM_OM47F01U_(U)
7
When trouble arises
WARNING
■Driving to spread the liquid sealant evenly
Observe the following precautions to reduce the risk of accidents.
Failing to do so may result in a loss of vehicle control and ca use death
or serious injury.
●Drive the vehicle carefully at a low speed. Be especially careful when
turning and cornering.
●If the vehicle does not drive straight or you feel a pull throu gh the
steering wheel, stop the vehicle and check the following.
• Tire condition. The tire may have separated from the wheel.
• Tire inflation pressure. If the tire inflation pressure is 19 psi (130 kPa, 1.3 kgf/cm
2 or bar) or less, the tire may be severely dam-
aged.
NOTICE
■When performing an emergency repair
●A tire should only be repaired with the emergency tire puncture repair
kit if the damage is caused by a sharp object such as nail or screw
passing through the tire tread.
Do not remove the sharp object from the tire. Removing the obje ct may
widen the opening and disenable e mergency repair with the repair kit.
●The repair kit is not waterproof. Make sure that the repair kit is not
exposed to water, such as when it is being used in the rain.
●Do not put the repair kit directly onto dusty ground such as sa nd at the
side of the road. If the repair kit vacuums up dust etc., a mal function
may occur.
■Precautions for the emergency tire puncture repair kit
●The repair kit power source should be 12 V DC suitable for vehi cle
use. Do not connect the repa ir kit to any other source.
●If fuel splatters on the repair kit, the repair kit may deterio rate. Take
care not to allow fuel to contact it.
●Place the repair kit in a storage to prevent it from being exposed to dirt
or water.
●Store the repair kit in the luggage compartment out of reach of chil-
dren.
●Do not disassemble or modify the repair kit. Do not subject par ts such
as the air pressure indicator to impacts. This may cause a malfunction.
Page 638 of 744

6387-2. Steps to take in an emergency
PRIUS_OM_OM47F01U_(U)
■The compact spare tire (if equipped)
●The compact spare tire is identified by the label “TEMPORARY USE
ONLY” on the tire sidewall.
Use the compact spar e tire temporarily, and only in an emergenc y.
●Make sure to check the tire inflation pressure of the compact s pare tire.
( P. 6 6 8 )
■When using the compact spare tire (if equipped)
As the compact spare tire is not equipped with a tire pressure warning
valve and transmitter, low inflation pressure of the spare tire will not be
indicated by the tire pressure warning system. Also, if you rep lace the
compact spare tire after the tire pressure warning light comes on, the light
remains on.
■When the compact spare tire is equipped (if equipped)
The vehicle height may become lower when driving with the compa ct
spare tire compared to when d riving with standard tires.
■If you have a flat front tire on a road covered with snow or ic e (vehi-
cles with compact spare tire)
Install the compact spare tire on one of the rear wheels of the vehicle.
Perform the following steps and f it tire chains to the front tires:
Replace a rear tire with the compact spare tire.
Replace the flat front tire with the tire removed from the rear of the vehi-
cle.
Fit tire chains to the front tires.
■Jack point
■Storing the jack The mark indicating the jack point is
stamped on the underside of the vehi-
cle.
Place the jack in the same direction as
the mark next to the storage space.
1
2
3
Page 668 of 744
668
PRIUS_OM_OM47F01U_(U)
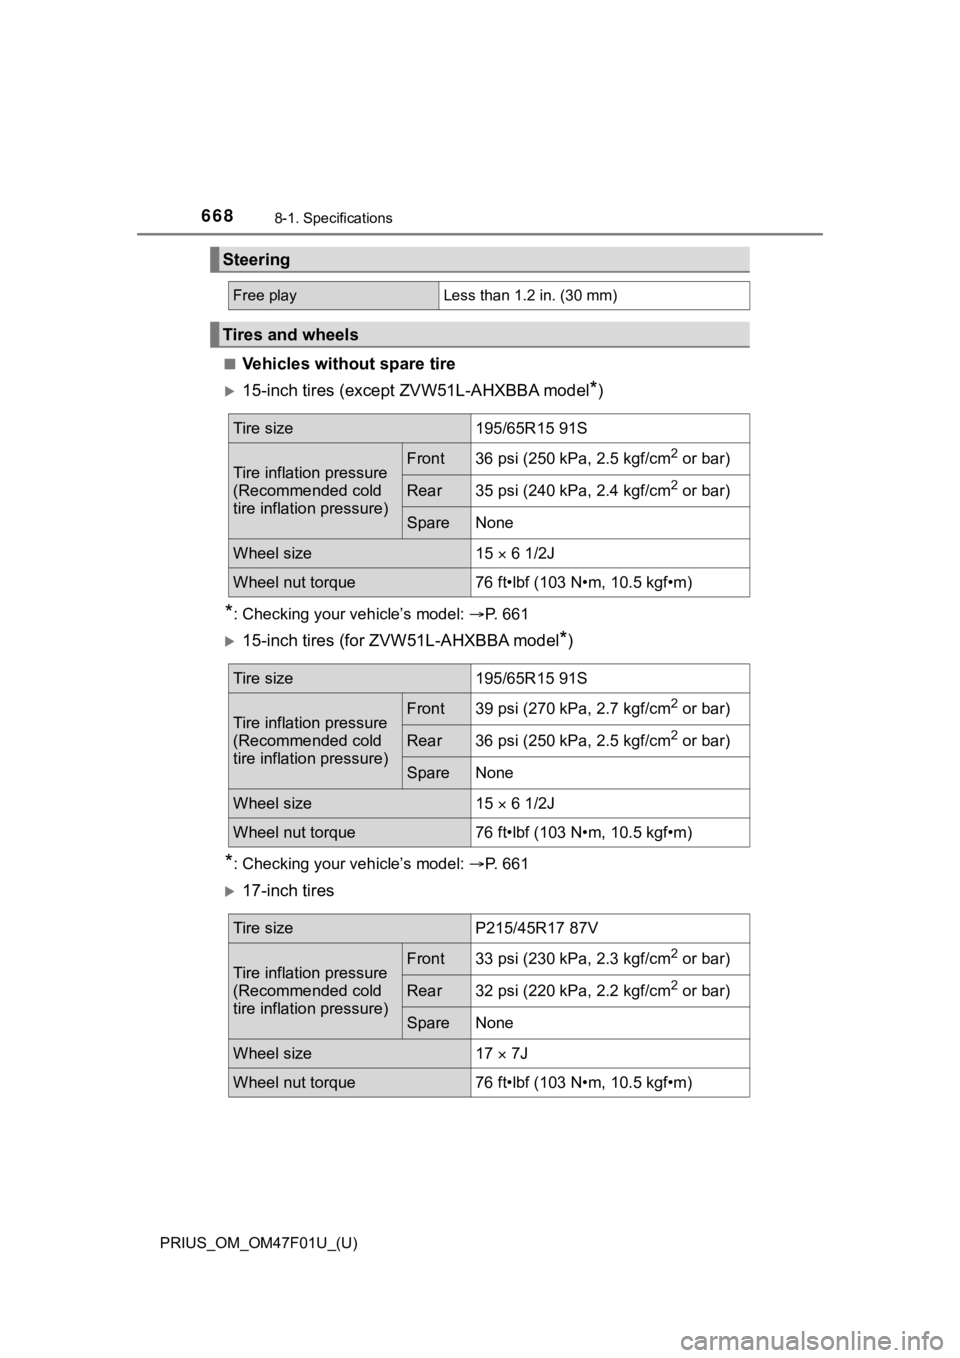
8-1. Specifications
■Vehicles without spare tire
15-inch tires (except ZVW51L-AHXBBA model*)
*: Checking your vehicle’s model: P. 6 6 1
15-inch tires (for ZVW51L-AHXBBA model*)
*: Checking your vehicle’s model: P. 6 6 1
17-inch tires
Steering
Free playLess than 1.2 in. (30 mm)
Tires and wheels
Tire size195/65R15 91S
Tire inflation pressure
(Recommended cold
tire inflation pressure)Front36 psi (250 kPa, 2.5 kgf/cm2 or bar)
Rear35 psi (240 kPa, 2.4 kgf/cm2 or bar)
SpareNone
Wheel size15 6 1/2J
Wheel nut torque76 ft•lbf (103 N•m, 10.5 kgf•m)
Tire size195/65R15 91S
Tire inflation pressure
(Recommended cold
tire inflation pressure)Front39 psi (270 kPa, 2.7 kgf/cm2 or bar)
Rear36 psi (250 kPa, 2.5 kgf/cm2 or bar)
SpareNone
Wheel size15 6 1/2J
Wheel nut torque76 ft•lbf (103 N•m, 10.5 kgf•m)
Tire sizeP215/45R17 87V
Tire inflation pressure
(Recommended cold
tire inflation pressure)Front33 psi (230 kPa, 2.3 kgf/cm2 or bar)
Rear32 psi (220 kPa, 2.2 kgf/cm2 or bar)
SpareNone
Wheel size17 7J
Wheel nut torque76 ft•lbf (103 N•m, 10.5 kgf•m)
Page 669 of 744

PRIUS_OM_OM47F01U_(U)
6698-1. Specifications
8
Vehicle specifications
■Vehicles with spare tire
15-inch tires (Type A)
15-inch tires (Type B)
Tire size195/65R15 91S,
T125/70D17 98M (spare)
Tire inflation pressure
(Recommended cold
tire inflation pressure)Front36 psi (250 kPa, 2.5 kgf/cm2 or bar)
Rear35 psi (240 kPa, 2.4 kgf/cm2 or bar)
Spare60 psi (420 kPa, 4.2 kgf/cm2 or bar)
Wheel size15 6 1/2J, 17 4T(spare)
Wheel nut torque76 ft•lbf (103 N•m, 10.5 kgf•m)
Tire size195/65R15 91H
Tire inflation pressure
(Recommended cold
tire inflation pressure)Front32 psi (220 kPa, 2.2 kgf/cm2 or bar)
Rear32 psi (220 kPa, 2.2 kgf/cm2 or bar)
Spare32 psi (220 kPa, 2.2 kgf/cm2 or bar)
Wheel size15 6 1/2J
Wheel nut torque76 ft•lbf (103 N•m, 10.5 kgf•m)
Page 675 of 744

PRIUS_OM_OM47F01U_(U)
6758-1. Specifications
8
Vehicle specifications
Tire size( P. 676)
DOT and Tire Identification Number (TIN) ( P. 676)
Location of treadwear indicators ( P. 528)
Tire ply composition and materials
Plies are layers of rubber-coated parallel cords. Cords are the strands
which form the p lies in a tire.
Summer tires or all season tires ( P. 533)
An all season tire has “M+S” on the sidewall. A tire not marked “M+S”
is a summer tire.
Radial tires or bias-ply tires
A radial tire has “RADIAL” on the sidewall. A tire not marked “ RADIAL”
is a bias-ply tire.
TUBELESS or TUBE TYPE
A tubeless tire does not have a tube and air is directly put into the tire.
A tube type tire has a tube insi de the tire and the tube mainta ins the air
pressure.
Load limit at maximum cold tire inflation pressure ( P. 532)
Maximum cold tire in flation pressure ( P. 668)
This means the press ure to which a tire may be inflated.
Uniform tire quality grading
For details, see “Uniform Tire Q uality Grading” that follows.
“TEMPORARY USE ONLY”
A compact spare tire is identified by the phrase “TEMPORARY USE
ONLY” molded on its sidewall. This tire is designed for tempora ry
emergency use only.
1
2
3
4
5
6
7
8
9
10
11