TOYOTA PRIUS C 2012 NHP10 / 1.G Owners Manual
PRIUS C 2012 NHP10 / 1.G
TOYOTA
TOYOTA
https://www.carmanualsonline.info/img/14/6621/w960_6621-0.png
TOYOTA PRIUS C 2012 NHP10 / 1.G Owners Manual
Trending: boot, Hybrid, coolant capacity, rear break, CD player, brake, remote start
Page 411 of 552
411
4-3. Do-it-yourself maintenance
4
Maintenance and care
Light bulbs
You may replace the following bulbs by yourself. The difficulty level
of replacement varies depending on the bulb. As there is a danger
that components may be damaged, we recommend that replacement
is carried out by your Toyota dealer.
■Preparing for light bulb replacement
Check the wattage of the light bulb to be replaced. ( P. 499)
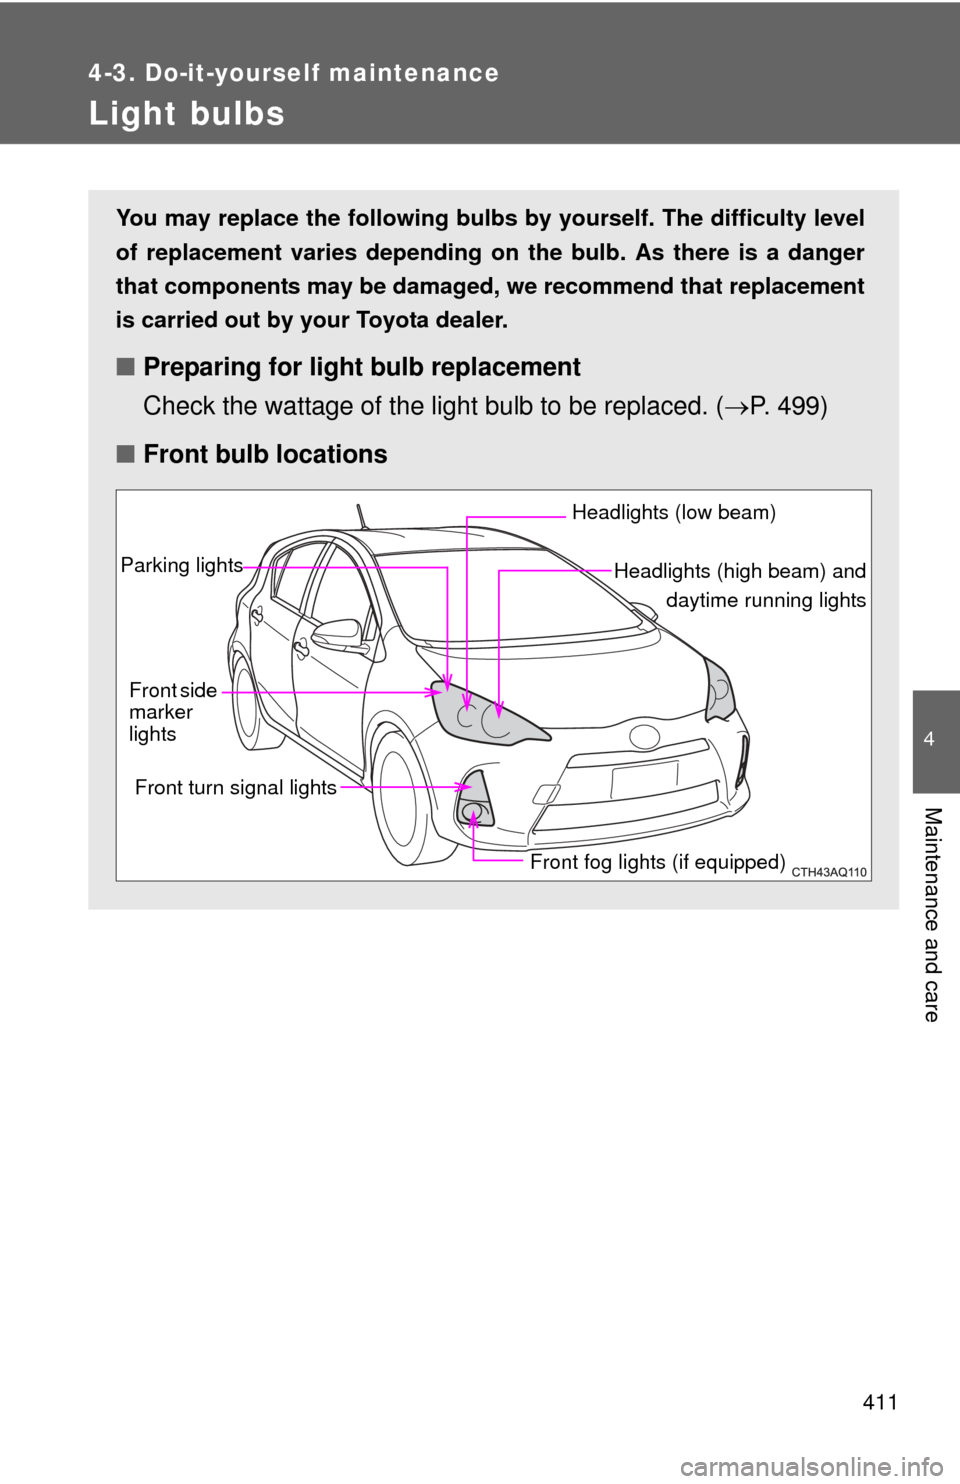
■ Front bulb locations
Front fog lights (if equipped)
Front side
marker
lights
Front turn signal lights
Parking lights
Headlights (low beam)
Headlights (high beam) and daytime running lights
Page 412 of 552
412 4-3. Do-it-yourself maintenance
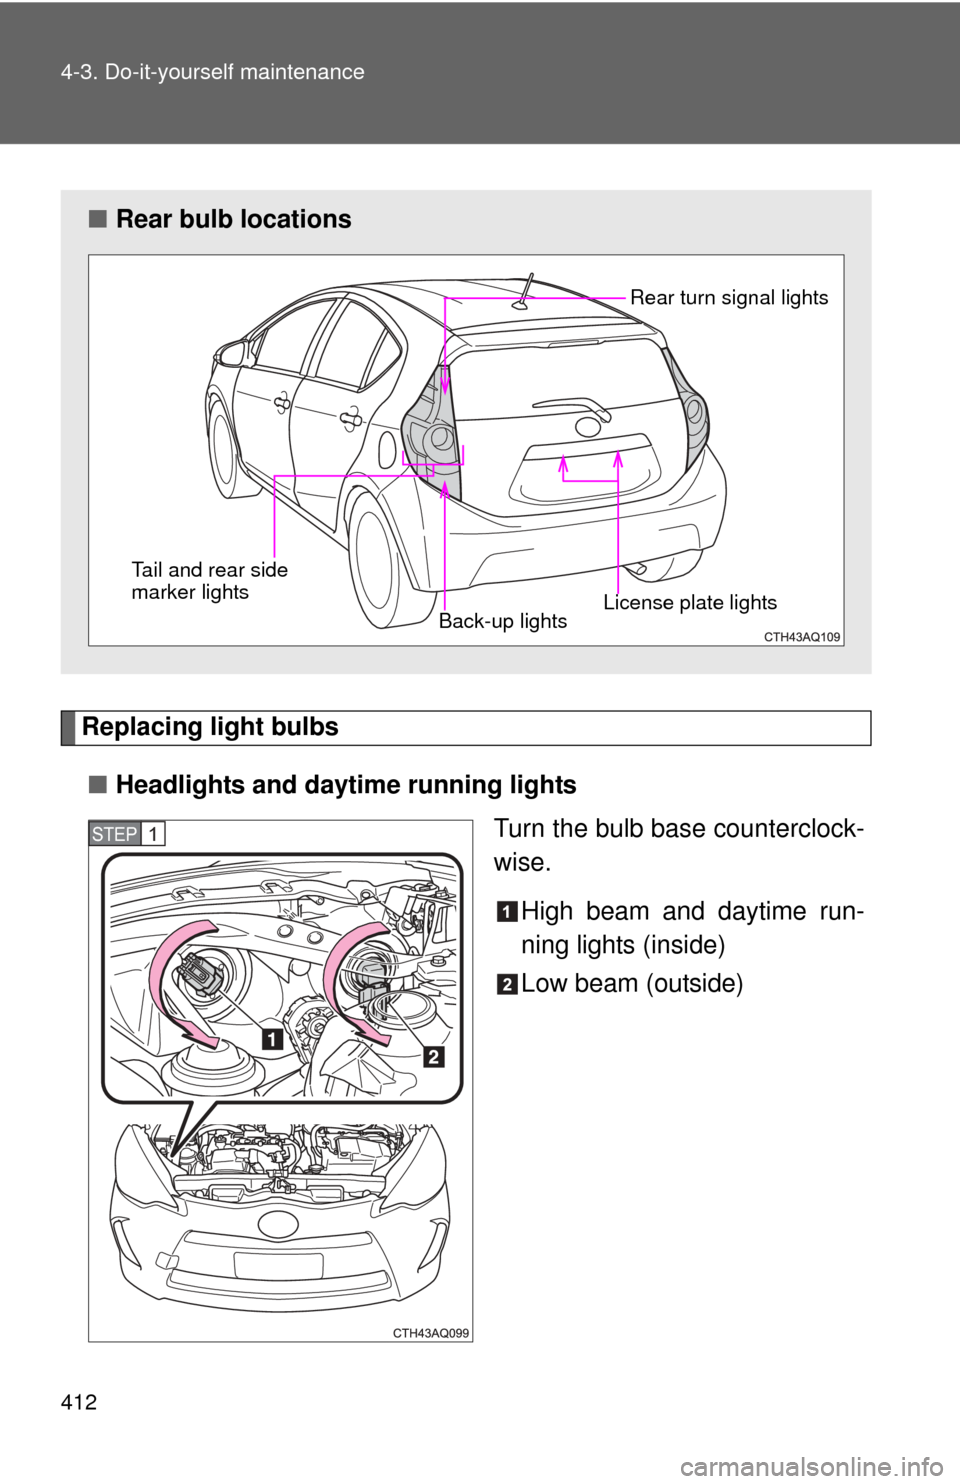
Replacing light bulbs■ Headlights and daytime running lights
Turn the bulb base counterclock-
wise.
High beam and daytime run-
ning lights (inside)
Low beam (outside)
■Rear bulb locations
Back-up lights Rear turn signal lights
Tail and rear side
marker lights License plate lights
STEP1
Page 413 of 552
413
4-3. Do-it-yourself maintenance
4
Maintenance and care
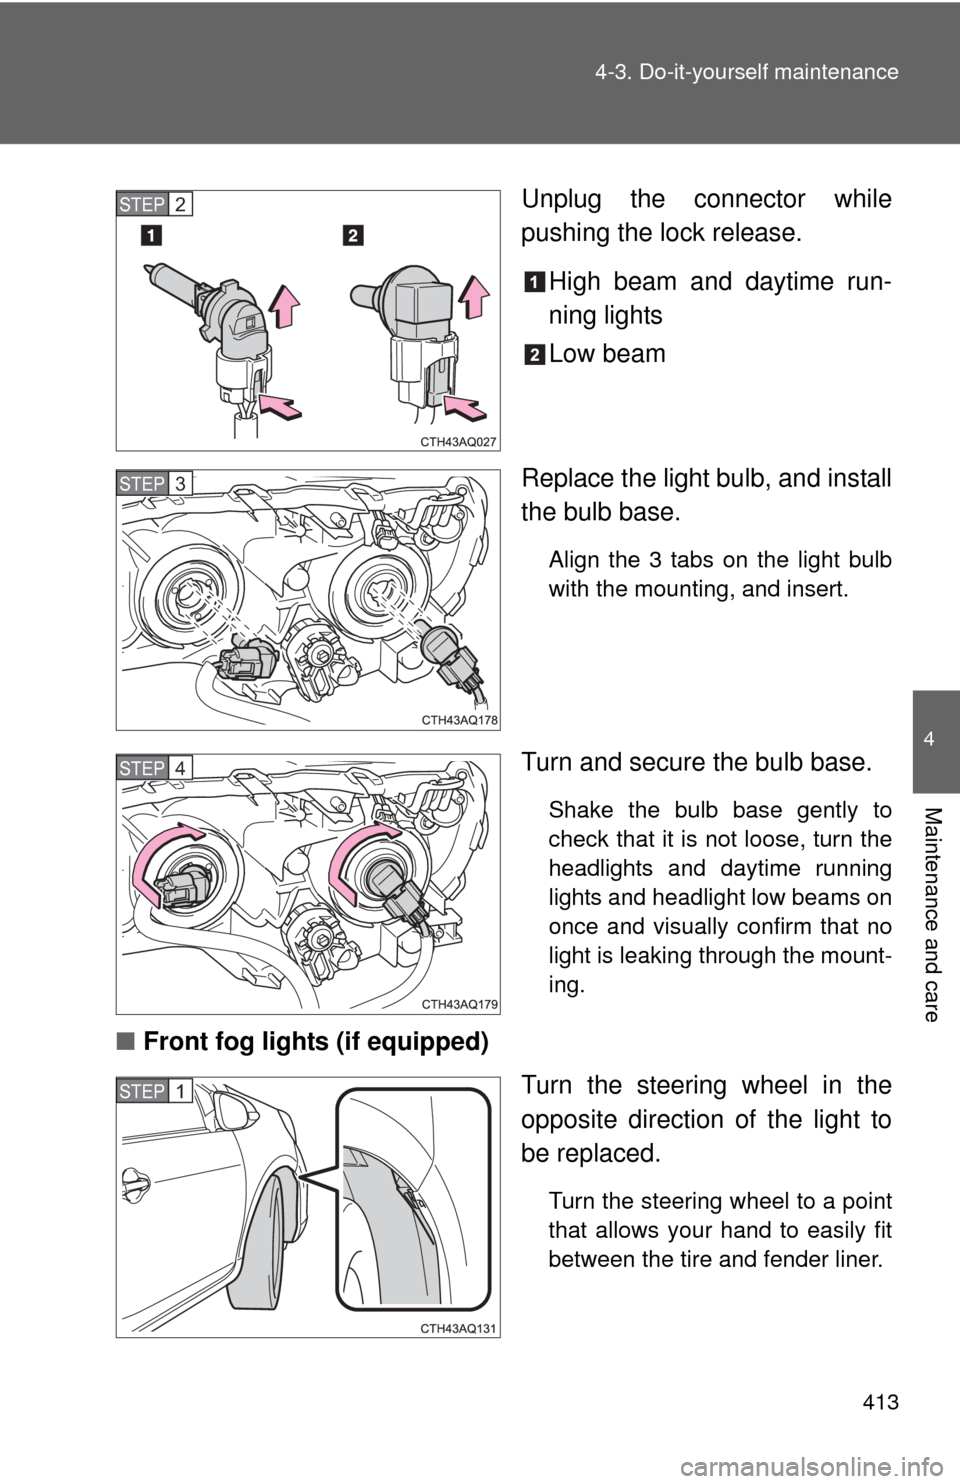
Unplug the connector while
pushing the lock release.
High beam and daytime run-
ning lights
Low beam
Replace the light bulb, and install
the bulb base.
Align the 3 tabs on the light bulb
with the mounting, and insert.
Turn and secure the bulb base.
Shake the bulb base gently to
check that it is not loose, turn the
headlights and daytime running
lights and headlight low beams on
once and visually confirm that no
light is leaking through the mount-
ing.
■ Front fog lights (if equipped)
Turn the steering wheel in the
opposite direction of the light to
be replaced.
Turn the steering wheel to a point
that allows your hand to easily fit
between the tire and fender liner.
STEP2
STEP3
STEP4
STEP1
Page 414 of 552
414 4-3. Do-it-yourself maintenance
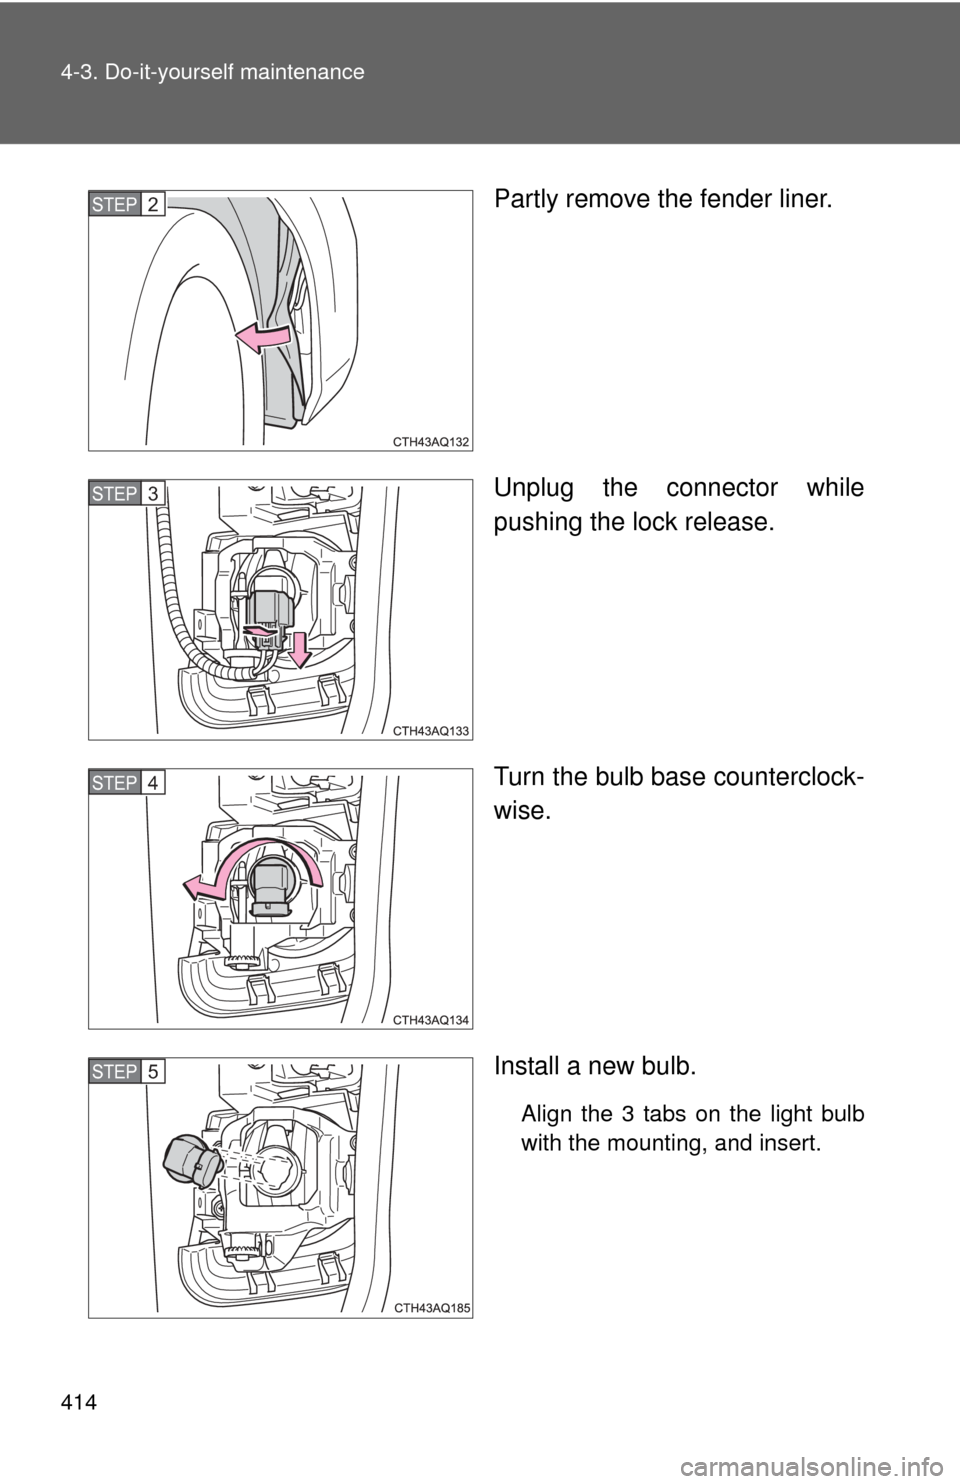
Partly remove the fender liner.
Unplug the connector while
pushing the lock release.
Turn the bulb base counterclock-
wise.
Install a new bulb.
Align the 3 tabs on the light bulb
with the mounting, and insert.
STEP2
STEP3
STEP4
STEP5
Page 415 of 552
415
4-3. Do-it-yourself maintenance
4
Maintenance and care
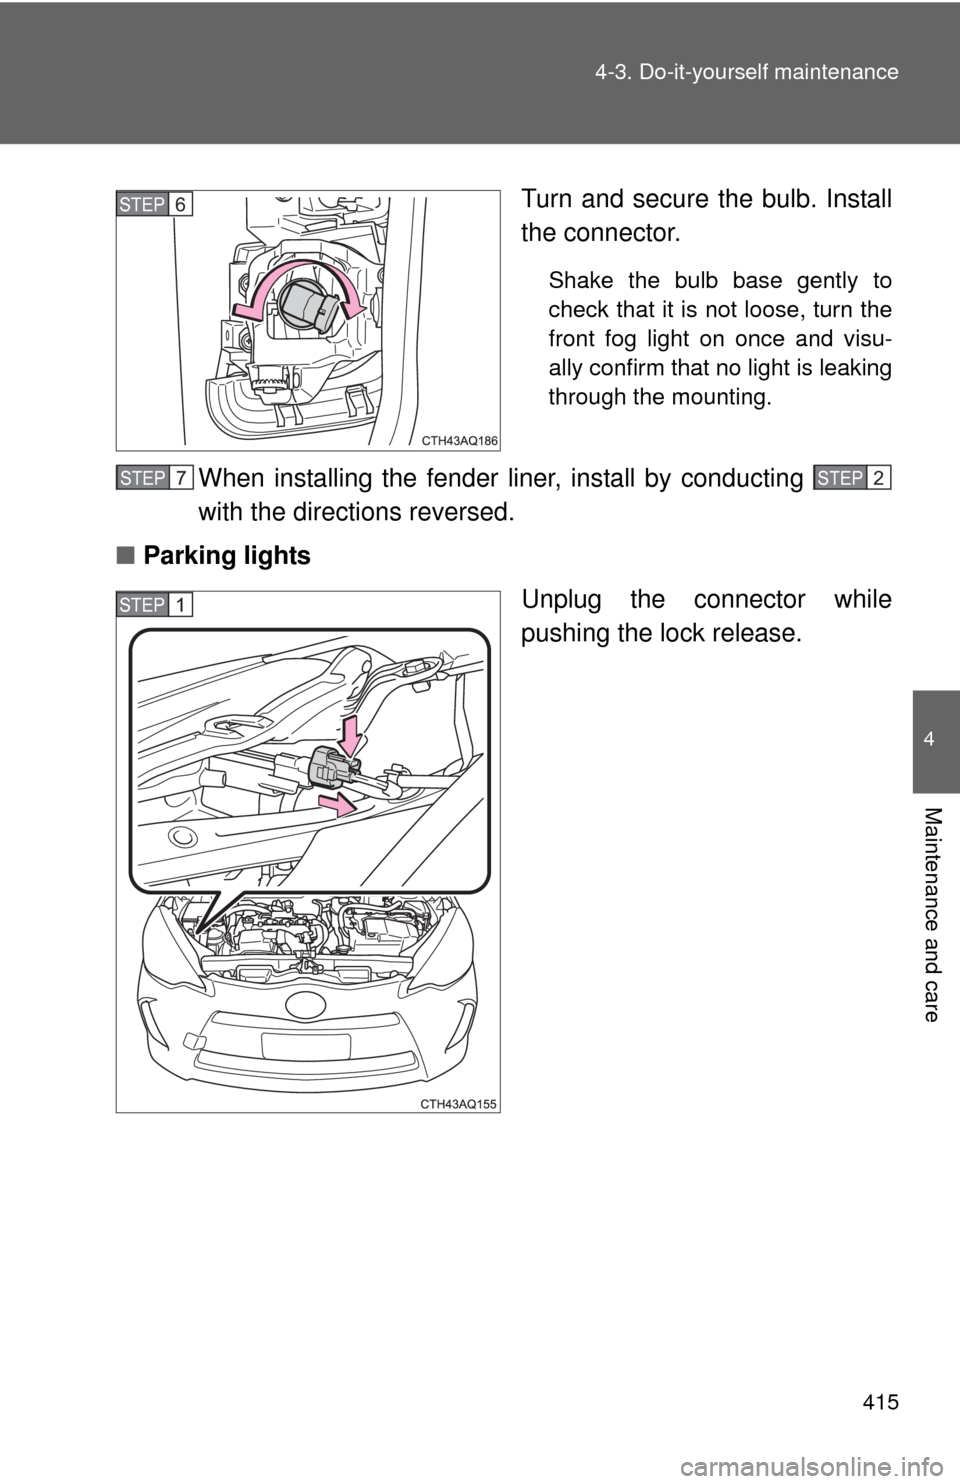
Turn and secure the bulb. Install
the connector.
Shake the bulb base gently to
check that it is not loose, turn the
front fog light on once and visu-
ally confirm that no light is leaking
through the mounting.
When installing the fender liner, install by conducting
with the directions reversed.
■ Parking lights
Unplug the connector while
pushing the lock release.
STEP6
STEP5STEP7STEP5STEP7STEP2
STEP1
Page 416 of 552
416 4-3. Do-it-yourself maintenance
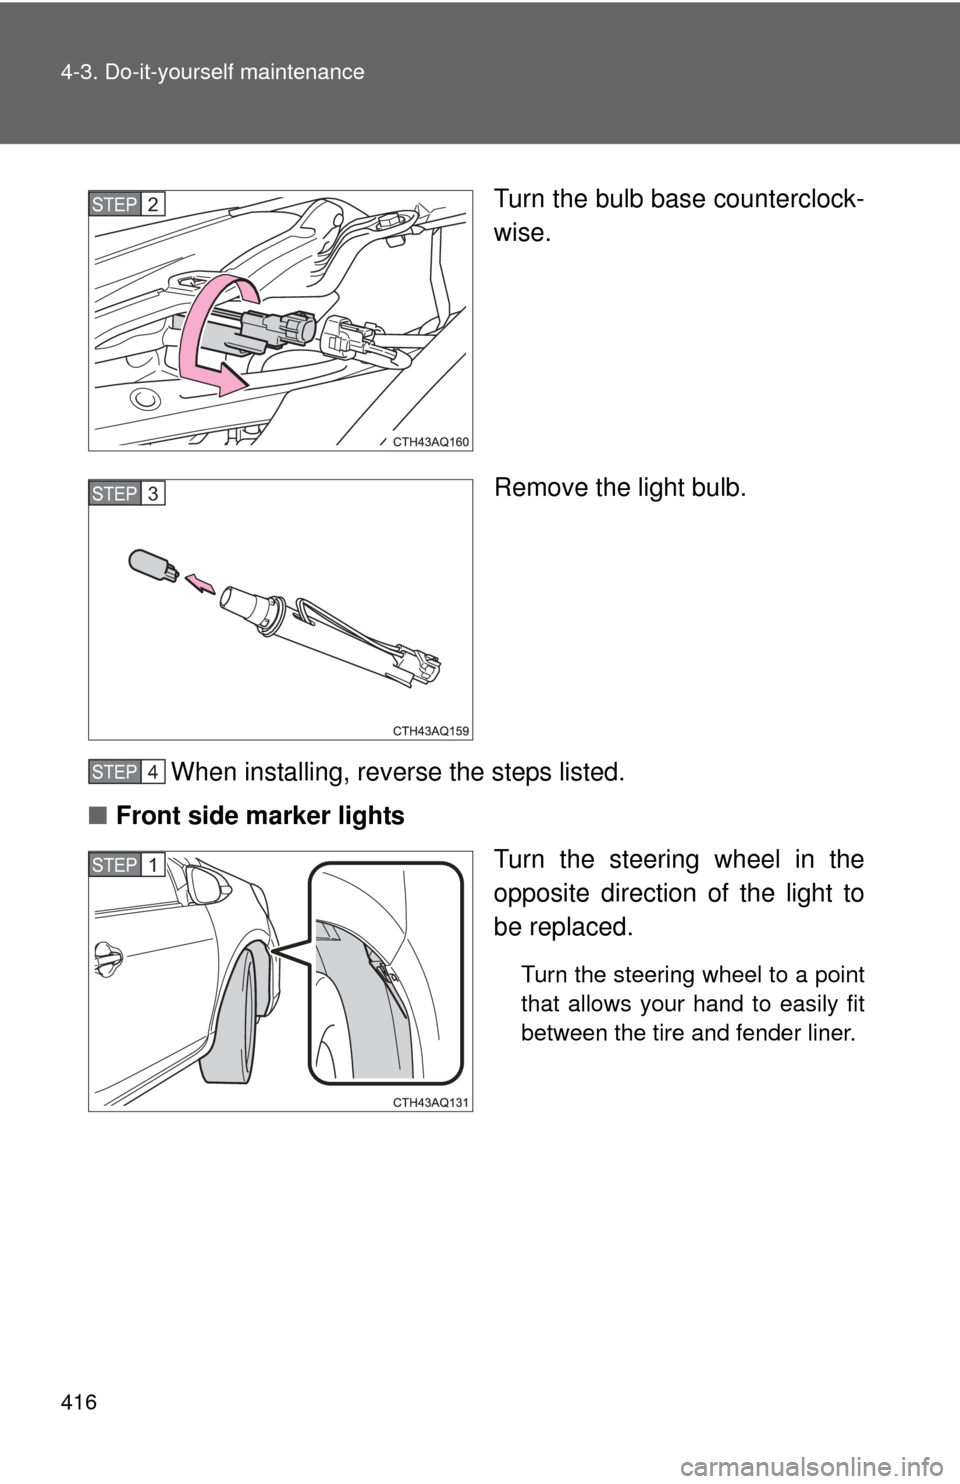
Turn the bulb base counterclock-
wise.
Remove the light bulb.
When installing, reverse the steps listed.
■ Front side marker lights
Turn the steering wheel in the
opposite direction of the light to
be replaced.
Turn the steering wheel to a point
that allows your hand to easily fit
between the tire and fender liner.
STEP2
STEP3
STEP4
STEP1
Page 417 of 552
417
4-3. Do-it-yourself maintenance
4
Maintenance and care
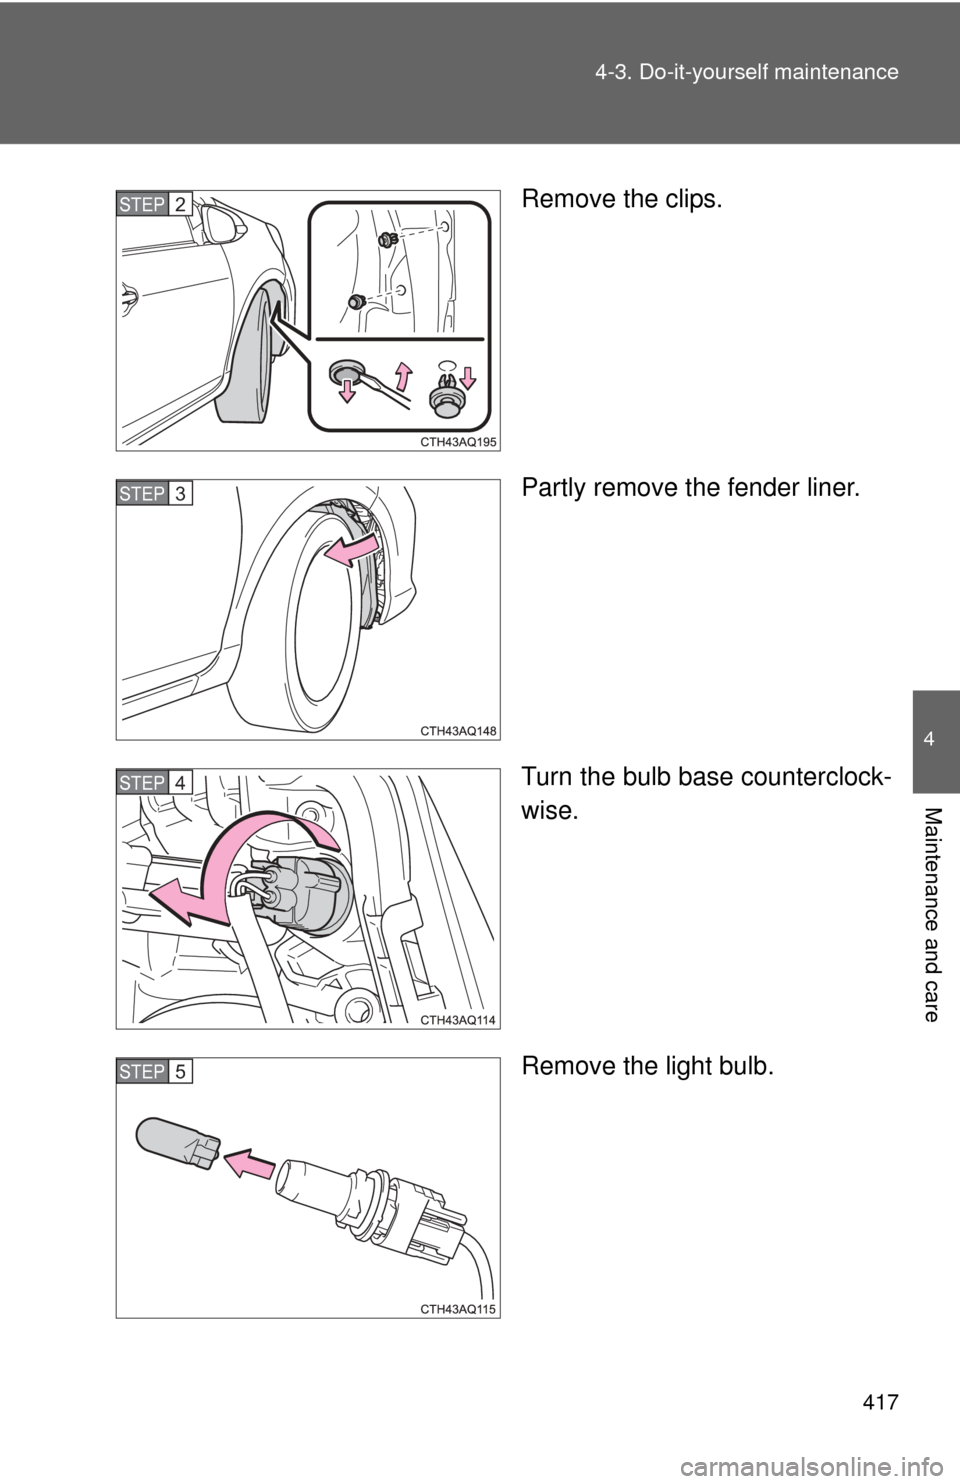
Remove the clips.
Partly remove the fender liner.
Turn the bulb base counterclock-
wise.
Remove the light bulb.STEP2
STEP3
STEP4
STEP5
Page 418 of 552
418 4-3. Do-it-yourself maintenance
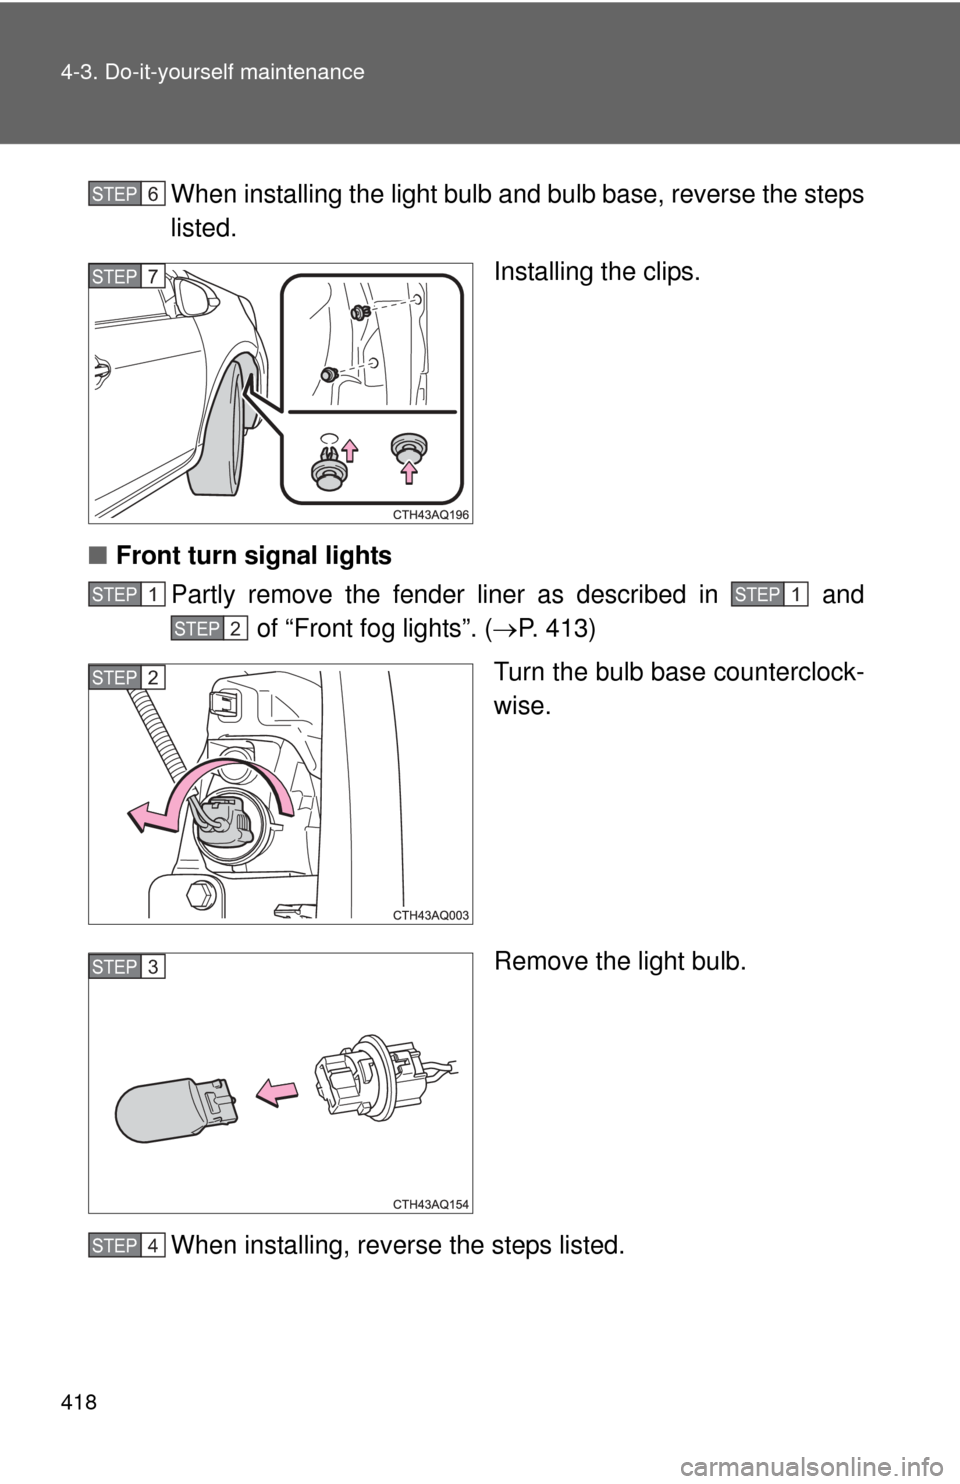
When installing the light bulb and bulb base, reverse the steps
listed.
Installing the clips.
■ Front turn signal lights
Partly remove the fender liner as described in and of “Front fog lights”. ( P. 413)
Turn the bulb base counterclock-
wise.
Remove the light bulb.
When installing, reverse the steps listed.STEP6
STEP7
STEP1STEP1
STEP2
STEP2
STEP3
STEP4
Page 419 of 552
419
4-3. Do-it-yourself maintenance
4
Maintenance and care
■
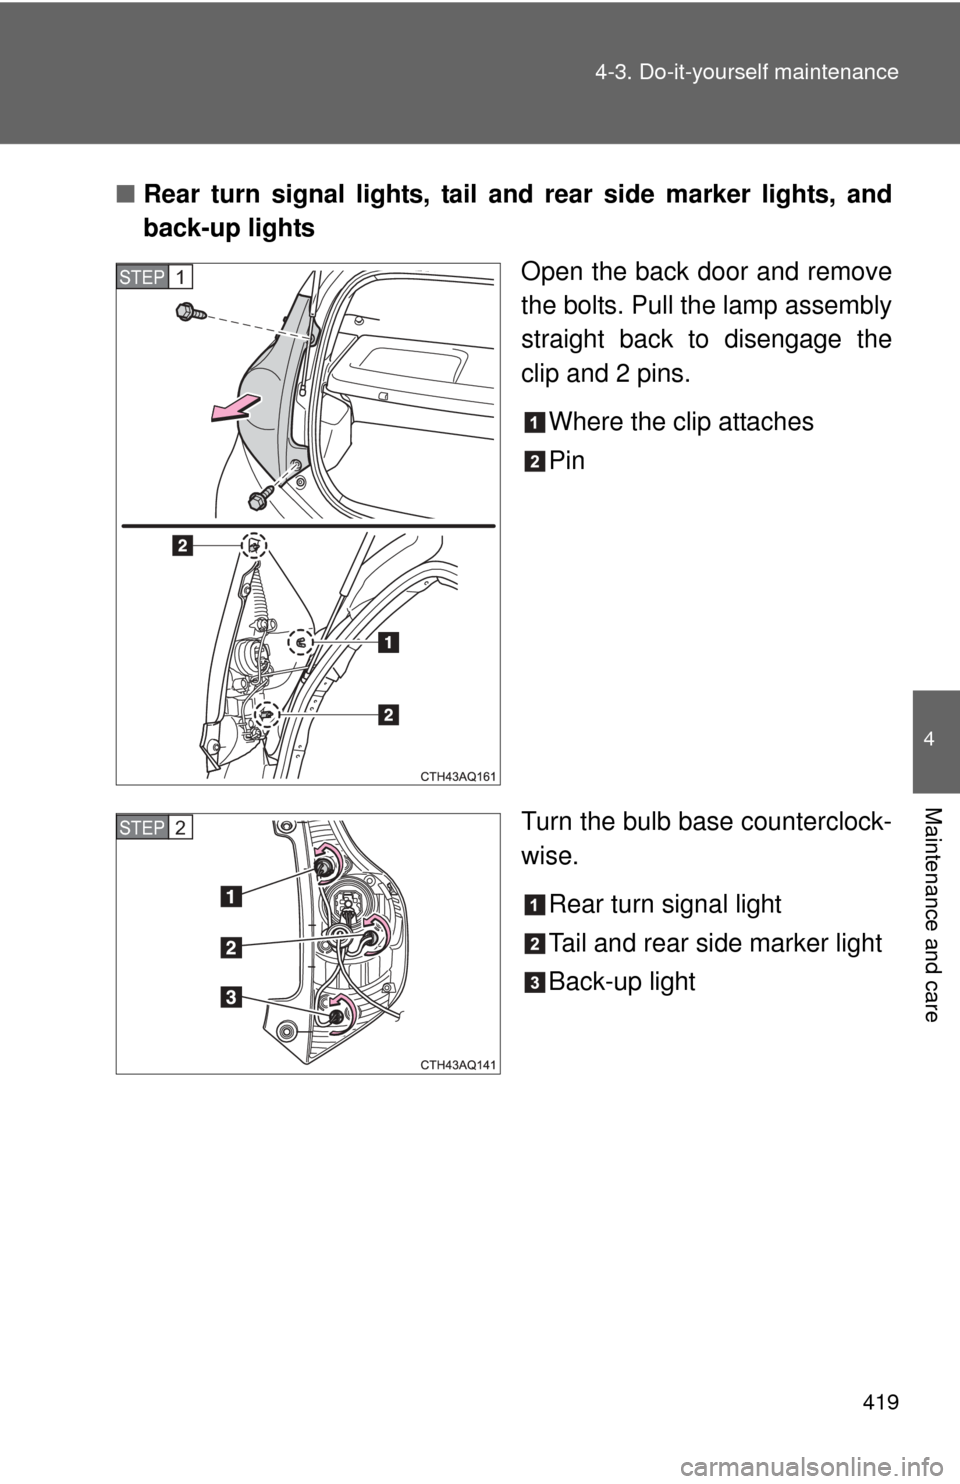
Rear turn signal lights, tail a nd rear side marker lights, and
back-up lights
Open the back door and remove
the bolts. Pull the lamp assembly
straight back to disengage the
clip and 2 pins.
Where the clip attaches
Pin
Turn the bulb base counterclock-
wise. Rear turn signal light
Tail and rear side marker light
Back-up light
STEP1
STEP2
Page 420 of 552
420 4-3. Do-it-yourself maintenance
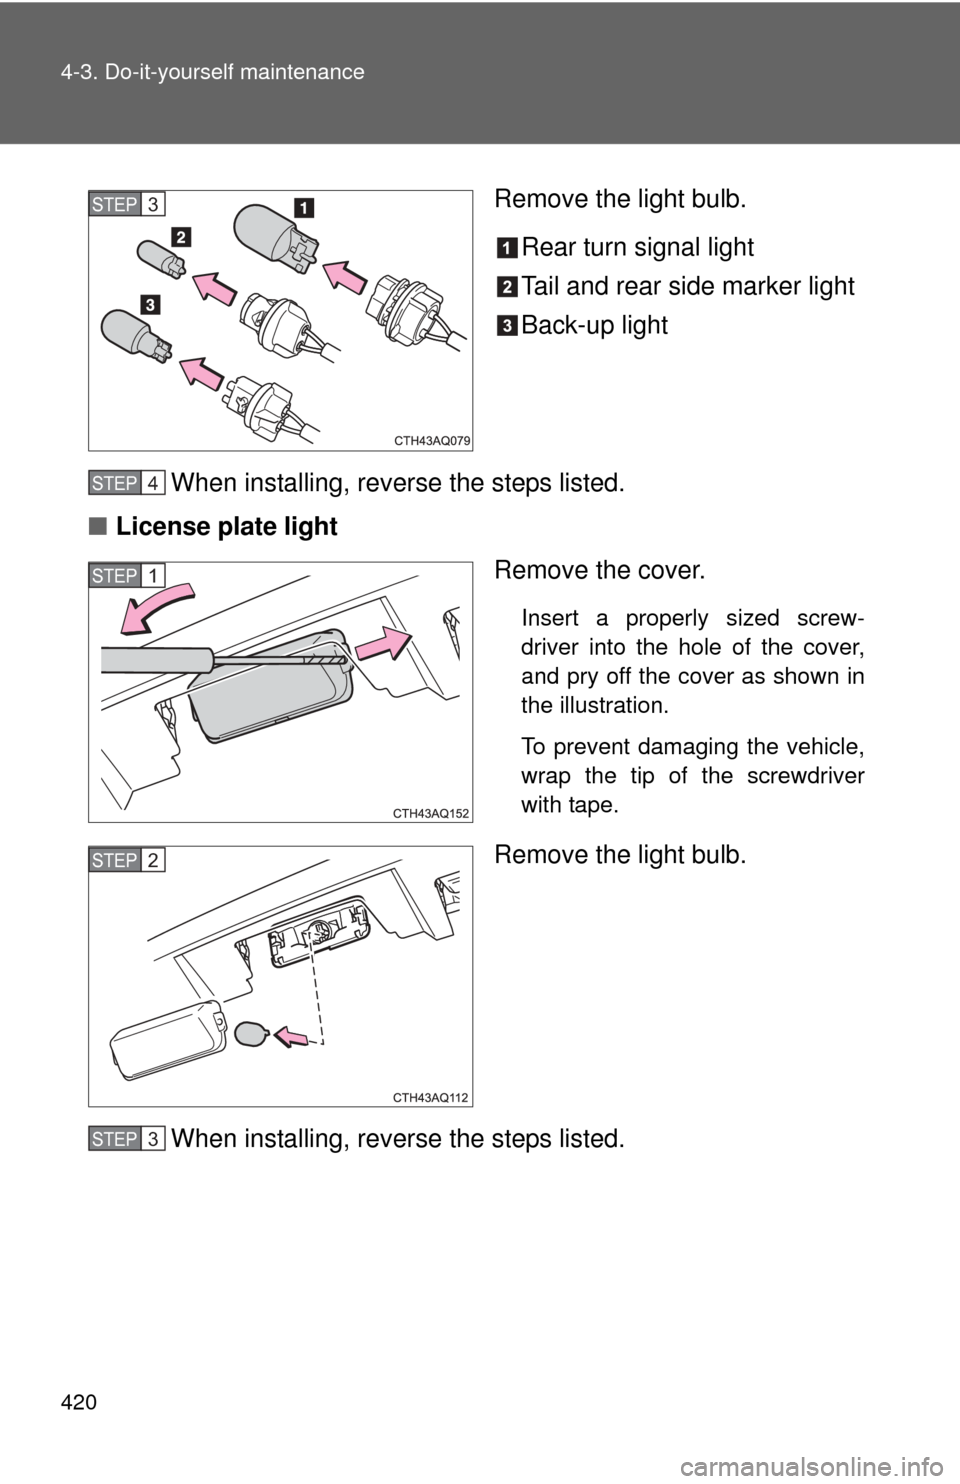
Remove the light bulb.Rear turn signal light
Tail and rear side marker light
Back-up light
When installing, reverse the steps listed.
■ License plate light
Remove the cover.
Insert a properly sized screw-
driver into the hole of the cover,
and pry off the cover as shown in
the illustration.
To prevent damaging the vehicle,
wrap the tip of the screwdriver
with tape.
Remove the light bulb.
When installing, reverse the steps listed.
STEP3
STEP4
STEP1
STEP2
STEP3
Trending: auxiliary battery, Spark plug, condenser, service interval, heater, Hybrid, rear view mirror
