TOYOTA PRIUS C 2015 NHP10 / 1.G Owners Manual
PRIUS C 2015 NHP10 / 1.G
TOYOTA
TOYOTA
https://www.carmanualsonline.info/img/14/6630/w960_6630-0.png
TOYOTA PRIUS C 2015 NHP10 / 1.G Owners Manual
Trending: seat memory, brakes, brake, brake fluid, phone, flat tire, sat nav
Page 421 of 552
4217-3. Do-it-yourself maintenance
7
Maintenance and care
PRIUS c_U (OM52E68U)■
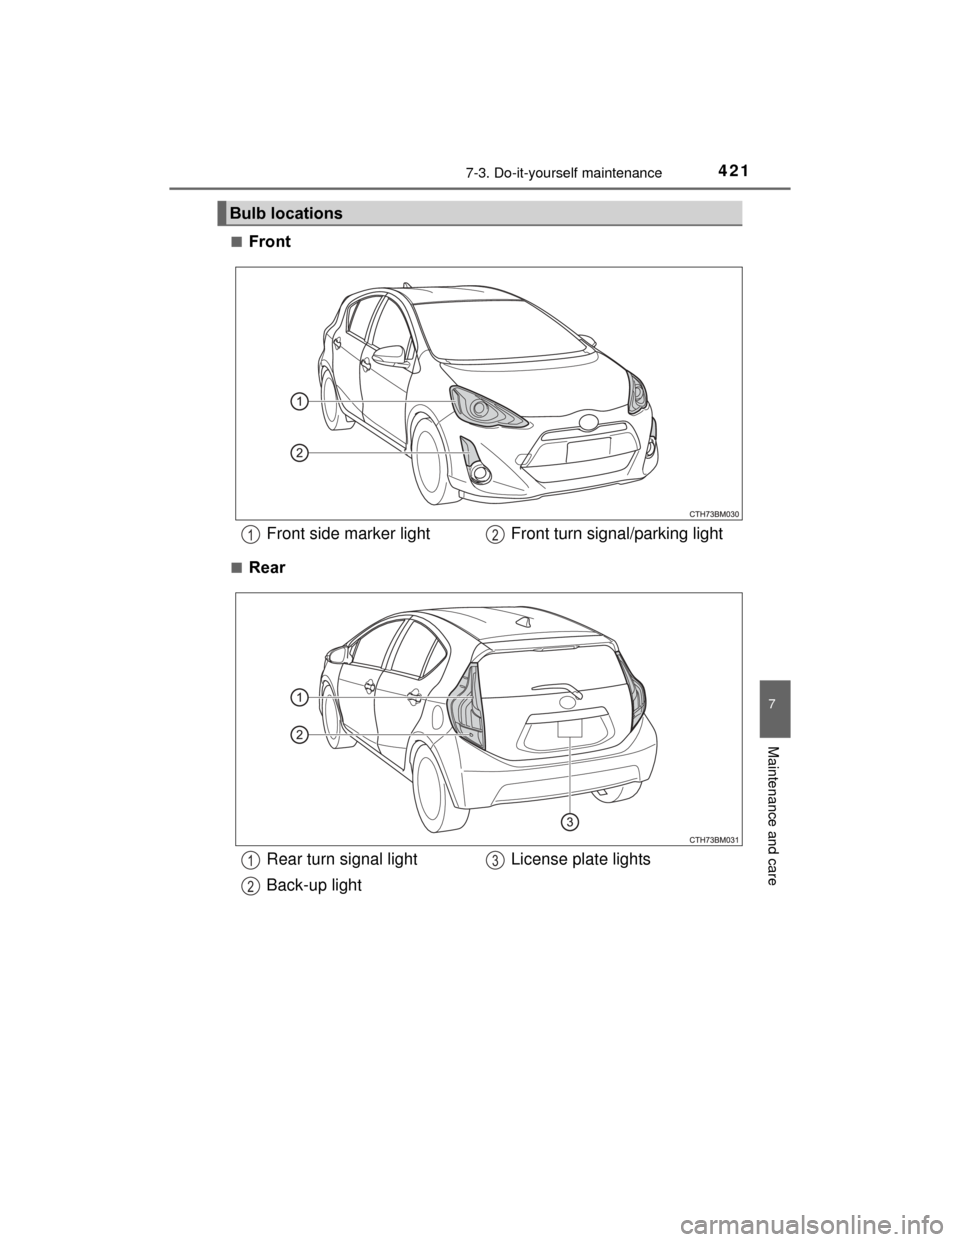
Front
■Rear
Bulb locations
Front side marker light Front turn signal/parking light12
Rear turn signal light
Back-up light
License plate lights1
2
3
Page 422 of 552
4227-3. Do-it-yourself maintenance
PRIUS c_U (OM52E68U)■
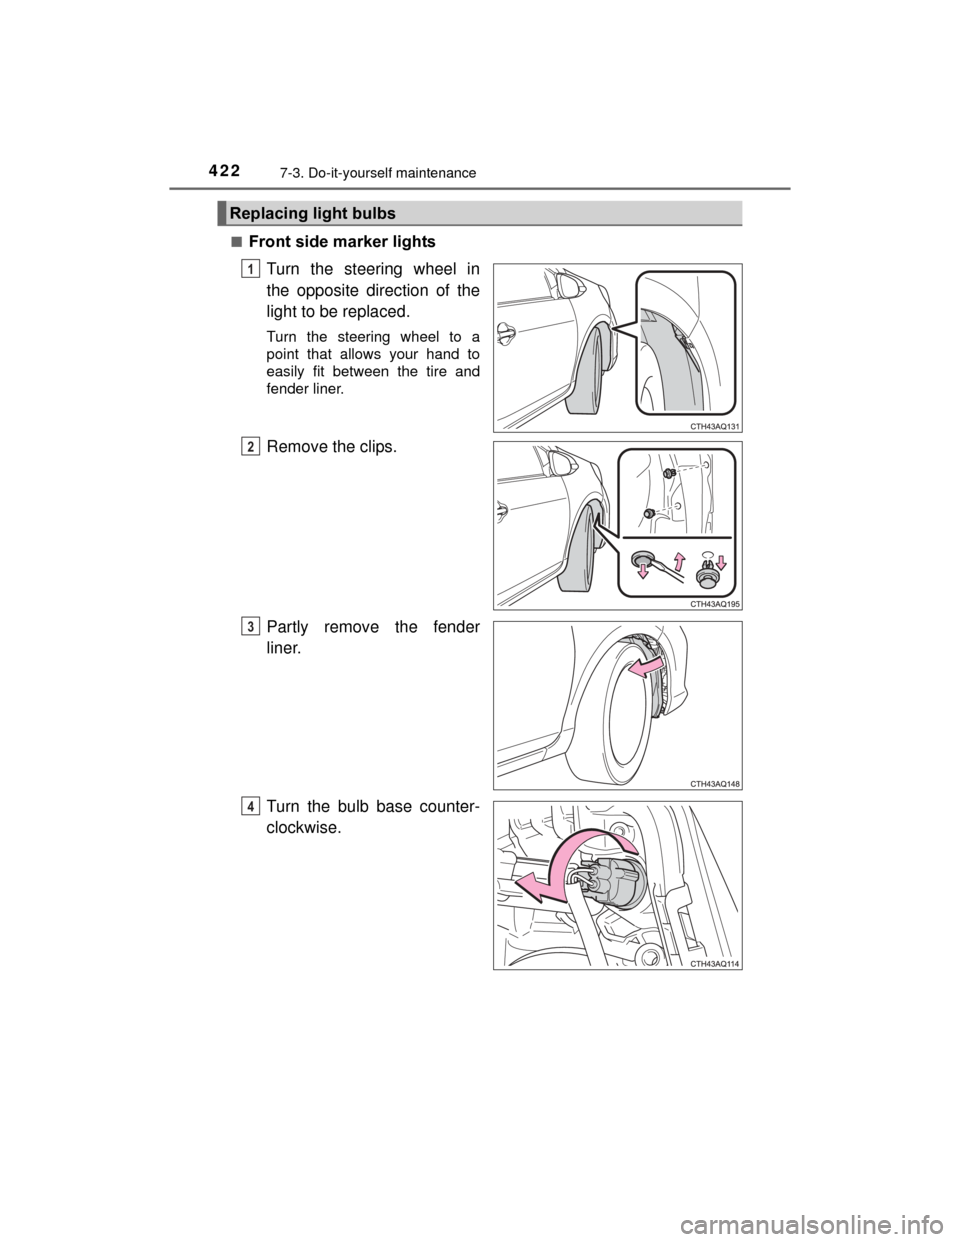
Front side marker lights
Turn the steering wheel in
the opposite direction of the
light to be replaced.
Turn the steering wheel to a
point that allows your hand to
easily fit between the tire and
fender liner.
Remove the clips.
Partly remove the fender
liner.
Turn the bulb base counter-
clockwise.
Replacing light bulbs
1
2
3
4
Page 423 of 552
4237-3. Do-it-yourself maintenance
7
Maintenance and care
PRIUS c_U (OM52E68U)
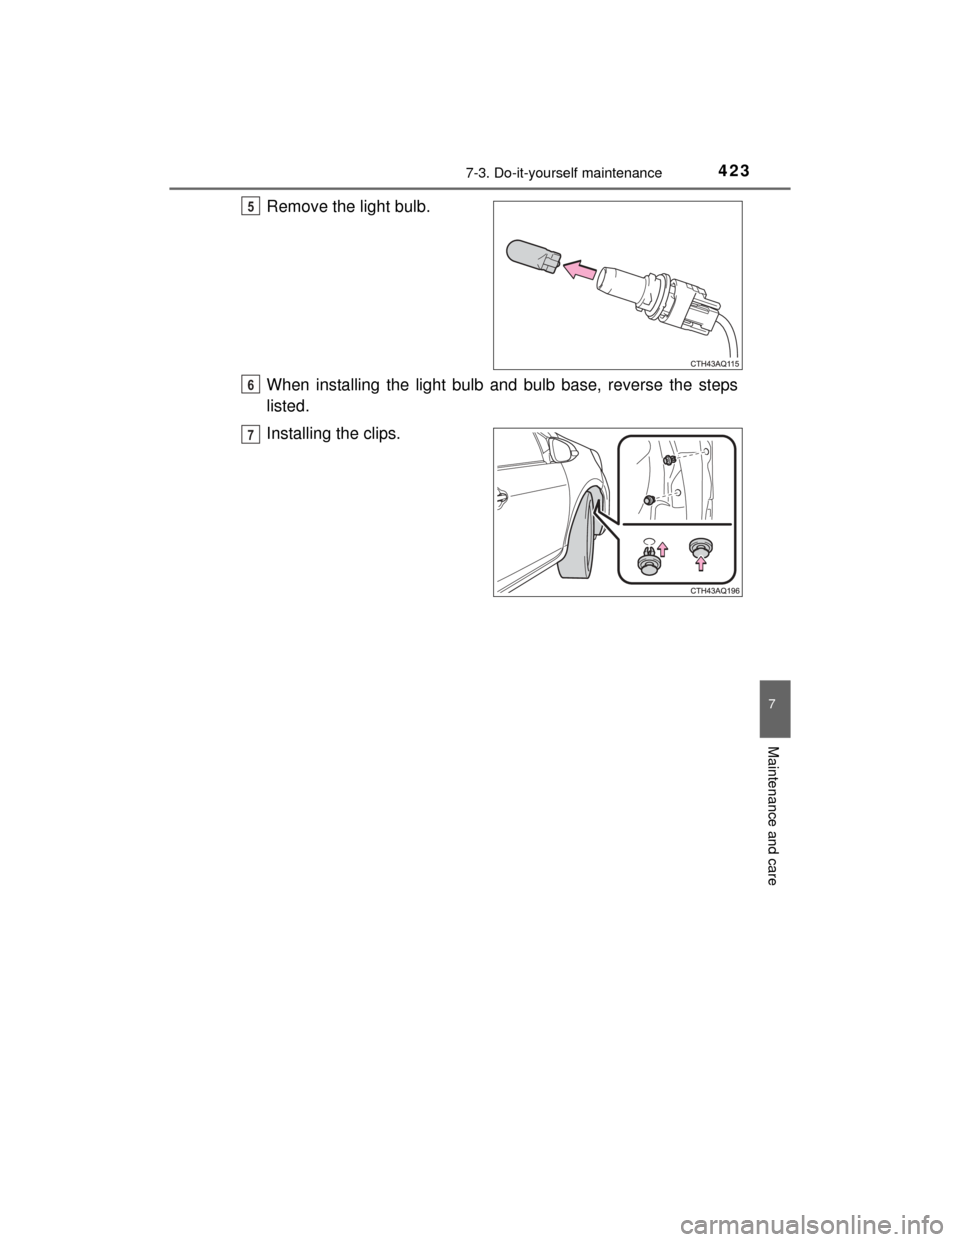
Remove the light bulb.
When installing the light bulb and bulb base, reverse the steps
listed.
Installing the clips.5
6
7
Page 424 of 552
4247-3. Do-it-yourself maintenance
PRIUS c_U (OM52E68U)■
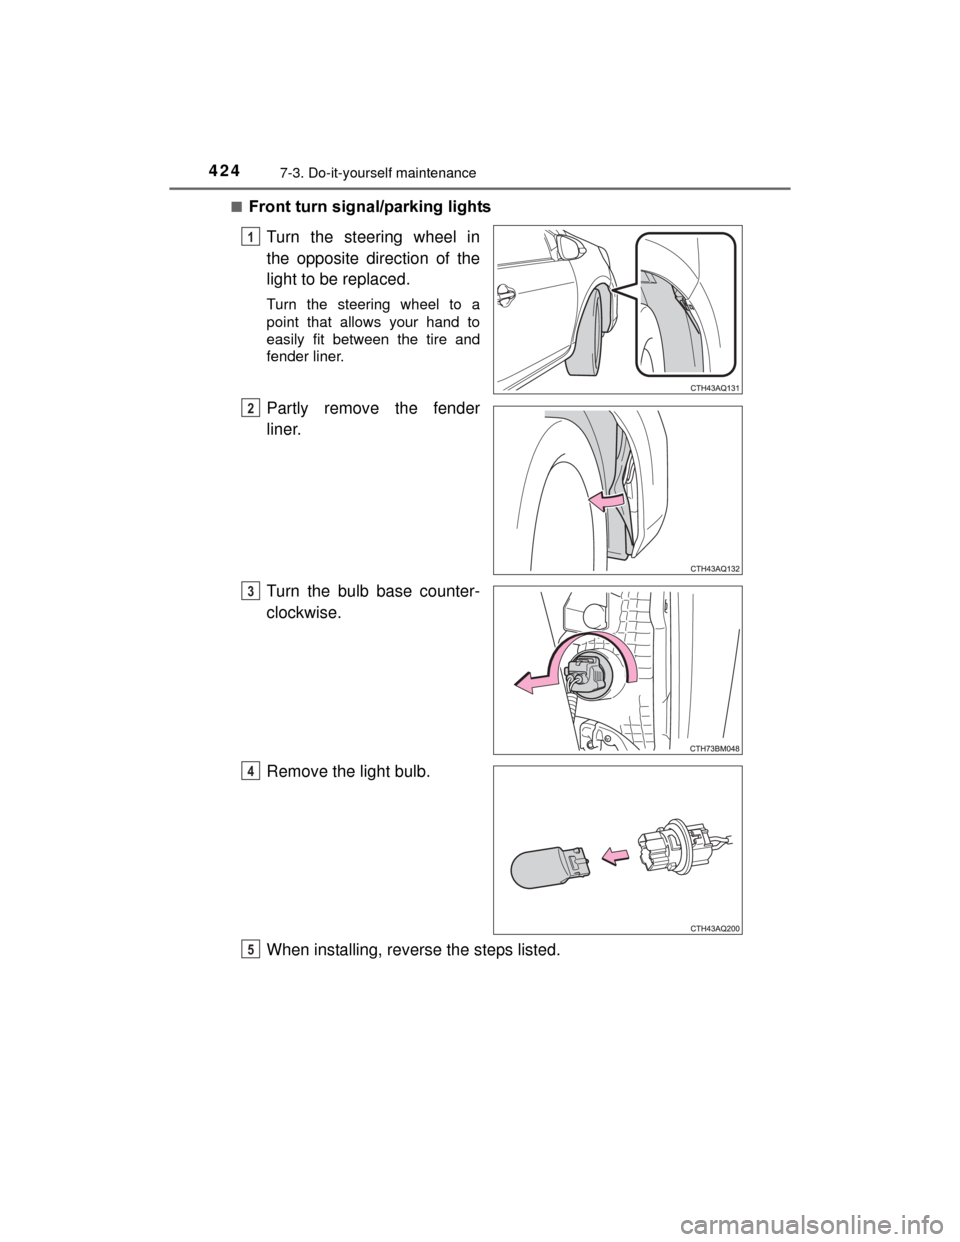
Front turn signal/parking lights
Turn the steering wheel in
the opposite direction of the
light to be replaced.
Turn the steering wheel to a
point that allows your hand to
easily fit between the tire and
fender liner.
Partly remove the fender
liner.
Turn the bulb base counter-
clockwise.
Remove the light bulb.
When installing, reverse the steps listed.
1
2
3
4
5
Page 425 of 552
4257-3. Do-it-yourself maintenance
7
Maintenance and care
PRIUS c_U (OM52E68U)■
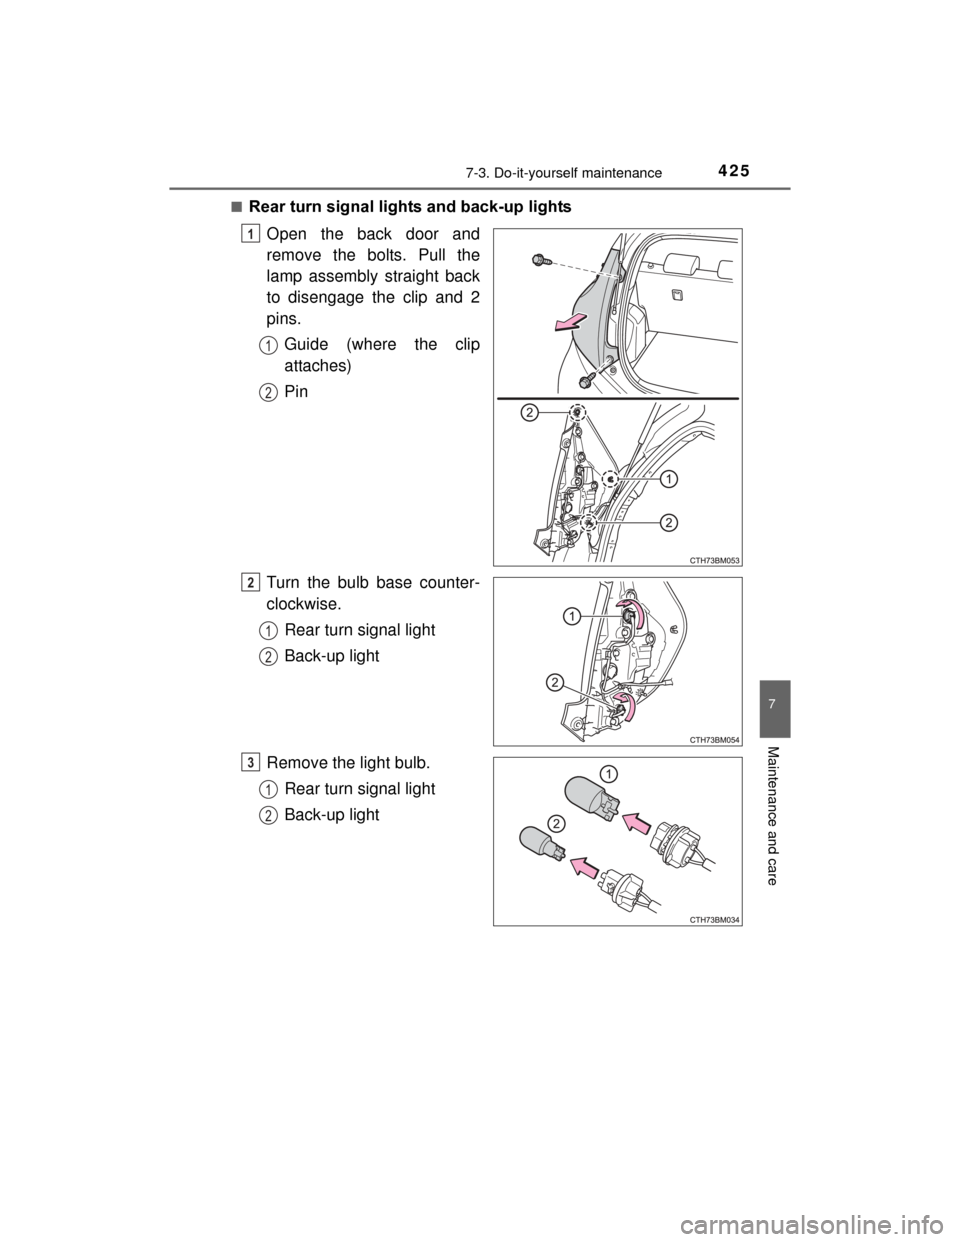
Rear turn signal lights and back-up lights
Open the back door and
remove the bolts. Pull the
lamp assembly straight back
to disengage the clip and 2
pins. Guide (where the clip
attaches)
Pin
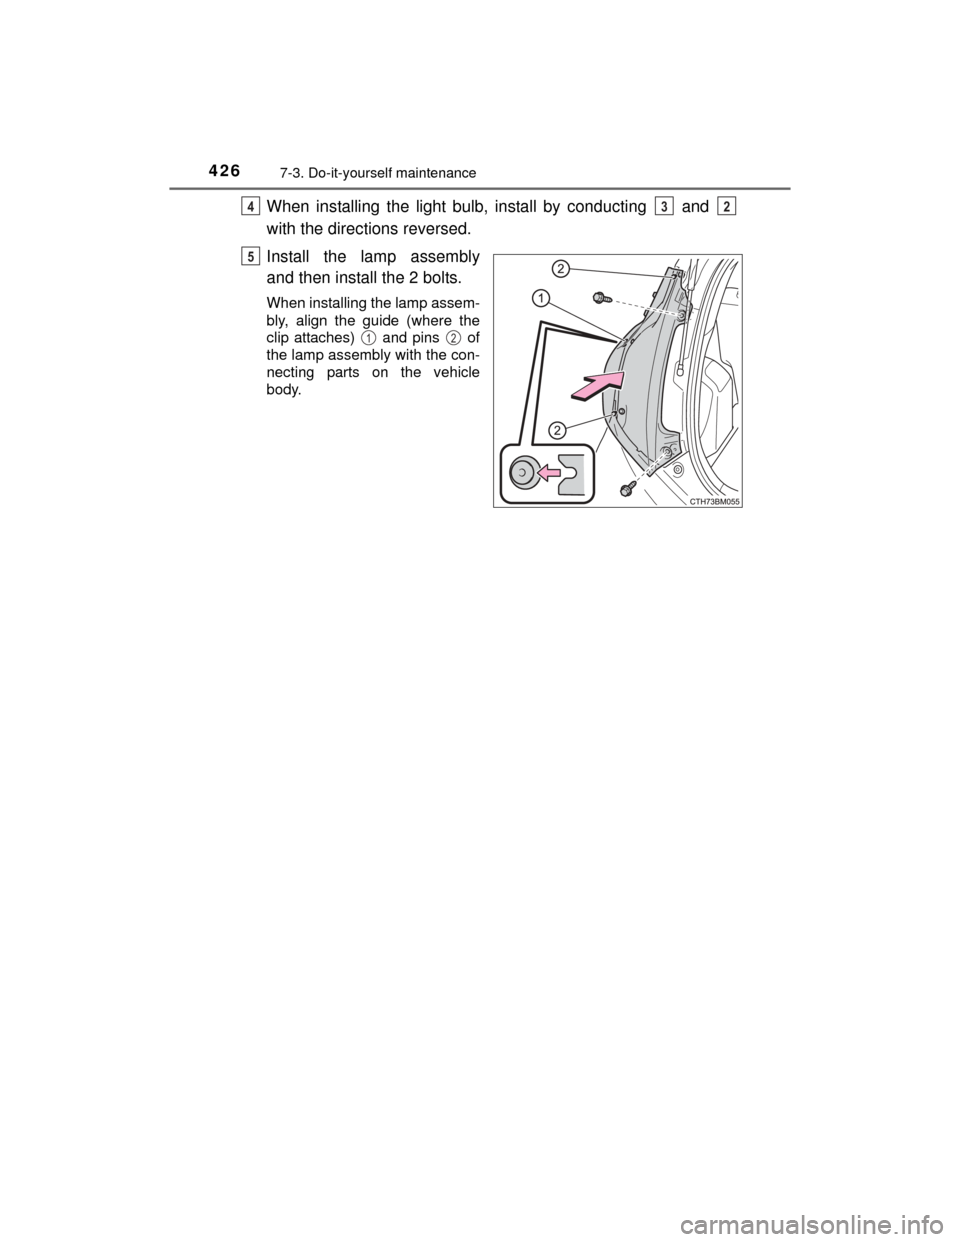
Turn the bulb base counter-
clockwise. Rear turn signal light
Back-up light
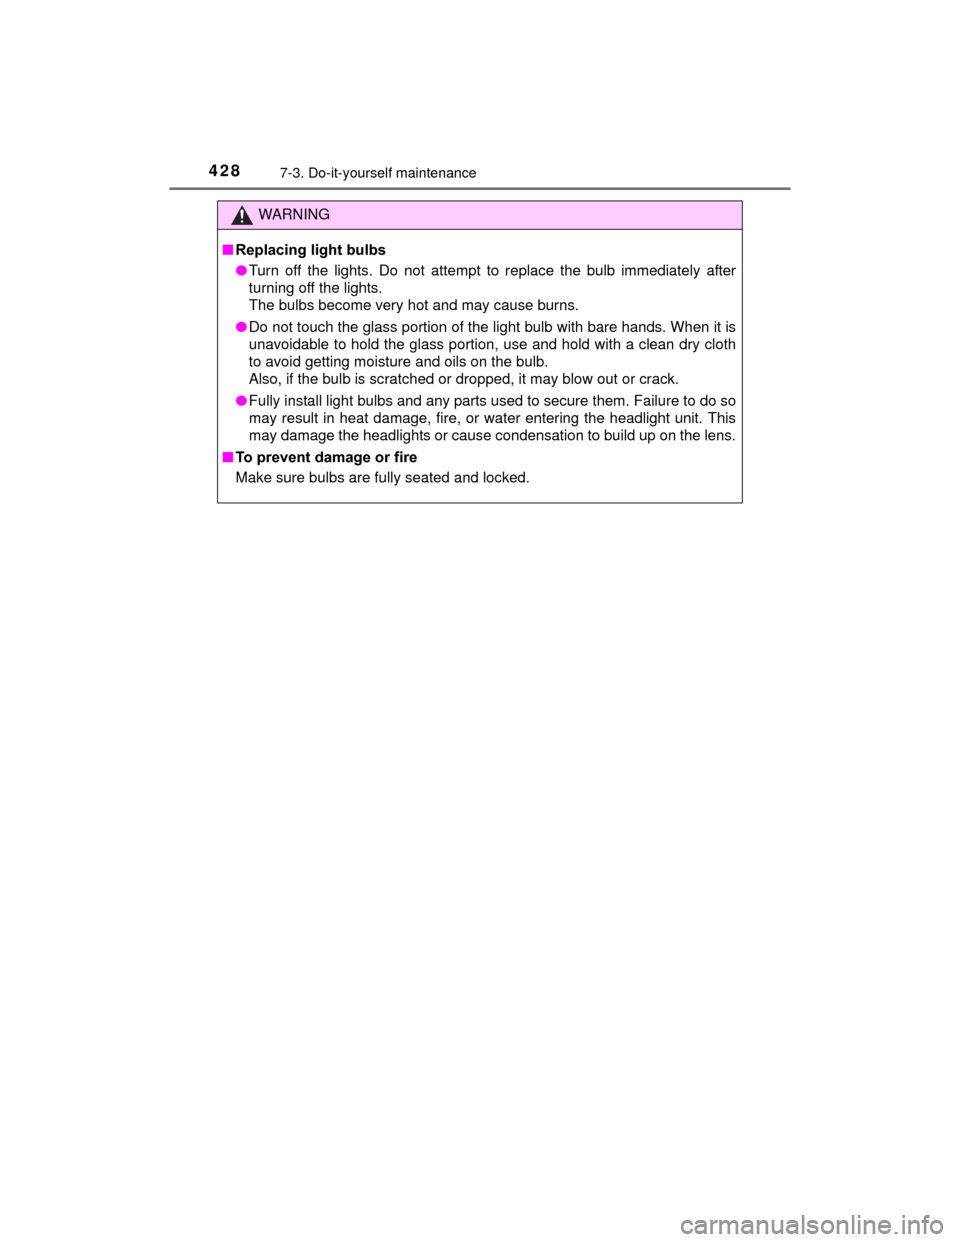
Remove the light bulb. Rear turn signal light
Back-up light
1
1
2
2
1
2
3
1
2
Page 426 of 552
4267-3. Do-it-yourself maintenance
PRIUS c_U (OM52E68U)
When installing the light bulb, install by conducting and
with the directions reversed.
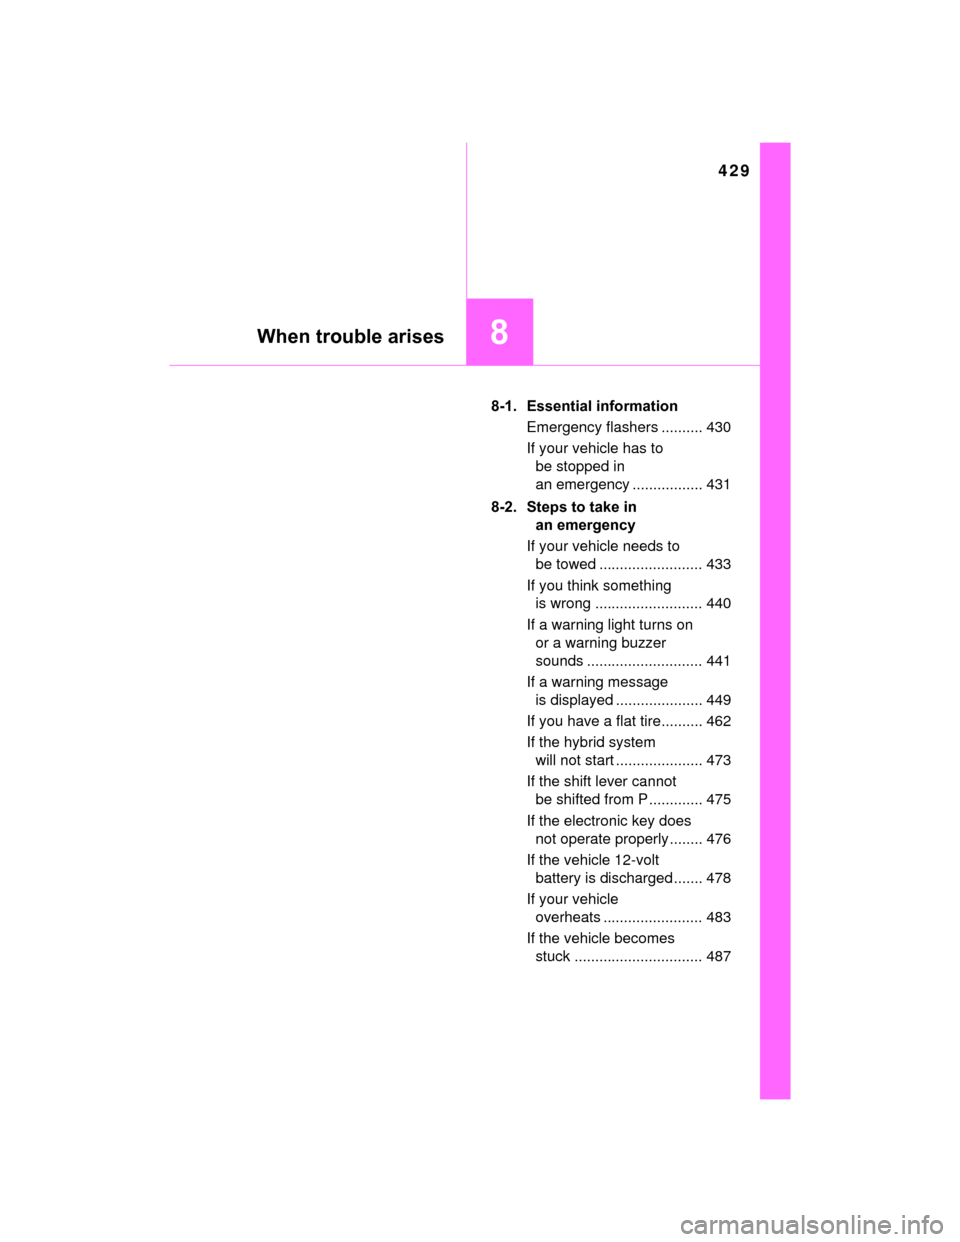
Install the lamp assembly
and then install the 2 bolts.
When installing the lamp assem-
bly, align the guide (where the
clip attaches) and pins of
the lamp assembly with the con-
necting parts on the vehicle
body.
432
5
12
Page 427 of 552
4277-3. Do-it-yourself maintenance
7
Maintenance and care
PRIUS c_U (OM52E68U)■
License plate light
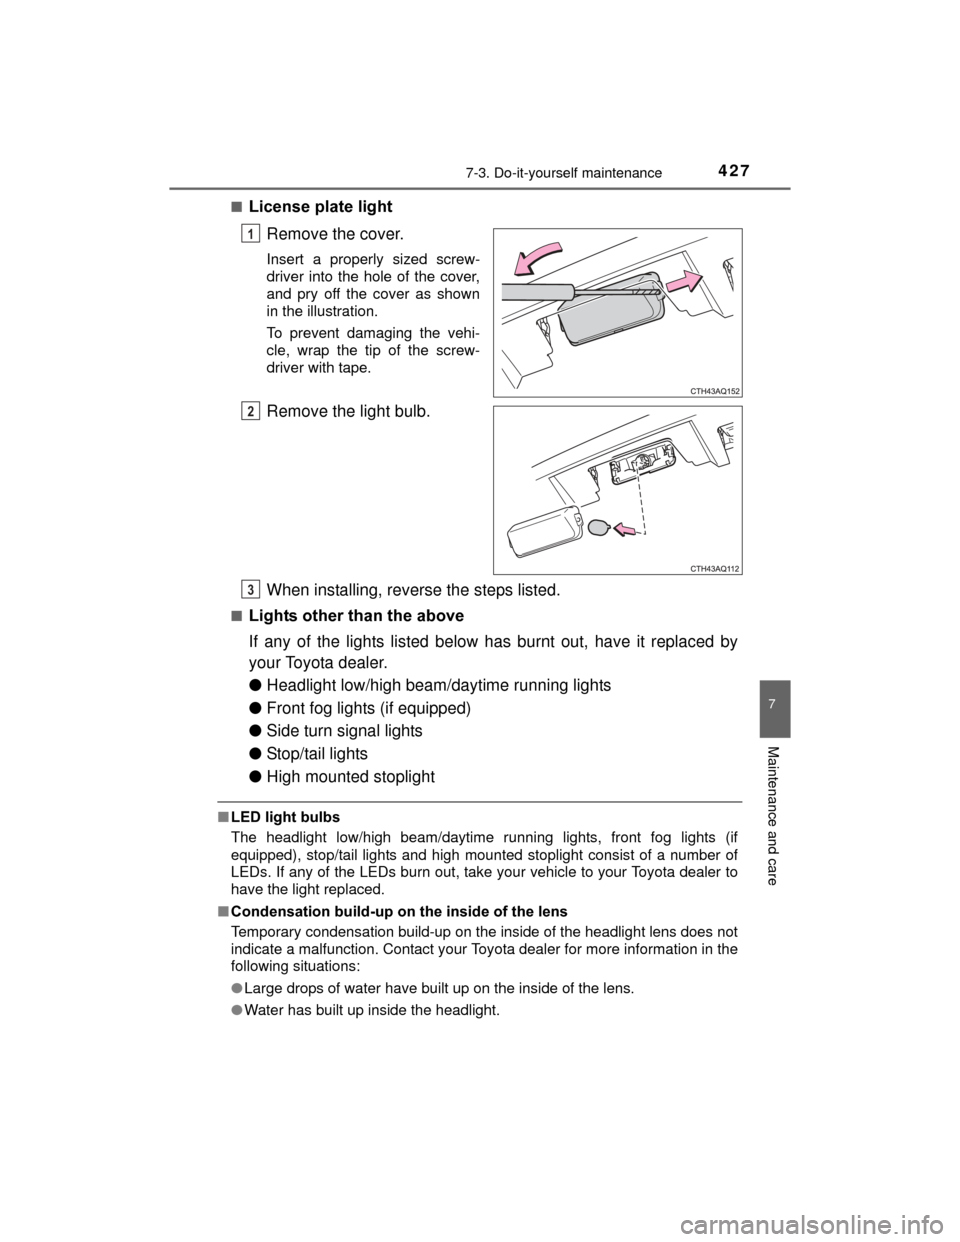
Remove the cover.
Insert a properly sized screw-
driver into the hole of the cover,
and pry off the cover as shown
in the illustration.
To prevent damaging the vehi-
cle, wrap the tip of the screw-
driver with tape.
Remove the light bulb.
When installing, reverse the steps listed.
■Lights other than the above
If any of the lights listed below has burnt out, have it replaced by
your Toyota dealer.
●Headlight low/high beam/daytime running lights
● Front fog lights (if equipped)
● Side turn signal lights
● Stop/tail lights
● High mounted stoplight
■LED light bulbs
The headlight low/high beam/daytime running lights, front fog lights (if
equipped), stop/tail lights and high mounted stoplight consist of a number of
LEDs. If any of the LEDs burn out, take your vehicle to your Toyota dealer to
have the light replaced.
■ Condensation build-up on the inside of the lens
Temporary condensation build-up on the inside of the headlight lens does not
indicate a malfunction. Contact your Toyo ta dealer for more information in the
following situations:
● Large drops of water have built up on the inside of the lens.
● Water has built up inside the headlight.
1
2
3
Page 428 of 552
4287-3. Do-it-yourself maintenance
PRIUS c_U (OM52E68U)
WARNING
■Replacing light bulbs
●Turn off the lights. Do not attempt to replace the bulb immediately after
turning off the lights.
The bulbs become very hot and may cause burns.
● Do not touch the glass portion of the light bulb with bare hands. When it is
unavoidable to hold the glass portion, use and hold with a clean dry cloth
to avoid getting moisture and oils on the bulb.
Also, if the bulb is scratched or dropped, it may blow out or crack.
● Fully install light bulbs and any parts used to secure them. Failure to do so
may result in heat damage, fire, or water entering the headlight unit. This
may damage the headlights or cause condensation to build up on the lens.
■ To prevent damage or fire
Make sure bulbs are fully seated and locked.
Page 429 of 552
429
8When trouble arises
PRIUS c_U (OM52E68U)8-1. Essential information
Emergency flashers .......... 430
If your vehicle has to be stopped in
an emergency ................. 431
8-2. Steps to take in an emergency
If your vehicle needs to be towed ......................... 433
If you think something is wrong .......................... 440
If a warning light turns on or a warning buzzer
sounds ............................ 441
If a warning message is displayed ..................... 449
If you have a flat tire.......... 462
If the hybrid system will not start ..................... 473
If the shift lever cannot be shifted from P ............. 475
If the electronic key does not operate properly ........ 476
If the vehicle 12-volt battery is discharged ....... 478
If your vehicle overheats ........................ 483
If the vehicle becomes stuck ............................... 487
Page 430 of 552
430
PRIUS c_U (OM52E68U)
8-1. Essential information
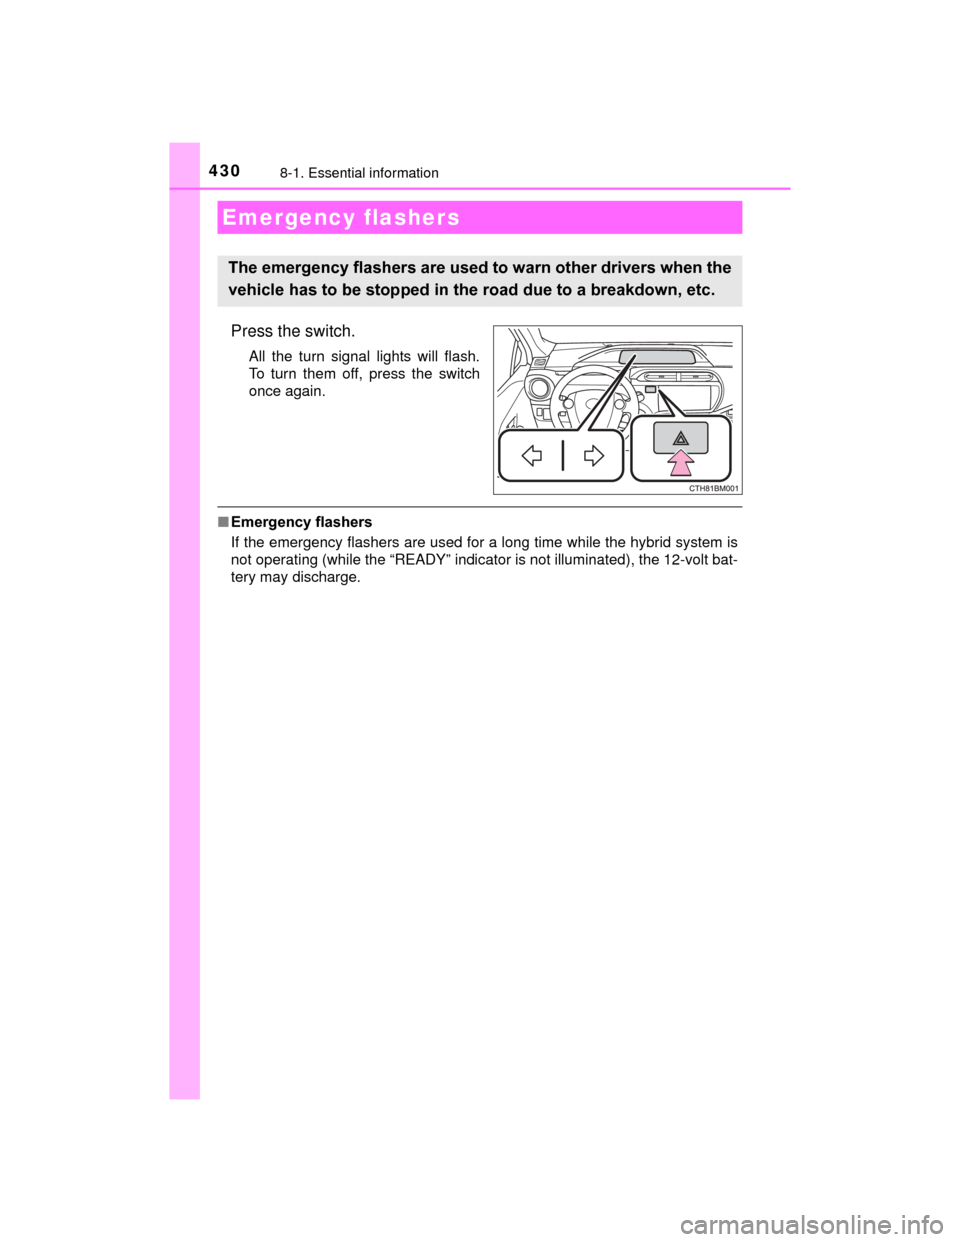
Press the switch.
All the turn signal lights will flash.
To turn them off, press the switch
once again.
■Emergency flashers
If the emergency flashers are used for a long time while the hybrid system is
not operating (while the “READY” indicator is not illuminated), the 12-volt bat-
tery may discharge.
Emergency flashers
The emergency flashers are used to warn other drivers when the
vehicle has to be stopped in the road due to a breakdown, etc.
Trending: fuel pressure, service reset, low beam, distance, ABS, warning, fuel filter
