display TOYOTA PRIUS C 2016 NHP10 / 1.G Navigation Manual
[x] Cancel search | Manufacturer: TOYOTA, Model Year: 2016, Model line: PRIUS C, Model: TOYOTA PRIUS C 2016 NHP10 / 1.GPages: 282, PDF Size: 4.98 MB
Page 179 of 282
179
2. SETUP
Prius_C_Navi_U
PHONE
7
When 15 contacts have already been
registered to the favorites list
1When 15 contacts have already been
registered to the favorites list, a regis-
tered contact needs to be replaced.
Select “Yes” when the confirmation
screen appears to replace a contact.
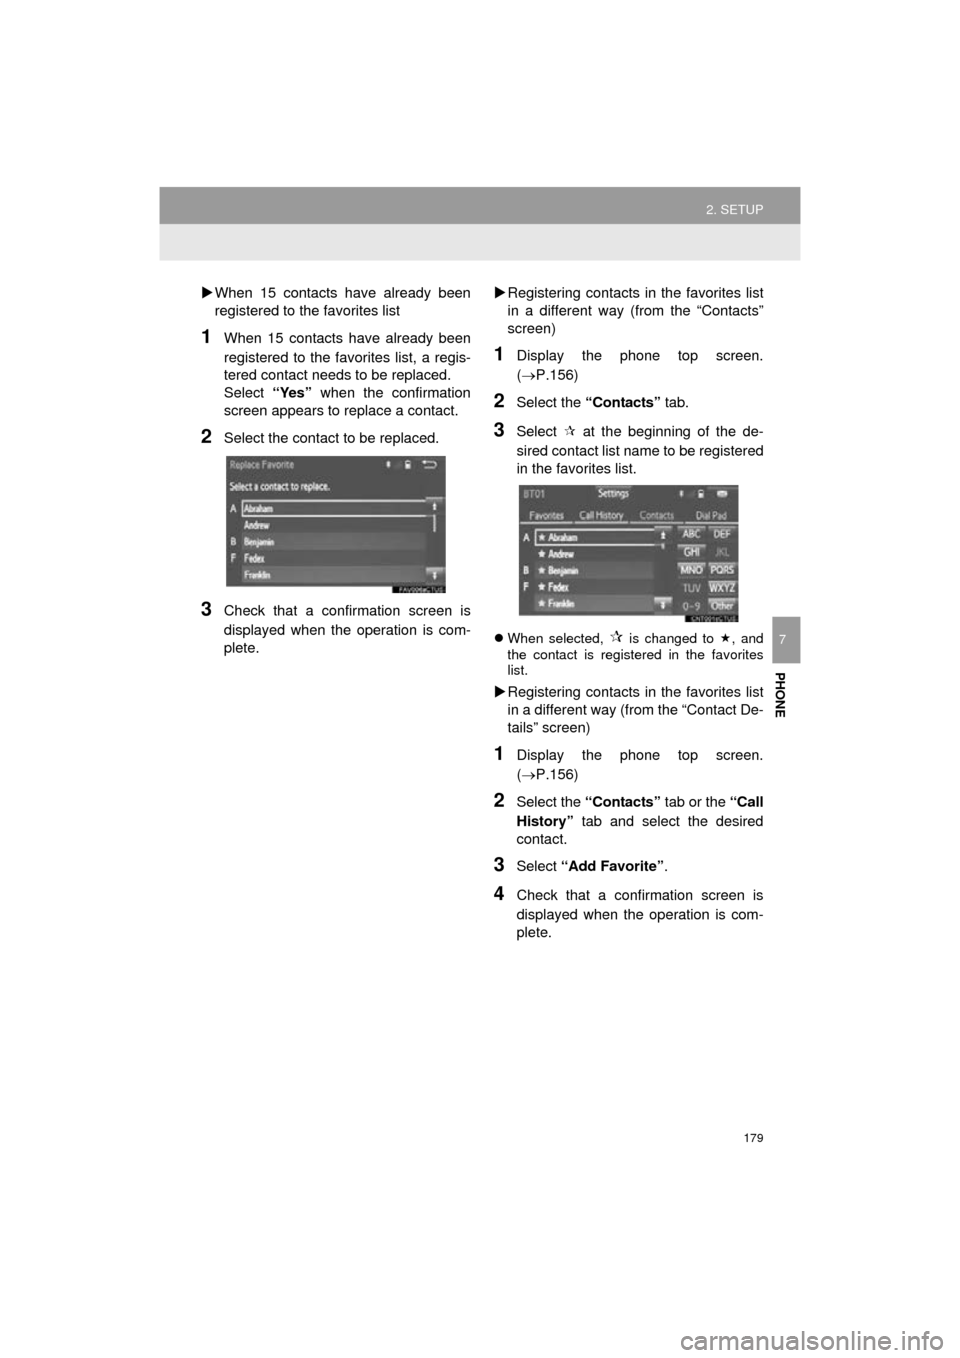
2Select the contact to be replaced.
3Check that a confirmation screen is
displayed when the operation is com-
plete.
Registering contacts in the favorites list
in a different way (from the “Contacts”
screen)
1Display the phone top screen.
(P.156)
2Select the “Contacts” tab.
3Select at the beginning of the de-
sired contact list name to be registered
in the favorites list.
When selected, is changed to , and
the contact is registered in the favorites
list.
Registering contacts in the favorites list
in a different way (from the “Contact De-
tails” screen)
1Display the phone top screen.
(P.156)
2Select the “Contacts” tab or the “Call
History” tab and select the desired
contact.
3Select “Add Favorite” .
4Check that a confirmation screen is
displayed when the operation is com-
plete.
Page 180 of 282
180
2. SETUP
Prius_C_Navi_U
■DELETING THE CONTACTS IN THE
FAVORITES LIST
1Select “Remove Favorite” .
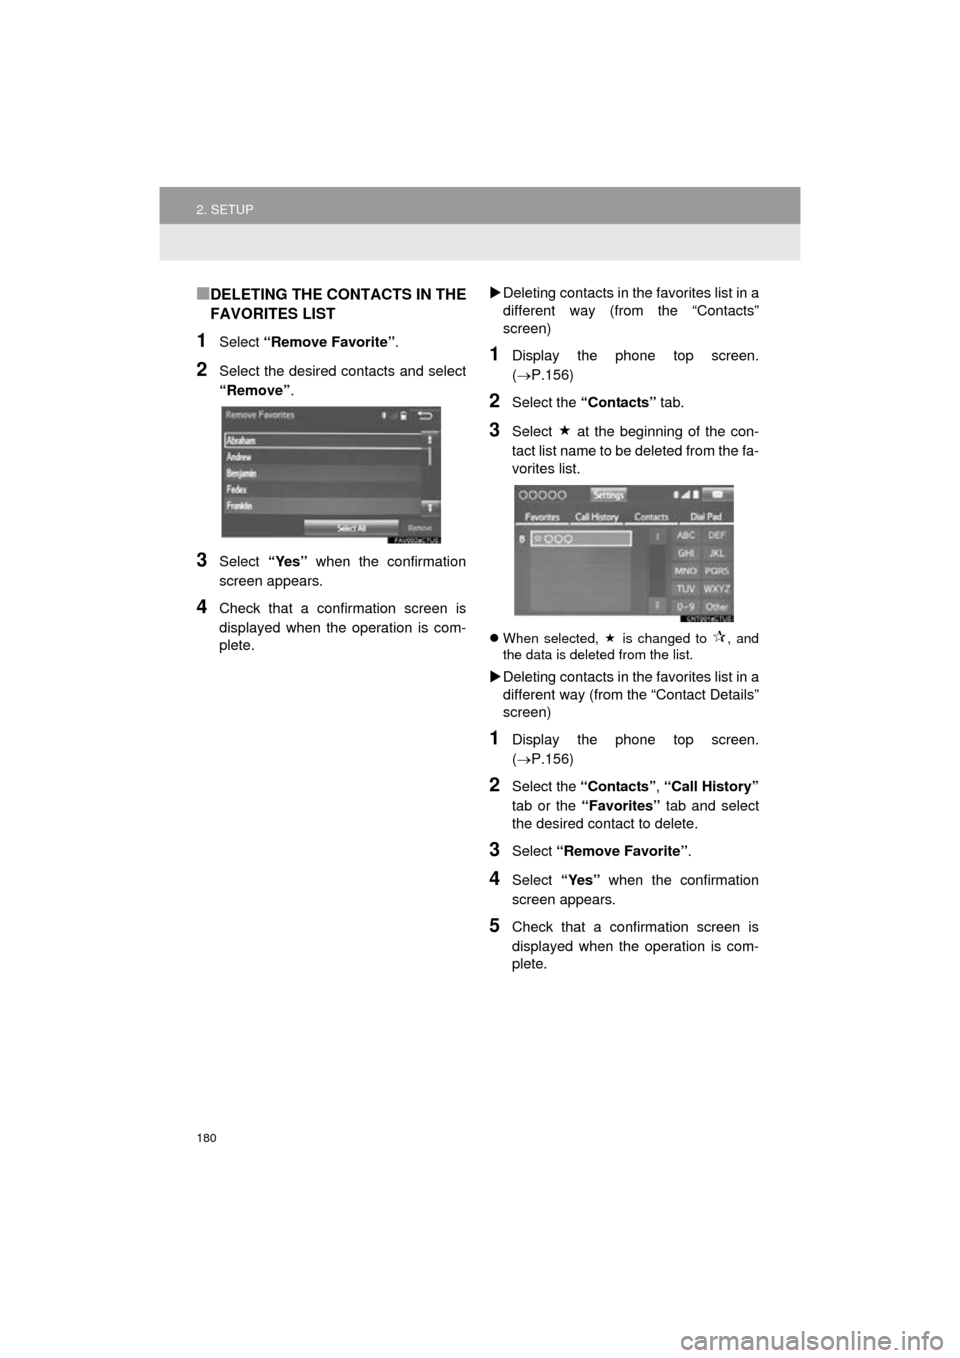
2Select the desired contacts and select
“Remove”.
3Select “Yes” when the confirmation
screen appears.
4Check that a confirmation screen is
displayed when the operation is com-
plete.
Deleting contacts in th e favorites list in a
different way (from the “Contacts”
screen)
1Display the phone top screen.
(P.156)
2Select the “Contacts” tab.
3Select at the beginning of the con-
tact list name to be deleted from the fa-
vorites list.
When selected, is changed to , and
the data is deleted from the list.
Deleting contacts in th e favorites list in a
different way (from the “Contact Details”
screen)
1Display the phone top screen.
(P.156)
2Select the “Contacts” , “Call History”
tab or the “Favorites” tab and select
the desired contact to delete.
3Select “Remove Favorite” .
4Select “Yes” when the confirmation
screen appears.
5Check that a confirmation screen is
displayed when the operation is com-
plete.
Page 181 of 282
181
2. SETUP
Prius_C_Navi_U
PHONE
7
1Display the “Phone/Message Settings”
screen. (P.171)
2Select “Messaging Settings” .
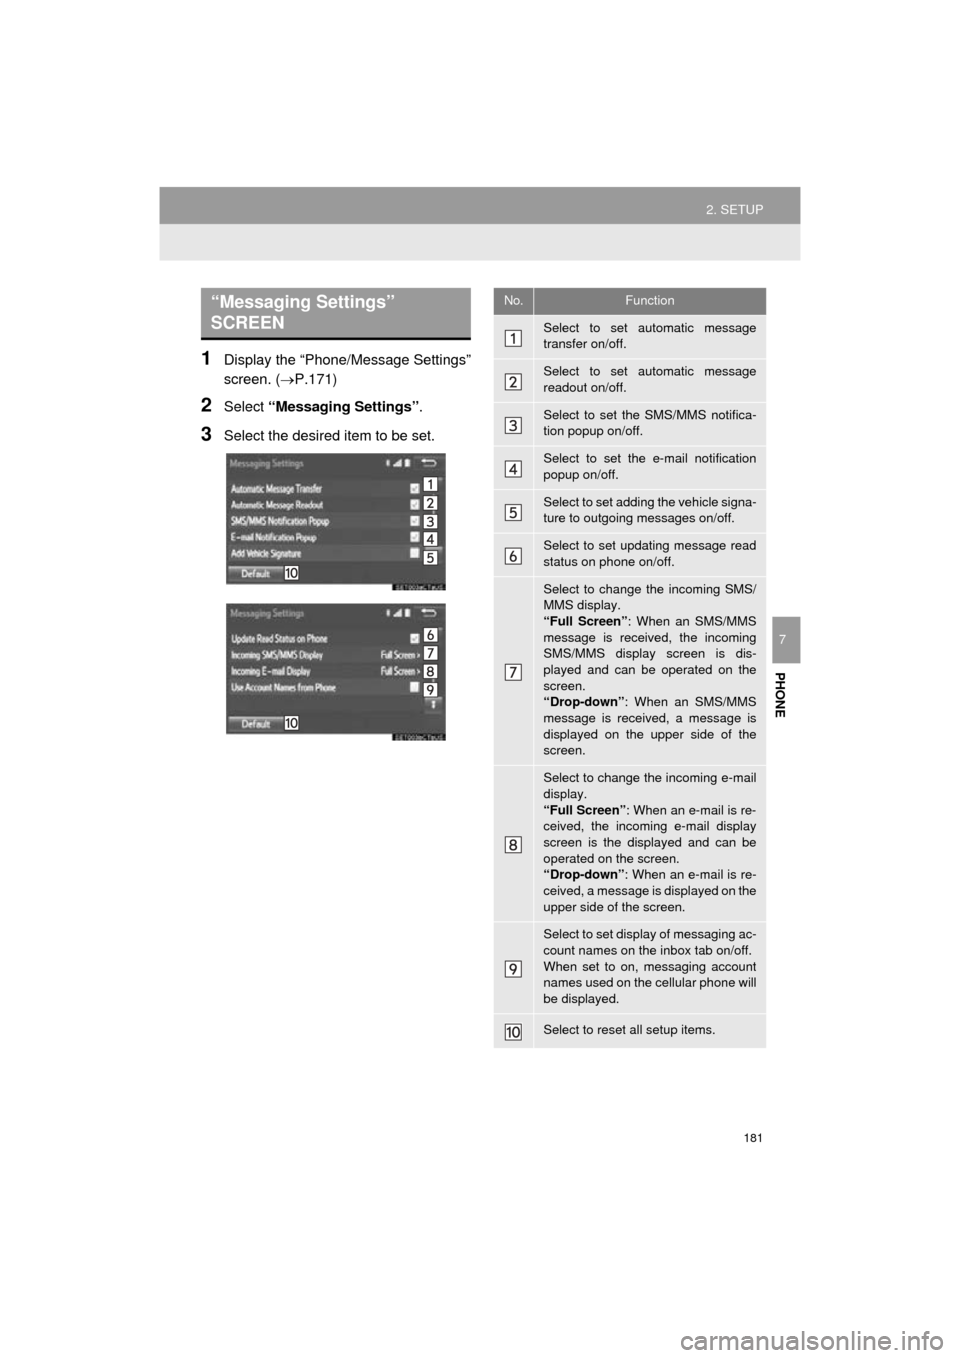
3Select the desired item to be set.
“Messaging Settings”
SCREEN No.Function
Select to set automatic message
transfer on/off.
Select to set automatic message
readout on/off.
Select to set the SMS/MMS notifica-
tion popup on/off.
Select to set the e-mail notification
popup on/off.
Select to set adding the vehicle signa-
ture to outgoing messages on/off.
Select to set updating message read
status on phone on/off.
Select to change the incoming SMS/
MMS display.
“Full Screen”: When an SMS/MMS
message is received, the incoming
SMS/MMS display screen is dis-
played and can be operated on the
screen.
“Drop-down” : When an SMS/MMS
message is received, a message is
displayed on the upper side of the
screen.
Select to change the incoming e-mail
display.
“Full Screen” : When an e-mail is re-
ceived, the incoming e-mail display
screen is the displayed and can be
operated on the screen.
“Drop-down” : When an e-mail is re-
ceived, a message is displayed on the
upper side of the screen.
Select to set display of messaging ac-
count names on the inbox tab on/off.
When set to on, messaging account
names used on the cellular phone will
be displayed.
Select to reset all setup items.
Page 182 of 282
182
2. SETUP
Prius_C_Navi_U
1Display the phone top screen.
(P.156)
2Select “Settings” .
3Select “Messaging Settings” .
1Display the “Phone/Message Settings”
screen. (P.171)
2Select “Phone Display Settings” .
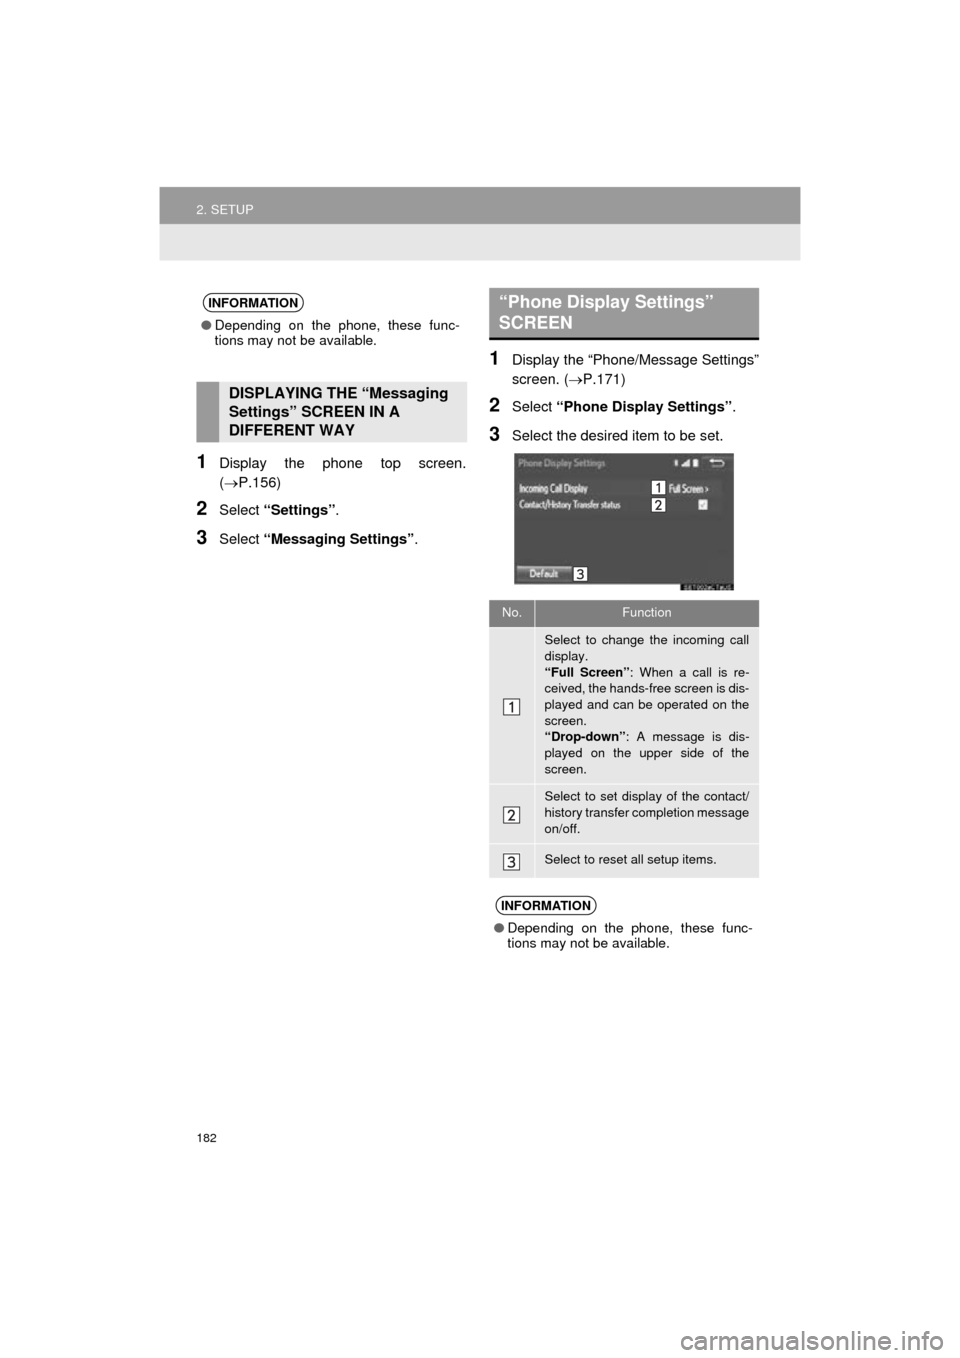
3Select the desired item to be set.
INFORMATION
●Depending on the phone, these func-
tions may not be available.
DISPLAYING THE “Messaging
Settings” SCREEN IN A
DIFFERENT WAY
“Phone Display Settings”
SCREEN
No.Function
Select to change the incoming call
display.
“Full Screen” : When a call is re-
ceived, the hands-free screen is dis-
played and can be operated on the
screen.
“Drop-down” : A message is dis-
played on the upper side of the
screen.
Select to set display of the contact/
history transfer completion message
on/off.
Select to reset all setup items.
INFORMATION
● Depending on the phone, these func-
tions may not be available.
Page 185 of 282
185
3. WHAT TO DO IF...
Prius_C_Navi_U
PHONE
7
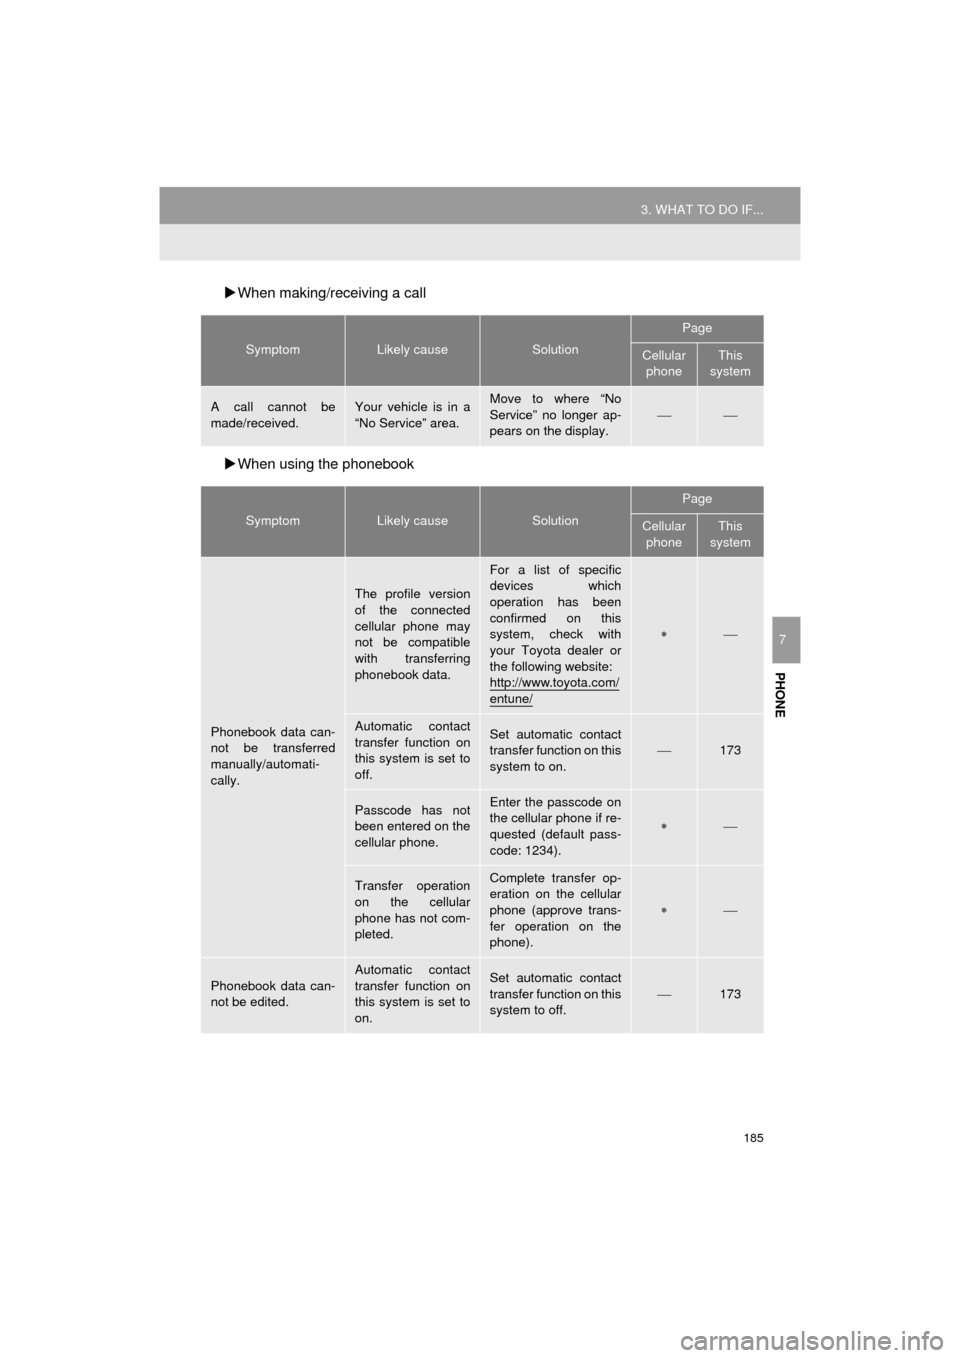
When making/receiving a call
When using the phonebook
SymptomLikely causeSolution
Page
Cellular
phoneThis
system
A call cannot be
made/received.Your vehicle is in a
“No Service” area.Move to where “No
Service” no longer ap-
pears on the display.
SymptomLikely causeSolution
Page
Cellular phoneThis
system
Phonebook data can-
not be transferred
manually/automati-
cally.
The profile version
of the connected
cellular phone may
not be compatible
with transferring
phonebook data.
For a list of specific
devices which
operation has been
confirmed on this
system, check with
your Toyota dealer or
the following website:
http://www.toyota.com/
entune/
Automatic contact
transfer function on
this system is set to
off.Set automatic contact
transfer function on this
system to on.173
Passcode has not
been entered on the
cellular phone.Enter the passcode on
the cellular phone if re-
quested (default pass-
code: 1234).
Transfer operation
on the cellular
phone has not com-
pleted.Complete transfer op-
eration on the cellular
phone (approve trans-
fer operation on the
phone).
Phonebook data can-
not be edited.
Automatic contact
transfer function on
this system is set to
on.Set automatic contact
transfer function on this
system to off.
173
Page 187 of 282
187
3. WHAT TO DO IF...
Prius_C_Navi_U
PHONE
7
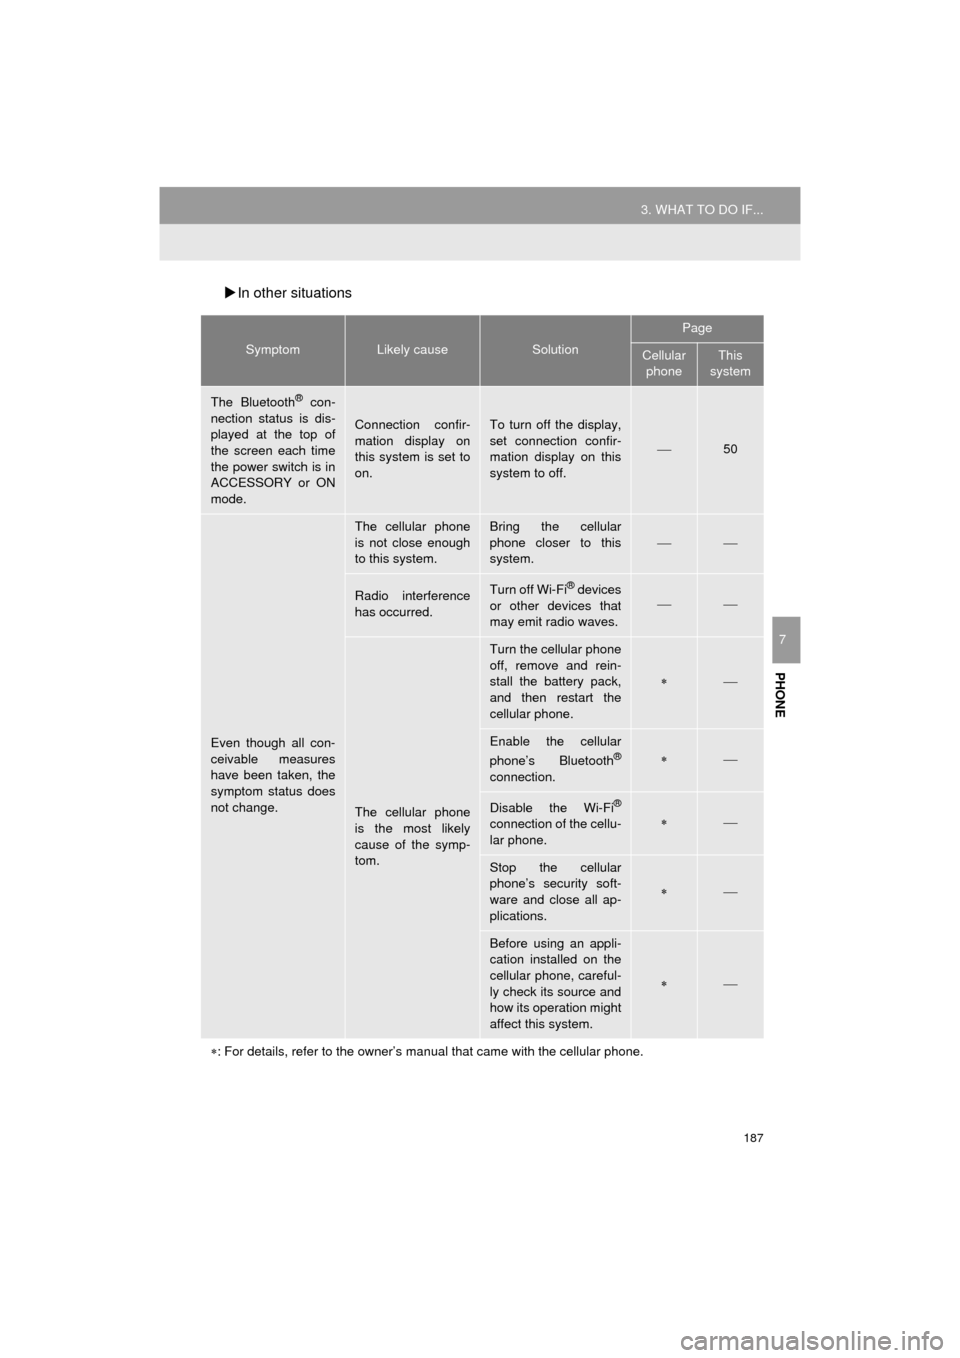
In other situations
SymptomLikely causeSolution
Page
Cellular
phoneThis
system
The Bluetooth® con-
nection status is dis-
played at the top of
the screen each time
the power switch is in
ACCESSORY or ON
mode.
Connection confir-
mation display on
this system is set to
on.To turn off the display,
set connection confir-
mation display on this
system to off.
50
Even though all con-
ceivable measures
have been taken, the
symptom status does
not change.
The cellular phone
is not close enough
to this system.Bring the cellular
phone closer to this
system.
Radio interference
has occurred.Turn off Wi-Fi® devices
or other devices that
may emit radio waves.
The cellular phone
is the most likely
cause of the symp-
tom.
Turn the cellular phone
off, remove and rein-
stall the battery pack,
and then restart the
cellular phone.
Enable the cellular
phone’s Bluetooth®
connection.
Disable the Wi-Fi®
connection of the cellu-
lar phone.
Stop the cellular
phone’s security soft-
ware and close all ap-
plications.
Before using an appli-
cation installed on the
cellular phone, careful-
ly check its source and
how its operation might
affect this system.
: For details, refer to the owner’s manual that came with the cellular phone.
Page 188 of 282
188
Prius_C_Navi_U
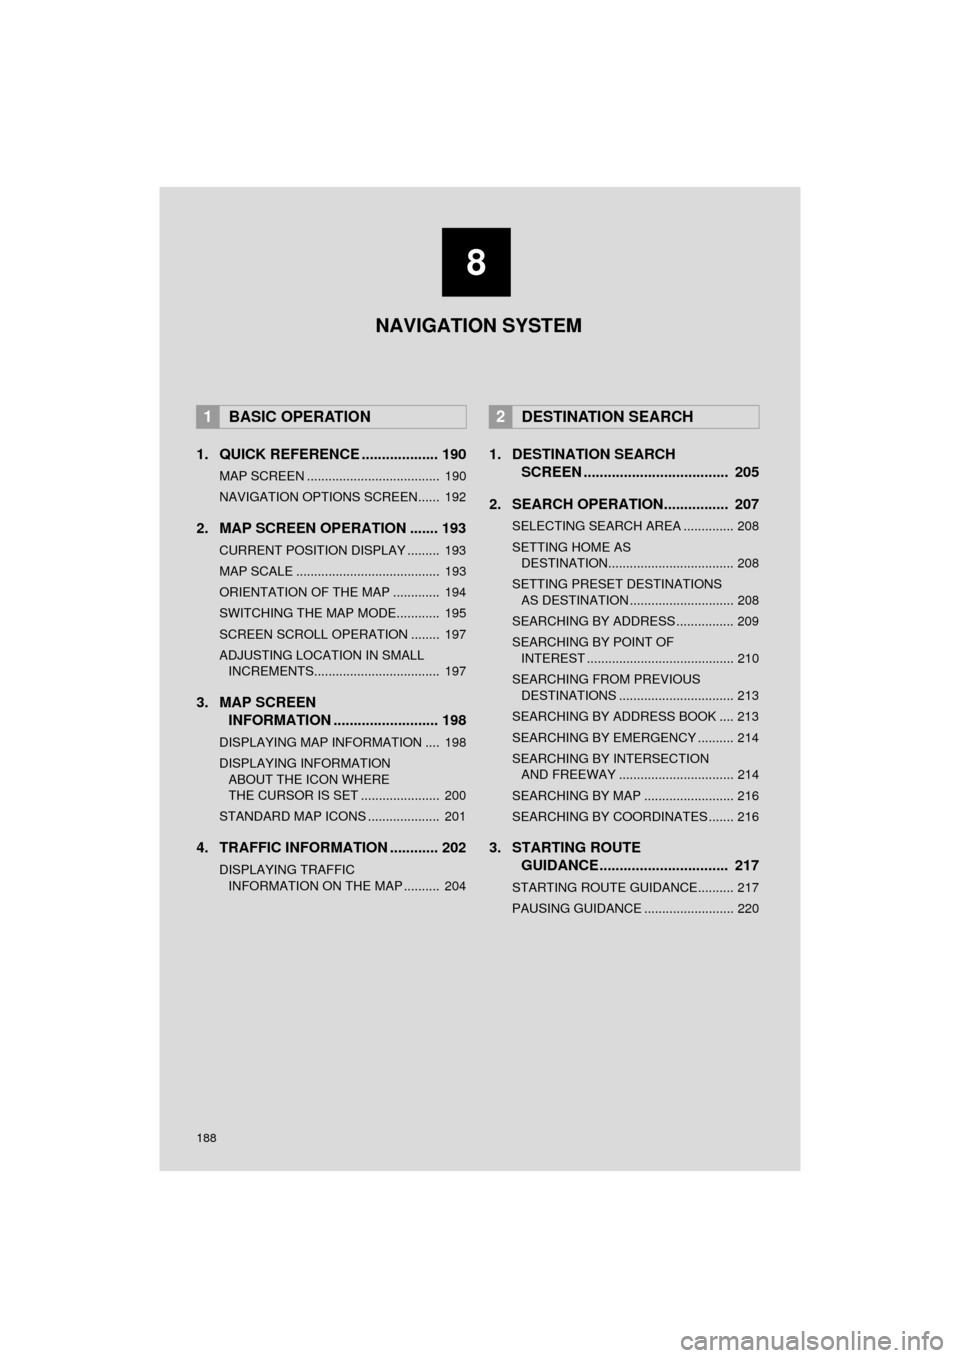
1. QUICK REFERENCE ................... 190
MAP SCREEN ..................................... 190
NAVIGATION OPTIONS SCREEN...... 192
2. MAP SCREEN OPERATION ....... 193
CURRENT POSITION DISPLAY ......... 193
MAP SCALE ........................................ 193
ORIENTATION OF THE MAP ............. 194
SWITCHING THE MAP MODE............ 195
SCREEN SCROLL OPERATION ........ 197
ADJUSTING LOCATION IN SMALL INCREMENTS................................... 197
3. MAP SCREEN INFORMATION .......................... 198
DISPLAYING MAP INFORMATION .... 198
DISPLAYING INFORMATION
ABOUT THE ICON WHERE
THE CURSOR IS SET ...................... 200
STANDARD MAP ICONS .................... 201
4. TRAFFIC INFORMATION ............ 202
DISPLAYING TRAFFIC INFORMATION ON THE MAP .......... 204
1. DESTINATION SEARCH SCREEN .................................... 205
2. SEARCH OPERATION.. .............. 207
SELECTING SEARCH AREA .............. 208
SETTING HOME AS
DESTINATION................................... 208
SETTING PRESET DESTINATIONS AS DESTINATION ............................. 208
SEARCHING BY ADDRESS ................ 209
SEARCHING BY POINT OF INTEREST ......................................... 210
SEARCHING FROM PREVIOUS DESTINATIONS ................................ 213
SEARCHING BY ADDRESS BOOK .... 213
SEARCHING BY EMERGENCY .......... 214
SEARCHING BY INTERSECTION AND FREEWAY ................................ 214
SEARCHING BY MAP ......................... 216
SEARCHING BY COORDINATES ....... 216
3. STARTING ROUTE GUIDANCE....... ......................... 217
STARTING ROUTE GUIDANCE.......... 217
PAUSING GUIDANCE ......................... 220
1BASIC OPERATION2DESTINATION SEARCH
8
NAVIGATION SYSTEM
Page 190 of 282
190
Prius_C_Navi_U
1. BASIC OPERATION
1. QUICK REFERENCE
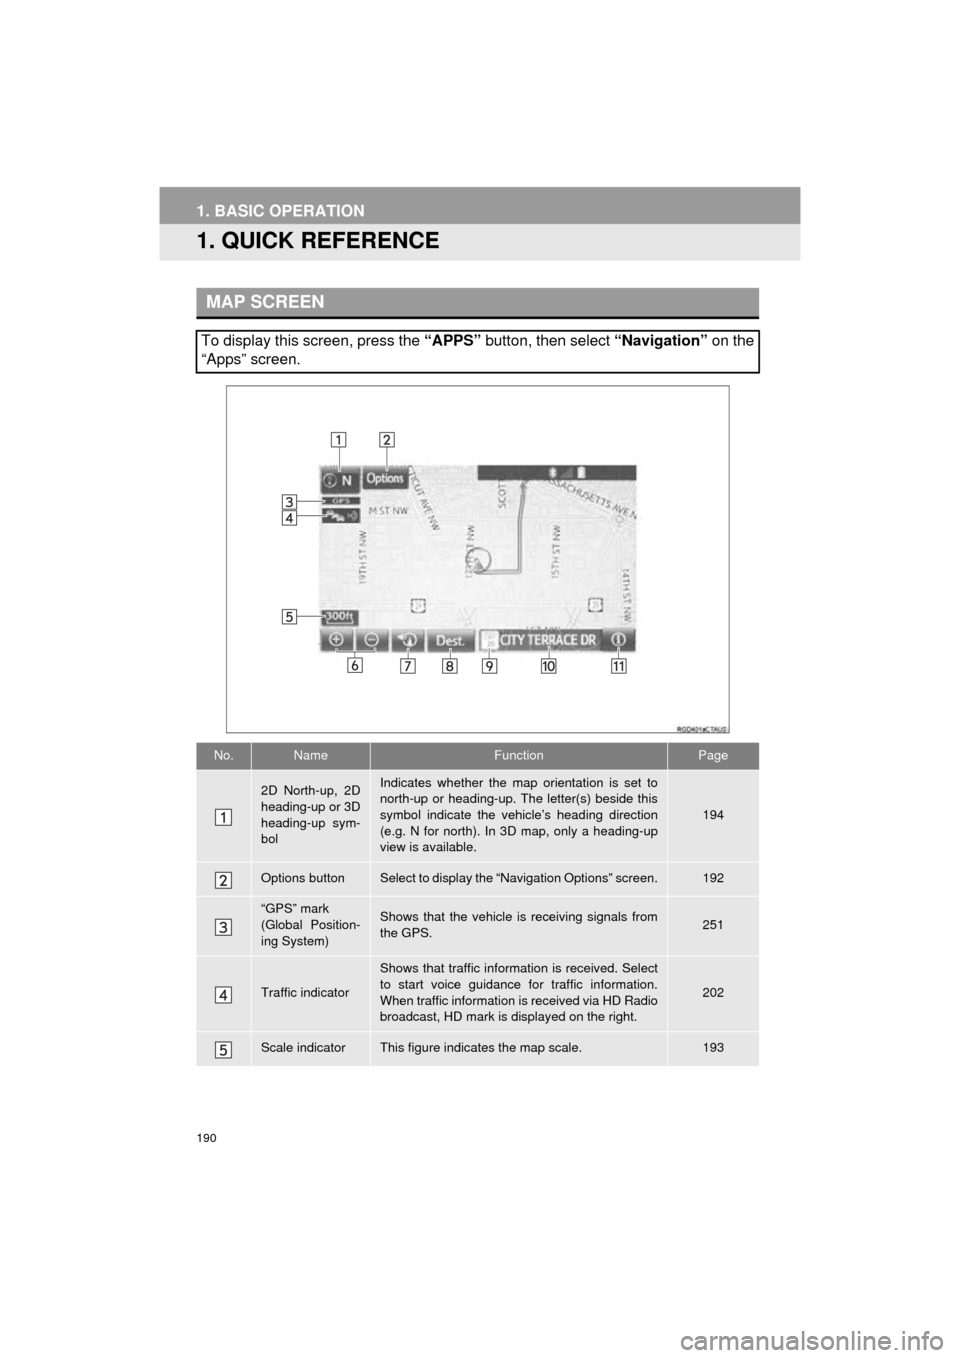
MAP SCREEN
To display this screen, press the “APPS” button, then select “Navigation” on the
“Apps” screen.
No.NameFunctionPage
2D North-up, 2D
heading-up or 3D
heading-up sym-
bolIndicates whether the map orientation is set to
north-up or heading-up. The letter(s) beside this
symbol indicate the vehicle’s heading direction
(e.g. N for north). In 3D map, only a heading-up
view is available.
194
Options buttonSelect to display the “Navigation Options” screen.192
“GPS” mark
(Global Position-
ing System)Shows that the vehicle is receiving signals from
the GPS.251
Traffic indicator
Shows that traffic information is received. Select
to start voice guidance for traffic information.
When traffic information is received via HD Radio
broadcast, HD mark is displayed on the right.
202
Scale indicatorThis figure indicates the map scale.193
Page 191 of 282
191
1. BASIC OPERATION
NAVIGATION SYSTEM
Prius_C_Navi_U
8
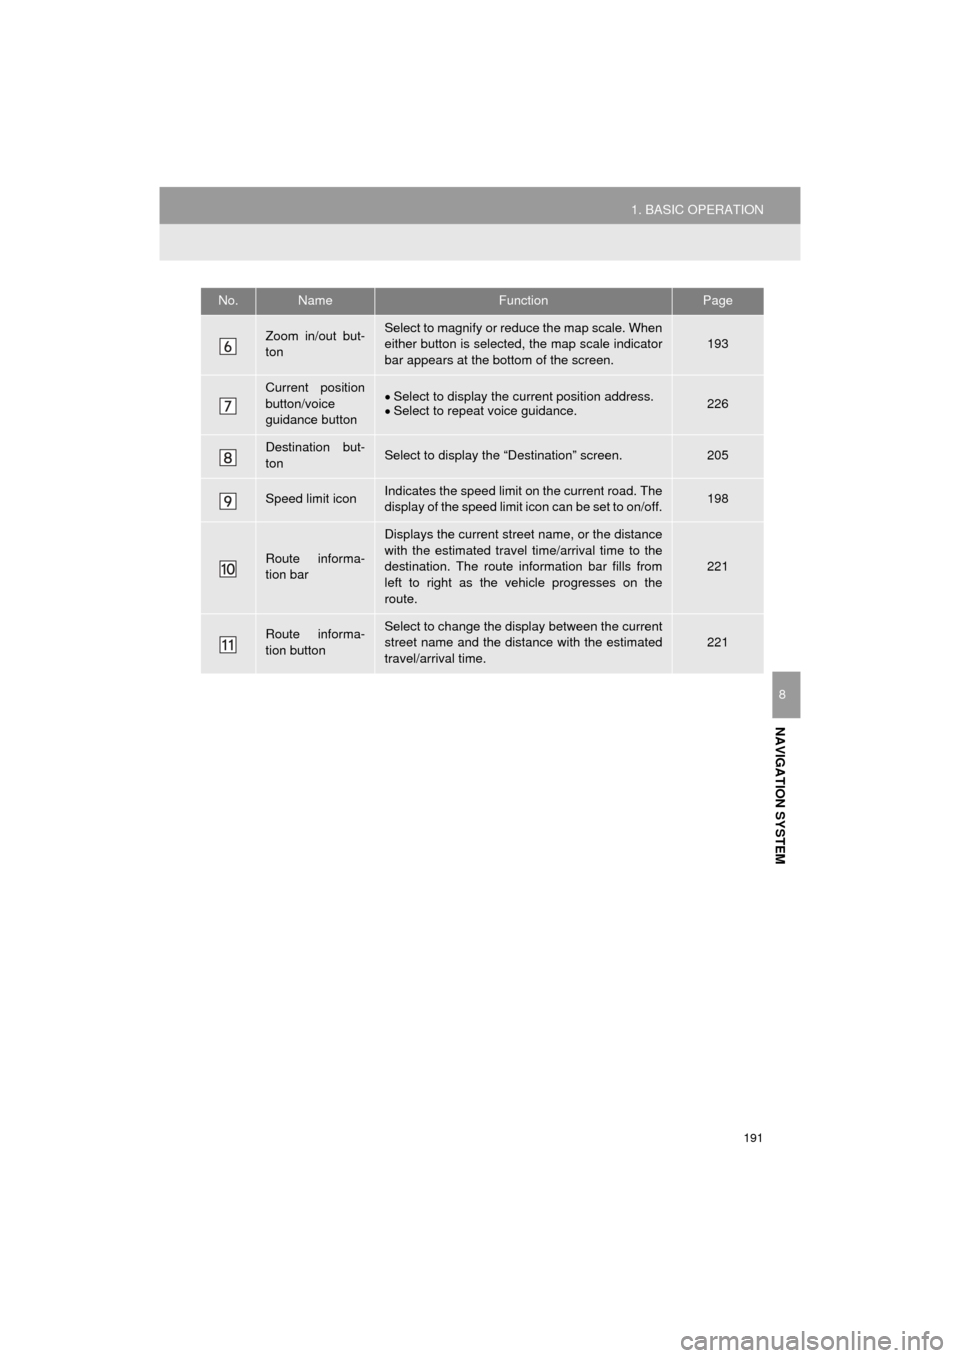
Zoom in/out but-
tonSelect to magnify or reduce the map scale. When
either button is selected, the map scale indicator
bar appears at the bottom of the screen.193
Current position
button/voice
guidance buttonSelect to display the current position address.
Select to repeat voice guidance.226
Destination but-
tonSelect to display the “Destination” screen.205
Speed limit iconIndicates the speed limit on the current road. The
display of the speed limit icon can be set to on/off.198
Route informa-
tion bar
Displays the current street name, or the distance
with the estimated travel time/arrival time to the
destination. The route information bar fills from
left to right as the vehicle progresses on the
route.
221
Route informa-
tion buttonSelect to change the display between the current
street name and the distance with the estimated
travel/arrival time.
221
No.NameFunctionPage
Page 192 of 282
192
1. BASIC OPERATION
Prius_C_Navi_U
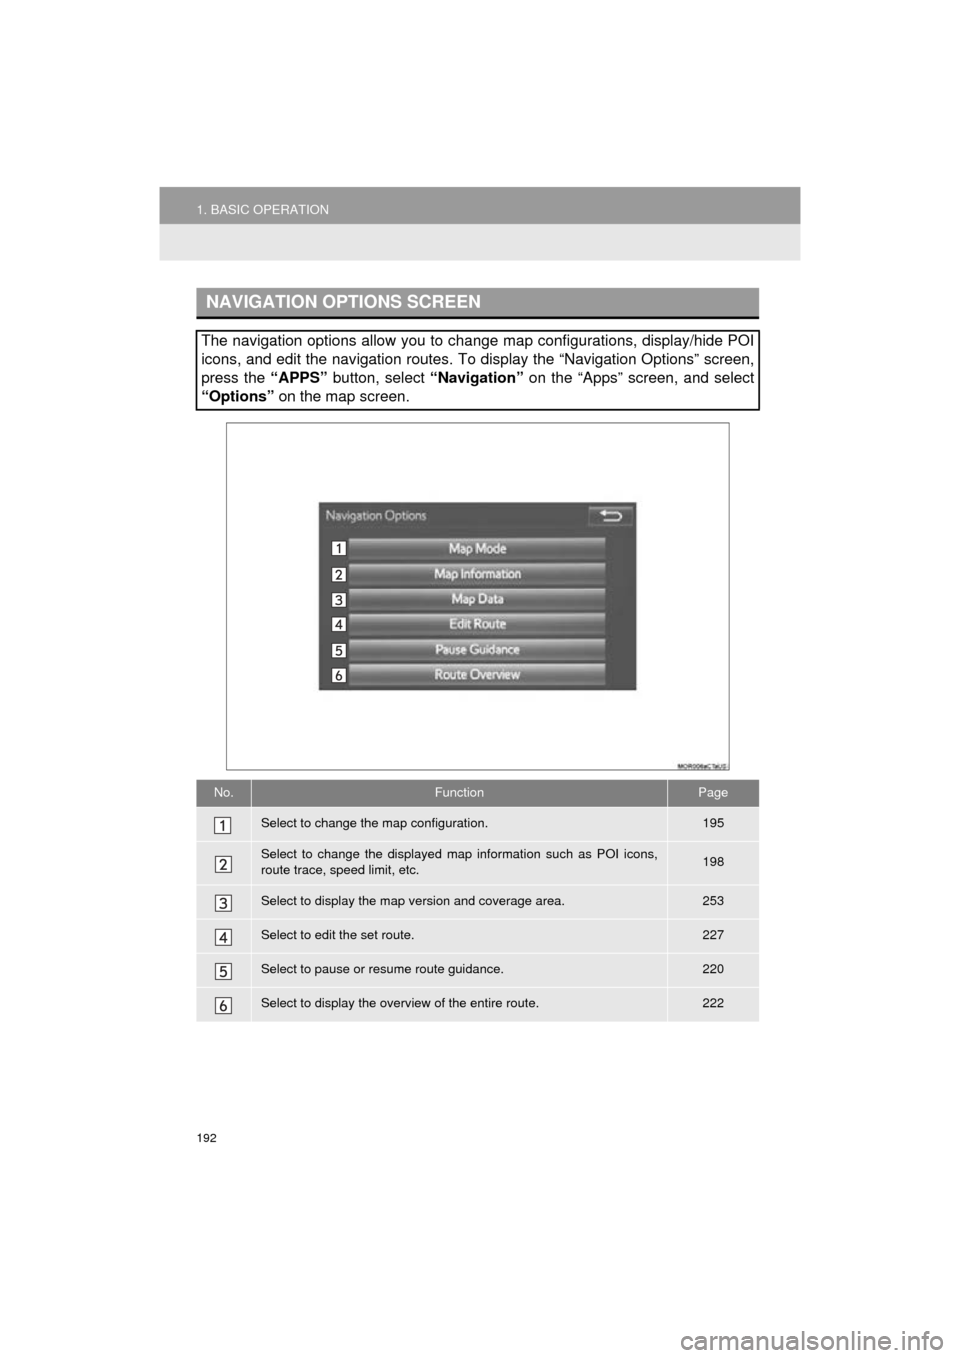
NAVIGATION OPTIONS SCREEN
The navigation options allow you to change map configurations, display/hide POI
icons, and edit the navigation routes. To display the “Navigation Options” screen,
press the “APPS” button, select “Navigation” on the “Apps” screen, and select
“Options” on the map screen.
No.FunctionPage
Select to change the map configuration.195
Select to change the displayed map information such as POI icons,
route trace, speed limit, etc.198
Select to display the map version and coverage area.253
Select to edit the set route.227
Select to pause or resume route guidance.220
Select to display the overview of the entire route.222