battery location TOYOTA PRIUS C 2020 Owners Manual
[x] Cancel search | Manufacturer: TOYOTA, Model Year: 2020, Model line: PRIUS C, Model: TOYOTA PRIUS C 2020Pages: 600, PDF Size: 12.02 MB
Page 129 of 600

1293-2. Opening, closing and locking the doors
3
Operation of each component
PRIUS c_U
■Operation signals
Vehicles without a smart key system
The emergency flashers flash to indicate that the doors have been locked/
unlocked. (Locked: once; Unlocked: twice)
Vehicles with a smart key system
A buzzer sounds and the emergency flashers flash to indicate th at the doors
have been locked/unlocked. (Locked: once; Unlocked: twice)
■ Security feature
Vehicles without a smart key system
If a door is not opened within approximately 60 seconds after t he vehicle is
unlocked, the security feature automatically locks the vehicle again.
Vehicles with a smart key system
If a door is not opened within approximately 60 seconds after t he vehicle is
unlocked, the security feature automatically locks the vehicle again. (How-
ever, depending on the location of the electronic key, the key may be
detected as being in the vehicle. In this case, vehicle may be unlocked.)
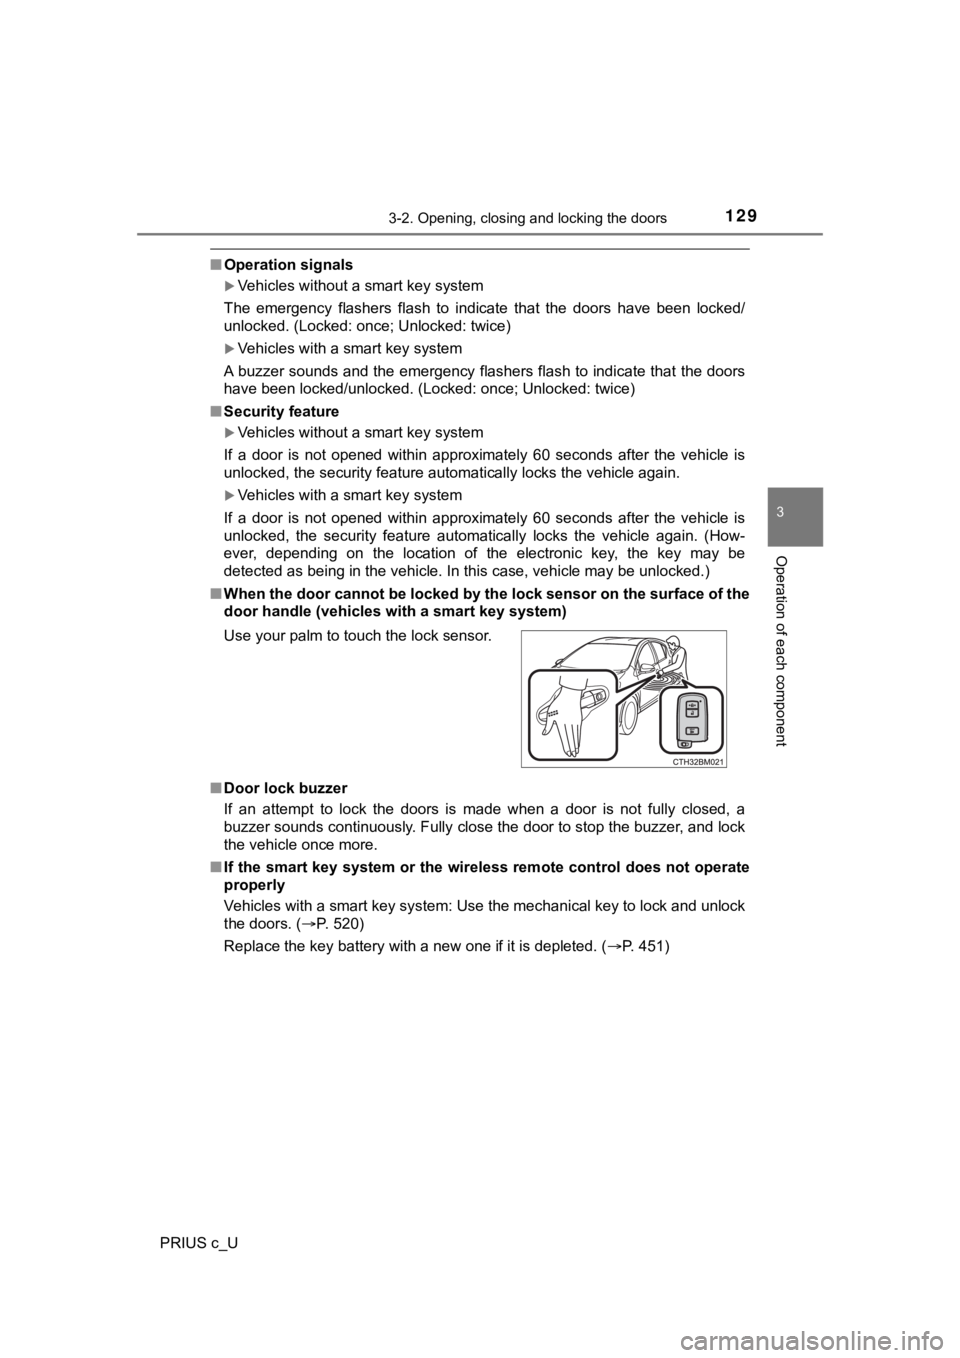
■ When the door cannot be locked by the lock sensor on the surface of the
door handle (vehicles with a smart key system)
■ Door lock buzzer
If an attempt to lock the doors is made when a door is not full y closed, a
buzzer sounds continuously. Fully close the door to stop the bu zzer, and lock
the vehicle once more.
■ If the smart key system or the wireless remote control does not operate
properly
Vehicles with a smart key system: Use the mechanical key to loc k and unlock
the doors. ( P. 520)
Replace the key battery with a new one if it is depleted. ( P. 451)
Use your palm to touch the lock sensor.
Page 144 of 600

1443-2. Opening, closing and locking the doors
PRIUS c_U■
Notes for the entry function
●Even when the electronic key is within the effective range (det ection areas),
the system may not operate properly in the following cases:
• The electronic key is too close to the window or outside door handle, near
the ground, or in a high place when the doors are locked or unl ocked.
• The electronic key is on the instrument panel, luggage cover o r floor, in
the door pockets or glove box when the hybrid system is started or power
switch modes are changed.
● Do not exit the vehicle with the electronic key placed on the i nstrument
panel or near the door pockets. Depending on the radio wave reception con-
ditions, it may be detected by the antenna outside the cabin and the door
will become lockable from the outside, possibly trapping the electronic key
inside the vehicle.
● As long as the electronic key is within the effective range, th e doors may be
locked or unlocked by anyone. However, only the doors detecting the elec-
tronic key can be used to unlock the vehicle.
● Whether or not the electronic key is inside the vehicle, the hy brid system
could be started if the electronic key is near the window.
● The doors may unlock if a large amount of water splashes on the door han-
dle, such as in the rain or in a car wash when the electronic k ey is within the
effective range. (The door will automatically be locked after a pproximately
60 seconds if the doors are not opened and closed.)
● The lock and unlock sensors may not work properly if they come into con-
tact with ice, snow, mud, etc. Clean the sensors and attempt to operate
them again.
● If the wireless remote control is used to lock the doors when t he electronic
key is near the vehicle, there is a possibility that the door m ay not be
unlocked by the entry function. (Using the wireless remote cont rol to unlock
the doors may resume the function.)
● If the door handle becomes wet while the electronic key is with in the effec-
tive range, the door may lock and unlock repeatedly. In that ca se, follow the
following correction procedures to wash the vehicle:
• Place the electronic key in a location 6 ft. (2 m) or more awa y from the
vehicle. (Take care to ensure that the key is not stolen.)
• Set the electronic key to battery-saving mode to disable the s mart key
system. ( P. 142)
Page 400 of 600

400
PRIUS c_U
7-1. Maintenance and care
●Working from top to bottom, liberally apply water to the vehicl e
body, wheel wells and underside of the vehicle to remove any di rt
and dust.
● Wash the vehicle body using a sponge or soft cloth, such as a
chamois.
● For hard-to-remove marks, use car wash soap and rinse thoroughl y
with water.
● Wipe away any water.
● Wax the vehicle when the wate rproof coating deteriorates.
If water does not bead on a clean surface, apply wax when the vehicle
body is cool.
■Automatic car washes
●Fold the mirrors before washing the vehicle. Start washing from the front of
the vehicle. Make sure to extend the mirrors before driving.
● Brushes used in automatic car washes may scratch the vehicle su rface and
harm your vehicle's paint.
● In certain automatic car washes, the rear spoiler may interfere with machine
operation. This may prevent t he vehicle from being cleaned properly or
result in damage to the rear spoiler.
■ High pressure car washes
As water may enter the cabin, do not bring the nozzle tip near the gaps
around the doors or perimeter of the windows, or spray these ar eas continu-
ously.
■ When using a car wash (vehicles with a smart key system)
If the door handle becomes wet while the electronic key is within the effective
range, the door may lock and unlock repeatedly. In that case, f ollow the fol-
lowing correction procedures to wash the vehicle:
● Place the electronic key in a location 6 ft. (2 m) or more away from the vehi-
cle. (Take care to ensure that the key is not stolen.)
● Set the electronic key to battery-saving mode to disable the sm art key sys-
tem. ( P. 142)
Cleaning and protecting the vehicle exterior
Perform the following to protect the vehicle and maintain it in
prime condition:
Page 431 of 600

4317-3. Do-it-yourself maintenance
7
Maintenance and care
PRIUS c_U■
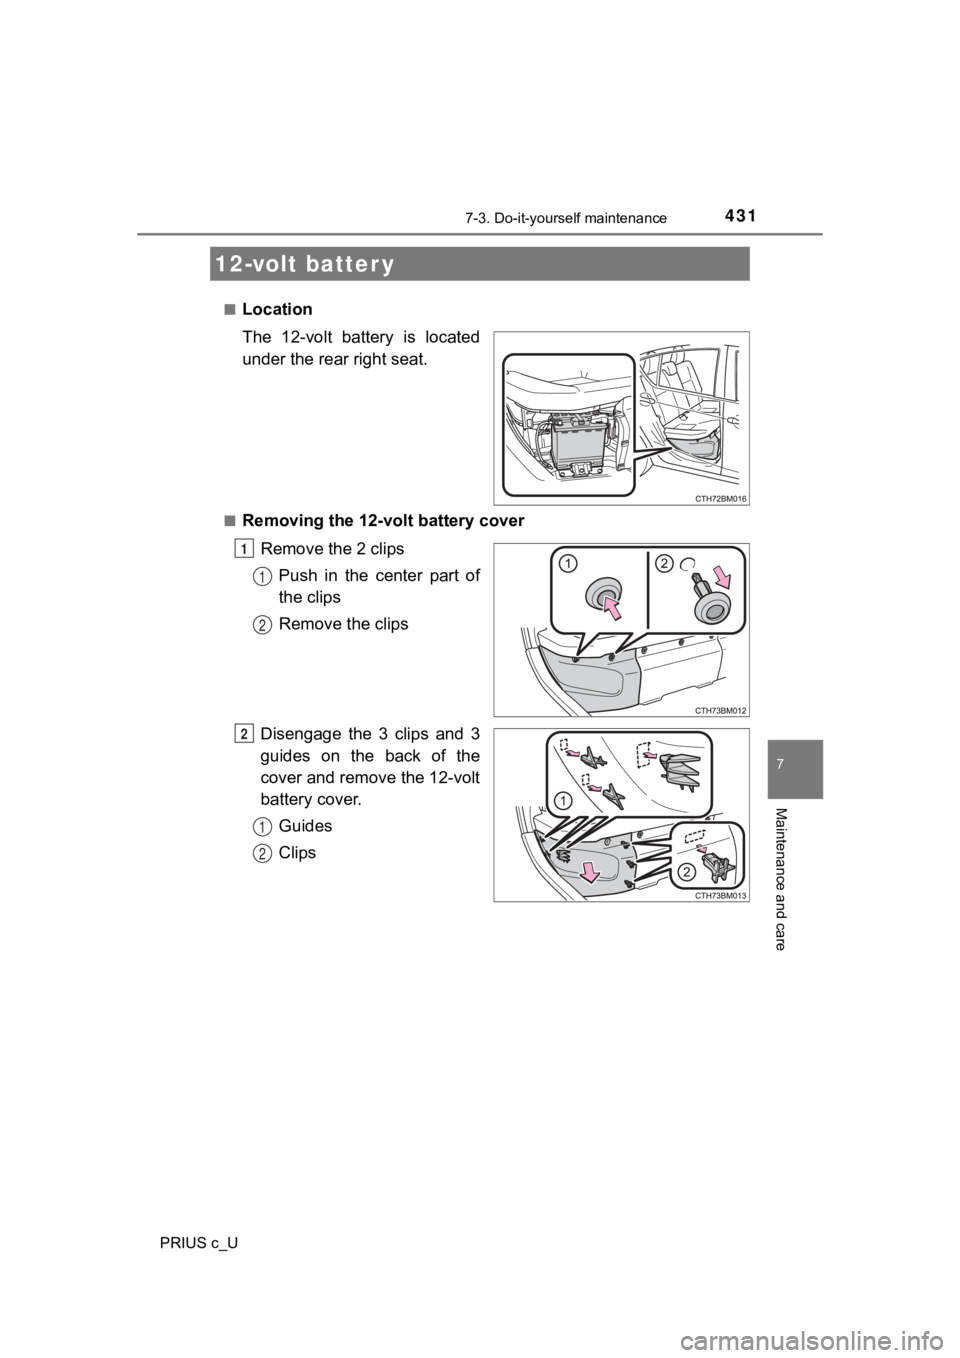
Location
The 12-volt battery is located
under the rear right seat.
■Removing the 12-volt battery cover
Remove the 2 clipsPush in the center part of
the clips
Remove the clips
Disengage the 3 clips and 3
guides on the back of the
cover and remove the 12-volt
battery cover. Guides
Clips
12-volt batter y
1
1
2
2
1
2