change time TOYOTA PRIUS PLUG-IN HYBRID 2015 1.G Navigation Manual
[x] Cancel search | Manufacturer: TOYOTA, Model Year: 2015, Model line: PRIUS PLUG-IN HYBRID, Model: TOYOTA PRIUS PLUG-IN HYBRID 2015 1.GPages: 356, PDF Size: 6 MB
Page 143 of 356
143
1. PHONE OPERATION
4
PHONE
PRIUS_Navi_OM47A72U_(U)
14.06.16 20:56
4. CALL ON THE Bluetooth® PHONE
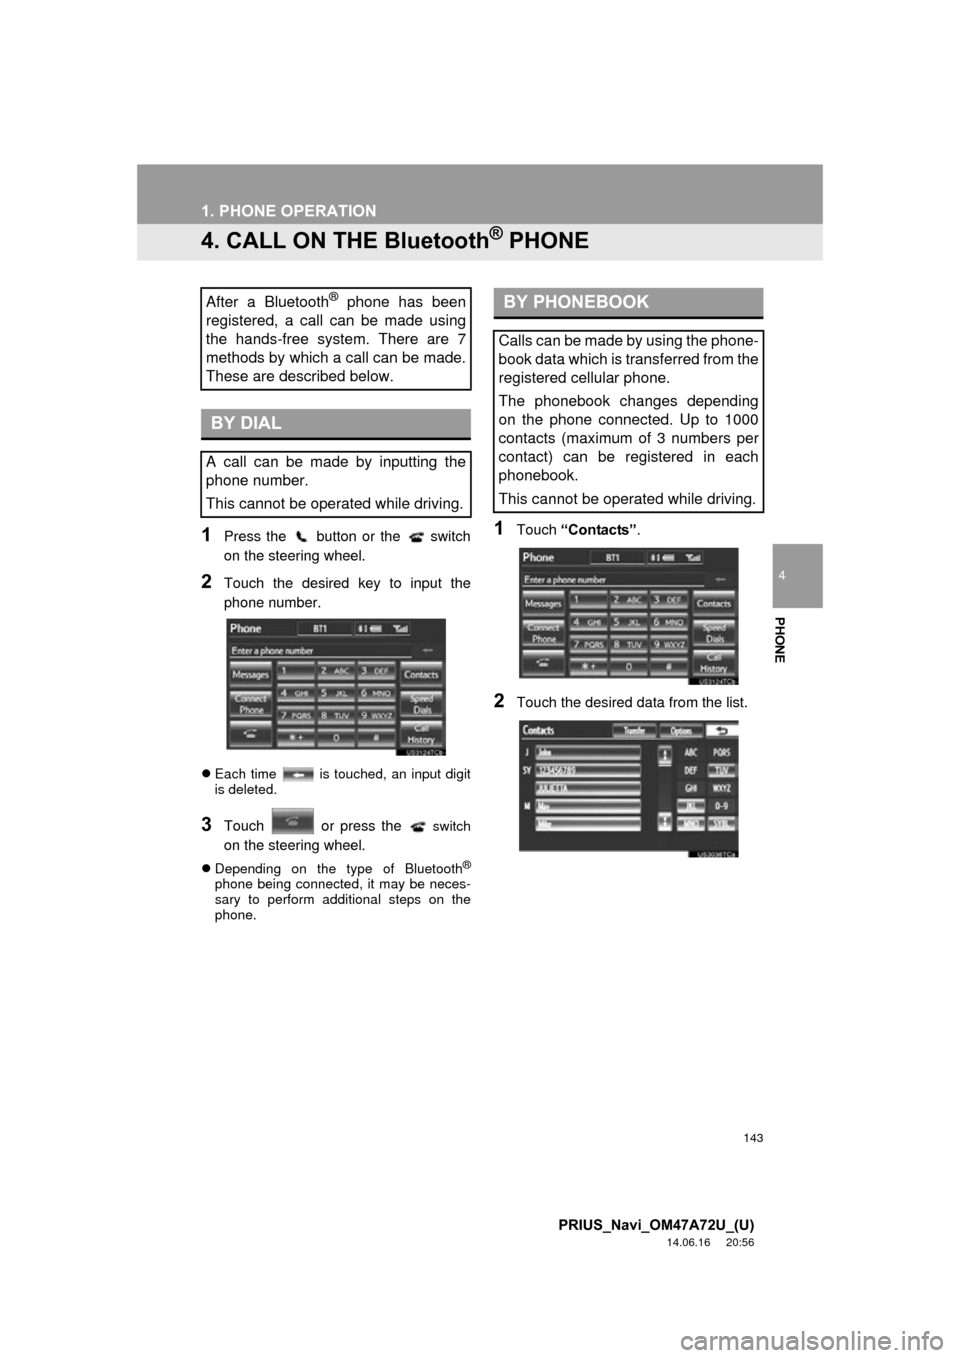
1Press the button or the switch
on the steering wheel.
2Touch the desired key to input the
phone number.
Each time is touched, an input digit
is deleted.
3Touch or press the switch
on the steering wheel.
Depending on the type of Bluetooth®
phone being connected, it may be neces-
sary to perform additional steps on the
phone.
1Touch “Contacts” .
2Touch the desired data from the list.
After a Bluetooth® phone has been
registered, a call can be made using
the hands-free system. There are 7
methods by which a call can be made.
These are described below.
BY DIAL
A call can be made by inputting the
phone number.
This cannot be operated while driving.
BY PHONEBOOK
Calls can be made by using the phone-
book data which is transferred from the
registered cellular phone.
The phonebook changes depending
on the phone connected. Up to 1000
contacts (maximum of 3 numbers per
contact) can be registered in each
phonebook.
This cannot be operated while driving.
Page 147 of 356
147
1. PHONE OPERATION
4
PHONE
PRIUS_Navi_OM47A72U_(U)
14.06.16 20:56
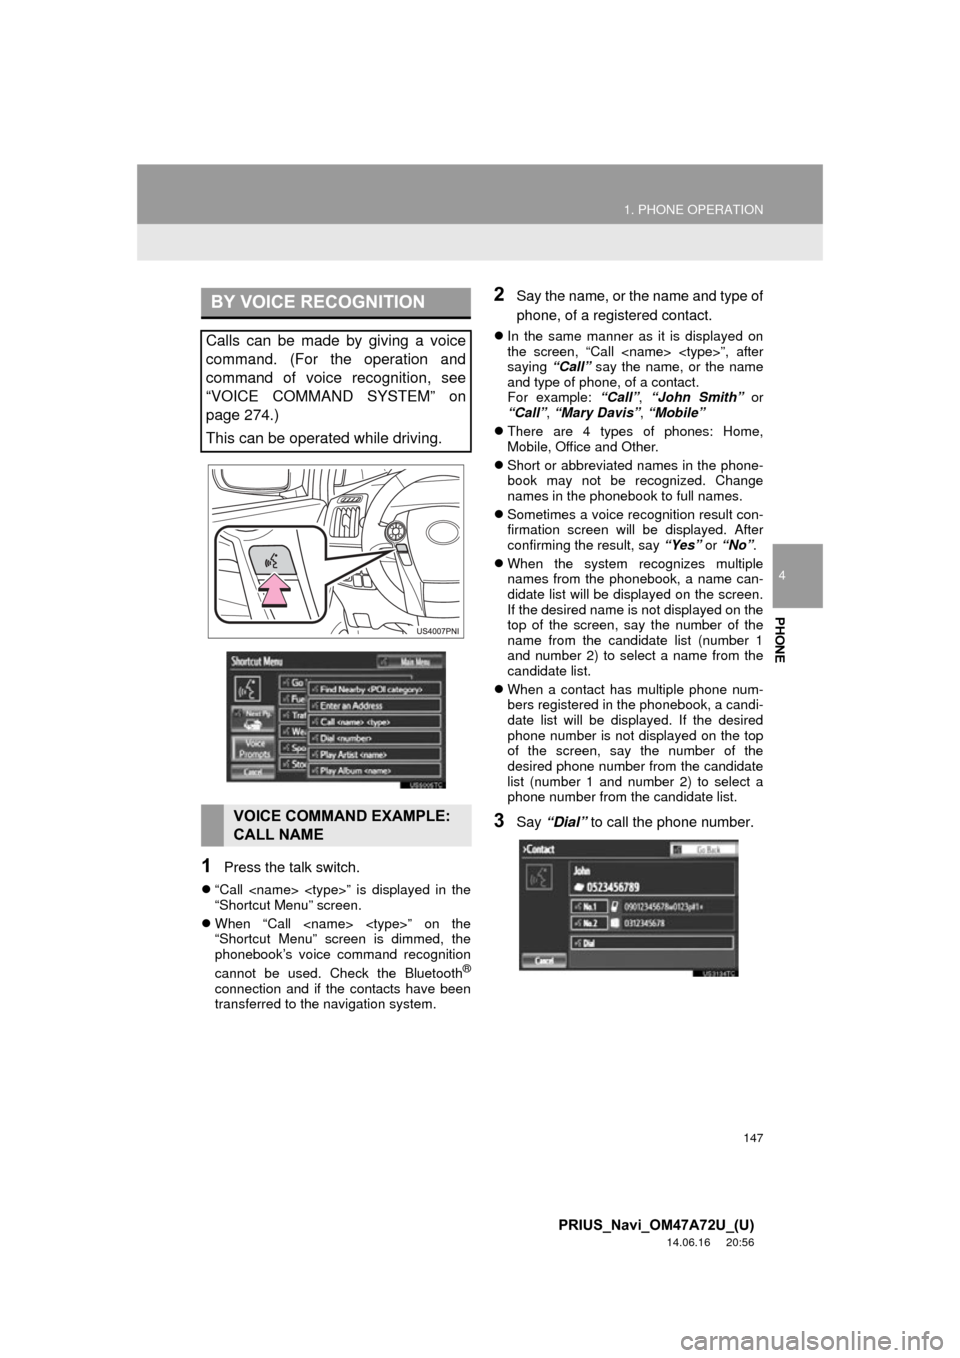
1Press the talk switch.
“Call
“Shortcut Menu” screen.
When “Call
“Shortcut Menu” screen is dimmed, the
phonebook’s voice command recognition
cannot be used. Check the Bluetooth
®
connection and if the contacts have been
transferred to the navigation system.
2Say the name, or the name and type of
phone, of a registered contact.
In the same manner as it is displayed on
the screen, “Call
saying “Call” say the name, or the name
and type of phone, of a contact.
For example: “Call”, “John Smith” or
“Call” , “Mary Davis”, “Mobile”
There are 4 types of phones: Home,
Mobile, Office and Other.
Short or abbreviated names in the phone-
book may not be recognized. Change
names in the phonebook to full names.
Sometimes a voice recognition result con-
firmation screen will be displayed. After
confirming the result, say “Yes” or “No”.
When the system recognizes multiple
names from the phonebook, a name can-
didate list will be displayed on the screen.
If the desired name is not displayed on the
top of the screen, say the number of the
name from the candidate list (number 1
and number 2) to select a name from the
candidate list.
When a contact has multiple phone num-
bers registered in the phonebook, a candi-
date list will be displayed. If the desired
phone number is not displayed on the top
of the screen, say the number of the
desired phone number from the candidate
list (number 1 and number 2) to select a
phone number from the candidate list.
3Say “Dial” to call the phone number.
BY VOICE RECOGNITION
Calls can be made by giving a voice
command. (For the operation and
command of voice recognition, see
“VOICE COMMAND SYSTEM” on
page 274.)
This can be operated while driving.
VOICE COMMAND EXAMPLE:
CALL NAME
Page 188 of 356
188
2. SETUP
PRIUS_Navi_OM47A72U_(U)
14.06.16 20:56
■CHANGING “Bluetooth* Power”
When “Bluetooth* Power” is “On”:
The Bluetooth
® device is automatically
connected when the “POWER” switch is in
ACCESSORY or ON mode.
When “Bluetooth* Power” is “Off” :
The Bluetooth
® device is disconnected,
and the system will not connect to it next
time.
The “Bluetooth* Power” auto connection
state can be set on or off.
• “On” : The auto connection is turned on.
• “Off” : The auto connection is turned off.
The auto connection state cannot be
changed from “On” to “Off” while driving,
but it can be changed from “Off” to “On” .
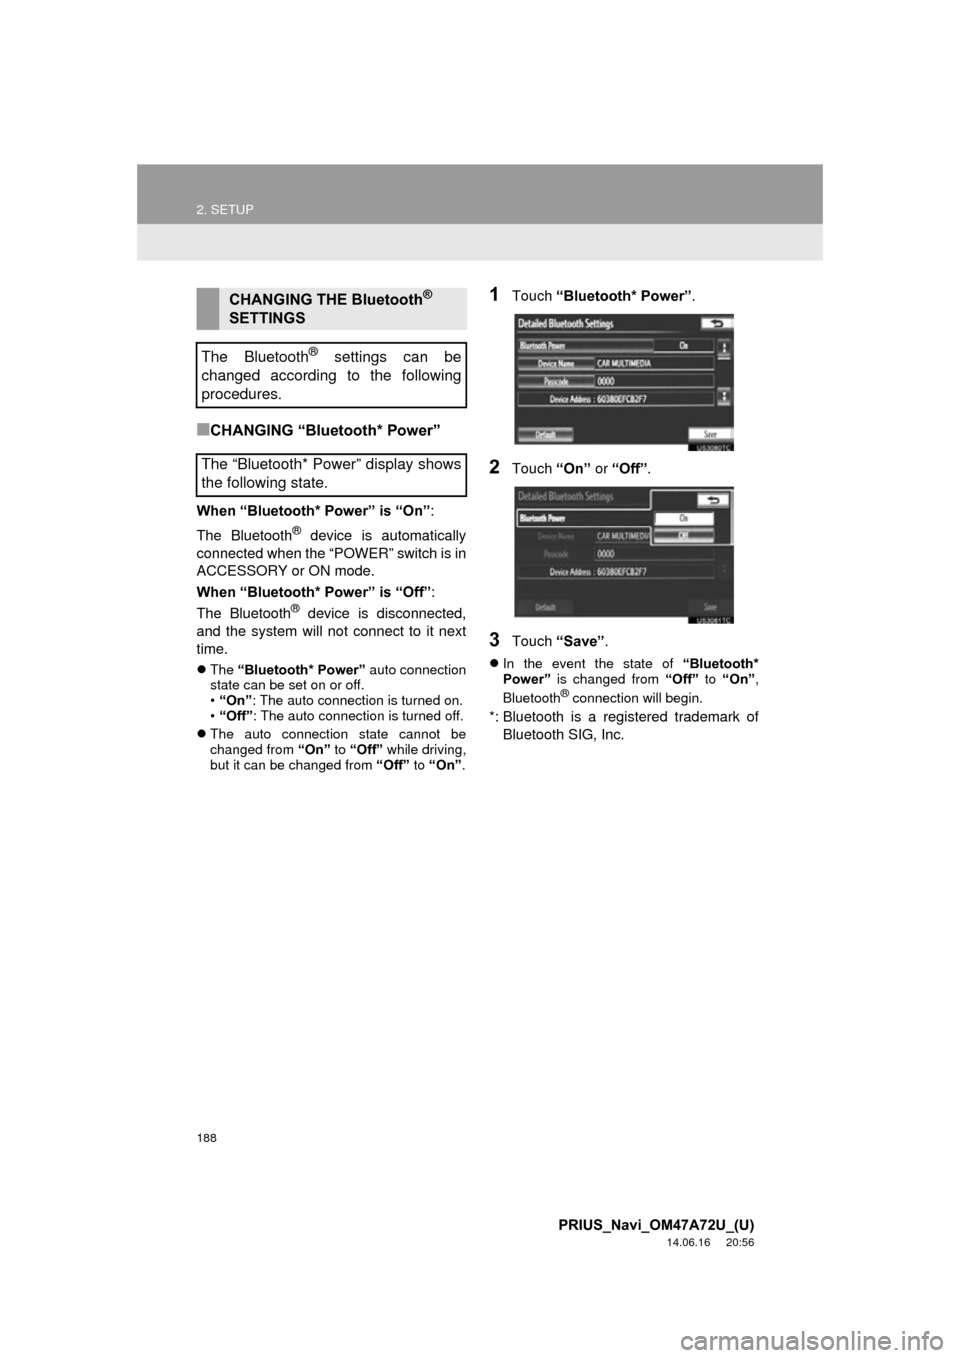
1Touch “Bluetooth* Power” .
2Touch “On” or “Off” .
3Touch “Save” .
In the event the state of “Bluetooth*
Power” is changed from “Off” to “On” ,
Bluetooth
® connection will begin.
*: Bluetooth is a registered trademark of Bluetooth SIG, Inc.
CHANGING THE Bluetooth®
SETTINGS
The Bluetooth
® settings can be
changed according to the following
procedures.
The “Bluetooth* Power” display shows
the following state.
Page 196 of 356
196
1. AUDIO/VIDEO SYSTEM OPERATION
PRIUS_Navi_OM47A72U_(U)
14.06.16 20:56
2. SOME BASICS
This section describes some of the ba-
sic features of the audio/video system.
Some information may not pertain to
your system.
Your audio/video system works when
the “POWER” switch is turned to AC-
CESSORY or ON mode.
CAUTION
●For vehicles sold in U.S.A. and Canada:
Part 15 of the FCC Rules
FCC Warning: Changes or modifications
in construction not expressly approved
by the party responsible for compliance
could void the user’s authority to operate
the equipment. Radio frequency
exposure. This device is approved for
Mobile Application only and, to comply
with applicable FCC radio frequency
exposure regulations, must be used with
a distance of at least 7.9 in. (20 cm)
between the antenna and the body of
any person at all time during use.
CAUTION
●Laser products
• Do not take this unit apart or attempt to
make any changes yourself. This is an
intricate unit that uses a laser pickup to
retrieve information from the surface of
compact discs. The laser is carefully
shielded so that its rays remain inside
the cabinet. Therefore, never try to
disassemble the player or alter any of
its parts since you may be exposed to
laser rays and dangerous voltages.
• This product utilizes a laser. Use of controls or adjustments or
performance of procedures other than
those specified herein may result in
hazardous radiation exposure.
NOTICE
● To prevent the 12-volt battery from being
discharged, do not leave the audio/video
system on longer than necessary when
the hybrid system is not operating.
Page 198 of 356
198
1. AUDIO/VIDEO SYSTEM OPERATION
PRIUS_Navi_OM47A72U_(U)
14.06.16 20:56
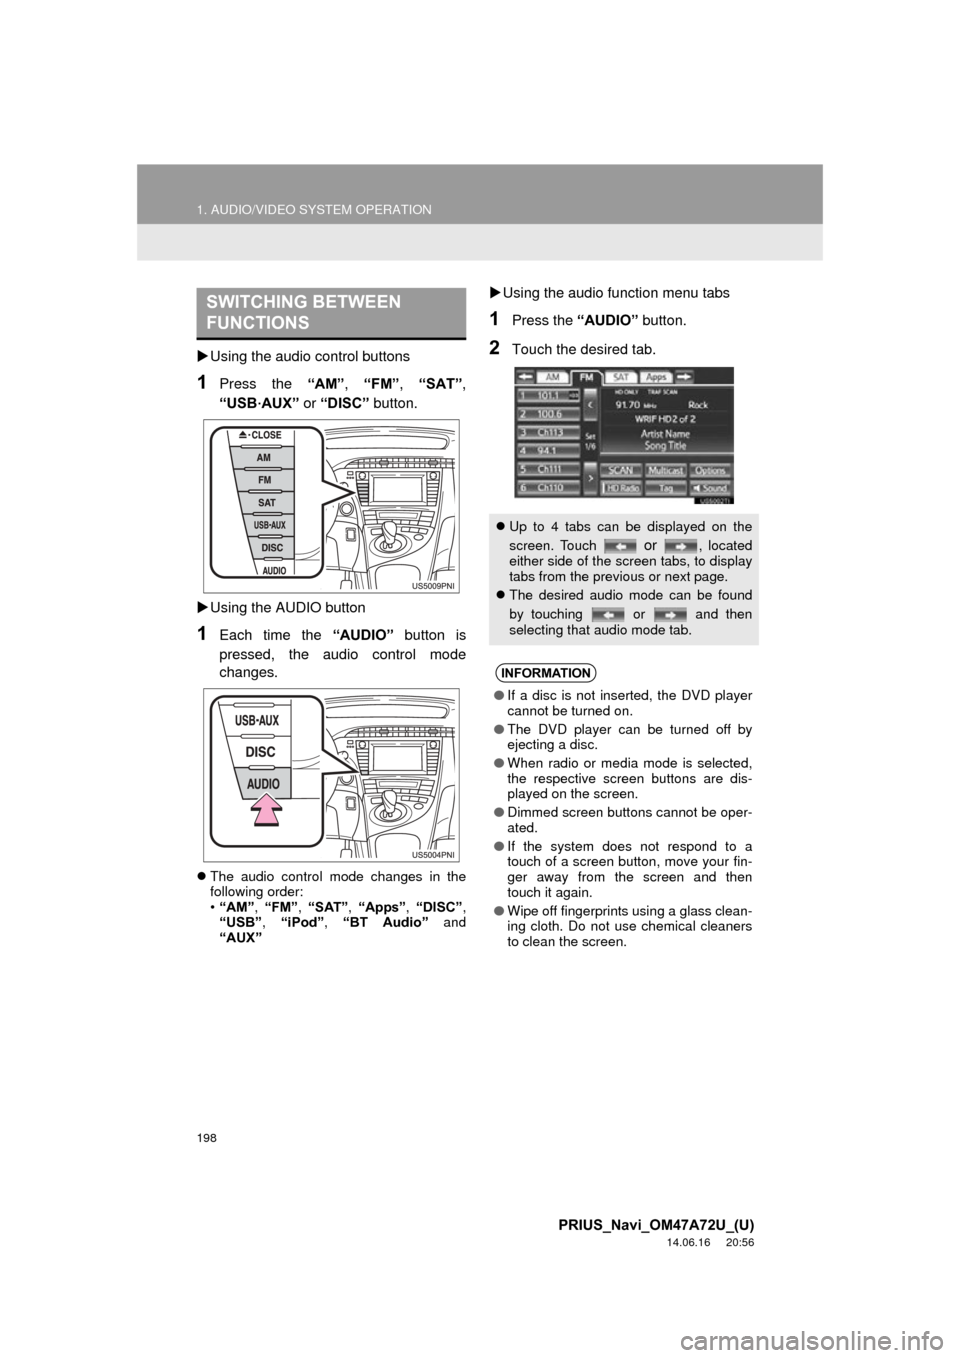
Using the audio control buttons
1Press the “AM”, “FM” , “SAT”,
“USB
·AUX” or “DISC” button.
Using the AUDIO button
1Each time the “AUDIO” button is
pressed, the audio control mode
changes.
The audio control mode changes in the
following order:
•“AM”, “FM”, “SAT” , “Apps” , “DISC” ,
“USB” , “iPod” , “BT Audio” and
“AUX”
Using the audio function menu tabs
1Press the “AUDIO” button.
2Touch the desired tab.
SWITCHING BETWEEN
FUNCTIONS
Up to 4 tabs can be displayed on the
screen. Touch
or , located
either side of the screen tabs, to display
tabs from the previous or next page.
The desired audio mode can be found
by touching or and then
selecting that audio mode tab.
INFORMATION
●If a disc is not inserted, the DVD player
cannot be turned on.
● The DVD player can be turned off by
ejecting a disc.
● When radio or media mode is selected,
the respective screen buttons are dis-
played on the screen.
● Dimmed screen buttons cannot be oper-
ated.
● If the system does not respond to a
touch of a screen button, move your fin-
ger away from the screen and then
touch it again.
● Wipe off fingerprints using a glass clean-
ing cloth. Do not use chemical cleaners
to clean the screen.
Page 207 of 356
207
1. AUDIO/VIDEO SYSTEM OPERATION
5
AUDIO/VIDEO SYSTEM
PRIUS_Navi_OM47A72U_(U)
14.06.16 20:56
When “Text” is touched, information such
as the artist name, song title, album title
and music genre of the track being lis-
tened to are displayed on the text screen.
To display messages from the station,
touch “Additional Information” .
When “TYPE ” or “ TYPE” is
touched, a program type will be searched.
Once a program type has been set,
“TYPE SEEK” will appear on the screen.
(See “SELECTING A DESIRED TYPE” on
page 204.)
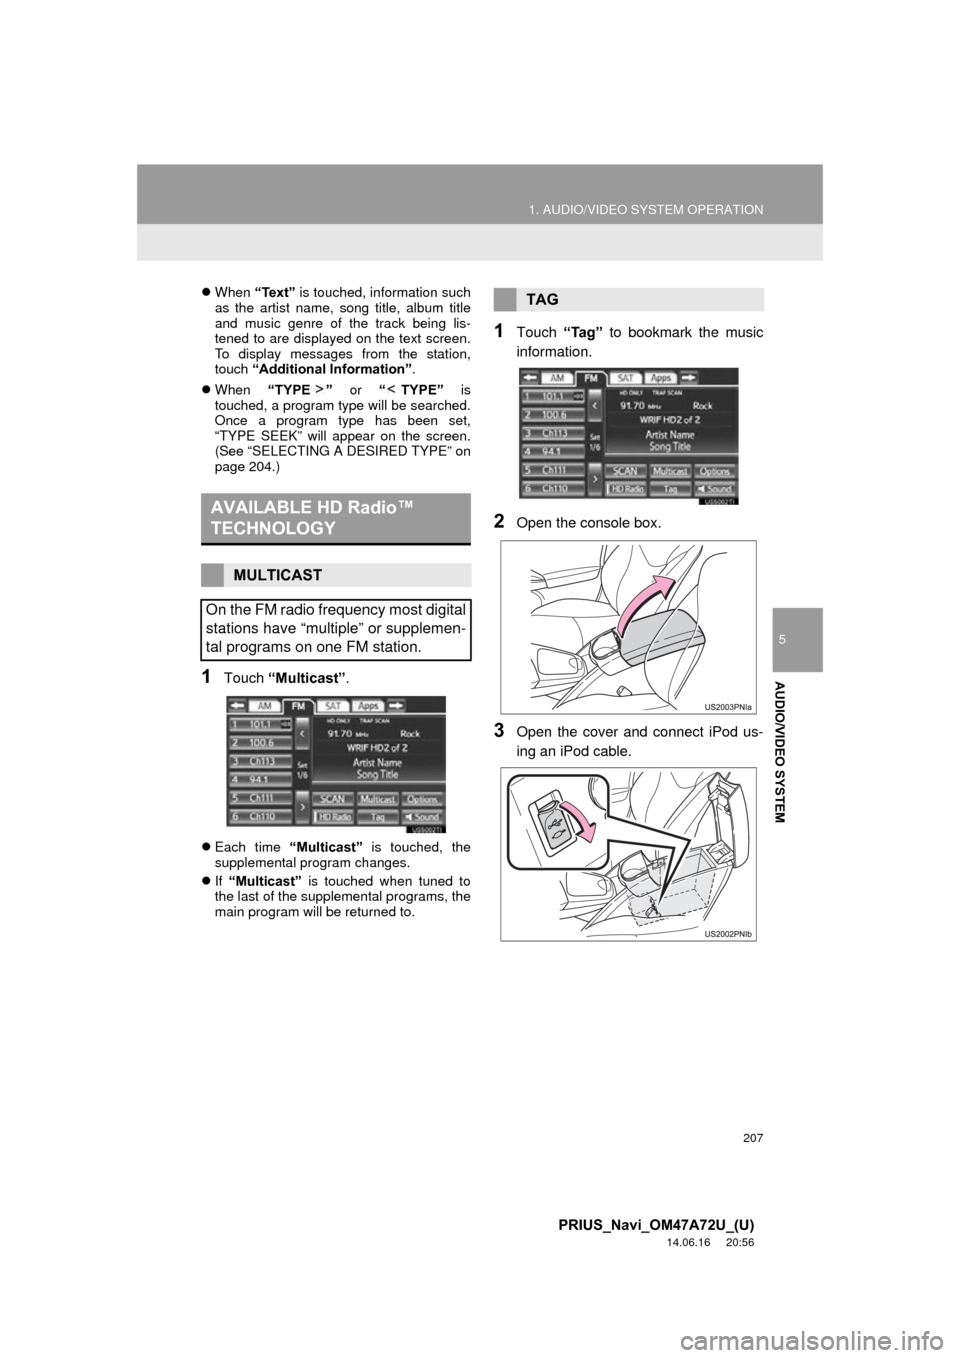
1Touch “Multicast” .
Each time “Multicast” is touched, the
supplemental program changes.
If “Multicast” is touched when tuned to
the last of the supplemental programs, the
main program will be returned to.
1Touch “Tag” to bookmark the music
information.
2Open the console box.
3Open the cover and connect iPod us-
ing an iPod cable.
AVAILABLE HD Radio™
TECHNOLOGY
MULTICAST
On the FM radio frequency most digital
stations have “multiple” or supplemen-
tal programs on one FM station.
TAG
Page 215 of 356
215
1. AUDIO/VIDEO SYSTEM OPERATION
5
AUDIO/VIDEO SYSTEM
PRIUS_Navi_OM47A72U_(U)
14.06.16 20:56
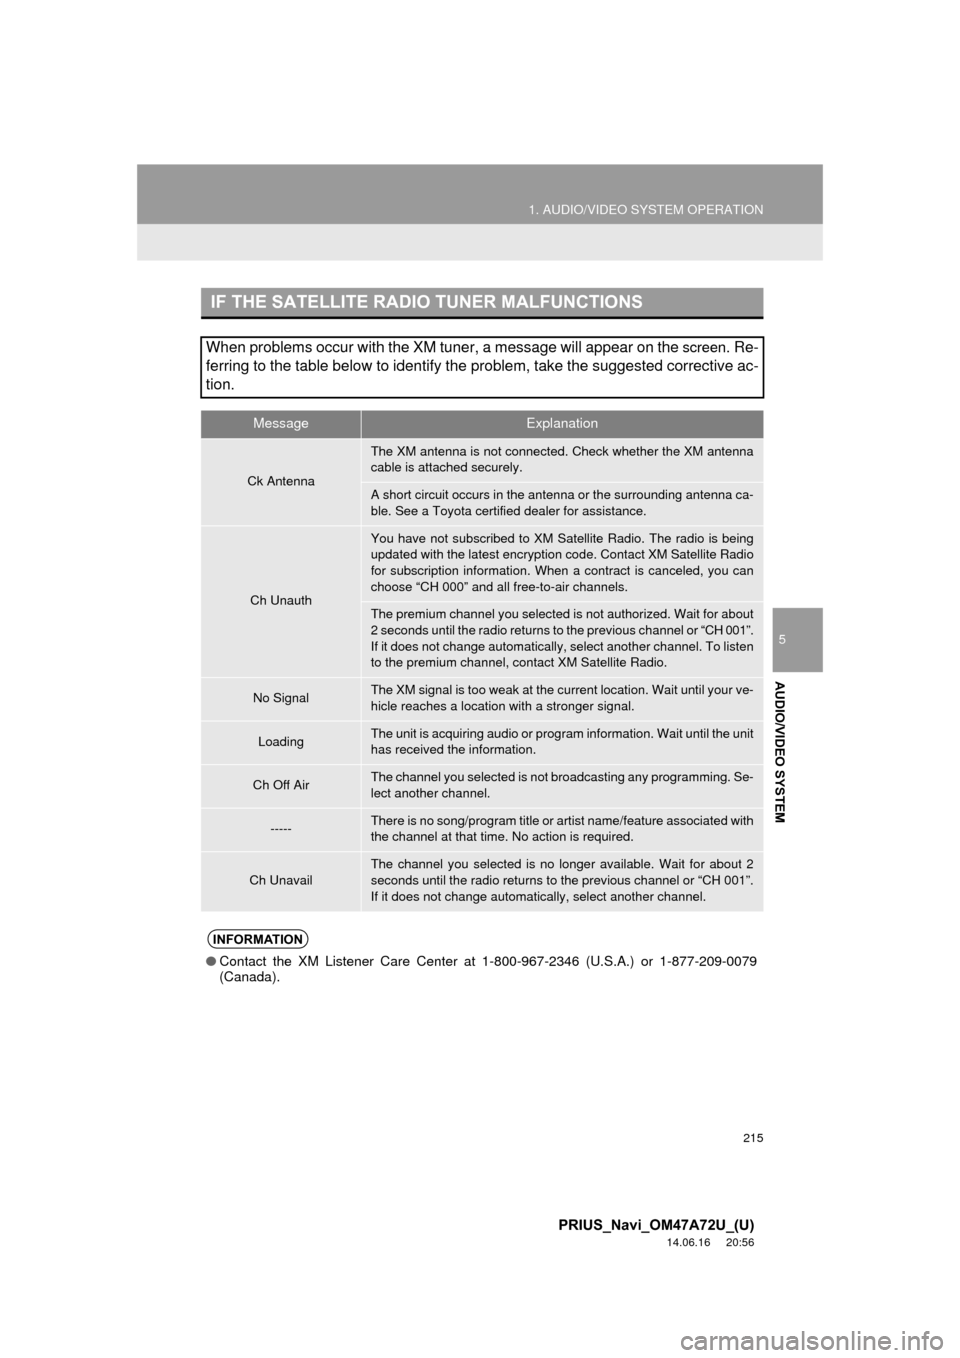
IF THE SATELLITE RADIO TUNER MALFUNCTIONS
When problems occur with the XM tuner, a message will appear on the screen. Re-
ferring to the table below to identify the problem, take the suggested corrective ac-
tion.
MessageExplanation
Ck Antenna
The XM antenna is not connected. Check whether the XM antenna
cable is attached securely.
A short circuit occurs in the antenna or the surrounding antenna ca-
ble. See a Toyota certified dealer for assistance.
Ch Unauth
You have not subscribed to XM Satellite Radio. The radio is being
updated with the latest encryption code. Contact XM Satellite Radio
for subscription information. When a contract is canceled, you can
choose “CH 000” and all free-to-air channels.
The premium channel you selected is not authorized. Wait for about
2 seconds until the radio returns to the previous channel or “CH 001”.
If it does not change automatically, select another channel. To listen
to the premium channel, contact XM Satellite Radio.
No SignalThe XM signal is too weak at the current location. Wait until your ve-
hicle reaches a location wi th a stronger signal.
LoadingThe unit is acquiring audio or program information. Wait until the unit
has received the information.
Ch Off AirThe channel you selected is not broadcasting any programming. Se-
lect another channel.
-----There is no song/program title or artist name/feature associated with
the channel at that time. No action is required.
Ch Unavail
The channel you selected is no longe r available. Wait for about 2
seconds until the radio returns to the previous channel or “CH 001”.
If it does not change automatically, select another channel.
INFORMATION
● Contact the XM Listener Care Center at 1-800-967-2346 (U.S.A.) or 1-877-209-0079
(Canada).
Page 224 of 356
224
1. AUDIO/VIDEO SYSTEM OPERATION
PRIUS_Navi_OM47A72U_(U)
14.06.16 20:56
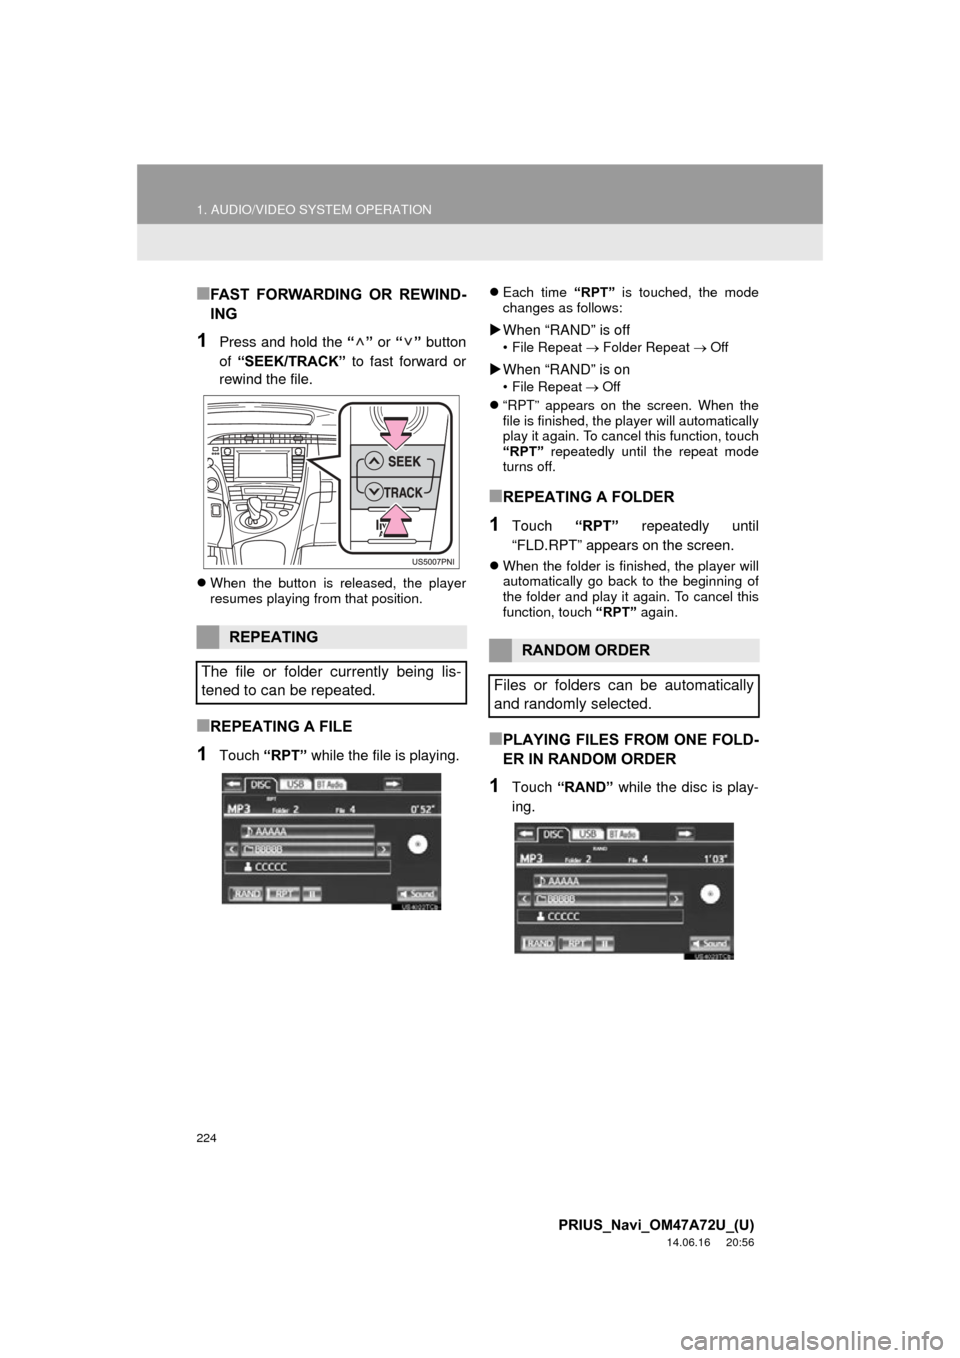
■FAST FORWARDING OR REWIND-
ING
1Press and hold the “” or “” button
of “SEEK/TRACK” to fast forward or
rewind the file.
When the button is released, the player
resumes playing from that position.
■REPEATING A FILE
1Touch “RPT” while the file is playing.
Each time “RPT” is touched, the mode
changes as follows:
When “RAND” is off
• File Repeat Folder Repeat Off
When “RAND” is on
• File Repeat Off
“RPT” appears on the screen. When the
file is finished, the player will automatically
play it again. To cancel this function, touch
“RPT” repeatedly until the repeat mode
turns off.
■REPEATING A FOLDER
1Touch “RPT” repeatedly until
“FLD.RPT” appears on the screen.
When the folder is finished, the player will
automatically go back to the beginning of
the folder and play it again. To cancel this
function, touch “RPT” again.
■PLAYING FILES FROM ONE FOLD-
ER IN RANDOM ORDER
1Touch “RAND” while the disc is play-
ing.
REPEATING
The file or folder currently being lis-
tened to can be repeated.RANDOM ORDER
Files or folders can be automatically
and randomly selected.
Page 225 of 356
225
1. AUDIO/VIDEO SYSTEM OPERATION
5
AUDIO/VIDEO SYSTEM
PRIUS_Navi_OM47A72U_(U)
14.06.16 20:56
Each time “RAND” is touched, the mode
changes as follows:
• Random (1 Folder Random)
Folder Random (1 Disc Random) Off
Once “RAND” appears on the screen, the
system selects a file randomly from the
folder currently being listened to. To can-
cel this function, touch “RAND” repeat-
edly until the random mode turns off.
■PLAYING THE FILES IN ALL THE
FOLDERS ON THE DISC IN RAN-
DOM ORDER
1Touch “RAND” repeatedly until
“FLD.RAND” appears on the screen.
Once “FLD.RAND” appears on the
screen, the system selects a file randomly
from all of the existing folders. To cancel
this function, touch “RAND” again.
INFORMATION
●When a file is skipped or the system is
inoperative, touch “RAND” to reset.
OPERATING A DVD DISC
The playback condition of some DVD
discs may be determined by the DVD
software producer. This DVD player
plays a disc as the software producer
intended. As such some functions may
not work properly. Be sure to read the
instruction manual that comes with the
individual DVD disc. For detailed infor-
mation about DVD video discs, see
“DVD PLAYER AND DVD VIDEO
DISC INFORMATION” on page 236.
PRECAUTIONS ON DVD VIDEO
DISC
When recording with a DVD video, au-
dio tracks may not record in some cas-
es while the menu is displayed. As
audio will not play in this case, verify
that the video tracks are playing and
then activate playback.
When playback of a disc is completed:
If an audio CD or MP3/WMA disc is
playing, the first track or file starts.
If a DVD video is playing, playback will
stop or the menu screen will be dis-
played.
The title/chapter number and playback
time display may not appear while
playing back certain DVD video discs.
CAUTION
● Conversational speech on some DVDs
is recorded at a low volume to empha-
size the impact of sound effects. If you
adjust the volume assuming that the
conversations represent the maximum
volume level that the DVD will play, you
may be startled by louder sound effects
or when you change to a different audio
source. The louder sounds may have a
significant impact on the human body or
pose a driving hazard. Keep this in mind
when you adjust the volume.
Page 228 of 356
228
1. AUDIO/VIDEO SYSTEM OPERATION
PRIUS_Navi_OM47A72U_(U)
14.06.16 20:56
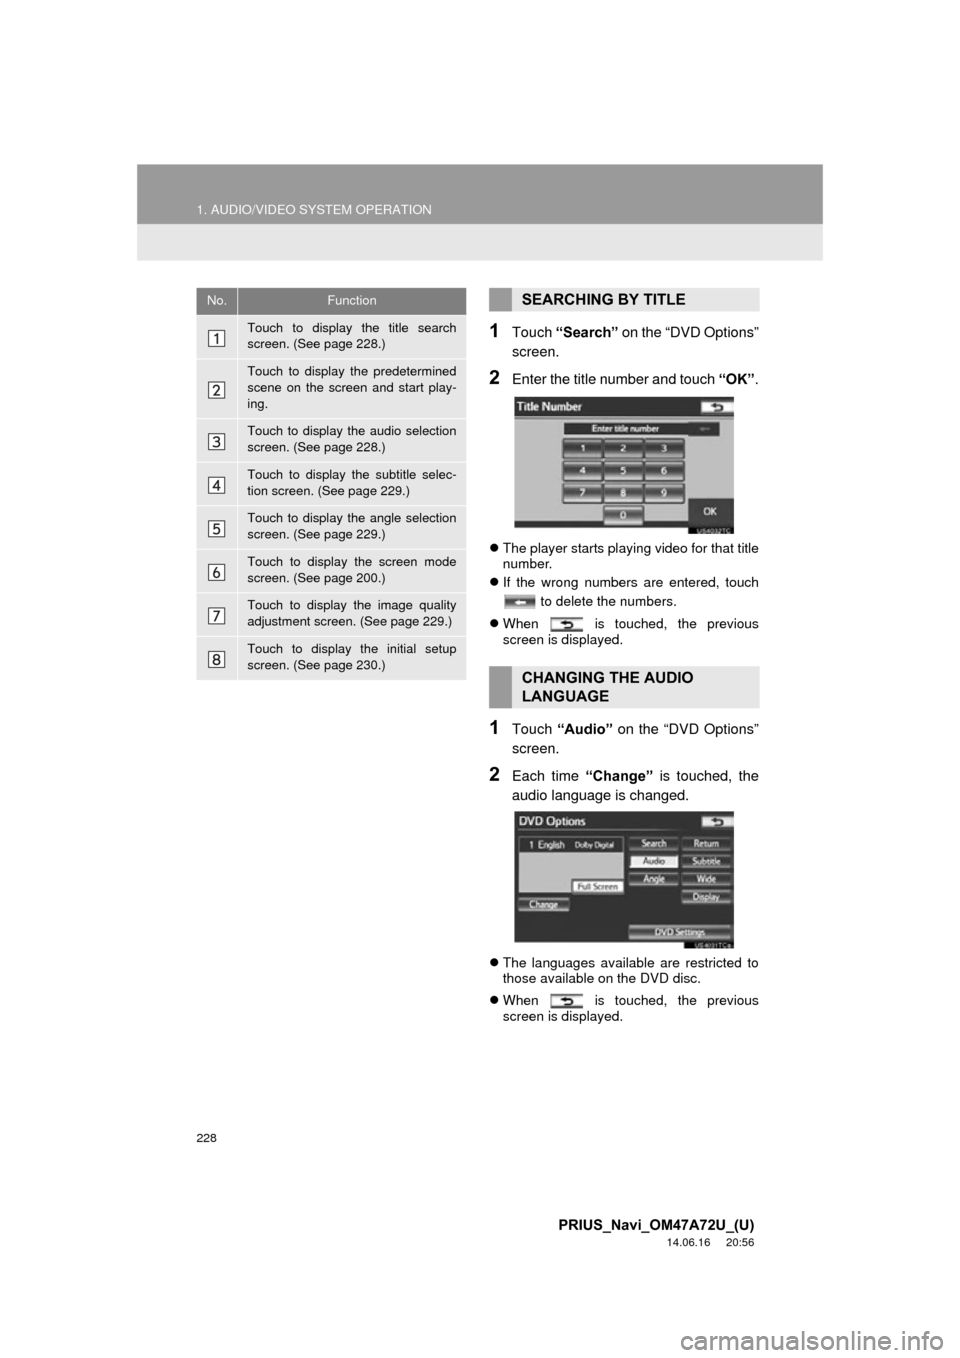
1Touch “Search” on the “DVD Options”
screen.
2Enter the title number and touch “OK”.
The player starts playing video for that title
number.
If the wrong numbers are entered, touch
to delete the numbers.
When is touched, the previous
screen is displayed.
1Touch “Audio” on the “DVD Options”
screen.
2Each time “Change” is touched, the
audio language is changed.
The languages available are restricted to
those available on the DVD disc.
When is touched, the previous
screen is displayed.
No.Function
Touch to display the title search
screen. (See page 228.)
Touch to display the predetermined
scene on the screen and start play-
ing.
Touch to display the audio selection
screen. (See page 228.)
Touch to display the subtitle selec-
tion screen. (See page 229.)
Touch to display the angle selection
screen. (See page 229.)
Touch to display the screen mode
screen. (See page 200.)
Touch to display the image quality
adjustment screen. (See page 229.)
Touch to display the initial setup
screen. (See page 230.)
SEARCHING BY TITLE
CHANGING THE AUDIO
LANGUAGE