wheel TOYOTA PRIUS PLUG-IN HYBRID 2015 1.G Navigation Manual
[x] Cancel search | Manufacturer: TOYOTA, Model Year: 2015, Model line: PRIUS PLUG-IN HYBRID, Model: TOYOTA PRIUS PLUG-IN HYBRID 2015 1.GPages: 356, PDF Size: 6 MB
Page 166 of 356
166
2. SETUP
PRIUS_Navi_OM47A72U_(U)
14.06.16 20:56
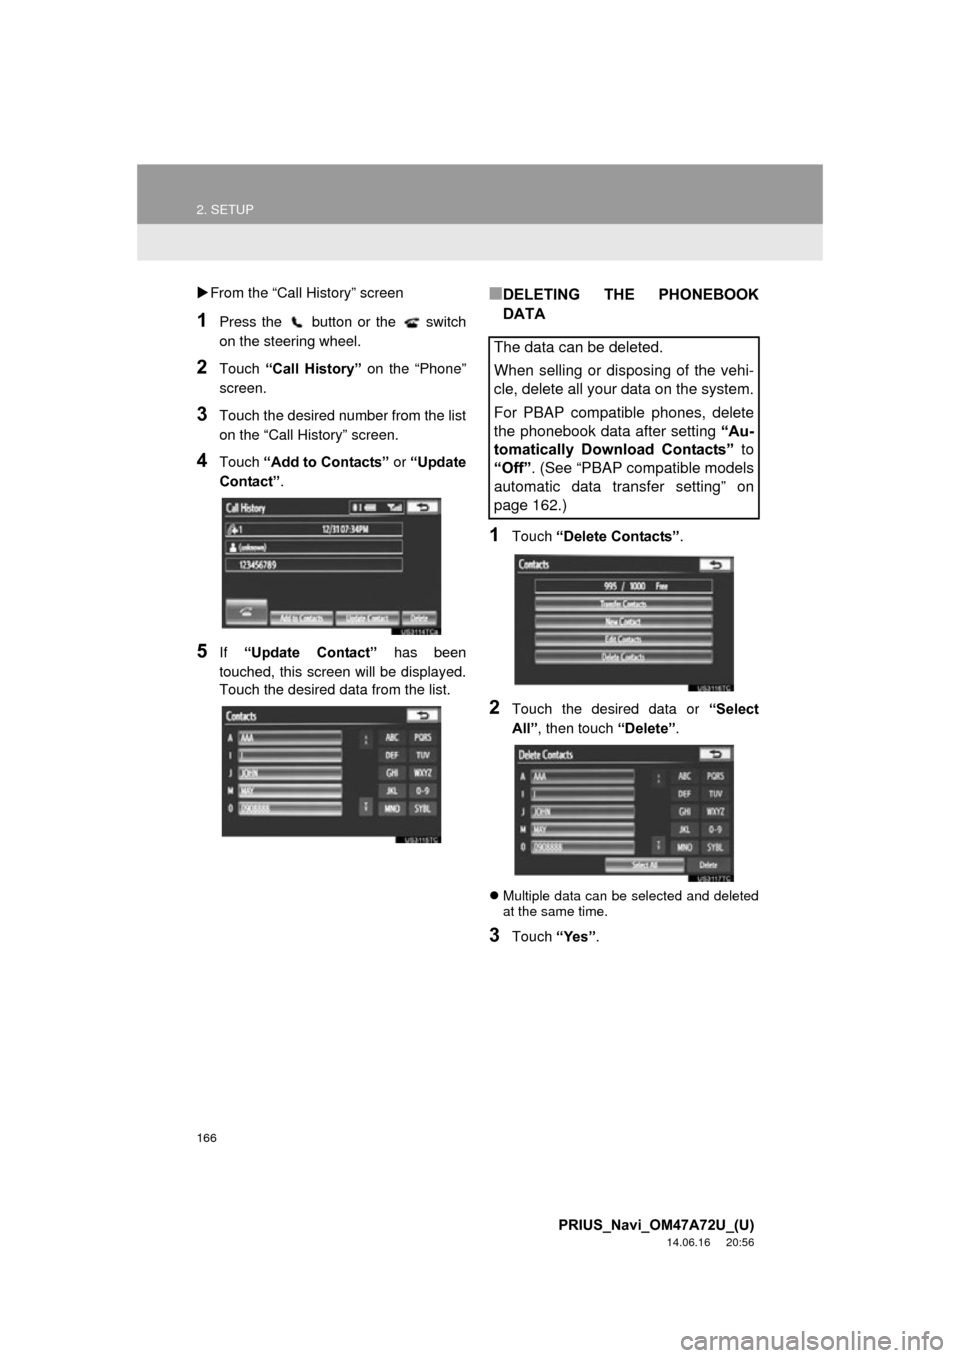
From the “Call History” screen
1Press the button or the switch
on the steering wheel.
2Touch “Call History” on the “Phone”
screen.
3Touch the desired number from the list
on the “Call History” screen.
4Touch “Add to Contacts” or “Update
Contact” .
5If “Update Contact” has been
touched, this screen will be displayed.
Touch the desired data from the list.
■DELETING THE PHONEBOOK
DATA
1Touch “Delete Contacts” .
2Touch the desired data or “Select
All” , then touch “Delete”.
Multiple data can be selected and deleted
at the same time.
3Touch “Yes”.
The data can be deleted.
When selling or disposing of the vehi-
cle, delete all your data on the system.
For PBAP compatible phones, delete
the phonebook data after setting “Au-
tomatically Download Contacts” to
“Off” . (See “PBAP compatible models
automatic data transfer setting” on
page 162.)
Page 167 of 356
167
2. SETUP
4
PHONE
PRIUS_Navi_OM47A72U_(U)
14.06.16 20:56
■ALTERNATIVE PHONEBOOK
DATA DELETION METHOD
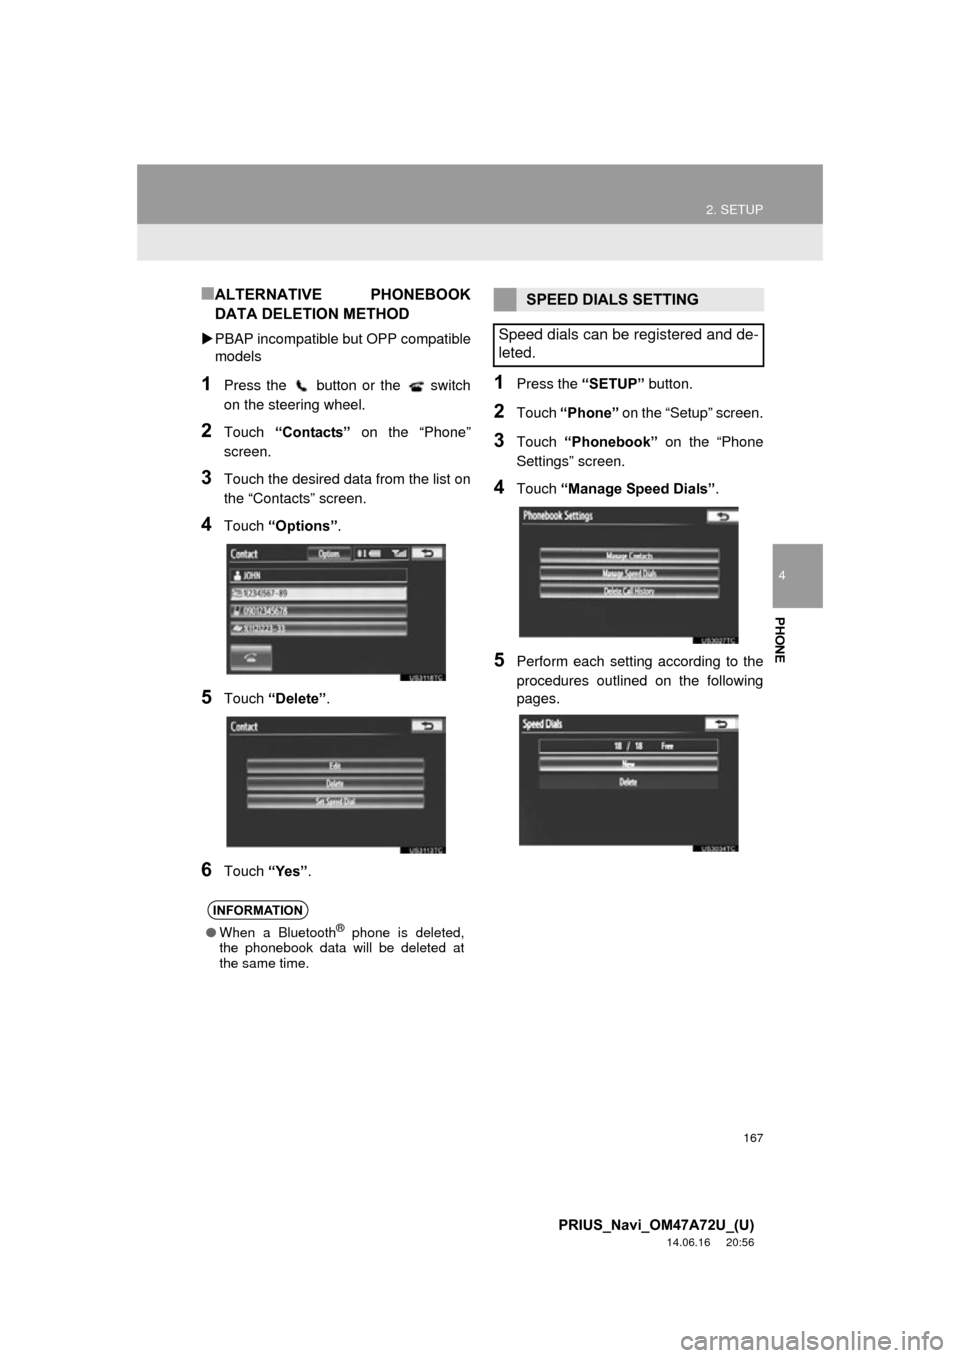
PBAP incompatible but OPP compatible
models
1Press the button or the switch
on the steering wheel.
2Touch “Contacts” on the “Phone”
screen.
3Touch the desired data from the list on
the “Contacts” screen.
4Touch “Options”.
5Touch “Delete” .
6Touch “Yes”.
1Press the “SETUP” button.
2Touch “Phone” on the “Setup” screen.
3Touch “Phonebook” on the “Phone
Settings” screen.
4Touch “Manage Speed Dials” .
5Perform each setting according to the
procedures outlined on the following
pages.
INFORMATION
●When a Bluetooth® phone is deleted,
the phonebook data will be deleted at
the same time.
SPEED DIALS SETTING
Speed dials can be registered and de-
leted.
Page 168 of 356
168
2. SETUP
PRIUS_Navi_OM47A72U_(U)
14.06.16 20:56
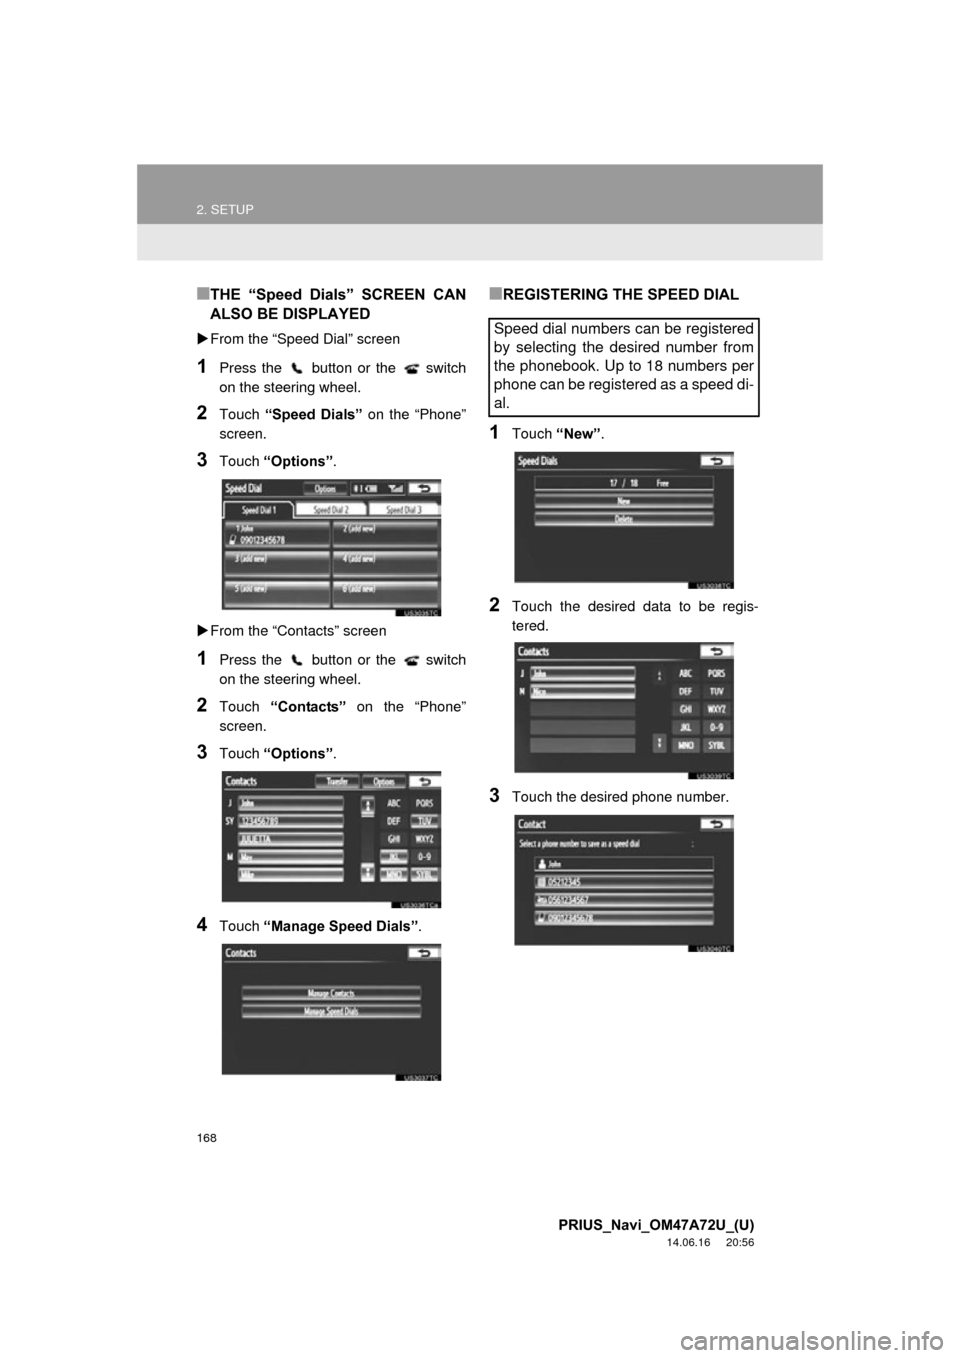
■THE “Speed Dials” SCREEN CAN
ALSO BE DISPLAYED
From the “Speed Dial” screen
1Press the button or the switch
on the steering wheel.
2Touch “Speed Dials” on the “Phone”
screen.
3Touch “Options”.
From the “Contacts” screen
1Press the button or the switch
on the steering wheel.
2Touch “Contacts” on the “Phone”
screen.
3Touch “Options”.
4Touch “Manage Speed Dials” .
■REGISTERING THE SPEED DIAL
1Touch “New”.
2Touch the desired data to be regis-
tered.
3Touch the desired phone number.
Speed dial numbers can be registered
by selecting the desired number from
the phonebook. Up to 18 numbers per
phone can be registered as a speed di-
al.
Page 169 of 356
169
2. SETUP
4
PHONE
PRIUS_Navi_OM47A72U_(U)
14.06.16 20:56
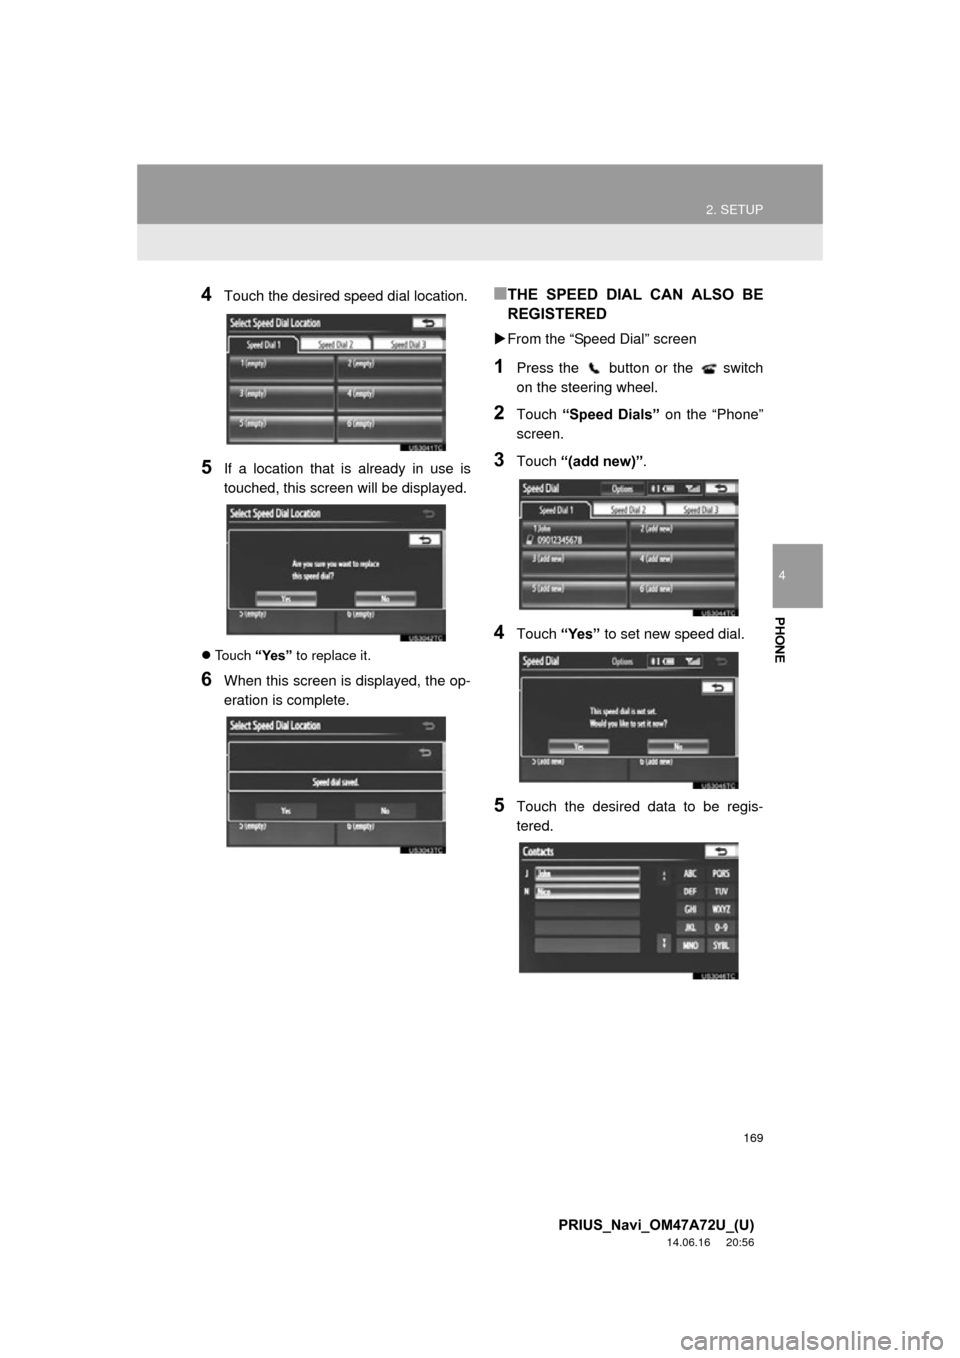
4Touch the desired speed dial location.
5If a location that is already in use is
touched, this screen will be displayed.
Touch “Yes” to replace it.
6When this screen is displayed, the op-
eration is complete.
■THE SPEED DIAL CAN ALSO BE
REGISTERED
From the “Speed Dial” screen
1Press the button or the switch
on the steering wheel.
2Touch “Speed Dials” on the “Phone”
screen.
3Touch “(add new)” .
4Touch “Yes” to set new speed dial.
5Touch the desired data to be regis-
tered.
Page 170 of 356

170
2. SETUP
PRIUS_Navi_OM47A72U_(U)
14.06.16 20:56
6Touch the desired phone number.
From the “Contact” screen
1Press the button or the switch
on the steering wheel.
2Touch “Contacts” on the “Phone”
screen.
3Touch the desired data from the list on
the “Contacts” screen.
4Touch “Options”.
5Touch “Set Speed Dial”.
6This screen is displayed.
The following operations are performed in
the same manner as when they are per-
formed from the “Setup” screen.
■DELETING THE SPEED DIAL
1Touch “Delete” .
2Touch the desired data, or to delete all
the data touch “Select All”, then touch
“Delete” .
Multiple data can be selected and deleted
at the same time.
3Touch “Yes”.
The speed dial can be deleted.
Page 171 of 356
171
2. SETUP
4
PHONE
PRIUS_Navi_OM47A72U_(U)
14.06.16 20:56
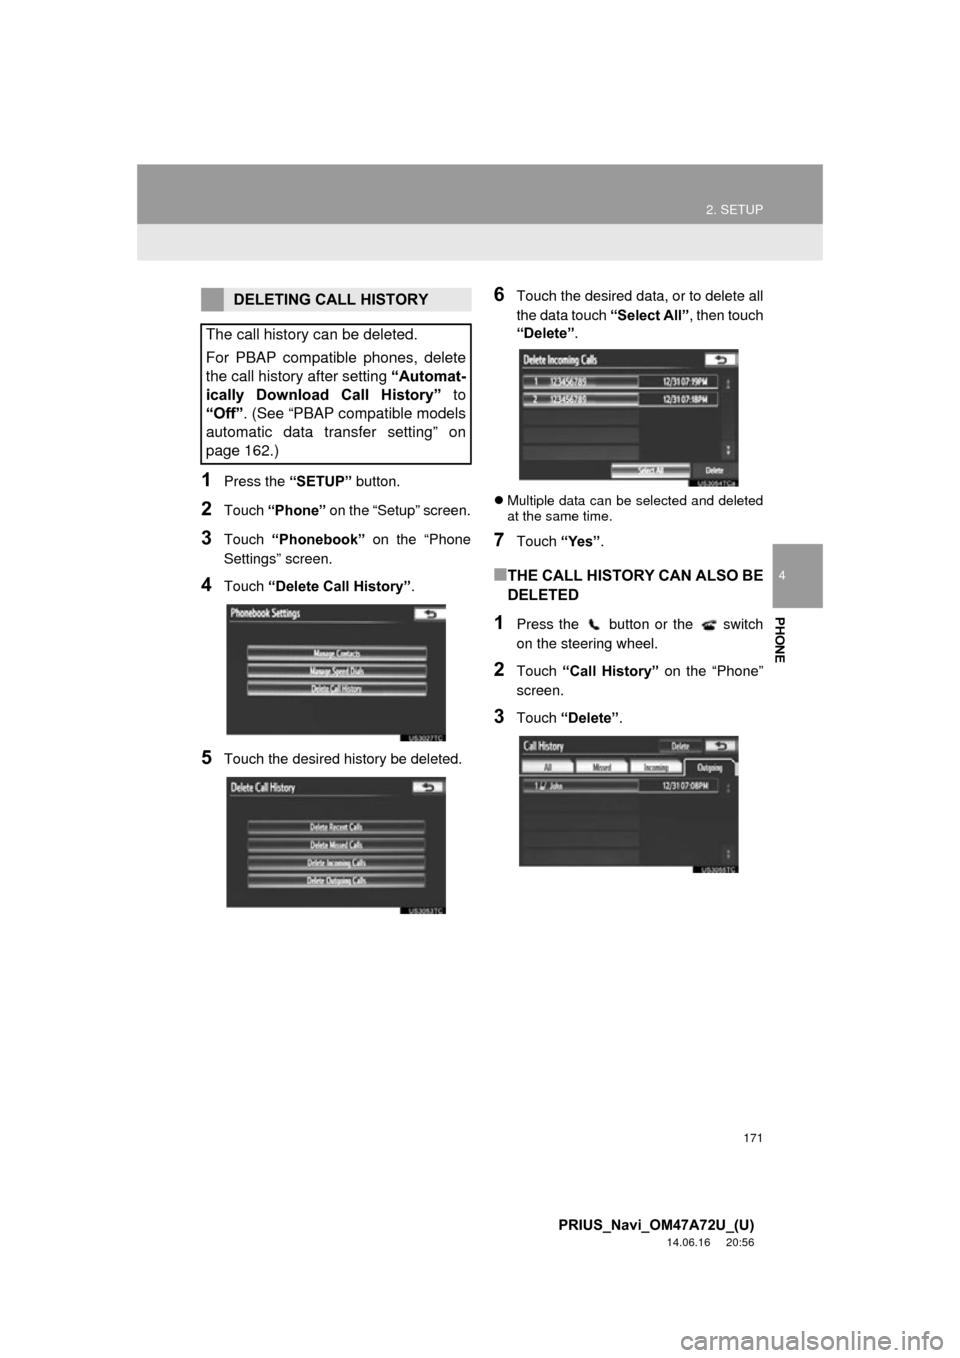
1Press the “SETUP” button.
2Touch “Phone” on the “Setup” screen.
3Touch “Phonebook” on the “Phone
Settings” screen.
4Touch “Delete Call History”.
5Touch the desired history be deleted.
6Touch the desired data, or to delete all
the data touch “Select All”, then touch
“Delete” .
Multiple data can be selected and deleted
at the same time.
7Touch “Yes”.
■THE CALL HISTORY CAN ALSO BE
DELETED
1Press the button or the switch
on the steering wheel.
2Touch “Call History” on the “Phone”
screen.
3Touch “Delete” .
DELETING CALL HISTORY
The call history can be deleted.
For PBAP compatible phones, delete
the call history after setting “Automat-
ically Download Call History” to
“Off” . (See “PBAP compatible models
automatic data transfer setting” on
page 162.)
Page 172 of 356
172
2. SETUP
PRIUS_Navi_OM47A72U_(U)
14.06.16 20:56
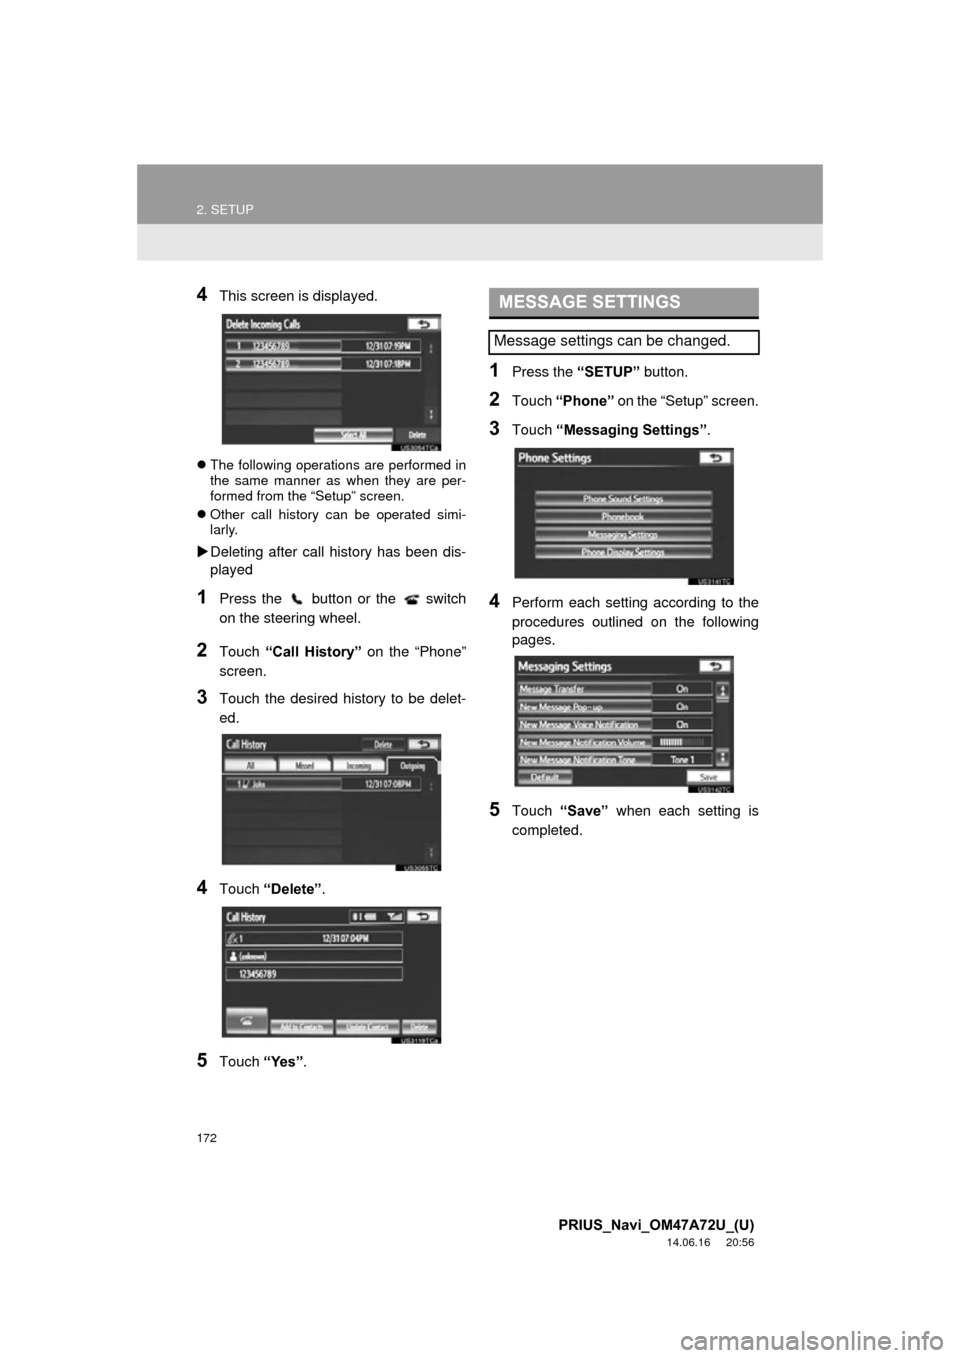
4This screen is displayed.
The following operations are performed in
the same manner as when they are per-
formed from the “Setup” screen.
Other call history can be operated simi-
larly.
Deleting after call history has been dis-
played
1Press the button or the switch
on the steering wheel.
2Touch “Call History” on the “Phone”
screen.
3Touch the desired history to be delet-
ed.
4Touch “Delete” .
5Touch “Yes”.
1Press the “SETUP” button.
2Touch “Phone” on the “Setup” screen.
3Touch “Messaging Settings”.
4Perform each setting according to the
procedures outlined on the following
pages.
5Touch “Save” when each setting is
completed.
MESSAGE SETTINGS
Message settings can be changed.
Page 173 of 356
173
2. SETUP
4
PHONE
PRIUS_Navi_OM47A72U_(U)
14.06.16 20:56
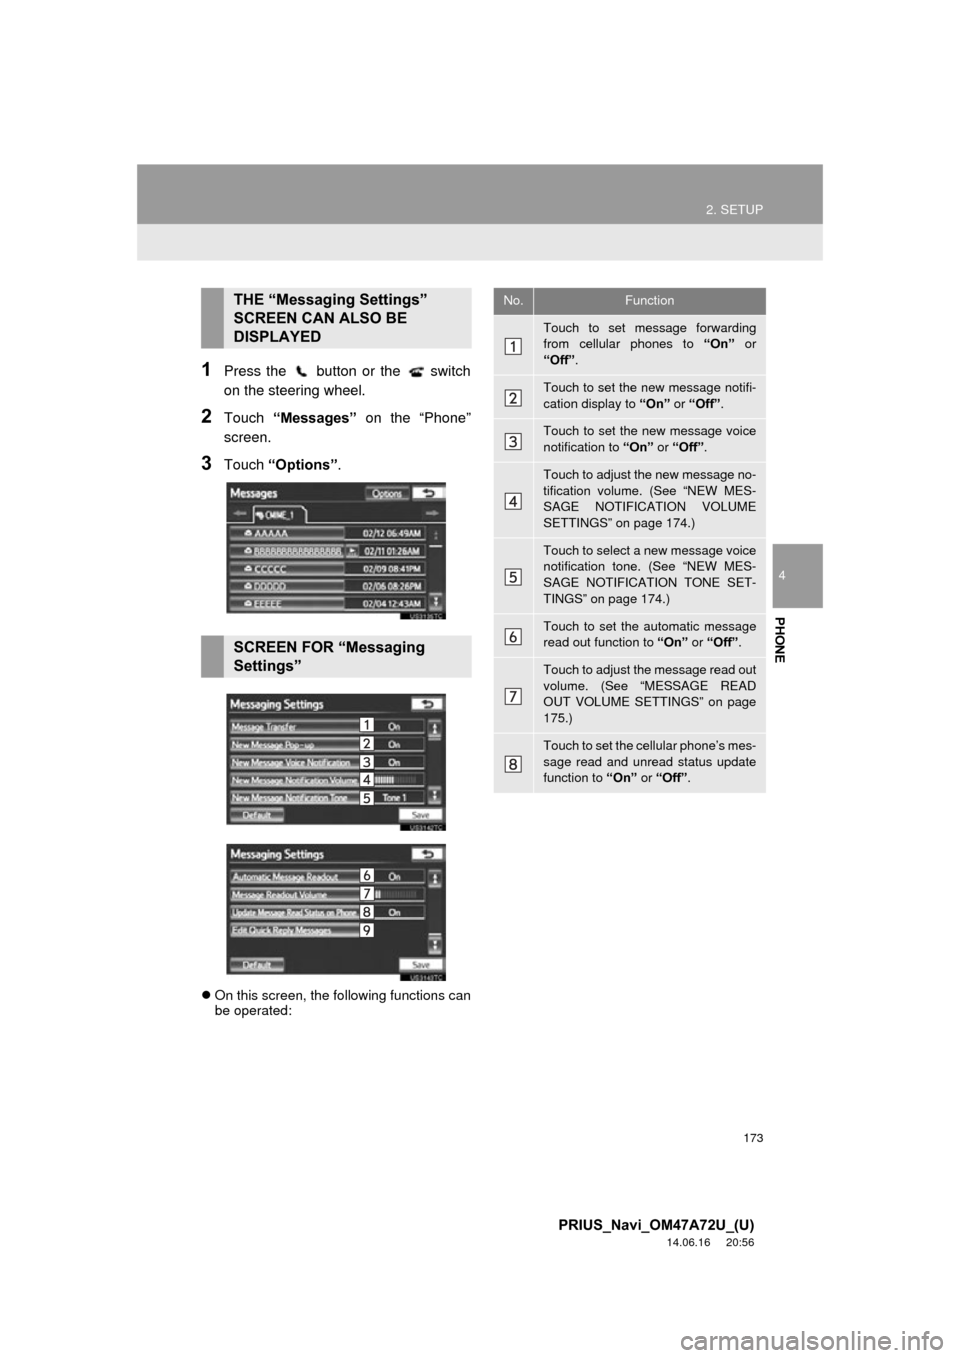
1Press the button or the switch
on the steering wheel.
2Touch “Messages” on the “Phone”
screen.
3Touch “Options”.
On this screen, the following functions can
be operated:
THE “Messaging Settings”
SCREEN CAN ALSO BE
DISPLAYED
SCREEN FOR “Messaging
Settings”
No.Function
Touch to set message forwarding
from cellular phones to “On” or
“Off” .
Touch to set the new message notifi-
cation display to “On” or “Off” .
Touch to set the new message voice
notification to “On” or “Off”.
Touch to adjust the new message no-
tification volume. (See “NEW MES-
SAGE NOTIFICATION VOLUME
SETTINGS” on page 174.)
Touch to select a new message voice
notification tone. (See “NEW MES-
SAGE NOTIFICATION TONE SET-
TINGS” on page 174.)
Touch to set the automatic message
read out function to “On” or “Off”.
Touch to adjust the message read out
volume. (See “MESSAGE READ
OUT VOLUME SETTINGS” on page
175.)
Touch to set the cellular phone’s mes-
sage read and unread status update
function to “On” or “Off”.
Page 178 of 356
178
2. SETUP
PRIUS_Navi_OM47A72U_(U)
14.06.16 20:56
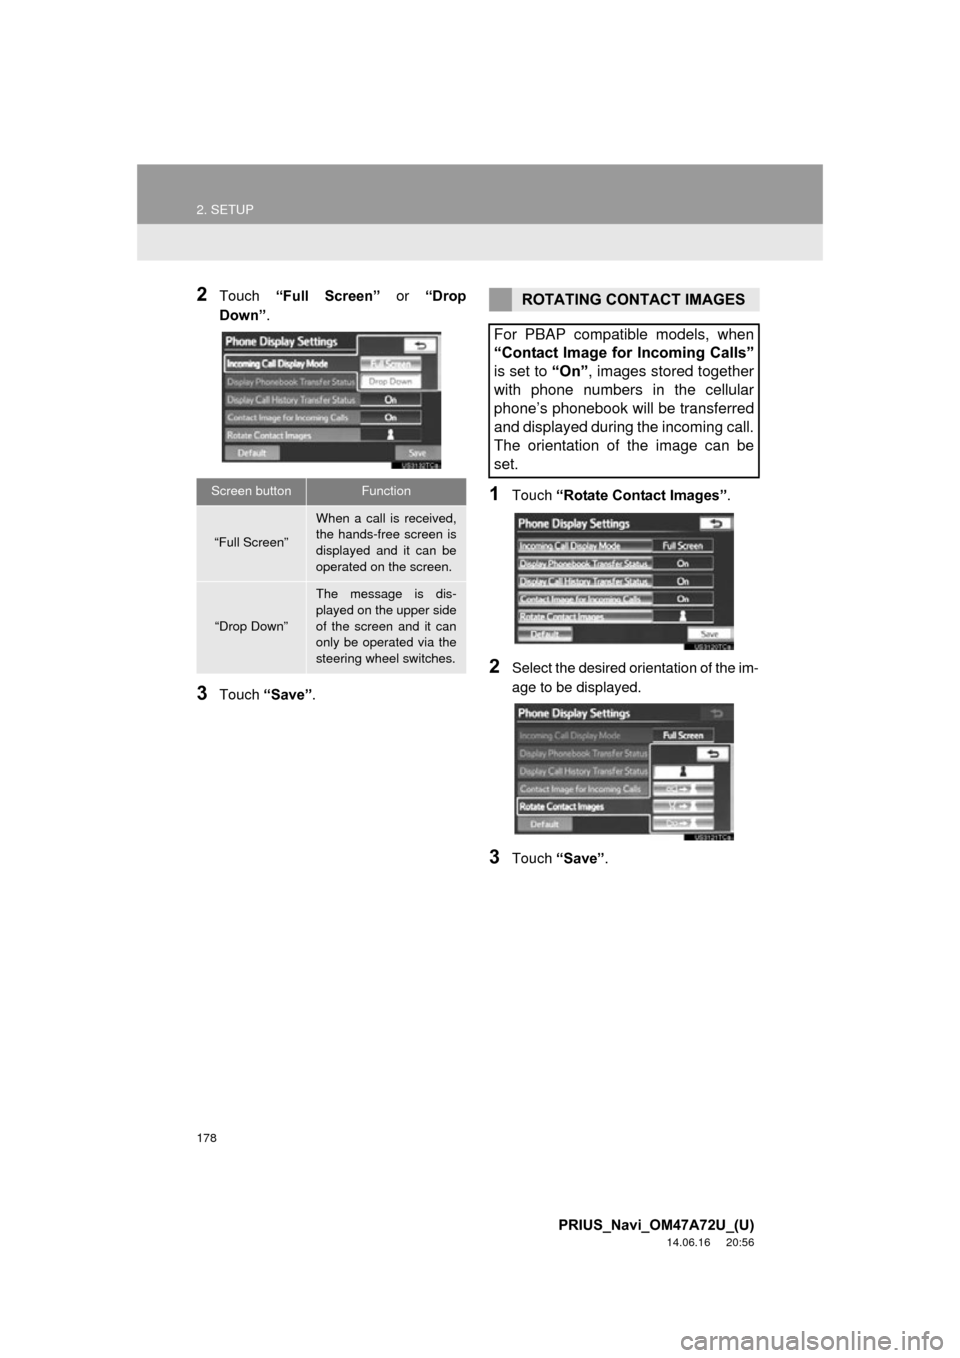
2Touch “Full Screen” or “Drop
Down”.
3Touch “Save” .
1Touch “Rotate Contact Images” .
2Select the desired orientation of the im-
age to be displayed.
3Touch “Save” .
Screen buttonFunction
“Full Screen”
When a call is received,
the hands-free screen is
displayed and it can be
operated on the screen.
“Drop Down”
The message is dis-
played on the upper side
of the screen and it can
only be operated via the
steering wheel switches.
ROTATING CONTACT IMAGES
For PBAP compatible models, when
“Contact Image for Incoming Calls”
is set to “On”, images stored together
with phone numbers in the cellular
phone’s phonebook will be transferred
and displayed during the incoming call.
The orientation of the image can be
set.
Page 217 of 356
217
1. AUDIO/VIDEO SYSTEM OPERATION
5
AUDIO/VIDEO SYSTEM
PRIUS_Navi_OM47A72U_(U)
14.06.16 20:56
6. RADIO OPERATION (INTERNET RADIO BROADCAST)
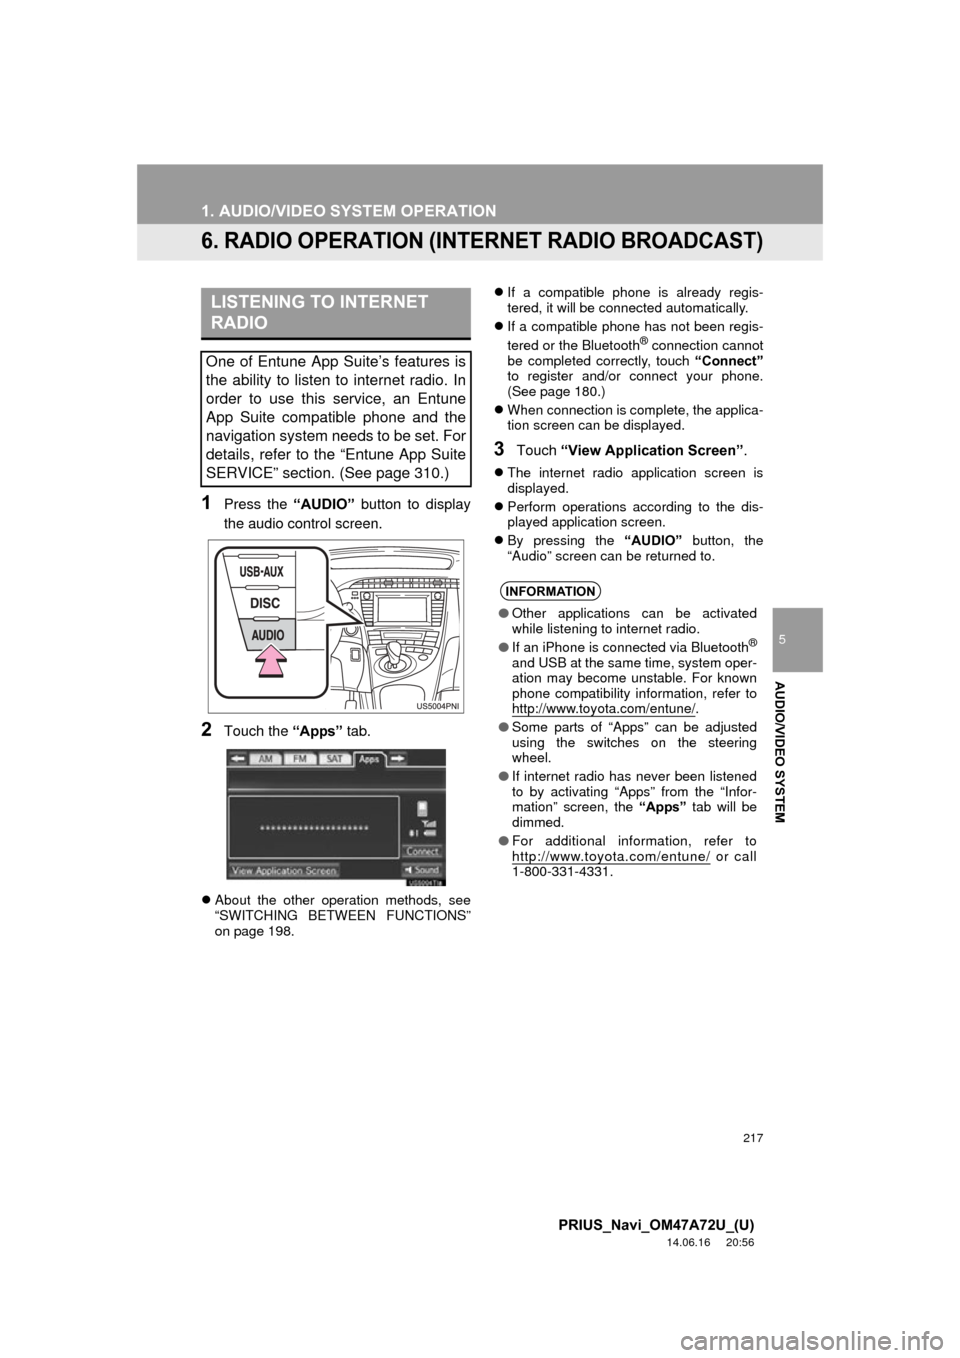
1Press the “AUDIO” button to display
the audio control screen.
2Touch the “Apps” tab.
About the other operation methods, see
“SWITCHING BETWEEN FUNCTIONS”
on page 198.
If a compatible phone is already regis-
tered, it will be connected automatically.
If a compatible phone has not been regis-
tered or the Bluetooth
® connection cannot
be completed correctly, touch “Connect”
to register and/or connect your phone.
(See page 180.)
When connection is complete, the applica-
tion screen can be displayed.
3Touch “View Application Screen” .
The internet radio application screen is
displayed.
Perform operations according to the dis-
played application screen.
By pressing the “AUDIO” button, the
“Audio” screen can be returned to.
LISTENING TO INTERNET
RADIO
One of Entune App Suite’s features is
the ability to listen to internet radio. In
order to use this service, an Entune
App Suite compatible phone and the
navigation system needs to be set. For
details, refer to the “Entune App Suite
SERVICE” section. (See page 310.)
INFORMATION
● Other applications can be activated
while listening to internet radio.
● If an iPhone is connected via Bluetooth
®
and USB at the same time, system oper-
ation may become unstable. For known
phone compatibility information, refer to
http://www.toyota.com/entune/
.
● Some parts of “Apps” can be adjusted
using the switches on the steering
wheel.
● If internet radio has never been listened
to by activating “Apps” from the “Infor-
mation” screen, the “Apps” tab will be
dimmed.
● For additional information, refer to
http://www.toyota.com/entune/
or call
1-800-331-4331.