TOYOTA PRIUS PRIME 2023 Owners Manual
Manufacturer: TOYOTA, Model Year: 2023, Model line: PRIUS PRIME, Model: TOYOTA PRIUS PRIME 2023Pages: 680, PDF Size: 14.97 MB
Page 161 of 680
1613-1. Instrument cluster
3
Vehicle status information and indicators
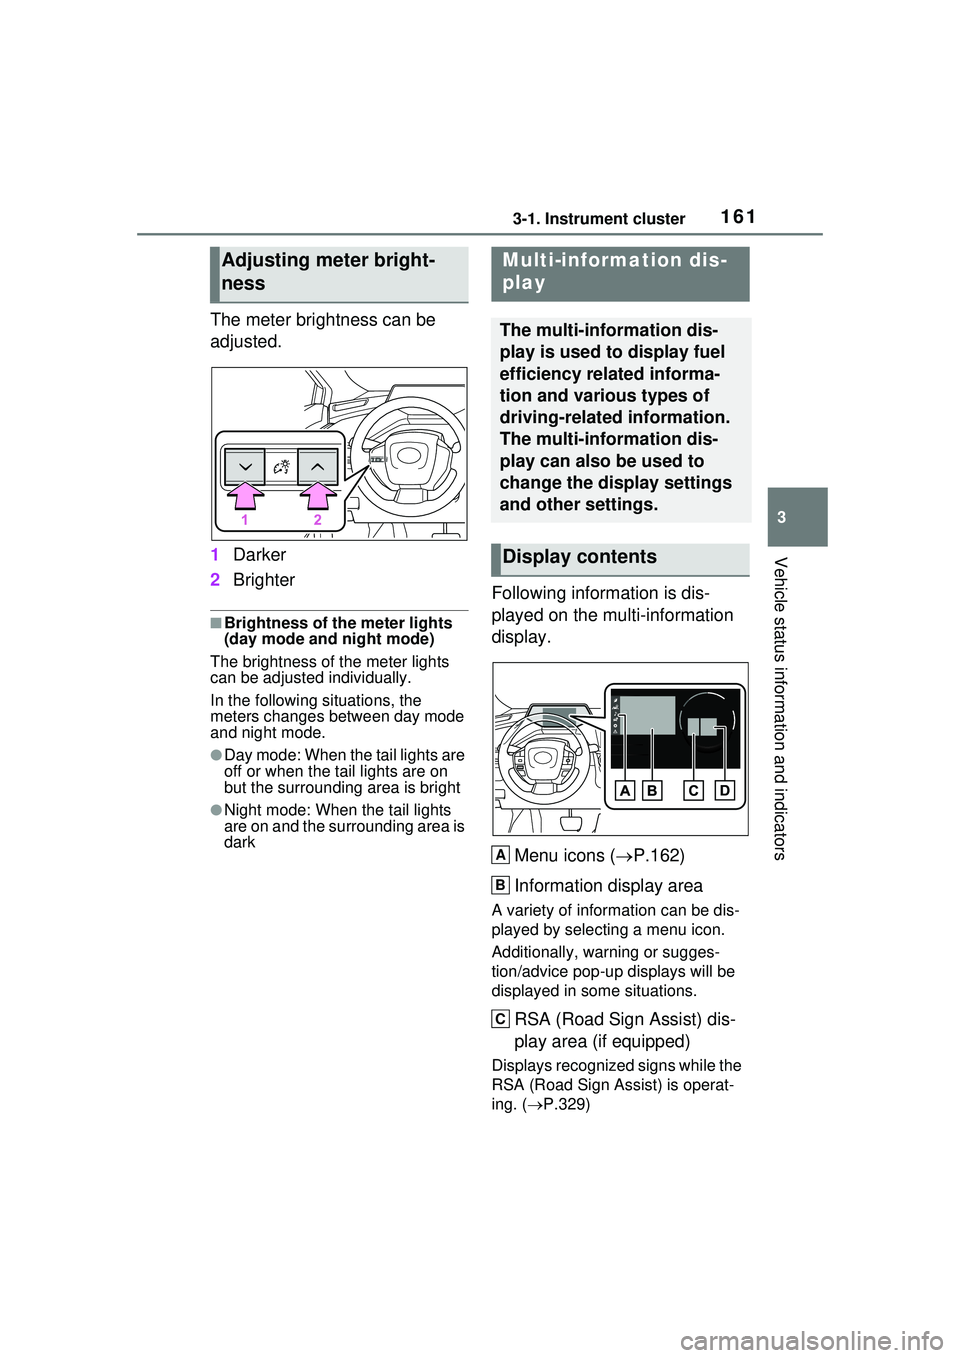
The meter brightness can be
adjusted.
1Darker
2 Brighter
■Brightness of the meter lights
(day mode and night mode)
The brightness of the meter lights
can be adjusted individually.
In the following situations, the
meters changes between day mode
and night mode.
●Day mode: When the tail lights are
off or when the tail lights are on
but the surrounding area is bright
●Night mode: When the tail lights
are on and the surrounding area is
dark
Following information is dis-
played on the multi-information
display.
Menu icons ( P.162)
Information display area
A variety of information can be dis-
played by selecting a menu icon.
Additionally, warning or sugges-
tion/advice pop-up displays will be
displayed in some situations.
RSA (Road Sign Assist) dis-
play area (if equipped)
Displays recognized signs while the
RSA (Road Sign Assist) is operat-
ing. ( P.329)
Adjusting meter bright-
nessMulti-information dis-
play
The multi-information dis-
play is used to display fuel
efficiency related informa-
tion and various types of
driving-related information.
The multi-information dis-
play can also be used to
change the display settings
and other settings.
Display contents
A
B
C
Page 162 of 680
1623-1. Instrument cluster
Driving support system infor-
mation (P.165)
■The multi-information display is
displayed when
The power switch is in ON.
■Liquid crystal display
( P.159)
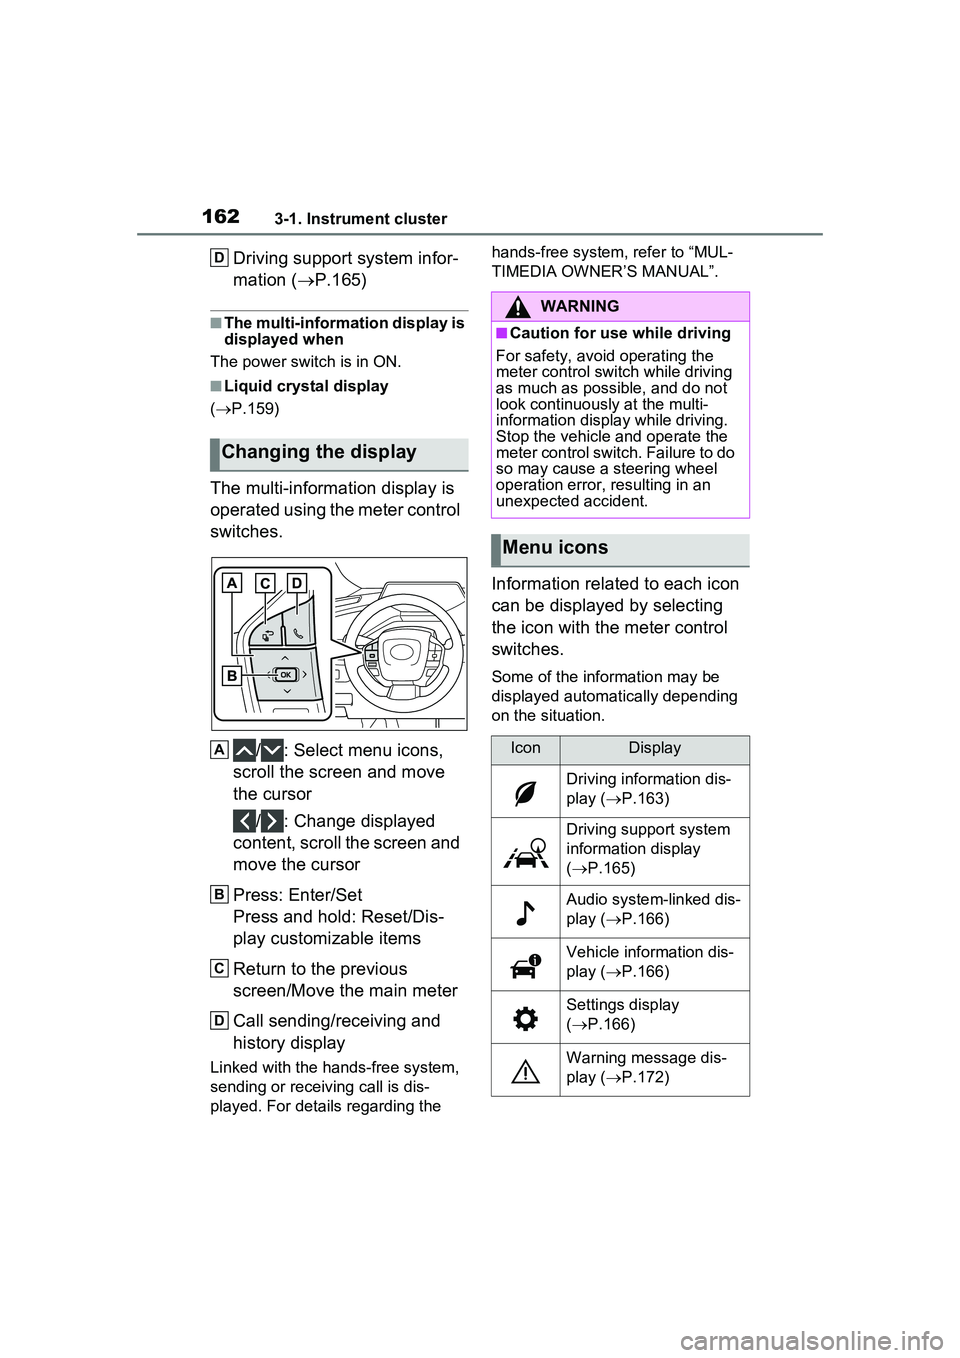
The multi-information display is
operated using the meter control
switches.
/ : Select menu icons,
scroll the screen and move
the cursor
/ : Change displayed
content, scroll the screen and
move the cursor
Press: Enter/Set
Press and hold: Reset/Dis-
play customizable items
Return to the previous
screen/Move the main meter
Call sending/receiving and
history display
Linked with the hands-free system,
sending or receiving call is dis-
played. For details regarding the hands-free system, refer to “MUL-
TIMEDIA OWNER’S MANUAL”.
Information related to each icon
can be displayed by selecting
the icon with the meter control
switches.
Some of the information may be
displayed automatically depending
on the situation.
Changing the display
D
A
B
C
D
WARNING
■Caution for use while driving
For safety, avoid operating the
meter control switch while driving
as much as possible, and do not
look continuously at the multi-
information displa y while driving.
Stop the vehicle and operate the
meter control switch. Failure to do
so may cause a steering wheel
operation error, resulting in an
unexpected accident.
Menu icons
IconDisplay
Driving information dis-
play ( P.163)
Driving support system
information display
( P.165)
Audio system-linked dis-
play ( P.166)
Vehicle information dis-
play ( P.166)
Settings display
( P.166)
Warning message dis-
play ( P.172)
Page 163 of 680
1633-1. Instrument cluster
3
Vehicle status information and indicators
Select to display power con-
sumption or fuel consumption
data in various forms.
■Power Consumption/Fuel
Economy
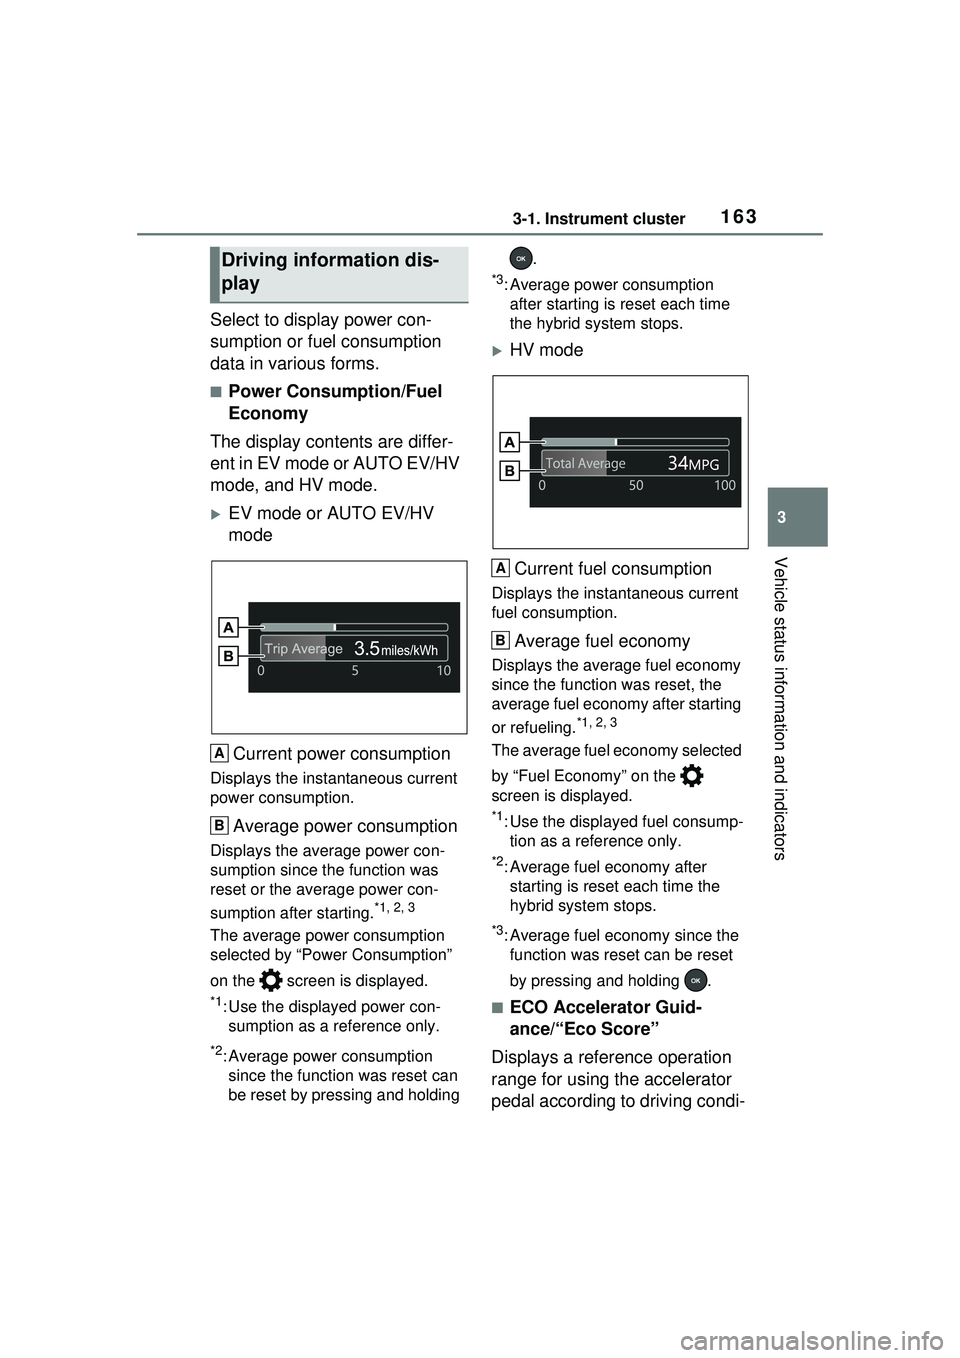
The display contents are differ-
ent in EV mode or AUTO EV/HV
mode, and HV mode.
EV mode or AUTO EV/HV
mode
Current power consumption
Displays the instantaneous current
power consumption.
Average power consumption
Displays the average power con-
sumption since the function was
reset or the average power con-
sumption after starting.
*1, 2, 3
The average power consumption
selected by “Power Consumption”
on the screen is displayed.
*1: Use the displayed power con- sumption as a reference only.
*2: Average power consumption since the function was reset can
be reset by pressing and holding .
*3: Average power consumption
after starting is reset each time
the hybrid system stops.
HV mode
Current fuel consumption
Displays the instantaneous current
fuel consumption.
Average fuel economy
Displays the average fuel economy
since the function was reset, the
average fuel economy after starting
or refueling.
*1, 2, 3
The average fuel economy selected
by “Fuel Economy” on the
screen is displayed.
*1: Use the displayed fuel consump- tion as a reference only.
*2: Average fuel economy after starting is reset each time the
hybrid system stops.
*3: Average fuel economy since the function was reset can be reset
by pressing and holding .
■ECO Accelerator Guid-
ance/“Eco Score”
Displays a reference operation
range for using the accelerator
pedal according to driving condi-
Driving information dis-
play
A
B
A
B
Page 164 of 680
1643-1. Instrument cluster
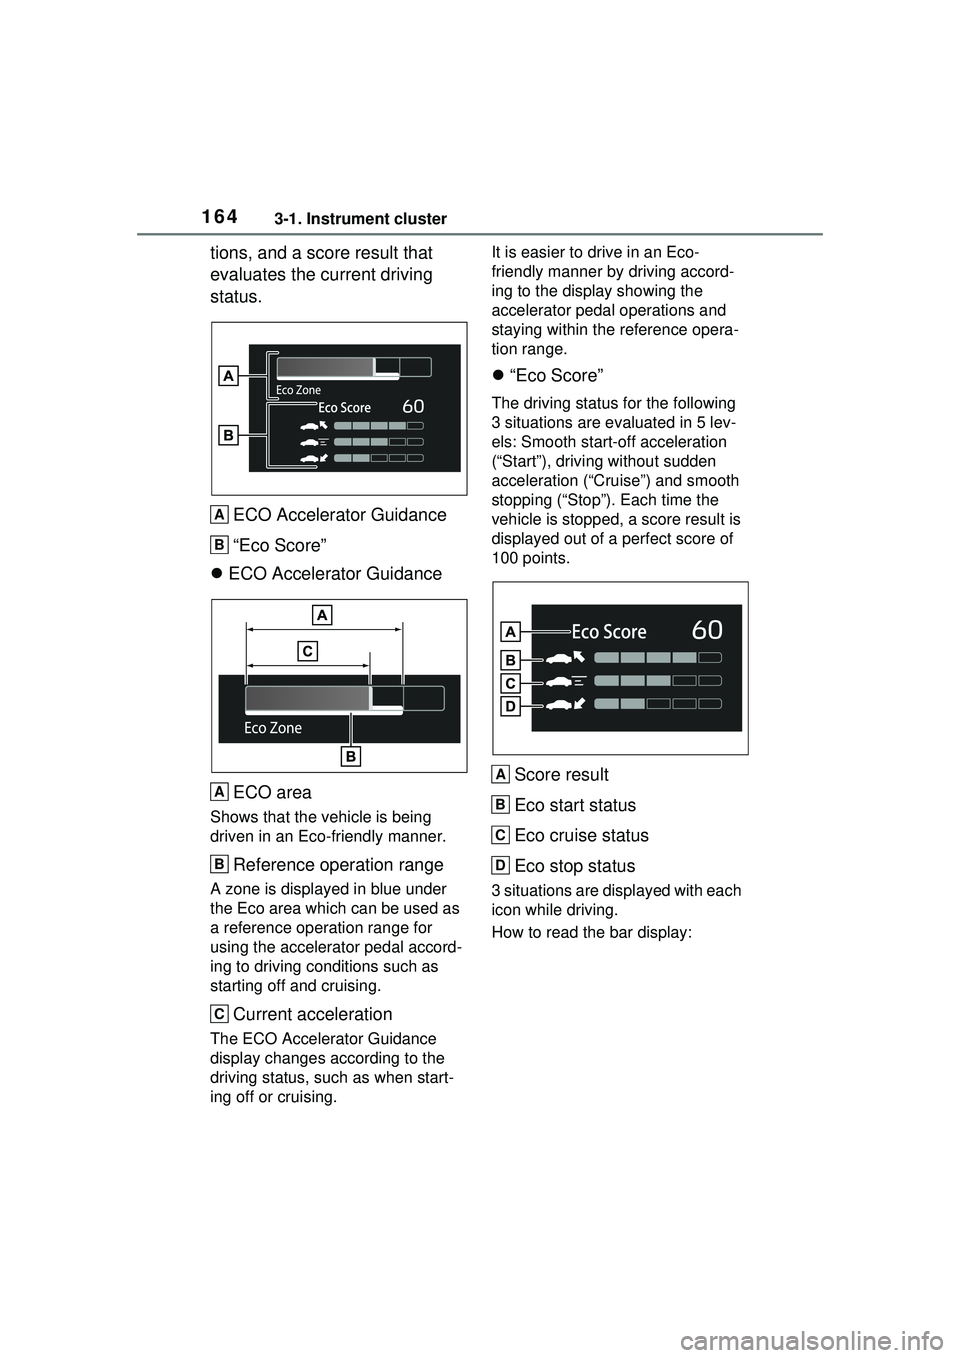
tions, and a score result that
evaluates the current driving
status.ECO Accelerator Guidance
“Eco Score”
ECO Accelerator Guidance
ECO area
Shows that the vehicle is being
driven in an Eco-friendly manner.
Reference operation range
A zone is displayed in blue under
the Eco area which can be used as
a reference operation range for
using the accelerator pedal accord-
ing to driving conditions such as
starting off and cruising.
Current acceleration
The ECO Accelerator Guidance
display changes according to the
driving status, such as when start-
ing off or cruising. It is easier to drive in an Eco-
friendly manner by driving accord-
ing to the display showing the
accelerator pedal operations and
staying within the reference opera-
tion range.
“Eco Score”
The driving status for the following
3 situations are evaluated in 5 lev-
els: Smooth start-off acceleration
(“Start”), driving without sudden
acceleration (“Cruise”) and smooth
stopping (“Stop”). Each time the
vehicle is stopped, a score result is
displayed out of a perfect score of
100 points.
Score result
Eco start status
Eco cruise status
Eco stop status
3 situations are displayed with each
icon while driving.
How to read the bar display:
A
B
A
B
C
A
B
C
D
Page 165 of 680
1653-1. Instrument cluster
3
Vehicle status information and indicators
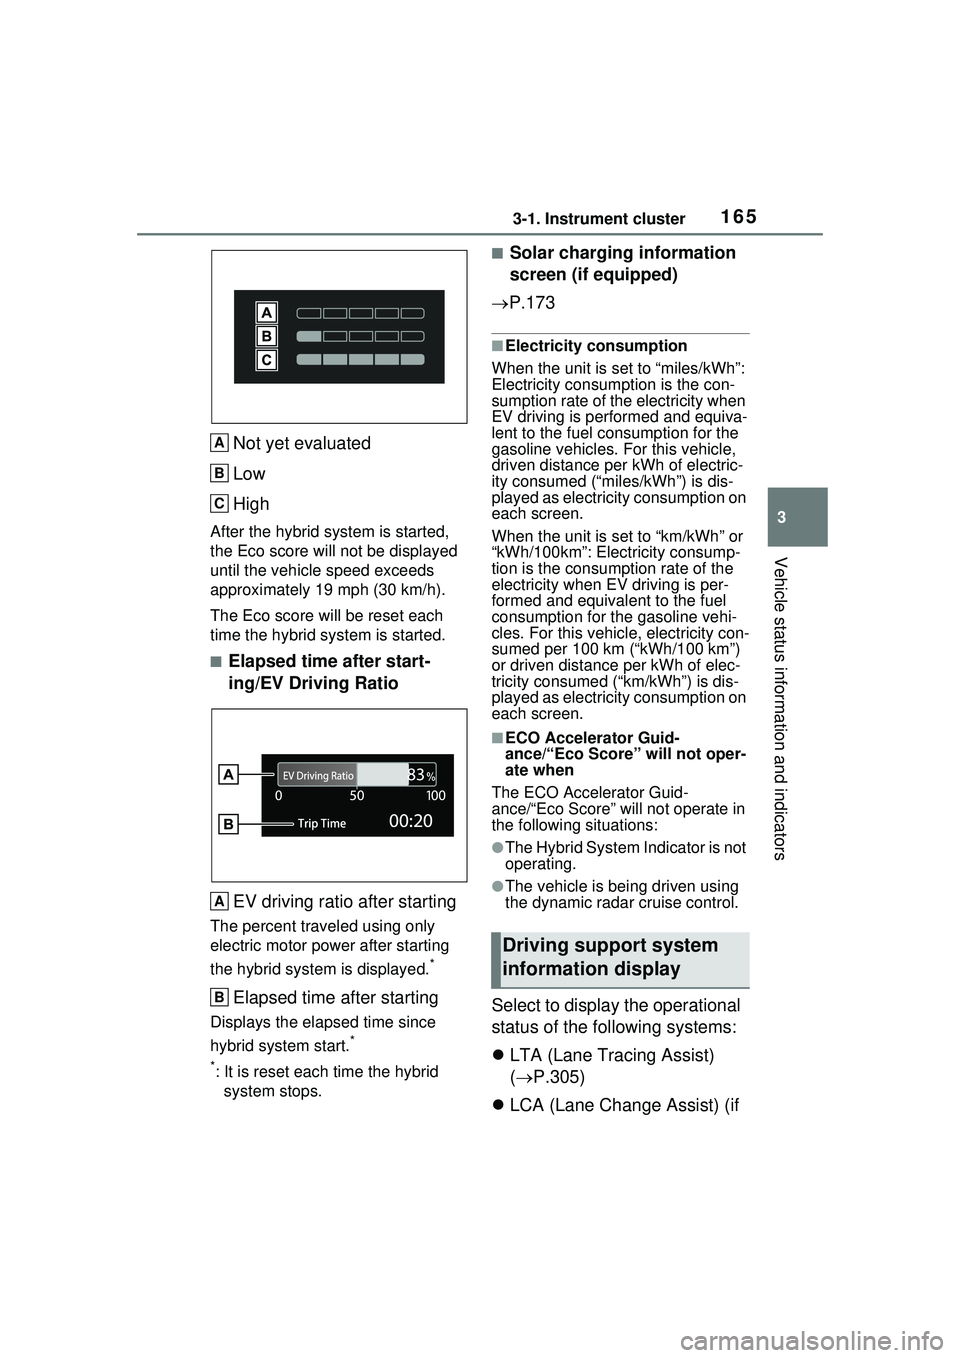
Not yet evaluated
Low
High
After the hybrid system is started,
the Eco score will not be displayed
until the vehicle speed exceeds
approximately 19 mph (30 km/h).
The Eco score will be reset each
time the hybrid system is started.
■Elapsed time after start-
ing/EV Driving RatioEV driving ratio after starting
The percent traveled using only
electric motor power after starting
the hybrid system is displayed.
*
Elapsed time after starting
Displays the elapsed time since
hybrid system start.
*
*
: It is reset each time the hybrid system stops.
■Solar charging information
screen (if equipped)
P.173
■Electricity consumption
When the unit is set to “miles/kWh”:
Electricity consum ption is the con-
sumption rate of the electricity when
EV driving is performed and equiva-
lent to the fuel consumption for the
gasoline vehicles. For this vehicle,
driven distance per kWh of electric-
ity consumed (“miles/kWh”) is dis-
played as electricity consumption on
each screen.
When the unit is set to “km/kWh” or
“kWh/100km”: Electricity consump-
tion is the consumption rate of the
electricity when EV driving is per-
formed and equivalent to the fuel
consumption for the gasoline vehi-
cles. For this vehicl e, electricity con-
sumed per 100 km (“kWh/100 km”)
or driven distance per kWh of elec-
tricity consumed (“km/kWh”) is dis-
played as electricity consumption on
each screen.
■ECO Accelerator Guid-
ance/“Eco Score” will not oper-
ate when
The ECO Accelerator Guid-
ance/“Eco Score” will not operate in
the following situations:
●The Hybrid System Indicator is not
operating.
●The vehicle is being driven using
the dynamic radar cruise control.
Select to display the operational
status of the following systems:
LTA (Lane Tracing Assist)
( P.305)
LCA (Lane Change Assist) (if
A
B
C
A
B
Driving support system
information display
Page 166 of 680
1663-1. Instrument cluster
equipped) (P.310)
LDA (Lane Departure Alert)
( P.313)
PDA (Proactive driving assist)
( P.320)
Dynamic radar cruise control
( P.331)
Cruise Control ( P.342)
■Navigation system-linked
display (if equipped)
Select to display the following
navigation system-linked infor-
mation.
Route guidance to destination
Compass
Select to enable selection of an
audio source or track on the dis-
play.
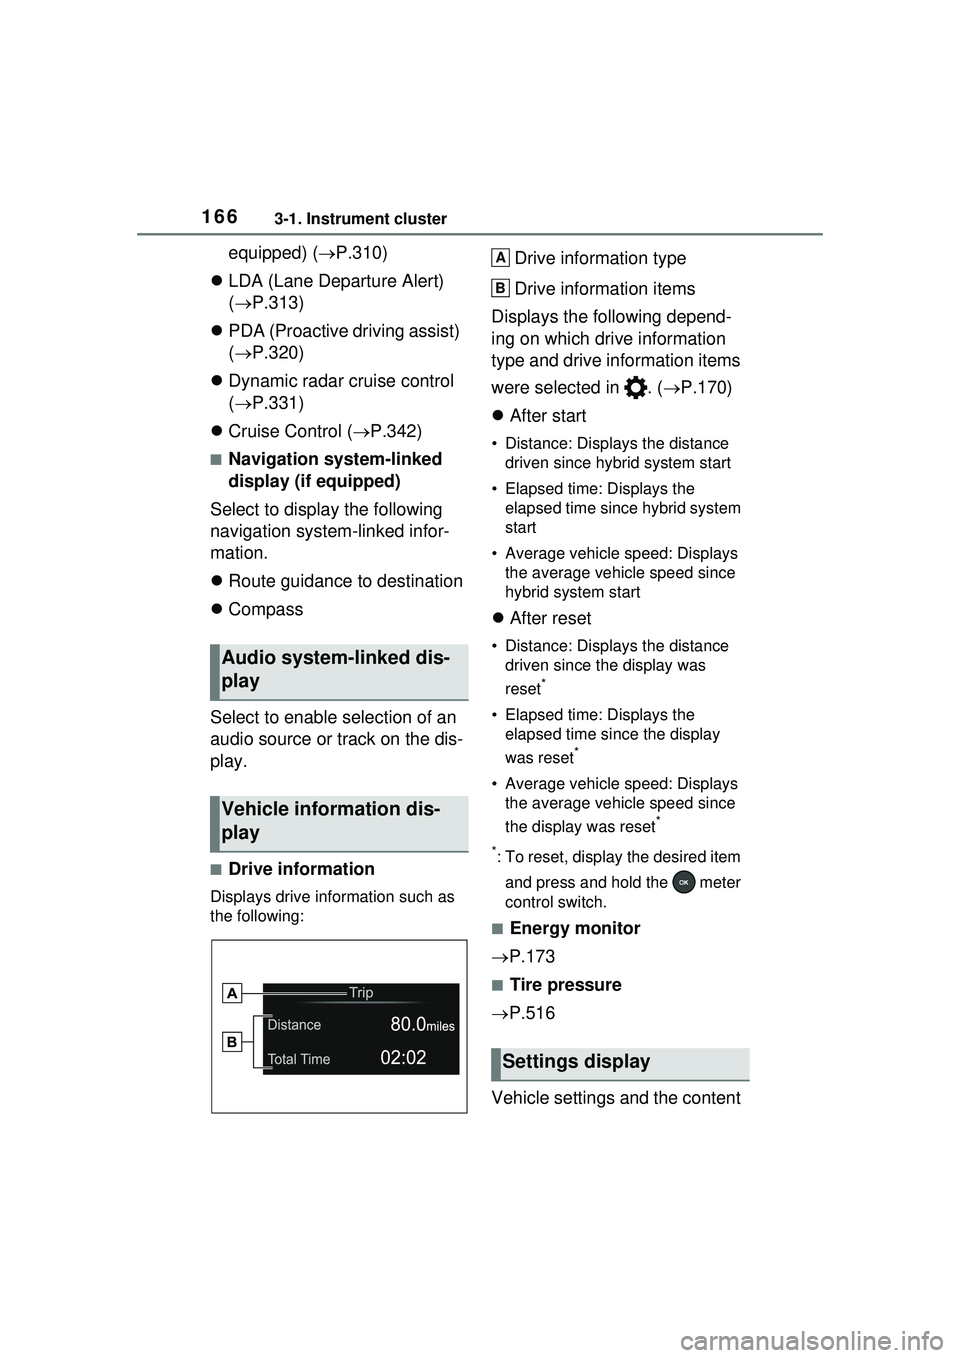
■Drive information
Displays drive information such as
the following:
Drive information type
Drive information items
Displays the following depend-
ing on which drive information
type and drive information items
were selected in . ( P.170)
After start
• Distance: Displays the distance
driven since hybrid system start
• Elapsed time: Displays the elapsed time since hybrid system
start
• Average vehicle speed: Displays the average vehicle speed since
hybrid system start
After reset
• Distance: Displays the distance
driven since the display was
reset
*
• Elapsed time: Displays the elapsed time since the display
was reset
*
• Average vehicle speed: Displays the average vehicle speed since
the display was reset
*
*
: To reset, display the desired item and press and hold the meter
control switch.
■Energy monitor
P.173
■Tire pressure
P.516
Vehicle settings and the content
Audio system-linked dis-
play
Vehicle information dis-
play
Settings display
A
B
Page 167 of 680
1673-1. Instrument cluster
3
Vehicle status information and indicators
displayed on the screen can be
changed by using the meter
control switches.
■Setting procedure
1 Operate or of the
meter control switches and
select .
2 Operate or of the
meter control switches and
select the desired item.
• If the function is turned on and off or the volume, etc. is
changed on the setting
screen, the setting is changed
each time is pressed.
• For functions that allow oper- ation contents, display con-
tents, etc., of function to be
selected, the setting screen is
displayed by pressing and
holding . When the setting
screen is displayed, select the
setting or desired value (time,
etc.) with .
3 After changing the settings,
press of the meter control
switches.
■ LDA (Lane Departure
Alert) ( P.313)
Select to set up the following
items.
Lane Departure Alert on/off
Select to enable/disable Lane
Departure Alert system.
“Alert Options”
Select to set the alert type.
“Alert Timing”
Select to set the alert timing.
■ BSM (Blind Spot Moni-
tor) (if equipped) ( P.354)
Select to set up the following
items.
BSM (Blind Spot Monitor)
on/off
Select to enable/disable the BSM
system.
“Support timing”
Select to change the alert timing for
an approaching vehicle.
“Brightness”
Select to switch the brightness of
the outside rear view mirror indica-
tors. ( P.354)
“Buzzer alert”
Select to enable/disable the buzzer
alert which sounds when BSM sys-
tem is operated.
■ PCS (Pre-Collision Sys-
tem) ( P.293)
Select to set up the following
items.
PCS on/off
Select to enable/disable the pre-
collision system.
“Warning timing”
Select to change the pre-collision
warning timing.
■ PDA (Proactive driving
assist) ( P.320)
PDA on/off
Select to enable/disable the PDA
Page 168 of 680
1683-1. Instrument cluster
system.
“Sensitivity”
Select to change the alert timing for
a detected object.
SA (Steering Assist)
Select to enable/disable the Steer-
ing Assist function.
DA (Deceleration Assist)
Select to enable/disable the Decel-
eration Assist function.
OAA (Obstacle Anticipation
Assist)
Select to enable/disable the Obsta-
cle Anticipation Assist function.
■ Intuitive parking
assist ( P.363)
Select to set up the following
items.
Intuitive parking assist on/off
Select to enable/disable the intui-
tive parking assist.
Volume
Select to set the volume of the
buzzer which sounds when the
RCTA (if equipped), the RCD (if
equipped) or intuitive parking assist
is operated.
■ RCTA (Rear Cross Traf-
fic Alert) (if equipped)
( P.373)
Select to set up the following
items.
RCTA (Rear Cross Traffic
Alert) on/off
Select to enable/disable the RCTA
system.
Volume
Select to set the volume of the
buzzer which sounds when the
RCTA, the RCD (if equipped) or the
intuitive parking as sist is operated.
■ RCD (Rear Camera
Detection) function (if
equipped) ( P.378)
Select to enable/disable the
Rear Camera Detection func-
tion.
■ PKSB (Parking Sup-
port Brake System) (if
equipped) ( P.382)
Select to enable/disable the
Parking Support Brake function.
■ SEA (Safe Exit Assist) (if
equipped) ( P.359)
Select to set up the following
items.
Safe Exit Assist on/off
Select to enable/d isable the Safe
Exit Assist system.
“Sensitivity”
Select to change the alert timing for
a vehicle or bicycle.
Mirror indicate on/off
Select to enable/disable the outside
rear view mirrors display.
■ RSA (Road Sign
Assist) (if equipped)
( P.329)
Select to set up the following
items.
Road Sign Assist on/off
Page 169 of 680
1693-1. Instrument cluster
3
Vehicle status information and indicators
Select to enable/disable the RSA
(Road Sign Assist).
“Notification Method”
Select to change each notification
method used to notify the driver
when the system recognizes
excess speed and Do Not Enter
sign.
“Notification Level”
Select to change each notification
level used to notify the driver when
the system recognizes excess
speed.
■ DRCC ( P.331)
Select to set up the following
items.
“Extended Resume Time” (if
equipped)
Select to enable/disable the
extended resume time function.
( P.333)
“Acceleration Setting”
Select to change the setting for
when vehicle accelerates until the
set vehicle speed is reached.
“Guide message”
Select to enable/disable the guide
message display.
“Curve Speed Reduction”
Select to change the curve speed
reduction function setting.
( P.338)
■ Vehicle Settings
“Charging Settings”
Select to set up the following items.
• “Charging Schedule”
Select to register or change the charging schedule. (
P.123)
• “Charging Current”
Select to change the charging cur-
rent. ( P.119)
• “Connector Lock”
Select to change the method for
locking and unlocking. ( P.103)
• “Battery Cooler”
Select to enable /disable the bat-
tery cooler. ( P.109)
• “Battery Heater”
Select to enable /disable the bat-
tery heater. ( P.108)
Driver Break Suggestion
( P.316)
Select to enable/disable the drive
break suggestion.
“Advanced Drive” (if
equipped)
Select to enable/d isable the Traffic
Jam Assist Function. ( P.348)
“DMC Recording” (if
equipped)
Select to enable/disable the notifi-
cation for driver monitor camera
recording when the operation of
Traffic Jam Assist is started.
( P.348)
LCA (Lane Change Assist) (if
equipped) ( P.310)
Select to enable/disable Lane
Change Assist system.
FCTA (Front Cross Traffic
Alert) (if equipped) ( P.326)
Select to set up the following items.
• FCTA on/off
Select to enable/disable the FCTA
Page 170 of 680
1703-1. Instrument cluster
system.
•“Timing”
Select to set the alert timing for
FCTA system.
Regenerative brake
Select to set up the following items.
• “Deceleration”
Select to change the regenerative
braking force when Regeneration
Boost is operating. ( P.260)
• “Deceleration Memory”
Select to store the settings for
regenerative braking force.
( P.260)
“TPWS setting” (Tire Pres-
sure Warning System)
( P.516)
• “Tire Set Switching”
Select to register the tire pressure
warning system sensor ID code set.
( P.524)
• “Tire Rotation”
Select to register the position of
each wheel after performing a tire
rotation. ( P.518)
• “Tire Pressure Setting”
Select to perform the tire inflation
pressure setting procedure of the
tire pressure warning system.
( P.520)
• “Pressure unit setting”
Select to change the units of mea-
sure displayed.( P.619)
Driver monitor (if equipped)
Select to enable/disable the driver
monitor warning function. ( P.292)
PBD (Power Back Door) (if equipped) (
P.194)
Select to set up the following items.
• System settings
Select to enable/d isable the power
back door system.
• “Opening Adjustment”
Select the open position when
power back door is fully open.
•“Volume”
Select to set the volume of the
buzzer which sounds when the
power back door system operates.
“Scheduled Maintenance”
Select to reset the scheduled main-
tenance information (message indi-
cating maintenance is required and
distance until the next mainte-
nance) after all maintenance is per-
formed.
Oil Maintenance
Select to reset th e Oil maintenance.
( P.506)
Rear Seat Reminder
( P.188)
Select to enable/disable the rear
seat reminder function.
Digital Keys (if equipped)
Select to reset registered digital
keys. ( P.183)
■ Settings
“Language”
Select to change the language on
the multi-information display.
“Units”
Select to change the unit of mea-
sure for fuel consumption.
“Meter Type”