remote control TOYOTA PRIUS PRIME 2023 Owners Manual
[x] Cancel search | Manufacturer: TOYOTA, Model Year: 2023, Model line: PRIUS PRIME, Model: TOYOTA PRIUS PRIME 2023Pages: 680, PDF Size: 14.97 MB
Page 11 of 680
11
• An agreement from the vehicle’s owner (or the lessee for a leased
vehicle) is obtained
• In response to an official request by the police, a court of law or a
government agency
• For use by Toyota in a lawsuit
However, if necessary, Toyota
may:
• Use the data fo r research on
vehicle safety performance
• Disclose the data to a third party for research purposes without
disclosing information about the
specific vehicle or vehicle owner
The SRS airbag and seat belt
pretensioner devices in your
Toyota contain explosive chemi-
cals. If the vehicle is scrapped
with the airbags and seat belt
pretensioners left as they are,
this may cause an accident such
as fire. Be sure to have the sys-
tems of the SRS airbag and seat
belt pretensioner removed and
disposed of by a qualified ser-
vice shop or by your Toyota
dealer before you scrap your
vehicle.
Special handling may apply,
See www.dtsc.ca.gov/
hazardouswaste/perchlorate.
Your vehicle has components
that may contain perchlorate. These components may include
the airbags, seat belt preten-
sioners, wireless remote control
batteries, and the batteries in
the tire pressure warning valve
and transmitters.
The word “QR Code” is regis-
tered trademark of DENSO
WAVE INCORPORATED in
Japan and other countries.
Scrapping of your Toyota
Perchlorate Material
“QR Code”
WARNING
■General precautions while
driving
Driving under the influence: Never
drive your vehicle when under the
influence of alcohol or drugs that
have impaired your ability to oper-
ate your vehicle. Alcohol and cer-
tain drugs delay reaction time,
impair judgment and reduce coor-
dination, which could lead to an
accident that could result in death
or serious injury.
Defensive driving: Always drive
defensively. Anticipate mistakes
that other drivers or pedestrians
might make and be ready to avoid
accidents.
Driver distraction: Always give
your full attention to driving. Any-
thing that distracts the driver,
such as adjusting controls, talking
on a cellular phone or reading can
result in a collisio n with resulting
death or serious injury to you,
your occupants or others.
Page 22 of 680
22Pictorial index
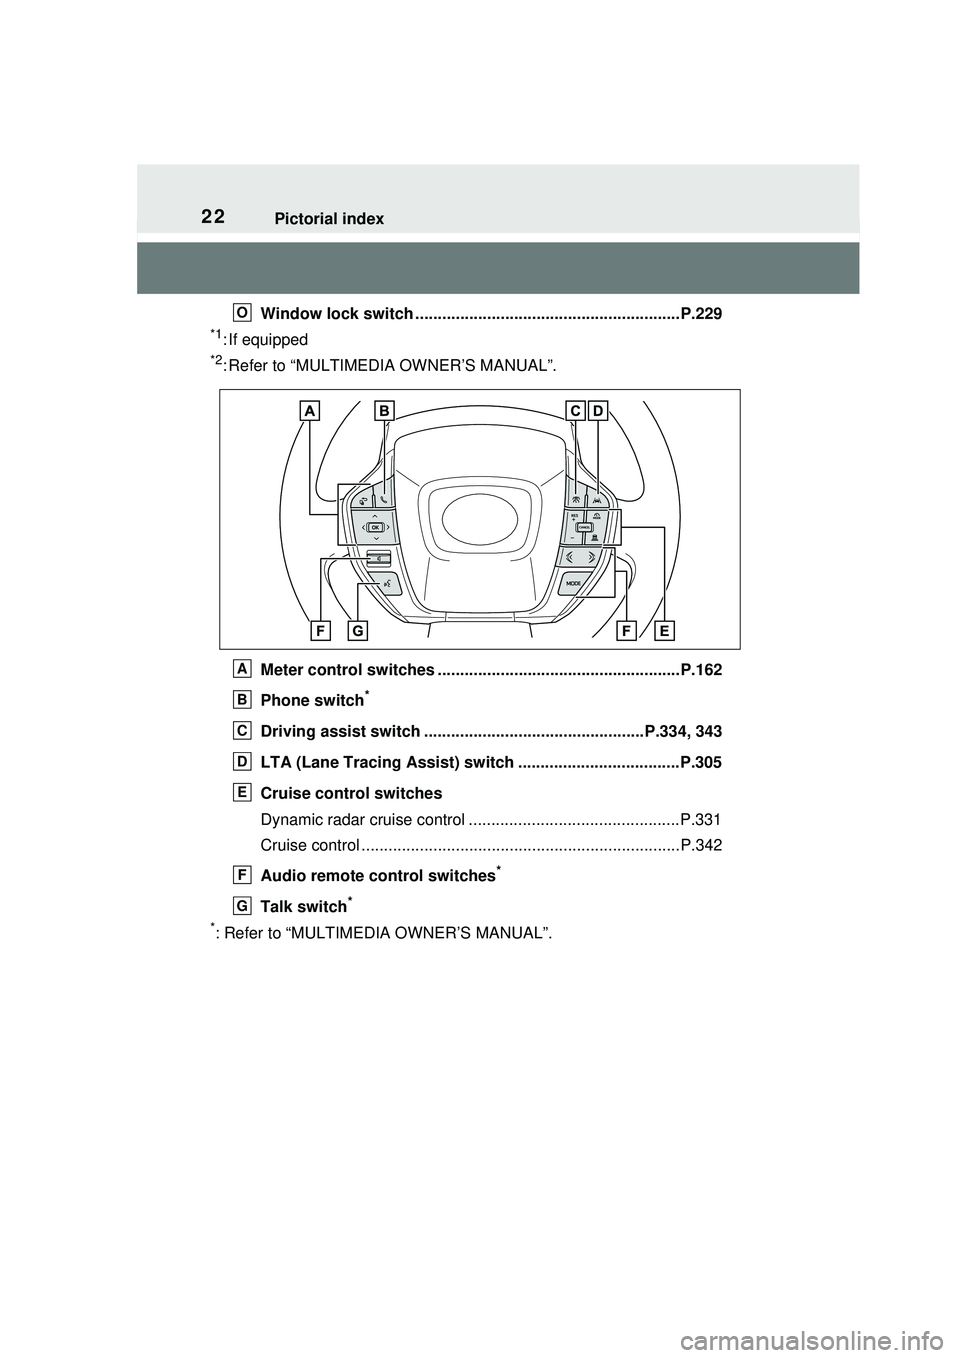
Window lock switch ...........................................................P.229
*1: If equipped
*2: Refer to “MULTIMEDIA OWNER’S MANUAL”.Meter control switches ............... .......................................P.162
Phone switch
*
Driving assist switch .................................................P.334, 343
LTA (Lane Tracing Assist) switch ....................................P.305
Cruise control switches
Dynamic radar cruise control ...............................................P.331
Cruise control .......................................................................P.342
Audio remote control switches
*
Talk switch*
*
: Refer to “MULTIMEDIA OWNER’S MANUAL”.
O
A
B
C
D
E
F
G
Page 103 of 680
1032-2. Charging
2
Plug-in hybrid system
If the door is unlocked and the
AC charging connector is
locked, you can unlock it by
doing the following:
When using the smart key
system, lock the door once
and then unlock it again.
( P.185)
When using the wireless
remote control, press the
unlock button to unlock the
door. ( P.185)
■Changing the AC charging
connector lock settings
The method for locking and
unlocking can be changed on
the multi-information display or
Multimedia Display.
The charging connector lock
settings cannot be changed
when the AC charging cable is
connected to the vehicle.
The settings cannot be changed
when the power switch is in
ACC.
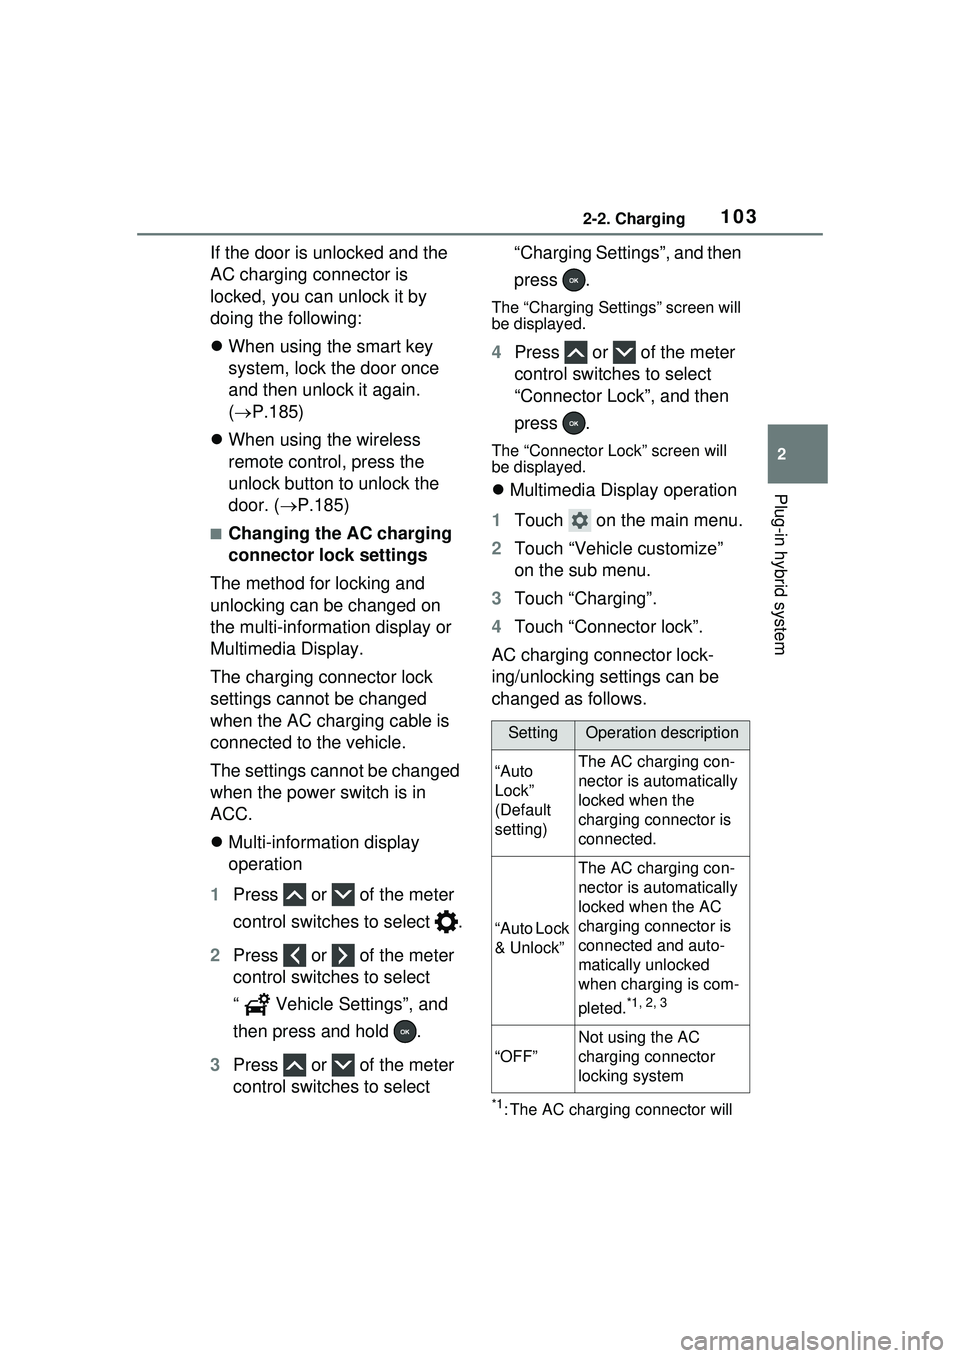
Multi-information display
operation
1 Press or of the meter
control switches to select .
2 Press or of the meter
control switches to select
“ Vehicle Settings”, and
then press and hold .
3 Press or of the meter
control switches to select “Charging Settings”, and then
press .
The “Charging Settings” screen will
be displayed.
4
Press or of the meter
control switches to select
“Connector Lock”, and then
press .
The “Connector Lock” screen will
be displayed.
Multimedia Display operation
1 Touch on the main menu.
2 Touch “Vehicle customize”
on the sub menu.
3 Touch “Charging”.
4 Touch “Connector lock”.
AC charging connector lock-
ing/unlocking settings can be
changed as follows.
*1: The AC charging connector will
SettingOperation description
“Auto
Lock”
(Default
setting)The AC charging con-
nector is automatically
locked when the
charging connector is
connected.
“Auto Lock
& Unlock”
The AC charging con-
nector is automatically
locked when the AC
charging connector is
connected and auto-
matically unlocked
when charging is com-
pleted.
*1, 2, 3
“OFF”
Not using the AC
charging connector
locking system
Page 104 of 680
1042-2. Charging
be unlocked if power supply is
interrupted due to a power out-
age, etc., after the AC charging
connector is automatically
locked.
*2: The AC charging connector can be unlocked by similar opera-
tions to that of “Auto Lock”
(Default setting).
*3: When the end time of the charging schedule “Start-Stop”
or “Start and stop at set times”
setting is reached, the AC
charging connector is unlocked
even if it is not fully charged.
■AC charging connector lock
function
●If the AC charging connector is
locked/unlocked repeatedly, it
may not work temporary due to
protect the system by AC charging
system. In this case, wait for a
while before co nnecting the AC
charging connector to AC
charging inlet again.
●The AC charging connector lock
function does not guarantee that
theft of the AC charging cable will
be prevented, and is not neces-
sarily effective for all mischiefs.
■Security function for unlocking
If the AC charging connector is not
removed within approximately 30
seconds after the vehicle is
unlocked, the security function auto-
matically locks the connector again.
■When the AC charging connec-
tor cannot be inserted into the
AC charging inlet
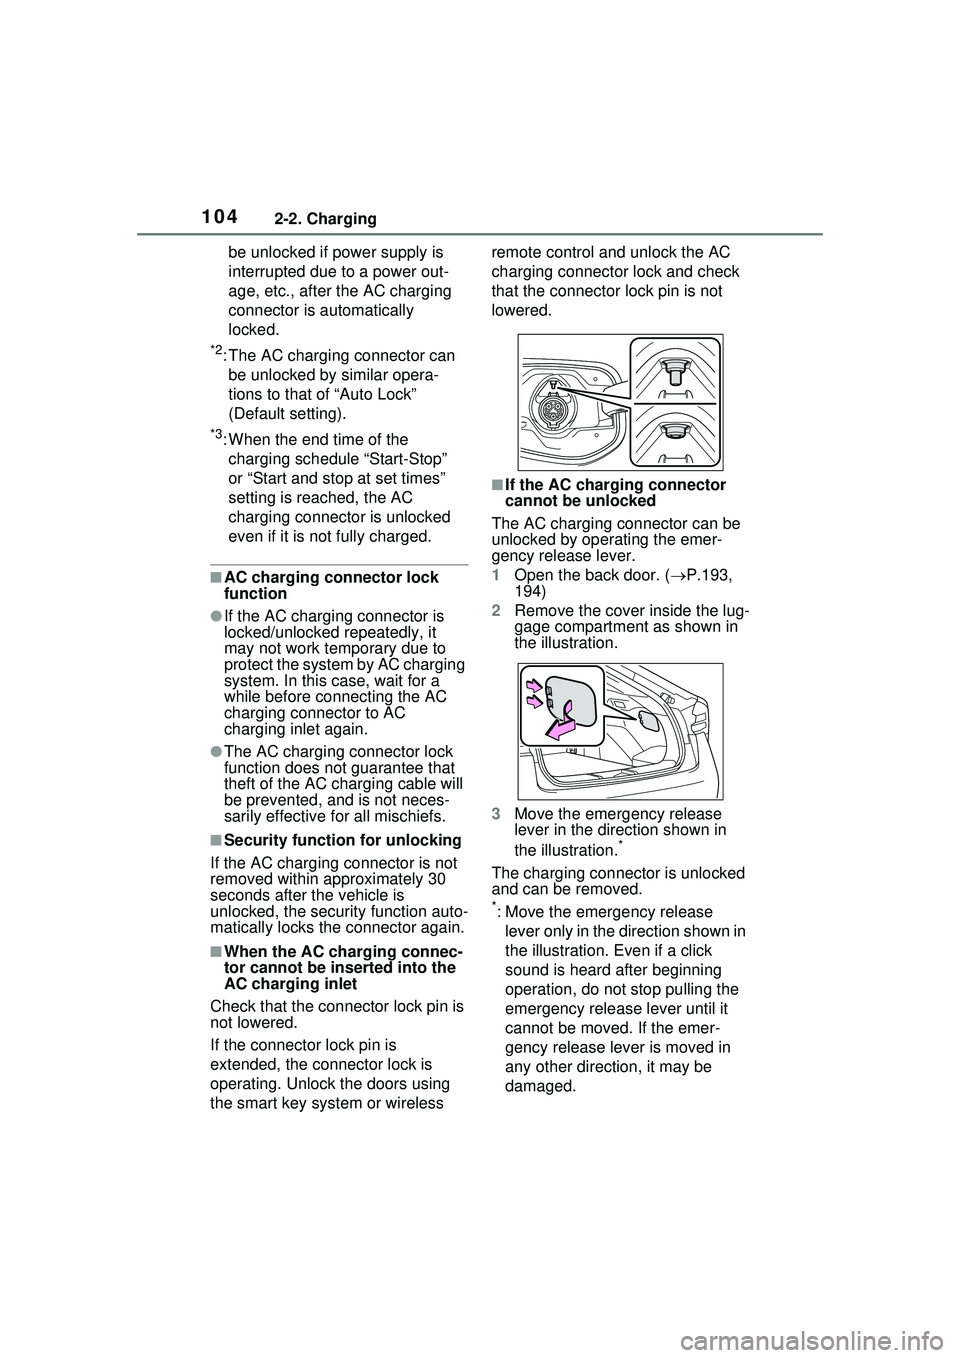
Check that the connector lock pin is
not lowered.
If the connector lock pin is
extended, the connector lock is
operating. Unlock the doors using
the smart key system or wireless remote control and unlock the AC
charging connector lock and check
that the connector
lock pin is not
lowered.
■If the AC charging connector
cannot be unlocked
The AC charging connector can be
unlocked by operating the emer-
gency release lever.
1 Open the back door. ( P.193,
194)
2 Remove the cover inside the lug-
gage compartment as shown in
the illustration.
3 Move the emergency release
lever in the direction shown in
the illustration.
*
The charging connector is unlocked
and can be removed.
*: Move the emergency release
lever only in the direction shown in
the illustration. Even if a click
sound is heard after beginning
operation, do not stop pulling the
emergency release lever until it
cannot be moved. If the emer-
gency release lever is moved in
any other direction, it may be
damaged.
Page 122 of 680
1222-2. Charging
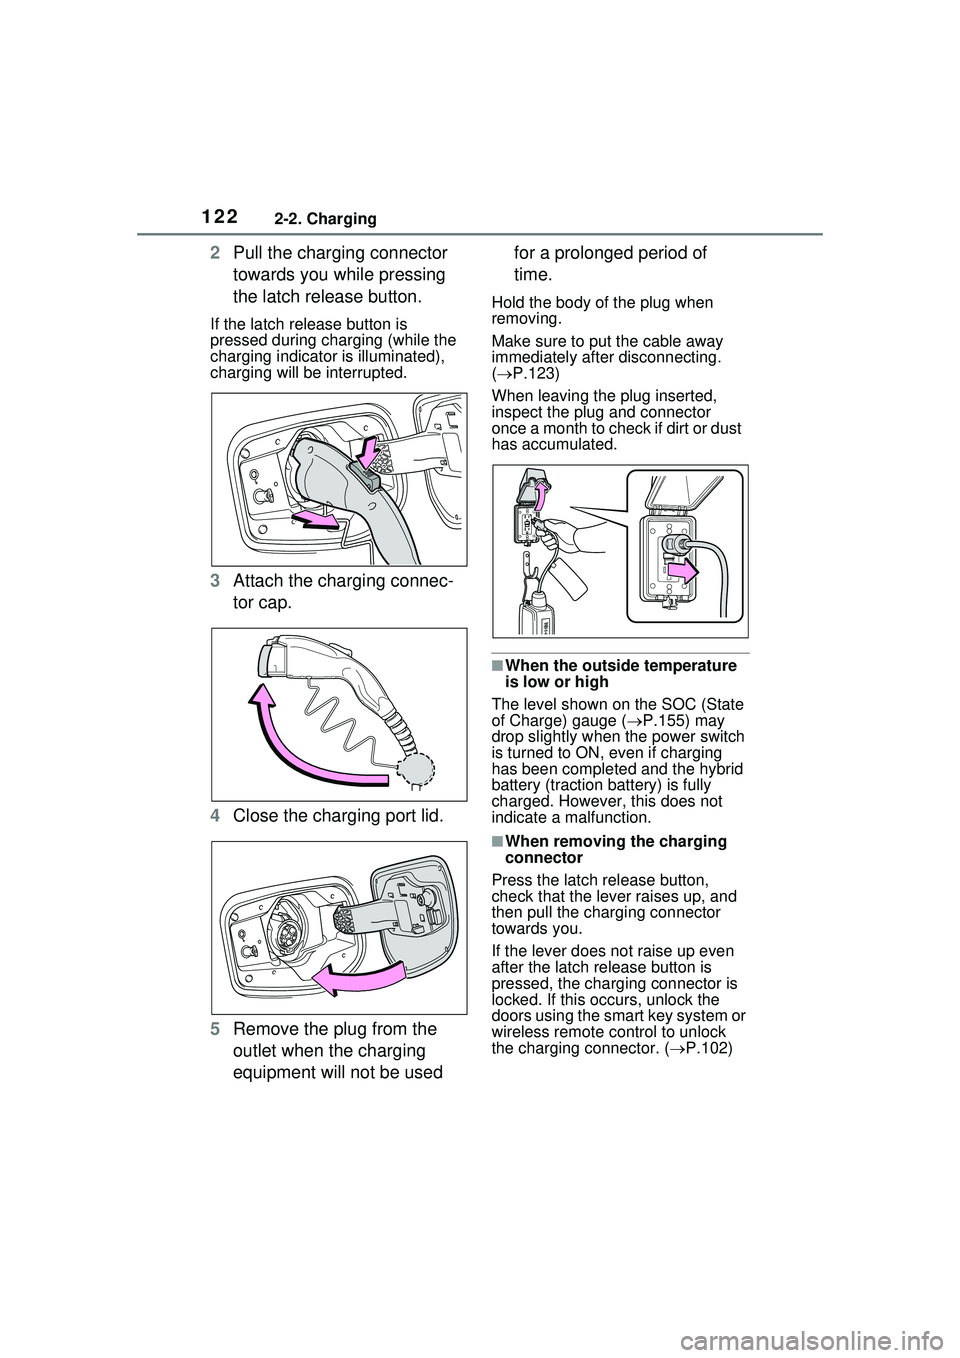
2Pull the charging connector
towards you while pressing
the latch release button.
If the latch release button is
pressed during charging (while the
charging indicator is illuminated),
charging will be interrupted.
3Attach the charging connec-
tor cap.
4 Close the charging port lid.
5 Remove the plug from the
outlet when the charging
equipment will not be used for a prolonged period of
time.
Hold the body of the plug when
removing.
Make sure to put the cable away
immediately after disconnecting.
(
P.123)
When leaving the plug inserted,
inspect the plug and connector
once a month to check if dirt or dust
has accumulated.
■When the outside temperature
is low or high
The level shown on the SOC (State
of Charge) gauge ( P.155) may
drop slightly when the power switch
is turned to ON, even if charging
has been completed and the hybrid
battery (traction battery) is fully
charged. However, this does not
indicate a malfunction.
■When removing the charging
connector
Press the latch release button,
check that the lever raises up, and
then pull the charging connector
towards you.
If the lever does not raise up even
after the latch release button is
pressed, the charging connector is
locked. If this occurs, unlock the
doors using the smart key system or
wireless remote control to unlock
the charging connector. ( P.102)
Page 180 of 680
1804-1. Key information
4-1.Key information
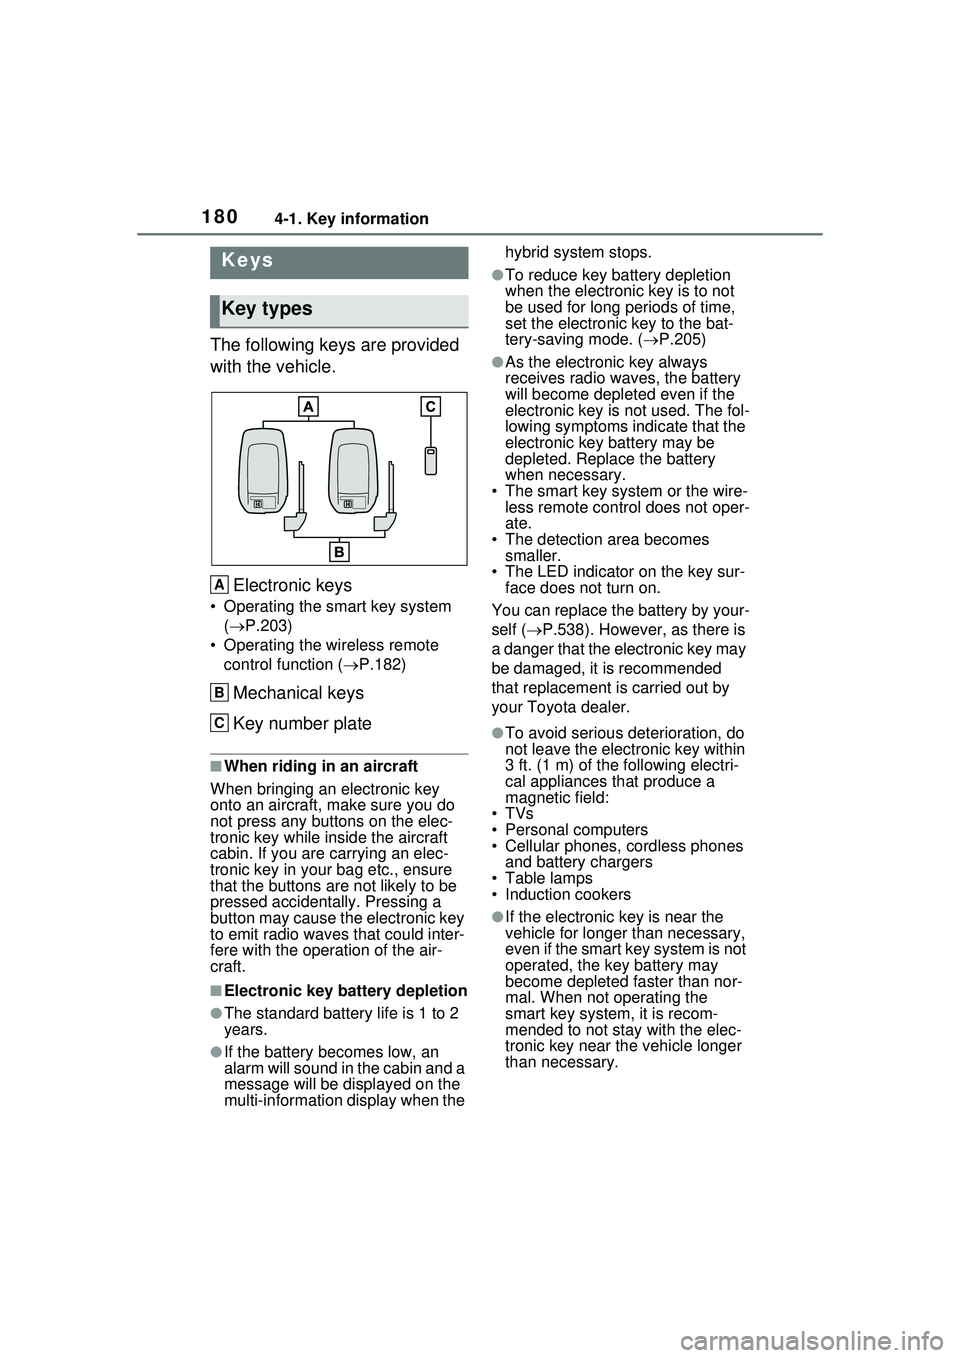
The following keys are provided
with the vehicle.Electronic keys
• Operating the smart key system ( P.203)
• Operating the wireless remote control function ( P.182)
Mechanical keys
Key number plate
■When riding in an aircraft
When bringing an electronic key
onto an aircraft, make sure you do
not press any buttons on the elec-
tronic key while inside the aircraft
cabin. If you are carrying an elec-
tronic key in your bag etc., ensure
that the buttons are not likely to be
pressed accidentally. Pressing a
button may cause the electronic key
to emit radio waves that could inter-
fere with the oper ation of the air-
craft.
■Electronic key battery depletion
●The standard battery life is 1 to 2
years.
●If the battery becomes low, an
alarm will sound in the cabin and a
message will be displayed on the
multi-information display when the hybrid system stops.
●To reduce key ba
ttery depletion
when the electronic key is to not
be used for long periods of time,
set the electronic key to the bat-
tery-saving mode. ( P.205)
●As the electronic key always
receives radio waves, the battery
will become depleted even if the
electronic key is not used. The fol-
lowing symptoms indicate that the
electronic key battery may be
depleted. Replace the battery
when necessary.
• The smart key system or the wire- less remote control does not oper-
ate.
• The detection area becomes smaller.
• The LED indicator on the key sur- face does not turn on.
You can replace the battery by your-
self ( P.538). However, as there is
a danger that the electronic key may
be damaged, it is recommended
that replacement is carried out by
your Toyota dealer.
●To avoid serious deterioration, do
not leave the electronic key within
3 ft. (1 m) of the following electri-
cal appliances that produce a
magnetic field:
•TVs
• Personal computers
• Cellular phones, cordless phones and battery chargers
• Table lamps
• Induction cookers
●If the electronic key is near the
vehicle for longer than necessary,
even if the smart key system is not
operated, the key battery may
become depleted faster than nor-
mal. When not operating the
smart key system, it is recom-
mended to not stay with the elec-
tronic key near the vehicle longer
than necessary.
Keys
Key types
A
B
C
Page 182 of 680
1824-1. Key information
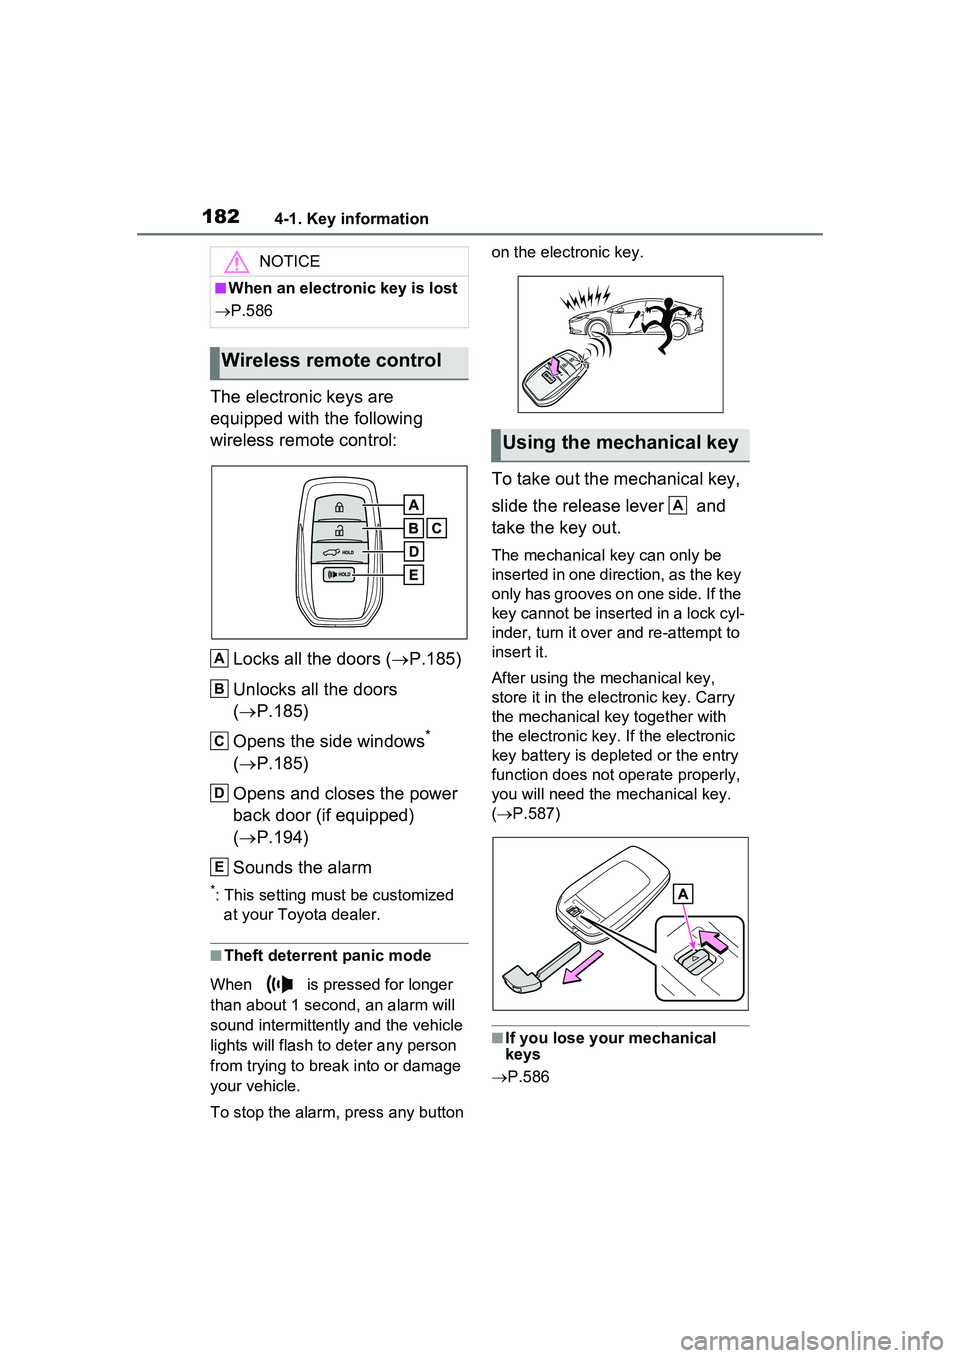
The electronic keys are
equipped with the following
wireless remote control:Locks all the doors ( P.185)
Unlocks all the doors
( P.185)
Opens the side windows
*
( P.185)
Opens and closes the power
back door (if equipped)
( P.194)
Sounds the alarm
*: This setting must be customized at your Toyota dealer.
■Theft deterrent panic mode
When is pressed for longer
than about 1 second, an alarm will
sound intermittently and the vehicle
lights will flash to deter any person
from trying to break into or damage
your vehicle.
To stop the alarm, press any button on the electronic key.
To take out the mechanical key,
slide the release lever and
take the key out.
The mechanical key can only be
inserted in one direction, as the key
only has grooves on one side. If the
key cannot be inserted in a lock cyl-
inder, turn it over
and re-attempt to
insert it.
After using the mechanical key,
store it in the electronic key. Carry
the mechanical key together with
the electronic key. If the electronic
key battery is depleted or the entry
function does not operate properly,
you will need the mechanical key.
( P.587)
■If you lose your mechanical
keys
P.586
NOTICE
■When an electronic key is lost
P.586
Wireless remote control
A
B
C
D
E
Using the mechanical key
A
Page 185 of 680
1854-2. Opening, closing and locking the doors
4
Before driving
4-2.Opening, closing and locking the doors
■Using the entry function
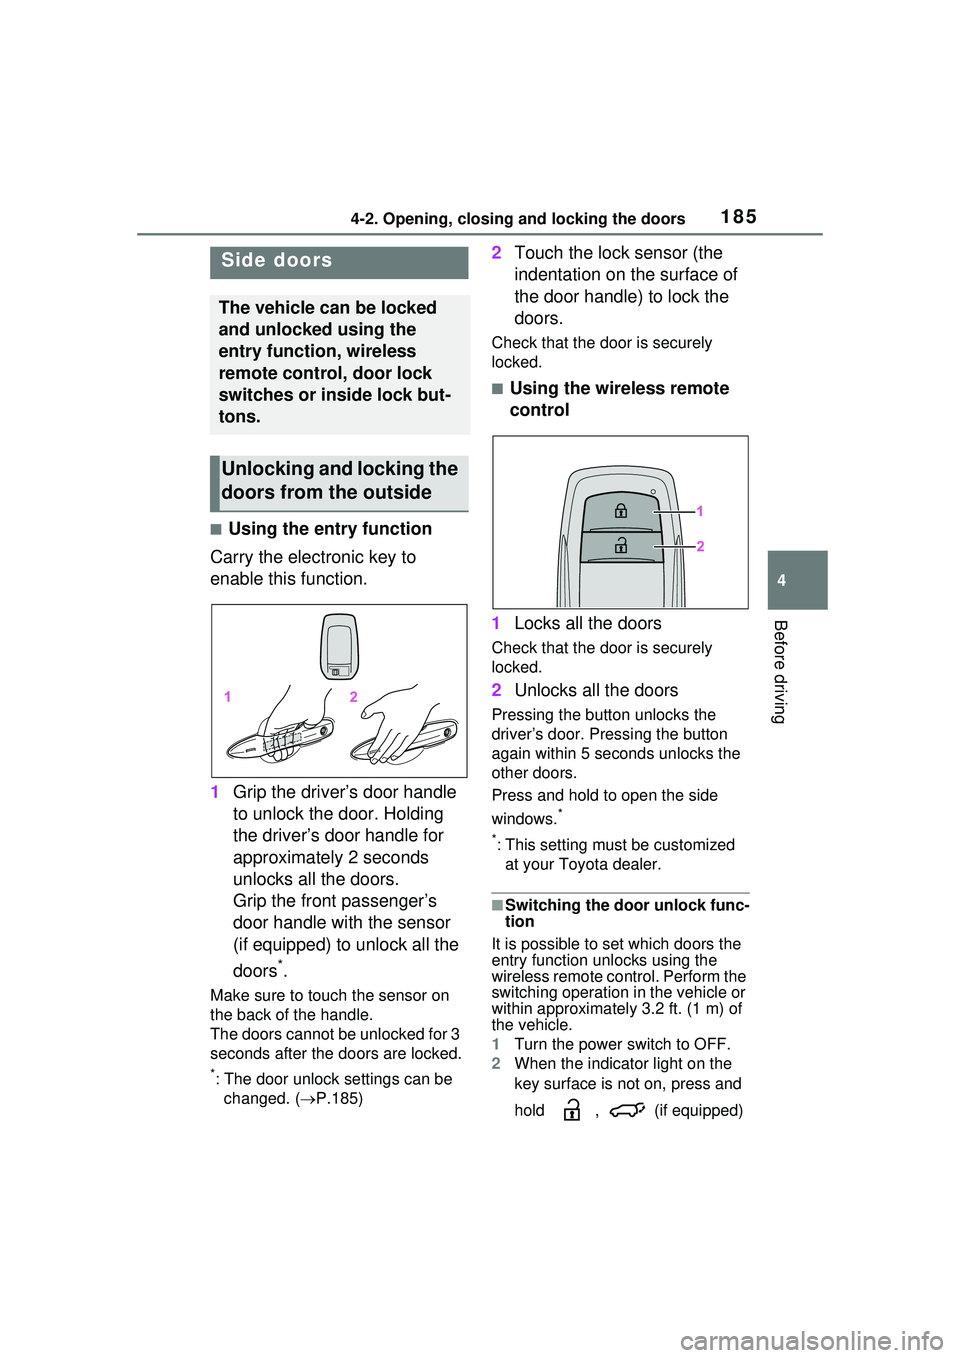
Carry the electronic key to
enable this function.
1 Grip the driver’s door handle
to unlock the door. Holding
the driver’s door handle for
approximately 2 seconds
unlocks all the doors.
Grip the front passenger’s
door handle with the sensor
(if equipped) to unlock all the
doors
*.
Make sure to touch the sensor on
the back of the handle.
The doors cannot be unlocked for 3
seconds after the doors are locked.
*: The door unlock settings can be
changed. ( P.185)
2 Touch the lock sensor (the
indentation on the surface of
the door handle) to lock the
doors.
Check that the do or is securely
locked.
■Using the wireless remote
control
1 Locks all the doors
Check that the do or is securely
locked.
2 Unlocks all the doors
Pressing the button unlocks the
driver’s door. Pressing the button
again within 5 seconds unlocks the
other doors.
Press and hold to open the side
windows.
*
*
: This setting must be customized at your Toyota dealer.
■Switching the door unlock func-
tion
It is possible to set which doors the
entry function unlocks using the
wireless remote control. Perform the
switching operation in the vehicle or
within approximately 3.2 ft. (1 m) of
the vehicle.
1 Turn the power switch to OFF.
2 When the indicator light on the
key surface is not on, press and
hold , (if equipped)
Side doors
The vehicle can be locked
and unlocked using the
entry function, wireless
remote control, door lock
switches or inside lock but-
tons.
Unlocking and locking the
doors from the outside
Page 186 of 680
1864-2. Opening, closing and locking the doors
or for approximately 5
seconds while pressing and
holding .
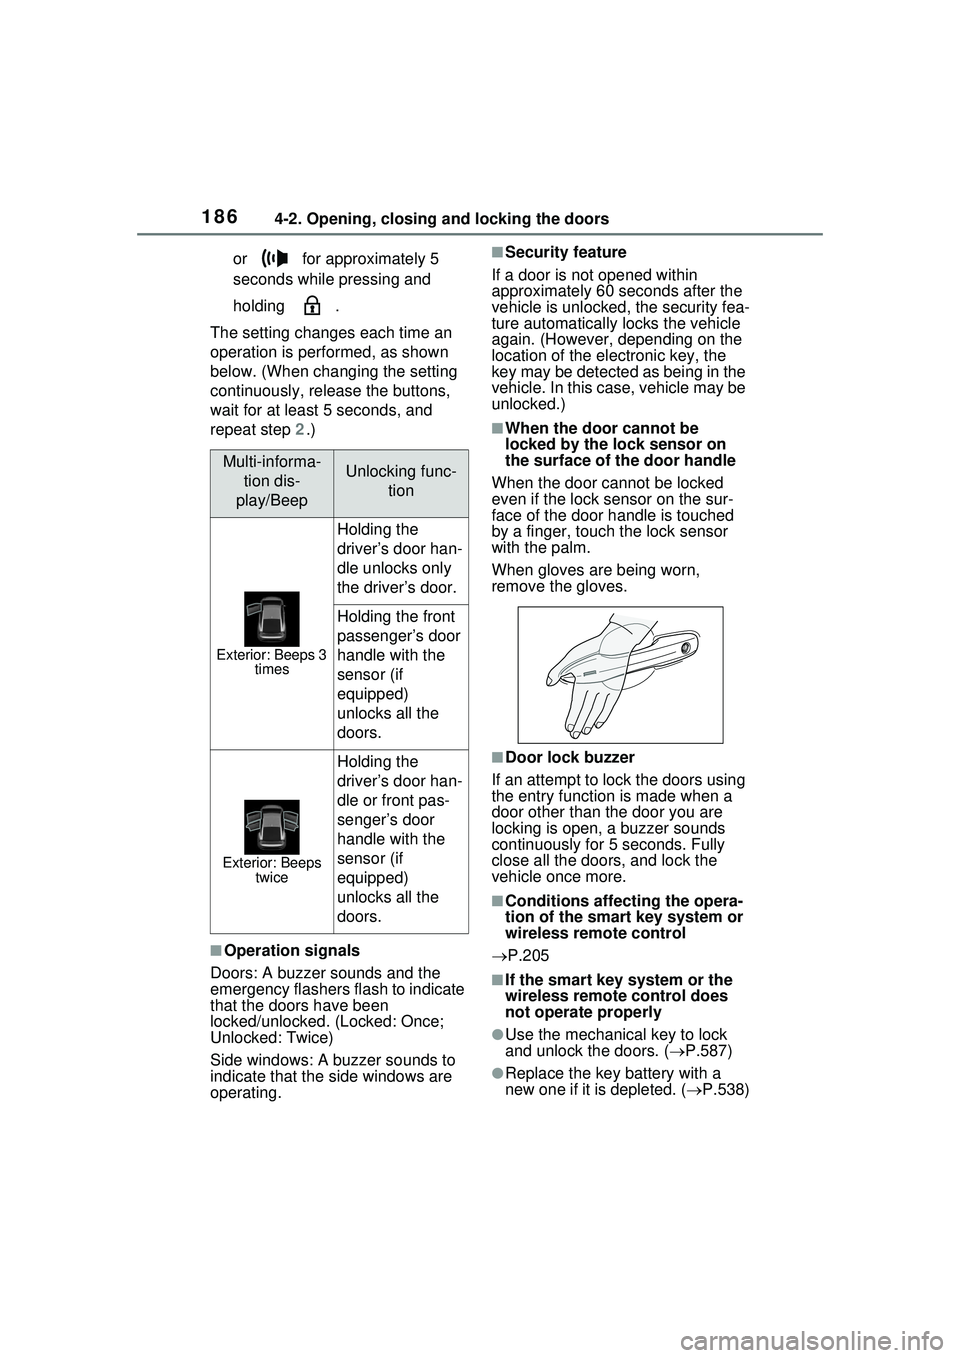
The setting changes each time an
operation is performed, as shown
below. (When changing the setting
continuously, release the buttons,
wait for at least 5 seconds, and
repeat step 2 .)
■Operation signals
Doors: A buzzer sounds and the
emergency flashers flash to indicate
that the doors have been
locked/unlocked. (Locked: Once;
Unlocked: Twice)
Side windows: A buzzer sounds to
indicate that the side windows are
operating.
■Security feature
If a door is not opened within
approximately 60 seconds after the
vehicle is unlocked, the security fea-
ture automatically locks the vehicle
again. (However, depending on the
location of the electronic key, the
key may be detected as being in the
vehicle. In this case, vehicle may be
unlocked.)
■When the door cannot be
locked by the lock sensor on
the surface of the door handle
When the door cannot be locked
even if the lock sensor on the sur-
face of the door handle is touched
by a finger, touch the lock sensor
with the palm.
When gloves are being worn,
remove the gloves.
■Door lock buzzer
If an attempt to lock the doors using
the entry function is made when a
door other than the door you are
locking is open, a buzzer sounds
continuously for 5 seconds. Fully
close all the doors, and lock the
vehicle once more.
■Conditions affecting the opera-
tion of the smart key system or
wireless remote control
P.205
■If the smart key system or the
wireless remote control does
not operate properly
●Use the mechanical key to lock
and unlock the doors. ( P.587)
●Replace the key battery with a
new one if it is depleted. ( P.538)
Multi-informa-
tion dis-
play/BeepUnlocking func- tion
Exterior: Beeps 3 times
Holding the
driver’s door han-
dle unlocks only
the driver’s door.
Holding the front
passenger’s door
handle with the
sensor (if
equipped)
unlocks all the
doors.
Exterior: Beeps twice
Holding the
driver’s door han-
dle or front pas-
senger’s door
handle with the
sensor (if
equipped)
unlocks all the
doors.
Page 187 of 680
1874-2. Opening, closing and locking the doors
4
Before driving
■If the 12-volt battery is dis-
charged
The doors cannot be locked and
unlocked using the smart key sys-
tem or wireless remote control. Lock
or unlock the doors using the
mechanical key. ( P.587)
■Customization
Settings (e.g. unlocking function
using a key) can be changed.
(Customizable features: P.618)
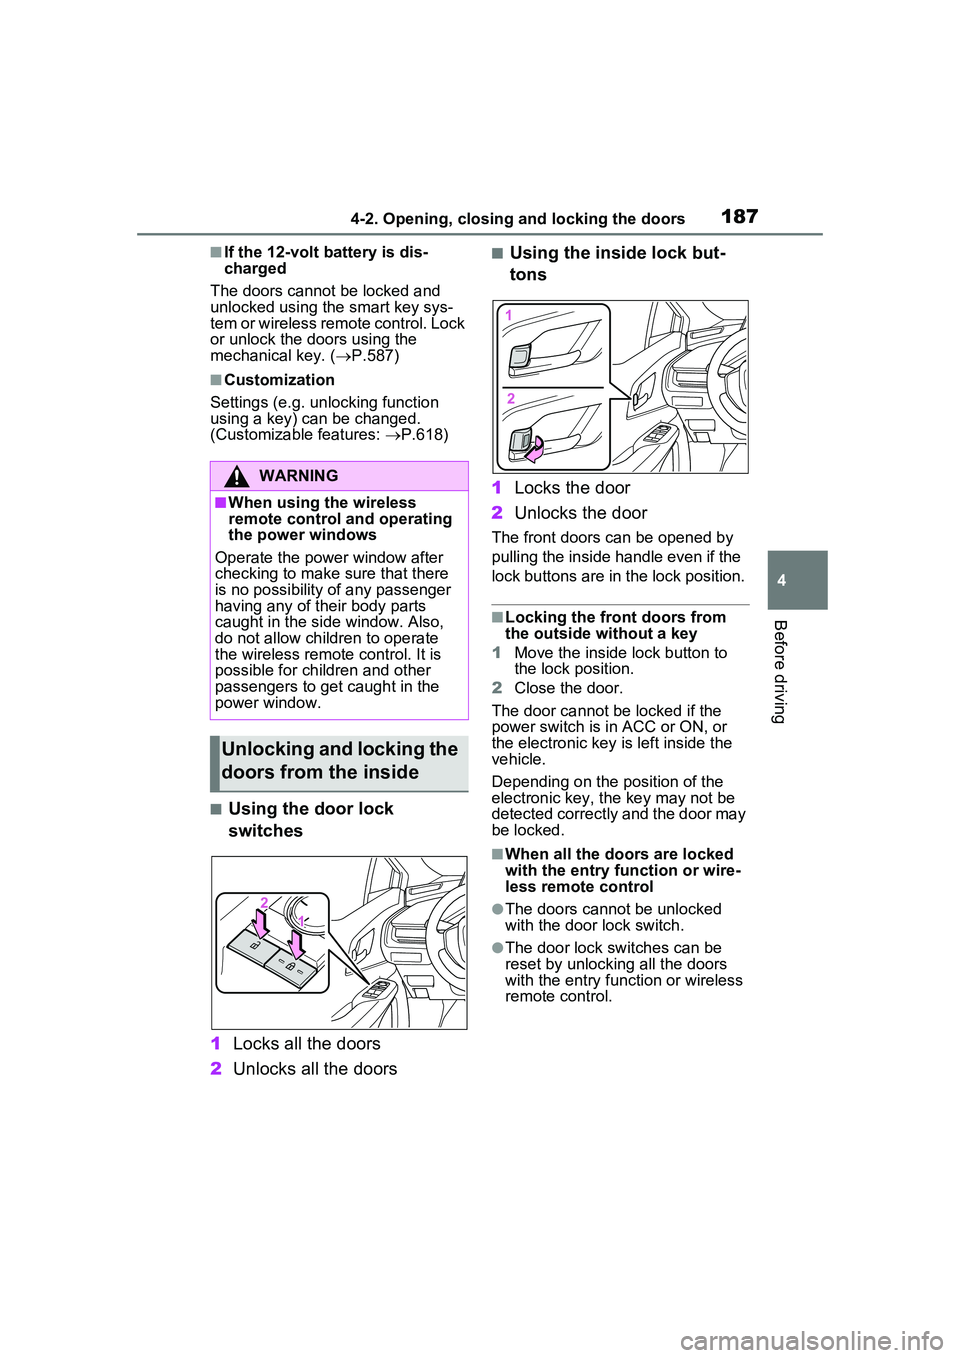
■Using the door lock
switches
1 Locks all the doors
2 Unlocks all the doors
■Using the inside lock but-
tons
1 Locks the door
2 Unlocks the door
The front doors can be opened by
pulling the inside handle even if the
lock buttons are in the lock position.
■Locking the front doors from
the outside without a key
1 Move the inside lock button to
the lock position.
2 Close the door.
The door cannot be locked if the
power switch is in ACC or ON, or
the electronic key is left inside the
vehicle.
Depending on the position of the
electronic key, the key may not be
detected correctly and the door may
be locked.
■When all the doors are locked
with the entry function or wire-
less remote control
●The doors cannot be unlocked
with the door lock switch.
●The door lock switches can be
reset by unlocking all the doors
with the entry function or wireless
remote control.
WARNING
■When using the wireless
remote control and operating
the power windows
Operate the power window after
checking to make sure that there
is no possibility of any passenger
having any of their body parts
caught in the side window. Also,
do not allow children to operate
the wireless remote control. It is
possible for children and other
passengers to get caught in the
power window.
Unlocking and locking the
doors from the inside