key TOYOTA PRIUS V 2012 Accessories, Audio & Navigation (in English)
[x] Cancel search | Manufacturer: TOYOTA, Model Year: 2012, Model line: PRIUS V, Model: TOYOTA PRIUS V 2012Pages: 409, PDF Size: 6.88 MB
Page 8 of 409

TABLE OF CONTENTS
8
PRIUS v (US) NAVI 47675U
11.05.17 14:27
1. ENTUNE-OVERVIEW .................... 302
ENTUNE SERVICE ............................. 302
BEFORE USING ENTUNE .................. 304
2. ENTUNE OPERATION .................. 306
ACTIVATING “APPS” .......................... 306
LINKING “APPS” AND NAVIGATION
LOCAL FUNCTION ........................... 309
INPUTTING KEYWORD OPERATION ..................................... 311
1. REAR VIEW MONITOR SYSTEM ........ ............................ ... 316
REAR VIEW MONITOR SYSTEM
OPERATION ..................................... 316
2. ADVANCED PARKING GUIDANCE SYSTEM ................... 320
INTRODUCTION ................................. 320
MANEUVERING WHEN PARKING ..... 322
PARKING ASSIST MODE
(PERPENDICULAR PARKING) ........ 328
PARALLEL PARKING ASSIST MODE................................................ 342
WHAT TO DO WHEN THIS SORT OF MESSAGE IS DISPLAYED ......... 353
MANUAL GUIDE LINE DISPLAY MODE................................................ 358
USAGE PRECAUTIONS ..................... 364
ALPHABETICAL INDEX ................... 376
8APPS
9PERIPHERAL MONITORING
SYSTEM
INDEX
Page 20 of 409
20
PRIUS v (US) NAVI 47675U
11.05.17 14:27
3. QUICK REFERENCE
1. “Destination” SCREEN
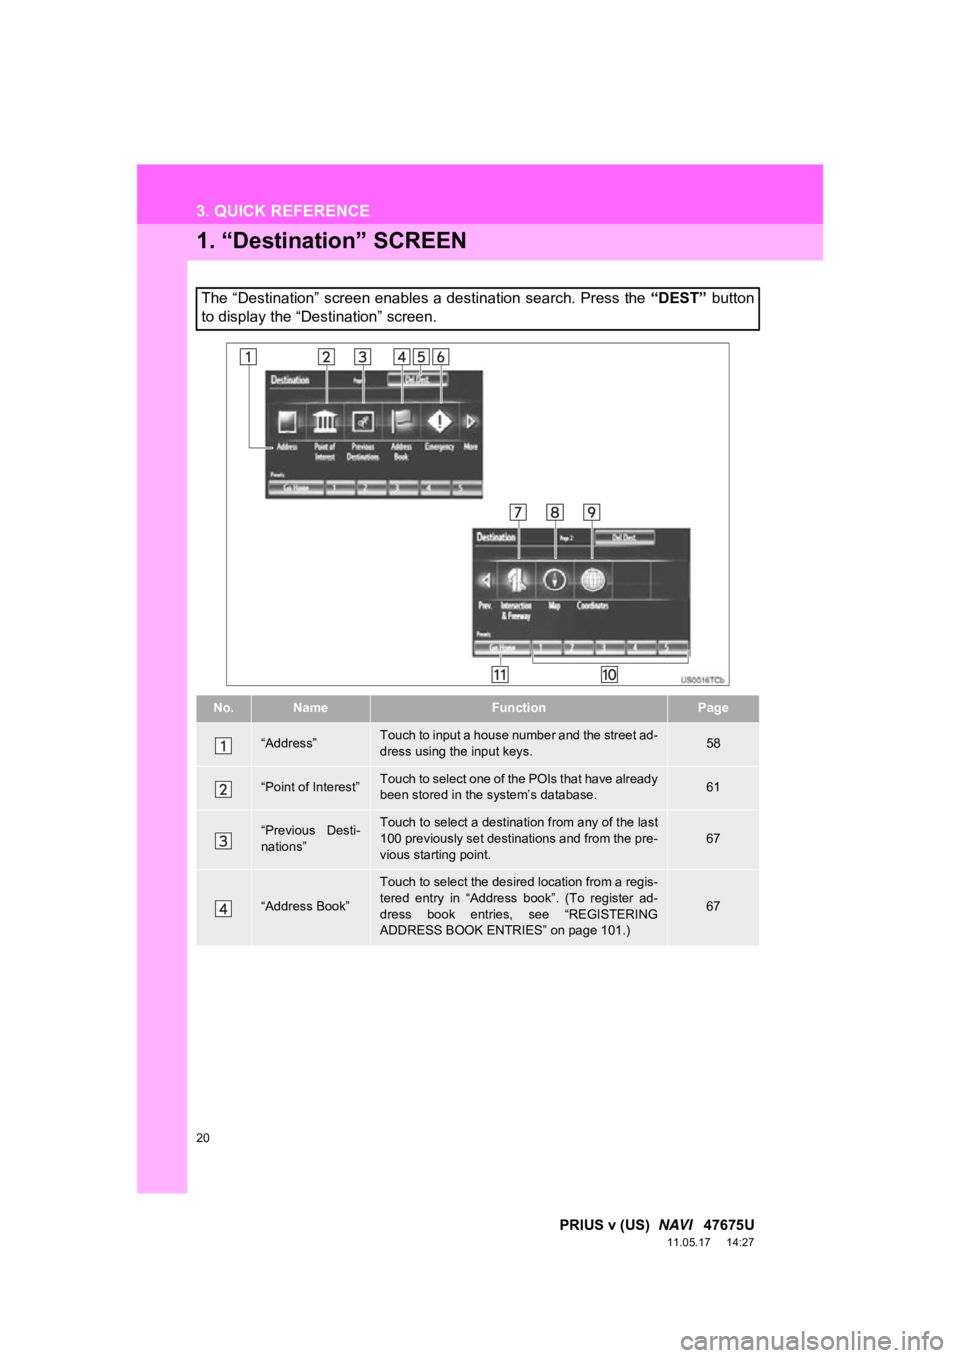
The “Destination” screen enables a destination search. Press the “DEST” button
to display the “Destination” screen.
No.NameFunctionPage
“Address”Touch to input a house number and the street ad-
dress using the input keys.58
“Point of Interest”Touch to select one of the POIs that have already
been stored in the system’s database.61
“Previous Desti-
nations”Touch to select a destination from any of the last
100 previously set destinations and from the pre-
vious starting point.67
“Address Book”
Touch to select the desired location from a regis-
tered entry in “Address book”. (To register ad-
dress book entries, see “REGISTERING
ADDRESS BOOK ENTRIES” on page 101.)
67
Page 28 of 409
28
1. BASIC INFORMATION BEFORE OPERATION
PRIUS v (US) NAVI 47675U
11.05.17 14:27
3. INPUTTING LETTERS AND NUMBERS/LIST SCREEN OPERATION
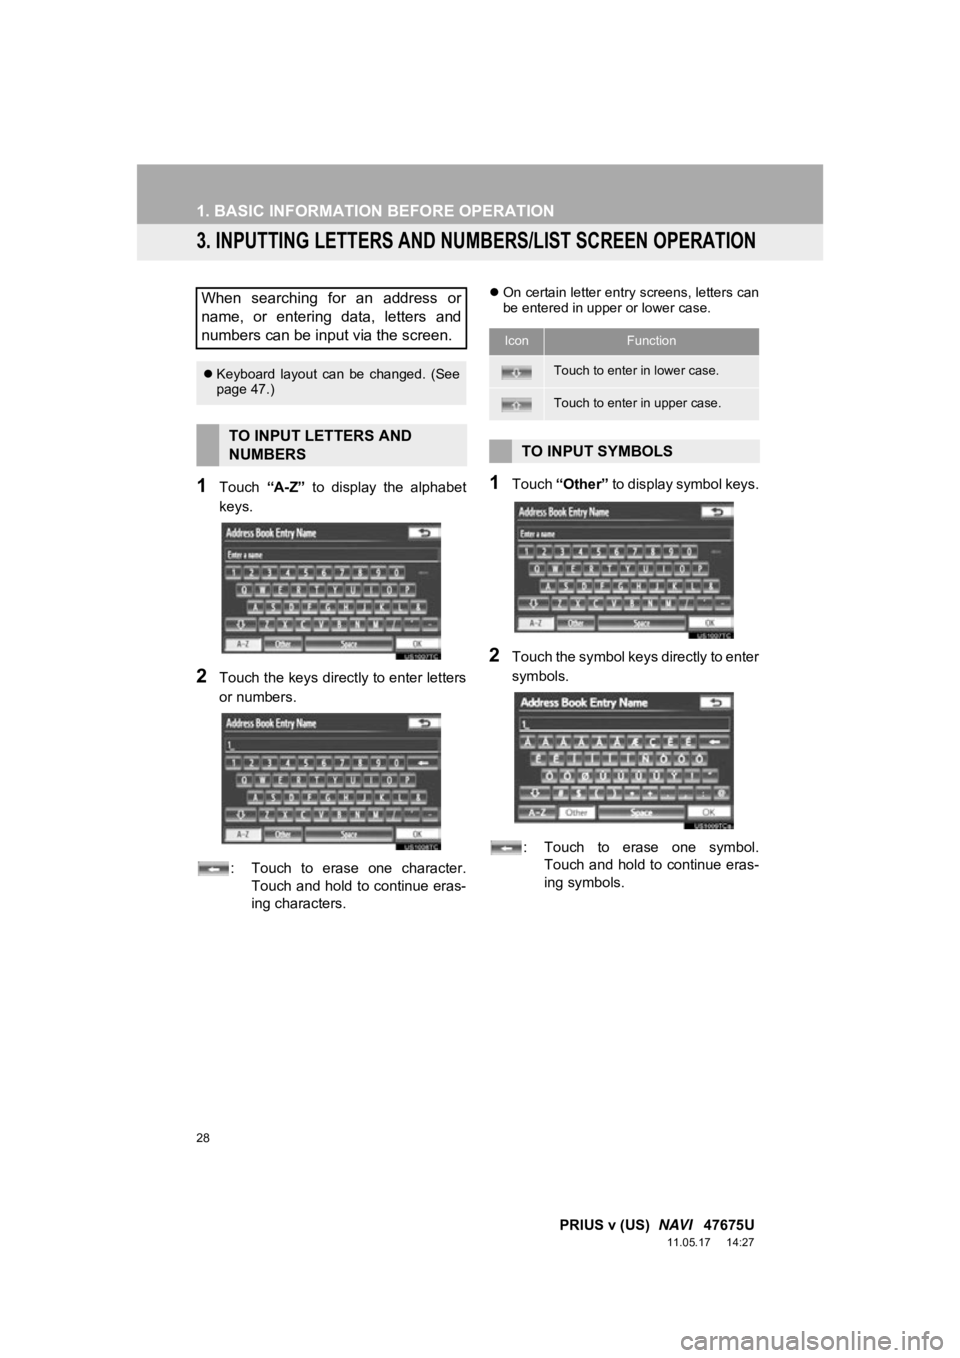
1Touch “A-Z” to display the alphabet
keys.
2Touch the keys direct ly to enter letters
or numbers.
: Touch to erase one character. Touch and hold to continue eras-
ing characters.
On certain letter entry screens, letters can
be entered in upper or lower case.
1Touch “Other” to display symbol keys.
2Touch the symbol keys directly to enter
symbols.
: Touch to erase one symbol. Touch and hold to continue eras-
ing symbols.
When searching for an address or
name, or entering data, letters and
numbers can be input via the screen.
Keyboard layout can be changed. (See
page 47.)
TO INPUT LETTERS AND
NUMBERS
IconFunction
Touch to enter in lower case.
Touch to enter in upper case.
TO INPUT SYMBOLS
Page 44 of 409
44
2. SETUP
PRIUS v (US) NAVI 47675U
11.05.17 14:27
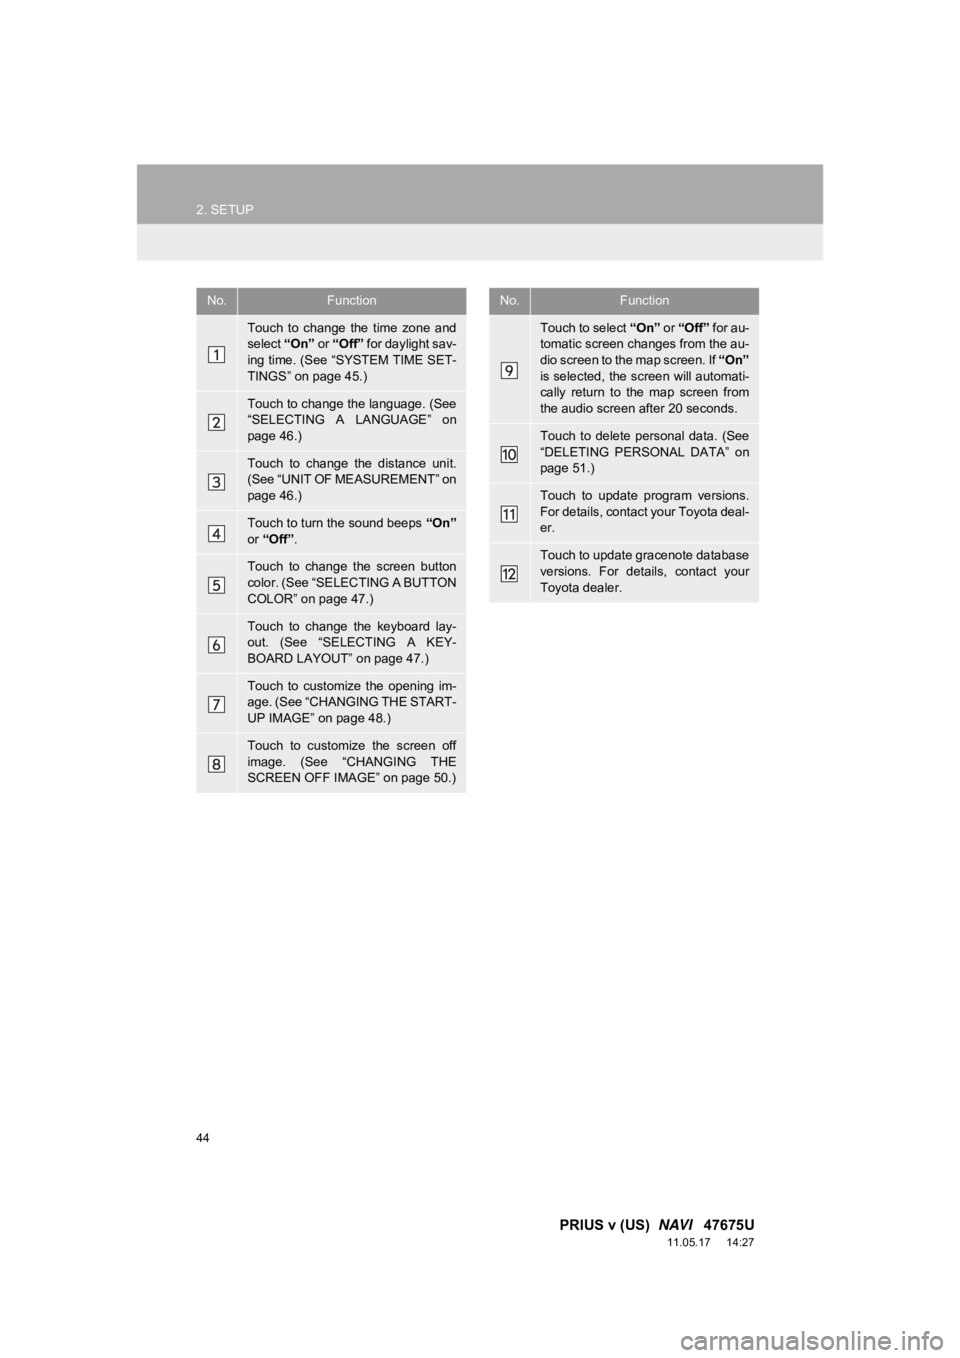
No.Function
Touch to change the time zone and
select “On” or “Off” for daylight sav-
ing time. (See “SYSTEM TIME SET-
TINGS” on page 45.)
Touch to change the language. (See
“SELECTING A LANGUAGE” on
page 46.)
Touch to change the distance unit.
(See “UNIT OF MEASUREMENT” on
page 46.)
Touch to turn the sound beeps “On”
or “Off” .
Touch to change the screen button
color. (See “SELECTING A BUTTON
COLOR” on page 47.)
Touch to change the keyboard lay-
out. (See “SELECTING A KEY-
BOARD LAYOUT” on page 47.)
Touch to customize the opening im-
age. (See “CHANGING THE START-
UP IMAGE” on page 48.)
Touch to customize the screen off
image. (See “CHANGING THE
SCREEN OFF IMAGE” on page 50.)
Touch to select “On” or “Off” for au-
tomatic screen changes from the au-
dio screen to the map screen. If “On”
is selected, the screen will automati-
cally return to the map screen from
the audio screen after 20 seconds.
Touch to delete personal data. (See
“DELETING PERSONAL DATA” on
page 51.)
Touch to update program versions.
For details, contact your Toyota deal-
er.
Touch to update gracenote database
versions. For details, contact your
Toyota dealer.
No.Function
Page 47 of 409
47
2. SETUP
2
BASIC FUNCTION
PRIUS v (US) NAVI 47675U
11.05.17 14:27
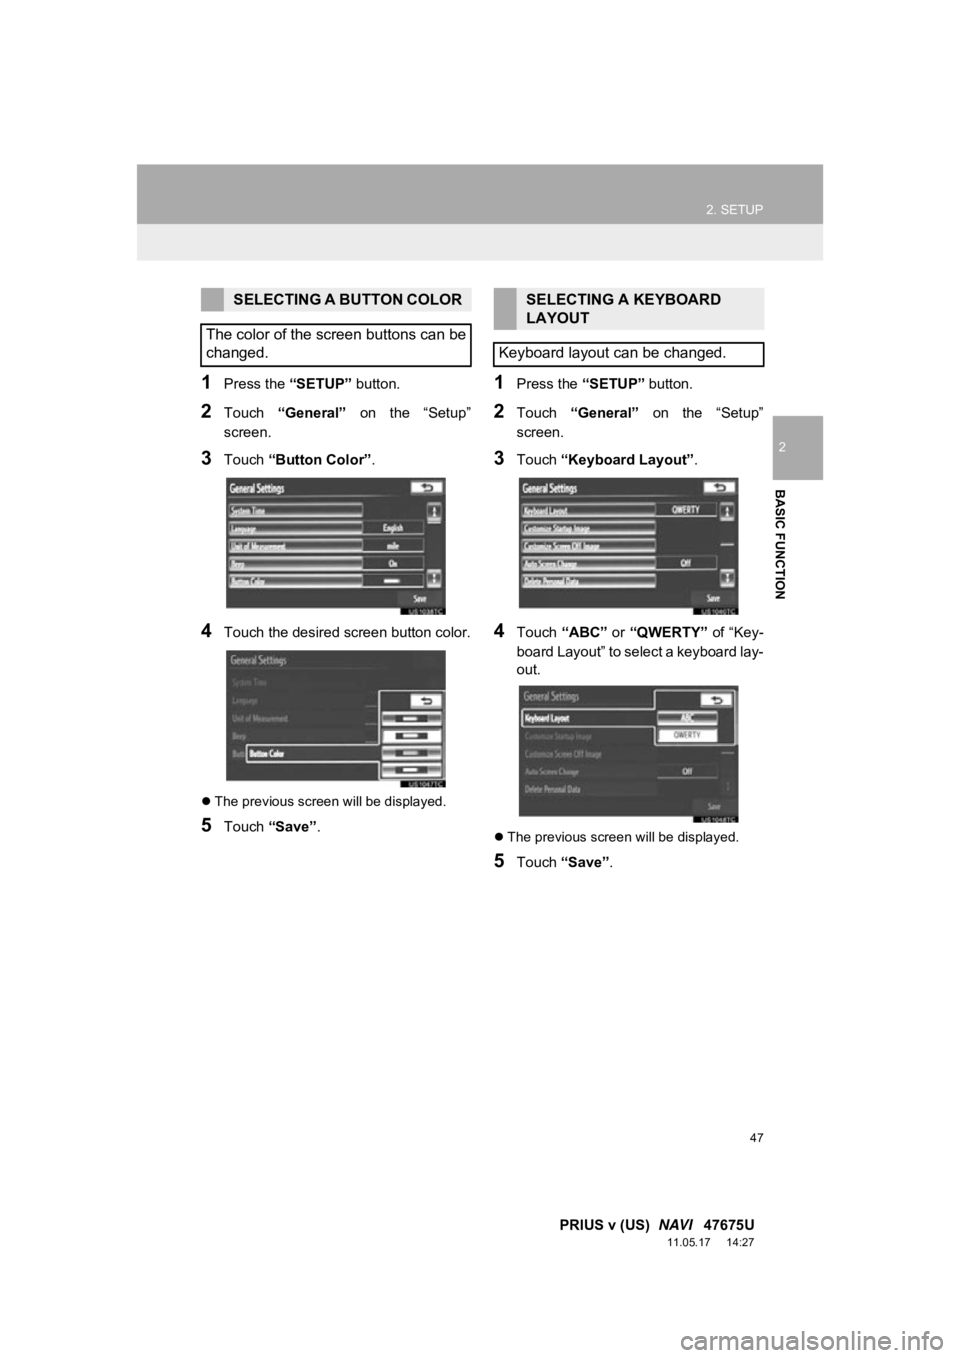
1Press the “SETUP” button.
2Touch “General” on the “Setup”
screen.
3Touch “Button Color”.
4Touch the desired screen button color.
The previous screen will be displayed.
5Touch “Save” .
1Press the “SETUP” button.
2Touch “General” on the “Setup”
screen.
3Touch “Keyboard Layout” .
4Touch “ABC” or “QWERTY” of “Key-
board Layout” to select a keyboard lay-
out.
The previous screen will be displayed.
5Touch “Save” .
SELECTING A BUTTON COLOR
The color of the screen buttons can be
changed.SELECTING A KEYBOARD
LAYOUT
Keyboard layout can be changed.
Page 103 of 409
103
3. ADDRESS BOOK
3
NAVIGATION SYSTEM
PRIUS v (US) NAVI 47675U
11.05.17 14:27
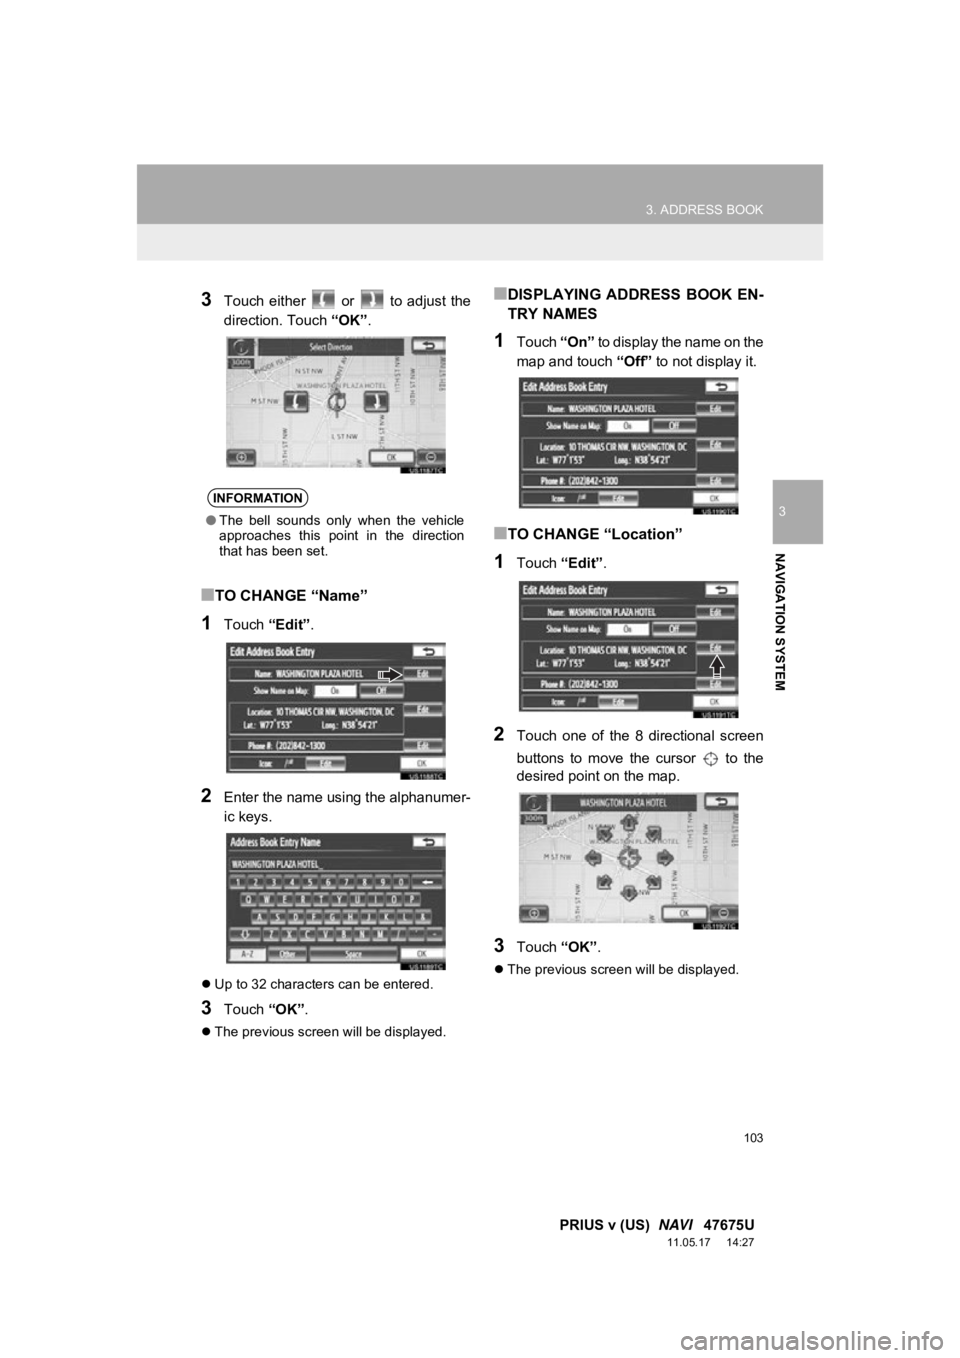
3Touch either or to adjust the
direction. Touch “OK”.
■TO CHANGE “Name”
1Touch “Edit”.
2Enter the name using the alphanumer-
ic keys.
Up to 32 characters can be entered.
3Touch “OK”.
The previous screen will be displayed.
■DISPLAYING ADDRESS BOOK EN-
TRY NAMES
1Touch “On” to display the name on the
map and touch “Off” to not display it.
■TO CHANGE “Location”
1Touch “Edit”.
2Touch one of the 8 directional screen
buttons to move the cursor to the
desired point on the map.
3Touch “OK”.
The previous screen will be displayed.
INFORMATION
●The bell sounds only when the vehicle
approaches this point in the direction
that has been set.
Page 104 of 409
104
3. ADDRESS BOOK
PRIUS v (US) NAVI 47675U
11.05.17 14:27
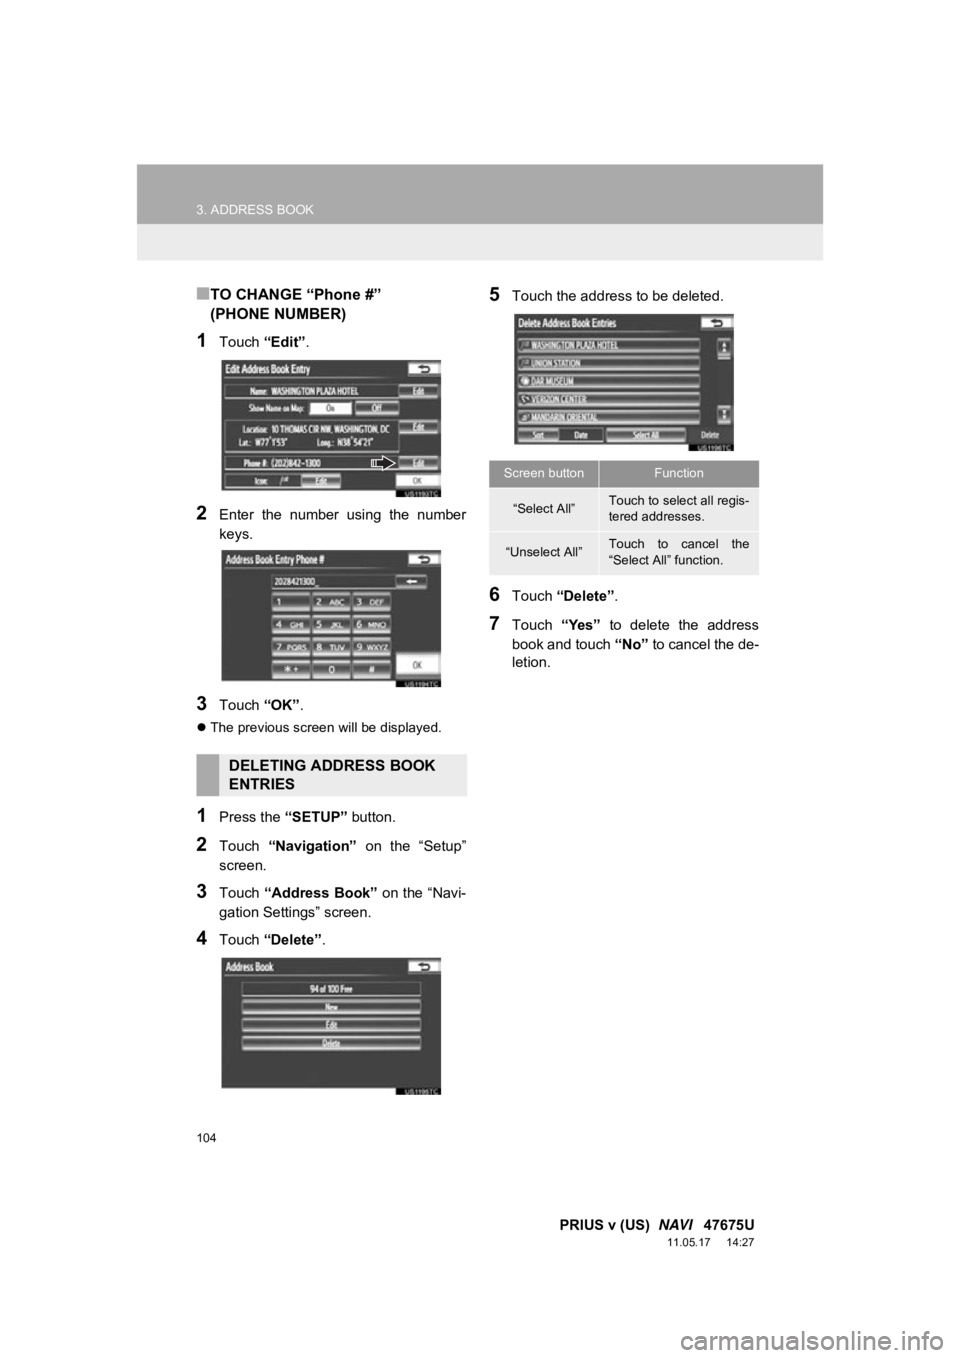
■TO CHANGE “Phone #”
(PHONE NUMBER)
1Touch “Edit”.
2Enter the number using the number
keys.
3Touch “OK”.
The previous screen will be displayed.
1Press the “SETUP” button.
2Touch “Navigation” on the “Setup”
screen.
3Touch “Address Book” on the “Navi-
gation Settings” screen.
4Touch “Delete” .
5Touch the address to be deleted.
6Touch “Delete” .
7Touch “Yes” to delete the address
book and touch “No” to cancel the de-
letion.
DELETING ADDRESS BOOK
ENTRIES
Screen buttonFunction
“Select All”Touch to select all regis-
tered addresses.
“Unselect All”Touch to cancel the
“Select All” function.
Page 107 of 409
107
3. ADDRESS BOOK
3
NAVIGATION SYSTEM
PRIUS v (US) NAVI 47675U
11.05.17 14:27
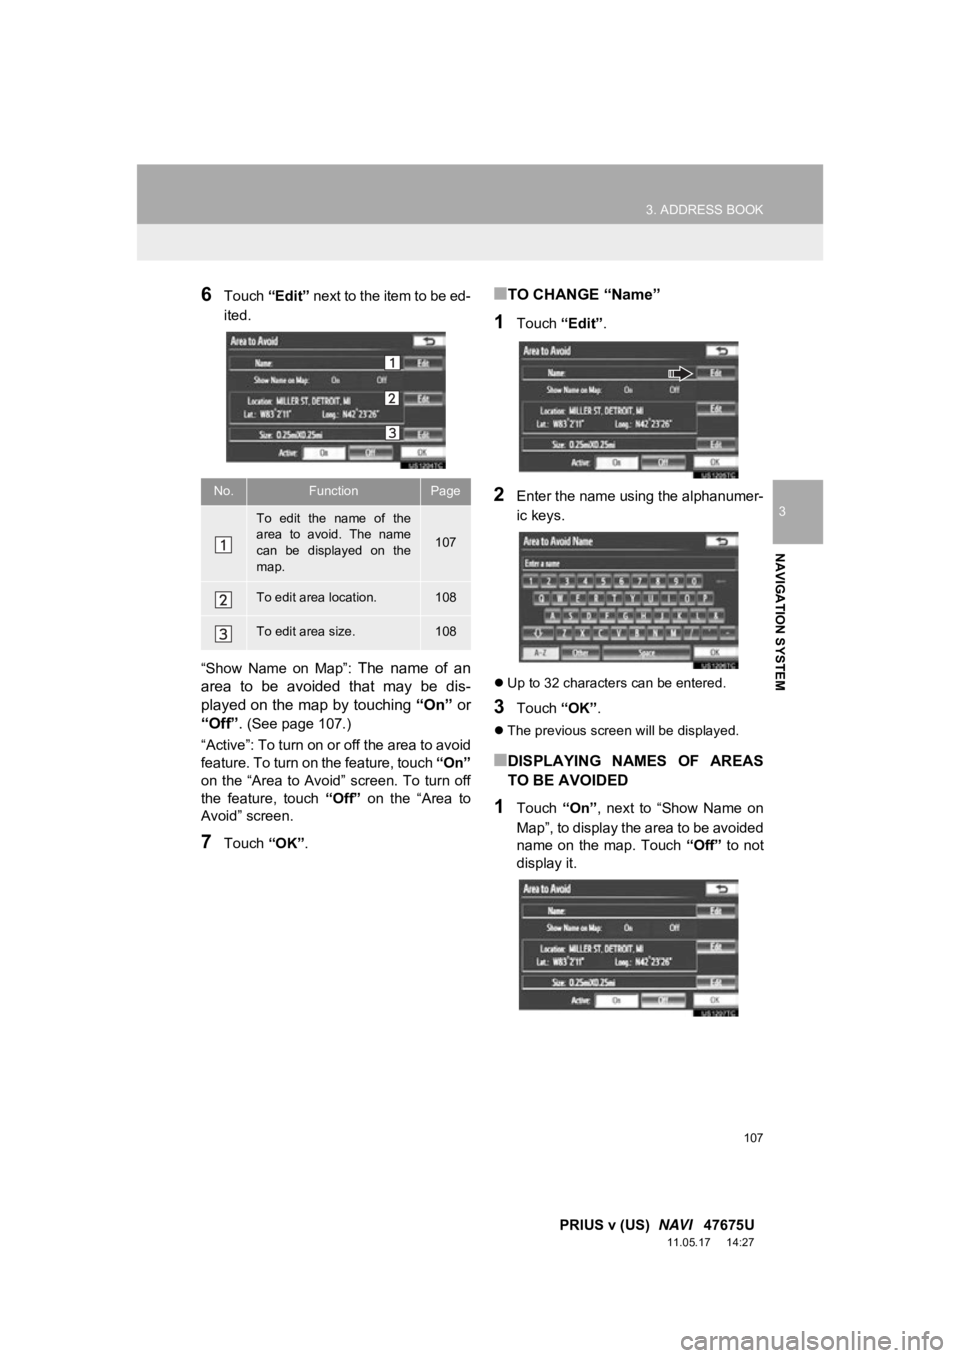
6Touch “Edit” next to the item to be ed-
ited.
“Show Name on Map”:
The name of an
area to be avoided that may be dis-
played on the map by touching “On” or
“Off” .
(See page 107.)
“Active”: To turn on or off the area to avoid
feature. To turn on the feature, touch “On”
on the “Area to Avoid” screen. To turn off
the feature, touch “Off” on the “Area to
Avoid” screen.
7Touch “OK”.
■TO CHANGE “Name”
1Touch “Edit”.
2Enter the name using the alphanumer-
ic keys.
Up to 32 characters can be entered.
3Touch “OK”.
The previous screen will be displayed.
■DISPLAYING NAMES OF AREAS
TO BE AVOIDED
1Touch “On”, next to “Show Name on
Map”, to display the area to be avoided
name on the map. Touch “Off” to not
display it.
No.FunctionPage
To edit the name of the
area to avoid. The name
can be displayed on the
map.
107
To edit area location.108
To edit area size.108
Page 122 of 409
122
4. SETUP
PRIUS v (US) NAVI 47675U
11.05.17 14:27
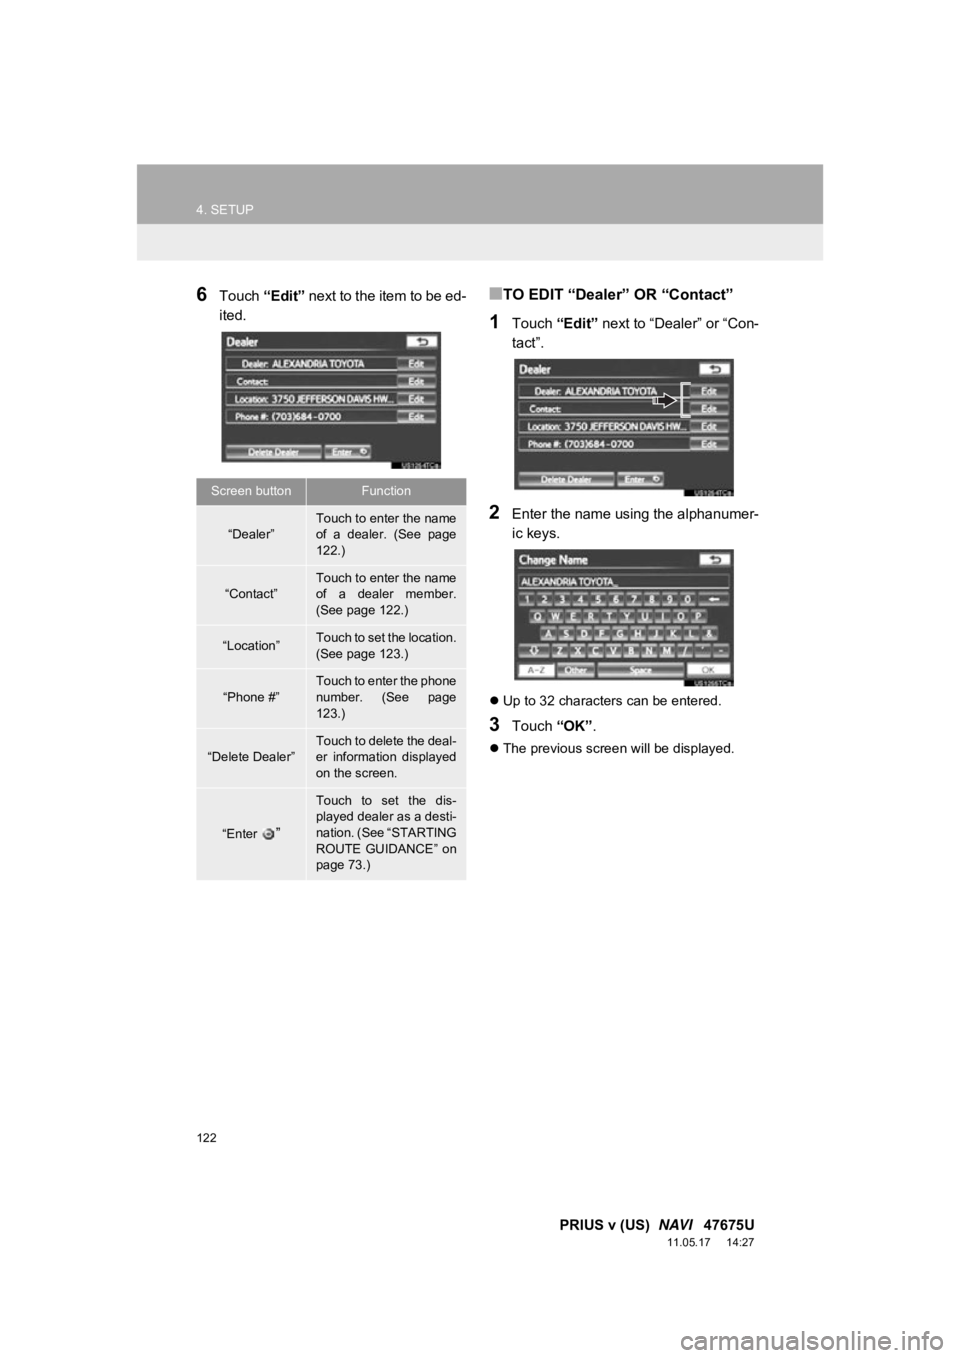
6Touch “Edit” next to the item to be ed-
ited.■TO EDIT “Dealer” OR “Contact”
1Touch “Edit” next to “Dealer” or “Con-
tact”.
2Enter the name using the alphanumer-
ic keys.
Up to 32 characters can be entered.
3Touch “OK”.
The previous screen will be displayed.
Screen buttonFunction
“Dealer”
Touch to enter the name
of a dealer. (See page
122.)
“Contact”Touch to enter the name
of a dealer member.
(See page 122.)
“Location”Touch to set the location.
(See page 123.)
“Phone #”
Touch to enter the phone
number. (See page
123.)
“Delete Dealer”
Touch to delete the deal-
er information displayed
on the screen.
“Enter ”
Touch to set the dis-
played dealer as a desti-
nation. (See “STARTING
ROUTE GUIDANCE” on
page 73.)
Page 123 of 409
123
4. SETUP
3
NAVIGATION SYSTEM
PRIUS v (US) NAVI 47675U
11.05.17 14:27
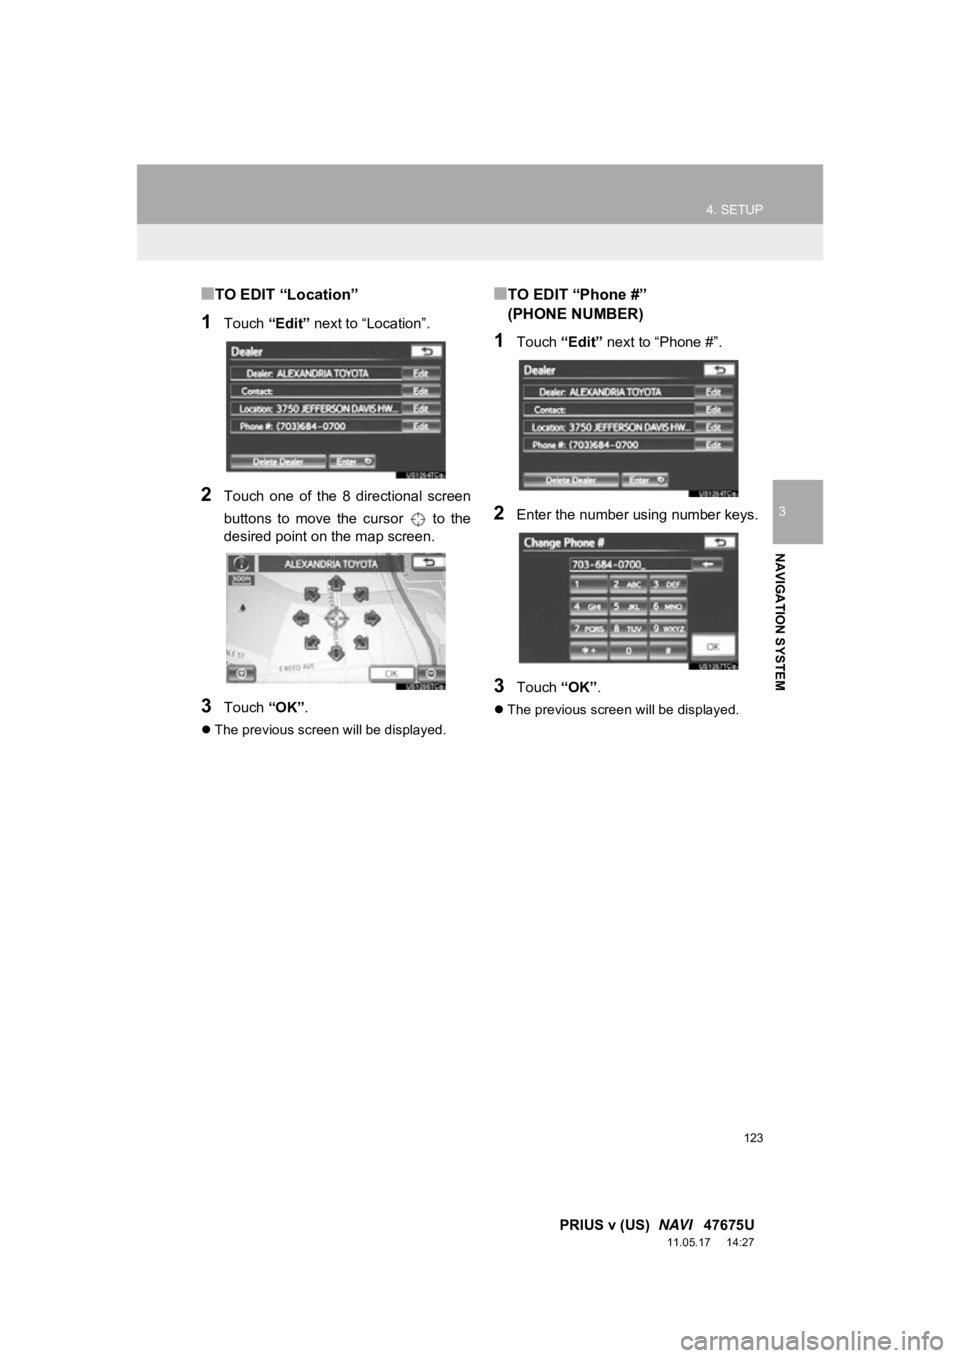
■TO EDIT “Location”
1Touch “Edit” next to “Location”.
2Touch one of the 8 directional screen
buttons to move the cursor to the
desired point on the map screen.
3Touch “OK”.
The previous screen will be displayed.
■TO EDIT “Phone #”
(PHONE NUMBER)
1Touch “Edit” next to “Phone #”.
2Enter the number using number keys.
3Touch “OK”.
The previous screen will be displayed.