TOYOTA PRIUS V 2012 Accessories, Audio & Navigation (in English)
Manufacturer: TOYOTA, Model Year: 2012, Model line: PRIUS V, Model: TOYOTA PRIUS V 2012Pages: 131, PDF Size: 5.2 MB
Page 51 of 131
51
1. AUDIO SYSTEM OPERATION
2
AUDIO SYSTEM
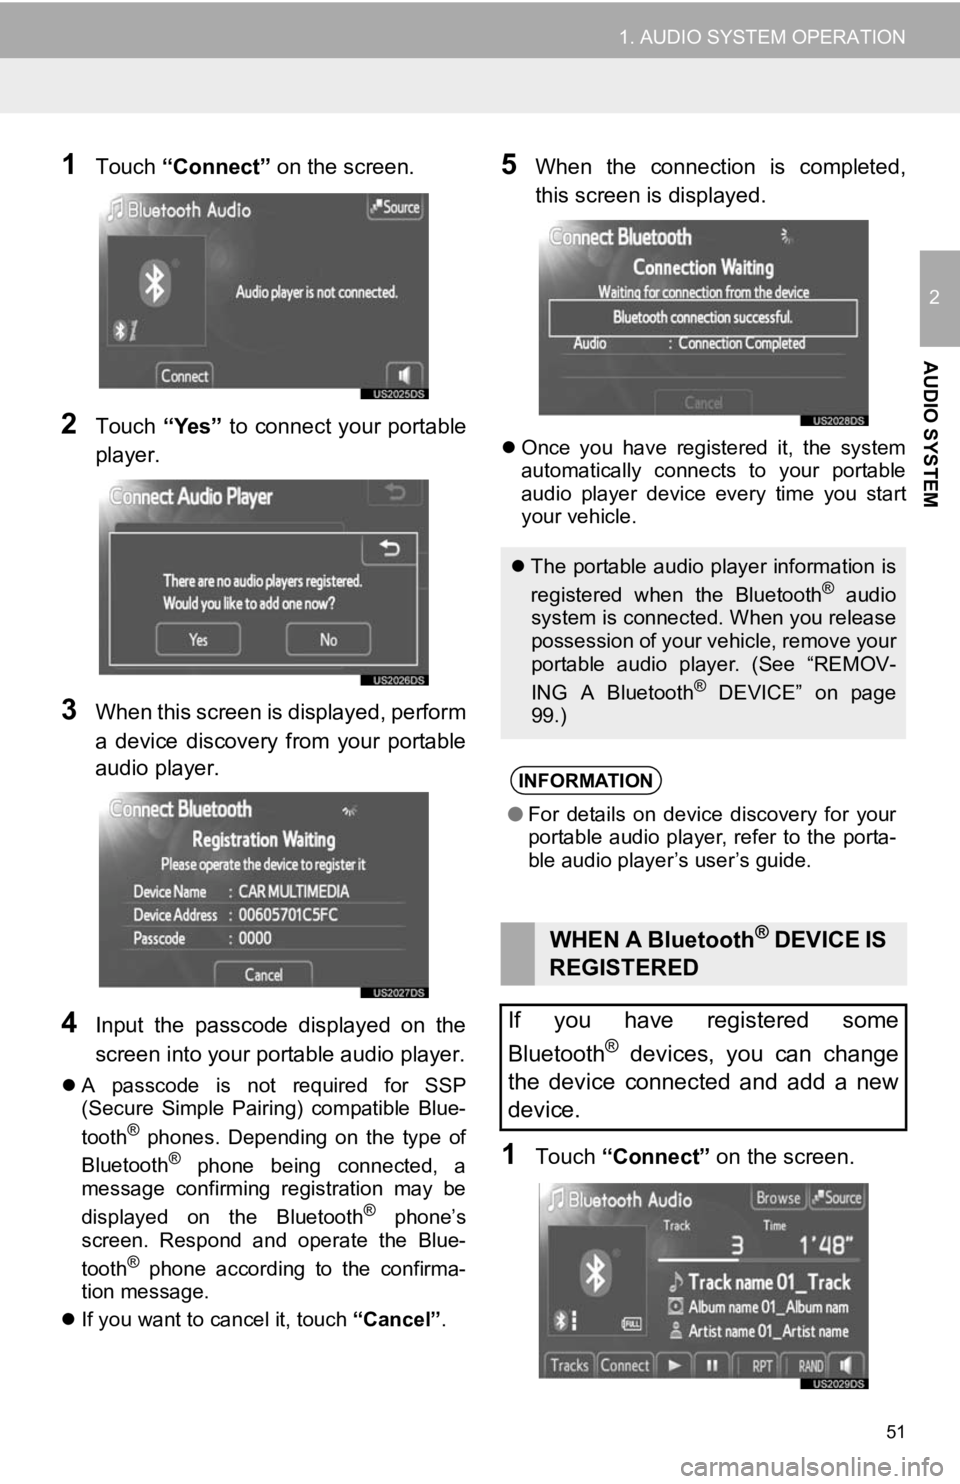
1Touch “Connect” on the screen.
2Touch “Yes” to connect your portable
player.
3When this screen is displayed, perform
a device discovery from your portable
audio player.
4Input the passcode displayed on the
screen into your portable audio player.
A passcode is not required for SSP
(Secure Simple Pairing) compatible Blue-
tooth
® phones. Depending on the type of
Bluetooth® phone being connected, a
message confirming registration may be
displayed on the Bluetooth
® phone’s
screen. Respond and operate the Blue-
tooth
® phone according to the confirma-
tion message.
If you want to cancel it, touch “Cancel”.
5When the connection is completed,
this screen is displayed.
Once you have registered it, the system
automatically connects to your portable
audio player device every time you start
your vehicle.
1Touch “Connect” on the screen.
The portable audio player information is
registered when the Bluetooth® audio
system is connected. When you release
possession of your vehicle, remove your
portable audio player. (See “REMOV-
ING A Bluetooth
® DEVICE” on page
99.)
INFORMATION
● For details on device discovery for your
portable audio player, refer to the porta-
ble audio player’s user’s guide.
WHEN A Bluetooth® DEVICE IS
REGISTERED
If you have registered some
Bluetooth
® devices, you can change
the device connected and add a new
device.
Page 52 of 131
52
1. AUDIO SYSTEM OPERATION
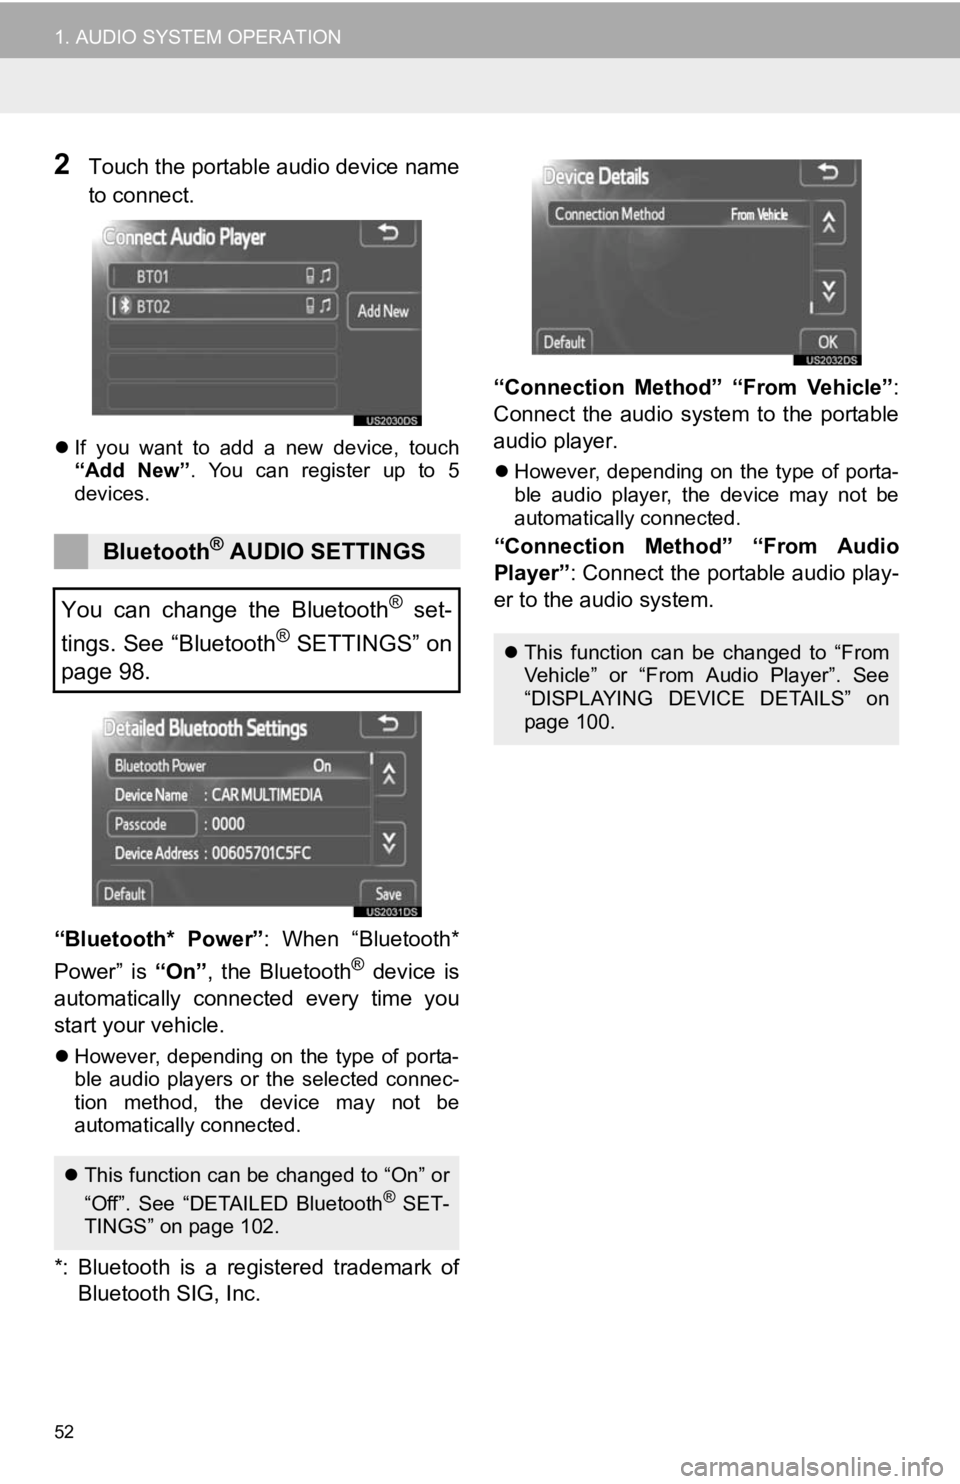
2Touch the portable audio device name
to connect.
If you want to add a new device, touch
“Add New” . You can register up to 5
devices.
“Bluetooth* Power” : When “Bluetooth*
Power” is “On”, the Bluetooth® device is
automatically connected every time you
start your vehicle.
However, depending on the type of porta-
ble audio players or the selected connec-
tion method, the device may not be
automatically connected.
*: Bluetooth is a re gistered trademark of
Bluetooth SIG, Inc. “Connection Method” “From Vehicle”
:
Connect the audio system to the portable
audio player.
However, depending on the type of porta-
ble audio player, the device may not be
automatically connected.
“Connection Method” “From Audio
Player” : Connect the portable audio play-
er to the audio system.Bluetooth® AUDIO SETTINGS
You can change the Bluetooth
® set-
tings. See “Bluetooth
® SETTINGS” on
page 98.
This function can be changed to “On” or
“Off”. See “DETAILED Bluetooth® SET-
TINGS” on page 102.
This function can be changed to “From
Vehicle” or “From Audio Player”. See
“DISPLAYING DEVICE DETAILS” on
page 100.
Page 53 of 131
53
1. AUDIO SYSTEM OPERATION
2
AUDIO SYSTEM
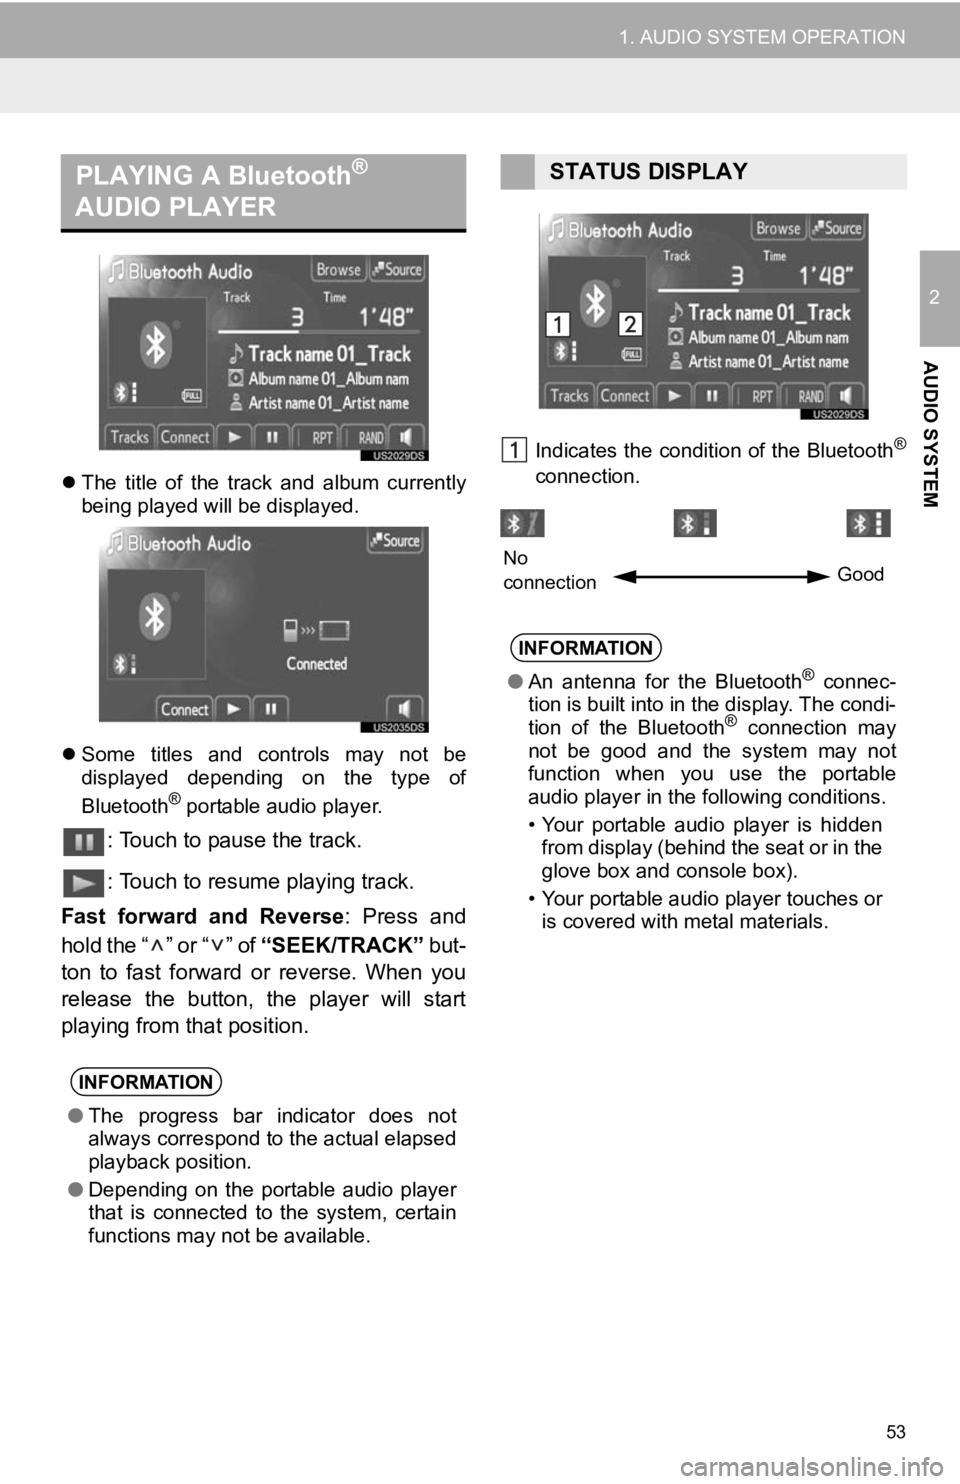
The title of the track and album currently
being played will be displayed.
Some titles and controls may not be
displayed depending on the type of
Bluetooth
® portable audio player.
: Touch to pause the track.
: Touch to resume playing track.
Fast forward and Reverse : Press and
hold the “ ” or “ ” of “SEEK/TRACK” but-
ton to fast forward or reverse. When you
release the button, the player will start
playing from that position.
Indicates the condition of the Bluetooth®
connection.
PLAYING A Bluetooth®
AUDIO PLAYER
INFORMATION
● The progress bar indicator does not
always correspond to the actual elapsed
playback position.
● Depending on the portable audio player
that is connected to the system, certain
functions may not be available.
STATUS DISPLAY
INFORMATION
●An antenna for the Bluetooth® connec-
tion is built into in the display. The condi-
tion of the Bluetooth
® connection may
not be good and the system may not
function when you use the portable
audio player in the following conditions.
• Your portable audio player is hidden from display (behind the seat or in the
glove box and console box).
• Your portable audio player touches or is covered with metal materials.
No
connection Good
Page 54 of 131
54
1. AUDIO SYSTEM OPERATION
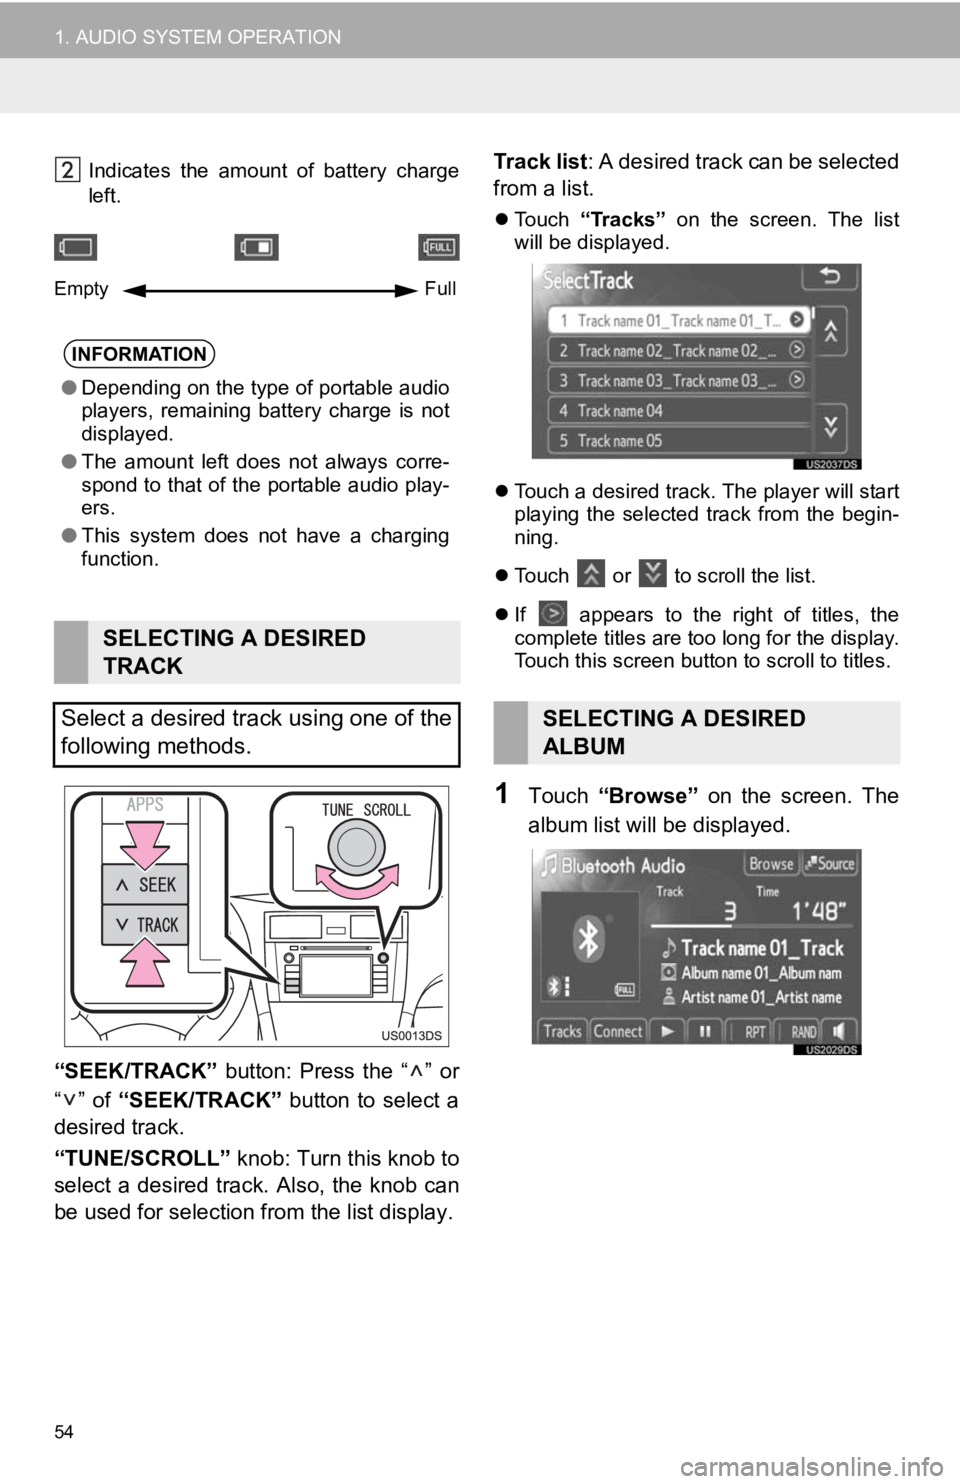
Indicates the amount of battery charge
left.
“SEEK/TRACK” button: Press the “ ” or
“” of “SEEK/TRACK” button to select a
desired track.
“TUNE/SCROLL” knob: Turn this knob to
select a desired track. Also, the knob can
be used for selection from the list display. Track list
: A desired track can be selected
from a list.
Touch “Tracks” on the screen. The list
will be displayed.
Touch a desired track. The player will start
playing the selected track from the begin-
ning.
Touch
or to scroll the list.
If
appears to the right of titles, the
complete titles are too long for the display.
Touch this screen button to scroll to titles.
1Touch “Browse” on the screen. The
album list will be displayed.
INFORMATION
● Depending on the type of portable audio
players, remaining battery charge is not
displayed.
● The amount left does not always corre-
spond to that of the portable audio play-
ers.
● This system does not have a charging
function.
SELECTING A DESIRED
TRACK
Select a desired track using one of the
following methods.
Empty Full
SELECTING A DESIRED
ALBUM
Page 55 of 131
55
1. AUDIO SYSTEM OPERATION
2
AUDIO SYSTEM
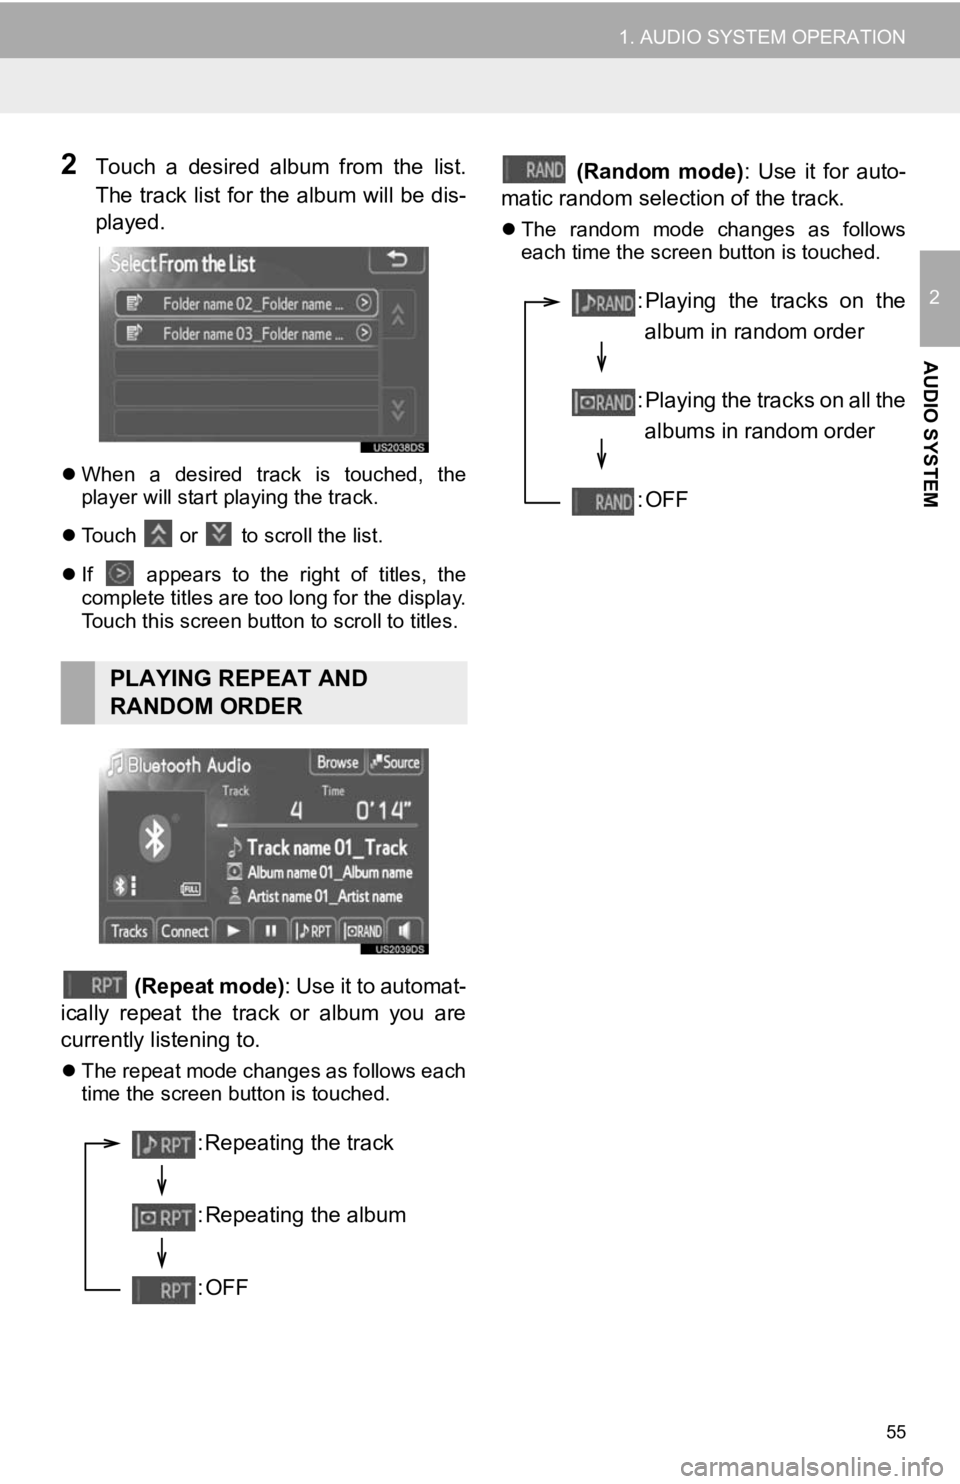
2Touch a desired album from the list.
The track list for the album will be dis-
played.
When a desired track is touched, the
player will start playing the track.
Touch
or to scroll the list.
If
appears to the right of titles, the
complete titles are too long for the display.
Touch this screen button to scroll to titles.
(Repeat mode) : Use it to automat-
ically repeat the track or album you are
currently listening to.
The repeat mode changes as follows each
time the screen button is touched.
(Random mode) : Use it for auto-
matic random selection of the track.
The random mode changes as follows
each time the screen button is touched.
PLAYING REPEAT AND
RANDOM ORDER
: Repeating the track
: Repeating the album
:OFF
: Playing the tracks on the
album in random order
: Playing the tracks on all the albums in random order
:OFF
Page 56 of 131
56
1. AUDIO SYSTEM OPERATION
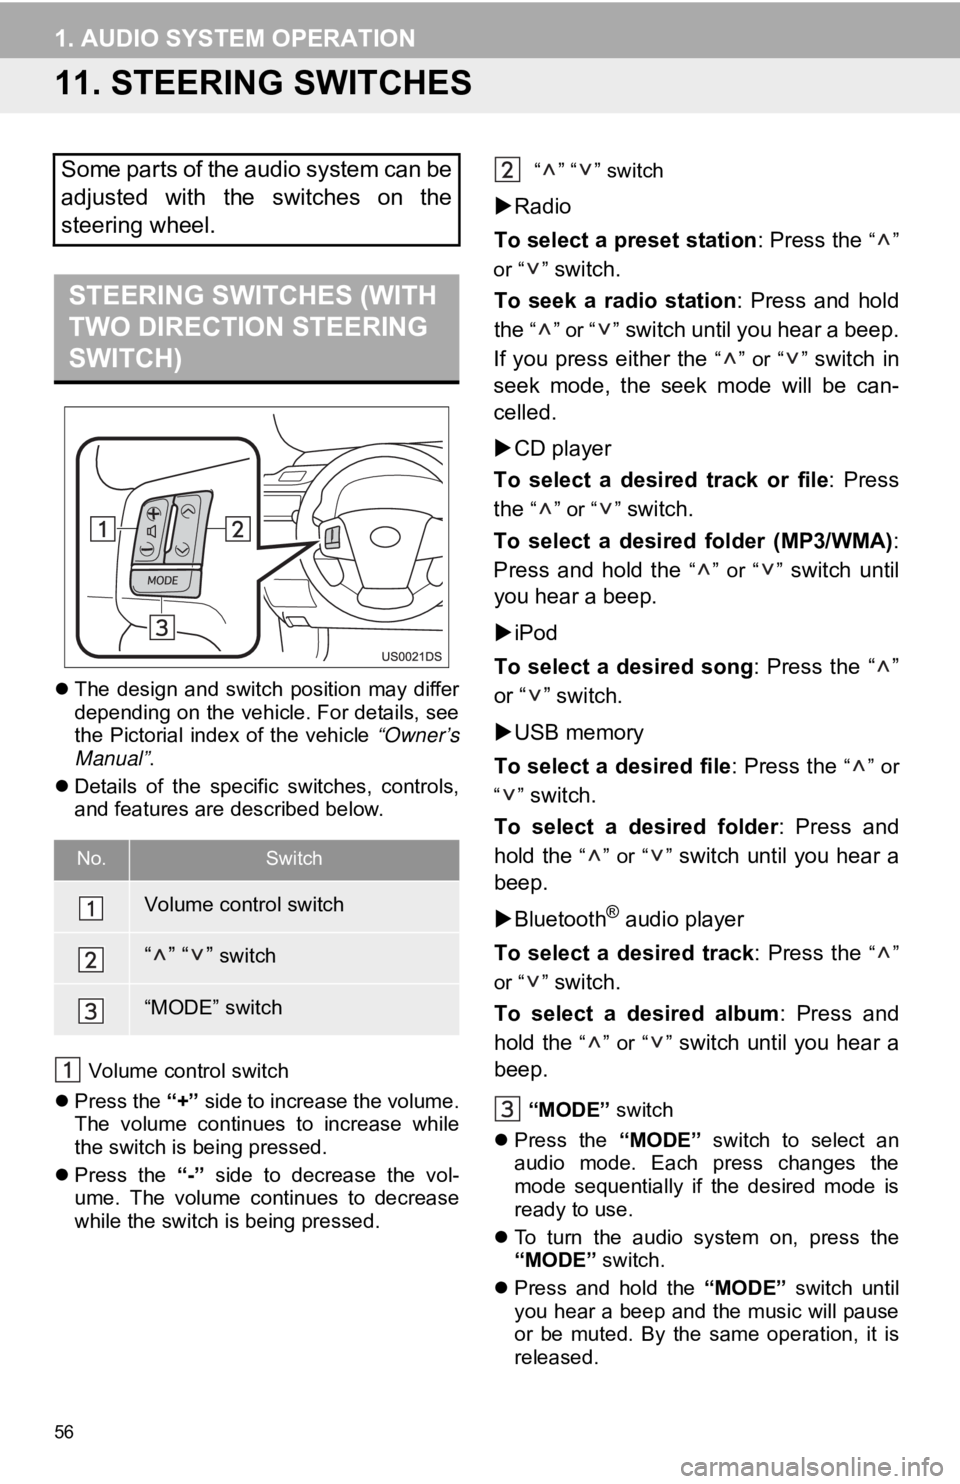
11. STEERING SWITCHES
The design and switch position may differ
depending on the vehicle. For details, see
the Pictorial index of the vehicle “Owner’s
Manual” .
Details of the specific switches, controls,
and features are described below.
Volume control switch
Press the “+” side to increase the volume.
The volume continues to increase while
the switch is being pressed.
Press the “-” side to decrease the vol-
ume. The volume continues to decrease
while the switch is being pressed. “” “” switch
Radio
To select a preset station : Press the
“”
or “ ”
switch.
To seek a radio station : Press and hold
the
“” or “” switch until you hear a beep.
If you press either the
“” or “” switch in
seek mode, the seek mode will be can-
celled.
CD player
To select a desired track or file : Press
the
“” or “” switch.
To select a desired folder (MP3/WMA) :
Press and hold the
“” or “” switch until
you hear a beep.
iPod
To select a desired song : Press the “ ”
or “ ” switch.
USB memory
To select a desired file : Press the
“” or
“”
switch.
To select a desired folder : Press and
hold the
“” or “” switch until you hear a
beep.
Bluetooth
® audio player
To select a desired track : Press the
“”
or “ ”
switch.
To select a desired album : Press and
hold the
“” or “” switch until you hear a
beep.
“MODE” switch
Press the “MODE” switch to select an
audio mode. Each press changes the
mode sequentially if the desired mode is
ready to use.
To turn the audio system on, press the
“MODE” switch.
Press and hold the “MODE” switch until
you hear a beep and the music will pause
or be muted. By the same operation, it is
released.
Some parts of the audio system can be
adjusted with the switches on the
steering wheel.
STEERING SWITCHES (WITH
TWO DIRECTION STEERING
SWITCH)
No.Switch
Volume control switch
“” “” switch
“MODE” switch
Page 57 of 131
57
1. AUDIO SYSTEM OPERATION
2
AUDIO SYSTEM
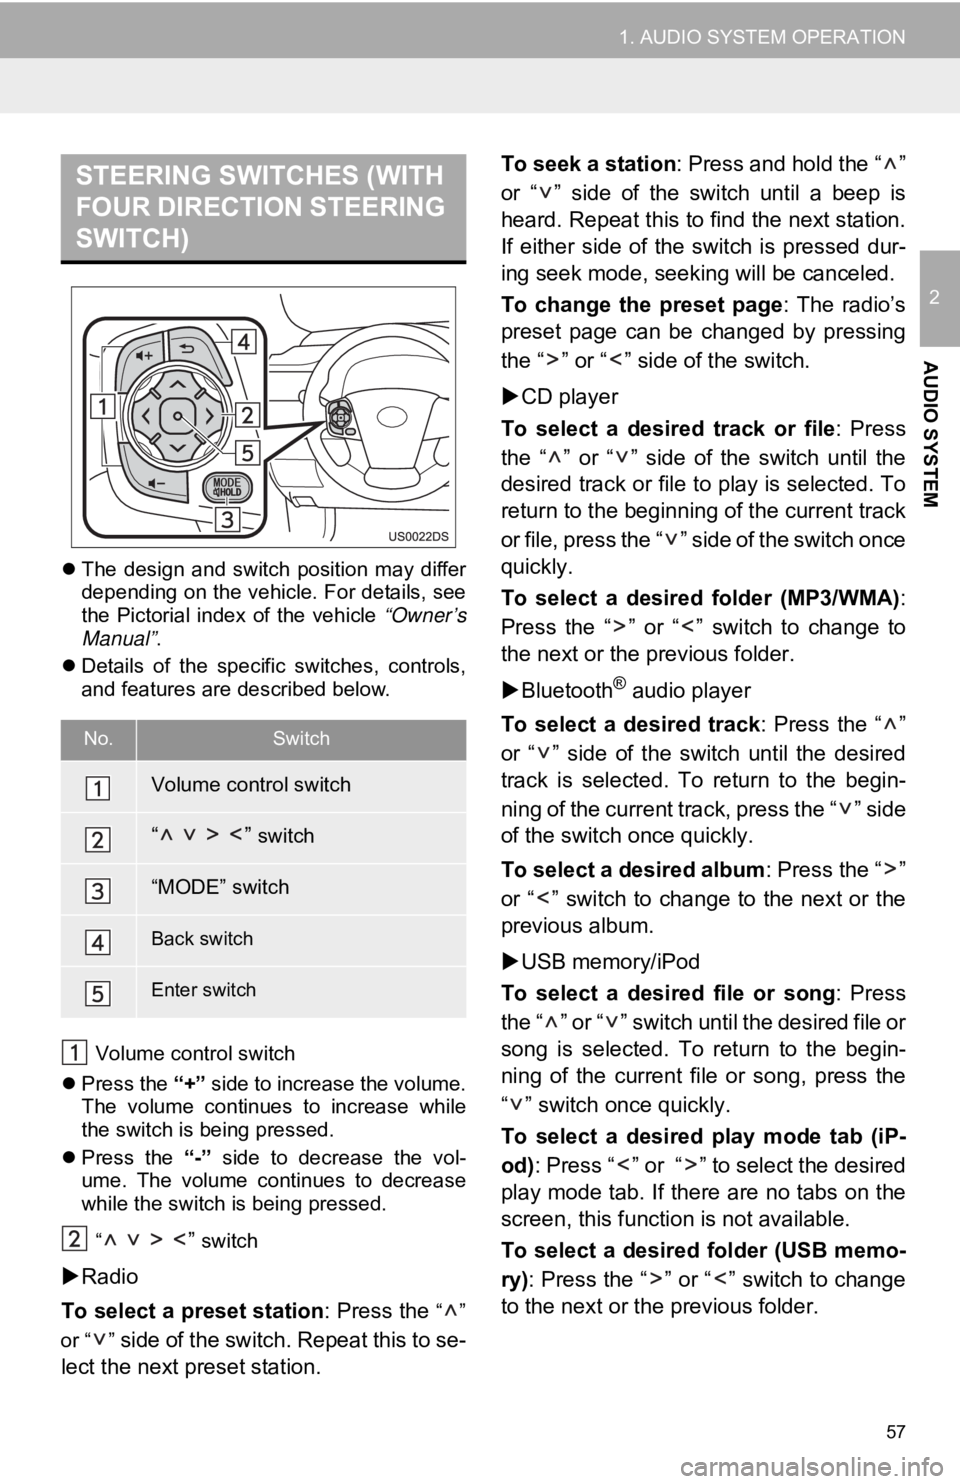
The design and switch position may differ
depending on the vehicle. For details, see
the Pictorial index of the vehicle “Owner’s
Manual” .
Details of the specific switches, controls,
and features are described below.
Volume control switch
Press the “+” side to increase the volume.
The volume continues to increase while
the switch is being pressed.
Press the “-” side to decrease the vol-
ume. The volume continues to decrease
while the switch is being pressed.
“
” switch
Radio
To select a preset station : Press the
“”
or “ ”
side of the switch. Repeat this to se-
lect the next preset station. To seek a station
: Press and hold the “ ”
or “ ” side of the switch until a beep is
heard. Repeat this to find the next station.
If either side of the switch is pressed dur-
ing seek mode, seeking will be canceled.
To change the preset page : The radio’s
preset page can be changed by pressing
the “ ” or “ ” side of the switch.
CD player
To select a desired track or file : Press
the “ ” or “ ” side of the switch until the
desired track or file to play is selected. To
return to the beginning of the current track
or file, press the “ ” side of the switch once
quickly.
To select a desired folder (MP3/WMA) :
Press the “ ” or “ ” switch to change to
the next or the previous folder.
Bluetooth
® audio player
To select a desired track : Press the “ ”
or “ ” side of the switch until the desired
track is selected. To return to the begin-
ning of the current track, press the “ ” side
of the switch once quickly.
To select a desired album : Press the “ ”
or “ ” switch to change to the next or the
previous album.
USB memory/iPod
To select a desired file or song : Press
the “ ” or “ ” switch until the desired file or
song is selected. To return to the begin-
ning of the current file or song, press the
“ ” switch once quickly.
To select a desired play mode tab (iP-
od) : Press “ ” or “ ” to select the desired
play mode tab. If there are no tabs on the
screen, this function is not available.
To select a desired folder (USB memo-
ry) : Press the “ ” or “ ” switch to change
to the next or the previous folder.
STEERING SWITCHES (WITH
FOUR DIRECTION STEERING
SWITCH)
No.Switch
Volume control switch
“ ” switch
“MODE” switch
Back switch
Enter switch
Page 58 of 131

58
1. AUDIO SYSTEM OPERATION
“MODE” switch
Press the “MODE” switch to select an
audio mode. Each press changes the
mode sequentially if the desired mode is
ready to use.
To turn the audio system on, press the
“MODE” switch.
Press and hold the “MODE” switch until
you hear a beep and the music will pause
or be muted. By the same operation, it is
released.
Back switch
Press the back switch to return to the pre-
vious screen.
Enter switch
When in radio mode, pressing the enter
switch returns to the preset screen.
When in media mode, pressing the enter
switch returns to the list screen.
Page 59 of 131
59
1. AUDIO SYSTEM OPERATION
2
AUDIO SYSTEM
12. AUDIO SYSTEM OPERATING HINTS
Fading and drifting stations: Generally,
the effective range of FM is about 25 miles
(40 km). Once outside this range, you may
notice fading and drifting, which increase
with the distance from the radio transmit-
ter. They are often accompanied by distor-
tion.
Multi-path: FM signals are reflective, mak-
ing it possible for two signals to reach your
antenna at the same time. If this happens,
the signals will cancel each other out,
causing a momentary flutter or loss of re-
ception.
Static and fluttering : These occur when
signals are blocked by buildings, trees, or
other large objects. Increasing the bass
level may reduce static and fluttering.
Station swapping : If the FM signal you
are listening to is interrupted or weakened,
and there is another strong station nearby
on the FM band, your radio may tune in the
second station until the original signal can
be picked up again.
Fading : AM broadcasts are reflected by
the upper atmosphere especially at
night. These reflected signals can interfere
with those received directly from the radio
station, causing the radio station to sound
alternately strong and weak.
Station interference : When a reflected
signal and a signal received directly from a
radio station are very nearly the same fre-
quency, they can interfere with each other,
making it difficult to hear the broadcast.
Static : AM is easily affected by external
sources of electrical noise, such as high
tension power lines, lightening, or electri-
cal motors. This re sults in static.
NOTICE
●To avoid damaging the audio system:
• Be careful not to spill beverages over
the audio system.
• Do not put anything other than on appropriate discs into the CD player
slot.
INFORMATION
● The use of a cellular phone inside or
near the vehicle may cause a noise from
the speakers of the audio system which
you are listening to. However, this does
not indicate a malfunction.
RADIO RECEPTION
Usually, a problem with radio reception
does not mean there is a problem with
your radio it is just the normal result
of conditions outside the vehicle.
For example, nearby buildings and ter-
rain can interfere with FM reception.
Power lines or telephone wires can in-
terfere with AM signals. And of course,
radio signals have a limited range, and
the farther you are from a station, the
weaker its signal will be. In addition, re-
ception conditions change constantly
as your vehicle moves.
Here are some common reception
problems that probably do not indicate
a problem with your radio.
FM
AM
Page 60 of 131
60
1. AUDIO SYSTEM OPERATION
Cargo loaded on the roof luggage carrier,
especially metal objects, may adversely
affect the reception of XM
® Satellite
Radio.
Alternation or modifications carried out
without appropriate authorization may
invalidate the user’s right to operate the
equipment.
“Made for iPod” and “Made for iPhone”
means that an electronic accessory has
been designed to connect specifically to
iPod, or iPhone, respectively, and has
been certified by the developer to meet
Apple performance standards.
Apple is not responsible for the operation
of this device or its compliance with safety
and regulatory standards.
iPhone, iPod, iPod classic, iPod nano,
iPod shuffle, and iPod touch are trade-
marks of Apple Inc., registered in the U.S.
and other countries.
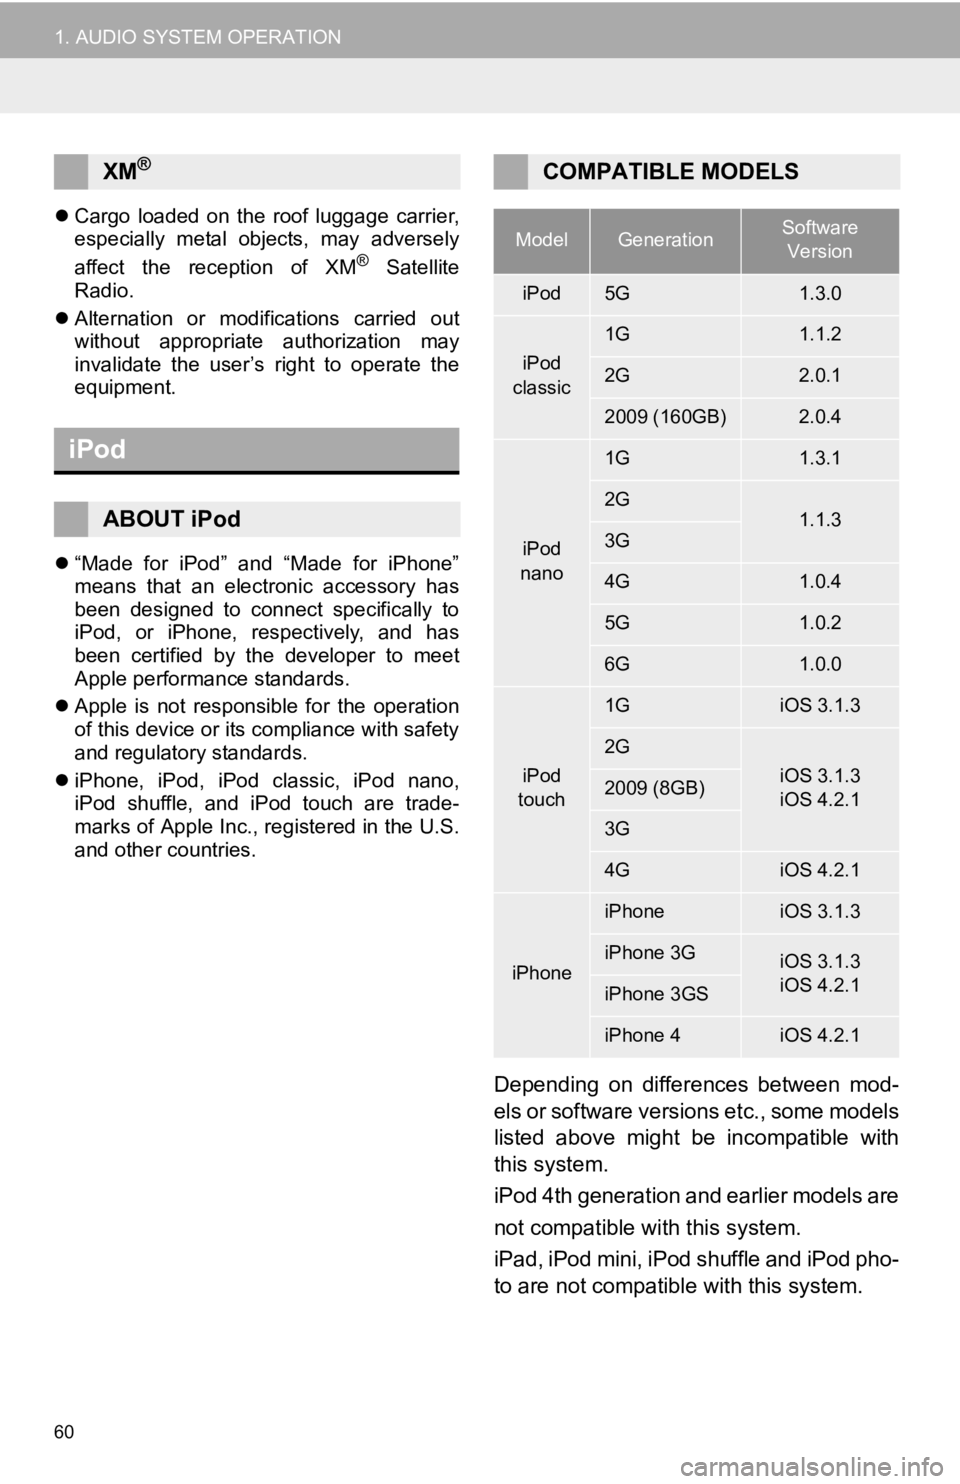
Depending on differences between mod-
els or software versions etc., some models
listed above might be incompatible with
this system.
iPod 4th generation and earlier models are
not compatible with this system.
iPad, iPod mini, iPod shuffle and iPod pho-
to are not compatible with this system.
XM®
iPod
ABOUT iPod
COMPATIBLE MODELS
ModelGenerationSoftware
Version
iPod5G1.3.0
iPod
classic
1G1.1.2
2G2.0.1
2009 (160GB)2.0.4
iPod
nano
1G1.3.1
2G1.1.33G
4G1.0.4
5G1.0.2
6G1.0.0
iPod
touch
1GiOS 3.1.3
2G
iOS 3.1.3
iOS 4.2.12009 (8GB)
3G
4GiOS 4.2.1
iPhone
iPhoneiOS 3.1.3
iPhone 3GiOS 3.1.3
iOS 4.2.1
iPhone 3GS
iPhone 4iOS 4.2.1