TOYOTA PRIUS V 2014 ZVW40 / 1.G Owners Manual
PRIUS V 2014 ZVW40 / 1.G
TOYOTA
TOYOTA
https://www.carmanualsonline.info/img/14/6658/w960_6658-0.png
TOYOTA PRIUS V 2014 ZVW40 / 1.G Owners Manual
Trending: fuel filter, warning, replace wiper, charging, servo, lights, child lock
Page 461 of 568
5
When trouble arises
461
5-2. Steps to take in an emergency
PRIUS v_OM_OM47840U_(U)
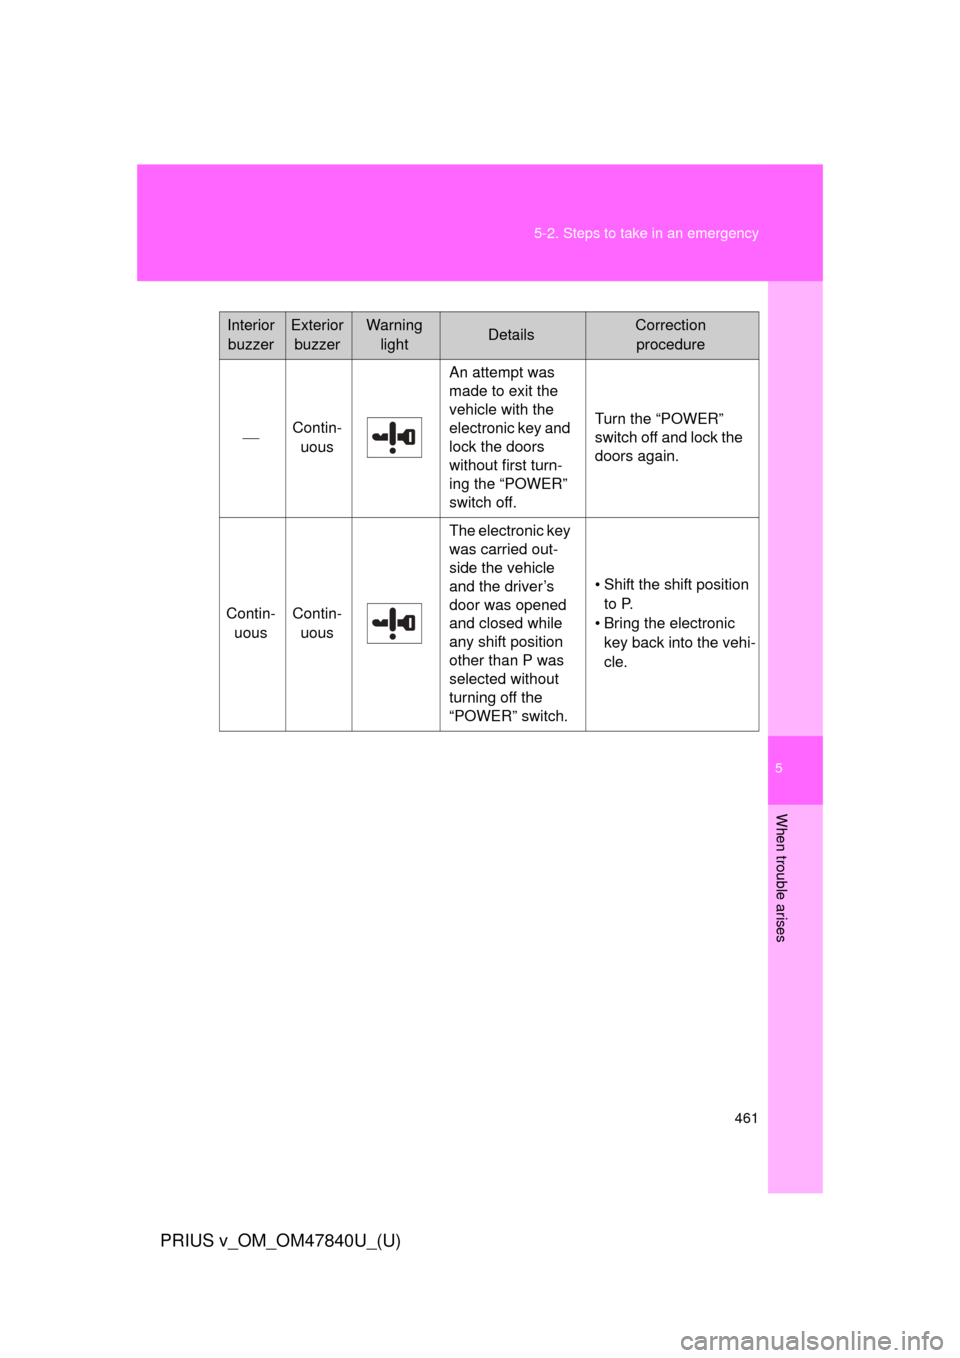
Interior
buzzerExterior buzzerWarning lightDetailsCorrection procedure
Contin- uous
An attempt was
made to exit the
vehicle with the
electronic key and
lock the doors
without first turn-
ing the “POWER”
switch off.
Turn the “POWER”
switch off and lock the
doors again.
Contin-uousContin- uous
The electronic key
was carried out-
side the vehicle
and the driver’s
door was opened
and closed while
any shift position
other than P was
selected without
turning off the
“POWER” switch.
• Shift the shift position to P.
• Bring the electronic key back into the vehi-
cle.
Page 462 of 568
462
5-2. Steps to take in an emergency
PRIUS v_OM_OM47840U_(U)
If you have a flat tire
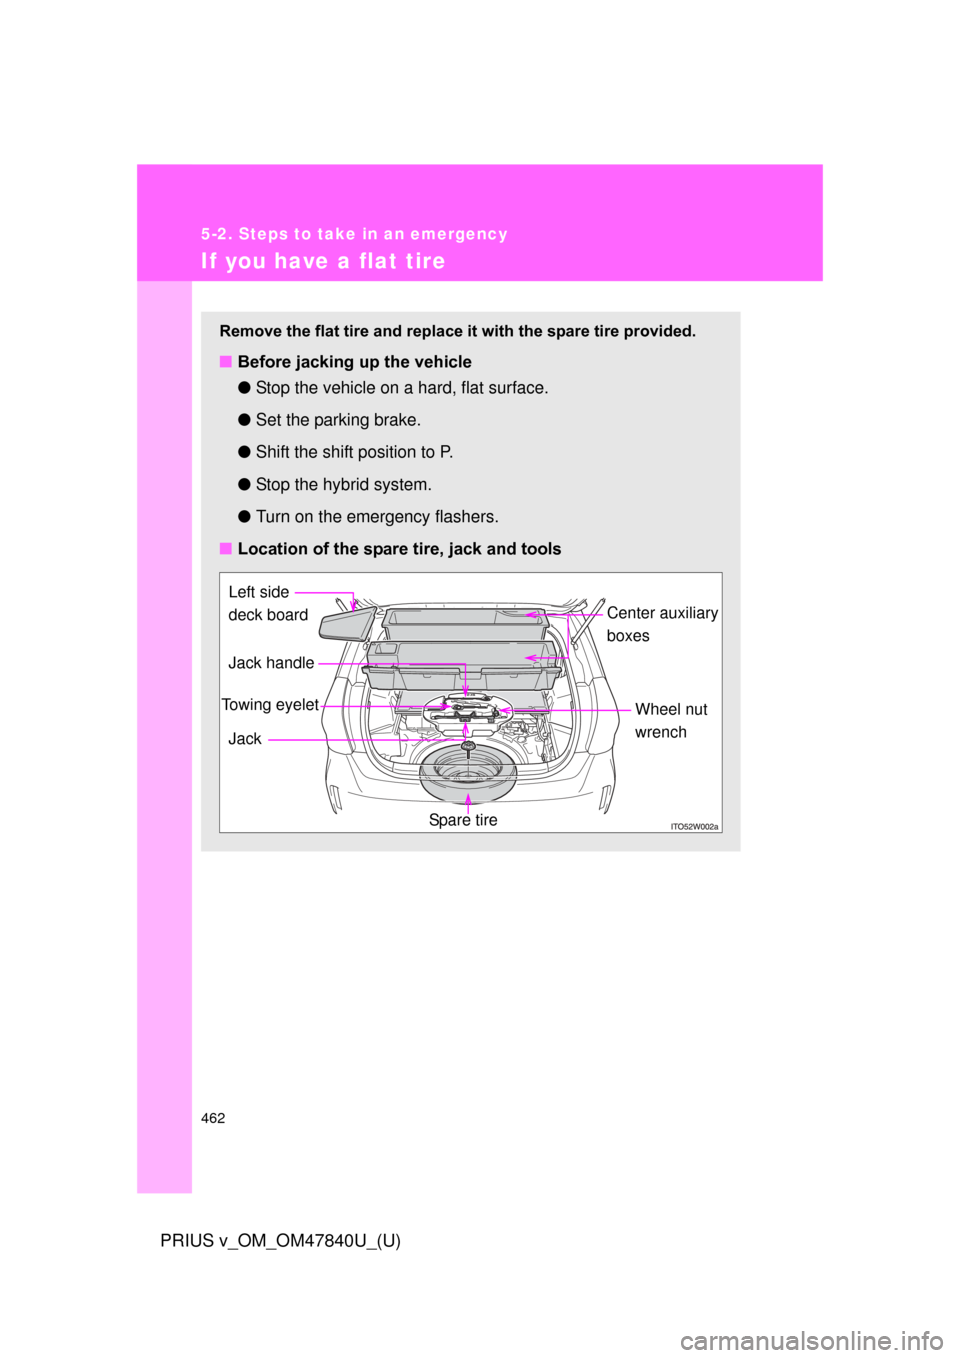
Remove the flat tire and replace it with the spare tire provided.
■Before jacking up the vehicle
●Stop the vehicle on a hard, flat surface.
● Set the parking brake.
● Shift the shift position to P.
● Stop the hybrid system.
● Turn on the emergency flashers.
■ Location of the spare tire, jack and tools
Center auxiliary
boxes
Jack Spa r e t ire
Jack handle
Towing eyelet Wheel nut
wrench
Left side
deck board
Page 463 of 568
5
When trouble arises
463
5-2. Steps to take in an emergency
PRIUS v_OM_OM47840U_(U)
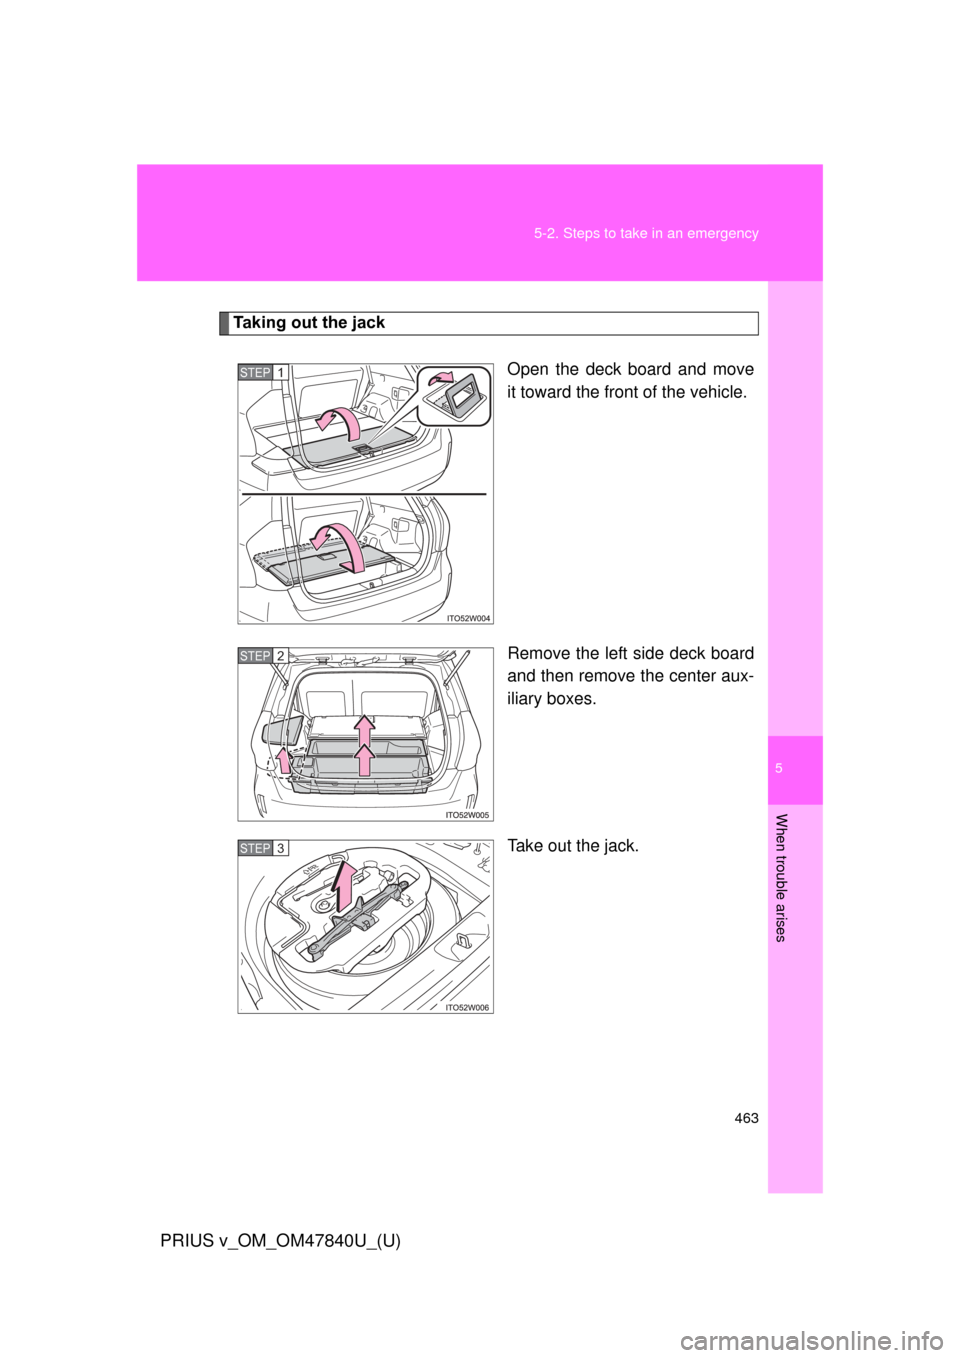
Taking out the jack
Open the deck board and move
it toward the front of the vehicle.
Remove the left side deck board
and then remove the center aux-
iliary boxes.
Take out the jack.
STEP 1
STEP 2
STEP 3
Page 464 of 568
464 5-2. Steps to take in an emergency
PRIUS v_OM_OM47840U_(U)
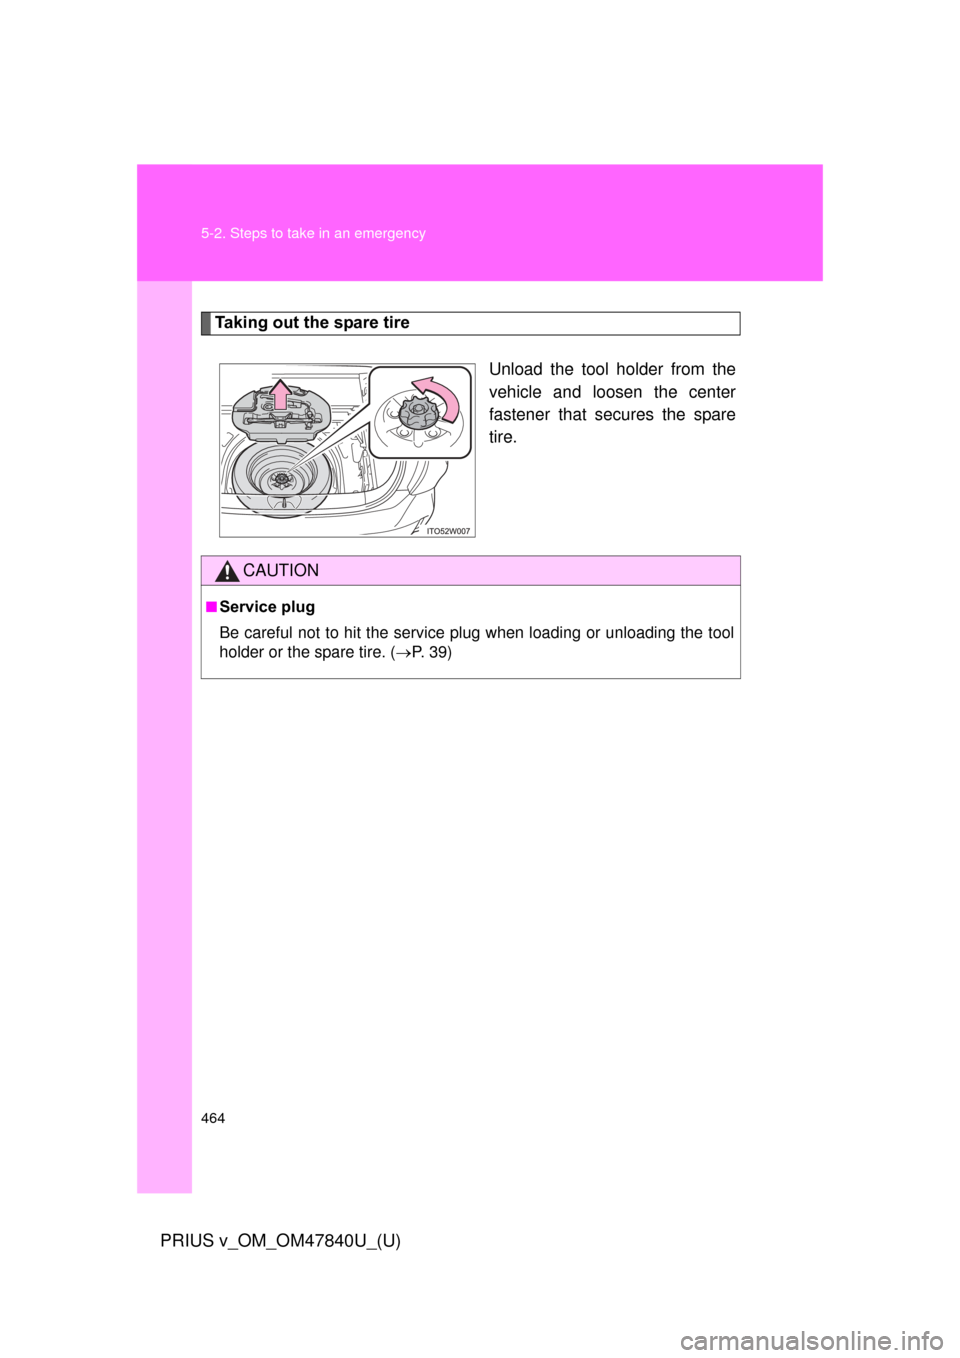
Taking out the spare tireUnload the tool holder from the
vehicle and loosen the center
fastener that secures the spare
tire.
CAUTION
■Service plug
Be careful not to hit the service plug when loading or unloading the tool
holder or the spare tire. (P. 3 9 )
Page 465 of 568
5
When trouble arises
465
5-2. Steps to take in an emergency
PRIUS v_OM_OM47840U_(U)
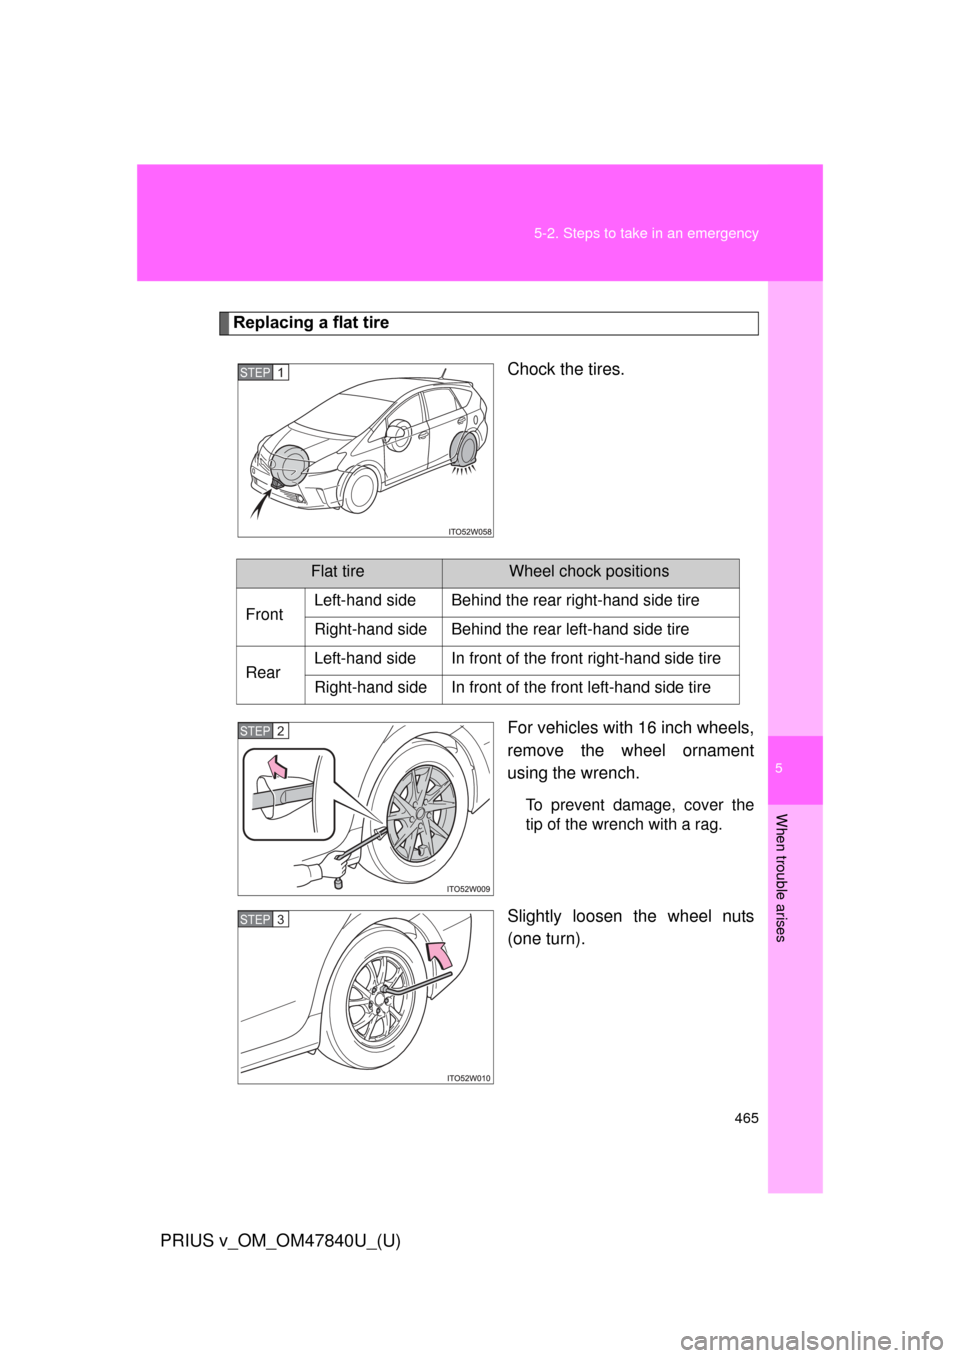
Replacing a flat tire
Chock the tires.
For vehicles with 16 inch wheels,
remove the wheel ornament
using the wrench.
To prevent damage, cover the
tip of the wrench with a rag.
Slightly loosen the wheel nuts
(one turn).
STEP 1
Flat tireWheel chock positions
Front Left-hand side Behind the rear right-hand side tire
Right-hand side Behind the rear left-hand side tire
Rear Left-hand side In front of the front right-hand side tire
Right-hand side In front of the front left-hand side tire
STEP 2
STEP 3
Page 466 of 568
466 5-2. Steps to take in an emergency
PRIUS v_OM_OM47840U_(U)
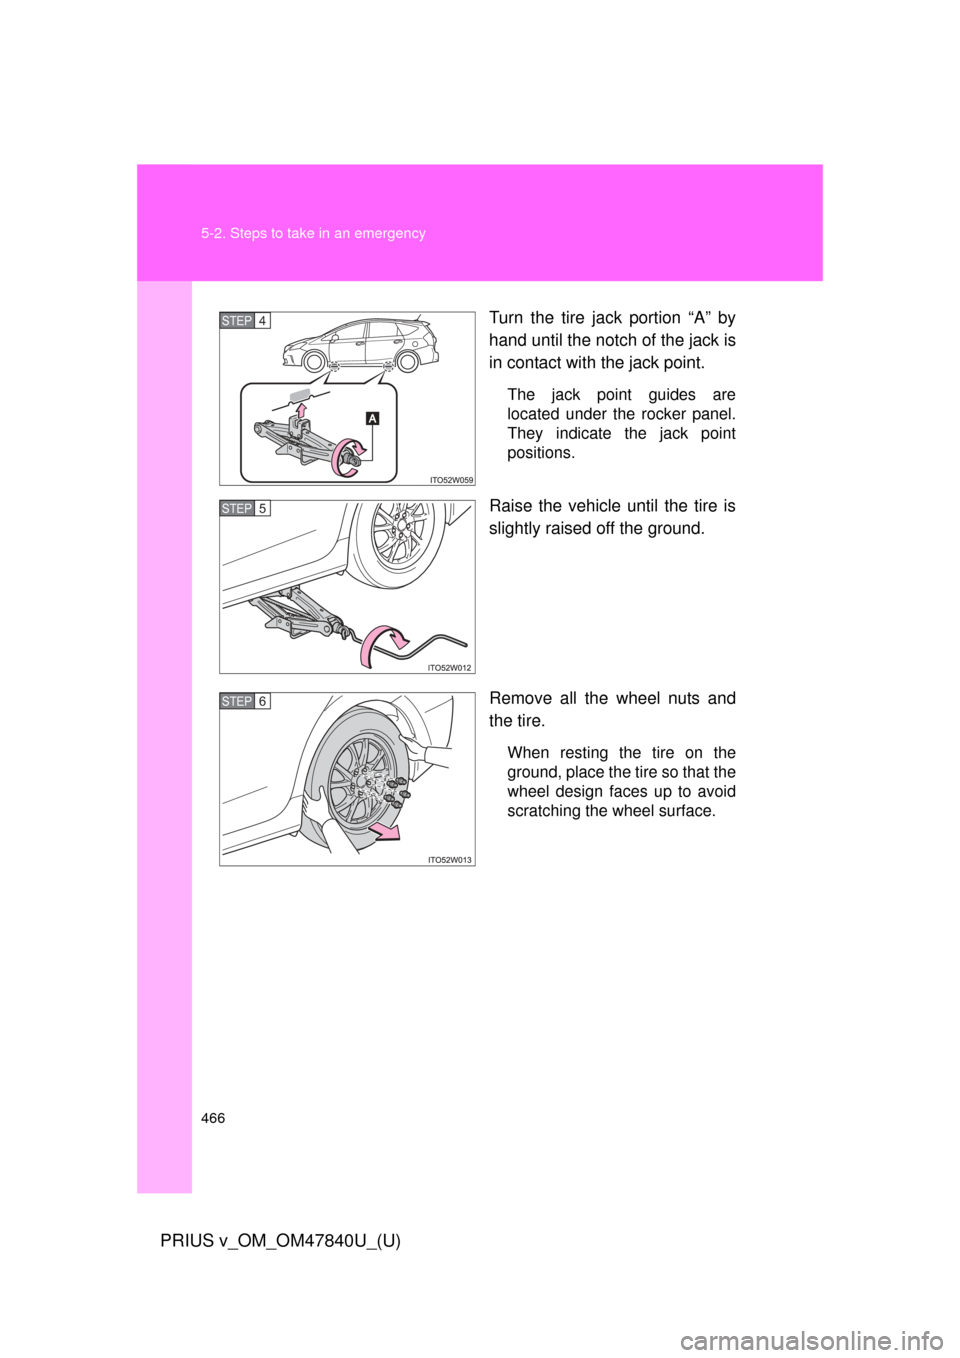
Turn the tire jack portion “A” by
hand until the notch of the jack is
in contact with the jack point.
The jack point guides are
located under the rocker panel.
They indicate the jack point
positions.
Raise the vehicle until the tire is
slightly raised off the ground.
Remove all the wheel nuts and
the tire.
When resting the tire on the
ground, place the tire so that the
wheel design faces up to avoid
scratching the wheel surface.
STEP 4
STEP 5
STEP 6
Page 467 of 568
5
When trouble arises
467
5-2. Steps to take in an emergency
PRIUS v_OM_OM47840U_(U)
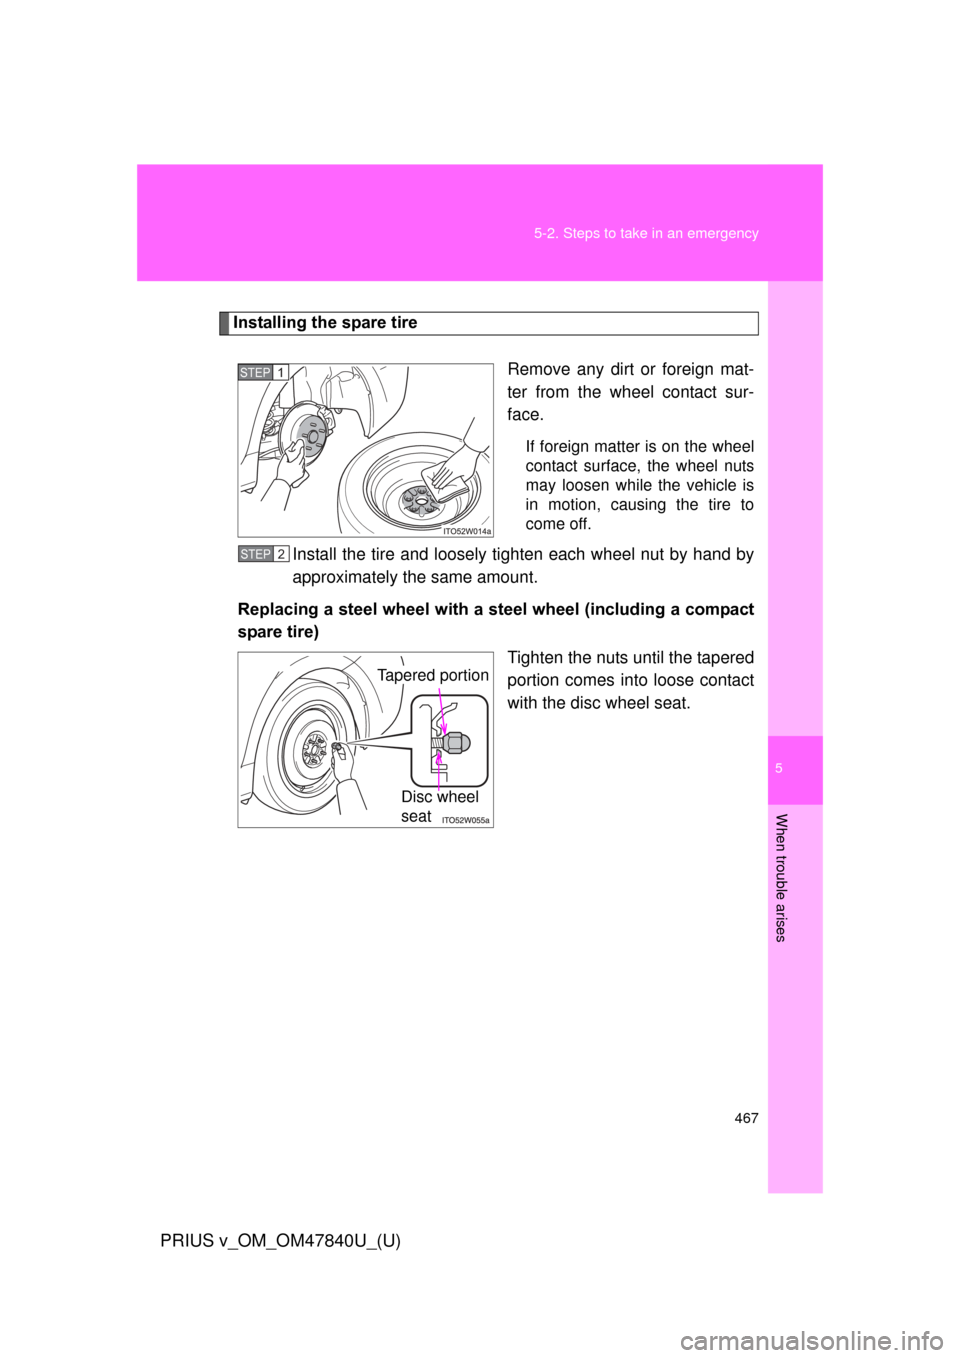
Installing the spare tire
Remove any dirt or foreign mat-
ter from the wheel contact sur-
face.
If foreign matter is on the wheel
contact surface, the wheel nuts
may loosen while the vehicle is
in motion, causing the tire to
come off.
Install the tire and loosely tighten each wheel nut by hand by
approximately the same amount.
Replacing a steel wheel with a steel wheel (including a compact
spare tire) Tighten the nuts until the tapered
portion comes into loose contact
with the disc wheel seat.
STEP 1
STEP 2
Tapered portion
Disc wheel
seat
Page 468 of 568
468 5-2. Steps to take in an emergency
PRIUS v_OM_OM47840U_(U)
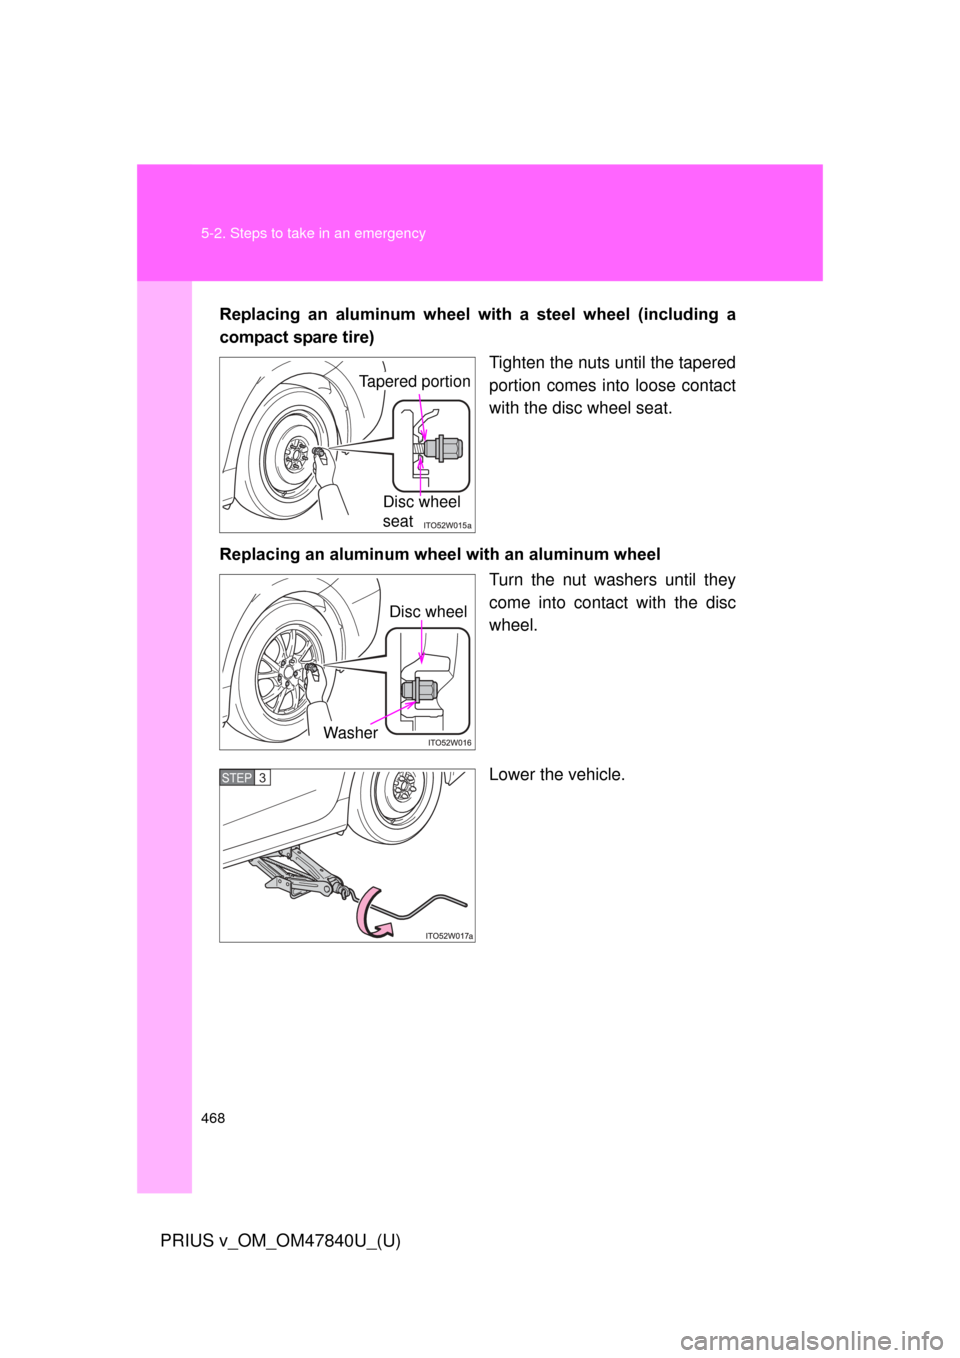
Replacing an aluminum wheel with a steel wheel (including a
compact spare tire)
Tighten the nuts until the tapered
portion comes into loose contact
with the disc wheel seat.
Replacing an aluminum wheel with an aluminum wheel
Turn the nut washers until they
come into contact with the disc
wheel.
Lower the vehicle.
Tapered portion
Disc wheel
seat
Disc wheel
Washer
STEP 3
Page 469 of 568
5
When trouble arises
469
5-2. Steps to take in an emergency
PRIUS v_OM_OM47840U_(U)
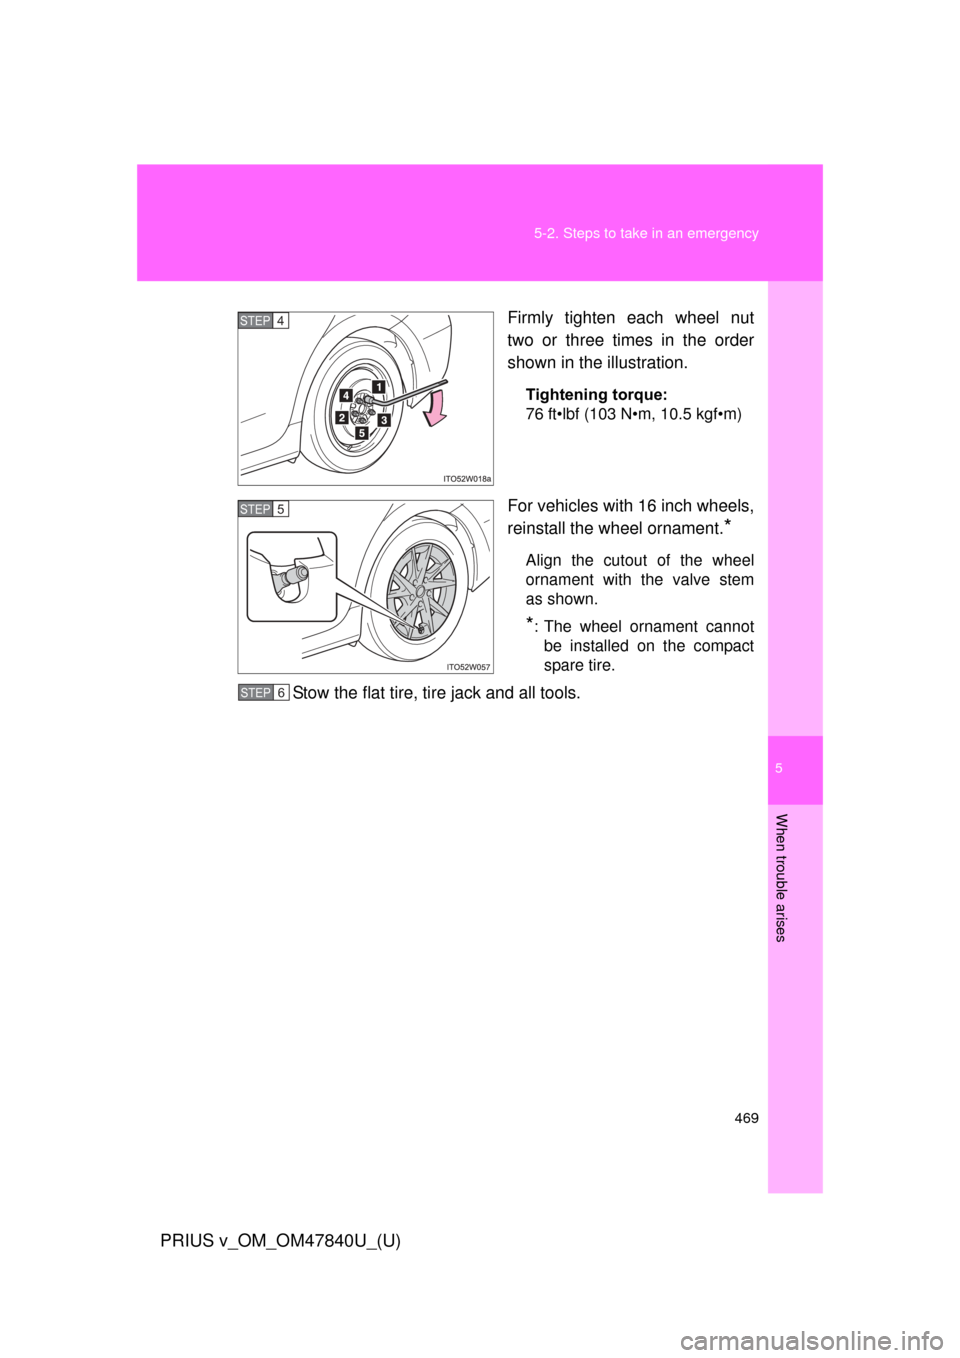
Firmly tighten each wheel nut
two or three times in the order
shown in the illustration.
Tightening torque:
76 ft•lbf (103 N•m, 10.5 kgf•m)
For vehicles with 16 inch wheels,
reinstall the wheel ornament.
*
Align the cutout of the wheel
ornament with the valve stem
as shown.
*: The wheel ornament cannot
be installed on the compact
spare tire.
Stow the flat tire, tire jack and all tools.
STEP 4
STEP 5
STEP 6
Page 470 of 568
470 5-2. Steps to take in an emergency
PRIUS v_OM_OM47840U_(U)
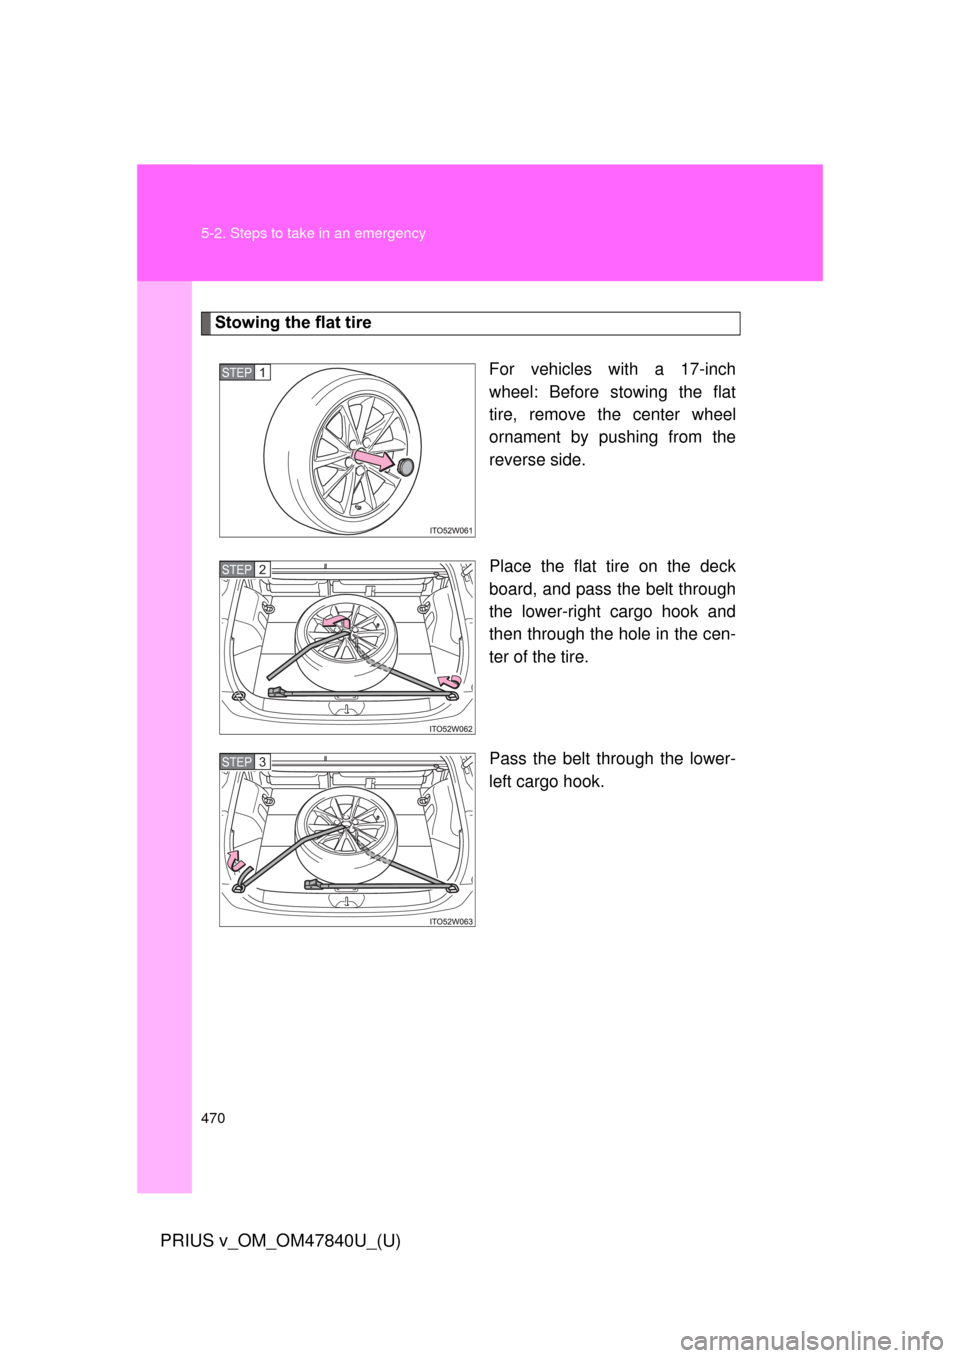
Stowing the flat tireFor vehicles with a 17-inch
wheel: Before stowing the flat
tire, remove the center wheel
ornament by pushing from the
reverse side.
Place the flat tire on the deck
board, and pass the belt through
the lower-right cargo hook and
then through the hole in the cen-
ter of the tire.
Pass the belt through the lower-
left cargo hook.
STEP 1
STEP 2
STEP 3
Trending: fuel reserve, instrument cluster, filter, instrument panel, homelink, replace wiper, ground clearance
