TOYOTA PRIUS V 2017 ZVW40 / 1.G Owners Manual
PRIUS V 2017 ZVW40 / 1.G
TOYOTA
TOYOTA
https://www.carmanualsonline.info/img/14/6668/w960_6668-0.png
TOYOTA PRIUS V 2017 ZVW40 / 1.G Owners Manual
Trending: height, buttons, flat tire, rear view mirror, lumbar support, climate, battery replacement
Page 281 of 624
281
PRIUS v_OM_OM47B23U_(U)
5-2. Setup
5
Audio system
General settings
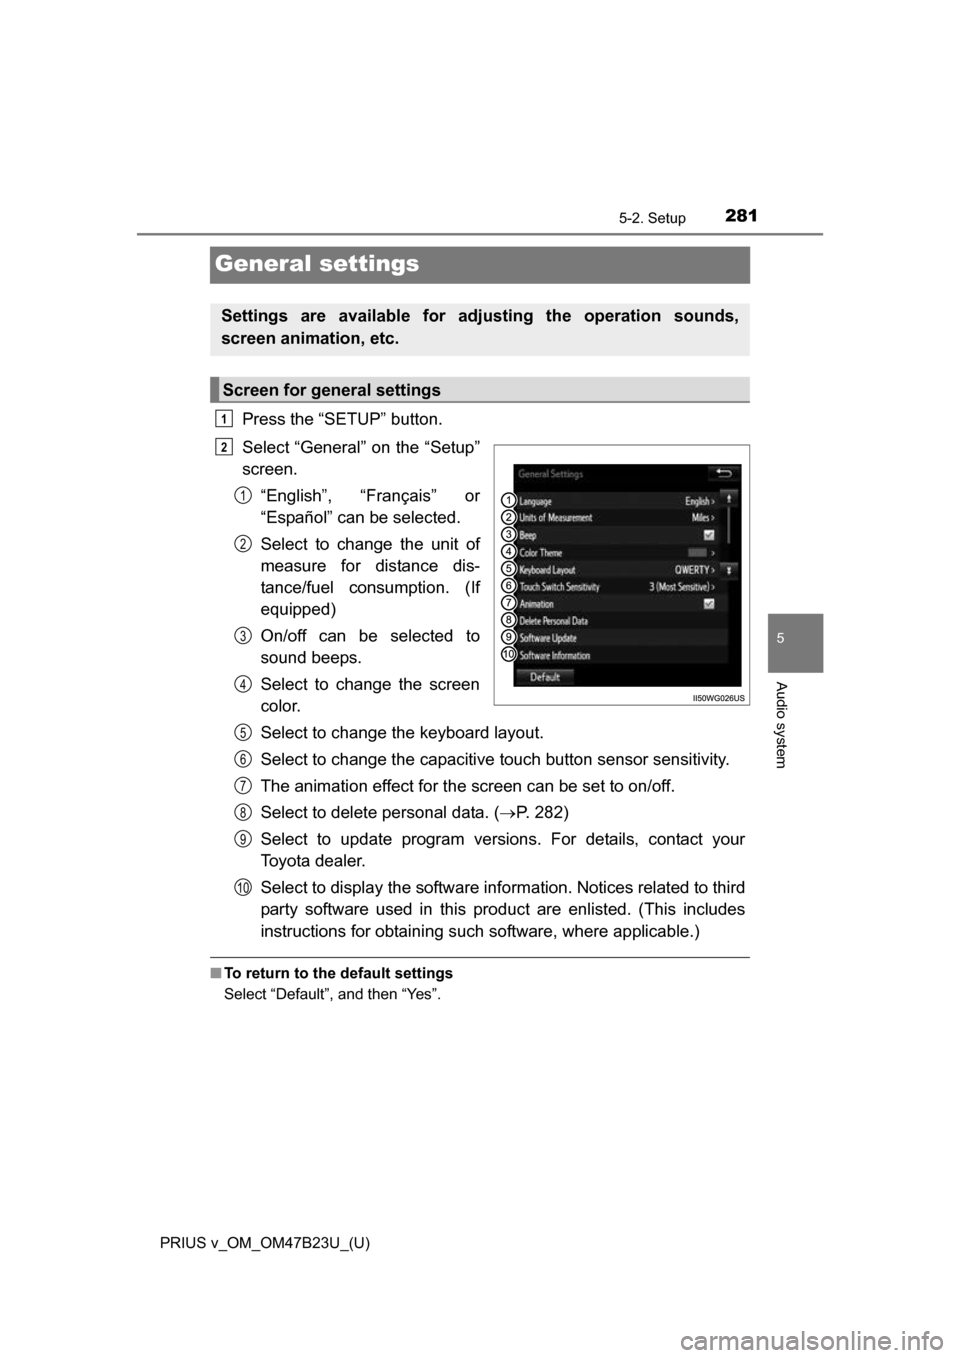
Press the “SETUP” button.
Select “General” on the “Setup”
screen.“English”, “Français” or
“Español” can be selected.
Select to change the unit of
measure for distance dis-
tance/fuel consumption. (If
equipped)
On/off can be selected to
sound beeps.
Select to change the screen
color.
Select to change the keyboard layout.
Select to change the capacitive touch button sensor sensitivity.
The animation effect for the screen can be set to on/off.
Select to delete personal data. ( ÔÇÆP. 282)
Select to update program versions. For details, contact your
Toyota dealer.
Select to display the software info rmation. Notices related to third
party software used in this pr oduct are enlisted. (This includes
instructions for obtaining such software, where applicable.)
‚ñÝ To return to the default settings
Select “Default”, and then “Yes”.
Settings are available for adjusting the operation sounds,
screen animation, etc.
Screen for general settings
1
2
1
2
3
4
5
6
7
8
9
10
Page 282 of 624
2825-2. Setup
PRIUS v_OM_OM47B23U_(U)
Select “Delete Personal Data” on the “General Settings” screen.
Select “Delete”.
Check carefully beforehand, as data cannot be retrieved once deleted.
A confirmation screen will be displayed. Select “Yes”.
The following personal data will be deleted or changed to its default
settings.
• Audio settings
• Phone settings
Delete personal data
1
2
3
Page 283 of 624
283
PRIUS v_OM_OM47B23U_(U)
5-2. Setup
5
Audio system
Audio settings
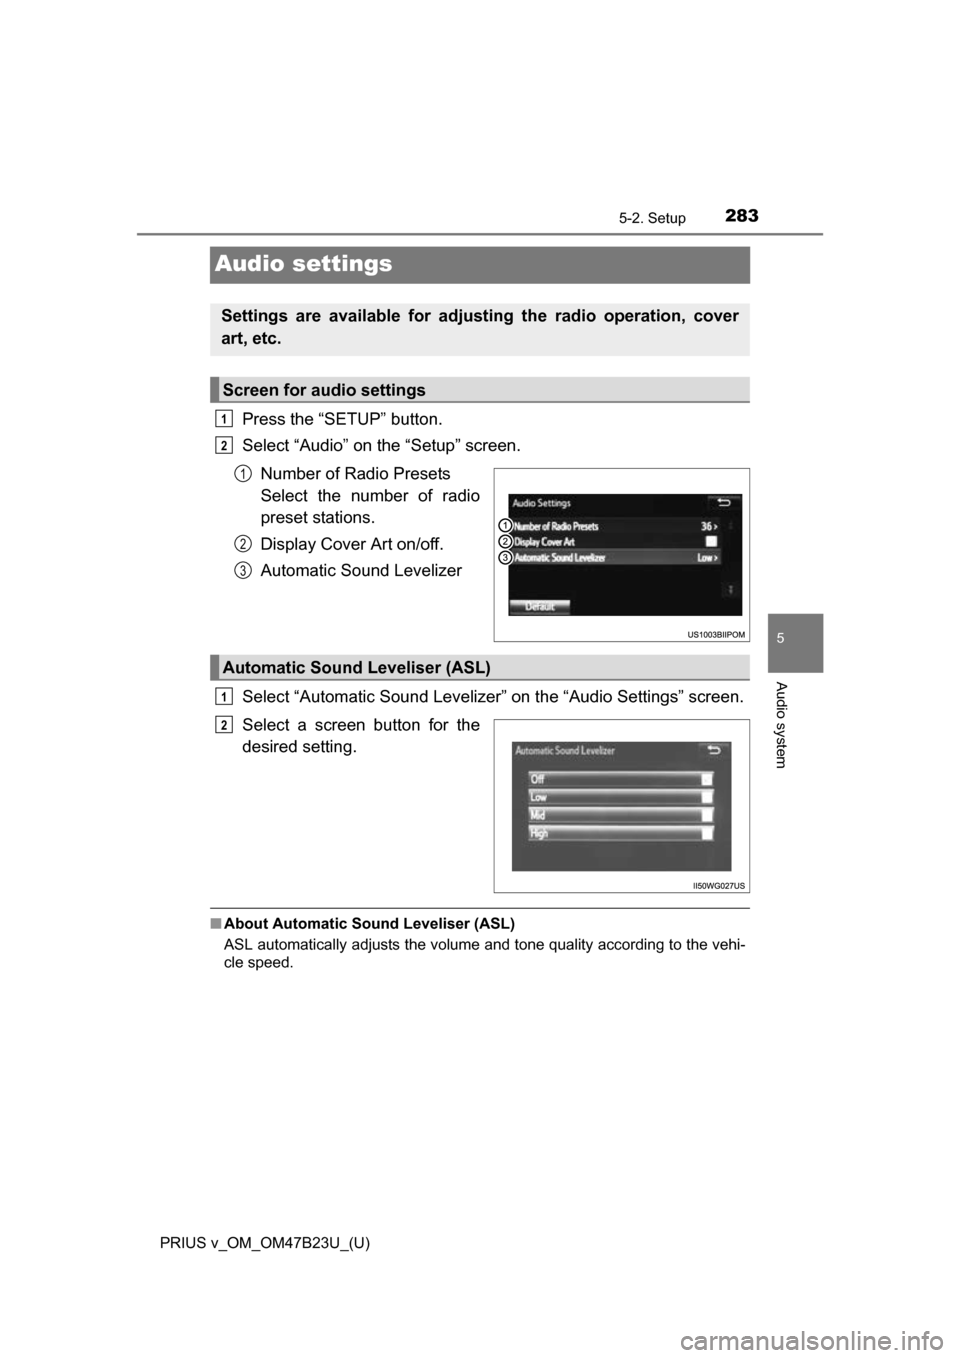
Press the “SETUP” button.
Select “Audio” on the “Setup” screen.Number of Radio Presets
Select the number of radio
preset stations.
Display Cover Art on/off.
Automatic Sound Levelizer
Select “Automatic Sound Levelizer” on the “Audio Settings” screen.
Select a screen button for the
desired setting.
‚ñÝ About Automatic Sou nd Leveliser (ASL)
ASL automatically adjusts the volume and tone quality according to the vehi-
cle speed.
Settings are available for adjusting the radio operation, cover
art, etc.
Screen for audio settings
1
2
1
2
3
Automatic Sound Leveliser (ASL)
1
2
Page 284 of 624
284
PRIUS v_OM_OM47B23U_(U)
5-2. Setup
Display settings
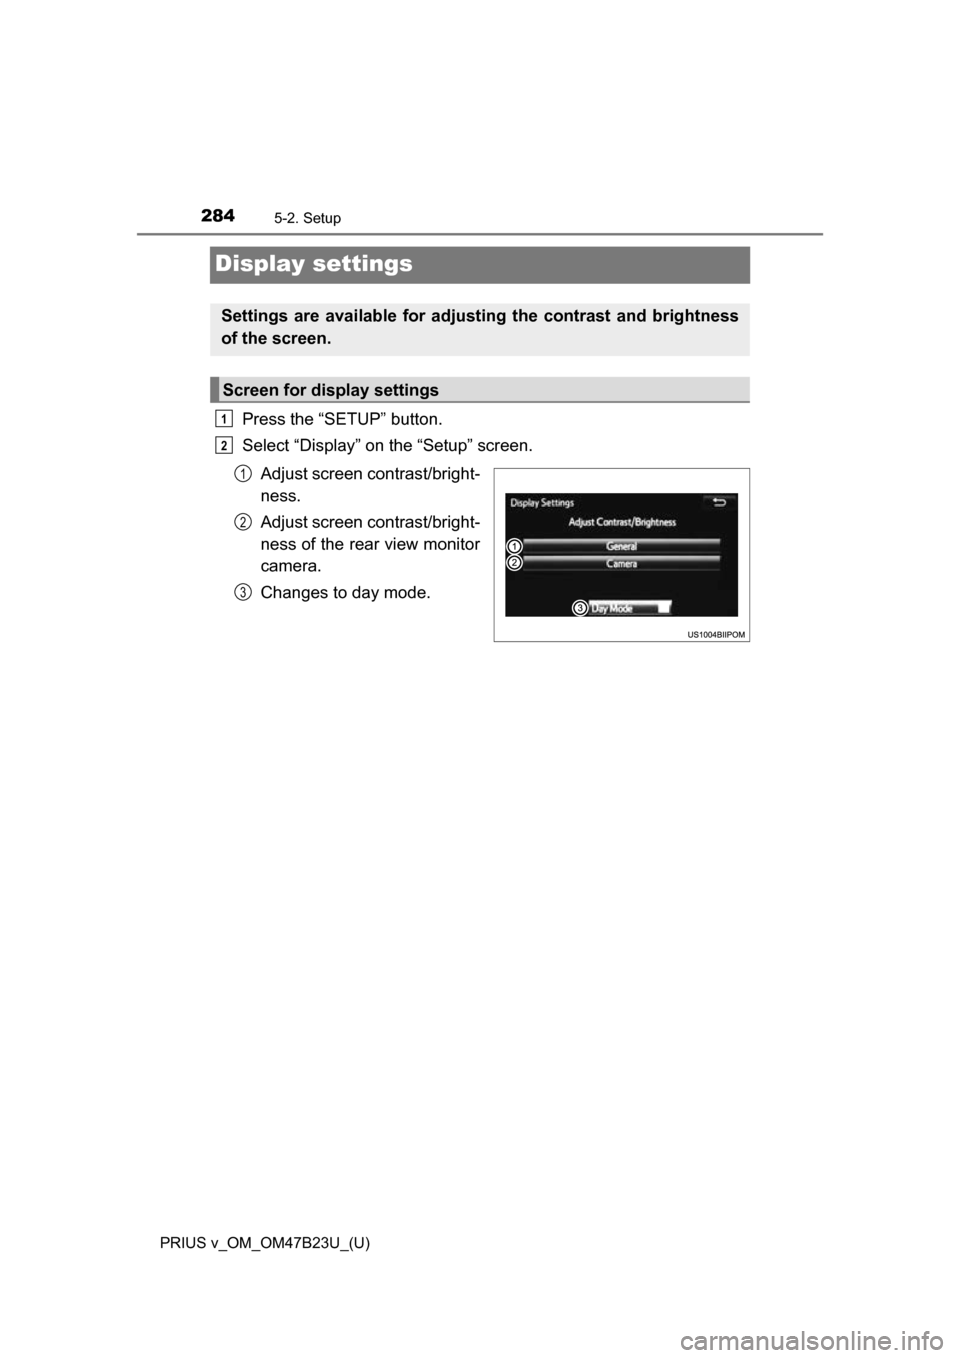
Press the “SETUP” button.
Select “Display” on the “Setup” screen.Adjust screen contrast/bright-
ness.
Adjust screen contrast/bright-
ness of the rear view monitor
camera.
Changes to day mode.
Settings are available for adjusting the contrast and brightness
of the screen.
Screen for display settings
1
2
1
2
3
Page 285 of 624
PRIUS v_OM_OM47B23U_(U)
2855-2. Setup
5
Audio system
Select “General” or “Camera” on the “Display Settings” screen.
Adjust the display as desired by selecting “+” or “-”.
When the headlights are turned on, the screen dims.
However, the screen can be switch ed to day mode by selecting “Day
Mode”.
The screen will stay in day mode when the headlights are turned on until
“Day Mode” is selected again.
Adjusting the screen contrast/brightness
Day mode
1
2
Page 286 of 624
286
PRIUS v_OM_OM47B23U_(U)
5-2. Setup
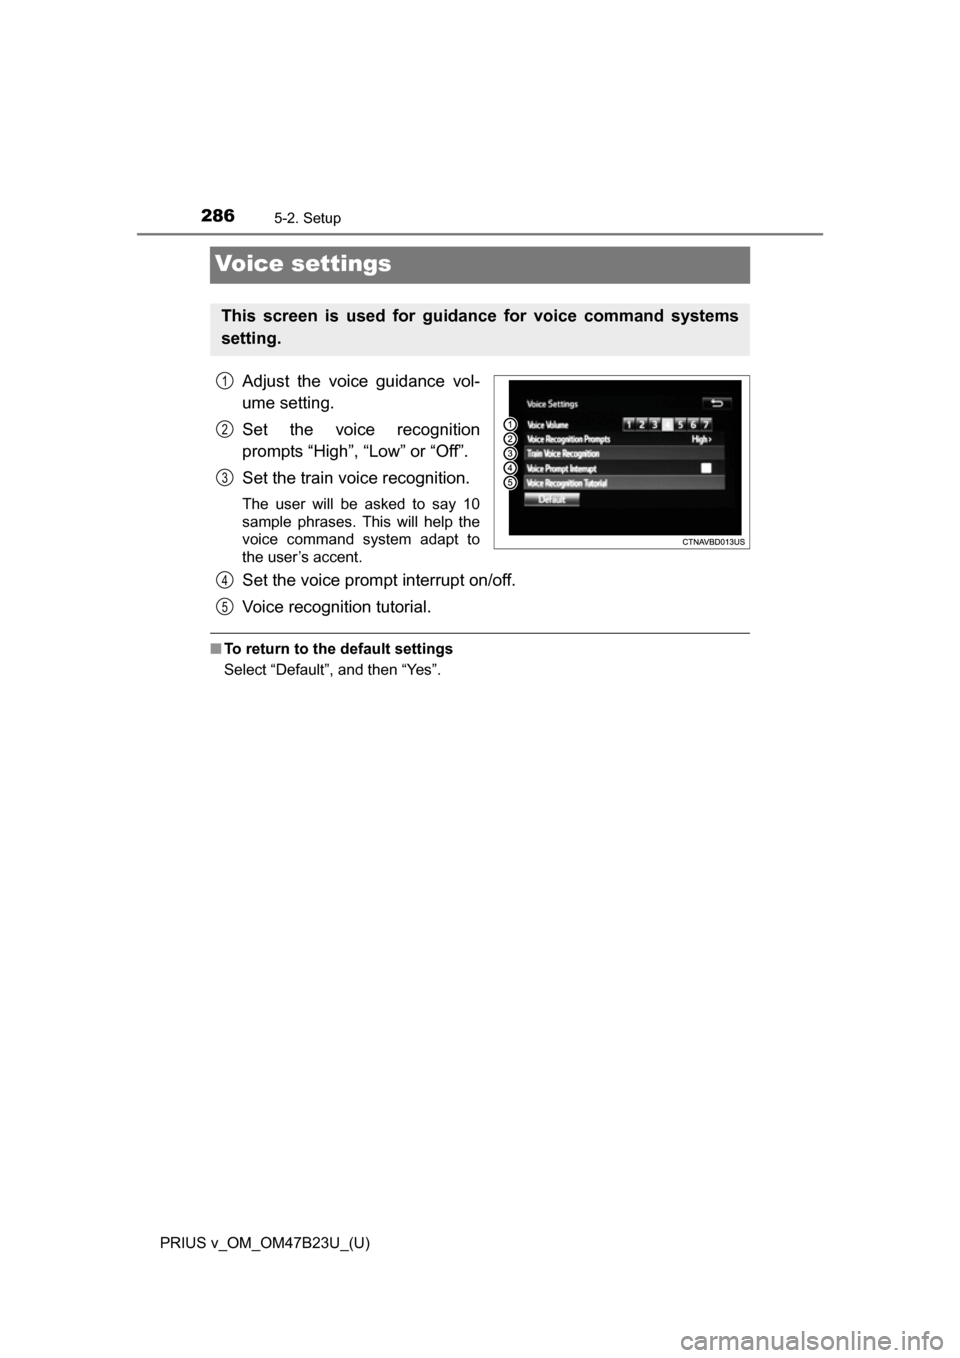
Voice settings
Adjust the voice guidance vol-
ume setting.
Set the voice recognition
prompts “High”, “Low” or “Off”.
Set the train voice recognition.
The user will be asked to say 10
sample phrases. This will help the
voice command system adapt to
the user’s accent.
Set the voice prompt interrupt on/off.
Voice recognition tutorial.
‚ñÝTo return to the default settings
Select “Default”, and then “Yes”.
This screen is used for guidance for voice command systems
setting.
1
2
3
4
5
Page 287 of 624
287
PRIUS v_OM_OM47B23U_(U)
5-3. Using the Multimedia system
5
Audio system
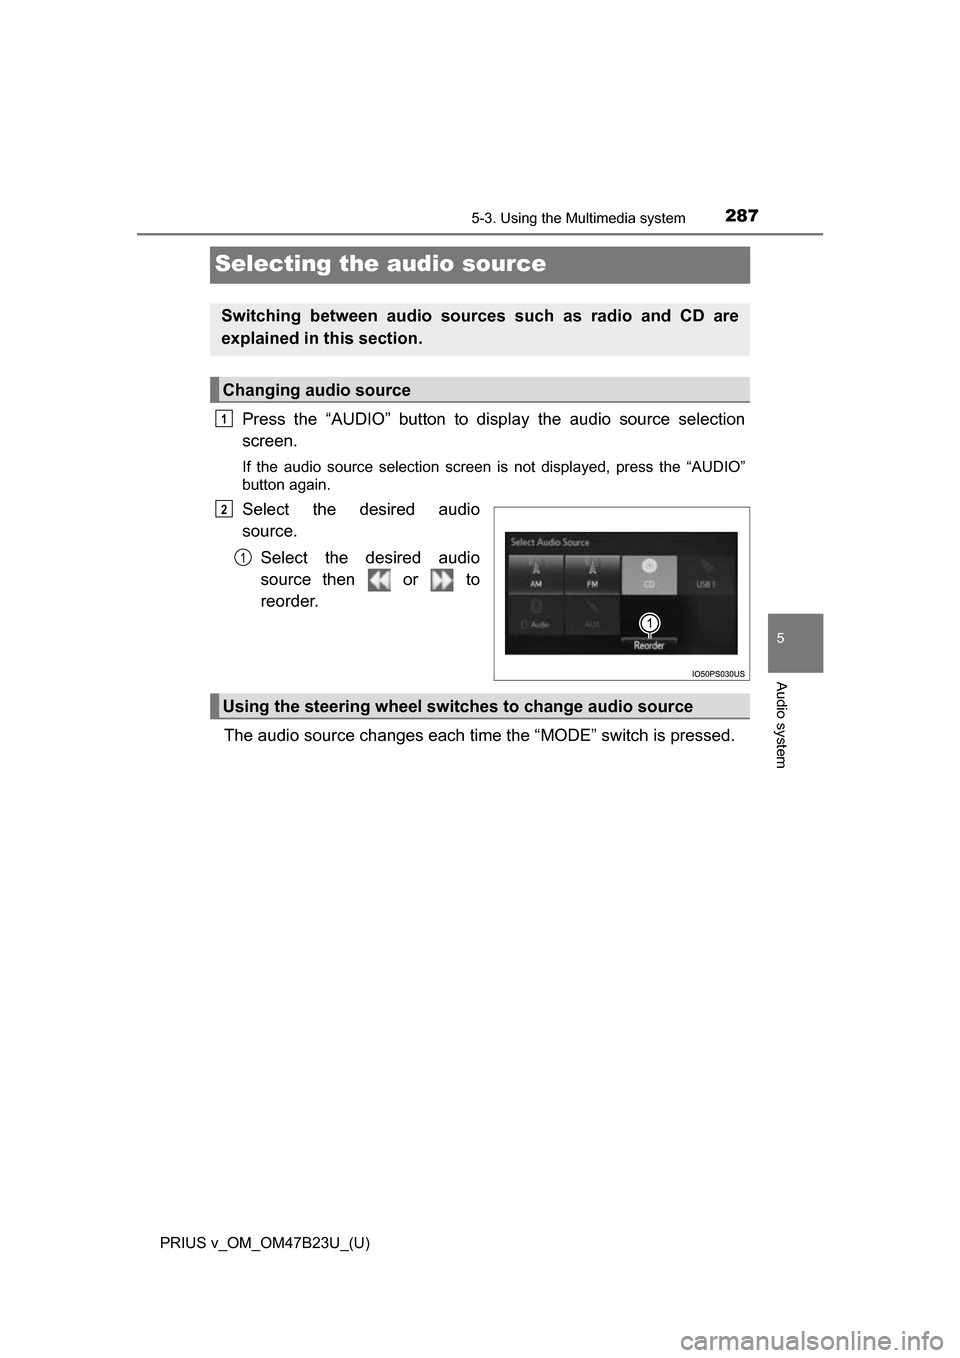
Selecting the audio source
Press the “AUDIO” button to disp lay the audio source selection
screen.
If the audio source selection screen is not displayed, press the “AUDIO”
button again.
Select the desired audio
source.
Select the desired audio
source then or to
reorder.
The audio source changes each time the “MODE” switch is pressed.
Switching between audio sources such as radio and CD are
explained in this section.
Changing audio source
1
2
1
Using the steering wheel switches to change audio source
Page 288 of 624
288
PRIUS v_OM_OM47B23U_(U)
5-3. Using the Multimedia system
List screen operation
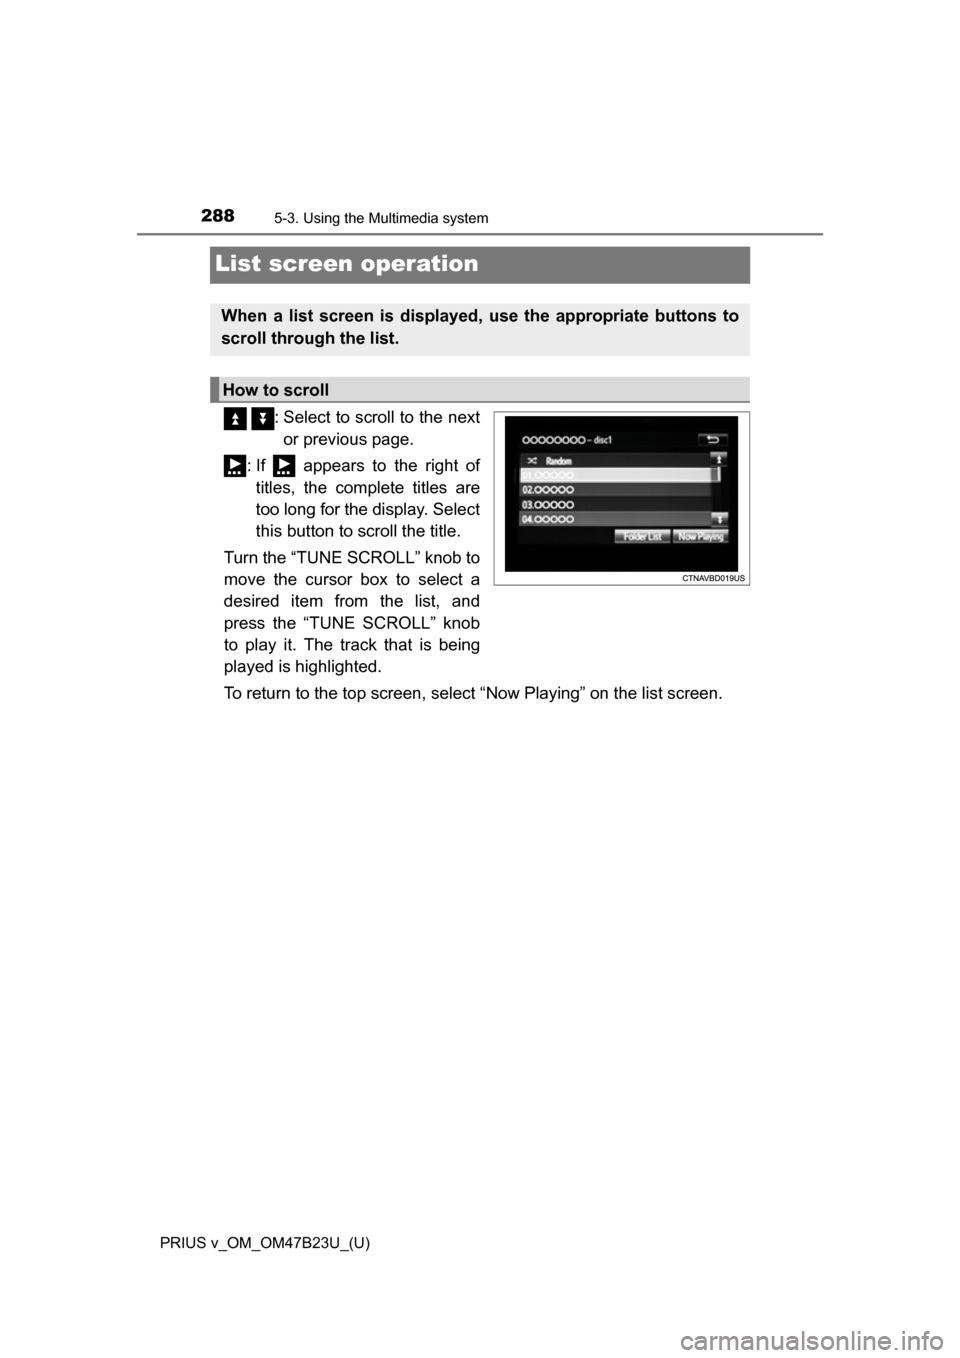
: Select to scroll to the nextor previous page.
: If appears to the right of titles, the complete titles are
too long for the display. Select
this button to scroll the title.
Turn the “TUNE SCROLL” knob to
move the cursor box to select a
desired item from the list, and
press the “TUNE SCROLL” knob
to play it. The track that is being
played is highlighted.
To return to the top screen, select “Now Playing” on the list screen.
When a list screen is displayed, use the appropriate buttons to
scroll through the list.
How to scroll
Page 289 of 624
PRIUS v_OM_OM47B23U_(U)
2895-3. Using the Multimedia system
5
Audio system
‚ñÝSelecting a track/file/song
Press the “” or “ ” button on “SEEK/TRACK” or turn the “TUNE
SCROLL” knob to select the desired track/file/song number.
To fast-forward or reverse, press and hold the “ ” or “ ” button on
“SEEK/TRACK”.
‚ñÝSelecting a track/file/song from the track/file/song list
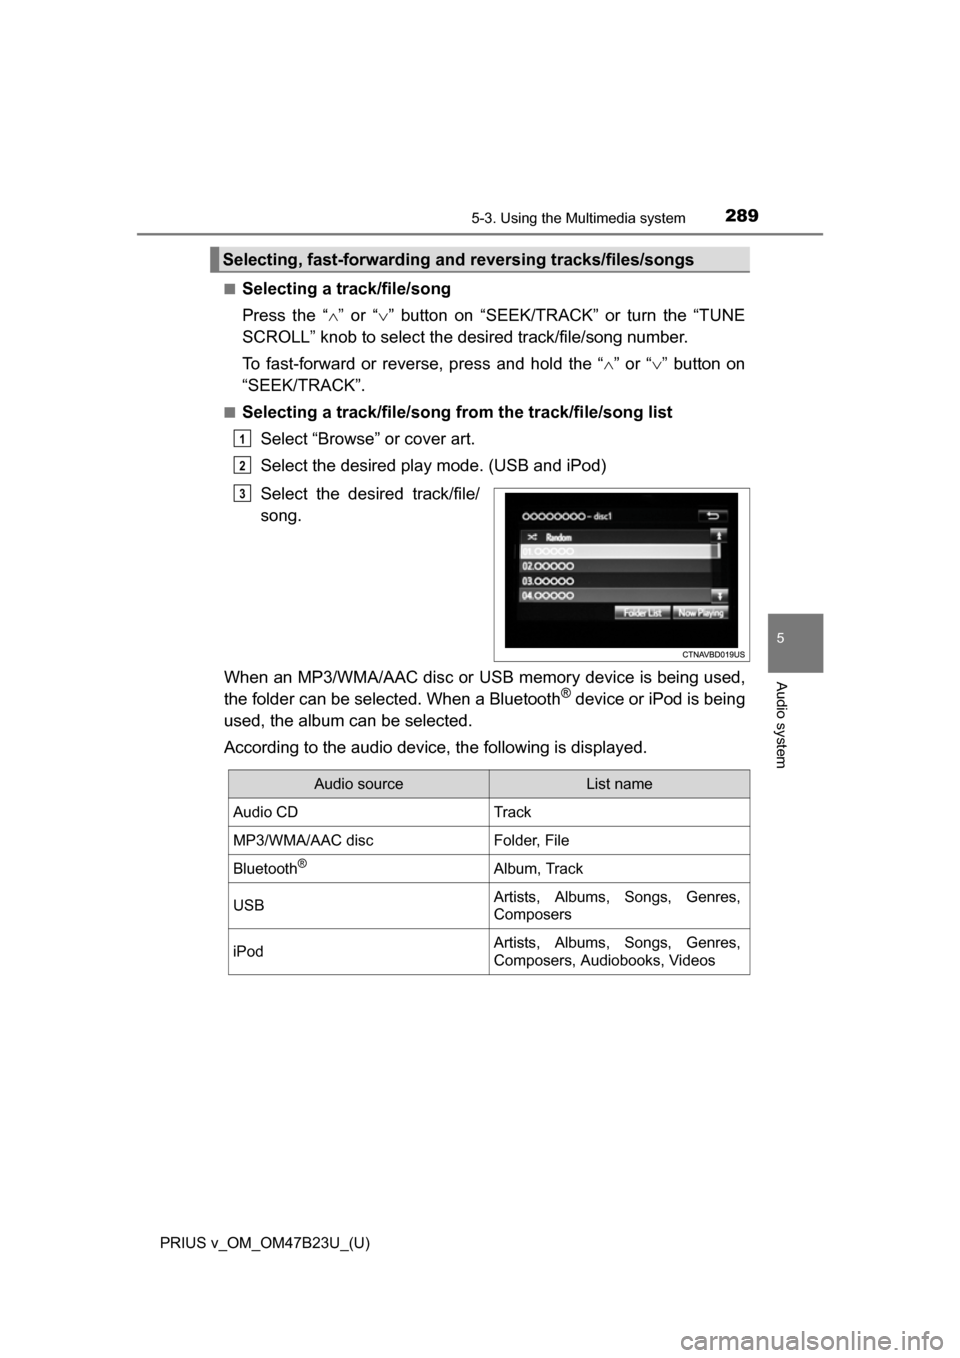
Select “Browse” or cover art.
Select the desired play mode. (USB and iPod)
Select the desired track/file/
song.
When an MP3/WMA/AAC disc or USB memory device is being used,
the folder can be selected. When a Bluetooth
® device or iPod is being
used, the album can be selected.
According to the audio device, the following is displayed.
Selecting, fast-forwarding a nd reversing tracks/files/songs
1
2
3
Audio sourceList name
Audio CDTrack
MP3/WMA/AAC discFolder, File
Bluetooth®Album, Track
USBArtists, Albums, Songs, Genres,
Composers
iPodArtists, Albums, Songs, Genres,
Composers, Audiobooks, Videos
Page 290 of 624
290
PRIUS v_OM_OM47B23U_(U)
5-3. Using the Multimedia system
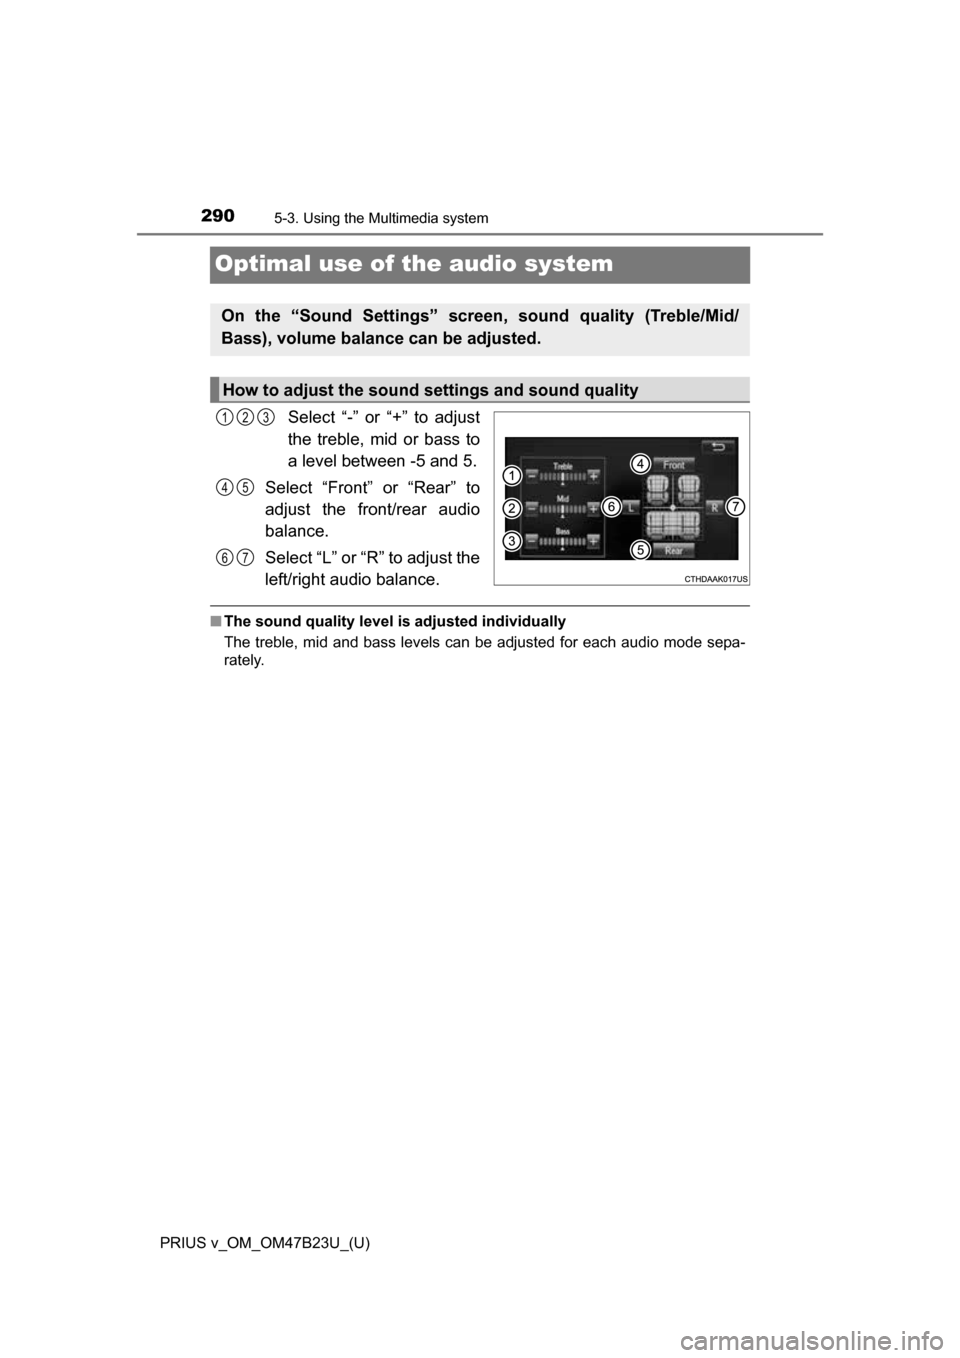
Optimal use of the audio system
Select “-” or “+” to adjust
the treble, mid or bass to
a level between -5 and 5.
Select “Front” or “Rear” to
adjust the front/rear audio
balance.
Select “L” or “R” to adjust the
left/right audio balance.
‚ñÝ The sound quality level is adjusted individually
The treble, mid and bass levels can be adjusted for each audio mode sepa-
rately.
On the “Sound Settings” screen, sound quality (Treble/Mid/
Bass), volume balance can be adjusted.
How to adjust the sound settings and sound quality
123
45
67
Trending: tow bar, heater, key, manual radio set, adding oil, air suspension, fuel consumption

