gearbox TOYOTA PROACE 2021 Owner's Guide
[x] Cancel search | Manufacturer: TOYOTA, Model Year: 2021, Model line: PROACE, Model: TOYOTA PROACE 2021Pages: 360, PDF Size: 70.79 MB
Page 183 of 360
183
Driving
6
NOTIC E
If the driver operates a direction indicator to overtake a slower vehicle, the cruise control allows the vehicle to temporarily approach the vehicle in front to assist the overtaking manoeuvre, without ever exceeding the speed setting.
WARNI NG
Some vehicles present on the road may not be properly seen or may be misinterpreted by the radar (e.g. a lorry), which may lead to a poor assessment of distance and lead to the vehicle accelerating or braking inappropriately.
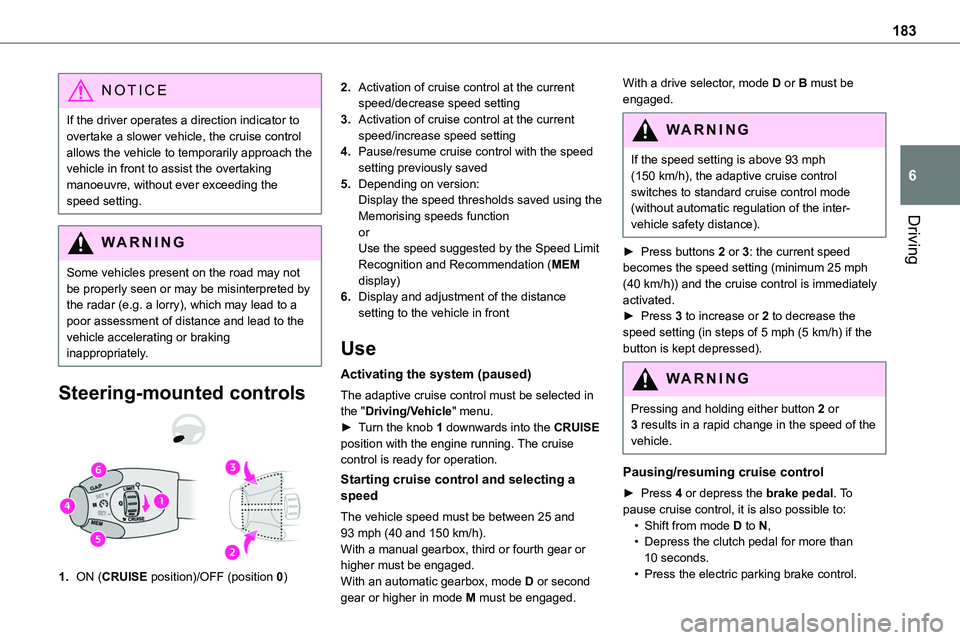
Steering-mounted controls
1.ON (CRUISE position)/OFF (position 0)
2.Activation of cruise control at the current speed/decrease speed setting
3.Activation of cruise control at the current speed/increase speed setting
4.Pause/resume cruise control with the speed setting previously saved
5.Depending on version:Display the speed thresholds saved using the Memorising speeds function
orUse the speed suggested by the Speed Limit Recognition and Recommendation (MEM display)
6.Display and adjustment of the distance setting to the vehicle in front
Use
Activating the system (paused)
The adaptive cruise control must be selected in the "Driving/Vehicle" menu.► Turn the knob 1 downwards into the CRUISE position with the engine running. The cruise control is ready for operation.
Starting cruise control and selecting a speed
The vehicle speed must be between 25 and 93 mph (40 and 150 km/h).With a manual gearbox, third or fourth gear or higher must be engaged.With an automatic gearbox, mode D or second gear or higher in mode M must be engaged.
With a drive selector, mode D or B must be engaged.
WARNI NG
If the speed setting is above 93 mph (150 km/h), the adaptive cruise control switches to standard cruise control mode (without automatic regulation of the inter-vehicle safety distance).
► Press buttons 2 or 3: the current speed becomes the speed setting (minimum 25 mph (40 km/h)) and the cruise control is immediately activated.► Press 3 to increase or 2 to decrease the speed setting (in steps of 5 mph (5 km/h) if the button is kept depressed).
WARNI NG
Pressing and holding either button 2 or 3 results in a rapid change in the speed of the vehicle.
Pausing/resuming cruise control
► Press 4 or depress the brake pedal. To pause cruise control, it is also possible to:• Shift from mode D to N,• Depress the clutch pedal for more than 10 seconds.• Press the electric parking brake control.
Page 188 of 360
188
Operation
The system operates subject to the following conditions:– The vehicle's speed does not exceed 37 mph (60 km/h) when a pedestrian is detected.– The vehicle's speed does not exceed 50 mph (80 km/h) when a stationary vehicle or a cyclist is detected.– The vehicle's speed is between 6 mph and
53 mph (10 km/h and 85 km/h) (versions with camera only) or 87 mph (140 km/h) (versions with camera and radar) when a moving vehicle is detected.This warning lamp flashes (for approximately 10 seconds) as soon as the function applies the vehicle’s brakes.With an automatic gearbox, in the event of automatic emergency braking bringing the vehicle to a complete stop, keep the brake pedal depressed to prevent the vehicle from moving off again.With a manual gearbox, in the event of automatic emergency braking bringing the vehicle to a complete stop, the engine may stall.
NOTIC E
The driver can maintain control of the vehicle
at any time by firmly turning the steering wheel and/or firmly depressing the accelerator pedal.
NOTIC E
Operation of the function may be felt by slight vibration in the brake pedal.If the vehicle comes to a complete stop, automatic braking is maintained for 1 to 2 seconds.
Deactivation/Activation
By default, the system is automatically activated at every engine start.It is set via the vehicle configuration menu.Deactivation of the system is signalled by the illumination of this warning lamp, accompanied by the display of a message.
Malfunction
In the event of a malfunction, this warning lamp comes on on the instrument panel, accompanied by the display of a message and an audible signal.Have it checked by any authorized Toyota retailer or Toyota authorized repairer, or any reliable repairer.If these warning lamps come on after the engine has been switched off and then restarted, contact any authorized Toyota retailer or Toyota authorized repairer, or any reliable repairer to have the system checked.
These warning lamps light up on the instrument panel to indicate that the driver's and/or front passenger's seat belt is not fastened (depending on version).
Lane departure warning
system
WARNI NG
Refer to the General recommendations on the use of driving and manoeuvring aids.
System that uses a camera to recognise continuous or broken lines on traffic lanes and triggers an alert if the vehicle wanders off line. If the direction indicator is not used at speeds above 50 mph (80 km/h) and there is a risk of one of these lines on the road surface being crossed, the system triggers the alert.This system is particularly useful on motorways and main roads.
Page 221 of 360
221
Practical information
7
NOTIC E
New vehicleDuring the first few particle filter regeneration operations, you may notice a "burning" smell. This is perfectly normal.
Manual gearbox
The gearbox does not require any maintenance (no oil change).
Automatic gearbox
The gearbox does not require any maintenance (no oil change).
Drive selector (Electric)
The drive selector does not require any maintenance.
Manual parking brake
If you notice excessive brake lever travel or decreased effectiveness, the parking brake must be adjusted, even between two services.This system must be checked by any authorized Toyota retailer or Toyota authorized repairer, or any reliable repairer.
Electric parking brake
This system does not require any routine servicing. However, in the event of a
problem, do not hesitate to have the system checked by a TOYOTA dealer or a qualified workshop.
NOTIC E
For more information on the Electric parking brake, refer to the corresponding section.
Brake pads
Brake wear depends on the style of driving, particularly in the case of vehicles used in town, over short distances. It may be necessary to have the condition of the brakes checked, even between vehicle services.Unless there is a leak in the circuit, a drop in the brake fluid level indicates that the brake pads are worn.
NOTIC E
After washing the vehicle, moisture, or in wintry conditions, ice can form on the brake discs and pads: braking efficiency may be reduced. Gently dab the brakes to dry and defrost them.
Brake disc/drum wear
For any information on checking brake disc/drum wear, contact any authorized Toyota retailer or Toyota authorized repairer, or any reliable repairer.
Wheels and tyres
The inflation pressure of all tyres, including the spare wheel, must be checked on "cold” tyres.The pressures indicated on the tyre pressure label are valid for "cold" tyres. If you have driven for more than 10 minutes or more than 10 km (6 miles) at over 50 km/h (31 mph), add 0.3 bar (30 kPa) to the values indicated on the label.
WARNI NG
Under-inflation increases fuel consumption. Non-compliant tyre pressure causes premature wear on tyres and has an adverse effect on the vehicle's road holding - risk of an accident!
Driving with worn or damaged tyres reduces the braking and road holding performance of the vehicle. It is recommended to regularly check the condition of the tyres (tread and sidewalls) and wheel rims as well as the presence of the valves.When the wear indicators no longer appear set back from the tread, the depth of the grooves is less than 1.6 mm; it is imperative to replace the tyres.Using different size wheels and tyres from those specified can affect the lifetime of tyres, wheel
rotation, ground clearance, the speedometer reading and have an adverse effect on road holding.
Page 225 of 360
225
Practical information
7
Free-wheeling
In certain situations, you must allow the vehicle to free-wheel (while being towed, on a rolling road, in an automatic car wash, or being transported by rail or sea freight, etc.).The procedure varies according to the type of gearbox and parking brake.
WARNI NG
Never leave the vehicle unattended with the vehicle into free-wheeling mode.
With manual or automatic
gearbox and manual parking
brake /
To release them
► With the vehicle stationary and engine running, depress the brake pedal.► With a manual gearbox, place the gear lever into neutral.► With an automatic gearbox, place the gear selector to mode N.► Release the parking brake.
► Release the brake pedal, then switch off the engine.
Reverting to normal operation
► Apply the parking brake.► With an automatic gearbox, place the gear selector to mode P.
With a manual gearbox and
electric parking brake /
To release them
► With the engine running and while depressing the brake pedal, move the gear selector to the neutral position.► While depressing the brake pedal, switch off the engine.► Release the brake pedal, then switch on the ignition.► While depressing the brake pedal, press the control lever to release the parking brake.► Release the brake pedal, then switch off the ignition.
Reverting to normal operation
► While depressing the brake pedal, restart the engine and apply the parking brake.
With an automatic gearbox
and electric parking brake /
To release them
► With the engine running and while depressing the brake pedal, set the gear selector to N.► While depressing the brake pedal, switch off
the engine.► Release the brake pedal, then switch on the ignition.► While depressing the brake pedal, press the control lever to release the parking brake.► Release the brake pedal, then switch off the ignition.
Reverting to normal operation
► While depressing the brake pedal, restart the engine, then set the gear selector to P.
Page 237 of 360
237
In the event of a breakdown
8
Original tyre sizeCompact-MediumLong
215/65 R16Placing a 225 wheel in the carrier is prohibited.
There is no restriction.215/60 R17
215/60 R17 M&S
225/55 R17Placing a 215 wheel in the carrier is not recommended (risk of noise).
NOTIC E
A punctured tyre of size 215 or 225 can be placed in the carrier.
Removing a wheel
WARNI NG
Parking the vehicleImmobilise the vehicle where it does not obstruct traffic: the ground must be level, stable and non-slippery.With a manual gearbox, engage first gear
then switch off the ignition to block the wheels.With an automatic gearbox, place the gear selector in position P then switch off the ignition to block the wheels. With a drive selector, place the gear selector in position P then switch off the ignition to block the wheels.Apply the parking brake, unless it is programmed to automatic mode (for an electric parking brake), and check that the indicator lamp lights up on the instrument panel.Ensure that the occupants have left the vehicle and are located in a safe place.Never go underneath a vehicle raised using a jack; use an axle stand.With an electric parking brake, place a chock against the wheel diagonally opposite to the one being replaced.
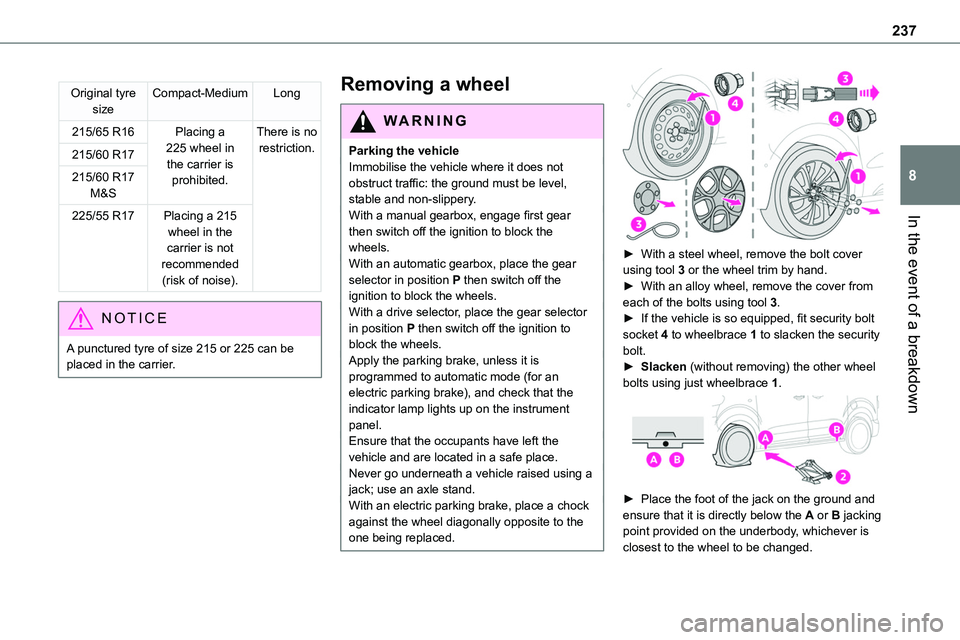
► With a steel wheel, remove the bolt cover using tool 3 or the wheel trim by hand.► With an alloy wheel, remove the cover from each of the bolts using tool 3.► If the vehicle is so equipped, fit security bolt socket 4 to wheelbrace 1 to slacken the security bolt.► Slacken (without removing) the other wheel bolts using just wheelbrace 1.
► Place the foot of the jack on the ground and ensure that it is directly below the A or B jacking point provided on the underbody, whichever is closest to the wheel to be changed.
Page 249 of 360
249
In the event of a breakdown
8
Starting using another
battery
If the vehicle's battery is flat, the engine can be started using a backup battery (either external or from another vehicle) and jump leads or using a battery booster.
WARNI NG
Never start the engine by connecting a battery charger.Never use a 24 V or higher battery booster.Check beforehand that the backup battery has a nominal voltage of 12 V and a capacity at least equal to that of the discharged battery.The two vehicles must not be in contact with each other.Switch off all electricity-consuming equipment on both vehicles (audio system, wipers, lighting, etc.).Make sure that the jump leads are well away from the engine’s moving parts (fan, belt, etc.).Do not disconnect the (+) terminal while the engine is running.
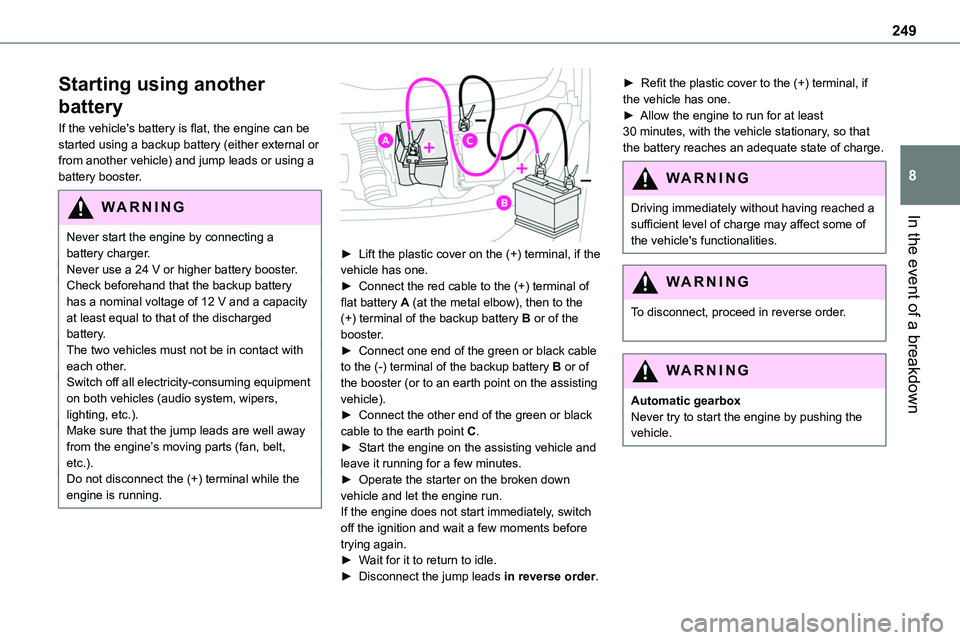
► Lift the plastic cover on the (+) terminal, if the vehicle has one.► Connect the red cable to the (+) terminal of flat battery A (at the metal elbow), then to the (+) terminal of the backup battery B or of the booster.► Connect one end of the green or black cable to the (-) terminal of the backup battery B or of the booster (or to an earth point on the assisting vehicle).► Connect the other end of the green or black
cable to the earth point C.► Start the engine on the assisting vehicle and leave it running for a few minutes.► Operate the starter on the broken down vehicle and let the engine run.If the engine does not start immediately, switch off the ignition and wait a few moments before trying again.► Wait for it to return to idle.► Disconnect the jump leads in reverse order.
► Refit the plastic cover to the (+) terminal, if the vehicle has one.► Allow the engine to run for at least 30 minutes, with the vehicle stationary, so that the battery reaches an adequate state of charge.
WARNI NG
Driving immediately without having reached a sufficient level of charge may affect some of the vehicle's functionalities.
WARNI NG
To disconnect, proceed in reverse order.
WARNI NG
Automatic gearboxNever try to start the engine by pushing the vehicle.
Page 252 of 360
252
Towing
Procedure for having your vehicle towed or for towing another vehicle using a removable mechanical device.
NOTIC E
General recommendationsObserve the legislation in force in the country
where you are driving.Ensure that the weight of the towing vehicle is higher than that of the towed vehicle.The driver must remain at the wheel of the towed vehicle and must have a valid driving licence.When towing a vehicle with all four wheels on the ground, always use an approved towbar; ropes and straps are prohibited.The towing vehicle must move off gently.When the vehicle is towed with its engine off, there is no longer braking and steering assistance.
WARNI NG
A professional recovery service must be called if:– broken down on a motorway or main road;– not possible to put the gearbox into neutral, unlock the steering, or release the parking brake;– not possible to tow a vehicle with an
automatic gearbox, with the engine running;– towing with only two wheels on the ground;– four-wheel drive vehicle;– no approved towbar available.
WARNI NG
Before towing the vehicle, it is essential to put the vehicle in free-wheeling mode.For more information on Free-wheeling, refer to the corresponding section.
NOTIC E
Electric motorAn electric vehicle cannot under any circumstances be used to tow another vehicle.However, it may be used, for example, to exit a rut.
WARNI NG
With a manual gearbox, place the gear lever in neutral.With an automatic gearbox, place the gear selector in position N.Failure to adhere to this instruction may lead to damage to some braking components and the lack of braking assistance on restarting the engine.
Page 253 of 360
253
In the event of a breakdown
8
Towing constraints
Type of vehicle(engine/gearbox)Front wheels on the groundRear wheels on the groundFlatbed4 wheels on the ground with towbar
Internal combustion/Manual
Internal combustion/Automatic
Electric
NOTIC E
In case of battery or electric parking brake failure, it is essential to call a professional using flatbed recovery vehicles (excluding manual gearbox).
Accessing the eye
The towing eye is stowed in the tool box.
NOTIC E
For more information on the Tool box, refer to the corresponding section.
Towing your vehicle
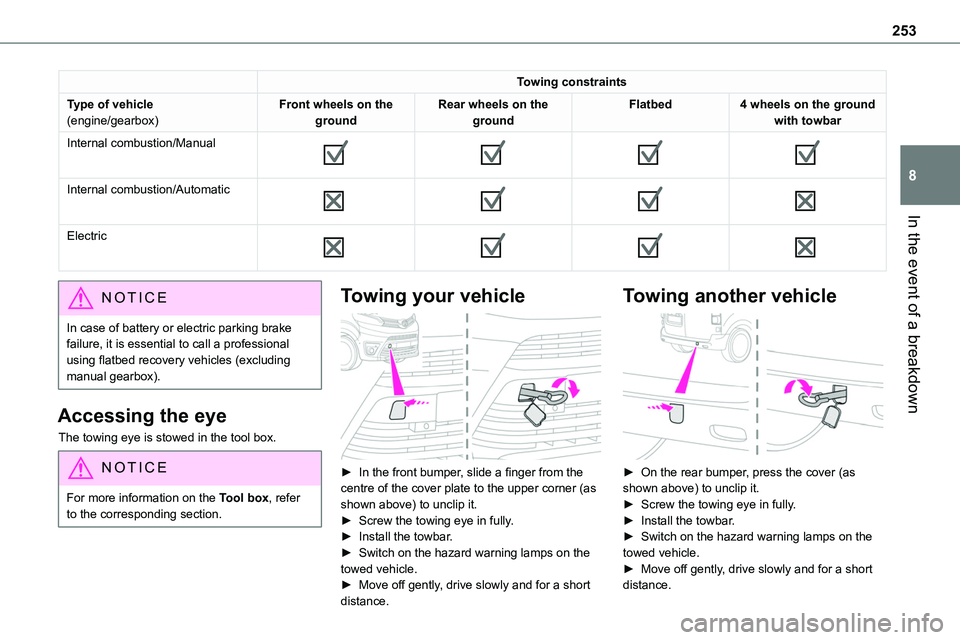
► In the front bumper, slide a finger from the centre of the cover plate to the upper corner (as shown above) to unclip it.► Screw the towing eye in fully.► Install the towbar.► Switch on the hazard warning lamps on the towed vehicle.
► Move off gently, drive slowly and for a short distance.
Towing another vehicle
► On the rear bumper, press the cover (as shown above) to unclip it.► Screw the towing eye in fully.► Install the towbar.► Switch on the hazard warning lamps on the towed vehicle.► Move off gently, drive slowly and for a short
distance.
Page 255 of 360
255
Technical data
9
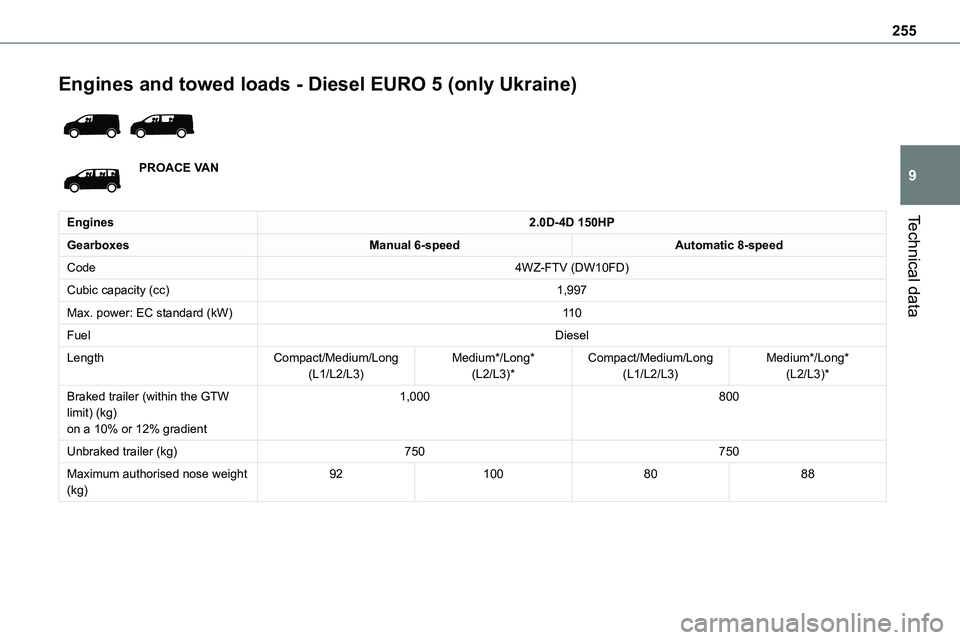
Engines and towed loads - Diesel EURO 5 (only Ukraine)
PROACE VAN
Engines2.0D-4D 150HP
GearboxesManual 6-speedAutomatic 8-speed
Code4WZ-FTV (DW10FD)
Cubic capacity (cc)1,997
Max. power: EC standard (kW)11 0
FuelDiesel
LengthCompact/Medium/Long(L1/L2/L3)Medium*/Long*(L2/L3)*Compact/Medium/Long(L1/L2/L3)Medium*/Long*(L2/L3)*
Braked trailer (within the GTW limit) (kg)on a 10% or 12% gradient
1,000800
Unbraked trailer (kg)750750
Maximum authorised nose weight (kg)921008088
Page 256 of 360
256
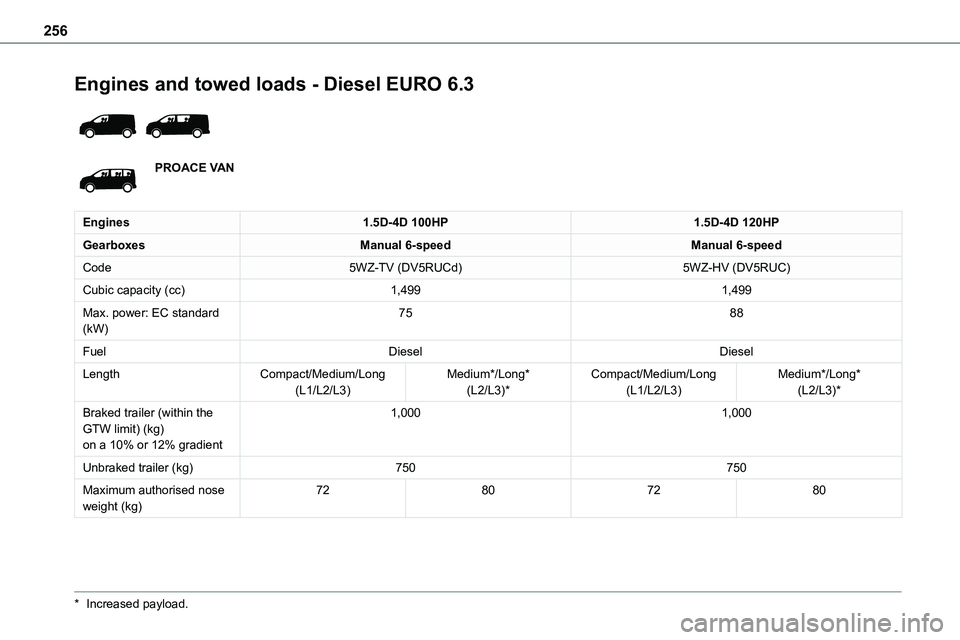
Engines and towed loads - Diesel EURO 6.3
PROACE VAN
Engines1.5D-4D 100HP1.5D-4D 120HP
GearboxesManual 6-speedManual 6-speed
Code5WZ-TV (DV5RUCd)5WZ-HV (DV5RUC)
Cubic capacity (cc)1,4991,499
Max. power: EC standard (kW)7588
FuelDieselDiesel
LengthCompact/Medium/Long(L1/L2/L3)Medium*/Long*(L2/L3)*Compact/Medium/Long(L1/L2/L3)Medium*/Long*(L2/L3)*
Braked trailer (within the GTW limit) (kg)on a 10% or 12% gradient
1,0001,000
Unbraked trailer (kg)750750
Maximum authorised nose weight (kg)72807280
* Increased payload.