tow TOYOTA PROACE 2022 (in English) User Guide
[x] Cancel search | Manufacturer: TOYOTA, Model Year: 2022, Model line: PROACE, Model: TOYOTA PROACE 2022Pages: 360, PDF Size: 70.79 MB
Page 56 of 360
56
2-seat front bench seat
If fitted in the vehicle, this is fixed and has a seat belt built into the backrest for the seat next to the driver’s seat.
NOTIC E
For more information on the Seat belts, refer to the corresponding section.
Under-seat storage
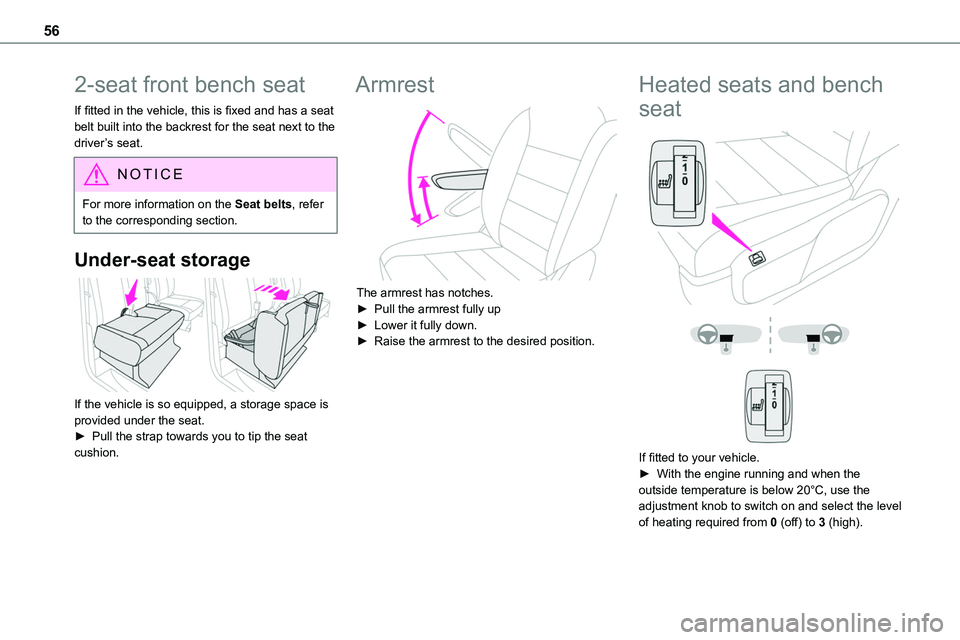
If the vehicle is so equipped, a storage space is provided under the seat.► Pull the strap towards you to tip the seat cushion.
Armrest
The armrest has notches.► Pull the armrest fully up► Lower it fully down.► Raise the armrest to the desired position.
Heated seats and bench
seat
If fitted to your vehicle.► With the engine running and when the outside temperature is below 20°C, use the adjustment knob to switch on and select the level of heating required from 0 (off) to 3 (high).
Page 58 of 360
58
Steering wheel
adjustment
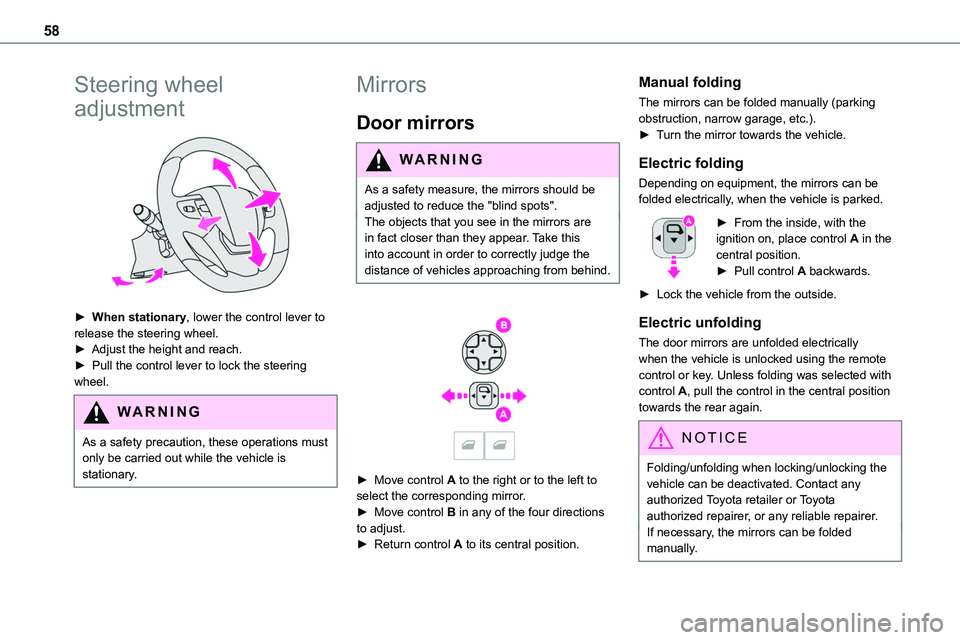
► When stationary, lower the control lever to release the steering wheel.► Adjust the height and reach.► Pull the control lever to lock the steering wheel.
WARNI NG
As a safety precaution, these operations must only be carried out while the vehicle is stationary.
Mirrors
Door mirrors
WARNI NG
As a safety measure, the mirrors should be adjusted to reduce the "blind spots".The objects that you see in the mirrors are
in fact closer than they appear. Take this into account in order to correctly judge the distance of vehicles approaching from behind.
► Move control A to the right or to the left to select the corresponding mirror.► Move control B in any of the four directions to adjust.
► Return control A to its central position.
Manual folding
The mirrors can be folded manually (parking obstruction, narrow garage, etc.).► Turn the mirror towards the vehicle.
Electric folding
Depending on equipment, the mirrors can be folded electrically, when the vehicle is parked.
► From the inside, with the ignition on, place control A in the central position.► Pull control A backwards.
► Lock the vehicle from the outside.
Electric unfolding
The door mirrors are unfolded electrically when the vehicle is unlocked using the remote control or key. Unless folding was selected with control A, pull the control in the central position towards the rear again.
NOTIC E
Folding/unfolding when locking/unlocking the vehicle can be deactivated. Contact any authorized Toyota retailer or Toyota authorized repairer, or any reliable repairer.If necessary, the mirrors can be folded manually.
Page 60 of 360
60
Smart Cargo
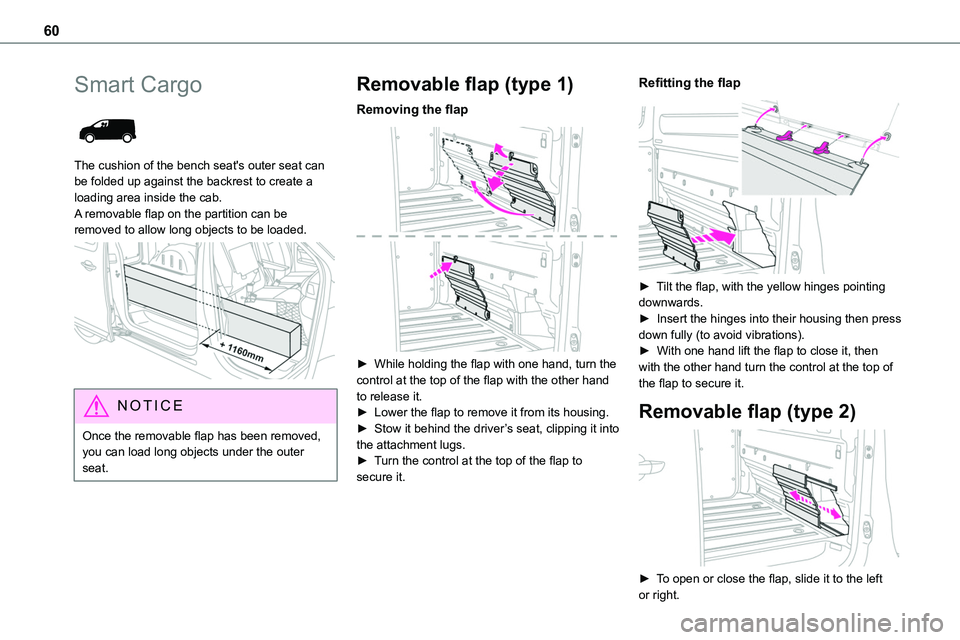
The cushion of the bench seat's outer seat can be folded up against the backrest to create a loading area inside the cab. A removable flap on the partition can be
removed to allow long objects to be loaded.
NOTIC E
Once the removable flap has been removed, you can load long objects under the outer seat.
Removable flap (type 1)
Removing the flap
► While holding the flap with one hand, turn the control at the top of the flap with the other hand to release it.► Lower the flap to remove it from its housing.► Stow it behind the driver’s seat, clipping it into
the attachment lugs.► Turn the control at the top of the flap to secure it.
Refitting the flap
► Tilt the flap, with the yellow hinges pointing downwards.► Insert the hinges into their housing then press down fully (to avoid vibrations).► With one hand lift the flap to close it, then with the other hand turn the control at the top of the flap to secure it.
Removable flap (type 2)
► To open or close the flap, slide it to the left or right.
Page 65 of 360
65
Ease of use and comfort
3
Fixed one-piece bench
seat
The different equipment and settings described hereafter vary according to the version and the configuration of your vehicle.
The bench seat has a one-piece backrest that may be fixed or foldable (table position).
NOTIC E
For more information on the Seat belts, refer to the corresponding section.
Access to row 3
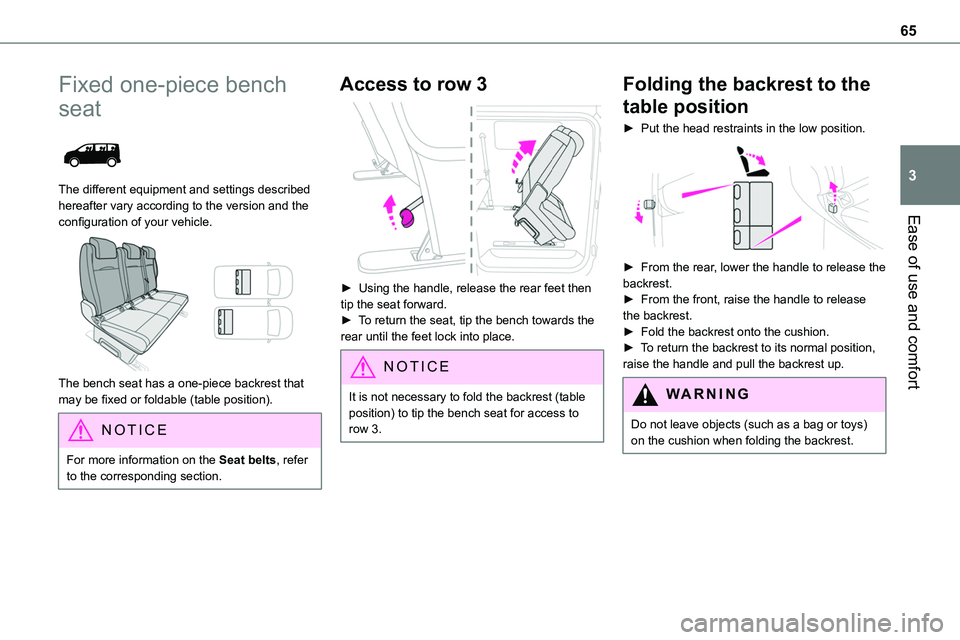
► Using the handle, release the rear feet then tip the seat forward.► To return the seat, tip the bench towards the rear until the feet lock into place.
NOTIC E
It is not necessary to fold the backrest (table position) to tip the bench seat for access to row 3.
Folding the backrest to the
table position
► Put the head restraints in the low position.
► From the rear, lower the handle to release the backrest.► From the front, raise the handle to release the backrest.► Fold the backrest onto the cushion.► To return the backrest to its normal position, raise the handle and pull the backrest up.
WARNI NG
Do not leave objects (such as a bag or toys)
on the cushion when folding the backrest.
Page 66 of 360
66
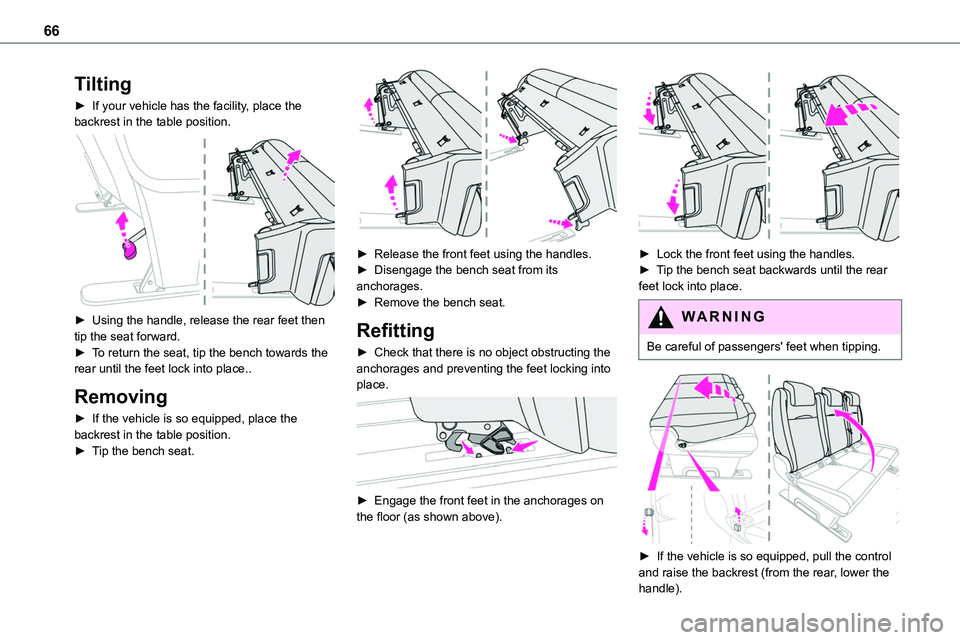
Tilting
► If your vehicle has the facility, place the backrest in the table position.
► Using the handle, release the rear feet then tip the seat forward.► To return the seat, tip the bench towards the rear until the feet lock into place..
Removing
► If the vehicle is so equipped, place the backrest in the table position.► Tip the bench seat.
► Release the front feet using the handles.► Disengage the bench seat from its anchorages.► Remove the bench seat.
Refitting
► Check that there is no object obstructing the anchorages and preventing the feet locking into place.
► Engage the front feet in the anchorages on the floor (as shown above).
► Lock the front feet using the handles.► Tip the bench seat backwards until the rear feet lock into place.
WARNI NG
Be careful of passengers' feet when tipping.
► If the vehicle is so equipped, pull the control and raise the backrest (from the rear, lower the handle).
Page 68 of 360
68
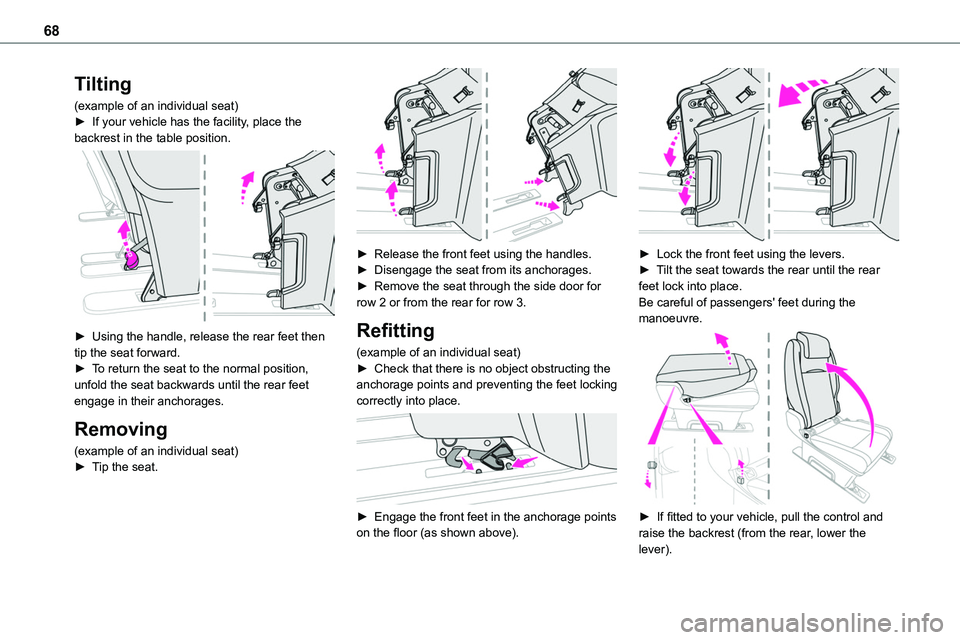
Tilting
(example of an individual seat)► If your vehicle has the facility, place the backrest in the table position.
► Using the handle, release the rear feet then tip the seat forward.► To return the seat to the normal position, unfold the seat backwards until the rear feet engage in their anchorages.
Removing
(example of an individual seat)► Tip the seat.
► Release the front feet using the handles.► Disengage the seat from its anchorages.► Remove the seat through the side door for row 2 or from the rear for row 3.
Refitting
(example of an individual seat)► Check that there is no object obstructing the anchorage points and preventing the feet locking correctly into place.
► Engage the front feet in the anchorage points on the floor (as shown above).
► Lock the front feet using the levers.► Tilt the seat towards the rear until the rear feet lock into place.Be careful of passengers' feet during the manoeuvre.
► If fitted to your vehicle, pull the control and raise the backrest (from the rear, lower the lever).
Page 75 of 360
75
Ease of use and comfort
3
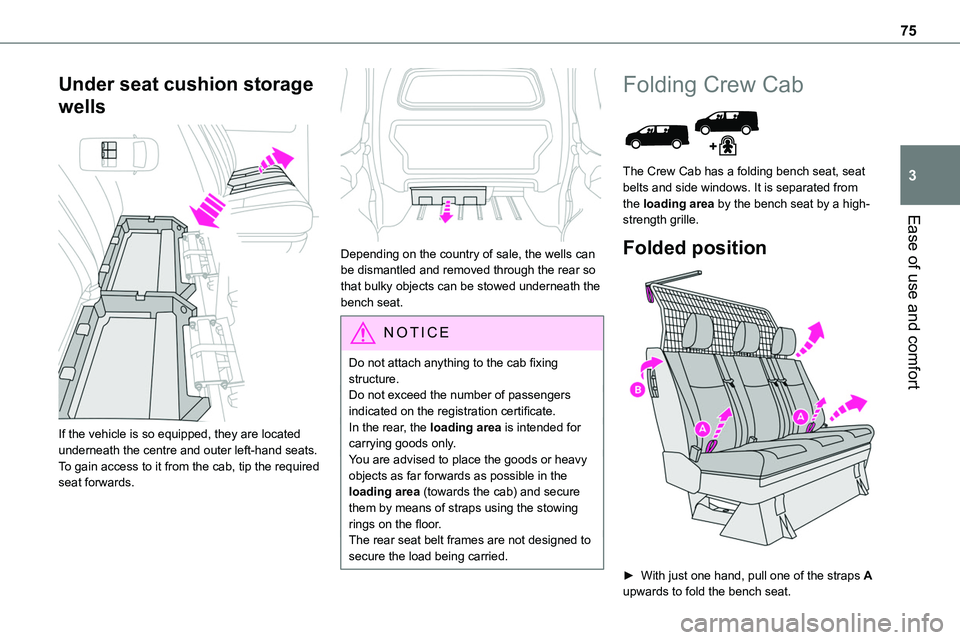
Under seat cushion storage
wells
If the vehicle is so equipped, they are located underneath the centre and outer left-hand seats.To gain access to it from the cab, tip the required seat forwards.
Depending on the country of sale, the wells can be dismantled and removed through the rear so that bulky objects can be stowed underneath the bench seat.
NOTIC E
Do not attach anything to the cab fixing structure.Do not exceed the number of passengers indicated on the registration certificate.In the rear, the loading area is intended for carrying goods only.You are advised to place the goods or heavy objects as far forwards as possible in the loading area (towards the cab) and secure them by means of straps using the stowing rings on the floor.The rear seat belt frames are not designed to secure the load being carried.
Folding Crew Cab
The Crew Cab has a folding bench seat, seat belts and side windows. It is separated from the loading area by the bench seat by a high-strength grille.
Folded position
► With just one hand, pull one of the straps A
upwards to fold the bench seat.
Page 76 of 360
76
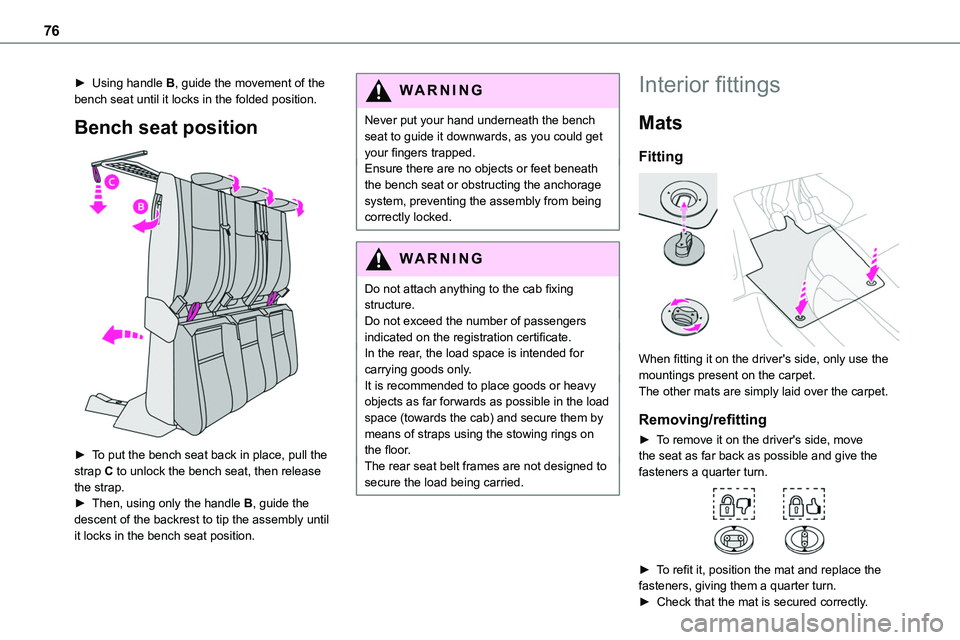
► Using handle B, guide the movement of the bench seat until it locks in the folded position.
Bench seat position
► To put the bench seat back in place, pull the strap C to unlock the bench seat, then release the strap.► Then, using only the handle B, guide the descent of the backrest to tip the assembly until
it locks in the bench seat position.
WARNI NG
Never put your hand underneath the bench seat to guide it downwards, as you could get your fingers trapped.Ensure there are no objects or feet beneath the bench seat or obstructing the anchorage system, preventing the assembly from being correctly locked.
WARNI NG
Do not attach anything to the cab fixing structure.Do not exceed the number of passengers indicated on the registration certificate.In the rear, the load space is intended for carrying goods only.It is recommended to place goods or heavy objects as far forwards as possible in the load space (towards the cab) and secure them by means of straps using the stowing rings on the floor.The rear seat belt frames are not designed to secure the load being carried.
Interior fittings
Mats
Fitting
When fitting it on the driver's side, only use the mountings present on the carpet.The other mats are simply laid over the carpet.
Removing/refitting
► To remove it on the driver's side, move the seat as far back as possible and give the fasteners a quarter turn.
► To refit it, position the mat and replace the
fasteners, giving them a quarter turn.► Check that the mat is secured correctly.
Page 78 of 360
78
Upper glove box
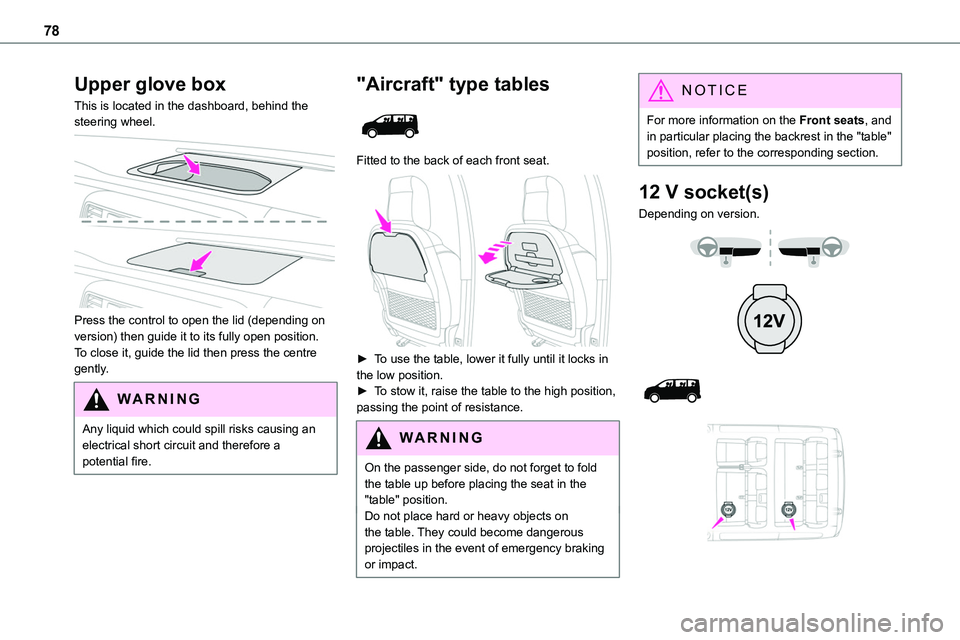
This is located in the dashboard, behind the steering wheel.
Press the control to open the lid (depending on version) then guide it to its fully open position.To close it, guide the lid then press the centre gently.
WARNI NG
Any liquid which could spill risks causing an electrical short circuit and therefore a potential fire.
"Aircraft" type tables
Fitted to the back of each front seat.
► To use the table, lower it fully until it locks in the low position.► To stow it, raise the table to the high position, passing the point of resistance.
WARNI NG
On the passenger side, do not forget to fold the table up before placing the seat in the "table" position.Do not place hard or heavy objects on the table. They could become dangerous projectiles in the event of emergency braking or impact.
NOTIC E
For more information on the Front seats, and in particular placing the backrest in the "table" position, refer to the corresponding section.
12 V socket(s)
Depending on version.
Page 80 of 360
80
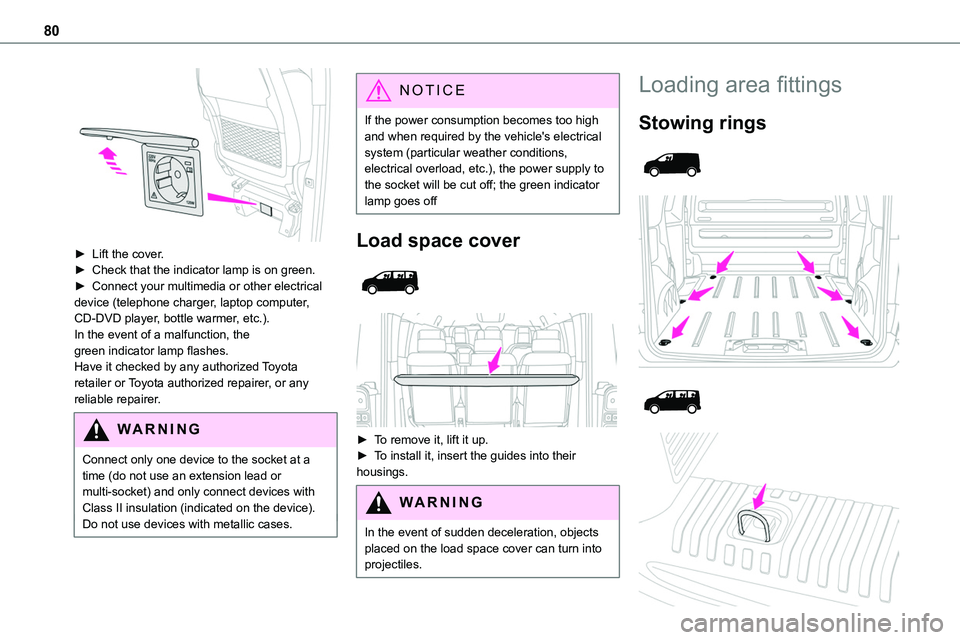
► Lift the cover.► Check that the indicator lamp is on green.► Connect your multimedia or other electrical device (telephone charger, laptop computer, CD-DVD player, bottle warmer, etc.).In the event of a malfunction, the green indicator lamp flashes.Have it checked by any authorized Toyota retailer or Toyota authorized repairer, or any reliable repairer.
WARNI NG
Connect only one device to the socket at a time (do not use an extension lead or multi-socket) and only connect devices with Class II insulation (indicated on the device).Do not use devices with metallic cases.
NOTIC E
If the power consumption becomes too high and when required by the vehicle's electrical system (particular weather conditions, electrical overload, etc.), the power supply to the socket will be cut off; the green indicator lamp goes off
Load space cover
► To remove it, lift it up.► To install it, insert the guides into their housings.
WARNI NG
In the event of sudden deceleration, objects placed on the load space cover can turn into projectiles.
Loading area fittings
Stowing rings