height TOYOTA PROACE CITY 2020 Owners Manual
[x] Cancel search | Manufacturer: TOYOTA, Model Year: 2020, Model line: PROACE CITY, Model: TOYOTA PROACE CITY 2020Pages: 272, PDF Size: 61.18 MB
Page 2 of 272
2
■Overview
Labels 4
■Eco-driving
Eco-coaching 8
1Instruments
Instrument Panel 9Warning and indicator lamps 11Indicators 16Trip computer 21Setting the date and time 22
2Access
Electronic key with remote control function and built-in key, 23Back-up procedures 30Central locking / unlocking 32Doors 34General recommendations for the sliding side
doors 35Rear roof flap 36Alarm 37Electric windows 39Tilting rear door windows 40
3Ease of use and comfort
General recommendations for the seats 41Front seats 41
Steering wheel adjustment 44
Mirrors 442-seat front bench seat 45Rear bench seat 47Interior fittings 48Extenso cabin 53Crew cab 55Heating and Ventilation 58Heating 59Manual air conditioning 59Dual-zone automatic air conditioning 60Front demisting - defrosting 62Rear screen and/or door mirrors demisting - defrosting 63Additional heating/ventilation system 63
4Lighting and visibility
Lighting control lever 67Direction indicators 68Automatic illumination of headlamps 68Daytime running lamps / Sidelamps 69Parking lamps 69Automatic headlamp dipping 70
Headlamp beam height adjustment 71Wiper control lever 71Changing a wiper blade 73Automatic wiping 74
5Safety
General safety recommendations 75Emergency or assistance call 75Hazard warning lamps 78
Horn 78Electronic stability control (ESC) 78Advanced Grip Control 80Hill Assist Descent Control 82Seat belts 83Airbags 85Child seats 88Deactivating the front passenger airbag 90Manual child lock 93Electric child lock 93
6Driving
Driving recommendations 95Starting/switching off the engine 97Manual parking brake 100Electric parking brake 101Hill start assist 1045-speed manual gearbox 1046-speed manual gearbox 105Automatic gearbox 105Gear efficiency indicator 109Stop & Start 109
Under-inflation detection 111Head-up display 11 3Driving and manoeuvring aids - General recommendations 11 4Speed Limit Recognition and Recommendation 11 6Speed limiter 11 9Cruise control - particular recommendations 121Programmable cruise control 122
Adaptive Cruise Control 124
Page 6 of 272
6
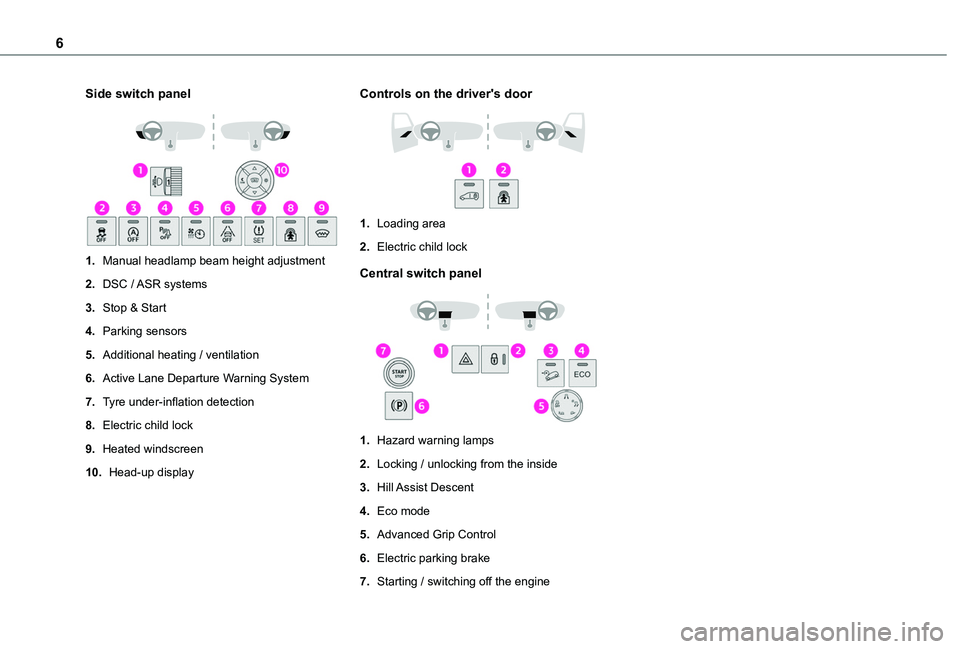
Side switch panel
1.Manual headlamp beam height adjustment
2.DSC / ASR systems
3.Stop & Start
4.Parking sensors
5.Additional heating / ventilation
6.Active Lane Departure Warning System
7.Tyre under-inflation detection
8.Electric child lock
9.Heated windscreen
10.Head-up display
Controls on the driver's door
1.Loading area
2.Electric child lock
Central switch panel
1.Hazard warning lamps
2.Locking / unlocking from the inside
3.Hill Assist Descent
4.Eco mode
5.Advanced Grip Control
6.Electric parking brake
7.Starting / switching off the engine
Page 37 of 272

37
Access
2
WARNI NG
Never fasten a load to the roof flap.
WARNI NG
Never drive without the support bar in place.The rear doors will only lock when the support
bar is installed.When the roof flap is open, take care when driving where height is restricted.Never rest loads directly on the rear doors.Comply with the usual indications for warning other drivers.Only use the roof flap on short trips.
Alarm
System which protects and provides a deterrent against theft and break-ins.
WARNI NG
Self-protection functionThe system checks for the disconnection of any of its components.The alarm is triggered if the battery, button or siren wiring is disconnected or damaged.For all work on the alarm system, contact a TOYOTA dealer or a qualified workshop.
Exterior perimeter
The system checks whether the vehicle is opened.The alarm is triggered if anyone tries to open one of the doors or the bonnet.
Volumetric
(without partition)
The system checks for any variation in volume in the passenger compartment.The alarm is triggered if anyone breaks a window, enters the passenger compartment or moves inside the vehicle.
(with partition)
The system only checks for a variation in volume inside the cab.The alarm is triggered if anyone breaks a window or enters the vehicle’s cab.It will not be triggered if someone enters the loading area.
NOTIC E
If your vehicle is fitted with Additional Heating / Ventilation, volumetric monitoring is not compatible with this system.For more information on Additional Heating / Ventilation, refer to the corresponding section.
Anti-tilt monitoring
The system checks for any change in the attitude of the vehicle.The alarm is triggered if the vehicle is lifted or moved.
NOTIC E
When the vehicle is parked, the alarm will not be triggered if the vehicle is knocked.
Page 41 of 272
41
Ease of use and comfort
3
General
recommendations for the
seats
WARNI NG
For safety reasons, seat adjustments must only be made when the vehicle is stationary.
WARNI NG
Folding or unfolding the seat backrests must only be done with the vehicle stationary.
WARNI NG
Before moving the seat backwards, ensure that there is no person or object that might prevent the full travel of the seat.There is a risk of trapping or pinching
passengers if present in the rear seats or of jamming the seat if large objects are placed on the floor behind the seat.
WARNI NG
Do not place hard or heavy objects on the backrests forming a table. They could become
dangerous projectiles in the event of sudden braking or a collision.– Do not remove a head restraint without stowing it; secure it to a support inside the vehicle.– Check that the seat belts remain accessible to the passenger and easy to fasten.– Passengers must never take their seat without adjusting and fastening their seat belt.
WARNI NG
Before carrying out the manoeuvres, check that nothing and no one is obstructing the moving elements and their locking.To avoid sudden folding, take care to hold the backrest and support it until it is horizontal.Never put your hand underneath the seat cushion to guide the seat downwards or upwards, you could get your fingers trapped. Place your hand on the grip/strap (depending on equipment) at the top of the seat cushion.
WARNI NG
Please note: an incorrectly latched backrest compromises the safety of passengers in the event of sudden braking or an impact.The contents of the boot may be thrown forward - risk of severe injury!
Front seats
Correct driving position
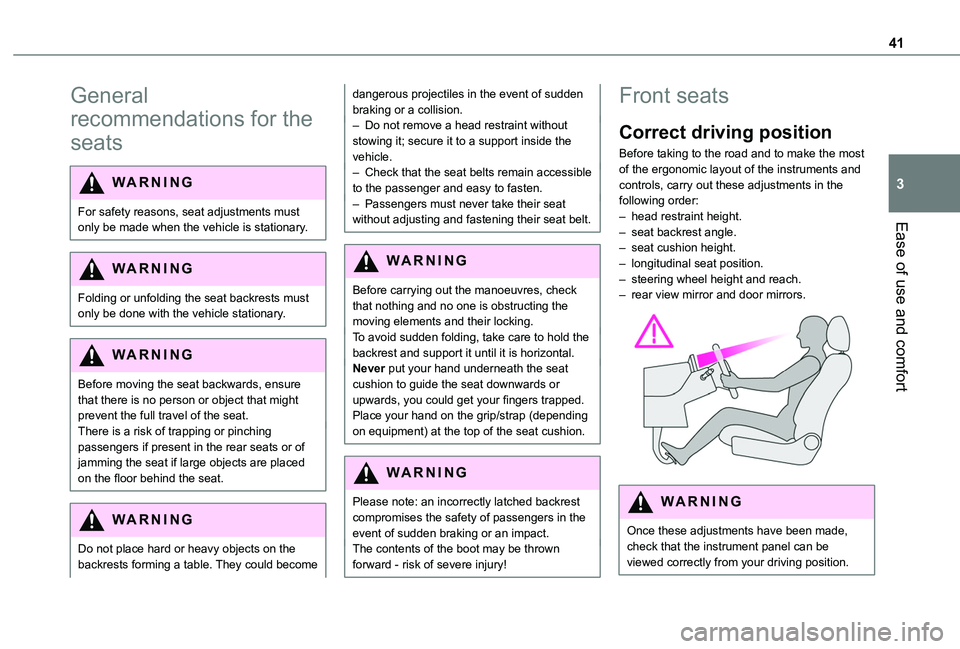
Before taking to the road and to make the most of the ergonomic layout of the instruments and controls, carry out these adjustments in the following order:– head restraint height.– seat backrest angle.– seat cushion height.– longitudinal seat position.– steering wheel height and reach.– rear view mirror and door mirrors.
WARNI NG
Once these adjustments have been made,
check that the instrument panel can be viewed correctly from your driving position.
Page 42 of 272
42
Adjustments
Longitudinal
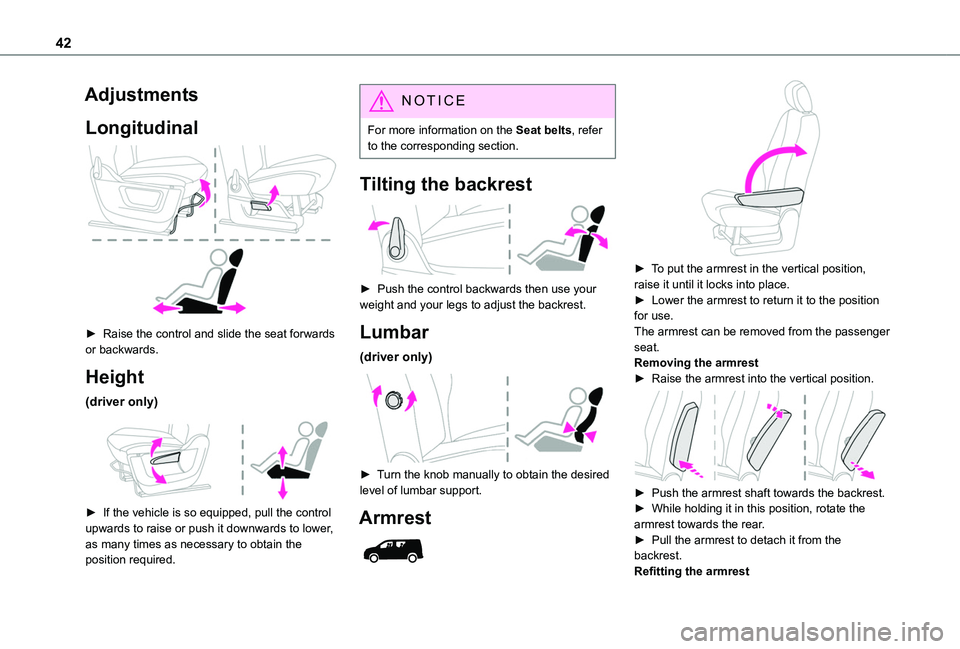
► Raise the control and slide the seat forwards or backwards.
Height
(driver only)
► If the vehicle is so equipped, pull the control upwards to raise or push it downwards to lower, as many times as necessary to obtain the
position required.
NOTIC E
For more information on the Seat belts, refer to the corresponding section.
Tilting the backrest
► Push the control backwards then use your weight and your legs to adjust the backrest.
Lumbar
(driver only)
► Turn the knob manually to obtain the desired level of lumbar support.
Armrest
► To put the armrest in the vertical position, raise it until it locks into place.► Lower the armrest to return it to the position for use.The armrest can be removed from the passenger seat.Removing the armrest► Raise the armrest into the vertical position.
► Push the armrest shaft towards the backrest.► While holding it in this position, rotate the armrest towards the rear.► Pull the armrest to detach it from the backrest.Refitting the armrest
Page 44 of 272
44
Steering wheel
adjustment
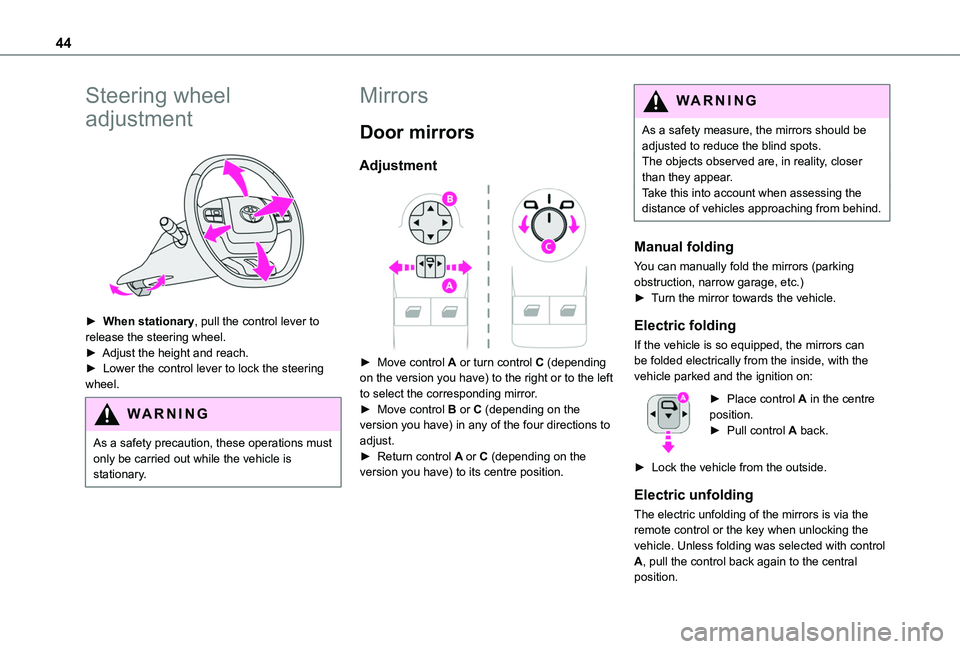
► When stationary, pull the control lever to release the steering wheel.► Adjust the height and reach.► Lower the control lever to lock the steering wheel.
WARNI NG
As a safety precaution, these operations must only be carried out while the vehicle is stationary.
Mirrors
Door mirrors
Adjustment
► Move control A or turn control C (depending on the version you have) to the right or to the left to select the corresponding mirror.► Move control B or C (depending on the version you have) in any of the four directions to adjust.
► Return control A or C (depending on the version you have) to its centre position.
WARNI NG
As a safety measure, the mirrors should be adjusted to reduce the blind spots.The objects observed are, in reality, closer than they appear.Take this into account when assessing the distance of vehicles approaching from behind.
Manual folding
You can manually fold the mirrors (parking obstruction, narrow garage, etc.)► Turn the mirror towards the vehicle.
Electric folding
If the vehicle is so equipped, the mirrors can be folded electrically from the inside, with the vehicle parked and the ignition on:
► Place control A in the centre position.► Pull control A back.
► Lock the vehicle from the outside.
Electric unfolding
The electric unfolding of the mirrors is via the remote control or the key when unlocking the vehicle. Unless folding was selected with control A, pull the control back again to the central position.
Page 48 of 272
48
► Check that the red indicator in the release grip 1 is no longer visible.► Ensure that the outer seat belts are not trapped during the manoeuvre.
Head restraint height
adjustment
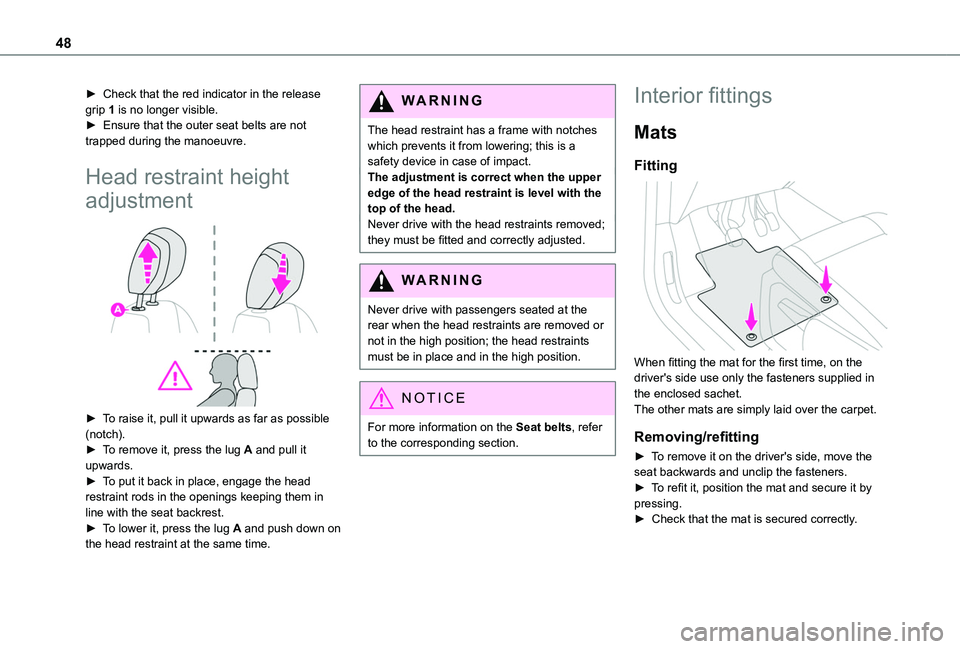
► To raise it, pull it upwards as far as possible (notch).► To remove it, press the lug A and pull it upwards.► To put it back in place, engage the head restraint rods in the openings keeping them in line with the seat backrest.► To lower it, press the lug A and push down on the head restraint at the same time.
WARNI NG
The head restraint has a frame with notches which prevents it from lowering; this is a safety device in case of impact.The adjustment is correct when the upper edge of the head restraint is level with the top of the head.Never drive with the head restraints removed; they must be fitted and correctly adjusted.
WARNI NG
Never drive with passengers seated at the rear when the head restraints are removed or not in the high position; the head restraints must be in place and in the high position.
NOTIC E
For more information on the Seat belts, refer to the corresponding section.
Interior fittings
Mats
Fitting
When fitting the mat for the first time, on the driver's side use only the fasteners supplied in the enclosed sachet.The other mats are simply laid over the carpet.
Removing/refitting
► To remove it on the driver's side, move the seat backwards and unclip the fasteners.► To refit it, position the mat and secure it by pressing.► Check that the mat is secured correctly.
Page 71 of 272
71
Lighting and visibility
4
NOTIC E
The system may suffer interference or not work correctly:– under conditions of poor visibility (snow, heavy rain, etc.),– if the windscreen in front of the camera is dirty, misted or obscured (for example, by a sticker, etc.),– if the vehicle is facing highly reflective signs.When the system detects thick fog, it temporarily deactivates the function.The system is not able to detect:– road users that do not have their own lighting, such as pedestrians,– vehicles whose lighting is obscured (for example: vehicles running behind a safety barrier on a motorway),– vehicles at the top or bottom of a steep slope, on winding roads, on crossroads.
WARNI NG
Clean the windscreen regularly, particularly the area in front of the camera.The internal surface of the windscreen can also become misted around the camera. In humid and cold weather, demist the windscreen regularly.Do not allow snow to accumulate on the bonnet or roof of the vehicle as this could obstruct the detection camera.
Headlamp beam height
adjustment
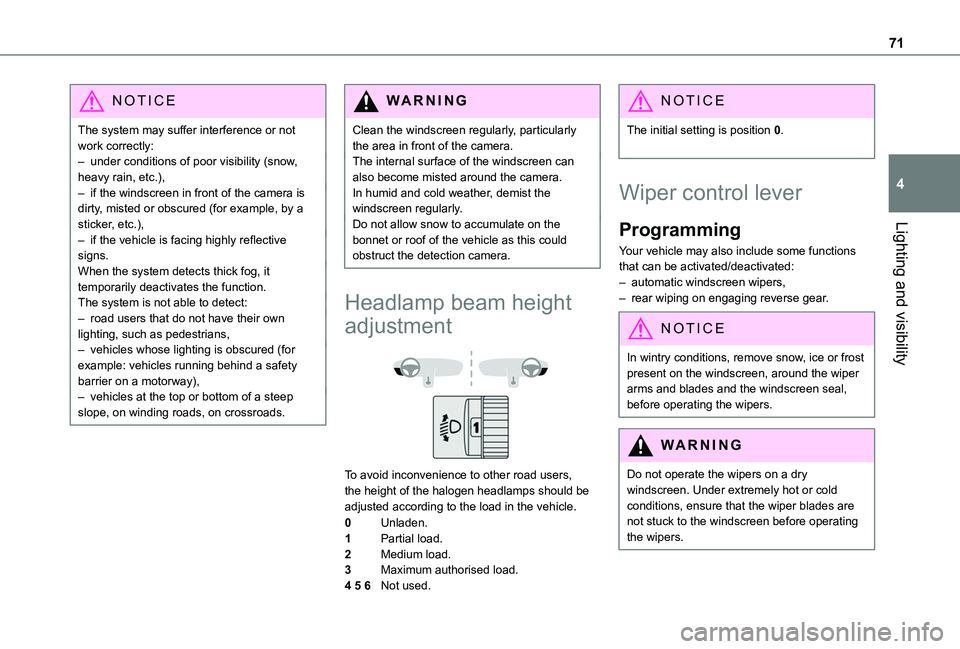
To avoid inconvenience to other road users, the height of the halogen headlamps should be adjusted according to the load in the vehicle.
0Unladen.
1Partial load.
2Medium load.
3Maximum authorised load.
4 5 6Not used.
NOTIC E
The initial setting is position 0.
Wiper control lever
Programming
Your vehicle may also include some functions that can be activated/deactivated:– automatic windscreen wipers,– rear wiping on engaging reverse gear.
NOTIC E
In wintry conditions, remove snow, ice or frost present on the windscreen, around the wiper arms and blades and the windscreen seal, before operating the wipers.
WARNI NG
Do not operate the wipers on a dry windscreen. Under extremely hot or cold conditions, ensure that the wiper blades are not stuck to the windscreen before operating the wipers.
Page 96 of 272

96
In case of towing
WARNI NG
Driving with a trailer places greater demands on the towing vehicle and requires extra care from the driver.
NOTIC E
Respect the maximum towable weights.At altitude: reduce the maximum load by 10% per 1,000 metres (3,280 ft) of altitude; the density of the air decreases with altitude and the performance of the engine reduces.
WARNI NG
New vehicle: do not pull a trailer before having driven at least 1,000 kilometres (620 miles).
NOTIC E
If the outside temperature is high, let the engine idle for 1 to 2 minutes after the vehicle comes to a stop, to help it to cool.
Before setting off
Nose weight
► Distribute the load in the trailer so that the heaviest items are as close as possible to the axle and the nose weight (at the point where it joins your vehicle) approaches the maximum permitted without exceeding it.
Tyres
► Check the tyre pressures of the towing vehicle and of the trailer, observing the recommended pressures.
Lighting
► Check the electrical signalling on the trailer and the headlamp beam height of your vehicle.
NOTIC E
If a genuine TOYOTA towing device is used, the rear parking sensors will be deactivated automatically to avoid the audible signal.
When driving
Cooling
Towing a trailer uphill increases the temperature of the coolant. The maximum towable load depends on the gradient and the exterior temperature. The cooling capacity of the fan does not increase with engine speed.► Reduce speed and lower the engine speed, so as to limit the heating-up.
In all cases, pay attention to the coolant temperature.If this warning lamp and the STOP warning lamp come on, stop the vehicle and switch off the engine as soon as possible.
Brakes
Braking distances are increased when towing a trailer. To avoid overheating of the brakes, the use of engine braking is recommended.
Side wind
Bear in mind the increased susceptibility to the wind that the vehicle will have.
Anti-theft protection
Electronic immobiliser
The remote control contains an electronic chip which has a special code. When the ignition is switched on, this code must be recognised in order for starting to be possible.A few seconds after switching off the ignition,
this system locks the engine control system, therefore preventing the engine from being started in the event of a break-in.In the event of a fault, you are informed by illumination of this warning lamp, an audible signal and a message on the screen.The vehicle will not start; contact a TOYOTA dealer as soon as possible.
Page 113 of 272
11 3
Driving
6
With audio system or touch screen
With the vehicle stationary, the system is reinitialised via the vehicle configuration menu.
Malfunction
These warning lamps come on in the event of a malfunction.In this case, the tyre under-inflation monitoring function is no longer performed.Have the system checked by a TOYOTA dealer or a qualified workshop.
Head-up display
This system projects various information onto a smoked projection blade situated in the driver's field of vision, enabling them to drive without taking their eyes off the road.
Information displayed
during operation
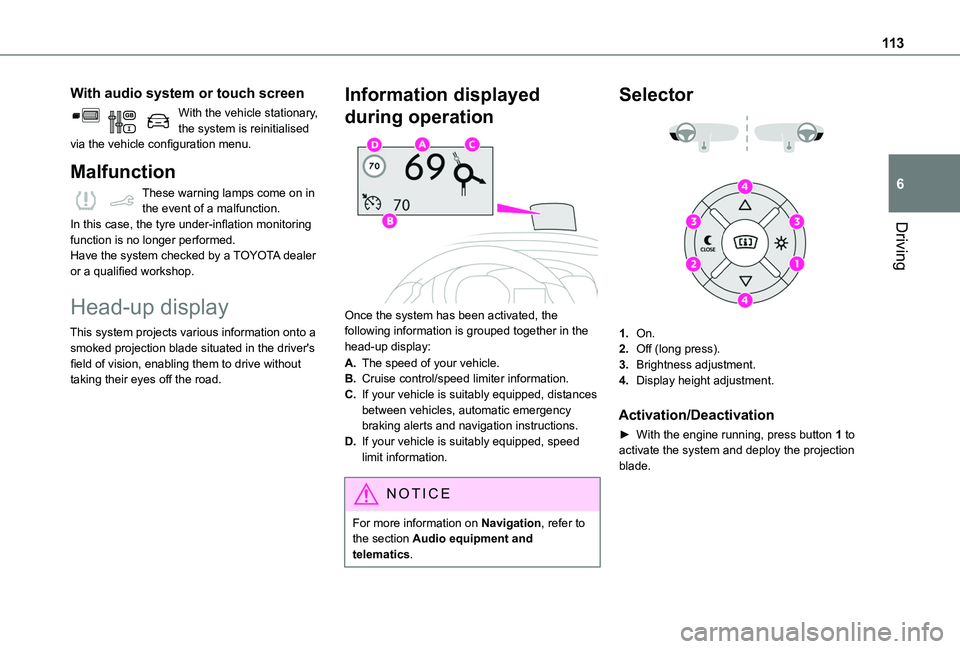
Once the system has been activated, the following information is grouped together in the head-up display:
A.The speed of your vehicle.
B.Cruise control/speed limiter information.
C.If your vehicle is suitably equipped, distances between vehicles, automatic emergency braking alerts and navigation instructions.
D.If your vehicle is suitably equipped, speed limit information.
NOTIC E
For more information on Navigation, refer to the section Audio equipment and
telematics.
Selector
1.On.
2.Off (long press).
3.Brightness adjustment.
4.Display height adjustment.
Activation/Deactivation
► With the engine running, press button 1 to
activate the system and deploy the projection blade.