fuse TOYOTA PROACE CITY 2021 Owners Manual
[x] Cancel search | Manufacturer: TOYOTA, Model Year: 2021, Model line: PROACE CITY, Model: TOYOTA PROACE CITY 2021Pages: 272, PDF Size: 60.75 MB
Page 3 of 272
3
Contents
Memorising speeds 133Active Safety Brake with Collision Risk Alert and Intelligent emergency braking assistance 133Active Lane Departure Warning System 136Blind Spot Monitoring System 139Active Blind Spot Monitoring System 141Distraction detection 141Parking sensors 143Reversing Camera 145Surround Rear Vision 146
7Practical information
Compatibility of fuels 150Refuelling 150Misfuel prevention (Diesel) 152Snow chains 152Towing device 153Overload indicator 155Energy economy mode 156Roof bars / Roof rack 157Bonnet 158
Engine compartment 159Checking levels 159Speed checks 161AdBlue® (Diesel engines) 163Free-wheeling 166Advice on care and maintenance 166
8In the event of a breakdown
Running out of fuel (Diesel) 168
Tool kit 168Temporary puncture repair kit 169Spare wheel 172Changing a bulb 175Changing a fuse 18112 V battery 183Towing 186
9Technical data
Dimensions 189Engine technical data and towed loads 193Identification markings 196
10Bluetooth® audio system
First steps 197Steering mounted controls 198Menus 199Radio 199DAB (Digital Audio Broadcasting) radio 200Media 202Telephone 204
Frequently asked questions 207
11TOYOTA Connect Radio
First steps 210Steering mounted controls 2 11Menus 212Applications 213Radio 214DAB (Digital Audio Broadcasting) radio 215
Media 216
Telephone 217Settings 221Frequently asked questions 223
12TOYOTA Connect Nav
First steps 225Steering mounted controls 226Menus 226Voice commands 228Navigation 232Connected navigation 234Applications 237Radio 240DAB (Digital Audio Broadcasting) radio 241Media 242Telephone 243Settings 246Frequently asked questions 249
■Alphabetical index
Page 5 of 272
5
Overview
Instruments and controls
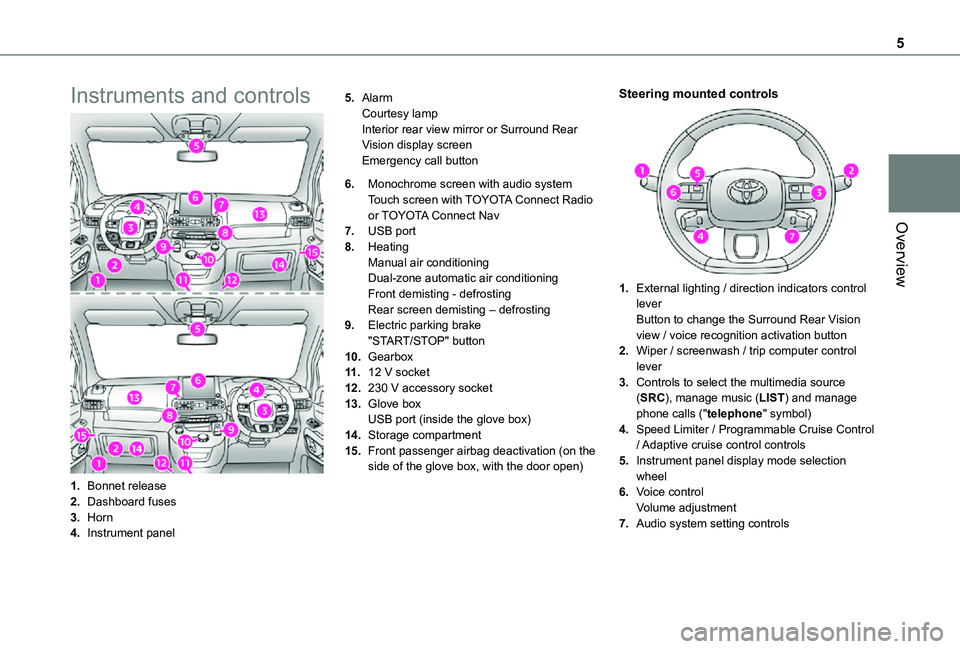
1.Bonnet release
2.Dashboard fuses
3.Horn
4.Instrument panel
5.AlarmCourtesy lampInterior rear view mirror or Surround Rear Vision display screenEmergency call button
6.Monochrome screen with audio systemTouch screen with TOYOTA Connect Radio or TOYOTA Connect Nav
7.USB port
8.HeatingManual air conditioningDual-zone automatic air conditioningFront demisting - defrostingRear screen demisting – defrosting
9.Electric parking brake"START/STOP" button
10.Gearbox
11 .12 V socket
12.230 V accessory socket
13.Glove boxUSB port (inside the glove box)
14.Storage compartment
15.Front passenger airbag deactivation (on the side of the glove box, with the door open)
Steering mounted controls
1.External lighting / direction indicators control leverButton to change the Surround Rear Vision view / voice recognition activation button
2.Wiper / screenwash / trip computer control lever
3.Controls to select the multimedia source (SRC), manage music (LIST) and manage phone calls ("telephone" symbol)
4.Speed Limiter / Programmable Cruise Control
/ Adaptive cruise control controls
5.Instrument panel display mode selection wheel
6.Voice controlVolume adjustment
7.Audio system setting controls
Page 79 of 272
79
Safety
5
General safety
recommendations
WARNI NG
Do not remove the labels attached in different places on your vehicle. They include safety warnings as well as identification information for the vehicle.
WARNI NG
For all work on your vehicle, use a qualified workshop that has the technical information, skills and equipment required, all of which a TOYOTA dealer is able to provide.
WARNI NG
Depending on country regulations, certain safety equipment may be mandatory: high
visibility safety vests, warning triangles, breathalysers, spare bulbs, spare fuses, fire extinguisher, first aid kit, mud flaps at the rear of the vehicle, etc.
WARNI NG
Installing electrical accessories:– The fitting of electrical equipment or accessories not approved by TOYOTA may cause excessive current consumption and faults and failures with the electrical system of your vehicle. Contact a TOYOTA dealer for information on the range of approved accessories.– As a safety measure, access to the diagnostic socket, used for the vehicle's electronic systems, is reserved strictly for TOYOTA dealers or qualified workshops, equipped with the special tools required (risk of malfunctions of the vehicle's electronic systems that could cause breakdowns or serious accidents). The Manufacturer cannot be held responsible if this advice is not followed.– Any modification or adaptation not intended or authorised by TOYOTA or carried out without meeting the technical requirements
defined by the Manufacturer will result in the suspension of the commercial warranty.
W ARNI NG
Installation of accessory radio communication transmittersBefore installing a radio communication transmitter with an external aerial, you must without fail contact a TOYOTA dealer for the specification of transmitters which can be fitted (frequency, maximum power, aerial position, specific installation requirements), in line with the Vehicle Electromagnetic Compatibility Directive (2004/104/EC).
Page 132 of 272
132
"Take back control" (red).
► Take back control of the vehicle immediately: the system cannot manage the current driving situation."Activation not possible, conditions unsuitable". The system refuses to activate cruise control, as the necessary conditions are not fulfilled.
Stop function
"Cruise control paused" (for a few seconds).The system has brought the vehicle to a complete stop and is holding it immobilised: cruise control is paused.The driver must accelerate to move off again, then reactivate cruise control.
Operating limits
Cruise control operates by day and night, in fog or moderate rainfall.Certain situations cannot be managed by the
system and require driver intervention.Elements not detected by the system:– Pedestrians, some cyclists, animals.– Stationary vehicles (traffic jam, breakdown, etc.).
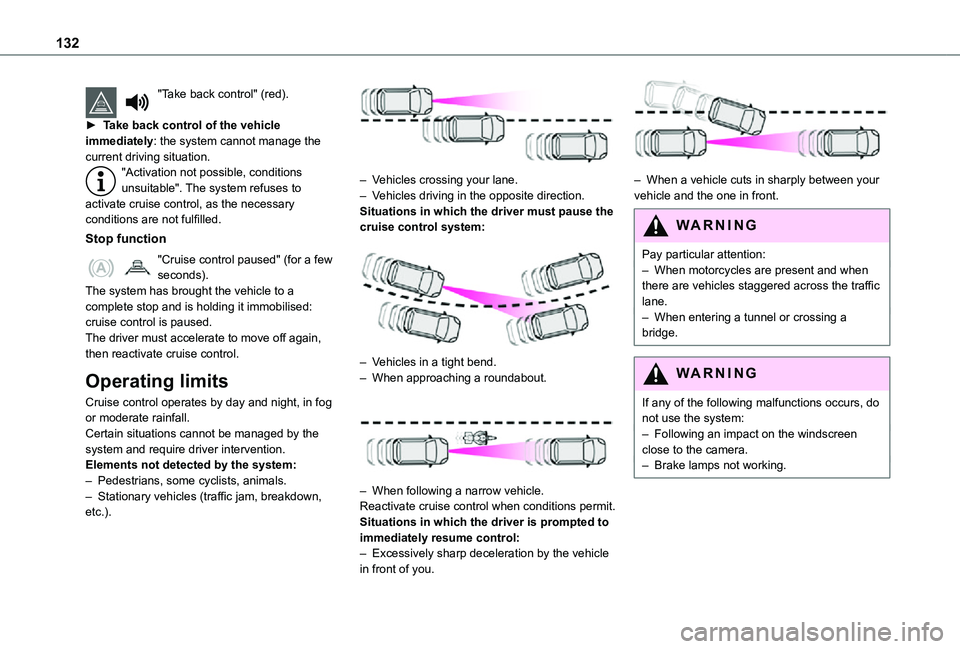
– Vehicles crossing your lane.– Vehicles driving in the opposite direction.Situations in which the driver must pause the cruise control system:
– Vehicles in a tight bend.– When approaching a roundabout.
– When following a narrow vehicle.Reactivate cruise control when conditions permit.Situations in which the driver is prompted to immediately resume control:– Excessively sharp deceleration by the vehicle in front of you.
– When a vehicle cuts in sharply between your vehicle and the one in front.
WARNI NG
Pay particular attention:– When motorcycles are present and when there are vehicles staggered across the traffic lane.– When entering a tunnel or crossing a bridge.
WARNI NG
If any of the following malfunctions occurs, do not use the system:– Following an impact on the windscreen close to the camera.– Brake lamps not working.
Page 140 of 272
140
– flashing, after a delay of about one second, when overtaking a vehicle slowly, and when the direction indicator is used.
Activation / Deactivation
Activation or deactivation is set via the vehicle configuration menu.
NOTIC E
The system state remains in memory when the ignition is switched off.
NOTIC E
The system is automatically deactivated when towing with a towbar approved by TOYOTA.
Conditions for operation
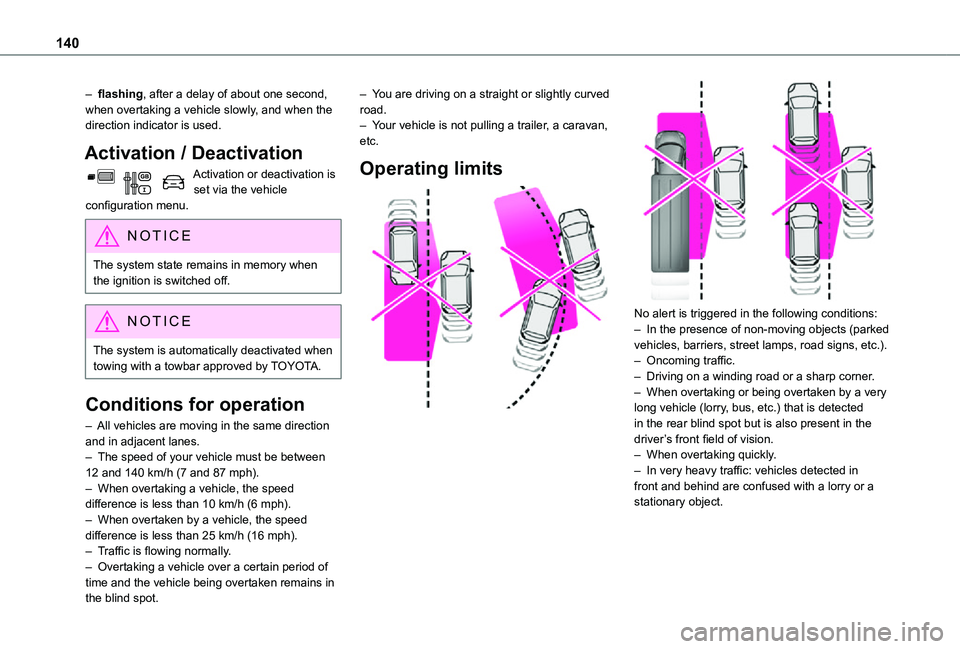
– All vehicles are moving in the same direction and in adjacent lanes.– The speed of your vehicle must be between 12 and 140 km/h (7 and 87 mph).– When overtaking a vehicle, the speed difference is less than 10 km/h (6 mph).– When overtaken by a vehicle, the speed difference is less than 25 km/h (16 mph).– Traffic is flowing normally.– Overtaking a vehicle over a certain period of time and the vehicle being overtaken remains in the blind spot.
– You are driving on a straight or slightly curved road.– Your vehicle is not pulling a trailer, a caravan, etc.
Operating limits
No alert is triggered in the following conditions:– In the presence of non-moving objects (parked vehicles, barriers, street lamps, road signs, etc.).– Oncoming traffic.– Driving on a winding road or a sharp corner.– When overtaking or being overtaken by a very long vehicle (lorry, bus, etc.) that is detected in the rear blind spot but is also present in the driver’s front field of vision.– When overtaking quickly.– In very heavy traffic: vehicles detected in front and behind are confused with a lorry or a stationary object.
Page 159 of 272

159
Practical information
7
Engine compartment
The engine represented is an example given for illustration purposes only.The locations of the following elements may vary:– Air filter.– Engine oil dipstick.– Engine oil filler cap.
Petrol engine
Diesel engine
1.Screenwash fluid reservoir
2.Engine coolant reservoir
3.Brake fluid reservoir
4.Battery / Fuses
5.Remote earth point (-)
6.Fusebox
7.Air filter
8.Engine oil filler cap
9.Engine oil dipstick
WARNI NG
The Diesel fuel system operates under very high pressure.All work on this circuit must be carried out only by a TOYOTA dealer or a qualified workshop.
Checking levels
Check all of the following levels regularly in accordance with the manufacturer's service schedule. Top them up if required, unless otherwise indicated.If a level drops significantly, have the corresponding system checked by a TOYOTA dealer or a qualified workshop.
WARNI NG
The fluids must comply with the manufacturer's requirements and with the vehicle's engine.
WARNI NG
Take care when working under the bonnet, as certain areas of the engine may be extremely hot (risk of burns) and the cooling fan could start at any time (even with the ignition off).
Used products
WARNI NG
Avoid prolonged contact of used oil or fluids with the skin.Most of these fluids are harmful to health and very corrosive.
ECO
Do not discard used oil or fluids into sewers or onto the ground.Empty used oil into the containers reserved for this purpose at a TOYOTA dealer or a qualified workshop.
Engine oil
The level is checked, with the engine having been switched off for at least 30
minutes and on level ground, either using the oil level indicator in the instrument panel when the ignition is switched on (for vehicles equipped with an electric gauge), or using the dipstick.
Page 181 of 272
181
In the event of a breakdown
8
Changing a fuse
Accessing the tools
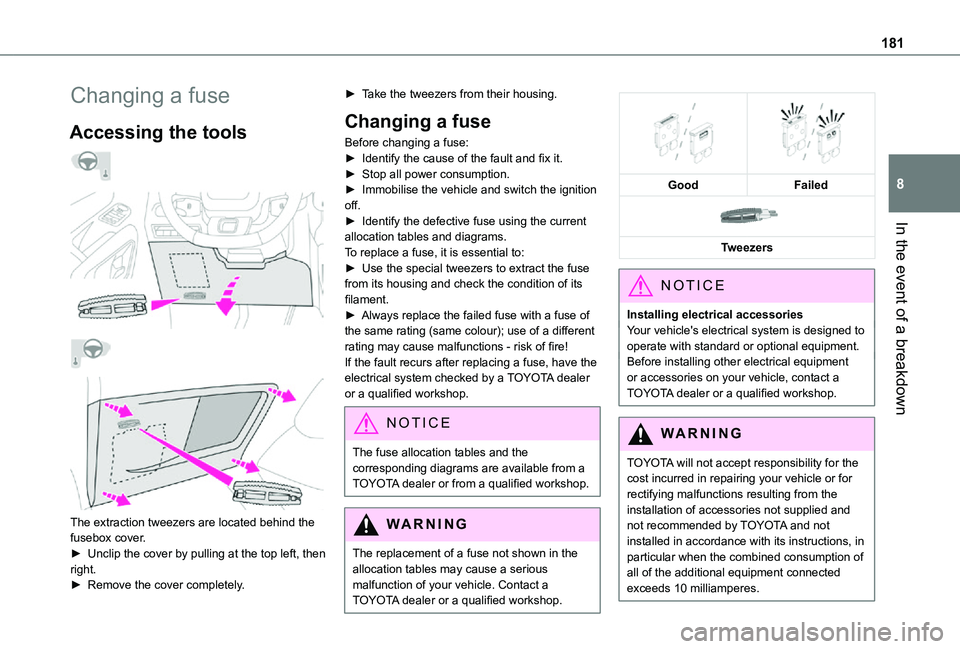
The extraction tweezers are located behind the fusebox cover.
► Unclip the cover by pulling at the top left, then right.► Remove the cover completely.
► Take the tweezers from their housing.
Changing a fuse
Before changing a fuse:► Identify the cause of the fault and fix it.► Stop all power consumption.► Immobilise the vehicle and switch the ignition off.► Identify the defective fuse using the current allocation tables and diagrams.To replace a fuse, it is essential to:► Use the special tweezers to extract the fuse from its housing and check the condition of its filament.► Always replace the failed fuse with a fuse of the same rating (same colour); use of a different rating may cause malfunctions - risk of fire!If the fault recurs after replacing a fuse, have the electrical system checked by a TOYOTA dealer or a qualified workshop.
NOTIC E
The fuse allocation tables and the corresponding diagrams are available from a TOYOTA dealer or from a qualified workshop.
WARNI NG
The replacement of a fuse not shown in the allocation tables may cause a serious malfunction of your vehicle. Contact a TOYOTA dealer or a qualified workshop.
GoodFailed
Tweezers
NOTIC E
Installing electrical accessoriesYour vehicle's electrical system is designed to operate with standard or optional equipment.Before installing other electrical equipment or accessories on your vehicle, contact a TOYOTA dealer or a qualified workshop.
WARNI NG
TOYOTA will not accept responsibility for the cost incurred in repairing your vehicle or for rectifying malfunctions resulting from the installation of accessories not supplied and not recommended by TOYOTA and not installed in accordance with its instructions, in
particular when the combined consumption of all of the additional equipment connected exceeds 10 milliamperes.
Page 182 of 272
182
NOTIC E
For more information on installing a towbar or TAXI type equipment, contact a TOYOTA dealer.
Dashboard fuses
The fusebox is placed in the lower dashboard (left-hand side).
Access to the fuses
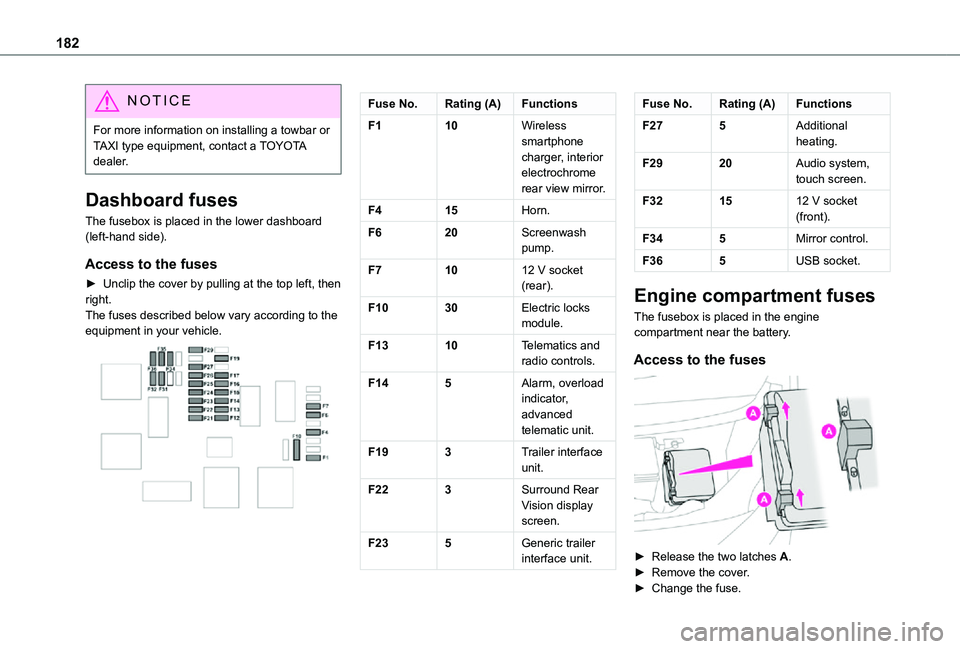
► Unclip the cover by pulling at the top left, then right.The fuses described below vary according to the equipment in your vehicle.
Fuse No.Rating (A)Functions
F110Wireless smartphone charger, interior electrochrome rear view mirror.
F415Horn.
F620Screenwash pump.
F71012 V socket (rear).
F1030Electric locks module.
F1310Telematics and radio controls.
F145Alarm, overload indicator, advanced telematic unit.
F193Trailer interface unit.
F223Surround Rear Vision display screen.
F235Generic trailer interface unit.
Fuse No.Rating (A)Functions
F275Additional heating.
F2920Audio system, touch screen.
F321512 V socket (front).
F345Mirror control.
F365USB socket.
Engine compartment fuses
The fusebox is placed in the engine compartment near the battery.
Access to the fuses
► Release the two latches A.► Remove the cover.► Change the fuse.
Page 183 of 272
183
In the event of a breakdown
8
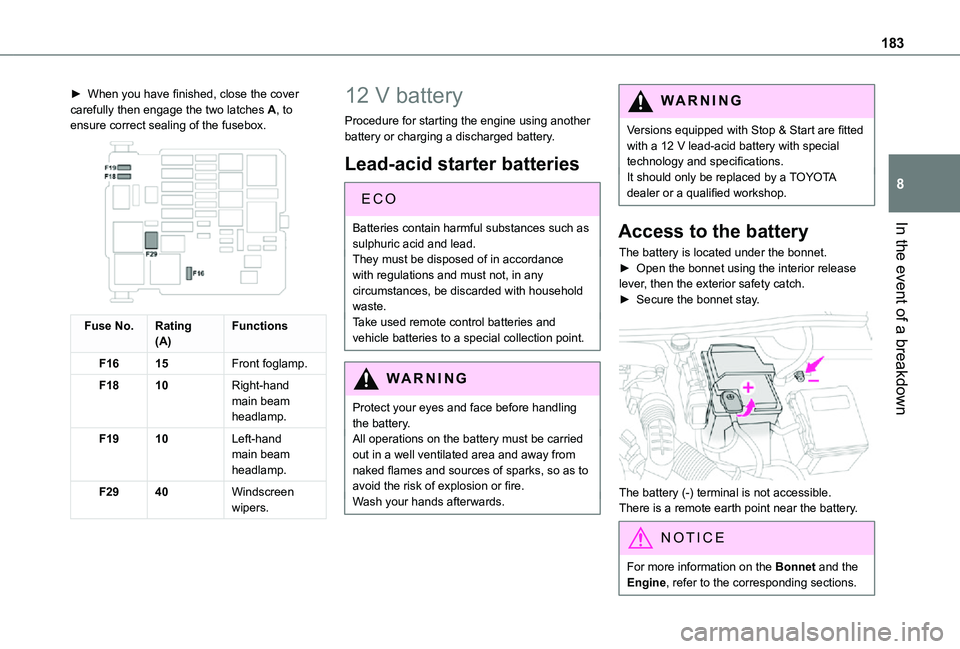
► When you have finished, close the cover carefully then engage the two latches A, to ensure correct sealing of the fusebox.
Fuse No.Rating(A)Functions
F1615Front foglamp.
F1810Right-hand main beam headlamp.
F1910Left-hand main beam headlamp.
F2940Windscreen wipers.
12 V battery
Procedure for starting the engine using another battery or charging a discharged battery.
Lead-acid starter batteries
EC O
Batteries contain harmful substances such as
sulphuric acid and lead.They must be disposed of in accordance with regulations and must not, in any circumstances, be discarded with household waste.Take used remote control batteries and vehicle batteries to a special collection point.
WARNI NG
Protect your eyes and face before handling the battery.All operations on the battery must be carried out in a well ventilated area and away from naked flames and sources of sparks, so as to avoid the risk of explosion or fire.Wash your hands afterwards.
WARNI NG
Versions equipped with Stop & Start are fitted with a 12 V lead-acid battery with special technology and specifications.It should only be replaced by a TOYOTA dealer or a qualified workshop.
Access to the battery
The battery is located under the bonnet.► Open the bonnet using the interior release lever, then the exterior safety catch.► Secure the bonnet stay.
The battery (-) terminal is not accessible.There is a remote earth point near the battery.
NOTIC E
For more information on the Bonnet and the Engine, refer to the corresponding sections.
Page 252 of 272
252
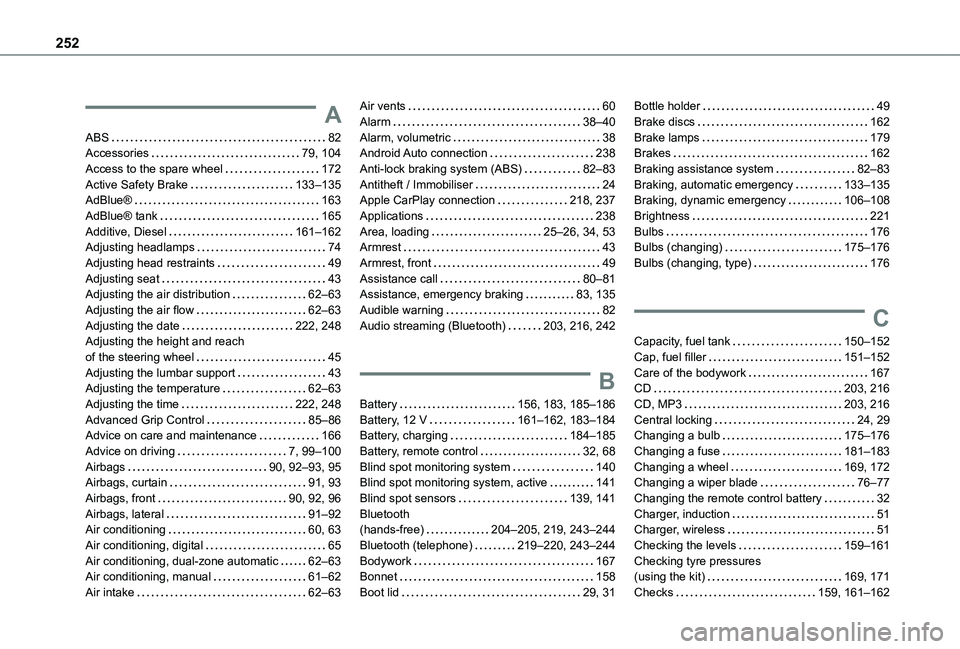
A
ABS 82Accessories 79, 104Access to the spare wheel 172Active Safety Brake 133–135AdBlue® 163AdBlue® tank 165Additive, Diesel 161–162Adjusting headlamps 74Adjusting head restraints 49Adjusting seat 43Adjusting the air distribution 62–63Adjusting the air flow 62–63Adjusting the date 222, 248Adjusting the height and reach of the steering wheel 45Adjusting the lumbar support 43Adjusting the temperature 62–63Adjusting the time 222, 248Advanced Grip Control 85–86Advice on care and maintenance 166
Advice on driving 7, 99–100Airbags 90, 92–93, 95Airbags, curtain 91, 93Airbags, front 90, 92, 96Airbags, lateral 91–92Air conditioning 60, 63Air conditioning, digital 65Air conditioning, dual-zone automatic 62–63Air conditioning, manual 61–62Air intake 62–63
Air vents 60Alarm 38–40Alarm, volumetric 38Android Auto connection 238Anti-lock braking system (ABS) 82–83Antitheft / Immobiliser 24Apple CarPlay connection 218, 237Applications 238Area, loading 25–26, 34, 53Armrest 43Armrest, front 49Assistance call 80–81Assistance, emergency braking 83, 135Audible warning 82Audio streaming (Bluetooth) 203, 216, 242
B
Battery 156, 183, 185–186Battery, 12 V 161–162, 183–184Battery, charging 184–185
Battery, remote control 32, 68Blind spot monitoring system 140Blind spot monitoring system, active 141Blind spot sensors 139, 141Bluetooth (hands-free) 204–205, 219, 243–244Bluetooth (telephone) 219–220, 243–244Bodywork 167Bonnet 158Boot lid 29, 31
Bottle holder 49Brake discs 162Brake lamps 179Brakes 162Braking assistance system 82–83Braking, automatic emergency 133–135Braking, dynamic emergency 106–108Brightness 221Bulbs 176Bulbs (changing) 175–176Bulbs (changing, type) 176
C
Capacity, fuel tank 150–152Cap, fuel filler 151–152Care of the bodywork 167CD 203, 216CD, MP3 203, 216Central locking 24, 29Changing a bulb 175–176
Changing a fuse 181–183Changing a wheel 169, 172Changing a wiper blade 76–77Changing the remote control battery 32Charger, induction 51Charger, wireless 51Checking the levels 159–161Checking tyre pressures (using the kit) 169, 171Checks 159, 161–162