stop start TOYOTA PROACE CITY 2022 Service Manual
[x] Cancel search | Manufacturer: TOYOTA, Model Year: 2022, Model line: PROACE CITY, Model: TOYOTA PROACE CITY 2022Pages: 320, PDF Size: 75.81 MB
Page 193 of 320

193
Practical information
7
WARNI NG
Stop & StartNever refuel with the engine in STOP mode; you must switch off the ignition.
Refuelling
At least 10 litres of fuel must be added, in order to be registered by the fuel gauge.Opening the filler cap may create a noise caused by an inrush of air. This is entirely normal and results from the sealing of the fuel system.To refuel in complete safety:► Always switch off the engine.► Unlock the vehicle using the Keyless Entry and Starting.► Open the fuel filler flap.
► With a conventional key, insert the key into the filler cap, then turn the key to the left.
► Unscrew and remove the filler cap, then place it on the holder located on the fuel filler flap.► Insert the nozzle and push it in fully (while pushing on the metal valve A).► Fill the tank. Do not continue past the third cut-off of the nozzle, as this may cause malfunctions.► Put the filler cap back in place and close it by turning to the right.► Push the fuel filler flap to close it (your vehicle must be unlocked).
WARNI NG
If the vehicle is equipped with a sliding door on its left-hand side, do not open it while the fuel filler flap is open. Otherwise, there is a risk that the fuel filler flap and the sliding door may be damaged and the person filling up may be injured.
WARNI NG
If the fuel filler flap is open, a device prevents the left-hand side door from opening.The door can be opened half-way, however.Close the fuel filler flap to regain use of the door.
Page 202 of 320
202
Charging the traction
battery (Electric)
To recharge, connect the vehicle to a domestic electricity supply (domestic or accelerated charging) or to a fast public charger (superfast charging).For a full charge, follow the desired charging procedure without pausing it, until it ends automatically. Charging can be either immediate or deferred (except fast public charger, mode 4).You can stop domestic or accelerated charging at any time by unlocking the vehicle and removing the nozzle. For superfast charging, refer to the fast public charger.For more information on the charging displays on the Instrument panel and the Touch screen, refer to the corresponding section.
NOTIC E
It is also possible to monitor the charging progress using the MyToyota application (Available soon).For more information on Remote functions, refer to the corresponding section.
WARNI NG
As a safety measure, the engine will not start if the charging cable is plugged into the
connector on the vehicle. A warning is displayed on the instrument panel.
NOTIC E
Cooling the traction batteryThe cooling fan in the engine compartment comes on during charging to cool the on-board charger and the traction battery.
NOTIC E
Vehicle in storage for more than 1 monthDischarge the traction battery down to 2 or 3 bars on the charge level indicator on the instrument panel.Do not connect the charging cable.Always park the vehicle in a place with temperatures between -10°C and 30°C (parking in a place with extreme temperatures can damage the traction battery).Disconnect the cable from the (+) terminal of the accessory battery in the engine compartment.Connect a 12 V battery charger to the (+) and (-) terminals of the accessory battery about every 3 months in order to recharge the accessory battery and maintain an operating voltage.
Precautions
Electric vehicles were developed in accordance with the guidelines on maximum electromagnetic fields issued by the International Commission on Non-Ionizing Radiation Protection (ICNIRP - 1998 Guidelines).
Wearers of pacemakers or equivalent devices
Ask your doctor about what precautions you should take, or ask the manufacturer of your implanted electro-medical device about whether its operation is guaranteed in an environment which complies with the ICNIRP recommendations.
WARNI NG
If in doubtDomestic or accelerated charging: do not remain inside or near the vehicle, or near the charging cable or charging unit, even for a short time.Superfast charging: do not use the system yourself and avoid approaching public fast charging points. Leave the area and ask a third party to recharge the vehicle.
Page 203 of 320
203
Practical information
7
For domestic or accelerated charging
WARNI NG
Before chargingDepending on the context:► Have a professional check that the electrical system to be used complies with applicable standards and is compatible with the vehicle.► Have a professional electrician install a dedicated domestic power socket or accelerated charging unit (Wallbox) compatible with the vehicle.You should preferably use the charging cable available as an accessory.For more information, contact a any authorized Toyota retailer or Toyota authorized repairer, or any reliable repairer.
WARNI NG
During chargingWhile charging is in progress, unlocking the vehicle will cause the charging to stop.If no action is taken on one of the openings (door or boot) or on the charging nozzle, the vehicle will lock again after 30 seconds and charging will resume automatically.Never work under the bonnet:
– Some areas remain very hot, even an hour after charging ends - risk of burns!– The fan may start at any time - risk of cuts or strangulation!
WARNI NG
After chargingCheck that the charging flap is closed.Do not leave the cable connected to the domestic power socket - risk of short-circuit or electrocution in the event of contact with or immersion in water!
For superfast charging
NOTIC E
Before chargingCheck that the fast public charging station and its charging cable are compatible with the vehicle.
If the exterior temperature is below:– 0°C, charging times may be extended.– -20°C, charging is still possible, but charging times may be extended even further (the battery has to be heated first).
WARNI NG
After chargingCheck that the charging flap is closed.
Connection
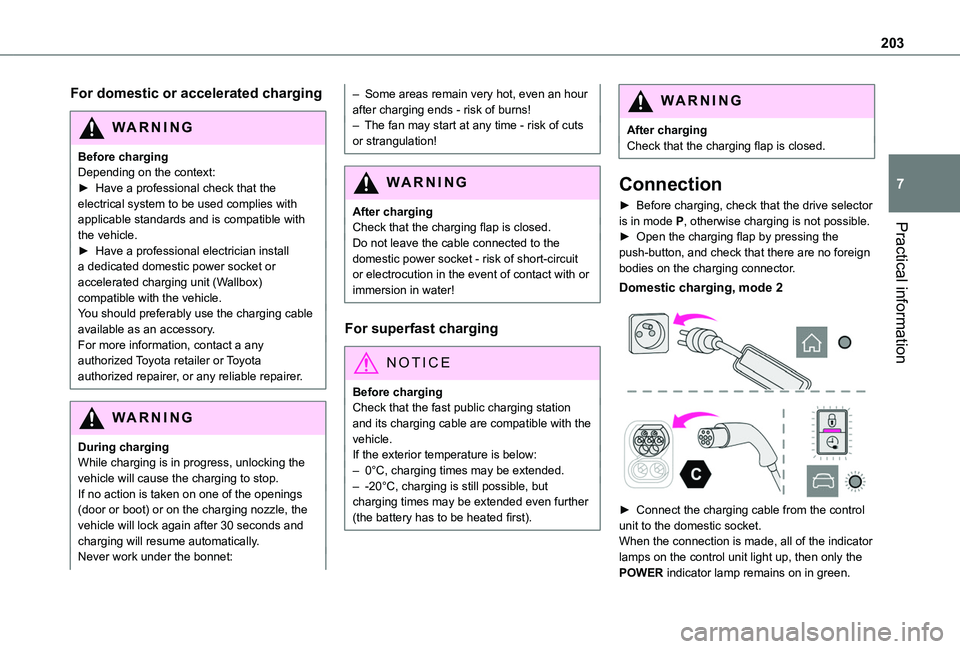
► Before charging, check that the drive selector is in mode P, otherwise charging is not possible.► Open the charging flap by pressing the push-button, and check that there are no foreign bodies on the charging connector.
Domestic charging, mode 2
► Connect the charging cable from the control unit to the domestic socket.When the connection is made, all of the indicator
lamps on the control unit light up, then only the POWER indicator lamp remains on in green.
Page 211 of 320

2 11
Practical information
7
WARNI NG
As a safety measure and to avoid damaging the roof, it is essential to use the roof bars and racks approved for your vehicle.Observe the instructions on fitting and use contained in the guide supplied with the roof bars and racks.
To fit the transverse roof bars or a roof rack, use the fixing points provided for this purpose:► Remove the fixing covers installed on the vehicle.
► Put each fixing in place and lock them on the roof one by one.► Ensure that the roof bars or the roof rack are correctly fitted (by shaking them).The bars are adaptable for each fixing point.
Bonnet
WARNI NG
Stop & StartBefore doing anything under the bonnet, you must switch off the ignition to avoid any risk of the engine restarting automatically.Take care with objects or clothing that could be caught in the blades of the cooling fan or in certain moving components - risk of strangulation and serious injury!
NOTIC E
The location of the interior bonnet release lever prevents opening the bonnet when the left-hand front door is closed.
WARNI NG
When the engine is hot, handle the exterior safety catch and the bonnet stay with care (risk of burns), using the protected area.When the bonnet is open, take care not to damage the safety catch.Do not open the bonnet under very windy
conditions.
WARNI NG
Cooling of the engine when stoppedThe engine cooling fan may start after the engine has been switched off.Take care with objects or clothing that could be caught in the blades of the fan!
Opening
► Open the left-hand front door.
► Pull the release lever, located at the bottom of the door frame, towards you.► Lift the safety catch and raise the bonnet.
Page 215 of 320

215
Practical information
7
be used which is appropriate for the prevailing conditions, in order to protect the elements of the system (pump, tank, ducts, jets, etc.).
WARNI NG
Filling with pure water is prohibited under all circumstances (risk of freezing, limestone deposits, etc.).
Diesel fuel additive (Diesel
with particle filter)
/ On reaching the minimum level in the particle filter additive tank, this warning lamp comes on fixed, accompanied by an audible signal and a warning message.
Topping up
The topping up of this additive must be carried out quickly.Go to any authorized Toyota retailer or Toyota authorized repairer, or any reliable repairer.
AdBlue® (Diesel engines)
An alert is triggered when the reserve level is reached.For more information on the Indicators and in particular the AdBlue® range indicators, refer to the corresponding section.To avoid the vehicle being immobilised in accordance with regulations, you must top up the AdBlue® tank.
For more information on AdBlue®, and in particular the supply of AdBlue®, refer to the corresponding section.
Checks
Unless otherwise indicated, check these components in accordance with the manufacturer's service schedule and according to your engine.Otherwise, have them checked by any authorized Toyota retailer or Toyota authorized repairer, or any reliable repairer.
WARNI NG
Only use products recommended by TOYOTA or products of equivalent quality and specification.In order to optimise the operation of components as important as those in the braking system, TOYOTA selects and offers very specific products.
12 V battery
The battery does not require any maintenance.However, check regularly that the terminals are correctly tightened (versions without quick release terminals) and that the connections are clean.
NOTIC E
For more information on the precautions to take before any work on the 12 V battery, refer to the corresponding section.
WARNI NG
Versions equipped with Stop & Start are fitted with a 12 V lead-acid battery of specific technology and specification.Its replacement should be carried out only by a TOYOTA dealer or a qualified workshop.
Passenger compartment
filter
Depending on the environment and the use of the vehicle (e.g. dusty atmosphere, city driving), change it twice as often, if necessary.
NOTIC E
A clogged passenger compartment filter can adversely affect air conditioning system performance and generate undesirable odours.
Page 218 of 320

218
NOTIC E
For more information on the Warning and indicator lamps and the associated alerts, or the Indicators, please refer to the corresponding sections.
WARNI NG
Once the AdBlue® tank is empty, a device
required by law prevents the engine from being restarted.If the SCR system is faulty, the level of emissions from the vehicle will no longer meet the Euro 6 standard and the vehicle starts polluting the environment.In the event of a confirmed SCR system malfunction, it is essential to visit any authorized Toyota retailer or Toyota authorized repairer, or any reliable repairer. After 685 miles (1,100 km), a device is automatically activated to prevent the engine from starting.In both cases, a range indicator indicates the distance that can be travelled before the vehicle is stopped.
NOTIC E
Freezing of the AdBlue®
AdBlue® freezes at temperatures below around -11°C.The SCR system includes a heater for the AdBlue® tank, allowing you to continue driving in very cold conditions.
Supply of AdBlue®
It is recommended that the AdBlue® be topped up as soon as the first alert is issued indicating that the reserve level has been reached.
WARNI NG
For the correct operation of the SCR system:– Use only AdBlue® fluid that meets the ISO 22241 standard.– Never transfer AdBlue® to another container as it would lose its purity.– Never dilute AdBlue® with water.
You can obtain AdBlue® from any authorized Toyota retailer or Toyota authorized repairer, or any reliable repairer, as well as service stations equipped with AdBlue® pumps specially designed for passenger vehicles.
WARNI NG
Never top up from an AdBlue® dispenser reserved for heavy goods vehicles.
Storage recommendations
AdBlue® freezes at about -11°C and deteriorates above +25°C. Containers should be stored in a cool area and protected from direct sunlight.Under these conditions, the fluid can be kept for at least a year.If the fluid has frozen, it can be used once it has completely thawed out in the ambient air.
WARNI NG
Never store AdBlue® containers in your vehicle.
Precautions for use
AdBlue® is a urea-based solution. This fluid is non-flammable, colourless and odourless (when kept in a cool place).In the event of contact with the skin, wash the affected area with soap and running water. In the event of contact with the eyes, immediately rinse the eyes with large amounts of water or with an eye wash solution for at least 15 minutes. Seek medical attention if you feel a persistent burning sensation or irritation.
Page 219 of 320

219
Practical information
7
If swallowed, immediately wash out the mouth with clean water and then drink plenty of water.In certain conditions (high temperature, for example), the risk of release of ammonia cannot be excluded: do not inhale the fluid. Ammonia vapours have an irritant effect on mucous membranes (eyes, nose and throat).
WARNI NG
Store AdBlue® out of the reach of children, in
its original container.
Precautions for use
AdBlue® is a urea-based solution. This fluid is non-flammable, colourless and odourless (when kept in a cool place).In the event of contact with the skin, wash the affected area with soap and running water. In the event of contact with the eyes, immediately rinse the eyes with large amounts of water or with an eye wash solution for at least 15 minutes. Seek medical attention if you feel a persistent burning sensation or irritation.If swallowed, immediately wash out the mouth with clean water and then drink plenty of water.In certain conditions (high temperature, for example), the risk of release of ammonia cannot be excluded: do not inhale the fluid. Ammonia vapours have an irritant effect on mucous membranes (eyes, nose and throat).
WARNI NG
Store AdBlue® out of the reach of children, in its original container.
Procedure
Before starting the top-up procedure, ensure that the vehicle is parked on a flat and level surface.In wintry conditions, ensure that the temperature of the vehicle is above -11°C. Otherwise the AdBlue® may be frozen and so cannot be poured into the tank. Park the vehicle in a warmer area for a few hours to allow the top-up to be carried out.
WARNI NG
Never pour the AdBlue® into the Diesel fuel tank.
WARNI NG
If any AdBlue® is splashed, or if there are any spillages on the bodywork, rinse immediately with cold water or wipe with a damp cloth.If the fluid has crystallised, clean it off using a sponge and hot water.
WARNI NG
Important: in the event of a top-up after a breakdown because of a lack of AdBlue, it is essential to wait around 5 minutes before switching on the ignition, without opening the driver’s door, unlocking the vehicle, inserting the key into the ignition switch, or bringing the key for the "Keyless Entry and Starting" system into the passenger compartment.Switch on the ignition, then wait for 10 seconds before starting the engine.
► Switch off the ignition and remove the key from the switch to switch off the engine.or► With Keyless Entry and Starting, press the "START/STOP" button to switch off the engine.
► With the vehicle unlocked and the fuel filler flap open, turn the blue cap of the AdBlue® tank anti-clockwise and remove it.► With a container of AdBlue®: after checking the expiry date, read the instructions on the label carefully before pouring the contents of the container into the vehicle's AdBlue tank.
Page 220 of 320
220
► With an AdBlue® pump: insert the nozzle and fill the tank until the nozzle automatically cuts out.
WARNI NG
In order not to overfill the AdBlue® tank:– Add between 10 and 13 litres using AdBlue® containers.– Stop after the nozzle’s first automatic cut-
out, if you are refilling at a service station.The system only registers AdBlue® top-ups of 5 litres or more.
WARNI NG
If the AdBlue® tank is completely empty – which is confirmed by the message "Top up AdBlue: Starting impossible" – it is essential to add at least 5 litres.
After refilling
► Refit the blue cap to the tank filler and turn it clockwise, as far as it will go.► Close the fuel filler flap.
Do not dispose of AdBlue® bottles or containers in the household waste.Place them in a container reserved for this purpose or take them back to where you purchased them.
Free-wheeling
In certain situations, you must allow the vehicle to free-wheel (while being towed, on a rolling road, in an automatic car wash, or being transported by rail or sea freight, etc.).The procedure varies according to the type of gearbox and parking brake.
WARNI NG
Do not leave the vehicle unattended while coasting.
With a manual gearbox and
electric parking brake /
To release them
► With the engine running and while depressing the brake pedal, move the gear selector to the neutral position.
► While depressing the brake pedal, switch off the ignition.► Release the brake pedal, then switch on the ignition again.► While depressing the brake pedal, press the control lever to release the parking brake.► Release the brake pedal, then switch off the ignition.
Reverting to normal operation
► While depressing the brake pedal, restart the engine.
With an automatic gearbox
and electric parking brake /
To release them
► With the engine running and while depressing the brake pedal, set the gear selector to N.► While depressing the brake pedal, switch off the ignition.
► Release the brake pedal, then switch on the ignition again.► While depressing the brake pedal, press the control lever to release the parking brake.► Release the brake pedal, then switch off the ignition.
Reverting to normal operation
► While depressing the brake pedal, restart the engine, then set the gear selector to P.
Page 221 of 320
221
Practical information
7
With drive selector and
electric parking brake /
Release procedure
► With the vehicle stationary and the engine running, depress the brake pedal and select mode N.Within 5 seconds:► Depress and hold the brake pedal, then observe this order: switch off the ignition (if start with START/STOP, press and hold the button for 2 seconds) and move the push selector forwards or backwards.► Release the brake pedal, then switch on the ignition again.► Place your foot on the brake and press the electric parking brake control to release it.► Release the brake pedal, then switch off the ignition.
NOTIC E
Keyless Entry and StartingYou must not depress the brake pedal while switching the ignition on again, then switching it off. If you do, the engine will start, requiring you to restart the procedure.
WARNI NG
A message is displayed on the instrument panel to confirm the unlocking of the wheels for 15 minutes.When the vehicle is free-wheeling, the audio system cannot be updated (message displayed on the instrument panel).
Reverting to normal operation
► While depressing the brake pedal, restart the engine, then set the gear selector to P.
Advice on care and
maintenance
General recommendations
Observe the following recommendations to avoid damaging the vehicle.
Exterior
WARNI NG
Never use a high-pressure jet wash in the engine compartment - risk of damaging the electrical components!Do not wash the vehicle in bright sunshine or extremely cold conditions.
NOTIC E
When washing the vehicle at an automatic roller-brush car wash, be sure to lock the doors and, depending on version, remove the electronic key.When using a pressure washer, hold the lance at least 30 cm from the vehicle (particularly when cleaning areas containing chipped paint, sensors or seals).Promptly clean up any stains containing chemicals liable to damage the vehicle's paint (including tree resin, bird droppings, insect secretions, pollen and tar).If justified by the environment, clean the vehicle frequently to remove salty deposits (in coastal areas), soot (in industrial areas) and mud/salts (in wet or cold areas). These substances can be highly corrosive.Contact any authorized Toyota retailer or Toyota authorized repairer, or any reliable repairer for advice on removing stubborn stains requiring special products (such as tar
or insect removers).Preferably, have paint touch-ups performed by any authorized Toyota retailer or Toyota authorized repairer, or any reliable repairer.
Page 226 of 320

226
WARNI NG
If after approximately 7 minutes the pressure of 2 bars is not reached, this indicates that the tyre is not repairable; contact a TOYOTA dealer or a qualified workshop for assistance.
► Move the switch to position "O".► Disconnect the compressor's electric plug from the vehicle's 12 V socket.► Refit the cap on the valve.► Remove the kit.► Remove and store the bottle of sealant.
WARNI NG
The sealant product is harmful if swallowed and causes irritation to the eyes.Keep this product out of the reach of children.The use-by date of the fluid is marked on the bottle.After use, do not discard the bottle in standard waste, take it to a TOYOTA dealer or an authorised waste disposal site.Do not forget to obtain a new bottle of sealant, available from a TOYOTA dealer or a qualified workshop.
► Drive immediately for approximately 3 miles (5 kilometres) at reduced speed (between 20 and 60 km/h (12 and 37 mph)) to plug the puncture.► Stop to check the repair and the tyre pressure using the kit.
WARNI NG
With a tyre repaired using this type of kit, do not exceed a speed of 80 km/h (50 mph) and do not drive more than 200 km (125 miles).Contact a TOYOTA dealer or a qualified workshop to have the tyre changed.
Checking / adjusting tyre
pressures
The compressor can be used, without injecting sealant, to check and, if necessary, adjust the tyre pressures.► Remove the valve cap from the tyre and keep it in a clean place.► Uncoil the pipe stowed under the compressor.
► Screw the pipe onto the valve and tighten firmly.► Check that the compressor switch is in position "O".► Fully uncoil the electric cable stowed under the compressor.► Connect the compressor's electric plug to the vehicle's 12 V socket.► Switch on the ignition.► Start the compressor by placing the switch at position "I" and adjust the pressure to the value shown on the vehicle's tyre pressure label. To deflate: press the black button located on the compressor pipe, near the valve connection.
WARNI NG
If after 7 minutes the pressure of 2 bars is not reached, this indicates that the tyre is damaged; contact a TOYOTA dealer or a qualified workshop for assistance.
► Once the correct pressure is reached, put the switch in position "O".► Remove the kit and stow it.► Replace the valve cap.
WARNI NG
Should the pressure of one or more tyres be adjusted, it is necessary to reinitialise the under-inflation detection system.For more information on Tyre under-inflation detection, refer to the corresponding section.