fold seats TOYOTA PROACE CITY 2022 Owners Manual
[x] Cancel search | Manufacturer: TOYOTA, Model Year: 2022, Model line: PROACE CITY, Model: TOYOTA PROACE CITY 2022Pages: 320, PDF Size: 75.81 MB
Page 54 of 320
54
General
recommendations for the
seats
WARNI NG
For safety reasons, seat adjustments must only be made when the vehicle is stationary.
WARNI NG
Folding or unfolding the seat backrests must only be done with the vehicle stationary.
WARNI NG
Before moving the seat backwards, ensure that there is no person or object that might prevent the full travel of the seat.There is a risk of trapping or pinching
passengers if present in the rear seats or of jamming the seat if large objects are placed on the floor behind the seat.
WARNI NG
Do not place hard or heavy objects on the backrests forming a table. They could become
dangerous projectiles in the event of sudden braking or a collision.– Do not remove a head restraint without stowing it; secure it to a support inside the vehicle.– Check that the seat belts remain accessible to the passenger and easy to fasten.– Passengers must never take their seat without adjusting and fastening their seat belt.– In row 3, be careful not to leave your feet under the row 2 seat while it is being tilted.– When a row 3 seat is in the fully folded position, ensure that the strap is correctly hooked to the Top Tether fixing of the row 2 backrest: risk of unexpected tipping of the seat.
WARNI NG
Before carrying out the manoeuvres, check that nothing and no one is obstructing the moving elements and their locking.
To avoid sudden folding, take care to hold the backrest and support it until it is horizontal.Never put your hand underneath the seat cushion to guide the seat downwards or upwards, you could get your fingers trapped. Place your hand on the grip/strap (depending on equipment) at the top of the seat cushion.
WARNI NG
Please note: an incorrectly latched backrest compromises the safety of passengers in the event of sudden braking or an impact.The contents of the boot may be thrown forward - risk of severe injury!
Front seats
Correct driving position
Before taking to the road and to make the most of the ergonomic layout of the instruments and controls, carry out these adjustments in the following order:– head restraint height.– seat backrest angle.– seat cushion height.– longitudinal seat position.– steering wheel height and reach.– rear view mirror and door mirrors.
Page 61 of 320
61
Ease of use and comfort
3
WARNI NG
Never put your hand underneath the seat cushion to guide the seat downwards or upwards, you could get your fingers trapped.Always just use the strap.Before carrying out these manoeuvres, check that nothing and nobody is obstructing the moving elements and their locking.
Folded position
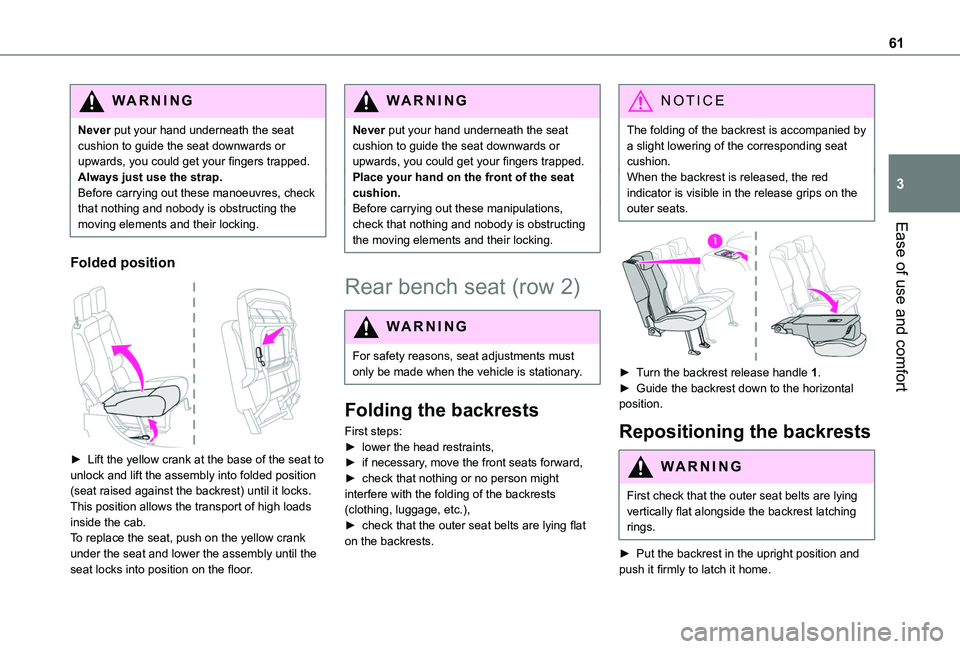
► Lift the yellow crank at the base of the seat to unlock and lift the assembly into folded position (seat raised against the backrest) until it locks.This position allows the transport of high loads inside the cab.To replace the seat, push on the yellow crank under the seat and lower the assembly until the seat locks into position on the floor.
WARNI NG
Never put your hand underneath the seat cushion to guide the seat downwards or upwards, you could get your fingers trapped.Place your hand on the front of the seat cushion.Before carrying out these manipulations, check that nothing and nobody is obstructing the moving elements and their locking.
Rear bench seat (row 2)
WARNI NG
For safety reasons, seat adjustments must only be made when the vehicle is stationary.
Folding the backrests
First steps:
► lower the head restraints,► if necessary, move the front seats forward,► check that nothing or no person might interfere with the folding of the backrests (clothing, luggage, etc.),► check that the outer seat belts are lying flat on the backrests.
NOTIC E
The folding of the backrest is accompanied by a slight lowering of the corresponding seat cushion.When the backrest is released, the red indicator is visible in the release grips on the outer seats.
► Turn the backrest release handle 1.► Guide the backrest down to the horizontal position.
Repositioning the backrests
WARNI NG
First check that the outer seat belts are lying vertically flat alongside the backrest latching rings.
► Put the backrest in the upright position and push it firmly to latch it home.
Page 62 of 320
62
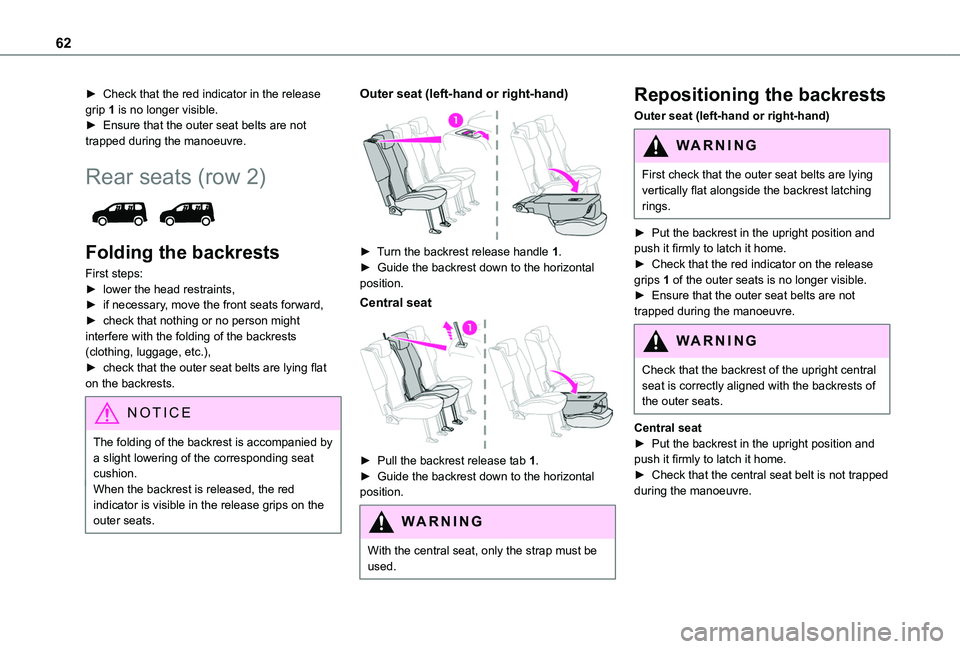
► Check that the red indicator in the release grip 1 is no longer visible.► Ensure that the outer seat belts are not trapped during the manoeuvre.
Rear seats (row 2)
Folding the backrests
First steps:► lower the head restraints,► if necessary, move the front seats forward,► check that nothing or no person might interfere with the folding of the backrests (clothing, luggage, etc.),► check that the outer seat belts are lying flat on the backrests.
NOTIC E
The folding of the backrest is accompanied by
a slight lowering of the corresponding seat cushion.When the backrest is released, the red indicator is visible in the release grips on the outer seats.
Outer seat (left-hand or right-hand)
► Turn the backrest release handle 1.► Guide the backrest down to the horizontal position.
Central seat
► Pull the backrest release tab 1.► Guide the backrest down to the horizontal position.
WARNI NG
With the central seat, only the strap must be used.
Repositioning the backrests
Outer seat (left-hand or right-hand)
WARNI NG
First check that the outer seat belts are lying vertically flat alongside the backrest latching rings.
► Put the backrest in the upright position and
push it firmly to latch it home.► Check that the red indicator on the release grips 1 of the outer seats is no longer visible.► Ensure that the outer seat belts are not trapped during the manoeuvre.
WARNI NG
Check that the backrest of the upright central seat is correctly aligned with the backrests of the outer seats.
Central seat► Put the backrest in the upright position and push it firmly to latch it home.► Check that the central seat belt is not trapped during the manoeuvre.
Page 63 of 320
63
Ease of use and comfort
3
Rear seats (row 3)
Access to row 3
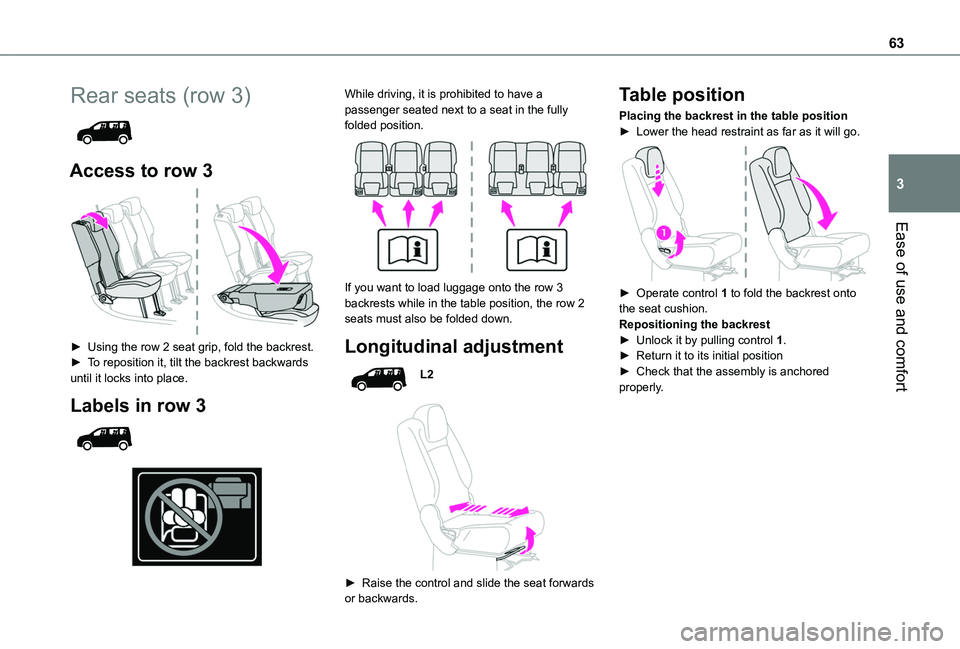
► Using the row 2 seat grip, fold the backrest.► To reposition it, tilt the backrest backwards until it locks into place.
Labels in row 3
While driving, it is prohibited to have a passenger seated next to a seat in the fully folded position.
If you want to load luggage onto the row 3 backrests while in the table position, the row 2 seats must also be folded down.
Longitudinal adjustment
L2
► Raise the control and slide the seat forwards or backwards.
Table position
Placing the backrest in the table position► Lower the head restraint as far as it will go.
► Operate control 1 to fold the backrest onto the seat cushion.Repositioning the backrest► Unlock it by pulling control 1.► Return it to its initial position► Check that the assembly is anchored properly.
Page 70 of 320
70
Side blinds
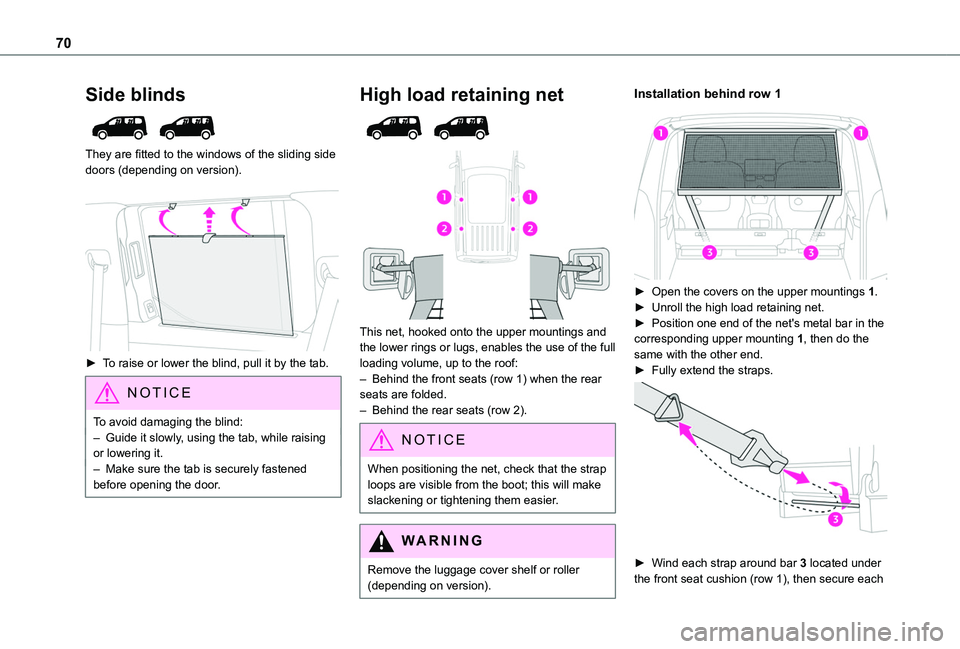
They are fitted to the windows of the sliding side doors (depending on version).
► To raise or lower the blind, pull it by the tab.
NOTIC E
To avoid damaging the blind:– Guide it slowly, using the tab, while raising
or lowering it.– Make sure the tab is securely fastened before opening the door.
High load retaining net
This net, hooked onto the upper mountings and the lower rings or lugs, enables the use of the full loading volume, up to the roof:– Behind the front seats (row 1) when the rear seats are folded.– Behind the rear seats (row 2).
NOTIC E
When positioning the net, check that the strap loops are visible from the boot; this will make slackening or tightening them easier.
WARNI NG
Remove the luggage cover shelf or roller (depending on version).
Installation behind row 1
► Open the covers on the upper mountings 1.► Unroll the high load retaining net.► Position one end of the net's metal bar in the corresponding upper mounting 1, then do the same with the other end.► Fully extend the straps.
► Wind each strap around bar 3 located under the front seat cushion (row 1), then secure each
Page 71 of 320
71
Ease of use and comfort
3
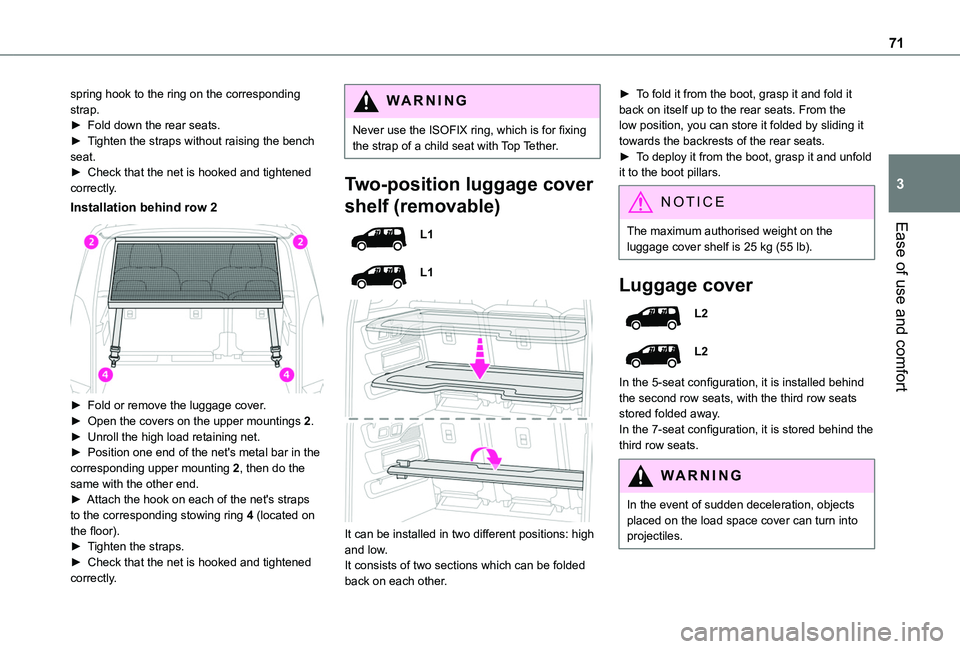
spring hook to the ring on the corresponding strap.► Fold down the rear seats.► Tighten the straps without raising the bench seat.► Check that the net is hooked and tightened correctly.
Installation behind row 2
► Fold or remove the luggage cover.► Open the covers on the upper mountings 2.► Unroll the high load retaining net.
► Position one end of the net's metal bar in the corresponding upper mounting 2, then do the same with the other end.► Attach the hook on each of the net's straps to the corresponding stowing ring 4 (located on the floor).► Tighten the straps.► Check that the net is hooked and tightened correctly.
WARNI NG
Never use the ISOFIX ring, which is for fixing the strap of a child seat with Top Tether.
Two-position luggage cover
shelf (removable)
L1
L1
It can be installed in two different positions: high and low.It consists of two sections which can be folded back on each other.
► To fold it from the boot, grasp it and fold it back on itself up to the rear seats. From the low position, you can store it folded by sliding it towards the backrests of the rear seats.► To deploy it from the boot, grasp it and unfold it to the boot pillars.
NOTIC E
The maximum authorised weight on the
luggage cover shelf is 25 kg (55 lb).
Luggage cover
L2
L2
In the 5-seat configuration, it is installed behind the second row seats, with the third row seats stored folded away.In the 7-seat configuration, it is stored behind the third row seats.
WARNI NG
In the event of sudden deceleration, objects placed on the load space cover can turn into projectiles.
Page 75 of 320
75
Ease of use and comfort
3
Extenso cabin
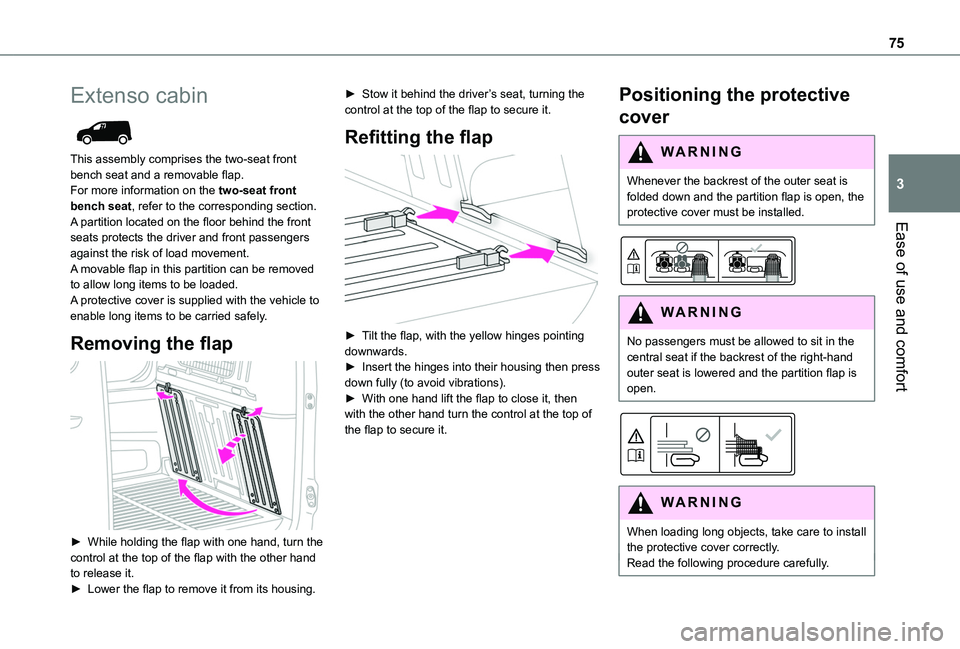
This assembly comprises the two-seat front bench seat and a removable flap.For more information on the two-seat front bench seat, refer to the corresponding section.A partition located on the floor behind the front seats protects the driver and front passengers against the risk of load movement.A movable flap in this partition can be removed to allow long items to be loaded.A protective cover is supplied with the vehicle to enable long items to be carried safely.
Removing the flap
► While holding the flap with one hand, turn the control at the top of the flap with the other hand to release it.► Lower the flap to remove it from its housing.
► Stow it behind the driver’s seat, turning the control at the top of the flap to secure it.
Refitting the flap
► Tilt the flap, with the yellow hinges pointing downwards.► Insert the hinges into their housing then press down fully (to avoid vibrations).► With one hand lift the flap to close it, then with the other hand turn the control at the top of the flap to secure it.
Positioning the protective
cover
WARNI NG
Whenever the backrest of the outer seat is folded down and the partition flap is open, the protective cover must be installed.
WARNI NG
No passengers must be allowed to sit in the central seat if the backrest of the right-hand outer seat is lowered and the partition flap is open.
WARNI NG
When loading long objects, take care to install the protective cover correctly.Read the following procedure carefully.
Page 76 of 320
76
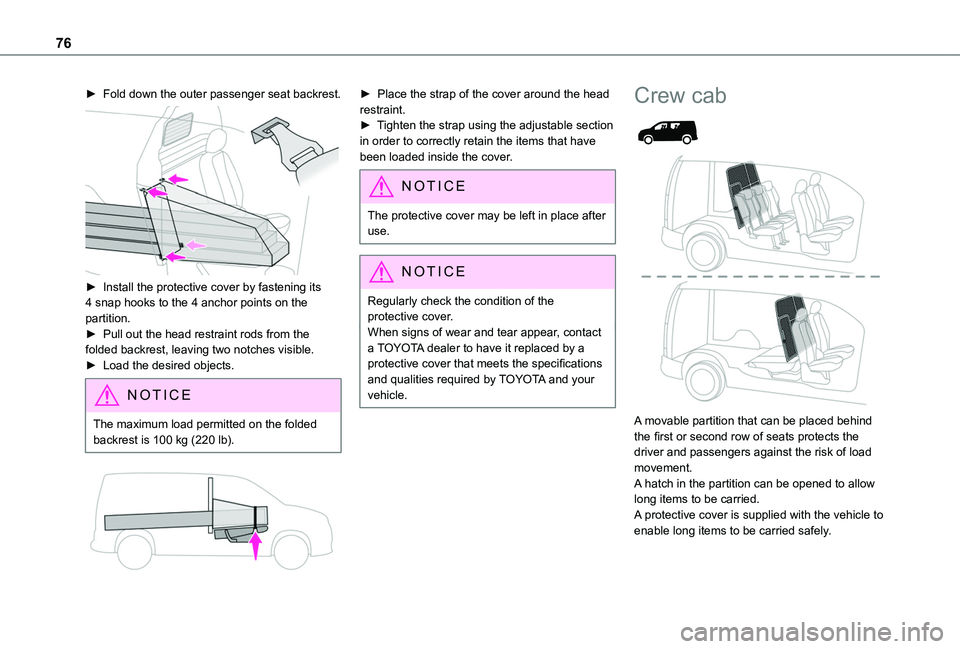
► Fold down the outer passenger seat backrest.
► Install the protective cover by fastening its 4 snap hooks to the 4 anchor points on the partition.► Pull out the head restraint rods from the folded backrest, leaving two notches visible.► Load the desired objects.
NOTIC E
The maximum load permitted on the folded backrest is 100 kg (220 lb).
► Place the strap of the cover around the head restraint.► Tighten the strap using the adjustable section in order to correctly retain the items that have been loaded inside the cover.
NOTIC E
The protective cover may be left in place after use.
NOTIC E
Regularly check the condition of the protective cover.When signs of wear and tear appear, contact a TOYOTA dealer to have it replaced by a protective cover that meets the specifications and qualities required by TOYOTA and your vehicle.
Crew cab
A movable partition that can be placed behind the first or second row of seats protects the
driver and passengers against the risk of load movement.A hatch in the partition can be opened to allow long items to be carried.A protective cover is supplied with the vehicle to enable long items to be carried safely.
Page 77 of 320
77
Ease of use and comfort
3
WARNI NG
Lock the movable partition in these 2 positions only.
WARNI NG
Do not lean on the movable partition when boarding!
WARNI NG
Stay alert if the vehicle is on a steep slope, with loads behind the partition and passengers on board!
WARNI NG
Do not place loads behind the partition positioned behind row 2, if the backrest of part 2/3 of the bench seat is folded down.
WARNI NG
Deactivate the front passenger airbag when carrying long objects.
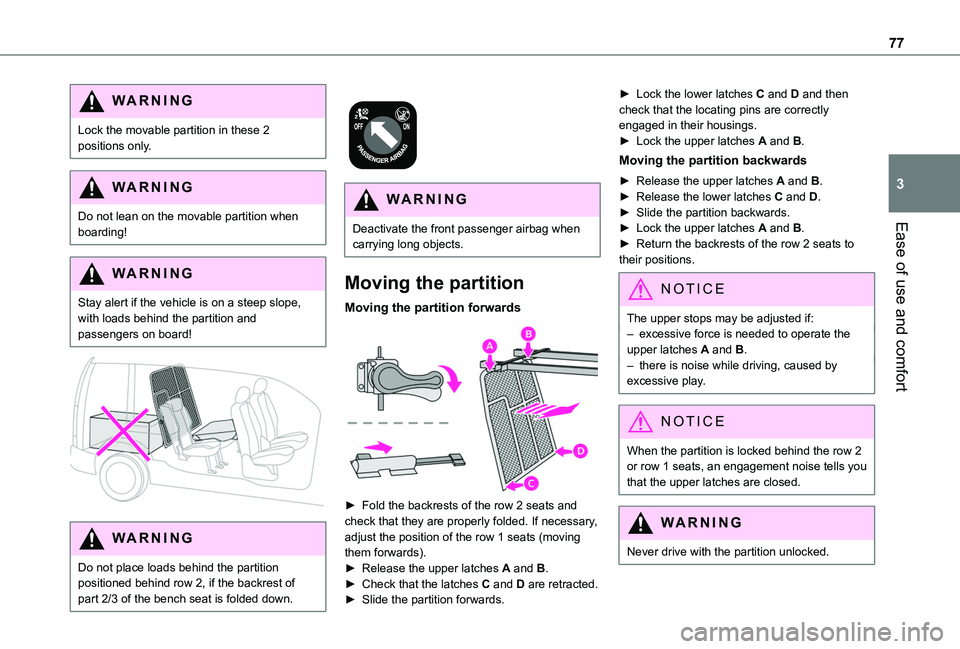
Moving the partition
Moving the partition forwards
► Fold the backrests of the row 2 seats and check that they are properly folded. If necessary, adjust the position of the row 1 seats (moving them forwards).► Release the upper latches A and B.► Check that the latches C and D are retracted.
► Slide the partition forwards.
► Lock the lower latches C and D and then check that the locating pins are correctly engaged in their housings.► Lock the upper latches A and B.
Moving the partition backwards
► Release the upper latches A and B.► Release the lower latches C and D.► Slide the partition backwards.► Lock the upper latches A and B.► Return the backrests of the row 2 seats to their positions.
NOTIC E
The upper stops may be adjusted if:– excessive force is needed to operate the upper latches A and B.– there is noise while driving, caused by excessive play.
NOTIC E
When the partition is locked behind the row 2 or row 1 seats, an engagement noise tells you that the upper latches are closed.
WARNI NG
Never drive with the partition unlocked.
Page 113 of 320
11 3
Safety
5
Unfastened
After the ignition is switched on, warning lamp 1 (depending on version) and the corresponding indicator lamps light up if the driver and/or one or more passengers unfasten their seat belts.At a speed greater than 12 mph (20 km/h), these warning lamps flash, accompanied by an audible signal for approximately two minutes. After this time, these warning lamps remain on as long as the seatbelts are not refastened.
Advice
WARNI NG
The driver must ensure that passengers use the seat belts correctly and that they are all fastened before setting off.Wherever seated in the vehicle, you must always fasten the seat belt, even for short journeys.Do not invert the seat belt buckles, as they will not fulfil their role properly.To ensure the proper functioning of the belt buckles, make sure that there are no foreign bodies present (e.g. a coin) before fastening.Before and after use, ensure that the seat belt is reeled in correctly.After folding or moving a seat or rear bench seat, ensure that the seat belt is positioned and reeled in correctly.
WARNI NG
InstallationThe lower part of the strap must be positioned as low as possible over the pelvis.The upper part must be positioned in the hollow of the shoulder.At the front, adjusting the position of the seat belt may require the seat height to be adjusted.In order to be effective, a seat belt must:– be tightened as close to the body as possible.– be pulled in front of you with a smooth movement, ensuring that it is not twisted.– must only be used to secure one person.– not show signs of tearing or fraying.– not be changed or modified, in order to avoid affecting its performance.
WARNI NG
Recommendations for childrenUse a suitable child seat if the passenger is less than 12 years old or shorter than 1.5 metres (4 ft 11").Never use the same seat belt to secure more than one child.Never carry a child on your lap.For more information on Child seats, refer to the corresponding section.
WARNI NG
MaintenanceIn accordance with current safety regulations, for all work on your vehicle's seat belts, contact a qualified workshop with the skills and equipment needed, which any authorized Toyota retailer or Toyota authorized repairer, or any reliable repairer is able to provide.Have the seat belts checked regularly by any authorized Toyota retailer or Toyota authorized repairer, or any reliable repairer, particularly if the straps show signs of damage.Clean the seat belt straps with soapy water or a textile cleaning product, sold by any authorized Toyota retailer or Toyota authorized repairer, or any reliable repairer.
WARNI NG
In the event of an impact
Depending on the nature and seriousness of impacts, the pyrotechnic pretensioner device may trigger before and independently of airbag deployment. Deployment of the pretensioners is accompanied by a slight discharge of harmless smoke and a noise, due to the activation of the pyrotechnic cartridge incorporated in the system.