ECO mode TOYOTA PROACE VERSO 2016 Owner's Manual
[x] Cancel search | Manufacturer: TOYOTA, Model Year: 2016, Model line: PROACE VERSO, Model: TOYOTA PROACE VERSO 2016Pages: 504, PDF Size: 81.64 MB
Page 215 of 504
215
Going into engine
START mode
START mode is invoked automatically in certain temporary conditions (examples: battery charge, engine temperature, braking assistance, air conditioning setting) to assure correct operation of the system and mainly when:- you open the driver's door,
- you open a sliding side door,- you unfasten the driver's seat belt,- the speed of the vehicle exceeds 15 mph (25 km/h) or 2 mph (3 km/h) (depending on the engine) with a manual gearbox,- the speed of the vehicle exceeds 2 mph (3 km/h) with an automatic gearbox.
Special cases: START invoked automatically
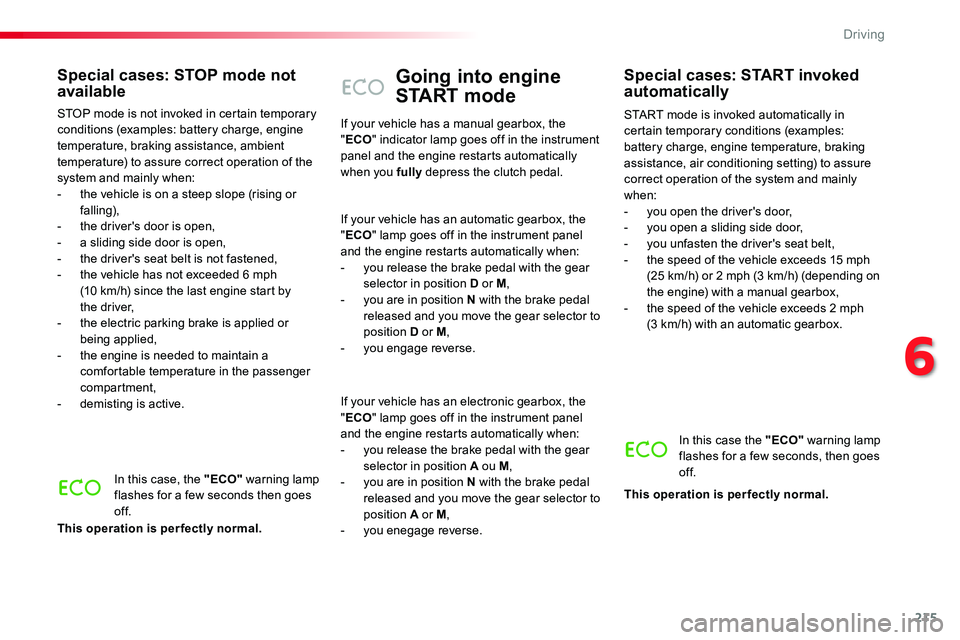
In this case the "ECO" warning lamp flashes for a few seconds, then goes of f.
This operation is perfectly normal.
If your vehicle has a manual gearbox, the "ECO" indicator lamp goes off in the instrument panel and the engine restarts automatically when you fully depress the clutch pedal.
If your vehicle has an automatic gearbox, the "ECO" lamp goes off in the instrument panel and the engine restarts automatically when:- you release the brake pedal with the gear selector in position D or M,- you are in position N with the brake pedal released and you move the gear selector to position D or M,- you engage reverse.
If your vehicle has an electronic gearbox, the "ECO" lamp goes off in the instrument panel and the engine restarts automatically when:- you release the brake pedal with the gear selector in position A ou M,- you are in position N with the brake pedal released and you move the gear selector to position A or M,- you enegage reverse.
Special cases: STOP mode not available
STOP mode is not invoked in certain temporary conditions (examples: battery charge, engine temperature, braking assistance, ambient temperature) to assure correct operation of the system and mainly when:- the vehicle is on a steep slope (rising or falling),
- the driver's door is open,- a sliding side door is open,- the driver's seat belt is not fastened,- the vehicle has not exceeded 6 mph (10 km/h) since the last engine start by the driver,- the electric parking brake is applied or being applied,- the engine is needed to maintain a comfortable temperature in the passenger compartment,- demisting is active.
In this case, the "ECO" warning lamp flashes for a few seconds then goes of f.
This operation is perfectly normal.
6
Driving
Page 216 of 504
216
Deactivation / Activation
With the audio system
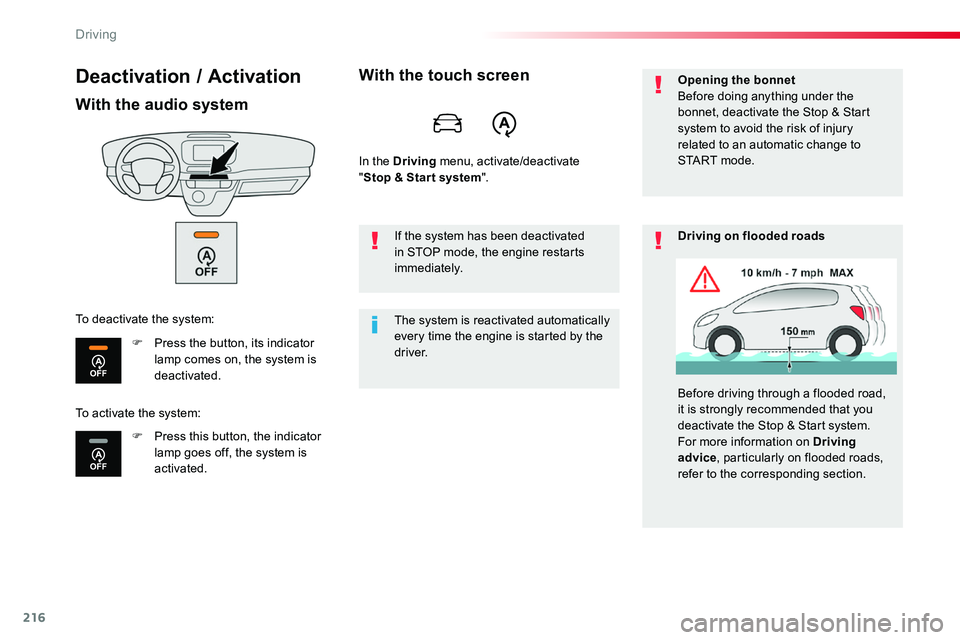
F Press the button, its indicator lamp comes on, the system is deactivated.
F Press this button, the indicator lamp goes off, the system is activated.
To deactivate the system:
With the touch screen
In the Driving menu, activate/deactivate "Stop & Star t system".
The system is reactivated automatically every time the engine is started by the driver.
If the system has been deactivated in STOP mode, the engine restarts immediately.
Opening the bonnetBefore doing anything under the bonnet, deactivate the Stop & Start system to avoid the risk of injury related to an automatic change to S TA R T m o d e .
Driving on flooded roads
Before driving through a flooded road, it is strongly recommended that you deactivate the Stop & Start system.For more information on Driving advice, particularly on flooded roads, refer to the corresponding section.
To activate the system:
Driving
Page 229 of 504
229
If your vehicle has a manual gearbox, third or fourth gear, or higher, must be engaged.
If your vehicle has an automatic or electronic gearbox, second gear or higher must be engaged.
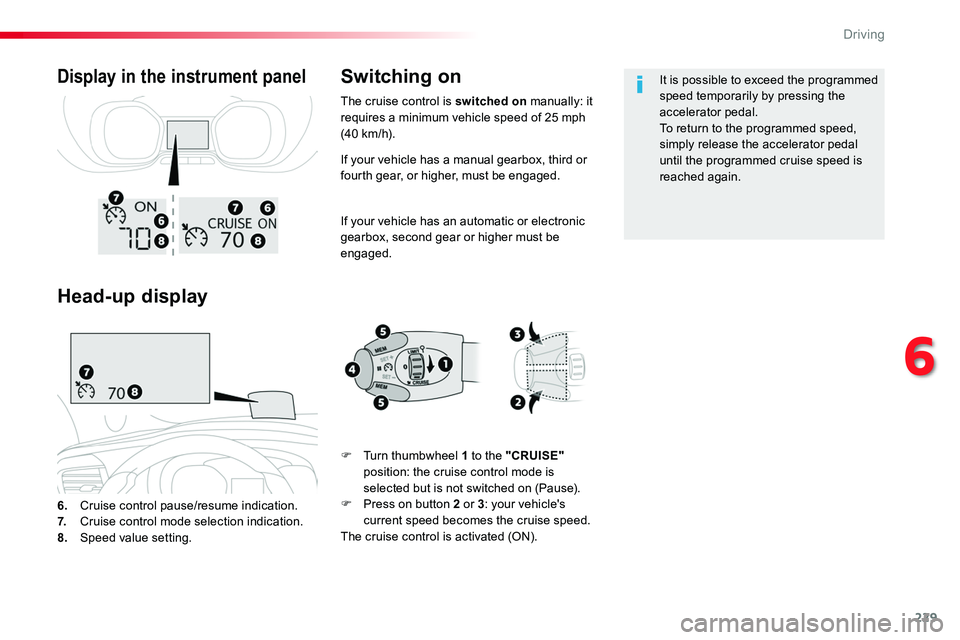
6. Cruise control pause/resume indication.7. Cruise control mode selection indication.
8. Speed value setting.
Display in the instrument panel
Head-up display
Switching on
F Turn thumbwheel 1 to the "CRUISE" position: the cruise control mode is selected but is not switched on (Pause).F Press on button 2 or 3: your vehicle's current speed becomes the cruise speed.The cruise control is activated (ON).
It is possible to exceed the programmed speed temporarily by pressing the accelerator pedal.To return to the programmed speed, simply release the accelerator pedal until the programmed cruise speed is reached again.
The cruise control is switched on manually: it requires a minimum vehicle speed of 25 mph (40 km/h).
6
Driving
Page 233 of 504
233
If your vehicle has an automatic or electronic gearbox, second gear or higher must be engaged.
If your vehicle has a manual gearbox, third or fourth gear, or higher, must be engaged.
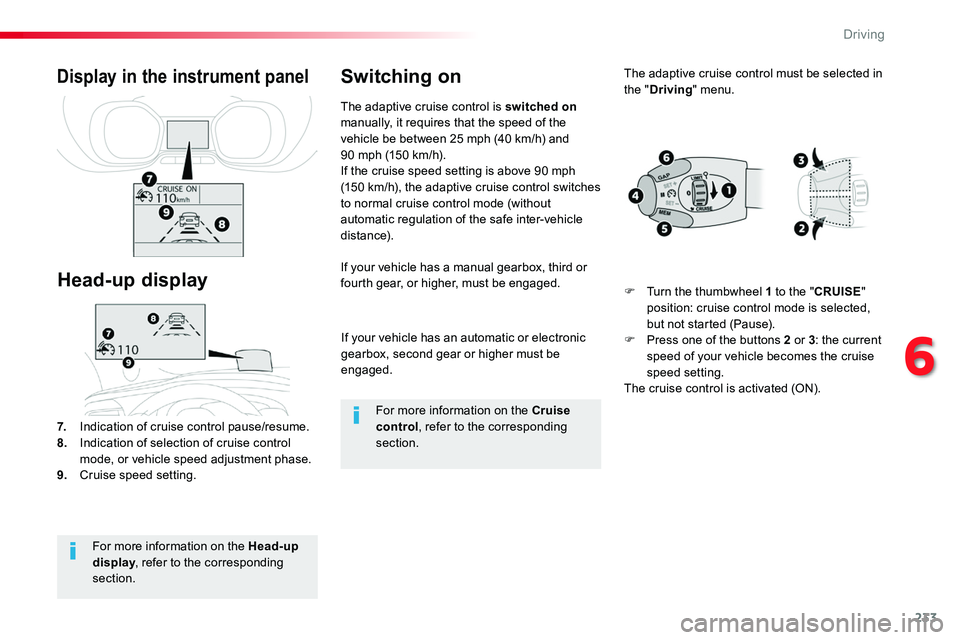
7. Indication of cruise control pause/resume.8. Indication of selection of cruise control mode, or vehicle speed adjustment phase.9. Cruise speed setting.
Display in the instrument panel
Head-up display
The adaptive cruise control is switched on manually, it requires that the speed of the vehicle be between 25 mph (40 km/h) and 90 mph (150 km/h).If the cruise speed setting is above 90 mph (150 km/h), the adaptive cruise control switches to normal cruise control mode (without automatic regulation of the safe inter-vehicle distance).
Switching on
For more information on the Head-up display, refer to the corresponding section.
For more information on the Cruise control, refer to the corresponding
section.
The adaptive cruise control must be selected in the "Driving" menu.
F Turn the thumbwheel 1 to the "CRUISE" position: cruise control mode is selected, but not started (Pause).F Press one of the buttons 2 or 3: the current speed of your vehicle becomes the cruise speed setting.The cruise control is activated (ON).
6
Driving
Page 238 of 504
238
In the event of a fault with the adaptive cruise control, you are alerted by an audible signal and display of the message message "Driving aid functions fault".Have the system checked by an authorized Toyota dealer or repairer, or another duly qualified and equipped professional.
Operating faultThe adaptive cruise control operates by day and at night, in fog or moderate rainfall.
When the cruise control is working, take care if making a maintained press on one of the cruise control programmed speed modification buttons: this can lead to a very quick change in the speed of your vehicle.Do not use the adaptive cruise control on slippery sur faces or in heavy traffic.
When descending a steep hill, the cruise control may not be able to prevent the vehicle from exceeding the programmed speed.When ascending a steep hill or when towing, it might not be possible to achieve or maintain the programmed speed.
The use of mats not approved by Toyota may inter fere with the operation of the adaptive cruise control.To avoid any risk of jamming the pedals:- ensure that mats are secured c o r r e c t l y,- never fit one mat on top of another.It is recommended that you always keep
your feet close to the pedals.
If the difference between the programmed speed setting and the speed of the vehicle in front is too great, the speed cannot be adjusted: the cruise control is automatically deactivated.
The system does not act on the braking system, but works only with engine braking.The regulation range is limited: there will no longer be any adjustment of speed if the difference between the programmed speed setting and the speed of the vehicle in front becomes too high.
The adaptive cruise control cannot in any circumstances replace the observation of speed limits, nor the need for the vigilance on the part of the driver.
Driving
Page 255 of 504
255
180° rear vision
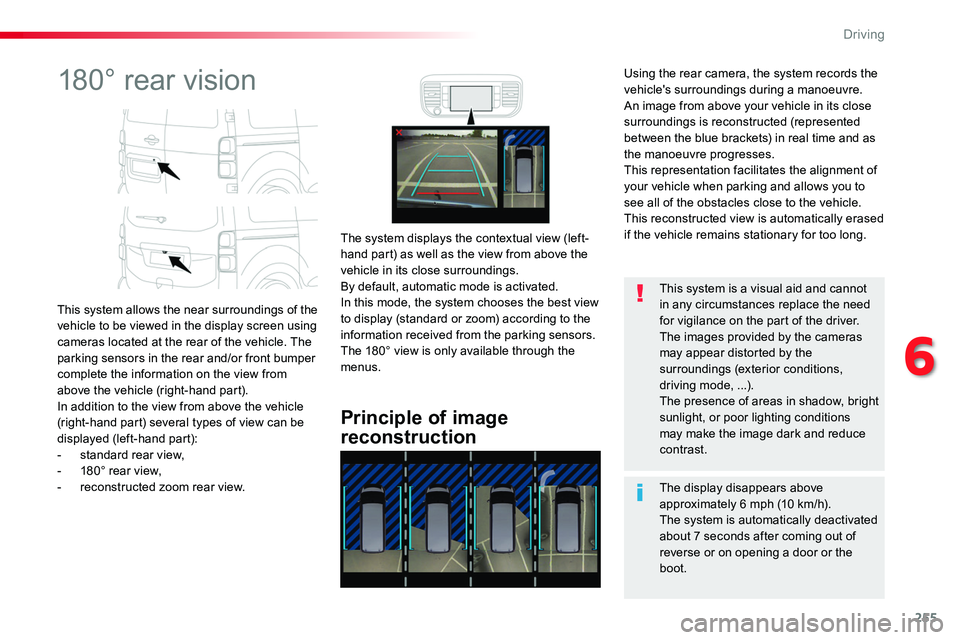
This system allows the near surroundings of the vehicle to be viewed in the display screen using cameras located at the rear of the vehicle. The parking sensors in the rear and/or front bumper complete the information on the view from above the vehicle (right-hand part).In addition to the view from above the vehicle (right-hand part) several types of view can be displayed (left-hand part):- standard rear view,- 180° rear view,- reconstructed zoom rear view.
Principle of image
reconstruction
The system displays the contextual view (left-hand part) as well as the view from above the vehicle in its close surroundings.By default, automatic mode is activated.In this mode, the system chooses the best view to display (standard or zoom) according to the information received from the parking sensors.The 180° view is only available through the menus.
The display disappears above approximately 6 mph (10 km/h).The system is automatically deactivated
about 7 seconds after coming out of reverse or on opening a door or the boot.
This system is a visual aid and cannot in any circumstances replace the need for vigilance on the part of the driver.The images provided by the cameras may appear distorted by the surroundings (exterior conditions, driving mode, ...).The presence of areas in shadow, bright sunlight, or poor lighting conditions may make the image dark and reduce contrast.
Using the rear camera, the system records the vehicle's surroundings during a manoeuvre. An image from above your vehicle in its close surroundings is reconstructed (represented between the blue brackets) in real time and as the manoeuvre progresses.This representation facilitates the alignment of your vehicle when parking and allows you to see all of the obstacles close to the vehicle.This reconstructed view is automatically erased if the vehicle remains stationary for too long.
6
Driving
Page 257 of 504
257
Activation
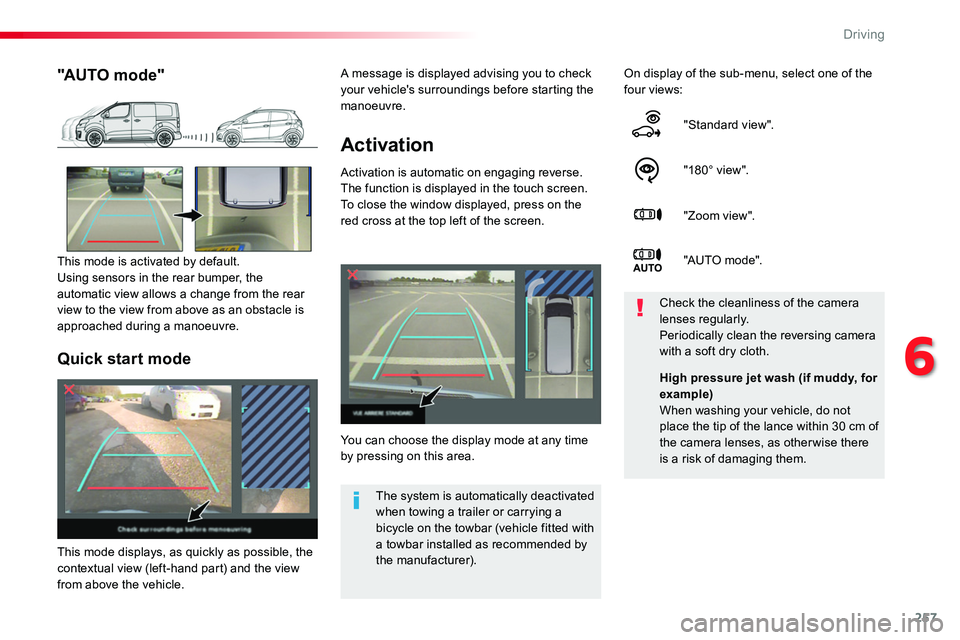
Activation is automatic on engaging reverse.The function is displayed in the touch screen. To close the window displayed, press on the red cross at the top left of the screen.
On display of the sub-menu, select one of the four views:
"Standard view".
"180° view".
"Zoom view".
"AUTO mo de".
You can choose the display mode at any time by pressing on this area.
Check the cleanliness of the camera lenses regularly.Periodically clean the reversing camera with a soft dry cloth.
"AUTO mode"
This mode is activated by default.Using sensors in the rear bumper, the automatic view allows a change from the rear view to the view from above as an obstacle is approached during a manoeuvre.
The system is automatically deactivated when towing a trailer or carrying a bicycle on the towbar (vehicle fitted with a towbar installed as recommended by the manufacturer).
Quick start mode
This mode displays, as quickly as possible, the contextual view (left-hand part) and the view from above the vehicle.
High pressure jet wash (if muddy, for example)When washing your vehicle, do not place the tip of the lance within 30 cm of the camera lenses, as otherwise there is a risk of damaging them.
A message is displayed advising you to check your vehicle's surroundings before starting the manoeuvre.
6
Driving
Page 266 of 504
266
Energy economy mode
System which manages the duration of use of certain functions to conserve a sufficient level of charge in the battery.After the engine has stopped, you can still use functions such as the audio and telematics system, windscreen wipers, dipped beam headlamps, courtesy lamps, etc. for a maximum combined duration of about forty minutes.
Switching to economy
mode
A message appears in the instrument panel screen indicating that the vehicle has switched to economy mode and the active functions are put on standby.
If a telephone call is being made at this time, it will be maintained for around 10 minutes with the Bluetooth hands-free system of your audio system.
Exiting economy mode
These functions are reactivated automatically next time the vehicle is driven.In order to restore the use of these functions immediately, start the engine and let it run:- for less than ten minutes, to use the equipment for approximately five minutes,- for more than ten minutes, to use the equipment for up to approximately thirty minutes.Let the engine run for the duration specified to ensure that the battery charge is sufficient.Do not repeatedly and continuously restart the engine in order to charge the battery.A flat battery prevents the engine from starting.For more information on the 12 V batter y, refer to the corresponding section.
Load reduction mode
System which manages the use of certain functions according to the level of charge remaining in the battery.When the vehicle is being driven, the load reduction function temporarily deactivates certain functions, such as the air conditioning, the heated rear screen...The deactivated functions are reactivated automatically as soon as conditions permit.
Practical information
Page 331 of 504
331
Toyota Pro Touch with navigation system
GPS satellite navigation - Connectivity - Multimedia audio - Bluetooth® telephone
ContentsFirst steps 332
Steering mounted controls 334
Menus 335
Voice commands 336
Navigation 342
Connected navigation 358
Connectivity 368
Radio Media 378
Telephone 390
Settings 402
Frequently asked questions 412
The system is protected in such a way that it will only operate in your vehicle.As a safety measure and because it requires sustained attention by the driver, the pairing of a Bluetooth mobile telephone with the Bluetooth hands-free system of your audio system must be done with the vehicle stationary and the ignition on.The display of the energy economy mode message signals that a change to standby is imminent. For more information on the Energy economy mode refer to the corresponding section.
.
Audio and Telematics
Page 336 of 504
336
Voice commands
First stepsSteering mounted controlsInformation - Using the system
Press the Push To Talk button and tell me what you'd like after the tone. Remember you can interrupt me at any time by pressing this button. If you
press it again while I'm waiting for you to speak, it'll end the conversation. If you need to start over, say "cancel". If you want to undo something, say "undo". And to get information and tips at any time, just say "help". If you ask to me do something and there's some information missing that I need, I'll give you some examples or take you through it step by step. There's more information available in "novice" mode. You can set the dialogue mode to "expert" when you feel comfortable.
To ensure that voice commands are always recognised by the system, please observe the following recommendations:- speak in a normal tone without breaking up words or raising your voice.- always wait for the "beep" (audible signal) before speaking.- for best operation, it is recommended that the windows and opening roof (if fitted) be closed to avoid inter ference from extraneous noises.- before making a voice command, ask other passengers to not speak.
The voice commands, with a choice of 12 languages (English, French, Italian, Spanish, German, Dutch, Portuguese, Polish, Turkish, Russian, Arabic, Brazilian), are made using the language previously chosen and set in the system.
The voice commands in Arabic for: "Navigate to address" and "Display POI in the city", are not available.
Example of a "voice command" for navigation:"Navigate to address 11 Regent Street, London".
Example of a "voice command" for
the radio and media:"Play ar tist Madonna".
Example of a "voice command" for the telephone:"Call David Miller".
Pressing this button activates the voice commands function.
Audio and Telematics