window TOYOTA PROACE VERSO 2019 Owner's Guide
[x] Cancel search | Manufacturer: TOYOTA, Model Year: 2019, Model line: PROACE VERSO, Model: TOYOTA PROACE VERSO 2019Pages: 505, PDF Size: 56.59 MB
Page 172 of 505
171
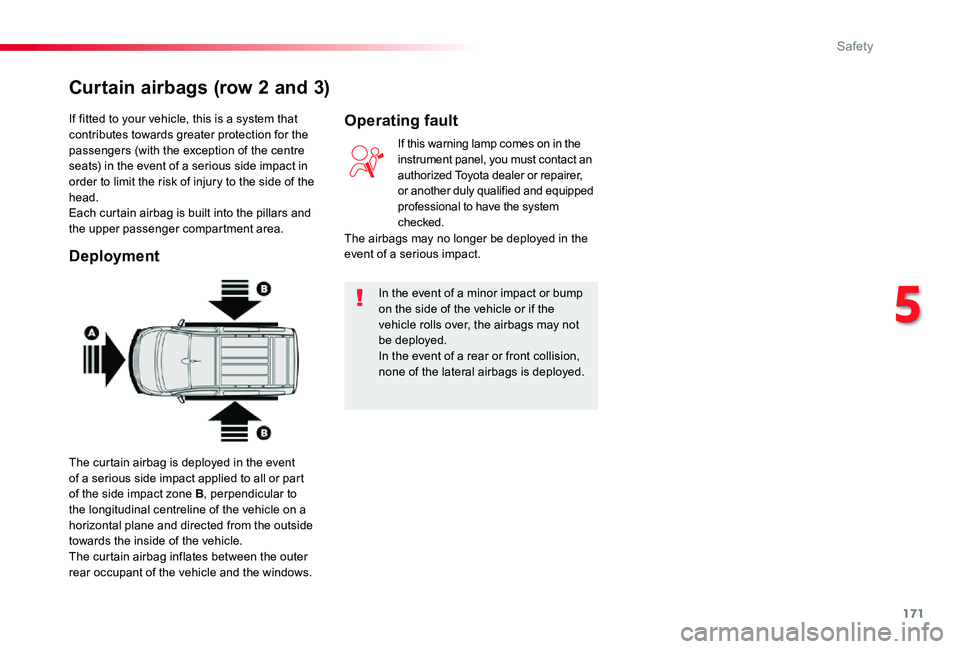
If fitted to your vehicle, this is a system that contributes towards greater protection for the passengers (with the exception of the centre seats) in the event of a serious side impact in order to limit the risk of injury to the side of the head.Each curtain airbag is built into the pillars and the upper passenger compartment area.
Deployment
In the event of a minor impact or bump on the side of the vehicle or if the vehicle rolls over, the airbags may not be deployed.In the event of a rear or front collision, none of the lateral airbags is deployed.
If this warning lamp comes on in the instrument panel, you must contact an authorized Toyota dealer or repairer, or another duly qualified and equipped professional to have the system checked.
Operating fault
Curtain airbags (row 2 and 3)
The airbags may no longer be deployed in the
event of a serious impact.
The curtain airbag is deployed in the event of a serious side impact applied to all or part of the side impact zone B, perpendicular to the longitudinal centreline of the vehicle on a horizontal plane and directed from the outside towards the inside of the vehicle.The curtain airbag inflates between the outer rear occupant of the vehicle and the windows.
5
Safety
Page 190 of 505
189
Child seatsInstalling a booster
cushion
Recommendations
The legislation on carrying a child on the front passenger seat is specific to each country. Refer to the legislation in force in the country in which you are driving.Deactivate the passenger front airbag when a rear ward facing child seat is installed on the front passenger seat. Other wise, the child would risk being seriously injured or killed if the airbag were deployed.
For optimum installation of the forward facing child seat, ensure that the back of the child seat is as close as possible to the backrest of the vehicle's seat, or in contact if possible.The head restraint must be removed before installing a child seat with a backrest on the
passenger seat.Ensure that the head restraint is stowed or attached securely so that it is not thrown around the vehicle in the event of sharp braking.Refit the head restraint as soon as the child seat is removed.
The incorrect installation of a child seat in a vehicle compromises the child's protection in the event of an accident.Check that there is no seat belt or seat belt buckle under the child seat as this could destabilise it.
Remember to fasten the seat belts or the child seat harnesses keeping the slack in relation to the child's body to a minimum, even for short journeys.For the installation of a child seat using a seat belt, ensure that this is well tensioned on the child seat and that it is holding the child seat firmly against the seat of your vehicle. If your front passenger seat is adjustable, move it for ward if necessary.At the rear seats, always leave sufficient space between the front seat and:- a rear ward facing child seat,- the feet of a child seated in a for ward facing child seat.For this, move the front seat for ward and if necessary straighten its backrest.
Children at the front
The chest part of the seat belt must be positioned on the child's shoulder without touching the neck.Ensure that the lap part of the seat belt passes correctly over the child's thighs.Toyota recommends the use of a booster seat which has a back, fitted with a seat belt guide at shoulder level.
As a safety precaution, do not leave:- one or more children alone and unsuper vised in a vehicle,- a child or an animal in a vehicle which is exposed to the sun, with the windows closed,- the keys within reach of children inside the vehicle.To prevent accidental opening of the doors, use the child lock.Take care not to open the rear windows by more than one third.To protect young children from the rays of the sun, fit side blinds on the rear windows.
5
Safety
Page 192 of 505
191
Child lock on rear
windows
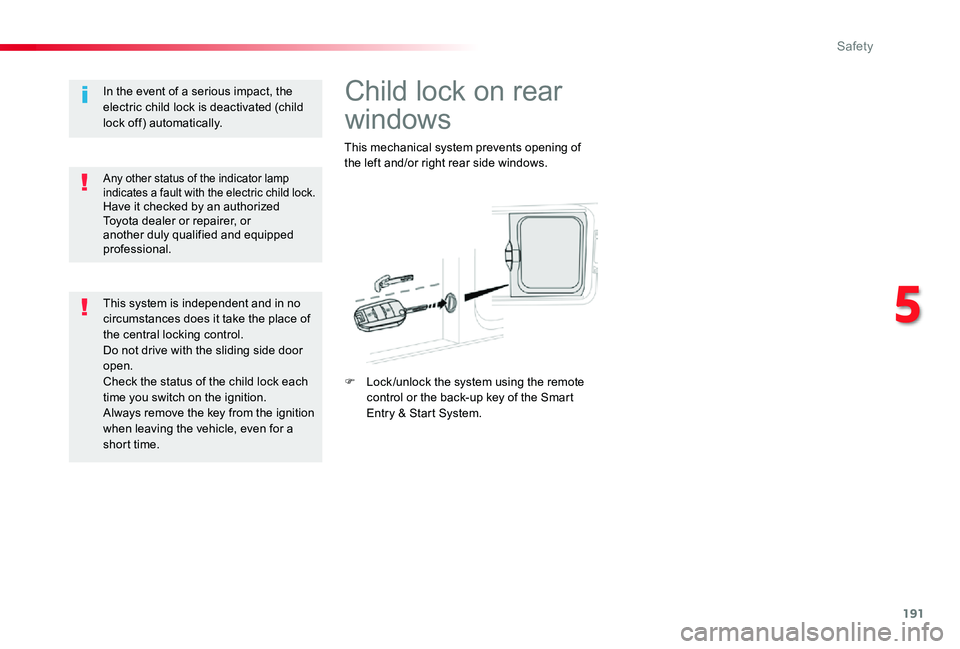
This mechanical system prevents opening of the left and/or right rear side windows.
F Lock /unlock the system using the remote control or the back-up key of the Smart Entry & Start System.
Any other status of the indicator lamp indicates a fault with the electric child lock.Have it checked by an authorized Toyota dealer or repairer, or another duly qualified and equipped professional.
In the event of a serious impact, the electric child lock is deactivated (child lock off) automatically.
This system is independent and in no circumstances does it take the place of the central locking control.Do not drive with the sliding side door open.Check the status of the child lock each time you switch on the ignition.Always remove the key from the ignition when leaving the vehicle, even for a short time.
5
Safety
Page 258 of 505
257
Activation
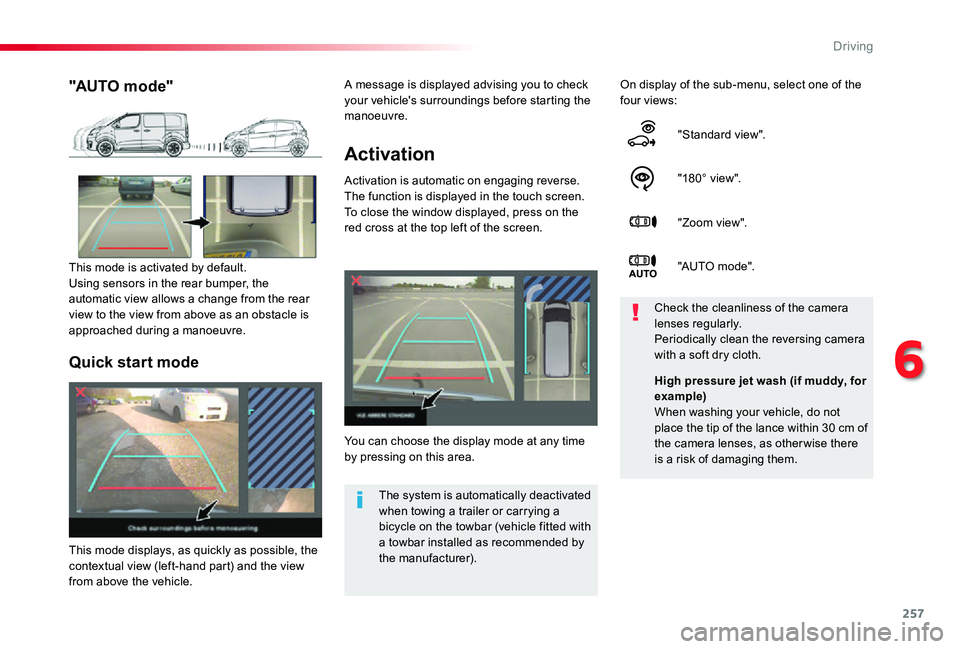
Activation is automatic on engaging reverse.The function is displayed in the touch screen. To close the window displayed, press on the red cross at the top left of the screen.
On display of the sub-menu, select one of the four views:
"Standard view".
"180° view".
"Zoom view".
"AUTO m o de".
You can choose the display mode at any time by pressing on this area.
Check the cleanliness of the camera lenses regularly.Periodically clean the reversing camera with a soft dry cloth.
"AUTO mode"
This mode is activated by default.Using sensors in the rear bumper, the automatic view allows a change from the rear view to the view from above as an obstacle is approached during a manoeuvre.
The system is automatically deactivated when towing a trailer or carrying a bicycle on the towbar (vehicle fitted with a towbar installed as recommended by the manufacturer).
Quick start mode
This mode displays, as quickly as possible, the contextual view (left-hand part) and the view from above the vehicle.
High pressure jet wash (if muddy, for example)When washing your vehicle, do not place the tip of the lance within 30 cm of the camera lenses, as otherwise there
is a risk of damaging them.
A message is displayed advising you to check your vehicle's surroundings before starting the manoeuvre.
6
Driving
Page 268 of 505
267
Accessories
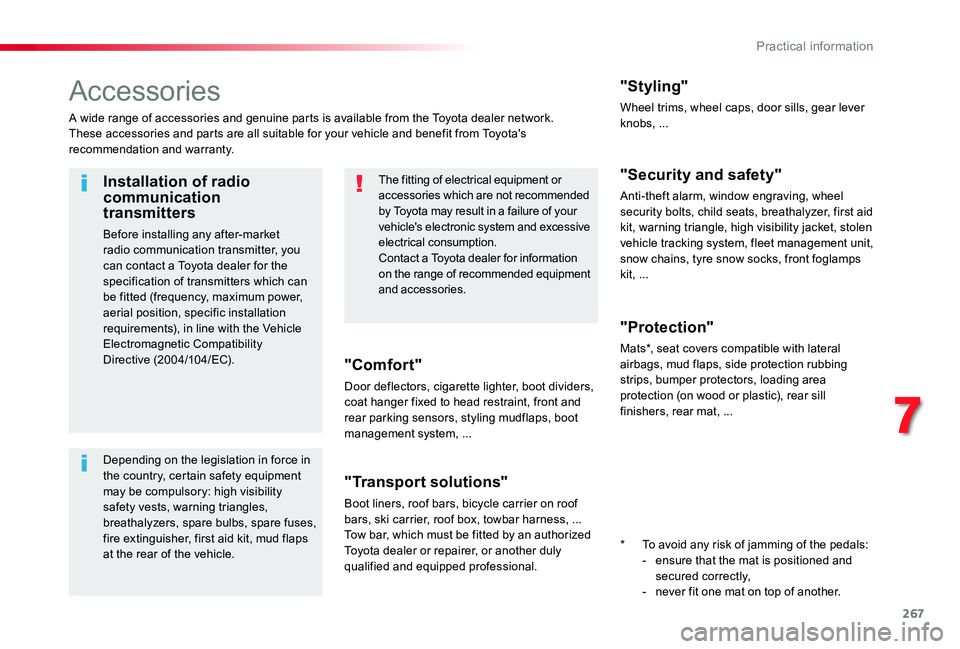
A wide range of accessories and genuine parts is available from the Toyota dealer network.These accessories and parts are all suitable for your vehicle and benefit from Toyota's recommendation and warranty.
"Comfort"
Door deflectors, cigarette lighter, boot dividers, coat hanger fixed to head restraint, front and rear parking sensors, styling mudflaps, boot management system, ...
"Transport solutions"
Boot liners, roof bars, bicycle carrier on roof bars, ski carrier, roof box, towbar harness, ...Tow bar, which must be fitted by an authorized Toyota dealer or repairer, or another duly qualified and equipped professional.
"Styling"
Wheel trims, wheel caps, door sills, gear lever knobs, ...
"Security and safety"
Anti-theft alarm, window engraving, wheel security bolts, child seats, breathalyzer, first aid kit, warning triangle, high visibility jacket, stolen vehicle tracking system, fleet management unit,
snow chains, tyre snow socks, front foglamps kit, ...
"Protection"
Mats*, seat covers compatible with lateral airbags, mud flaps, side protection rubbing strips, bumper protectors, loading area protection (on wood or plastic), rear sill finishers, rear mat, ...
The fitting of electrical equipment or accessories which are not recommended by Toyota may result in a failure of your vehicle's electronic system and excessive electrical consumption.
Contact a Toyota dealer for information on the range of recommended equipment and accessories.
Installation of radio communication transmitters
Before installing any after-market
radio communication transmitter, you can contact a Toyota dealer for the specification of transmitters which can be fitted (frequency, maximum power, aerial position, specific installation requirements), in line with the Vehicle Electromagnetic Compatibility Directive (2004/104/EC).
Depending on the legislation in force in the country, certain safety equipment may be compulsory: high visibility safety vests, warning triangles, breathalyzers, spare bulbs, spare fuses, fire extinguisher, first aid kit, mud flaps
at the rear of the vehicle.* To avoid any risk of jamming of the pedals:- ensure that the mat is positioned and secured correctly,- never fit one mat on top of another.
7
Practical information
Page 293 of 505
292
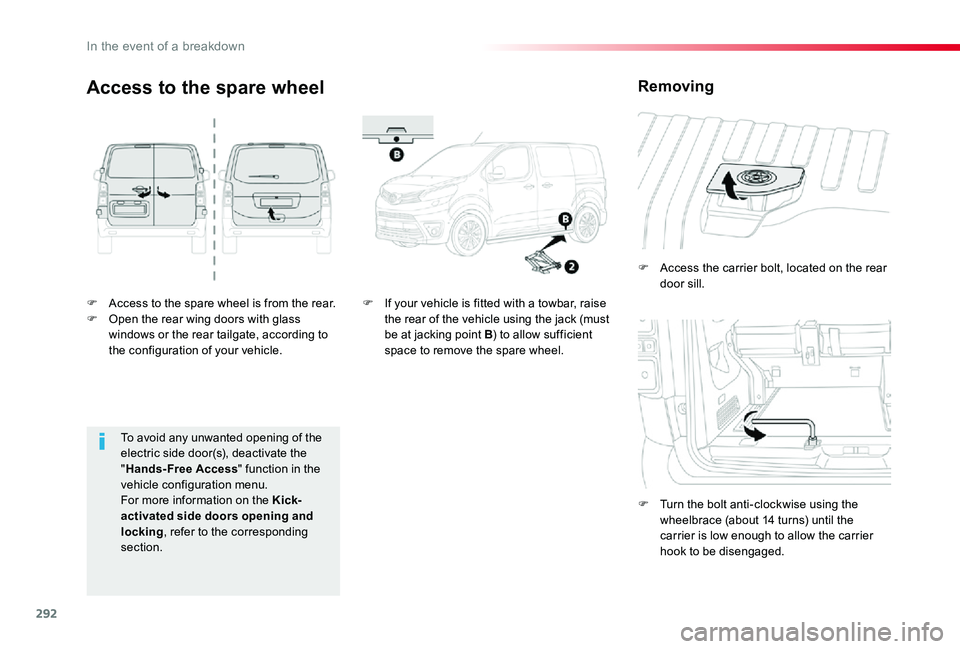
F Access to the spare wheel is from the rear.F Open the rear wing doors with glass windows or the rear tailgate, according to the configuration of your vehicle.
F Access the carrier bolt, located on the rear door sill.
F Turn the bolt anti-clockwise using the wheelbrace (about 14 turns) until the carrier is low enough to allow the carrier hook to be disengaged.
Access to the spare wheel
F If your vehicle is fitted with a towbar, raise the rear of the vehicle using the jack (must be at jacking point B) to allow sufficient space to remove the spare wheel.
Removing
To avoid any unwanted opening of the electric side door(s), deactivate the "Hands-Free Access" function in the vehicle configuration menu.For more information on the Kick-activated side doors opening and locking, refer to the corresponding
section.
In the event of a breakdown
Page 306 of 505
305
Rear lamps
(rear wing doors with glass
windows)
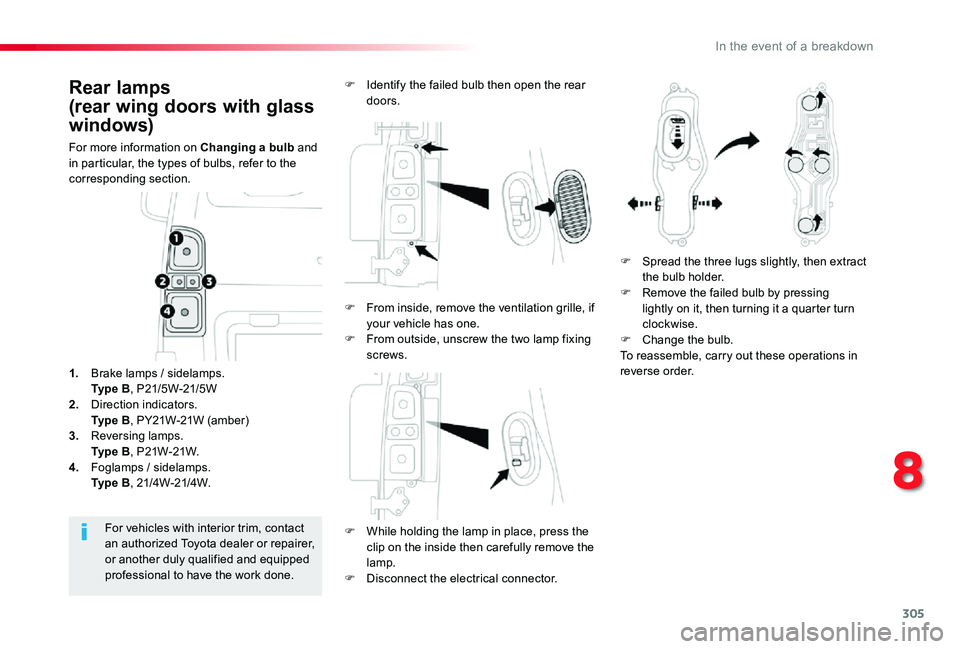
For more information on Changing a bulb and in particular, the types of bulbs, refer to the corresponding section.
F While holding the lamp in place, press the
clip on the inside then carefully remove the lamp.F Disconnect the electrical connector.
For vehicles with interior trim, contact an authorized Toyota dealer or repairer, or another duly qualified and equipped professional to have the work done.
1. Brake lamps / sidelamps. Ty p e B, P21/5W-21/5W2. Direction indicators. Ty p e B, PY21W-21W (amber)3. Reversing lamps. Ty p e B, P21W-21W.4. Foglamps / sidelamps. Ty p e B, 21/4W-21/4W.
F Identify the failed bulb then open the rear doors.
F Spread the three lugs slightly, then extract the bulb holder.F Remove the failed bulb by pressing lightly on it, then turning it a quarter turn clockwise.F Change the bulb.To reassemble, carry out these operations in reverse order.
F From inside, remove the ventilation grille, if your vehicle has one.F From outside, unscrew the two lamp fixing screws.
8
In the event of a breakdown
Page 307 of 505
306
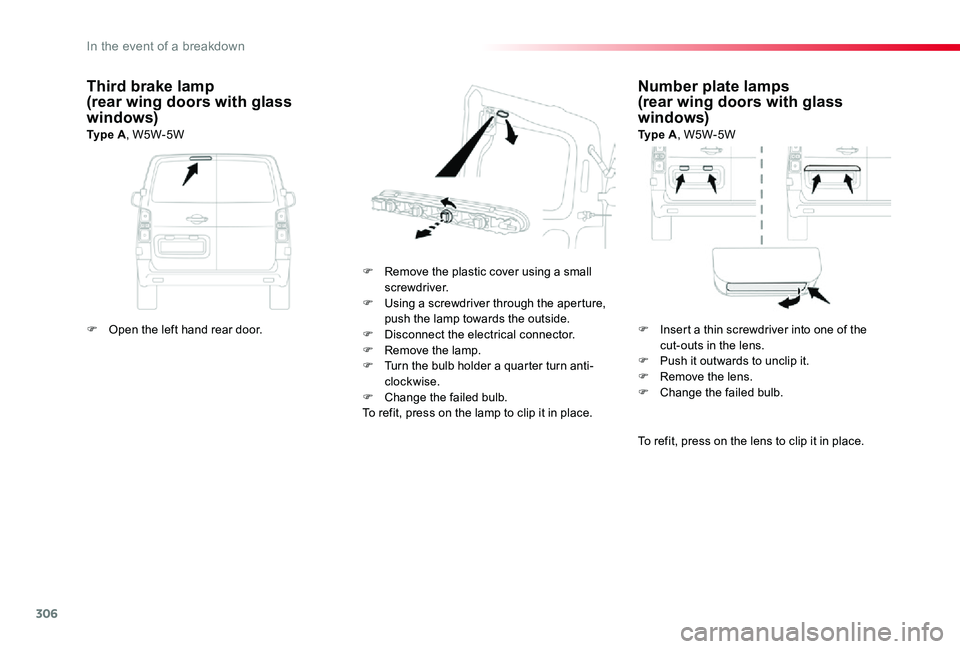
Number plate lamps(rear wing doors with glass windows)Ty p e A, W5W-5W
F Remove the plastic cover using a small screwdriver.F Using a screwdriver through the aperture, push the lamp towards the outside.F Disconnect the electrical connector.F Remove the lamp.F Turn the bulb holder a quarter turn anti-clockwise.F Change the failed bulb.To refit, press on the lamp to clip it in place.
Third brake lamp(rear wing doors with glass windows)Ty p e A, W5W-5W
To refit, press on the lens to clip it in place.
F Open the left hand rear door.F Insert a thin screwdriver into one of the cut-outs in the lens.F Push it outwards to unclip it.F Remove the lens.F Change the failed bulb.
In the event of a breakdown
Page 320 of 505
319
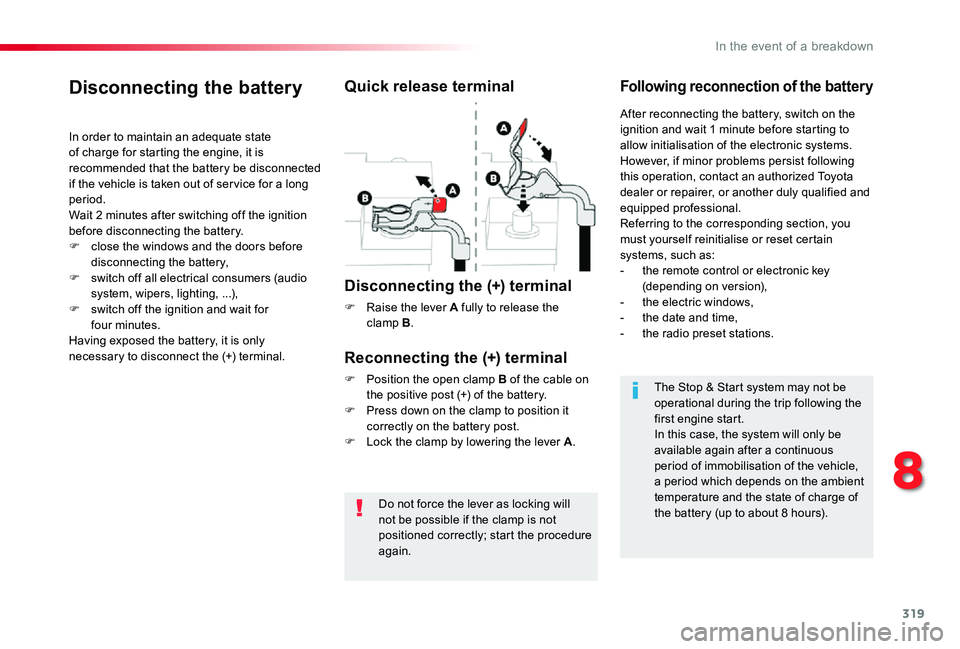
Do not force the lever as locking will not be possible if the clamp is not positioned correctly; start the procedure again.
Disconnecting the battery
In order to maintain an adequate state of charge for starting the engine, it is recommended that the battery be disconnected if the vehicle is taken out of ser vice for a long period.Wait 2 minutes after switching off the ignition before disconnecting the battery.
F close the windows and the doors before disconnecting the battery,F switch off all electrical consumers (audio system, wipers, lighting, ...),F switch off the ignition and wait for four minutes.Having exposed the battery, it is only necessary to disconnect the (+) terminal.
Quick release terminal
Disconnecting the (+) terminal
F Raise the lever A fully to release the clamp B.
Following reconnection of the battery
Reconnecting the (+) terminal
F Position the open clamp B of the cable on the positive post (+) of the battery.F Press down on the clamp to position it correctly on the battery post.F Lock the clamp by lowering the lever A.
After reconnecting the battery, switch on the ignition and wait 1 minute before starting to allow initialisation of the electronic systems.However, if minor problems persist following this operation, contact an authorized Toyota dealer or repairer, or another duly qualified and equipped professional.Referring to the corresponding section, you must yourself reinitialise or reset certain
systems, such as:- the remote control or electronic key (depending on version),- the electric windows,- the date and time,- the radio preset stations.
The Stop & Start system may not be operational during the trip following the first engine start.In this case, the system will only be
available again after a continuous period of immobilisation of the vehicle, a period which depends on the ambient temperature and the state of charge of the battery (up to about 8 hours).
8
In the event of a breakdown
Page 324 of 505
323
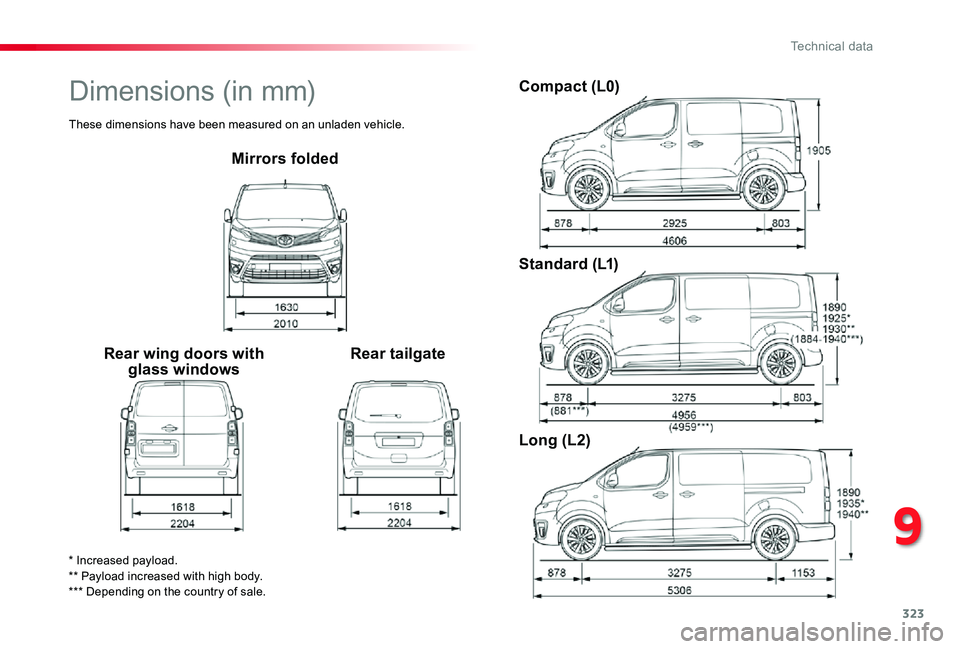
Mirrors folded
Rear wing doors with glass windowsRear tailgate
Compact (L0)
Standard (L1)
Long (L2)
* Increased payload.** Payload increased with high body.*** Depending on the country of sale.
Dimensions (in mm)
These dimensions have been measured on an unladen vehicle.
9
Technical data