TOYOTA PROACE VERSO 2020 Owners Manual
Manufacturer: TOYOTA, Model Year: 2020, Model line: PROACE VERSO, Model: TOYOTA PROACE VERSO 2020Pages: 418, PDF Size: 39.32 MB
Page 101 of 418
101
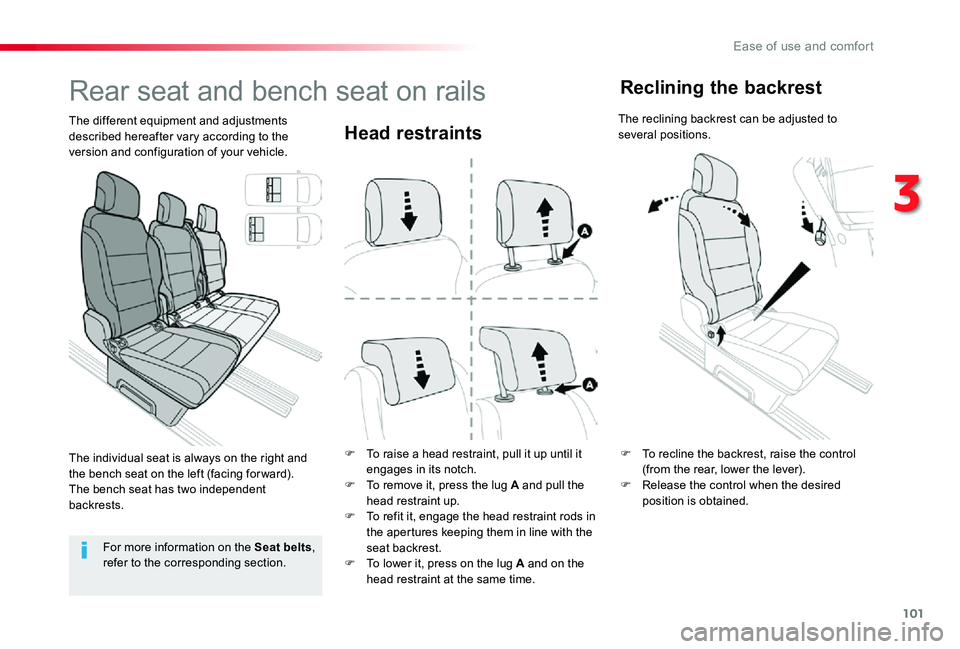
Head restraints
F To raise a head restraint, pull it up until it engages in its notch.F To remove it, press the lug A and pull the head restraint up.F To refit it, engage the head restraint rods in the apertures keeping them in line with the seat backrest.F To lower it, press on the lug A and on the head restraint at the same time.
Rear seat and bench seat on rails
The different equipment and adjustments described hereafter vary according to the version and configuration of your vehicle.
For more information on the Seat belts, refer to the corresponding section.
F To recline the backrest, raise the control (from the rear, lower the lever).F Release the control when the desired position is obtained.
Reclining the backrest
The reclining backrest can be adjusted to several positions.
The individual seat is always on the right and the bench seat on the left (facing for ward).The bench seat has two independent backrests.
3
Ease of use and comfort
Page 102 of 418
102
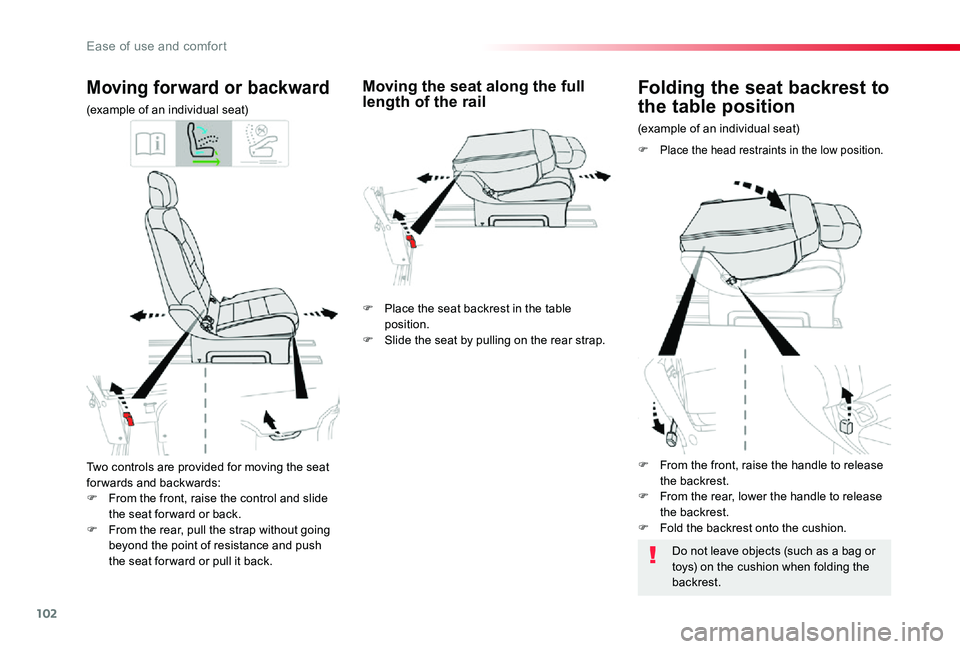
Two controls are provided for moving the seat for wards and backwards:F From the front, raise the control and slide the seat for ward or back.F From the rear, pull the strap without going beyond the point of resistance and push the seat for ward or pull it back.
Moving forward or backward
(example of an individual seat)
(example of an individual seat)
Folding the seat backrest to
the table position
F Place the head restraints in the low position.
Moving the seat along the full length of the rail
Do not leave objects (such as a bag or toys) on the cushion when folding the backrest.
F Place the seat backrest in the table position.F Slide the seat by pulling on the rear strap.
F From the front, raise the handle to release the backrest.F From the rear, lower the handle to release the backrest.F Fold the backrest onto the cushion.
Ease of use and comfort
Page 103 of 418
103
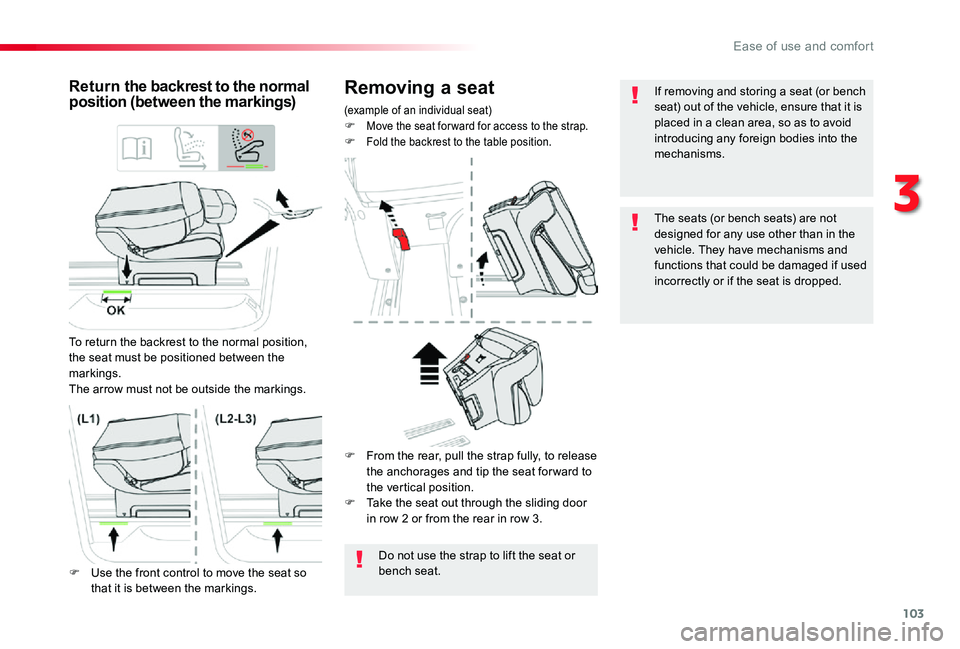
Removing a seat
(example of an individual seat)F Move the seat for ward for access to the strap.F Fold the backrest to the table position.
Retur n the backrest to the normal position (between the markings)
To return the backrest to the normal position, the seat must be positioned between the markings.The arrow must not be outside the markings.
Do not use the strap to lift the seat or bench seat.F Use the front control to move the seat so that it is between the markings.
F From the rear, pull the strap fully, to release the anchorages and tip the seat for ward to the vertical position.F Take the seat out through the sliding door in row 2 or from the rear in row 3.
If removing and storing a seat (or bench seat) out of the vehicle, ensure that it is placed in a clean area, so as to avoid introducing any foreign bodies into the mechanisms.
The seats (or bench seats) are not designed for any use other than in the vehicle. They have mechanisms and functions that could be damaged if used incorrectly or if the seat is dropped.
3
Ease of use and comfort
Page 104 of 418
104
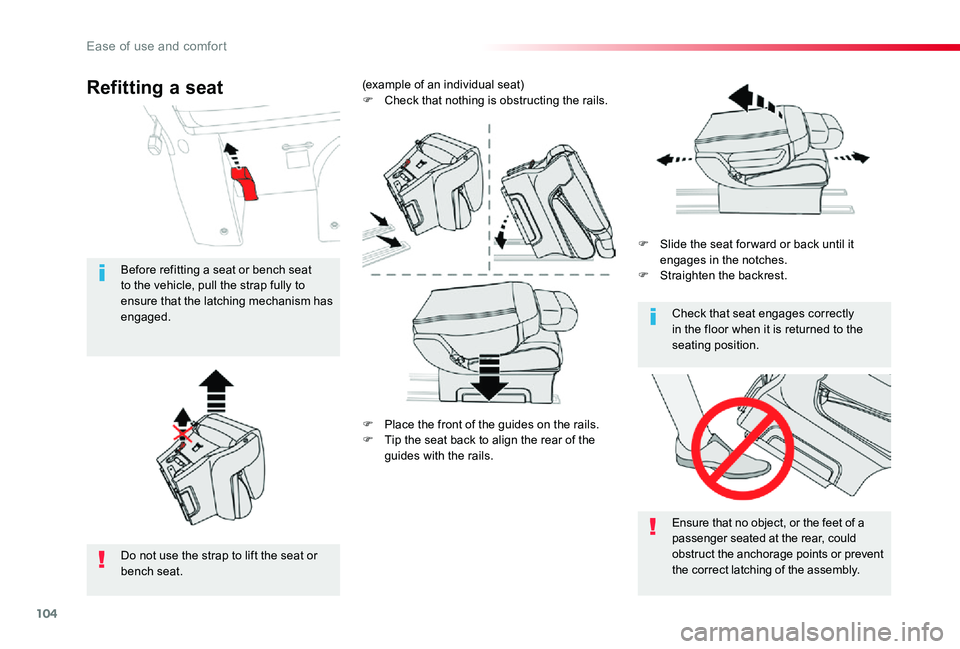
F Place the front of the guides on the rails.F Tip the seat back to align the rear of the
guides with the rails.
F Slide the seat for ward or back until it engages in the notches.F Straighten the backrest.
(example of an individual seat)F Check that nothing is obstructing the rails.
Ensure that no object, or the feet of a passenger seated at the rear, could obstruct the anchorage points or prevent the correct latching of the assembly.
Check that seat engages correctly in the floor when it is returned to the seating position.
Do not use the strap to lift the seat or bench seat.
Before refitting a seat or bench seat to the vehicle, pull the strap fully to ensure that the latching mechanism has engaged.
Refitting a seat
Ease of use and comfort
Page 105 of 418
105
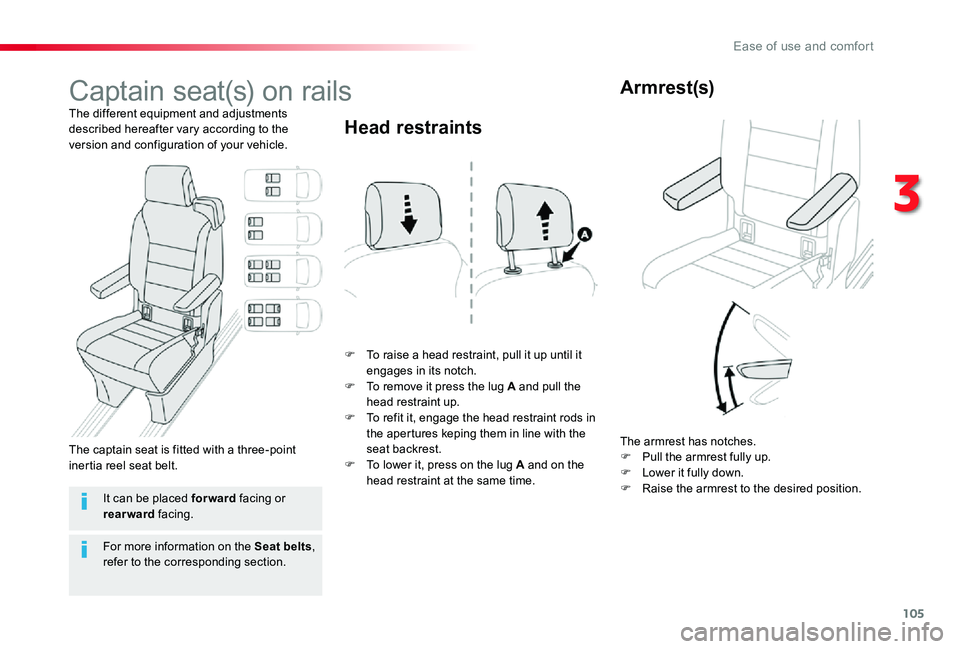
Captain seat(s) on rails
The different equipment and adjustments described hereafter vary according to the version and configuration of your vehicle.
F To raise a head restraint, pull it up until it engages in its notch.F To remove it press the lug A and pull the head restraint up.F To refit it, engage the head restraint rods in the apertures keping them in line with the seat backrest.F To lower it, press on the lug A and on the head restraint at the same time.
Head restraints
The armrest has notches.F Pull the armrest fully up.F Lower it fully down.F Raise the armrest to the desired position.
Ar mrest(s)
It can be placed forward facing or rearward facing.
The captain seat is fitted with a three-point inertia reel seat belt.
For more information on the Seat belts, refer to the corresponding section.
3
Ease of use and comfort
Page 106 of 418
106
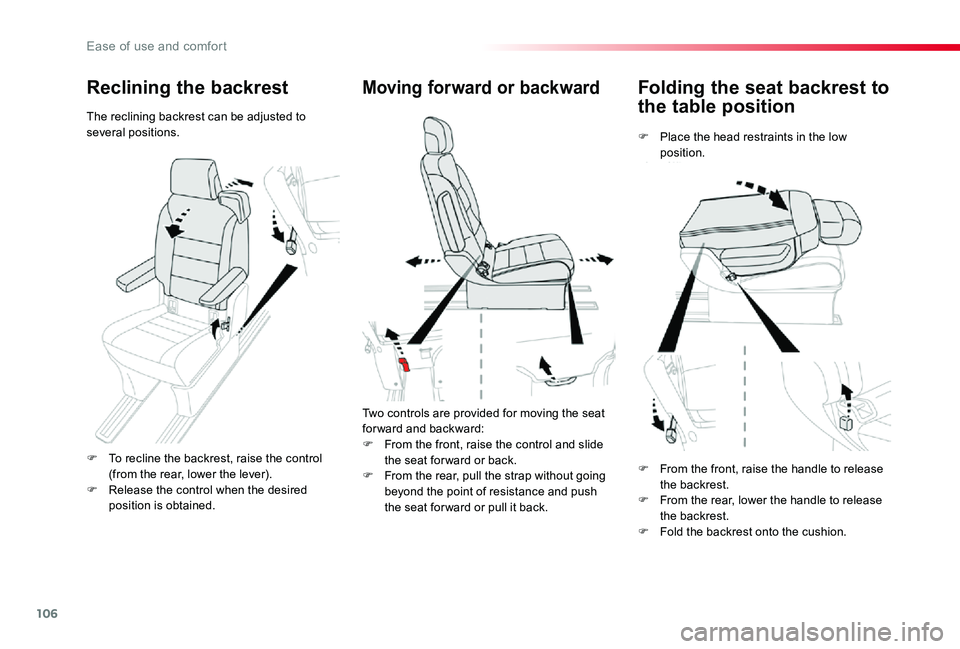
Folding the seat backrest to
the table position
F Place the head restraints in the low position.
Moving forward or backward
Two controls are provided for moving the seat for ward and backward:
F From the front, raise the control and slide the seat for ward or back.F From the rear, pull the strap without going beyond the point of resistance and push the seat for ward or pull it back.
Reclining the backrest
The reclining backrest can be adjusted to several positions.
F To recline the backrest, raise the control (from the rear, lower the lever).F Release the control when the desired position is obtained.
F From the front, raise the handle to release the backrest.F From the rear, lower the handle to release the backrest.F Fold the backrest onto the cushion.
Ease of use and comfort
Page 107 of 418
107
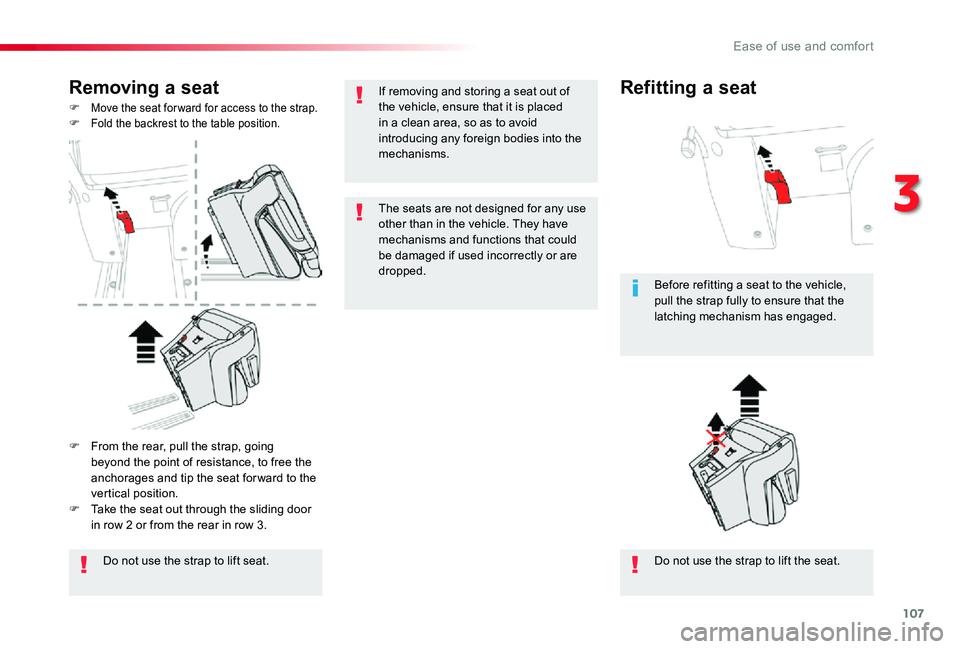
Removing a seat
F Move the seat for ward for access to the strap.F Fold the backrest to the table position.
Do not use the strap to lift seat.Do not use the strap to lift the seat.
Before refitting a seat to the vehicle, pull the strap fully to ensure that the latching mechanism has engaged.
F From the rear, pull the strap, going beyond the point of resistance, to free the anchorages and tip the seat for ward to the vertical position.F Take the seat out through the sliding door in row 2 or from the rear in row 3.
Refitting a seatIf removing and storing a seat out of the vehicle, ensure that it is placed in a clean area, so as to avoid introducing any foreign bodies into the mechanisms.
The seats are not designed for any use other than in the vehicle. They have mechanisms and functions that could
be damaged if used incorrectly or are dropped.
3
Ease of use and comfort
Page 108 of 418
108
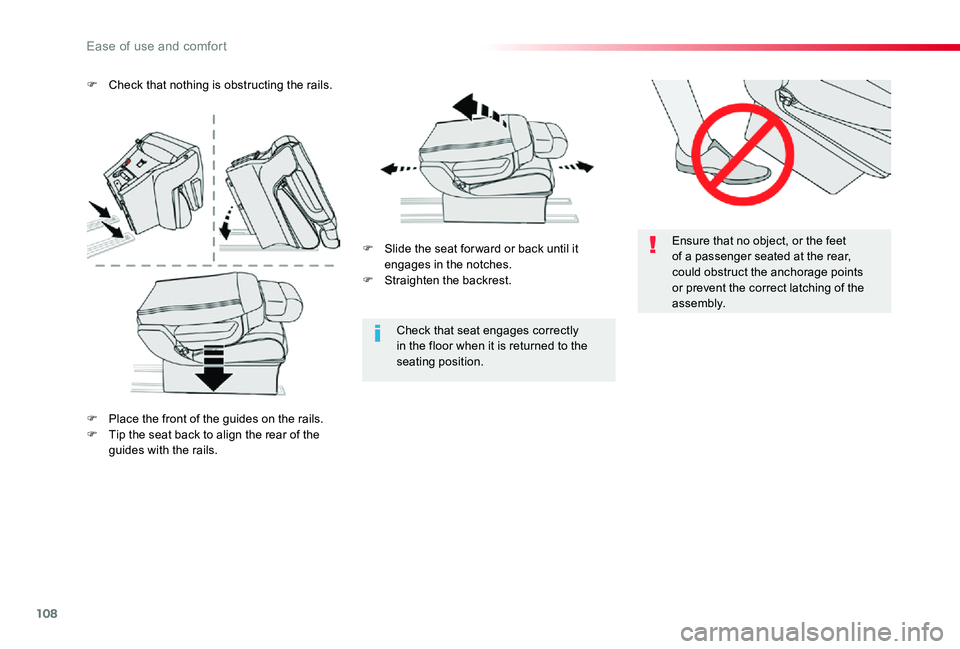
Ensure that no object, or the feet of a passenger seated at the rear, could obstruct the anchorage points or prevent the correct latching of the assembly.
Check that seat engages correctly in the floor when it is returned to the seating position.
F Slide the seat for ward or back until it engages in the notches.F Straighten the backrest.
F Check that nothing is obstructing the rails.
F Place the front of the guides on the rails.F Tip the seat back to align the rear of the guides with the rails.
Ease of use and comfort
Page 109 of 418
109
Precautions for the
seats and bench
seats
Following the various handling operations:- do not remove a head restraint without storing it and fixing it to a support,- check that the seat belts are always accessible to the passenger and easy to fasten,- a passenger must not take their seat without adjusting the seat's head restraint correctly and adjusting and fastening the seat belt.
Loading luggage or objects
behind the row 3 seat and
bench seat
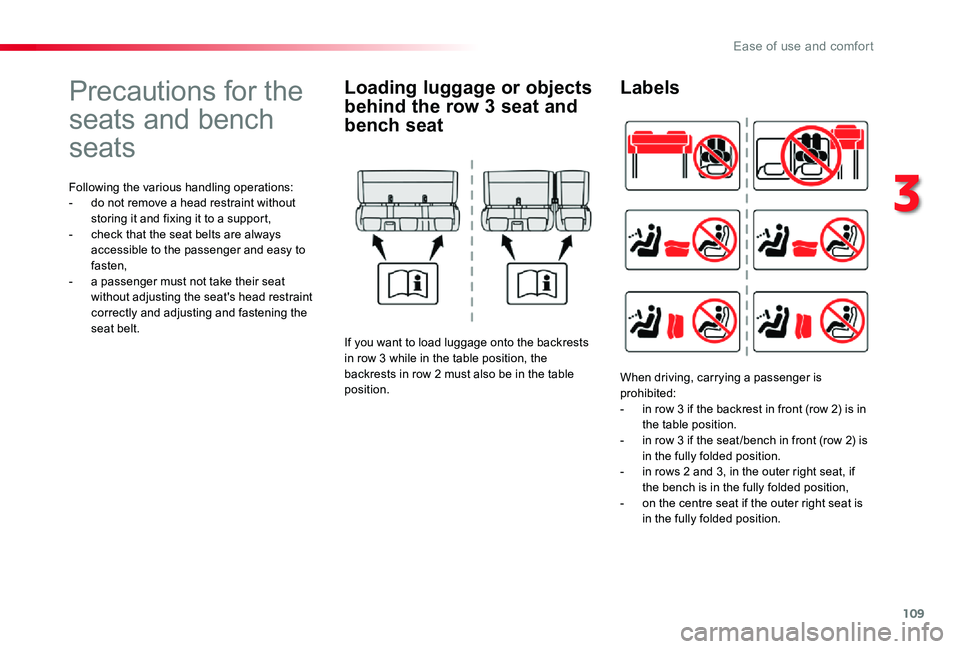
If you want to load luggage onto the backrests in row 3 while in the table position, the backrests in row 2 must also be in the table position.
Labels
When driving, carrying a passenger is prohibited:- in row 3 if the backrest in front (row 2) is in the table position.- in row 3 if the seat /bench in front (row 2) is in the fully folded position.- in rows 2 and 3, in the outer right seat, if the bench is in the fully folded position,- on the centre seat if the outer right seat is in the fully folded position.
3
Ease of use and comfort
Page 110 of 418
110
Mats
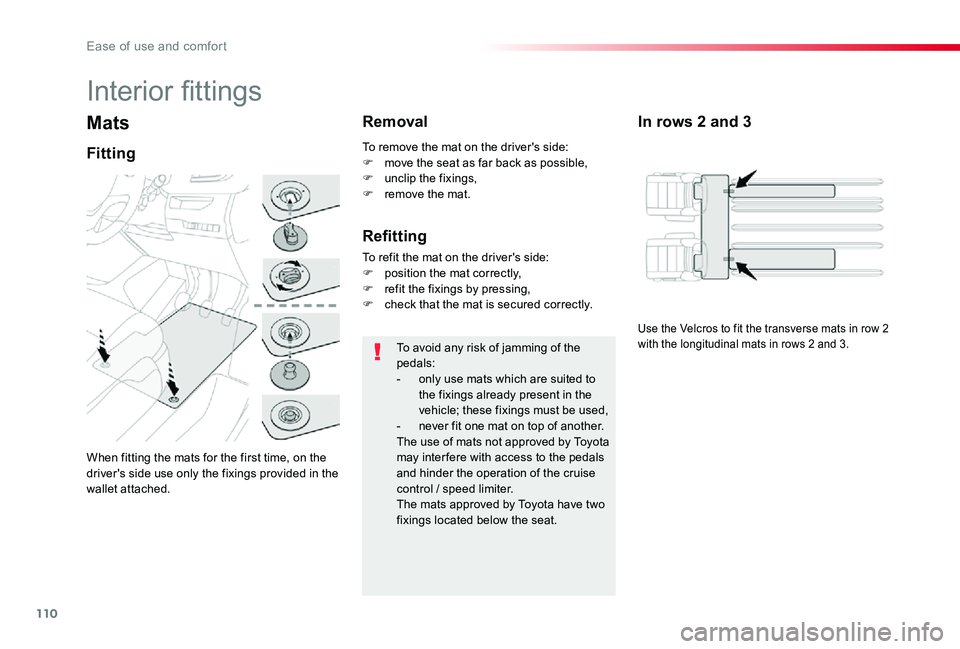
When fitting the mats for the first time, on the driver's side use only the fixings provided in the wallet attached.
Fitting
Removal
To avoid any risk of jamming of the pedals:- only use mats which are suited to the fixings already present in the vehicle; these fixings must be used,- never fit one mat on top of another.The use of mats not approved by Toyota may inter fere with access to the pedals and hinder the operation of the cruise control / speed limiter.The mats approved by Toyota have two fixings located below the seat.
To remove the mat on the driver's side:F move the seat as far back as possible,F unclip the fixings,F remove the mat.
Interior fittings
In rows 2 and 3
Refitting
To refit the mat on the driver's side:F position the mat correctly,F refit the fixings by pressing,F check that the mat is secured correctly.
Use the Velcros to fit the transverse mats in row 2 with the longitudinal mats in rows 2 and 3.
Ease of use and comfort