TOYOTA PROACE VERSO 2020 Owners Manual
Manufacturer: TOYOTA, Model Year: 2020, Model line: PROACE VERSO, Model: TOYOTA PROACE VERSO 2020Pages: 418, PDF Size: 39.32 MB
Page 111 of 418
111
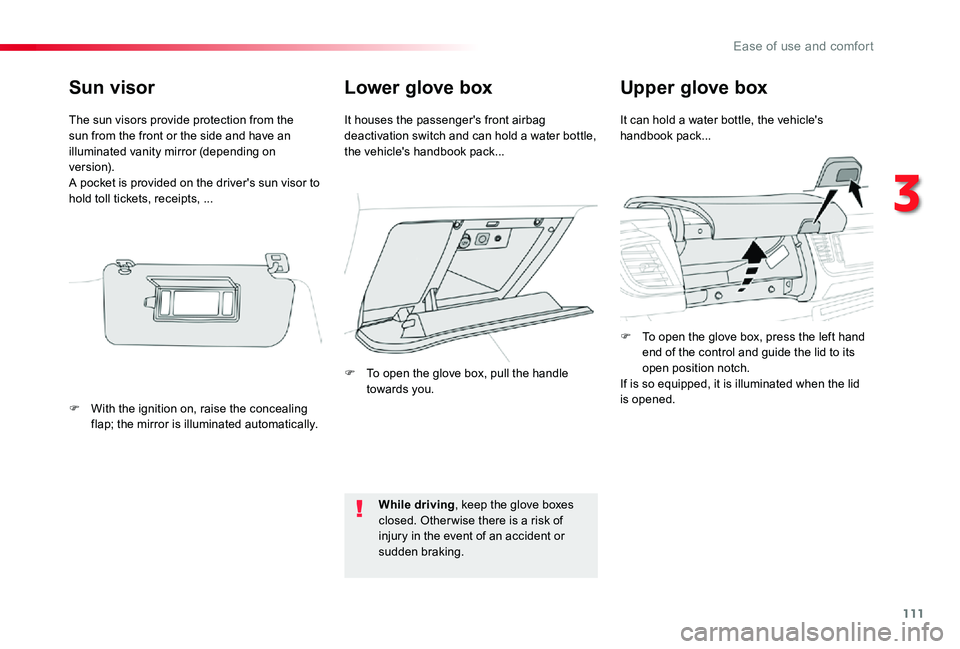
Lower glove boxUpper glove box
It can hold a water bottle, the vehicle's handbook pack...It houses the passenger's front airbag deactivation switch and can hold a water bottle, the vehicle's handbook pack...
While driving, keep the glove boxes closed. Other wise there is a risk of injury in the event of an accident or sudden braking.
Sun visor
The sun visors provide protection from the sun from the front or the side and have an illuminated vanity mirror (depending on ve r s i o n).A pocket is provided on the driver's sun visor to hold toll tickets, receipts, ...
F With the ignition on, raise the concealing flap; the mirror is illuminated automatically.
F To open the glove box, pull the handle towards you.
F To open the glove box, press the left hand end of the control and guide the lid to its open position notch.If is so equipped, it is illuminated when the lid is opened.
3
Ease of use and comfort
Page 112 of 418
112
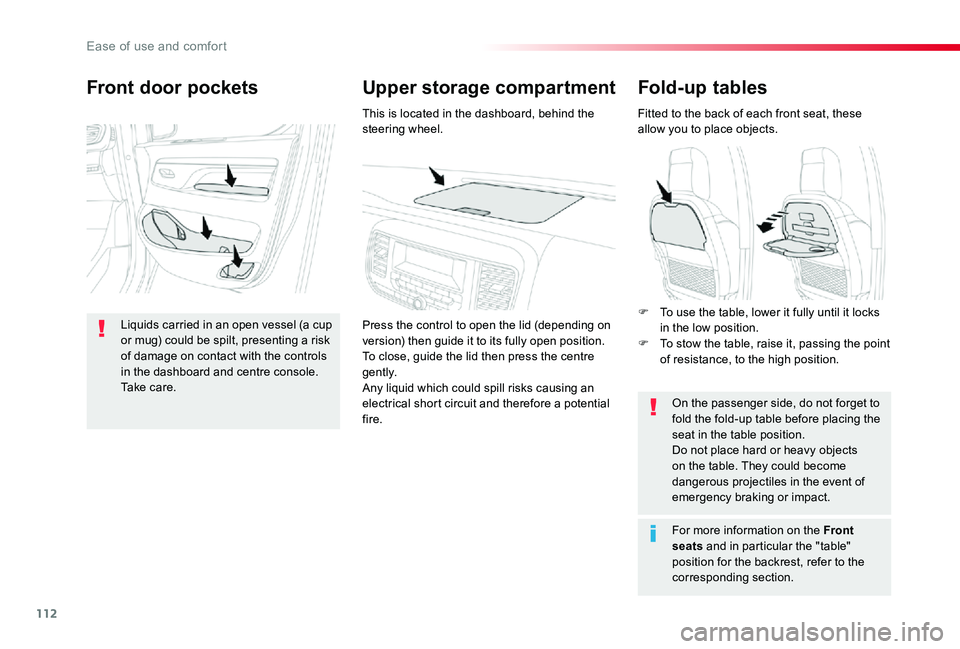
Fold-up tables
Fitted to the back of each front seat, these allow you to place objects.
On the passenger side, do not forget to fold the fold-up table before placing the seat in the table position.Do not place hard or heavy objects on the table. They could become dangerous projectiles in the event of emergency braking or impact.
For more information on the Front
seats and in particular the "table" position for the backrest, refer to the corresponding section.
Upper storage compartmentFront door pockets
Liquids carried in an open vessel (a cup or mug) could be spilt, presenting a risk of damage on contact with the controls in the dashboard and centre console. Take care.
This is located in the dashboard, behind the steering wheel.
Press the control to open the lid (depending on version) then guide it to its fully open position.To close, guide the lid then press the centre g e nt l y.Any liquid which could spill risks causing an electrical short circuit and therefore a potential fire.
F To use the table, lower it fully until it locks in the low position.F To stow the table, raise it, passing the point of resistance, to the high position.
Ease of use and comfort
Page 113 of 418
113
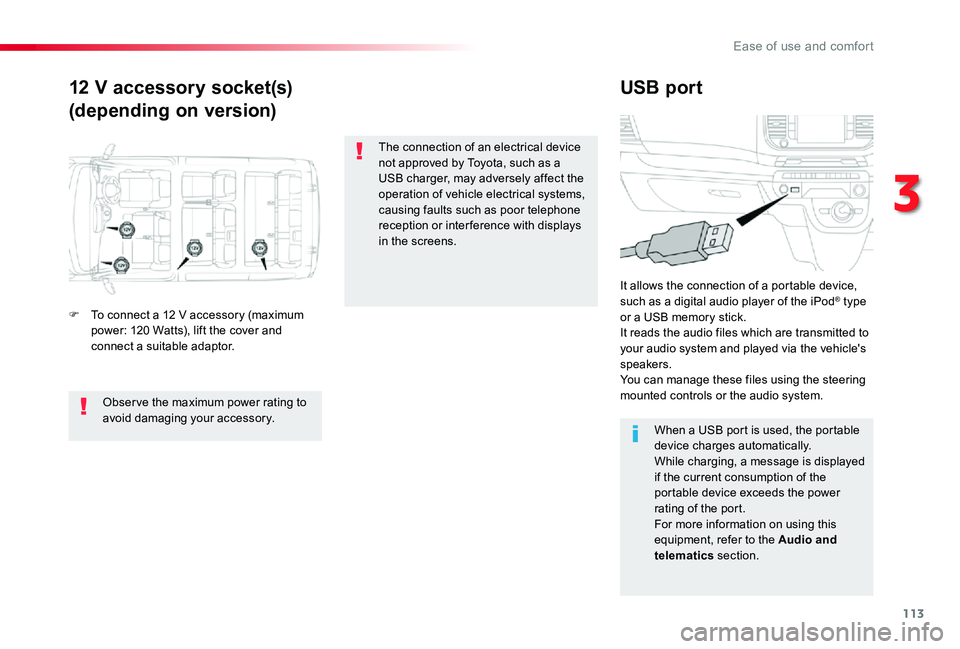
12 V accessory socket(s)
(depending on version)
USB port
F To connect a 12 V accessory (maximum power: 120 Watts), lift the cover and connect a suitable adaptor.
It allows the connection of a portable device, such as a digital audio player of the iPod® type or a USB memory stick.It reads the audio files which are transmitted to your audio system and played via the vehicle's speakers.You can manage these files using the steering mounted controls or the audio system.
When a USB port is used, the portable device charges automatically.While charging, a message is displayed if the current consumption of the portable device exceeds the power rating of the port.For more information on using this equipment, refer to the Audio and telematics section.
Obser ve the maximum power rating to avoid damaging your accessory.
The connection of an electrical device not approved by Toyota, such as a USB charger, may adversely affect the operation of vehicle electrical systems, causing faults such as poor telephone reception or inter ference with displays in the screens.
3
Ease of use and comfort
Page 114 of 418
114
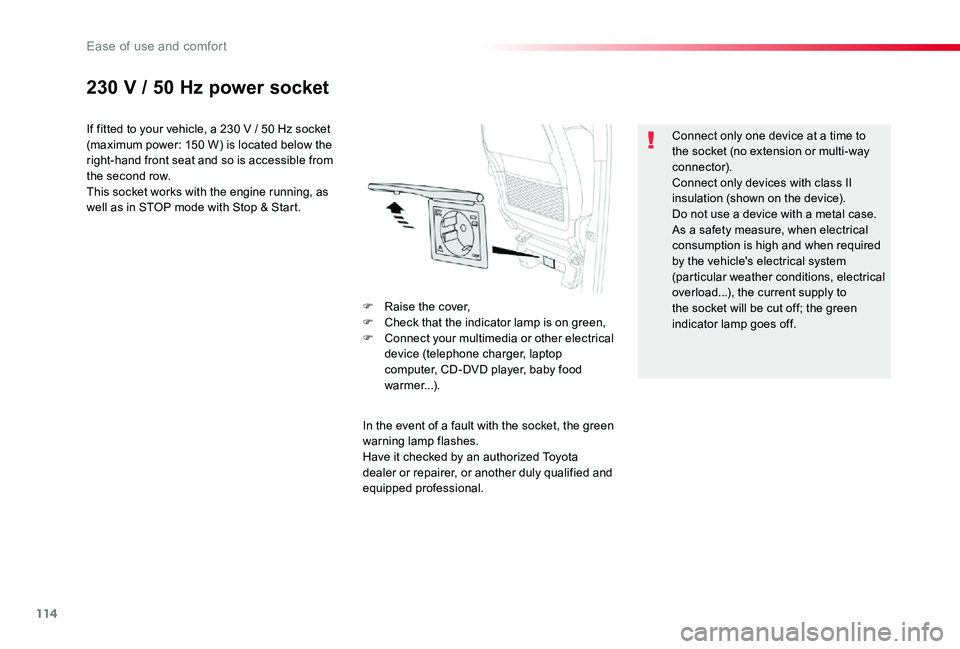
230 V / 50 Hz power socket
If fitted to your vehicle, a 230 V / 50 Hz socket (maximum power: 150 W) is located below the right-hand front seat and so is accessible from the second row.This socket works with the engine running, as well as in STOP mode with Stop & Start.
In the event of a fault with the socket, the green warning lamp flashes.Have it checked by an authorized Toyota dealer or repairer, or another duly qualified and equipped professional.
Connect only one device at a time to the socket (no extension or multi-way connector).Connect only devices with class II insulation (shown on the device).Do not use a device with a metal case.As a safety measure, when electrical consumption is high and when required by the vehicle's electrical system (particular weather conditions, electrical overload...), the current supply to the socket will be cut off; the green indicator lamp goes off.
F Raise the cover,F Check that the indicator lamp is on green,F Connect your multimedia or other electrical device (telephone charger, laptop computer, CD-DVD player, baby food warmer...).
Ease of use and comfort
Page 115 of 418
115
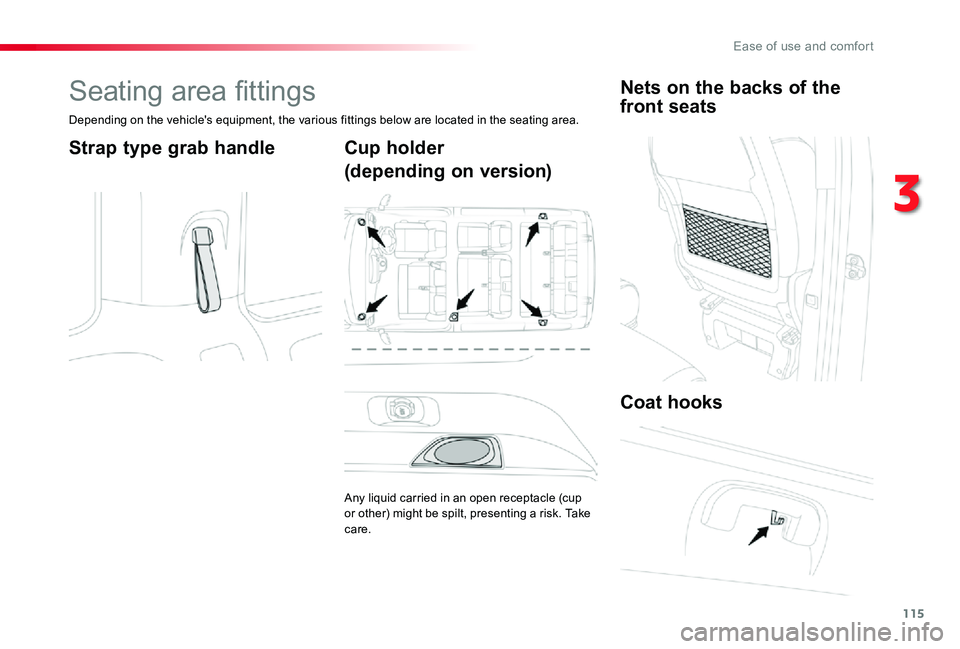
Seating area fittings
Depending on the vehicle's equipment, the various fittings below are located in the seating area.
Strap type grab handleCup holder
(depending on version)
Any liquid carried in an open receptacle (cup or other) might be spilt, presenting a risk. Take care.
Nets on the backs of the
front seats
Coat hooks
3
Ease of use and comfort
Page 116 of 418
116
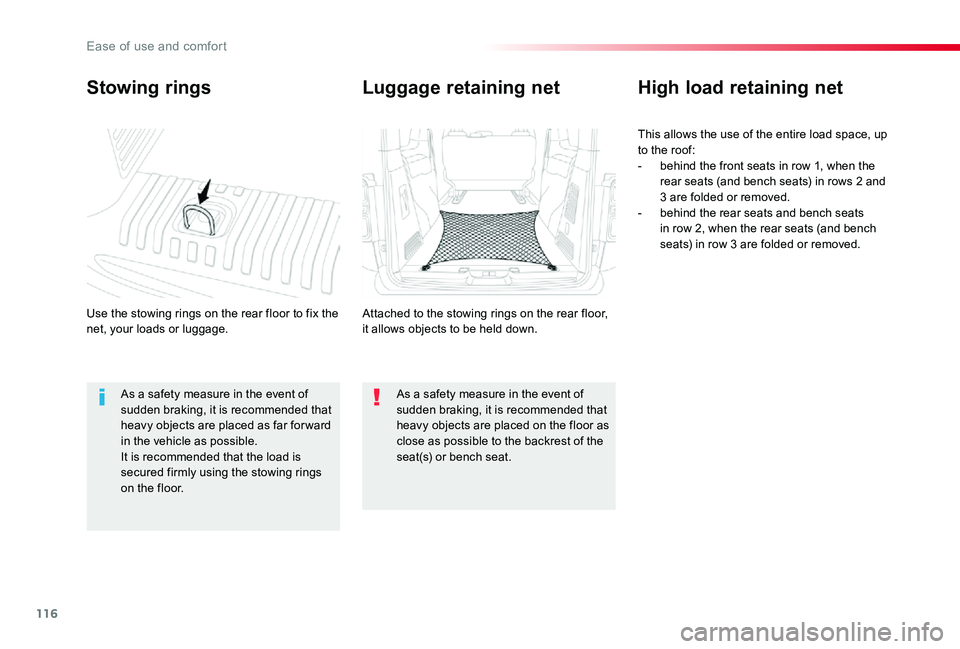
Stowing rings
Use the stowing rings on the rear floor to fix the net, your loads or luggage.
High load retaining net
This allows the use of the entire load space, up to the roof:- behind the front seats in row 1, when the rear seats (and bench seats) in rows 2 and 3 are folded or removed.- behind the rear seats and bench seats in row 2, when the rear seats (and bench seats) in row 3 are folded or removed.
Luggage retaining net
Attached to the stowing rings on the rear floor, it allows objects to be held down.
As a safety measure in the event of sudden braking, it is recommended that heavy objects are placed as far for ward in the vehicle as possible.It is recommended that the load is secured firmly using the stowing rings on the floor.
As a safety measure in the event of sudden braking, it is recommended that heavy objects are placed on the floor as close as possible to the backrest of the seat(s) or bench seat.
Ease of use and comfort
Page 117 of 418
117
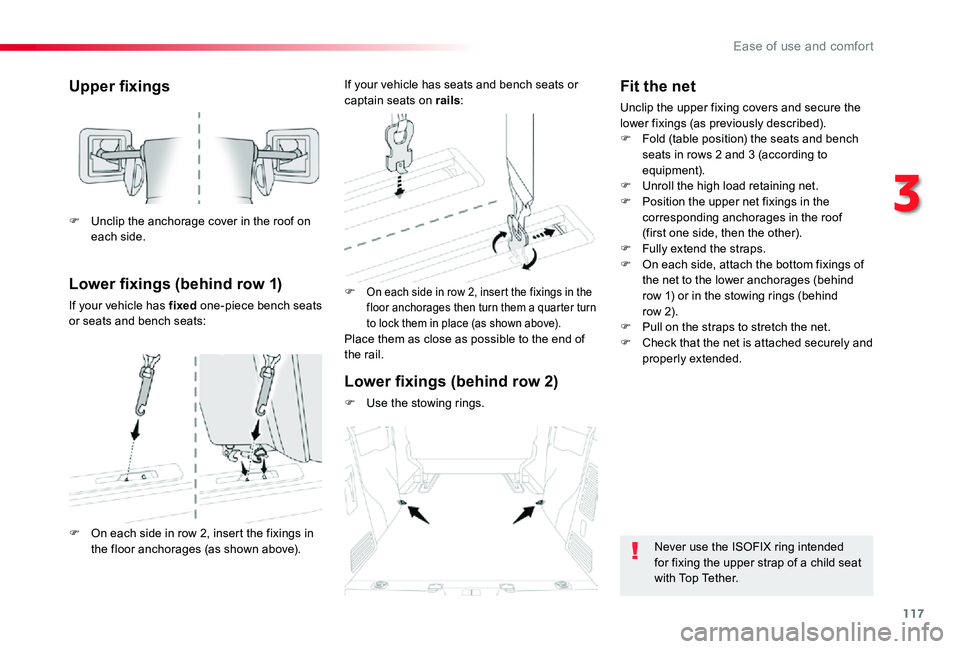
Upper fixings
Lower fixings (behind row 1)
If your vehicle has fixed one-piece bench seats or seats and bench seats:
F On each side in row 2, insert the fixings in the floor anchorages then turn them a quarter turn to lock them in place (as shown above).Place them as close as possible to the end of the rail.
F Unclip the anchorage cover in the roof on each side.
F On each side in row 2, insert the fixings in the floor anchorages (as shown above).
If your vehicle has seats and bench seats or captain seats on rails:
Lower fixings (behind row 2)
F Use the stowing rings.
Fit the net
Unclip the upper fixing covers and secure the lower fixings (as previously described).F Fold (table position) the seats and bench seats in rows 2 and 3 (according to equipment).F Unroll the high load retaining net.F Position the upper net fixings in the corresponding anchorages in the roof (first one side, then the other).
F Fully extend the straps.F On each side, attach the bottom fixings of the net to the lower anchorages (behind row 1) or in the stowing rings (behind row 2).F Pull on the straps to stretch the net.F Check that the net is attached securely and properly extended.
Never use the ISOFIX ring intended for fixing the upper strap of a child seat with Top Tether.
3
Ease of use and comfort
Page 118 of 418
118
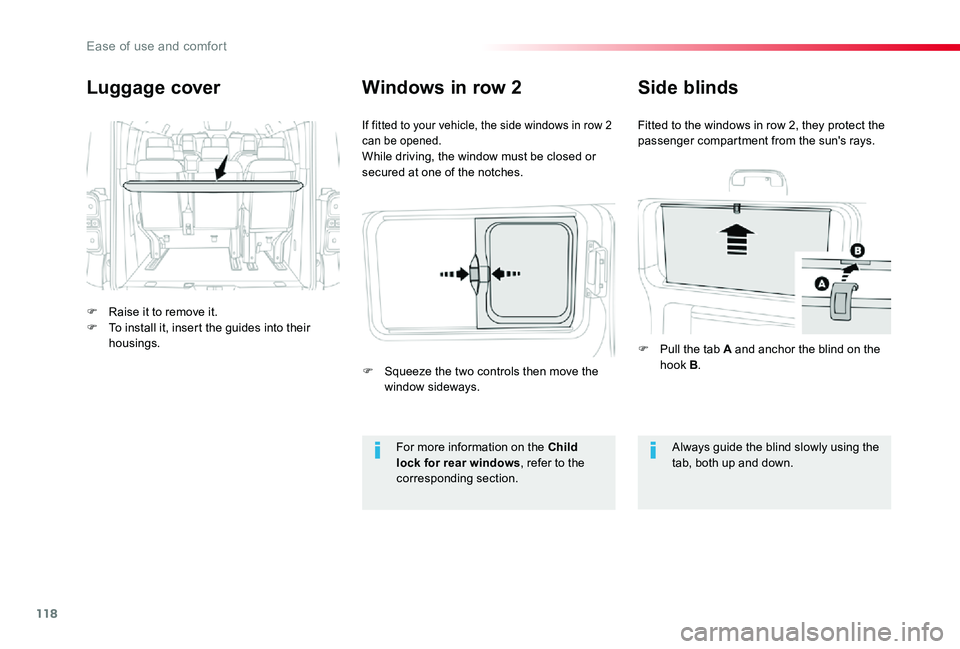
Luggage cover
F Raise it to remove it.F To install it, insert the guides into their housings.
If fitted to your vehicle, the side windows in row 2 can be opened.While driving, the window must be closed or secured at one of the notches.
Windows in row 2
For more information on the Child lock for rear windows, refer to the corresponding section.
Always guide the blind slowly using the tab, both up and down.
Side blinds
Fitted to the windows in row 2, they protect the passenger compartment from the sun's rays.
F Pull the tab A and anchor the blind on the hook B.F Squeeze the two controls then move the window sideways.
Ease of use and comfort
Page 119 of 418
119
3
E
Page 120 of 418
120
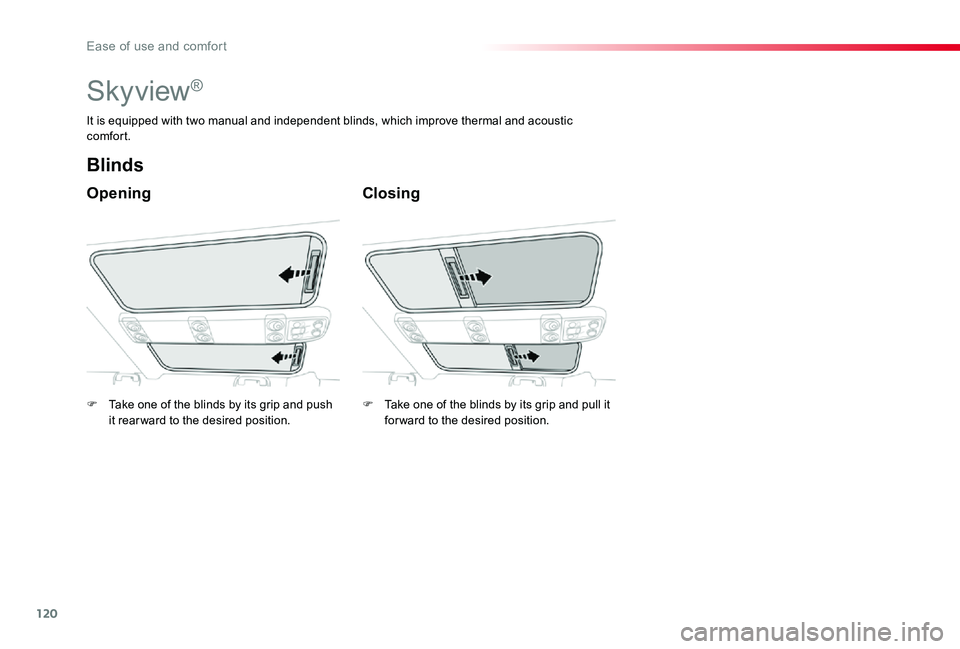
Skyview®
Opening
Blinds
Closing
It is equipped with two manual and independent blinds, which improve thermal and acoustic comfort.
F Take one of the blinds by its grip and push it rear ward to the desired position.F Take one of the blinds by its grip and pull it for ward to the desired position.
Ease of use and comfort