fog light TOYOTA PROACE VERSO 2020 User Guide
[x] Cancel search | Manufacturer: TOYOTA, Model Year: 2020, Model line: PROACE VERSO, Model: TOYOTA PROACE VERSO 2020Pages: 418, PDF Size: 39.32 MB
Page 246 of 418
246
Operating faultWith the touch screen
Contact an authorized Toyota dealer or repairer, or another duly qualified and equipped professional.
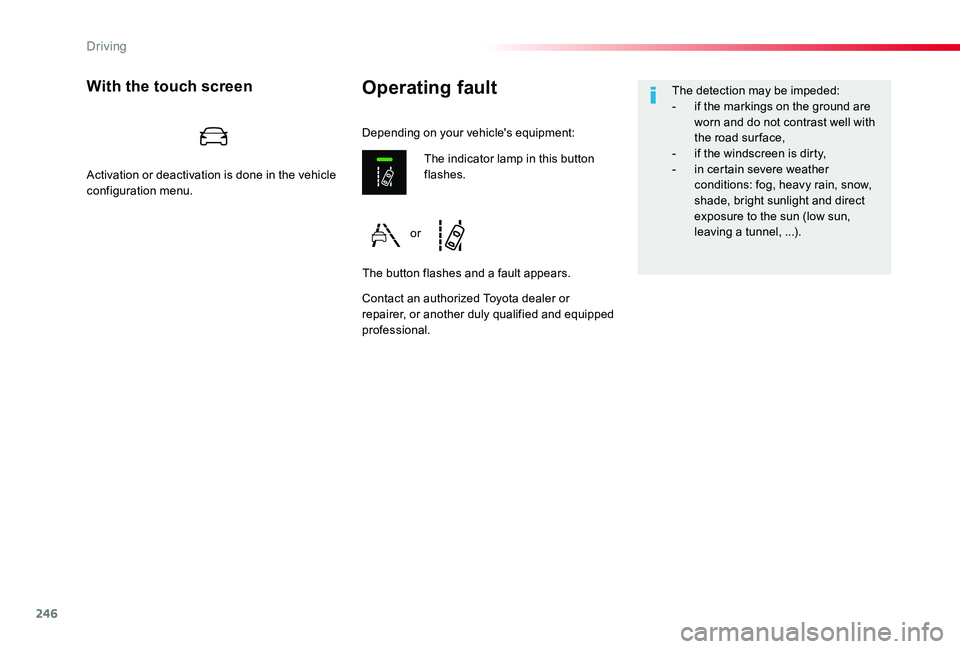
The indicator lamp in this button flashes.
The button flashes and a fault appears.
Depending on your vehicle's equipment:
The detection may be impeded:- if the markings on the ground are worn and do not contrast well with the road sur face,- if the windscreen is dirty,- in certain severe weather conditions: fog, heavy rain, snow, shade, bright sunlight and direct exposure to the sun (low sun, leaving a tunnel, ...).or
Activation or deactivation is done in the vehicle configuration menu.
Driving
Page 248 of 418
248
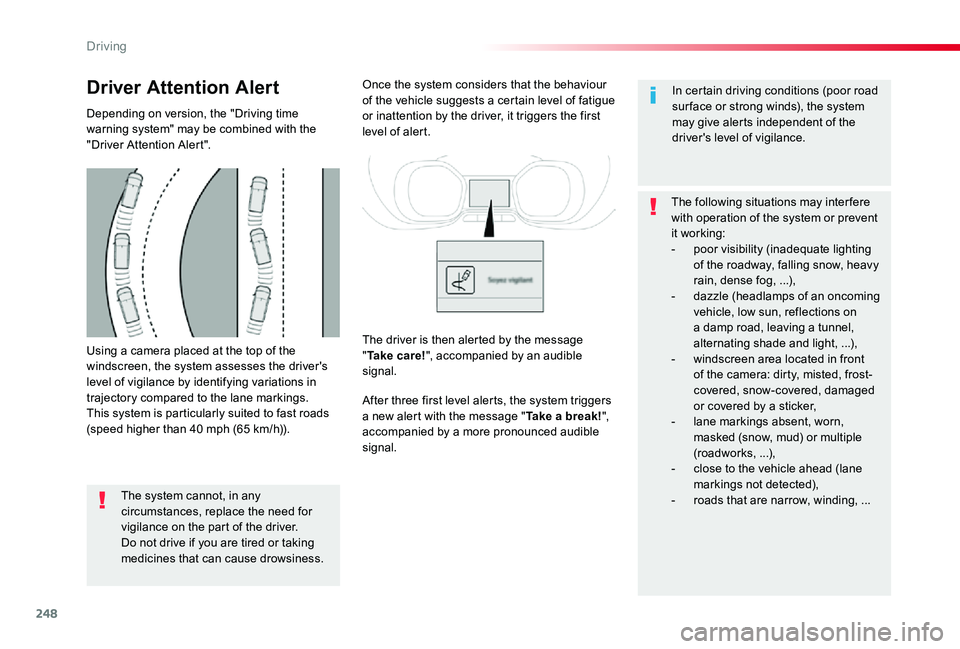
Using a camera placed at the top of the windscreen, the system assesses the driver's level of vigilance by identifying variations in trajectory compared to the lane markings.This system is particularly suited to fast roads (speed higher than 40 mph (65 km/h)).
Driver Attention Alert
Depending on version, the "Driving time warning system" may be combined with the "Driver Attention Alert".
The system cannot, in any circumstances, replace the need for vigilance on the part of the driver.Do not drive if you are tired or taking medicines that can cause drowsiness.
Once the system considers that the behaviour of the vehicle suggests a certain level of fatigue or inattention by the driver, it triggers the first level of alert.
After three first level alerts, the system triggers a new alert with the message "Take a break!", accompanied by a more pronounced audible
signal.
In certain driving conditions (poor road sur face or strong winds), the system may give alerts independent of the driver's level of vigilance.
The following situations may interfere with operation of the system or prevent it working:- poor visibility (inadequate lighting of the roadway, falling snow, heavy rain, dense fog, ...),- dazzle (headlamps of an oncoming vehicle, low sun, reflections on a damp road, leaving a tunnel, alternating shade and light, ...),- windscreen area located in front of the camera: dirty, misted, frost-covered, snow-covered, damaged or covered by a sticker,- lane markings absent, worn, masked (snow, mud) or multiple
(roadworks, ...),- close to the vehicle ahead (lane markings not detected),- roads that are narrow, winding, ...
The driver is then alerted by the message "Ta k e c a r e !", accompanied by an audible signal.
Driving
Page 267 of 418
267
Accessories
A wide range of accessories and genuine parts is available from the Toyota dealer network.These accessories and parts are all suitable for your vehicle and benefit from Toyota's recommendation and warranty.
"Comfort"
Door deflectors, cigarette lighter, boot dividers, coat hanger fixed to head restraint, front and rear parking sensors, styling mudflaps, boot management system, ...
"Transport solutions"
Boot liners, roof bars, bicycle carrier on roof bars, ski carrier, roof box, towbar harness, ...Tow bar, which must be fitted by an authorized Toyota dealer or repairer, or another duly qualified and equipped professional.
"Styling"
Wheel trims, wheel caps, door sills, gear lever knobs, ...
"Security and safety"
Anti-theft alarm, window engraving, wheel security bolts, child seats, breathalyzer, first aid kit, warning triangle, high visibility jacket, stolen vehicle tracking system, fleet management unit,
snow chains, tyre snow socks, front foglamps kit, ...
"Protection"
Mats*, seat covers compatible with lateral airbags, mud flaps, side protection rubbing strips, bumper protectors, loading area protection (on wood or plastic), rear sill finishers, rear mat, ...
The fitting of electrical equipment or accessories which are not recommended by Toyota may result in a failure of your vehicle's electronic system and excessive electrical consumption.
Contact a Toyota dealer for information on the range of recommended equipment and accessories.
Installation of radio communication transmitters
Before installing any after-market
radio communication transmitter, you can contact a Toyota dealer for the specification of transmitters which can be fitted (frequency, maximum power, aerial position, specific installation requirements), in line with the Vehicle Electromagnetic Compatibility Directive (2004/104/EC).
Depending on the legislation in force in the country, certain safety equipment may be compulsory: high visibility safety vests, warning triangles, breathalyzers, spare bulbs, spare fuses, fire extinguisher, first aid kit, mud flaps
at the rear of the vehicle.* To avoid any risk of jamming of the pedals:- ensure that the mat is positioned and secured correctly,- never fit one mat on top of another.
7
Practical information
Page 299 of 418
299
Front lamps
Xenon headlamps
For more information on Changing a bulb and in particular the types of bulb, refer to the corresponding section.
Halogen headlamps
For more information on Changing a bulb and in particular the types of bulb, refer to the corresponding section.
For H7 type bulbs with lugs... take care to obser ve their correct installation so as to ensure the best lighting performance.
Front fog lamps
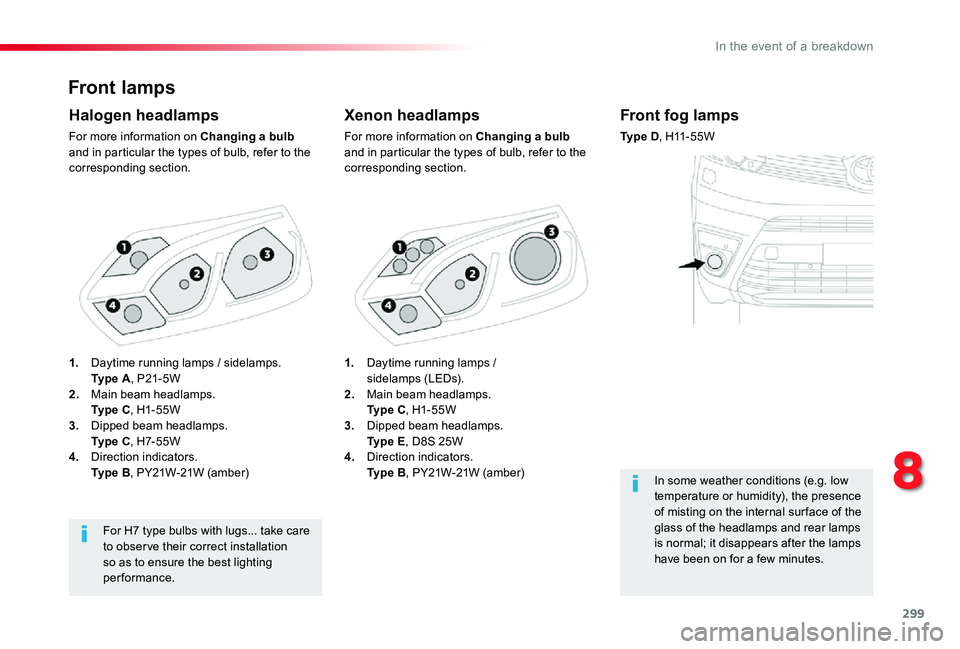
Ty p e D, H11-55W
In some weather conditions (e.g. low temperature or humidity), the presence of misting on the internal sur face of the glass of the headlamps and rear lamps is normal; it disappears after the lamps
have been on for a few minutes.
1. Daytime running lamps / sidelamps (LEDs).2. Main beam headlamps. Ty p e C, H1-55W3. Dipped beam headlamps. Ty p e E, D8S 25W4. Direction indicators. Ty p e B, PY21W-21W (amber)
1. Daytime running lamps / sidelamps. Ty p e A, P21-5W 2. Main beam headlamps. Ty p e C, H1-55W3. Dipped beam headlamps. Ty p e C, H7-55W4. Direction indicators. Ty p e B, PY21W-21W (amber)
8
In the event of a breakdown
Page 304 of 418
304
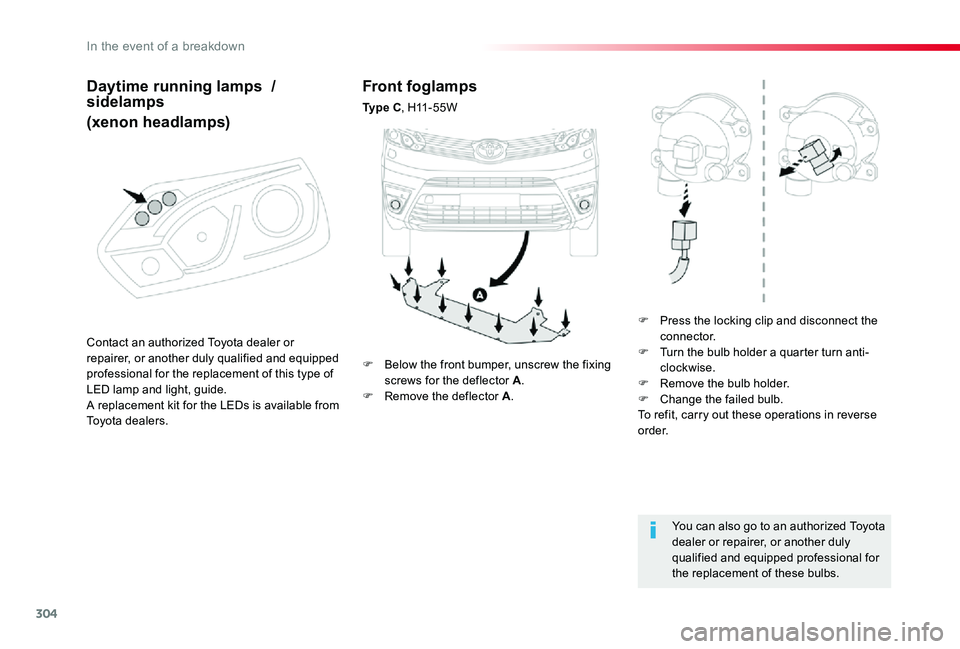
Front foglamps
Ty p e C, H11-55W
F Press the locking clip and disconnect the connector.F Turn the bulb holder a quarter turn anti-clockwise.F Remove the bulb holder.F Change the failed bulb.To refit, carry out these operations in reverse o r d e r.
You can also go to an authorized Toyota dealer or repairer, or another duly qualified and equipped professional for the replacement of these bulbs.
F Below the front bumper, unscrew the fixing screws for the deflector A.F Remove the deflector A.
Contact an authorized Toyota dealer or repairer, or another duly qualified and equipped professional for the replacement of this type of LED lamp and light, guide.A replacement kit for the LEDs is available from Toyota dealers.
Daytime running lamps / sidelamps
(xenon headlamps)
In the event of a breakdown
Page 305 of 418
305
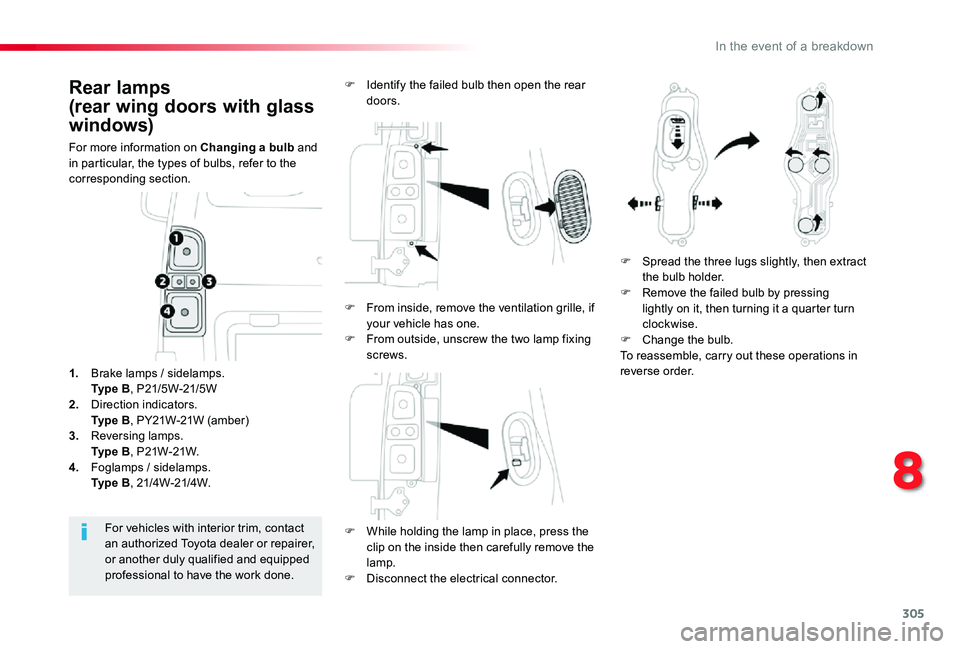
Rear lamps
(rear wing doors with glass
windows)
For more information on Changing a bulb and in particular, the types of bulbs, refer to the corresponding section.
F While holding the lamp in place, press the
clip on the inside then carefully remove the lamp.F Disconnect the electrical connector.
For vehicles with interior trim, contact an authorized Toyota dealer or repairer, or another duly qualified and equipped professional to have the work done.
1. Brake lamps / sidelamps. Ty p e B, P21/5W-21/5W2. Direction indicators. Ty p e B, PY21W-21W (amber)3. Reversing lamps. Ty p e B, P21W-21W.4. Foglamps / sidelamps. Ty p e B, 21/4W-21/4W.
F Identify the failed bulb then open the rear doors.
F Spread the three lugs slightly, then extract the bulb holder.F Remove the failed bulb by pressing lightly on it, then turning it a quarter turn clockwise.F Change the bulb.To reassemble, carry out these operations in reverse order.
F From inside, remove the ventilation grille, if your vehicle has one.F From outside, unscrew the two lamp fixing screws.
8
In the event of a breakdown
Page 308 of 418
308
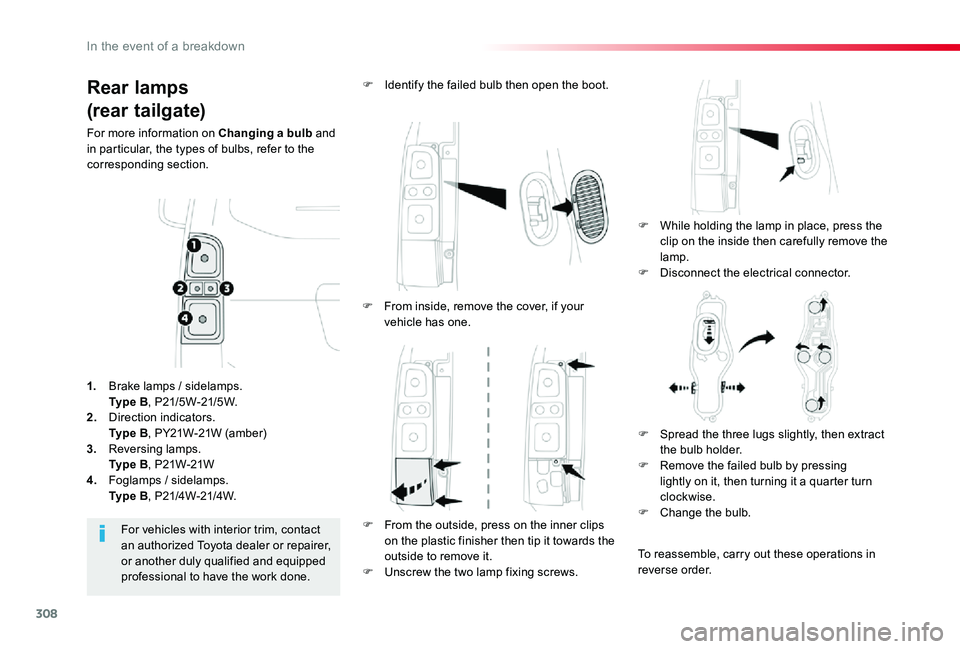
Rear lamps
(rear tailgate)
For more information on Changing a bulb and in particular, the types of bulbs, refer to the corresponding section.
F While holding the lamp in place, press the clip on the inside then carefully remove the
lamp.F Disconnect the electrical connector.
F Identify the failed bulb then open the boot.
For vehicles with interior trim, contact an authorized Toyota dealer or repairer, or another duly qualified and equipped professional to have the work done.
1. Brake lamps / sidelamps. Ty p e B, P21/5W-21/5W.2. Direction indicators. Ty p e B, PY21W-21W (amber)
3. Reversing lamps. Ty p e B, P21W-21W4. Foglamps / sidelamps. Ty p e B, P21/4W-21/4W.
F From inside, remove the cover, if your vehicle has one.
F From the outside, press on the inner clips on the plastic finisher then tip it towards the outside to remove it.F Unscrew the two lamp fixing screws.
F Spread the three lugs slightly, then extract the bulb holder.F Remove the failed bulb by pressing lightly on it, then turning it a quarter turn clockwise.F Change the bulb.
To reassemble, carry out these operations in reverse order.
In the event of a breakdown