Gear indicator TOYOTA PROACE VERSO 2022 Owner's Manual
[x] Cancel search | Manufacturer: TOYOTA, Model Year: 2022, Model line: PROACE VERSO, Model: TOYOTA PROACE VERSO 2022Pages: 360, PDF Size: 70.79 MB
Page 169 of 360
169
Driving
6
Special cases:
The engine will not go into standby if all of the conditions for operation are not met and in the following cases.– Steep slope (ascending or descending).– Vehicle has not exceeded 10 km/h (6 mph) since the last engine start (with the key or the “START/STOP” button).– Needed to maintain a comfortable temperature
in the passenger compartment.– Demisting active.In these cases, this indicator lamp flashes for a few seconds, then goes off.
NOTIC E
After the engine has restarted, STOP mode is not available until the vehicle has reached a speed of 8 km/h (5 mph).
NOTIC E
During parking manoeuvres, STOP mode is not available for a few seconds after coming out of reverse gear or turning the steering wheel.
Restarting the engine (START mode)
The engine automatically restarts as soon as the driver indicates the intention of moving off again.With a manual gearbox: with the clutch pedal fully depressed.With an automatic gearbox:– With the selector in position D or M: with the brake pedal released.– With the selector in position N and the brake
pedal released: with the selector at D or M.– With the selector in position P and the brake pedal depressed: with the selector at R, N, D or M.– Reverse gear engaged.
Special cases
The engine will restart automatically if all conditions for operation are met again and in the following case.– With a manual gearbox: vehicle speed exceeds 16 mph (25 km/h) or 2 mph (3 km/h) (depending on the engine).– With an automatic gearbox, vehicle speed exceeds 2 mph (3 km/h).In this case, this indicator lamp flashes for a few seconds, then goes off.
Malfunctions
Depending on the vehicle’s equipment:In the event of a system malfunction, this warning lamp flashes on the instrument panel.
The warning lamp in this button flashes and a message appears, accompanied by an audible signal.Have it checked by any authorized Toyota retailer or Toyota authorized repairer, or any reliable repairer.
The vehicle stalls in STOP mode
All of the instrument panel warning lamps come on if there is a fault.
Depending on version, a warning message may also be displayed, prompting you to place the gear selector in position N and depress the brake pedal.► Switch off the ignition then start the engine again with the key or the "START/STOP" button.
WARNI NG
12 V batteryThe Stop & Start system requires a 12 V battery of specific technology and specification.All work must be carried out only by any authorized Toyota retailer or Toyota authorized repairer, or any reliable repairer.
Page 183 of 360
183
Driving
6
NOTIC E
If the driver operates a direction indicator to overtake a slower vehicle, the cruise control allows the vehicle to temporarily approach the vehicle in front to assist the overtaking manoeuvre, without ever exceeding the speed setting.
WARNI NG
Some vehicles present on the road may not be properly seen or may be misinterpreted by the radar (e.g. a lorry), which may lead to a poor assessment of distance and lead to the vehicle accelerating or braking inappropriately.
Steering-mounted controls
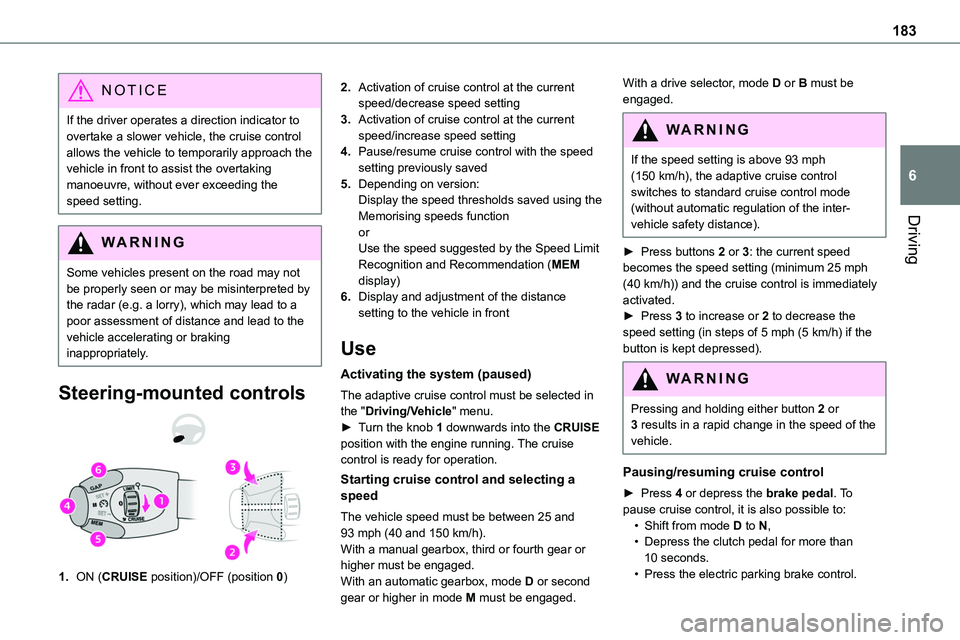
1.ON (CRUISE position)/OFF (position 0)
2.Activation of cruise control at the current speed/decrease speed setting
3.Activation of cruise control at the current speed/increase speed setting
4.Pause/resume cruise control with the speed setting previously saved
5.Depending on version:Display the speed thresholds saved using the Memorising speeds function
orUse the speed suggested by the Speed Limit Recognition and Recommendation (MEM display)
6.Display and adjustment of the distance setting to the vehicle in front
Use
Activating the system (paused)
The adaptive cruise control must be selected in the "Driving/Vehicle" menu.► Turn the knob 1 downwards into the CRUISE position with the engine running. The cruise control is ready for operation.
Starting cruise control and selecting a speed
The vehicle speed must be between 25 and 93 mph (40 and 150 km/h).With a manual gearbox, third or fourth gear or higher must be engaged.With an automatic gearbox, mode D or second gear or higher in mode M must be engaged.
With a drive selector, mode D or B must be engaged.
WARNI NG
If the speed setting is above 93 mph (150 km/h), the adaptive cruise control switches to standard cruise control mode (without automatic regulation of the inter-vehicle safety distance).
► Press buttons 2 or 3: the current speed becomes the speed setting (minimum 25 mph (40 km/h)) and the cruise control is immediately activated.► Press 3 to increase or 2 to decrease the speed setting (in steps of 5 mph (5 km/h) if the button is kept depressed).
WARNI NG
Pressing and holding either button 2 or 3 results in a rapid change in the speed of the vehicle.
Pausing/resuming cruise control
► Press 4 or depress the brake pedal. To pause cruise control, it is also possible to:• Shift from mode D to N,• Depress the clutch pedal for more than 10 seconds.• Press the electric parking brake control.
Page 188 of 360
188
Operation
The system operates subject to the following conditions:– The vehicle's speed does not exceed 37 mph (60 km/h) when a pedestrian is detected.– The vehicle's speed does not exceed 50 mph (80 km/h) when a stationary vehicle or a cyclist is detected.– The vehicle's speed is between 6 mph and
53 mph (10 km/h and 85 km/h) (versions with camera only) or 87 mph (140 km/h) (versions with camera and radar) when a moving vehicle is detected.This warning lamp flashes (for approximately 10 seconds) as soon as the function applies the vehicle’s brakes.With an automatic gearbox, in the event of automatic emergency braking bringing the vehicle to a complete stop, keep the brake pedal depressed to prevent the vehicle from moving off again.With a manual gearbox, in the event of automatic emergency braking bringing the vehicle to a complete stop, the engine may stall.
NOTIC E
The driver can maintain control of the vehicle
at any time by firmly turning the steering wheel and/or firmly depressing the accelerator pedal.
NOTIC E
Operation of the function may be felt by slight vibration in the brake pedal.If the vehicle comes to a complete stop, automatic braking is maintained for 1 to 2 seconds.
Deactivation/Activation
By default, the system is automatically activated at every engine start.It is set via the vehicle configuration menu.Deactivation of the system is signalled by the illumination of this warning lamp, accompanied by the display of a message.
Malfunction
In the event of a malfunction, this warning lamp comes on on the instrument panel, accompanied by the display of a message and an audible signal.Have it checked by any authorized Toyota retailer or Toyota authorized repairer, or any reliable repairer.If these warning lamps come on after the engine has been switched off and then restarted, contact any authorized Toyota retailer or Toyota authorized repairer, or any reliable repairer to have the system checked.
These warning lamps light up on the instrument panel to indicate that the driver's and/or front passenger's seat belt is not fastened (depending on version).
Lane departure warning
system
WARNI NG
Refer to the General recommendations on the use of driving and manoeuvring aids.
System that uses a camera to recognise continuous or broken lines on traffic lanes and triggers an alert if the vehicle wanders off line. If the direction indicator is not used at speeds above 50 mph (80 km/h) and there is a risk of one of these lines on the road surface being crossed, the system triggers the alert.This system is particularly useful on motorways and main roads.
Page 192 of 360
192
– with vehicles moving in the opposite direction,– driving on a winding road or sharp bends,– when overtaking or being overtaken by a very long vehicle (lorry, bus, etc.) which is both in the rear blind spot and present in the driver’s front field of vision,– when overtaking quickly,– in very heavy traffic: vehicles detected in front and behind are confused with a lorry or a
stationary object.
Activation/Deactivation
With audio system
► To activate or deactivate the system, press this button.The indicator lamp is on when the system is activated.
With touch screen
The settings are changed via the vehicle configuration menu.
NOTIC E
The system is automatically deactivated when towing with a towing device approved by TOYOTA.
Malfunction
Depending on the vehicle’s equipment:
In the event of a fault, this or these warning lamp(s) flash(es).orThe warning lamp in this button flashes and a message appears, accompanied by an audible signal.Consult any authorized Toyota retailer or Toyota authorized repairer, or any reliable repairer.
Parking sensors
WARNI NG
Refer to the General recommendations on the use of driving and manoeuvring aids.
Using sensors located in the bumper, this system signals the proximity of obstacles (e.g. pedestrian, vehicle, tree, barrier) present in their field of detection.
Rear parking sensors
The system is switched on by engaging reverse
gear, which is confirmed by an audible signal.The system is switched off when disengaging reverse gear.
Page 193 of 360

193
Driving
6
Audible assistance
The function signals the presence of obstacles
present within the sensors’ detection zone.The proximity information is given by an intermittent audible signal, the frequency of which increases as the vehicle approaches the obstacle.When the distance between the vehicle and the obstacle becomes less than about thirty centimetres, the audible signal becomes continuous.The sound emitted by the speaker (right or left) allows you to identify the side on which the obstacle is located.
Visual assistance
This supplements the audible signal by displaying bars on the screen that move
progressively nearer to the vehicle (green: more distant obstacles; yellow: close obstacles; red: very close obstacles).When the obstacle is very close, the "Danger" symbol is displayed on the screen.
Front parking sensors
In addition to the rear parking sensors, the front parking sensors are triggered when an obstacle is detected in front and the speed of the vehicle is still below 10 km/h (6 mph).The front parking sensors are interrupted if the vehicle stops for more than three seconds in forward gear, if an obstacle is no longer detected or when the speed of the vehicle exceeds 10 km/h (6 mph).
NOTIC E
The sound emitted by the speaker (front or rear) locates the obstacle relative to the vehicle, in front or behind it.
Deactivation/Activation
With button
► To deactivate or activate the system, press this button.The indicator lamp is on when the system is deactivated.
With audio system or touch screen
The settings are changed via the vehicle configuration menu.
NOTIC E
The rear parking sensors system will be deactivated automatically if a trailer or bicycle carrier is connected to a towing device installed in accordance with the manufacturer's recommendations.
Operating limits
If the boot is heavily loaded, the vehicle may tilt, affecting distance measurements.
Page 221 of 360
221
Practical information
7
NOTIC E
New vehicleDuring the first few particle filter regeneration operations, you may notice a "burning" smell. This is perfectly normal.
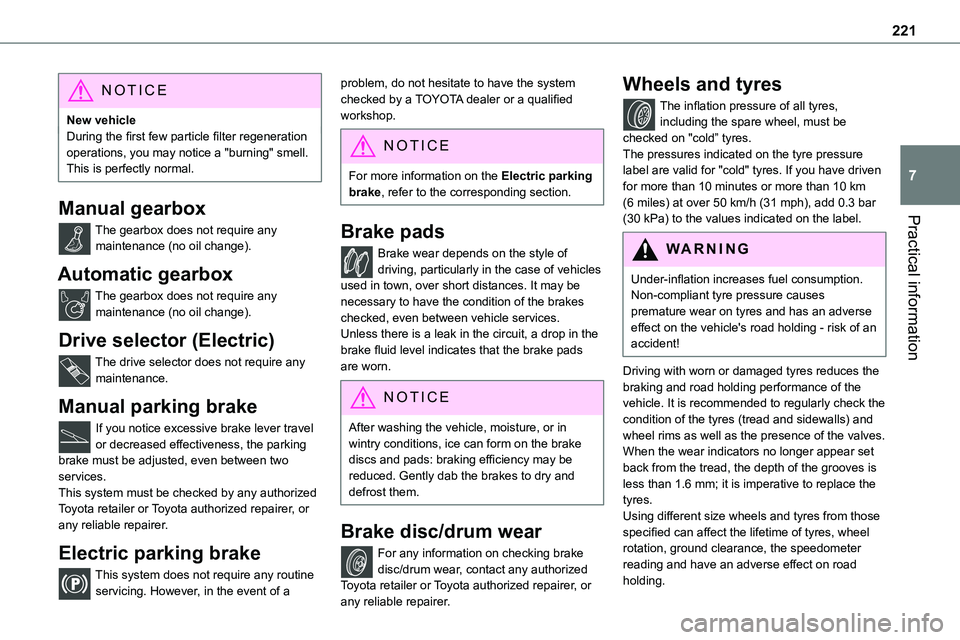
Manual gearbox
The gearbox does not require any maintenance (no oil change).
Automatic gearbox
The gearbox does not require any maintenance (no oil change).
Drive selector (Electric)
The drive selector does not require any maintenance.
Manual parking brake
If you notice excessive brake lever travel or decreased effectiveness, the parking brake must be adjusted, even between two services.This system must be checked by any authorized Toyota retailer or Toyota authorized repairer, or any reliable repairer.
Electric parking brake
This system does not require any routine servicing. However, in the event of a
problem, do not hesitate to have the system checked by a TOYOTA dealer or a qualified workshop.
NOTIC E
For more information on the Electric parking brake, refer to the corresponding section.
Brake pads
Brake wear depends on the style of driving, particularly in the case of vehicles used in town, over short distances. It may be necessary to have the condition of the brakes checked, even between vehicle services.Unless there is a leak in the circuit, a drop in the brake fluid level indicates that the brake pads are worn.
NOTIC E
After washing the vehicle, moisture, or in wintry conditions, ice can form on the brake discs and pads: braking efficiency may be reduced. Gently dab the brakes to dry and defrost them.
Brake disc/drum wear
For any information on checking brake disc/drum wear, contact any authorized Toyota retailer or Toyota authorized repairer, or any reliable repairer.
Wheels and tyres
The inflation pressure of all tyres, including the spare wheel, must be checked on "cold” tyres.The pressures indicated on the tyre pressure label are valid for "cold" tyres. If you have driven for more than 10 minutes or more than 10 km (6 miles) at over 50 km/h (31 mph), add 0.3 bar (30 kPa) to the values indicated on the label.
WARNI NG
Under-inflation increases fuel consumption. Non-compliant tyre pressure causes premature wear on tyres and has an adverse effect on the vehicle's road holding - risk of an accident!
Driving with worn or damaged tyres reduces the braking and road holding performance of the vehicle. It is recommended to regularly check the condition of the tyres (tread and sidewalls) and wheel rims as well as the presence of the valves.When the wear indicators no longer appear set back from the tread, the depth of the grooves is less than 1.6 mm; it is imperative to replace the tyres.Using different size wheels and tyres from those specified can affect the lifetime of tyres, wheel
rotation, ground clearance, the speedometer reading and have an adverse effect on road holding.
Page 237 of 360
237
In the event of a breakdown
8
Original tyre sizeCompact-MediumLong
215/65 R16Placing a 225 wheel in the carrier is prohibited.
There is no restriction.215/60 R17
215/60 R17 M&S
225/55 R17Placing a 215 wheel in the carrier is not recommended (risk of noise).
NOTIC E
A punctured tyre of size 215 or 225 can be placed in the carrier.
Removing a wheel
WARNI NG
Parking the vehicleImmobilise the vehicle where it does not obstruct traffic: the ground must be level, stable and non-slippery.With a manual gearbox, engage first gear
then switch off the ignition to block the wheels.With an automatic gearbox, place the gear selector in position P then switch off the ignition to block the wheels. With a drive selector, place the gear selector in position P then switch off the ignition to block the wheels.Apply the parking brake, unless it is programmed to automatic mode (for an electric parking brake), and check that the indicator lamp lights up on the instrument panel.Ensure that the occupants have left the vehicle and are located in a safe place.Never go underneath a vehicle raised using a jack; use an axle stand.With an electric parking brake, place a chock against the wheel diagonally opposite to the one being replaced.
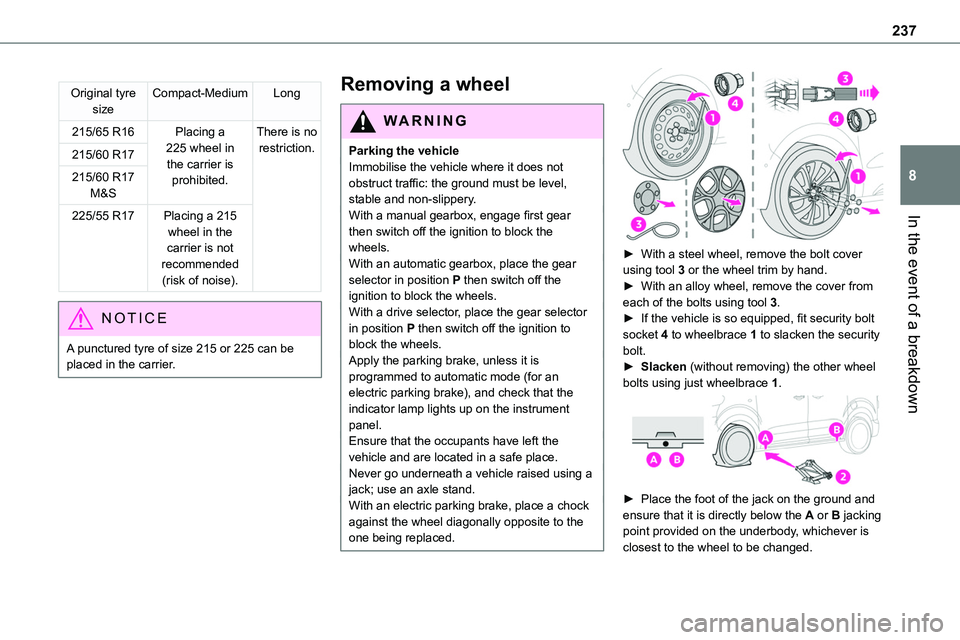
► With a steel wheel, remove the bolt cover using tool 3 or the wheel trim by hand.► With an alloy wheel, remove the cover from each of the bolts using tool 3.► If the vehicle is so equipped, fit security bolt socket 4 to wheelbrace 1 to slacken the security bolt.► Slacken (without removing) the other wheel bolts using just wheelbrace 1.
► Place the foot of the jack on the ground and ensure that it is directly below the A or B jacking point provided on the underbody, whichever is closest to the wheel to be changed.
Page 325 of 360
325
Alphabetical index
Driving modes (Electric) 167Dynamic stability control (DSC) 11 5, 11 7–11 8
E
EBFD 11 4Eco-driving (advice) 8
ECO mode 167Economy mode 212Electric motor 5, 9, 27, 200, 213, 217, 248, 252, 259Electric windows 52Electronic brake force distribution (EBFD) 11 4–11 5Emergency braking assistance (EBA) 11 5Emergency call 11 2–11 3Emergency warning lamps 11 2, 229Emissions control system, SCR 21, 222Energy economy mode 212Energy flows 27Energy recovery 21, 166Engine 222Engine compartment 216Engine, Diesel 198, 216, 229, 255Engines 254Environment 8, 40, 96, 151
F
Fatigue detection 189–190
Filling the AdBlue® tank 219, 223Filling the fuel tank 199–200Filter, air 220Filter, oil 220Filter, particle 219–220Filter, passenger compartment 88, 220Finisher 239Fitting a wheel 237–239
Fitting roof bars 214Fittings, interior 76–77, 82Fittings, rear 82Flap, charging 210Flap, fuel filler 199–200Flap, removable 60–62Flashing indicators 102Floor cab 245Fluid, brake 218Fluid, engine coolant 218Fluid, power steering 218Foglamp, rear 101, 243, 245Foglamps, front 101, 242Foglamps, rear 101Frequency (radio) 309Fuel 8, 198Fuel consumption 8Fuel tank 198, 200Fusebox, dashboard 245Fusebox, engine compartment 245, 247Fuses 245–247
G
Gauge, fuel 198–200Gearbox, automatic 160, 162–166, 169, 221, 249Gearbox, manual 160–161, 169, 221Gear lever, automatic gearbox 162–165Gear lever, manual gearbox 161
Gear shift indicator ~ Gear efficiency indicator 161Glove box 76–77G.P.S. 302
H
Hazard warning lamps 11 2, 229headlamp adjustment 105Headlamp adjustment 105Headlamps, automatic dipping 104–105Headlamps, automatic illumination 103Headlamps, dipped beam 101, 240–241Headlamps, halogen 240–241Headlamps, main beam 101, 240–241Headlamps, Xenon 240Head restraints, front 55Head-up display 173–174Heated bench seat 56Heating 88–90, 93–96Heating, additional 50, 94–96Heating, programmable 28, 50, 94–96, 98High voltage 200
Page 328 of 360
328
Replacing the air filter 220Replacing the oil filter 220Replacing the passenger compartment filter 220Reservoir, screenwash 219Resetting the trip recorder 23Reversing camera 172, 194, 197Reversing lamp 243, 245
Roof bars 214Running out of fuel (Diesel) 229
S
Safety, children 122, 125–127, 129, 135–136, 144, 144–145, 144–145Saturation of the particle filter (Diesel) 220Screen, instrument panel 24Screen menu map 286Screen, multifunction (with audio system) 267Screenwash, front 107Screenwash, rear 108SCR (Selective Catalytic Reduction) 21, 222Seat and bench seat, rear, fixed 64, 67–68Seat and bench seat, rear, on rails 64, 69–70Seat angle 53Seat belts 11 8–121, 128Seat belts, rear 120Seat, bench front, 2-seat 56, 120Seat, rear bench 64Seats, electric 54–55Seats, front 53–55
Seats, heated 56–57Seat(s), individual, rear, on rails 71–73, 120Seats, rear 65–70, 126Selector, gear 162Sensors (warnings) 172Serial number, vehicle 264Service indicator 18Servicing 18, 219, 222
Settings, equipment 26–27Settings, system 289, 316Sidelamps 101, 240, 242–243, 245Side repeater 242Silent vehicle warning sound (Electric) 11 4, 151Sliding side door, electric 36–37, 42–43, 45Sliding side door, hands-free 46–47Sliding side window 83Smart Cargo 60–62Smart Entry & Start 30–31, 153, 155–156Smartphone 28Snow chains 170, 212–213, 236Snow chains, link 212, 236Socket, 12 V accessory 76, 78Socket, 220 V 79Speed limiter 174, 176–179Speed limit recognition 175–176, 178, 181, 184–186Speedometer 173Sport mode 167Stability control (ESC) 11 5–11 8Starting a Diesel engine 198Starting the engine 152, 155
Starting the vehicle 153, 156, 160, 162–165Starting using another battery 156, 249Station, radio 267, 282, 308–309Stay, bonnet 216Steering mounted controls, audio 266, 279–280, 294Steering wheel, adjustment 58Stickers, customising ~ Stickers,
expressive 228Stopping the vehicle 155–156, 162–165Stop & Start 25, 89, 168–169, 198, 215, 220, 251Storage 56, 63, 74–75, 77Storage compartments 77–78Storage wells 74–75, 77Stowing rings 80Sunshine sensor 88Super-fast charging (Electric) 209, 2 11, 259Suspension 222Switching off the engine 152, 154–155Synchronising the remote control 40
T
Table of weights 255Table position 54Table, retractable sliding 84–87Tables, aircraft 78Tables of engines 259Tables of fuses 245–247Table top, working 63