ignition TOYOTA PROACE VERSO EV 2020 Repair Manual
[x] Cancel search | Manufacturer: TOYOTA, Model Year: 2020, Model line: PROACE VERSO EV, Model: TOYOTA PROACE VERSO EV 2020Pages: 360, PDF Size: 68.91 MB
Page 173 of 360
173
Driving
6
Brightness adjustment
► With the engine running, adjust the brightness of the information display using the buttons 3:• on the "sun" to increase the brightness,• on the "moon" to decrease the brightness.
W ARNI NG
When stationary or while driving, no objects
should be placed around the projection blade (or in its recess) so as not to impede its movement and correct operation.
NOTIC E
In certain extreme weather conditions (rain and/or snow, bright sunshine, etc.), the head-up display may not be legible or may suffer temporary interference.Some sunglasses may hamper reading of the information.To clean the projection blade, use a clean, soft cloth (such as a spectacles cloth or microfibre cloth). Do not use a dry or abrasive cloth, or detergent or solvent products, due to the risk of scratching the projection blade or damaging the non-reflective coating.
NOTIC E
This system operates when the engine is running, and the settings are saved when the ignition is switched off.
Memorising speeds
This function allows you to save speed settings which are then used to set the two systems: the speed limiter (limits the speed of the vehicle) or cruise control (vehicle cruising speed).You can save 6 speed settings for each of the two systems.
Programming
The speed thresholds can be set in the vehicle configuration menu using the touch screen.► Select the system for which you want to memorise new speed settings:
– speed limiter
or– cruise control.
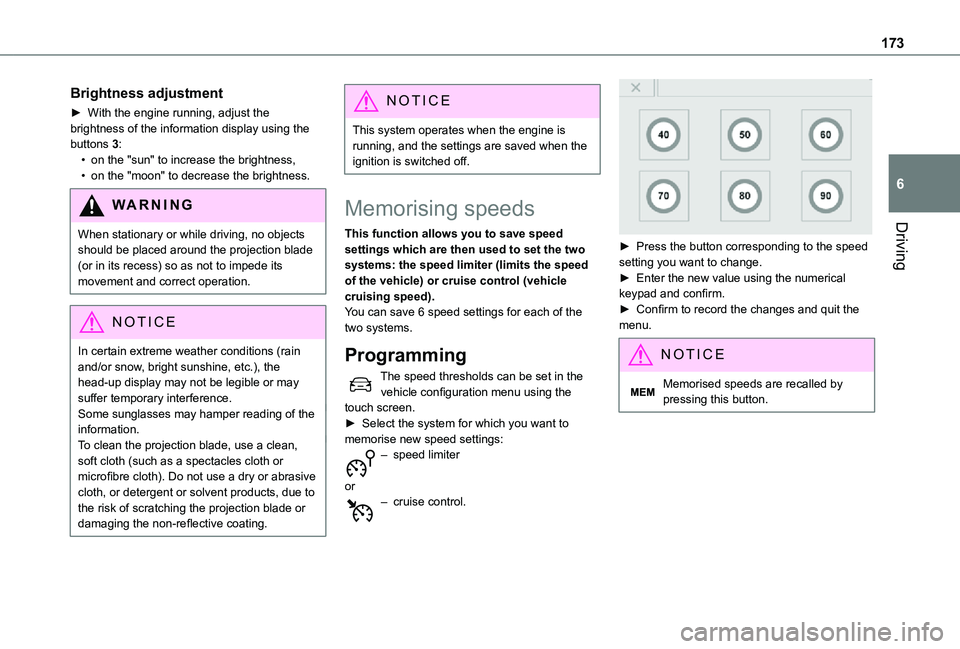
► Press the button corresponding to the speed setting you want to change.► Enter the new value using the numerical keypad and confirm.► Confirm to record the changes and quit the menu.
NOTIC E
Memorised speeds are recalled by pressing this button.
Page 176 of 360

176
Head-up display
3.Speed limit indication.
4.Request to memorise the speed.
5.Current speed setting.
Storing the speed setting
► Switch on the speed limiter/cruise control.The speed limiter/cruise control information is displayed. Upon detecting a sign suggesting a new speed setting, the system displays the value and "MEM" flashes for a few seconds, prompting you to save it as a new speed setting.
NOTIC E
If there is a difference of less than 6 mph (9 km/h) between the speed setting and the speed displayed by the Speed Limit Recognition and Recommendation, the "MEM" symbol is not displayed.
Depending on the road conditions, several speeds may be displayed.► Press button 2 once to save the suggested speed value.A message is displayed, confirming the request.► Press button 2 again to confirm and save the new speed setting.The display then reverts to its previous state.
Speed limiter
WARNI NG
Refer to the General recommendations on the use of driving and manoeuvring aids.
This system prevents the vehicle from exceeding the speed programmed by the driver (speed setting).The speed limiter is switched on manually.The minimum speed setting is 30 km/h (19 mph).The speed setting remains in the system memory when the ignition is switched off.
NOTIC E
For more information on this button and the Adaptive cruise control, refer to the corresponding section.
NOTIC E
For more information on Memorising speeds, refer to the corresponding section.
Page 179 of 360

179
Driving
6
WARNI NG
Operating limitsNever use the system in the following situations:– In an urban area with the risk of pedestrians crossing the road.– In heavy traffic (except versions with the Stop & Go function).– On winding or steep roads.– On slippery or flooded roads.– In poor weather conditions.– Driving on a speed circuit.– Driving on a rolling road.– When using snow chains, non-slip covers or studded tyres.
Cruise control
WARNI NG
Refer to the General recommendations on the use of driving and manoeuvring aids and to Cruise control - particular recommendations.
This system automatically maintains the vehicle’s speed at the value programmed by the driver (speed setting), without the use of the accelerator pedal.Cruise control is switched on manually.It requires a minimum vehicle speed of 25 mph (40 km/h).With a manual gearbox, third gear or higher must be engaged.With an automatic gearbox, mode D or second gear or higher in mode M must be engaged.With a drive selector, mode D or B must be engaged.
NOTIC E
Cruise control remains active after changing gear, regardless of the gearbox type, on engines fitted with Stop & Start.
NOTIC E
Switching off the ignition cancels any speed setting.
Steering mounted control
1.ON (CRUISE position) / OFF (position 0)
2.Activate cruise control at the current speed / decrease speed setting
3.Activate cruise control at the current speed / increase speed setting
4.Pause / resume cruise control with the speed setting previously saved
5.Depending on version:Display the speed thresholds saved using the Memorising speeds functionorUse the speed suggested by the Speed Limit Recognition and Recommendation (MEM display)
Page 183 of 360

183
Driving
6
► Press 4 to restart cruise control. Cruise control may have been paused automatically:• When the inter-vehicle distance threshold is reached.• When the distance between your vehicle and the one in front becomes too short.• When the vehicle starts moving too slowly or the vehicle in front starts moving too slowly.• When the VSC system is triggered.
W ARNI NG
When the driver attempts to reactivate cruise control, after the function has been paused, the message "Activation not possible, unsuitable conditions" is briefly displayed if reactivation is not possible (safety conditions not met).
Using the Speed Limit Recognition and Recommendation function or speed limit sign memorisation to modify the speed setting.
► Press 5 to accept the speed setting proposed by the system on the instrument panel or touch screen, then press again to confirm.
WARNI NG
To prevent any sudden acceleration or deceleration of the vehicle, select a speed setting fairly close to the current speed of your vehicle.
Changing the inter-vehicle distance
► Press 6 to display the distance setting thresholds ("Distant", "Normal" or "Near"), then press again to select a threshold.After a few seconds, the option is accepted and will be memorised when the ignition is switched off.
Temporarily exceeding the speed setting
► Depress the accelerator pedal. Distance monitoring and cruise control are deactivated as long as you continue to accelerate. The speed on the instrument panel flashes.
Deactivating the system
► Turn the knob 1 upwards into position 0 (OFF).
Information displayed on
the instrument panel
Head-up display
7.Cruise control pause/resume indication.
8.Indication of selection of cruise control mode, or vehicle speed adjustment phase.
9.Speed setting value.
NOTIC E
For more information on the Head-up display, refer to the corresponding section.
Messages and alerts
NOTIC E
The display of these messages or alerts is not sequential.
“Cruise control paused” or “Cruise control suspended” following a brief acceleration by the driver.
Page 186 of 360

186
WARNI NG
It is possible that warnings are not given, are given too late or seem unjustified.The driver must always stay in control of the vehicle and be prepared to react at any time to avoid an accident.
WARNI NG
Following an impact, the system is automatically deactivated.Have it checked by any authorized Toyota retailer or Toyota authorized repairer, or any reliable repairer.
Collision Risk Alert
This function warns the driver that their vehicle is at risk of a collision with the vehicle in front, or with a pedestrian or cyclist present in their traffic lane.
Modifying the alert trigger threshold
This trigger threshold determines the sensitivity with which the function warns of the risk of collision.The threshold is set via the vehicle configuration menu with the audio system or touch screen.► Select one of the three pre-defined thresholds: "Far", "Normal" or "Near".
The last threshold selected is memorised when the ignition is switched off.
Operation
Depending on the degree of risk of collision detected by the system and the alert trigger threshold chosen by the driver, several different levels of alert may be triggered and displayed on the instrument panel.The system takes account of the vehicle dynamics, the speed of your vehicle and the one in front, the environmental conditions and the operation of the vehicle (actions on the pedals, steering wheel, etc.) to trigger the alert at the most relevant moment.Level 1 (orange): visual alert only, warning that the vehicle in front is very close.The message "Vehicle Near" is displayed.Level 2 (red): visual and audible alert, warning that a collision is imminent.The message "Brake!" is displayed.
NOTIC E
Where the speed of your vehicle is too high approaching another vehicle, the first level of alert may not be displayed: the level 2 alert may be displayed directly.Important: the level 1 alert is not displayed when there is a stationary obstacle or when the "Near" trigger threshold has been selected.
Intelligent emergency
braking assistance (iEBA)
If the driver brakes, but not sufficiently to avoid a collision, this system will provide additional braking, within the limits of the laws of physics.This assistance will only be provided if the driver presses the brake pedal.
Active Safety Brake
This function, also called automatic emergency braking, intervenes following the alerts if the driver does not react quickly enough and does not operate the vehicle's brakes.It aims to reduce the speed of impact or avoid a collision where the driver fails to react.
Page 188 of 360

188
NOTIC E
No warning is transmitted while the direction indicator is active and for approximately 20 seconds after the direction indicator is switched off.
Activation/Deactivation
With/without audio system
► To activate or deactivate the system, press this button.The indicator lamp is on when the system is activated.
With touch screen
The settings are changed via the vehicle configuration menu.
Malfunction
Depending on the vehicle’s equipment:The indicator lamp in this button flashes.
or/The button flashes and a fault appears.Consult any authorized Toyota retailer or Toyota authorized repairer, or any reliable repairer.
NOTIC E
Detection may be impeded:– If the markings on the ground are worn and not clearly contrasted against the road surface.– If the windscreen is dirty.– In certain extreme weather conditions: fog, heavy rain, snow, shade, bright sunlight or direct exposure to the sun (e.g. low sun, leaving a tunnel).
Distraction detection
WARNI NG
Refer to the General recommendations on the use of driving and manoeuvring aids.
Depending on version, the function consists of either the "Coffee Break Alert" system alone or combined with the "Driver Attention Alert"
system.
WARNI NG
These systems are in no way designed to keep the driver awake or to prevent the driver from falling asleep at the wheel. It is the driver’s responsibility to stop if feeling tired.Take a break in case of feeling tired or at least every 2 hours.
Activation/Deactivation
This function is set via the vehicle configuration menu.The state of the system is memorised when the ignition is switched off.
Coffee Break Alert
The system triggers an alert as soon as it detects that the driver has not taken a
Page 189 of 360
.This alert is issued via the display of a message encouraging you to take a break, accompanied by an audible signal.If")
189
Driving
6
break after two hours of driving at a speed above 65 km/h (40 mph).This alert is issued via the display of a message encouraging you to take a break, accompanied by an audible signal.If the driver does not follow this advice, the alert is repeated hourly until the vehicle is stopped.The system resets itself if one of the following conditions is met:– engine running, the vehicle has been stationary for more than 15 minutes,– the ignition has been switched off for a few minutes,– the driver's seat belt is unfastened and their door is opened.
NOTIC E
As soon as the speed of the vehicle drops below 65 km/h (40 mph), the system goes into standby.The driving time is counted again once the speed is above 65 km/h (40 mph).
Driver Attention Warning
Depending on version, the "Coffee Break Alert" system is combined with the "Driver Attention Warning" system.
Using a camera placed at the top of the windscreen, the system assesses the driver's level of vigilance, fatigue or distraction by identifying variations in trajectory compared to the lane markings.This system is particularly suited to fast roads (speed higher than 40 mph (65 km/h)).At a first-level alert, the driver is warned by the “Take care!” message, accompanied by an audible signal.After three first-level alerts, the system triggers a further alert with the message "Dangerous driving: take a break", accompanied by a more pronounced audible signal.
NOTIC E
In certain driving conditions (poor road surface or strong winds), the system may give alerts independent of the driver's level of vigilance.
WARNI NG
The following situations may interfere with the operation of the system or prevent it from working:– lane markings absent, worn, hidden (snow, mud) or multiple (roadworks),– close to the vehicle ahead (lane markings not detected),– roads that are narrow, winding, etc.
Page 194 of 360

194
Top Rear Vision
WARNI NG
Refer to the General recommendations on the use of driving and manoeuvring aids.
As soon as reverse gear is engaged with the engine running, this system displays views of your vehicle’s close surroundings on the touch screen using a camera located at the rear of the vehicle.
The screen is divided into two parts with a contextual view and a view from above the vehicle in its close surroundings.The parking sensors supplement the information on the view from above the vehicle.Various contextual views may be displayed:– Standard view.– 180° view.– Zoom view.AUTO mode is activated by default.In this mode, the system chooses to display the best view (standard or zoom).You can change the type of view at any time during a manoeuvre.The state of the function is not saved when the
ignition is switched off.
Principle of operation
Using the rear camera, the vehicle's close surroundings are recorded during manoeuvres at low speed.An image from above your vehicle in its close surroundings is reconstructed (represented between the brackets) in real time and as the manoeuvre progresses.It facilitates the alignment of your vehicle when parking and allows obstacles close to the vehicle to be seen. It is automatically deleted if the vehicle remains stationary for too long.
Activation
Activation is automatic on engaging reverse gear at a speed lower than 6 mph (10 km/h).
Page 197 of 360

197
Practical information
7
Compatibility of fuels
Diesel fuels conforming to the EN590, EN16734 and EN16709 standards and containing up to 7%, 10%, 20% and 30% fatty acid methyl ester respectively. The use of B20 or B30 fuels, even occasionally, imposes special maintenance conditions referred to as "Arduous conditions".
Paraffinic Diesel fuel conforming to the EN15940 standard.
WARNI NG
The use of any other type of (bio) fuel (vegetable or animal oils, pure or diluted, domestic fuel, etc.) is strictly prohibited (risk of damage to the engine and fuel system).
NOTIC E
The only Diesel fuel additives authorised for use are those that meet the B715000 standard.
Diesel at low temperature
At temperatures below 0 °C (+32 °F), the formation of paraffins in summer-type Diesel fuels could prevent the engine from operating correctly. In these temperature conditions, use winter-type Diesel fuel and keep the fuel tank more than 50 % full.At temperatures below -15 °C (+5 °F) to avoid problems starting, it is best to park the vehicle under shelter (heated garage).
Travelling abroad
Certain fuels could damage your vehicle’s engine.In certain countries, the use of a particular fuel may be required (specific octane rating, specific trade name, etc.) to ensure correct operation of the engine.For all additional information, consult a dealer.
Refuelling
Fuel tank capacity: approximately 69 litres.Reserve level: approximately 6 litres.
Low fuel level
When the low fuel level is reached, one of these warning lamps lights up on the instrument panel, accompanied by the display of a message and an audible signal. When it first comes on, about 8 litres of fuel remain.You must refuel as soon as possible to avoid running out of fuel.For more information on Running out of fuel (Diesel), refer to the corresponding section.
NOTIC E
A small arrow by the warning lamp indicates which side of the vehicle the fuel filler flap is located on.
WARNI NG
Stop & StartNever refuel with the engine in STOP mode; you must switch off the ignition.
Refuelling
At least 8 litres of fuel must be added, in order to be registered by the fuel gauge.
Page 199 of 360

(Depending on country of sa")
199
Practical information
7
Fuel cut-off
Your vehicle is fitted with a safety system that cuts off the supply of fuel in the event of an impact.
Misfuel prevention (Diesel)
(Depending on country of sale.)This mechanical device prevents filling the tank of a Diesel vehicle with petrol.Located in the filler neck, the misfuel prevention device appears when the filler cap is removed.
When a petrol filler nozzle is inserted into the fuel filler neck of a Diesel vehicle, it comes into contact with the flap. The system remains closed and prevents filling.Do not persist but introduce a Diesel type filler nozzle.
NOTIC E
It remains possible to use a fuel jerrycan to fill the tank.In order to ensure a good flow of fuel, do not place the nozzle of the fuel can in direct contact with the flap of the misfuel prevention device.
NOTIC E
Travelling abroadAs Diesel fuel pump nozzles may be different in other countries, the presence of the misfuel prevention device may make refuelling impossible.Before travelling abroad, it is advisable to check with any authorized Toyota retailer or Toyota authorized repairer, or any reliable repairer if the vehicle is suitable for the distribution equipment of the countries visited.
Charging system
(Electric)
400 V electrical system
The electrical traction system, which operates at a voltage of approximately 400 V, is identified by orange cables, and its components are marked with this symbol:
WARNI NG
An electric vehicle’s power train can become hot during use and after switching off the ignition.Observe the warning messages shown on labels, particularly inside the flap.All work on or modifications to the vehicle’s electrical system (including the traction battery, connectors, orange cables and other components visible from the interior or exterior) is strictly prohibited - risk of severe burns or potentially fatal electric shock
(short-circuit/electrocution)!In the event of a problem, always contact any authorized Toyota retailer or Toyota authorized repairer, or any reliable repairer.