brake pads TOYOTA RAV4 1996 Service Repair Manual
[x] Cancel search | Manufacturer: TOYOTA, Model Year: 1996, Model line: RAV4, Model: TOYOTA RAV4 1996Pages: 1632, PDF Size: 41.64 MB
Page 349 of 1632

PROPORTIONING VALVE & BY-PASS VALVE
Land Cruiser (Models Without Traction Control ABS)
1. Turn ignition off. Depress brake pedal at least 40 times. Install proportioning valve gauge to front brake
caliper brake line connection and to rear brake caliper brake line connection. Bleed air from gauges and
lines.
2. Turn ignition to ON position and wait until pump motor has stopped. Raise front brake caliper pressure
and check rear brake caliper pressure by depressing brake pedal and checking fluid pressure on gauges.
3. If rear brake caliper pressure is incorrect, replace hydraulic brake booster. See HYDRAULIC BRAKE
BOOSTER under REMOVAL & INSTALLATION.
PROPORTIONING VALVE & BY-PASS VALVE PRESSURE SPECIFICATIONS (LAND CRUISER)
REMOVAL & INSTALLATION
FRONT DISC BRAKE PADS
Removal & Installation (Land Cruiser)
Raise and support vehicle. Remove front wheel. Remove clip, 2 pins, 2 pad retainer clips, pads, anti-squeal
shims and pad retainers. See Fig. 5
. Remove enough brake fluid from master cylinder so overflow will not
occur as piston is seated. Seat pistons using a hammer handle or equivalent. Slide NEW pads and anti-rattle
shims into caliper. Check reservoir fluid level. To install, reverse removal procedure. Tighten lower caliper bolt
to specification. See TORQUE SPECIFICATIONS
.
Sienna
Low Pressure Reading427 (30)427 (30)
High Pressure Reading1138 (80)711 (50)
Front Brake Caliper Pressure - psi (kg/cm2)Rear Brake Caliper Pressure - psi (kg/cm2)
327 (23)356 (25)
640 (45)484-540 (34-38)
1138 (80)754 (53)
NOTE: Location and number of anti-rattle springs, anti-squeal shims, pad support and
guide plates vary between models. Note component locations during removal
process for reassembly reference. Tacoma, Tundra and 4Runner with 4WD use
dual-piston calipers; other models use single-piston calipers.
NOTE: Pushing piston into caliper bore will force fluid back into master cylinder
reservoir. Remove reservoir cap when compressing caliper piston.
1999 Toyota RAV4
1999-2000 BRAKES Disc & Drum - Trucks & Vans
Microsoft
Sunday, November 22, 2009 10:07:28 AMPage 10 © 2005 Mitchell Repair Information Company, LLC.
Page 351 of 1632
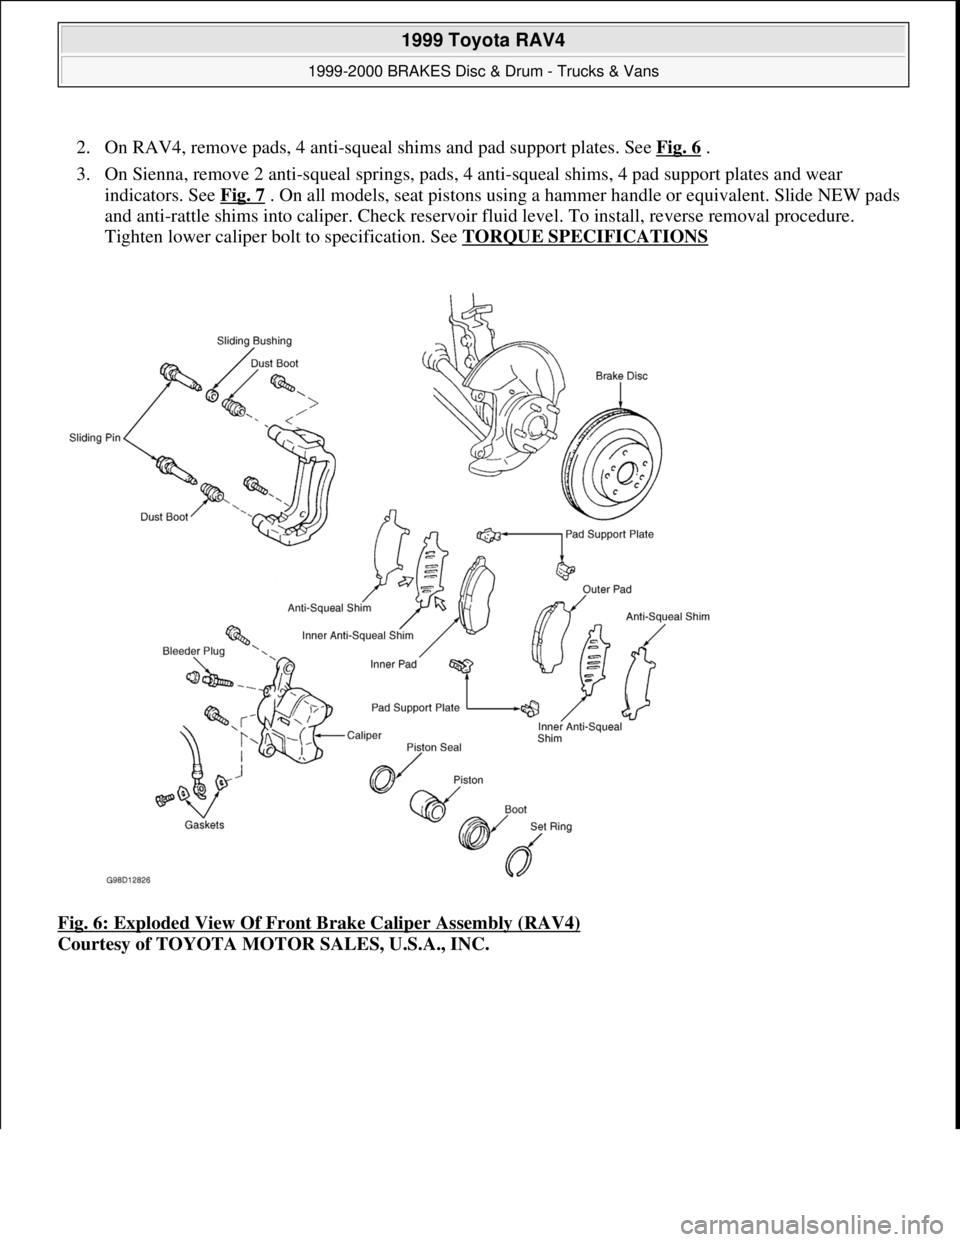
2. On RAV4, remove pads, 4 anti-squeal shims and pad support plates. See Fig. 6 .
3. On Sienna, remove 2 anti-squeal springs, pads, 4 anti-squeal shims, 4 pad support plates and wear
indicators. See Fig. 7
. On all models, seat pistons using a hammer handle or equivalent. Slide NEW pads
and anti-rattle shims into caliper. Check reservoir fluid level. To install, reverse removal procedure.
Tighten lower caliper bolt to specification. See TORQUE SPECIFICATIONS
Fig. 6: Exploded View Of Front Brake Caliper Assembly (RAV4)
Courtesy of TOYOTA MOTOR SALES, U.S.A., INC.
1999 Toyota RAV4
1999-2000 BRAKES Disc & Drum - Trucks & Vans
Microsoft
Sunday, November 22, 2009 10:07:28 AMPage 12 © 2005 Mitchell Repair Information Company, LLC.
Page 353 of 1632
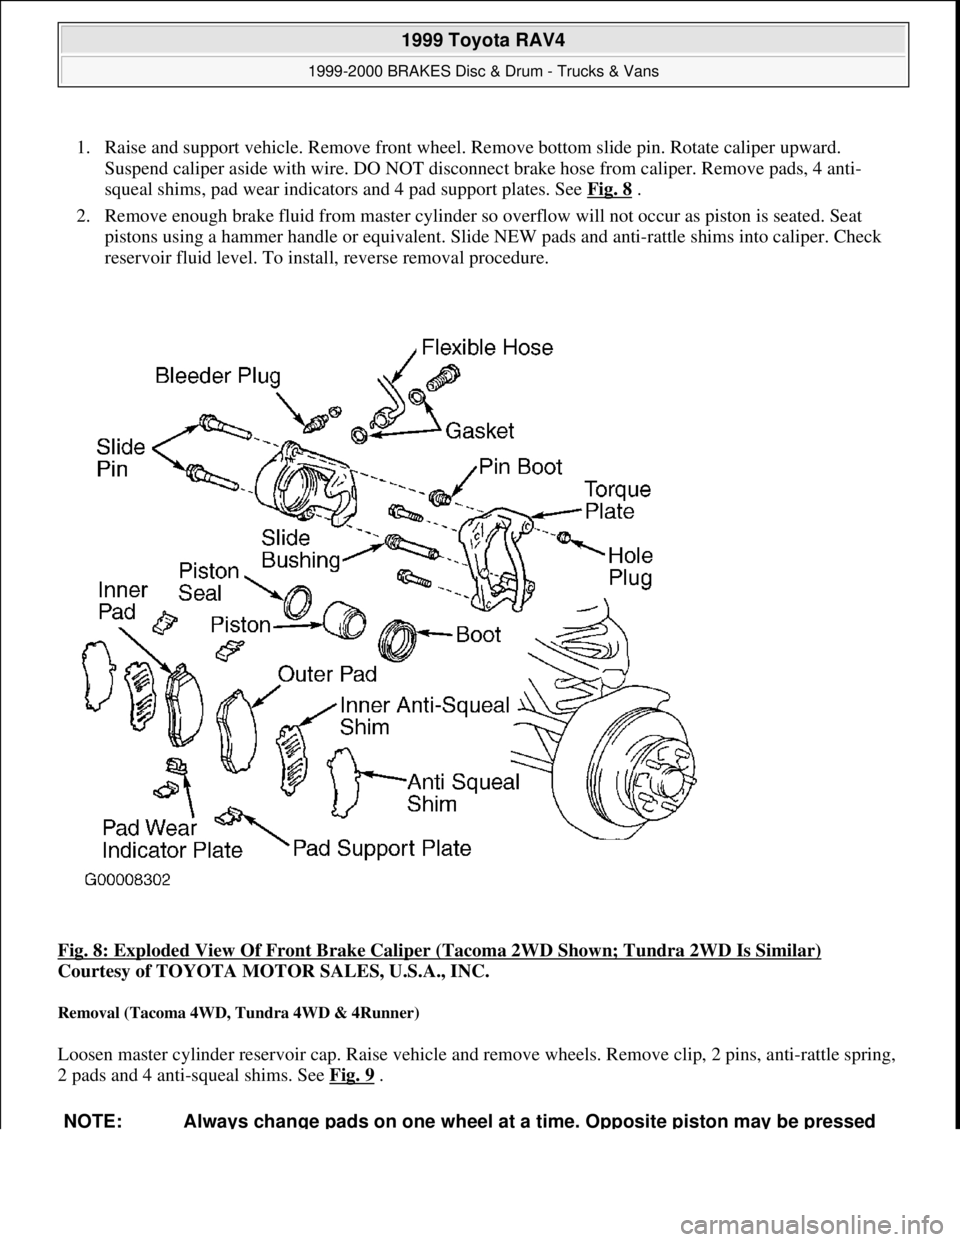
1. Raise and support vehicle. Remove front wheel. Remove bottom slide pin. Rotate caliper upward.
Suspend caliper aside with wire. DO NOT disconnect brake hose from caliper. Remove pads, 4 anti-
squeal shims, pad wear indicators and 4 pad support plates. See Fig. 8
.
2. Remove enough brake fluid from master cylinder so overflow will not occur as piston is seated. Seat
pistons using a hammer handle or equivalent. Slide NEW pads and anti-rattle shims into caliper. Check
reservoir fluid level. To install, reverse removal procedure.
Fig. 8: Exploded View Of Front Brake Caliper (Tacoma 2WD Shown; Tundra 2WD Is Similar)
Courtesy of TOYOTA MOTOR SALES, U.S.A., INC.
Removal (Tacoma 4WD, Tundra 4WD & 4Runner)
Loosen master cylinder reservoir cap. Raise vehicle and remove wheels. Remove clip, 2 pins, anti-rattle spring,
2 pads and 4 anti-squeal shims. See Fig. 9
.
NOTE: Always change pads on one wheel at a time. Opposite piston may be pressed
1999 Toyota RAV4
1999-2000 BRAKES Disc & Drum - Trucks & Vans
Microsoft
Sunday, November 22, 2009 10:07:28 AMPage 14 © 2005 Mitchell Repair Information Company, LLC.
Page 354 of 1632
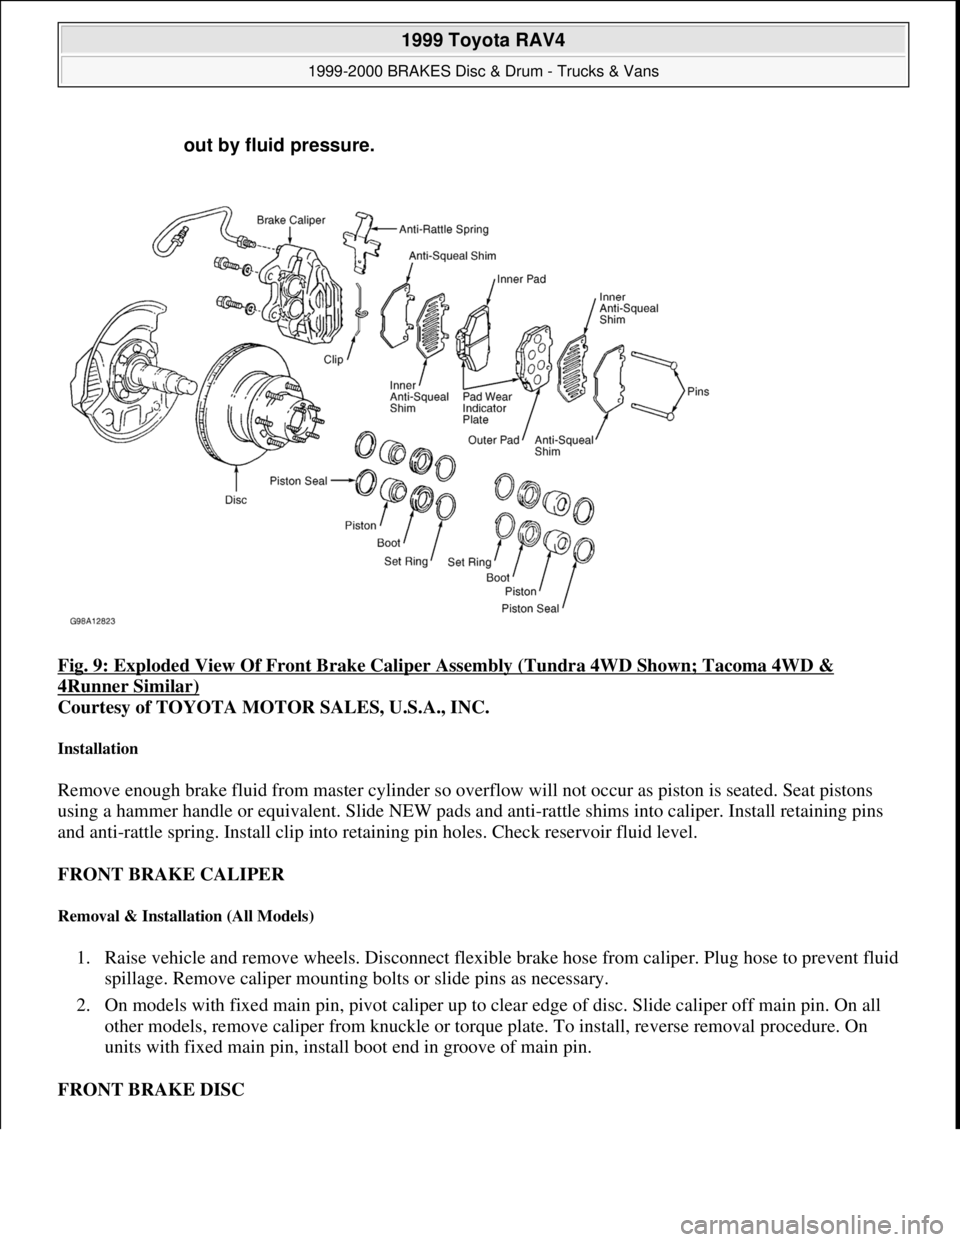
Fig. 9: Exploded View Of Front Brake Caliper Assembly (Tundra 4WD Shown; Tacoma 4WD &
4Runner Similar)
Courtesy of TOYOTA MOTOR SALES, U.S.A., INC.
Installation
Remove enough brake fluid from master cylinder so overflow will not occur as piston is seated. Seat pistons
using a hammer handle or equivalent. Slide NEW pads and anti-rattle shims into caliper. Install retaining pins
and anti-rattle spring. Install clip into retaining pin holes. Check reservoir fluid level.
FRONT BRAKE CALIPER
Removal & Installation (All Models)
1. Raise vehicle and remove wheels. Disconnect flexible brake hose from caliper. Plug hose to prevent fluid
spillage. Remove caliper mounting bolts or slide pins as necessary.
2. On models with fixed main pin, pivot caliper up to clear edge of disc. Slide caliper off main pin. On all
other models, remove caliper from knuckle or torque plate. To install, reverse removal procedure. On
units with fixed main pin, install boot end in groove of main pin.
FRONT BRAKE DISC out by fluid pressure.
1999 Toyota RAV4
1999-2000 BRAKES Disc & Drum - Trucks & Vans
Microsoft
Sunday, November 22, 2009 10:07:28 AMPage 15 © 2005 Mitchell Repair Information Company, LLC.
Page 355 of 1632
Removal & Installation (Land Cruiser)
Raise vehicle and remove wheels. Remove bolt and disconnect brakeline from steering knuckle. Remove 2
bolts, washer and brake caliper. Support brake caliper securely. Remove grease cap from flange. Remove snap
ring. Remove 6 nuts and washers. Remove 6 nuts and cone washers. Remove flange and gaskets. Remove lock
nut, lock washer and adjusting nut. Remove disc with axle hub. To install, reverse removal procedure. Tighten
bolts and nut to specifications. See TORQUE SPECIFICATIONS
.
Removal & Installation (RAV4 & Tundra)
Raise and support vehicle. Remove front wheel. Remove 2 caliper retaining bolts and remove caliper. Support
caliper securely out of way. Remove brake disc. To install, reverse removal procedure. Tighten bolts and nut to
specifications. See TORQUE SPECIFICATIONS
.
Removal & Installation (Sienna)
Raise and support vehicle. Remove front wheel. Remove cotter pin and hub lock cap. Remove hub nut. Remove
2 caliper retaining bolts and remove caliper. Support caliper securely out of way. Remove claw washer, outer
bearing and axle hub with brake disc. To install, reverse removal procedure. Tighten bolts and nut to
specifications. See TORQUE SPECIFICATIONS
.
Removal & Installation (Tacoma 2WD)
Raise and support vehicle. Remove front wheel. Remove 2 caliper retaining bolts and remove caliper. Support
caliper securely out of way. Remove cotter pin and hub lock cap. Remove hub nut. Remove claw washer, outer
bearing and axle hub with brake disc. To install, reverse removal procedure. Tighten bolts and nut to
specifications. See TORQUE SPECIFICATIONS
.
Removal & Installation (Tacoma 4WD & 4Runner)
Raise and support vehicle. Remove front wheel. Remove and plug flexible brake hose from caliper. On Tacoma,
remove snap ring. Remove 2 bolts and remove brake caliper and brake disc. Secure caliper out of way. To
install, reverse removal procedure. Be sure to install brake hose lock securely into lock hole in caliper. Tighten
bolts and nut to specifications. See TORQUE SPECIFICATIONS
.
REAR DISC BRAKE PADS
Removal & Installation (Land Cruiser)
1. Raise and support vehicle. Remove wheels. Secure disc with lug nuts. Remove guide bolts from torque
plate. Leave hose connected and suspend caliper from suspension. Remove pads, anti-squeal shims, wear
indicators and pad support plates. See Fig. 10
.
2. Install NEW pad support plates on torque plate. Install NEW pad wear indicators, anti-squeal shims and
pads. Position wear indicators on lower edge of pad. Anti-squeal shims go on outside of pads. NOTE: Pushing piston into caliper bore will force fluid back into master cylinder
reservoir. Remove small amount of fluid from reservoir with syringe.
1999 Toyota RAV4
1999-2000 BRAKES Disc & Drum - Trucks & Vans
Microsoft
Sunday, November 22, 2009 10:07:28 AMPage 16 © 2005 Mitchell Repair Information Company, LLC.
Page 950 of 1632
On models equipped with anti-lock brake systems, ALWAYS observe the following cautions:
DO NOT attempt to bleed hydraulic system without first referring to the appropriate ANTI-LOCK
BRAKE SYSTEM article in the BRAKES Section.
DO NOT mix tire sizes. As long as tires remain close to the original diameter, increasing the width is
acceptable. Rolling diameter must be identical for all 4 tires. Some manufacturers recommend tires of the
same brand, style and type. Failure to follow this precaution may cause inaccurate wheel speed readings.
Use ONLY recommended brake fluids. DO NOT use silicone brake fluids in an ABS-equipped vehicle.
BATTERY WARNING
REPLACING BLOWN FUSES
BRAKE PAD WEAR INDICATOR
Indicator will cause a squealing or scraping noise, warning that brake pads need replacement.
CATALYTIC CONVERTER CAUTION: The anti-lock brake system contains electronic equipment that can be
susceptible to interference caused by improperly installed or high output
radio transmitting equipment. Since this interference could cause the
possible loss of the anti-lock braking capability, such equipment should
be installed by qualified professionals.
WARNING:When battery is disconnected, vehicles equipped with computers may
lose memory data. When battery power is restored, driveability problems
may exist on some vehicles. These vehicles may require a relearn
procedure. See COMPUTER RELEARN PROCEDURES article in GENERAL
INFORMATION section.
CAUTION: Before replacing a blown fuse, remove ignition key, turn off all lights and
accessories to avoid damaging the electrical system. Be sure to use fuse
with the correct indicated amperage rating. The use of an incorrect
amperage rating fuse may result in a dangerous electrical system
overload.
CAUTION: Continued operation of vehicle with a severe malfunction could cause
converter to overheat, resulting in possible damage to converter and
vehicle.
CAUTION: Any modification to the exhaust system on turbo models, which reduces
exhaust backpressure, will lead to lean fuel mixtures and excessive spark
advance. This could cause serious engine damage.
1999 Toyota RAV4
MAINTENANCE INFORMATION 1997-99 MAINTENANCE Toyota Maintenance Information
Microsoft
Sunday, November 22, 2009 10:32:42 AMPage 8 © 2005 Mitchell Repair Information Company, LLC.