height adjustment TOYOTA RAV4 1996 Service Repair Manual
[x] Cancel search | Manufacturer: TOYOTA, Model Year: 1996, Model line: RAV4, Model: TOYOTA RAV4 1996Pages: 1632, PDF Size: 41.64 MB
Page 30 of 1632
against knuckle when bolt is tightened. Tighten wheel speed sensor and brake components to
specification. See TORQUE SPECIFICATIONS
.
ADJUSTMENTS
BRAKE BOOSTER PUSH ROD
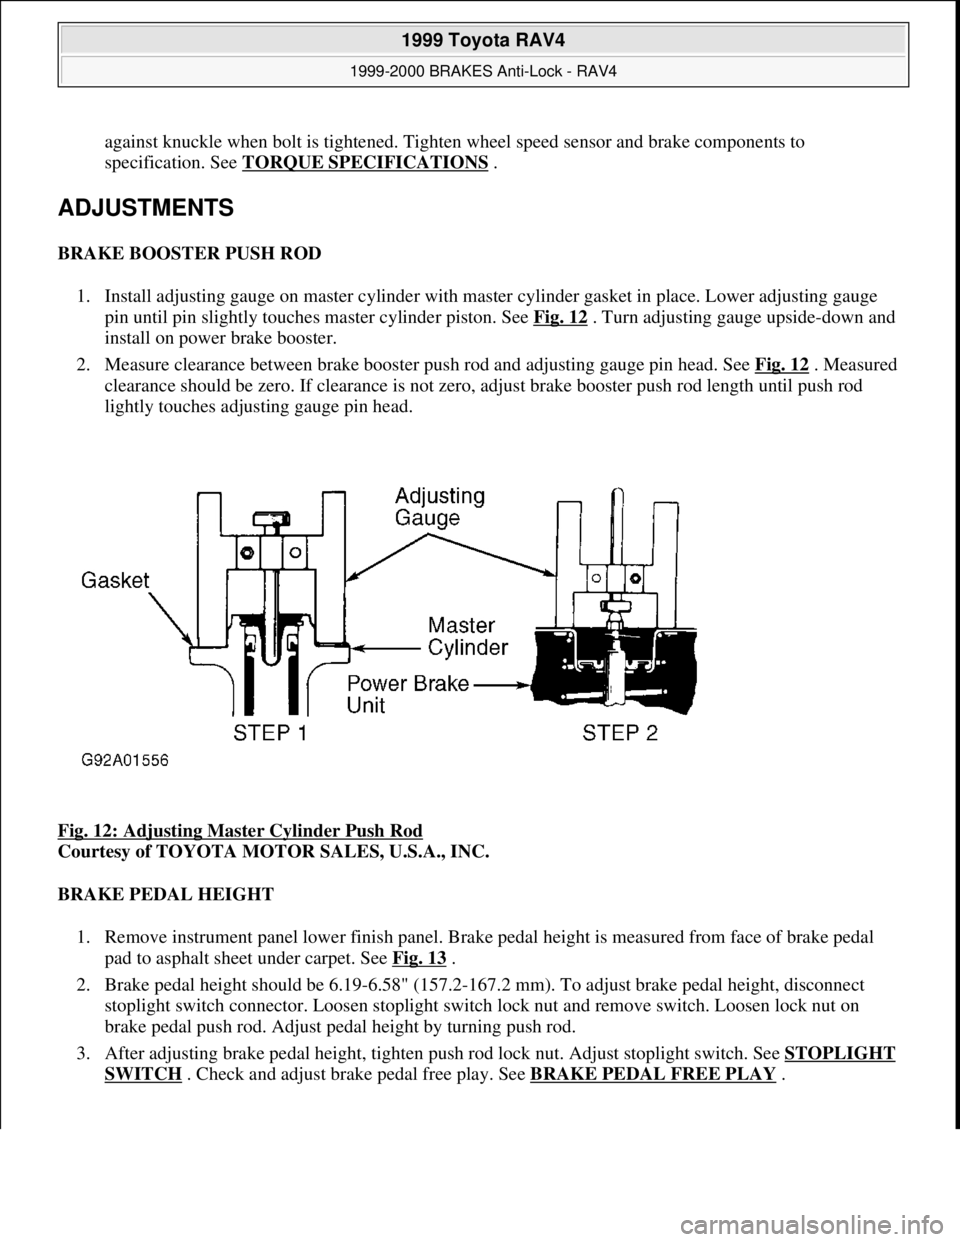
1. Install adjusting gauge on master cylinder with master cylinder gasket in place. Lower adjusting gauge
pin until pin slightly touches master cylinder piston. See Fig. 12
. Turn adjusting gauge upside-down and
install on power brake booster.
2. Measure clearance between brake booster push rod and adjusting gauge pin head. See Fig. 12
. Measured
clearance should be zero. If clearance is not zero, adjust brake booster push rod length until push rod
lightly touches adjusting gauge pin head.
Fig. 12: Adjusting Master Cylinder Push Rod
Courtesy of TOYOTA MOTOR SALES, U.S.A., INC.
BRAKE PEDAL HEIGHT
1. Remove instrument panel lower finish panel. Brake pedal height is measured from face of brake pedal
pad to asphalt sheet under carpet. See Fig. 13
.
2. Brake pedal height should be 6.19-6.58" (157.2-167.2 mm). To adjust brake pedal height, disconnect
stoplight switch connector. Loosen stoplight switch lock nut and remove switch. Loosen lock nut on
brake pedal push rod. Adjust pedal height by turning push rod.
3. After adjusting brake pedal height, tighten push rod lock nut. Adjust stoplight switch. See STOPLIGHT
SWITCH . Check and adjust brake pedal free play. See BRAKE PEDAL FREE PLAY.
1999 Toyota RAV4
1999-2000 BRAKES Anti-Lock - RAV4
Microsoft
Sunday, November 22, 2009 10:06:17 AMPage 30 © 2005 Mitchell Repair Information Company, LLC.
Page 31 of 1632
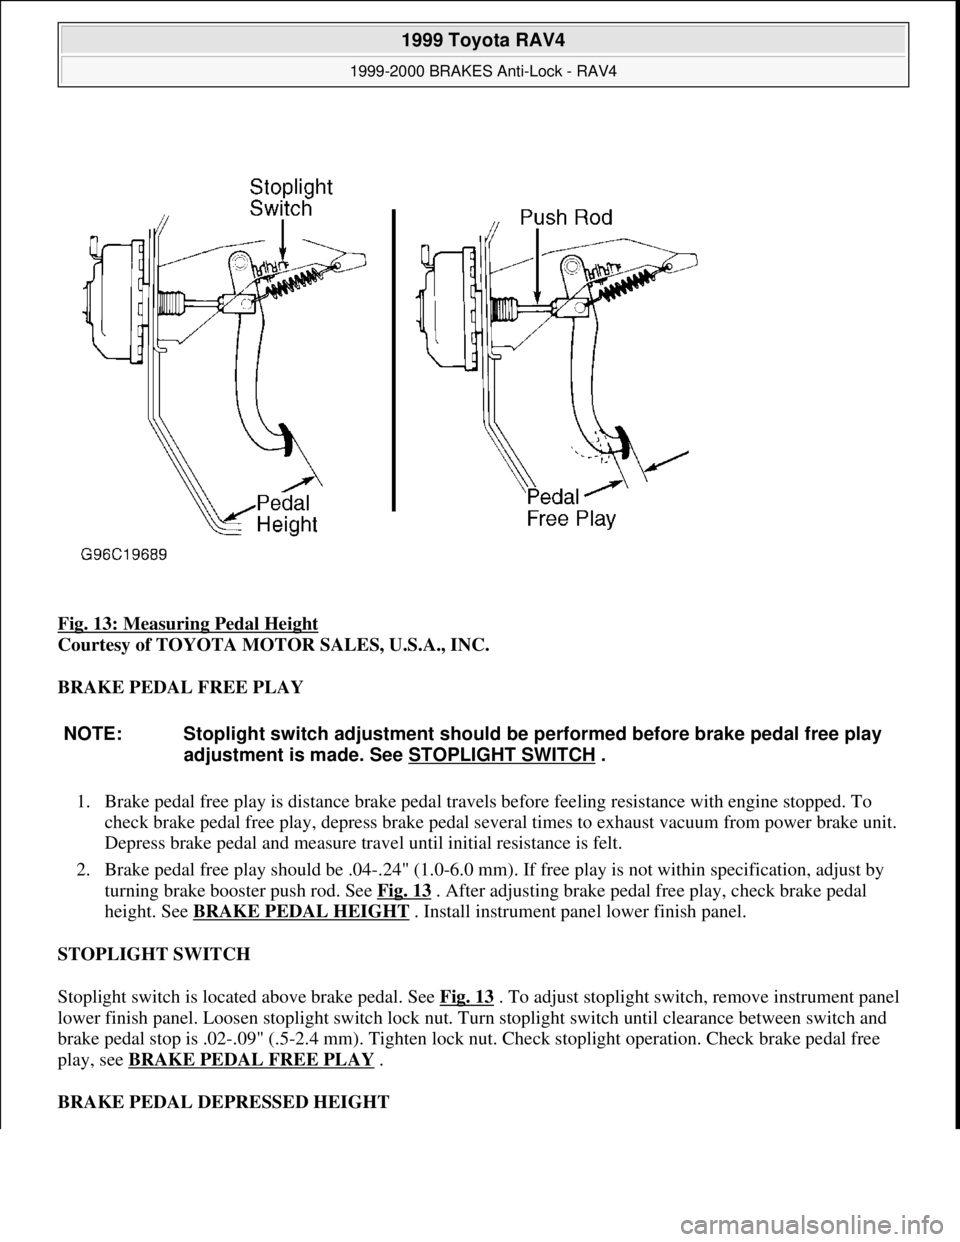
Fig. 13: Measuring Pedal Height
Courtesy of TOYOTA MOTOR SALES, U.S.A., INC.
BRAKE PEDAL FREE PLAY
1. Brake pedal free play is distance brake pedal travels before feeling resistance with engine stopped. To
check brake pedal free play, depress brake pedal several times to exhaust vacuum from power brake unit.
Depress brake pedal and measure travel until initial resistance is felt.
2. Brake pedal free play should be .04-.24" (1.0-6.0 mm). If free play is not within specification, adjust by
turning brake booster push rod. See Fig. 13
. After adjusting brake pedal free play, check brake pedal
height. See BRAKE PEDAL HEIGHT
. Install instrument panel lower finish panel.
STOPLIGHT SWITCH
Stoplight switch is located above brake pedal. See Fig. 13
. To adjust stoplight switch, remove instrument panel
lower finish panel. Loosen stoplight switch lock nut. Turn stoplight switch until clearance between switch and
brake pedal stop is .02-.09" (.5-2.4 mm). Tighten lock nut. Check stoplight operation. Check brake pedal free
play, see BRAKE PEDAL FREE PLAY .
BRAKE PEDAL DEPRESSED HEIGHT
NOTE: Stoplight switch adjustment should be performed before brake pedal free play
adjustment is made. See STOPLIGHT SWITCH
.
1999 Toyota RAV4
1999-2000 BRAKES Anti-Lock - RAV4
Microsoft
Sunday, November 22, 2009 10:06:17 AMPage 31 © 2005 Mitchell Repair Information Company, LLC.
Page 341 of 1632
4. Refill brake fluid reservoir as necessary. Repeat step 3 until air is no longer discharged. On RAV4,
tighten front bleeder screw to 69 INCH lbs. (7.8 N.m), and tighten rear bleeder screw to 74 INCH lbs.
(8.3 N.m). On Sienna, tighten bleeder screw to 74 INCH lbs. (8.3 N.m). Tighten bleeder screw to 97
INCH lbs. (11 N.m) on Land Cruiser, Tacoma, Tundra & 4Runner. Ensure fluid leakage is not present.
Add fluid to reservoir. Repeat procedure for remaining wheels.
ADJUSTMENTS
BRAKE PEDAL HEIGHT
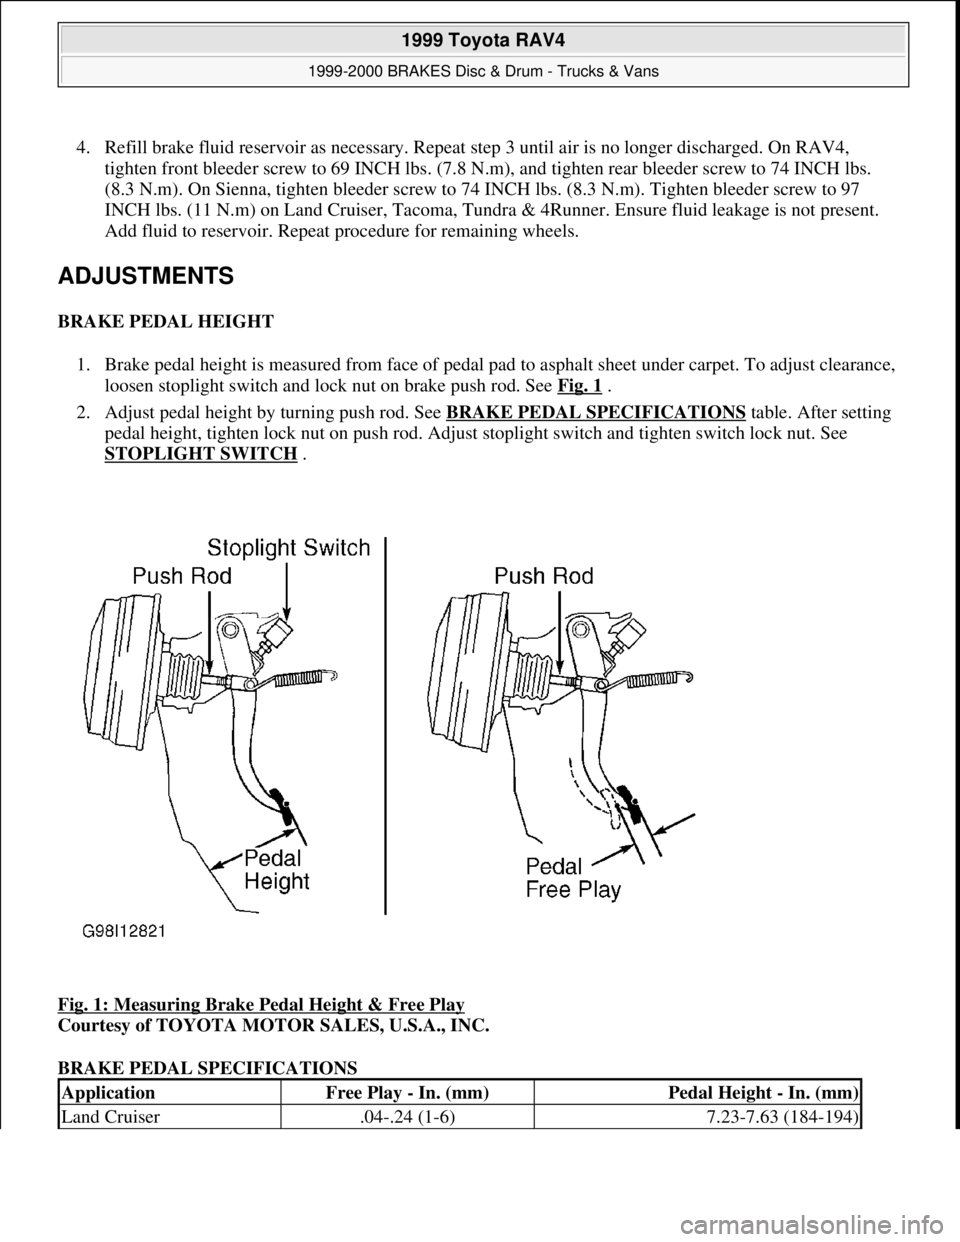
1. Brake pedal height is measured from face of pedal pad to asphalt sheet under carpet. To adjust clearance,
loosen stoplight switch and lock nut on brake push rod. See Fig. 1
.
2. Adjust pedal height by turning push rod. See BRAKE PEDAL SPECIFICATIONS
table. After setting
pedal height, tighten lock nut on push rod. Adjust stoplight switch and tighten switch lock nut. See
STOPLIGHT SWITCH
.
Fig. 1: Measuring Brake Pedal Height & Free Play
Courtesy of TOYOTA MOTOR SALES, U.S.A., INC.
BRAKE PEDAL SPECIFICATIONS
ApplicationFree Play - In. (mm)Pedal Height - In. (mm)
Land Cruiser.04-.24 (1-6)7.23-7.63 (184-194)
1999 Toyota RAV4
1999-2000 BRAKES Disc & Drum - Trucks & Vans
Microsoft
Sunday, November 22, 2009 10:07:28 AMPage 2 © 2005 Mitchell Repair Information Company, LLC.
Page 1294 of 1632
ADJUSTMENTS
SUN ROOF HEIGHT
Corolla, Celica (1999), RAV4 & 4Runner
Completely close sun roof. Measure sun roof height. Roof panel should be even with glass weatherstrip, within
0.06" (1.5 mm). If adjustment is required, pry out trim panels from left and right sides of sun roof opening.
Install or remove shims between bracket and sun roof as necessary. Recheck sun roof height.
Camry
Completely close sun roof. Measure sun roof height. On USA-built Camry, roof panel should be even with glass
weatherstrip, within 0.06" (1.5 mm). On Japan-built Camry and Camry Solara, roof panel should be even with
glass weatherstrip, within 0.06" (1.5 mm) at front, and +0.06" (1.5 mm) or -0.04" (1.0 mm) at rear. On all
models, if adjustment is required, pry out trim panels from left and right sides of sun roof opening. Install or
remove shims between bracket and sun roof as necessary. Recheck sun roof height.
Land Cruiser
Completely close sun roof. Measure sun roof height. Roof panel should be even with glass weatherstrip, within
0.06" (1.5 mm) at front, and +0.06" (1.5 mm) or -0.04" (1.0 mm) on all sides except rear. Roof panel should be
even with glass weatherstrip, within 0.06" (1.5 mm) at rear. If adjustment is required, pry out trim panels from
left and right sides of sun roof opening. Install or remove shims between bracket and sun roof as necessary.
Recheck sun roof height.
Avalon, Celica (2000) & Sienna
Completely close sun roof. Measure sun roof height. Roof panel should be even with glass weatherstrip, within
0.06" (1.5 mm) at front, and +0.06" (1.5 mm) or -0.04" (1.0 mm) at rear. If adjustment is required, pry out trim
panels from left and right sides of sun roof opening. Install or remove shims between bracket and sun roof as
necessary. Recheck sun roof height.
SUN ROOF CLOSING CLEARANCE
RAV4 (4-Door), Land Cruiser & 4Runner
If sun roof closing clearances are unequal between right and left sides, pry out trim panels from left and right
sides of sun roof opening. Loosen sun roof slider mount nuts (RAV4 4-door and 4Runner; screws on Land
Cruiser). Move either side forward or backward as necessary. Tighten sun roof slider mount nuts. Recheck sun
roof alignment and operation.
SUN ROOF FRONT-TO-REAR ALIGNMENT
Avalon (1999), Camry, Camry Solara & Sienna
If front-to-rear position of sun roof is incorrect, pry out trim panels from left and right sides of sun roof opening.
1999 Toyota RAV4
1999-2000 ACCESSORIES & EQUIPMENT Power Sun Roofs
Microsoft
Sunday, November 22, 2009 10:58:29 AMPage 14 © 2005 Mitchell Repair Information Company, LLC.
Page 1324 of 1632
Using a drill, remove stop rivets from each side rail. Slide left and right sun roof lift arm and drive cable
from side rail.
2. Remove right and left roof lift arm and cable assemblies. Remove 2 screws from front rail assembly.
Using a drill, remove 4 side rail rivets. Ensure not to damage side rail rivet holes when drilling. Remove
deflector and spring assembly. Remove sun roof wind deflector panel.
Reassembly
1. To reassemble, apply seal packing to drain cap. Align rear roof drip channel with roof drip channel guide
hook. Prior to installing drive motor, use an Allen wrench and align motor housing pointer to gear
pointer. See Fig. 36
.
2. Install NEW left and right sun roof lift arm and cable assembly rivets. Ensure not to sandwich sun roof
wind deflector between upper and lower sections of front rail assembly. Install NEW sealing type rivets
when installing sun roof wind deflector.
Installation
1. Soak sun roof side trim in water to soften it before installing. Adjust height of glass panel using 4
adjusting screws.
2. If sun roof housing was disassembled, adjust drive cable to a completely closed and tilted down position.
Using a screwdriver, slide left and right cable assemblies forward or backward to align holes in cable arm
and lift arm. Insert a .12" (3 mm) pin to ensure holes are aligned. Ensure hook is positioned as shown. See
Fig. 37
.
3. Remove alignment pin. Cycle assembly once (vent position closed, slide open and slide completely
closed). After cycling assembly closed, ensure alignment holes align. See Fig. 38
. If holes are not
aligned, repeat procedure.
4. A slight interference between guide pin and curved lead-in on side rail should exist. Cycle sun roof and
ensure hook engages wind deflector spring smoothly. If clicking sound is heard, adjustment is incorrect.
To readjust guide pin, loosen screw and adjust pin so there is a slight interference. Tighten nuts and bolt
to specification. See TORQUE SPECIFICATIONS
. To complete installation, reverse removal
procedure.
1999 Toyota RAV4
1999-2000 ACCESSORIES & EQUIPMENT Power Sun Roofs
Microsoft
Sunday, November 22, 2009 10:58:30 AMPage 44 © 2005 Mitchell Repair Information Company, LLC.