in the hood TOYOTA RAV4 1997 Owners Manual
[x] Cancel search | Manufacturer: TOYOTA, Model Year: 1997, Model line: RAV4, Model: TOYOTA RAV4 1997Pages: 198, PDF Size: 2.59 MB
Page 8 of 198

Part 1Keys
7
OPERATION OF INSTRUMENTS ANDCONTROLSÐ
Chapter 1-2 Keys and Doors
Keys
Side doors
Power windows
Quarter window
Back door
Hood
Fuel tank cap
Electric moon roof
Detachable sun roof
Your vehicle is supplied with two
kinds of key.
1. Master key- This key works in every
lock.
2. Subkey- This key will not work in the glovebox.
To protect things locked in the glovebox
when you have your vehicle parked, leave
the subkey with the attendant. Since the side doors and back door can be
locked without a key, you should always carry a
spare key in case you accidentally
lock your keys inside the vehicle.
KEY NUMBER PLATE
Your key number is shown on the
plate. Keep the plate in a safe place
such as your wallet, not in the vehicle.
If you should lose your keys of if you need
additional keys, duplicates can be made
by a Toyota dealer using the key number.
You should also put a copy of the key
number with your important papers.
Page 13 of 198

12
LOCKING AND UNLOCKING WITH KEY
Insert the key into the keyhole and turn
it.
To lock: Turn the key counterclockwise.
To unlock: Turn the key clockwise.
When closing the backdoor, make sure it is fully closed. See Luggage stowage precautionsº in
Part 2 for precautions to observe in load- ing luggage.
CAUTION!
Keep the back door closed while
driving. This not only keeps the
luggage from being thrown out but
also prevents exhaust gases from
entering the vehicle.
If the open back door hides the rear
stop and tail lights or rear turn sig-
nal lights while you are parked, oth- er road users must be warned of the
presence of your vehicle by a warn-
ing triangle or other device.
To open the hood, do the following.
1. Pull the hood lock release lever.
The hood will spring up slightly.
Before driving, be sure that the hood
is securely locked. Otherwise, the
hood may open unexpectedly while
driving and an accident may occur.
CAUTION!
Back door
Hood
Page 14 of 198

13
2. In front of the vehicle, pull up on theauxiliary catch lever and lift the hood.3. Hold the hood open by insertingthe support rod into the slot.
Before closing the hood, check that you
have not forgotten any tools, rags, etc.
and return the support rod to its clip-this
prevents ra ttles. Then lower the hood until
it is about 20 cm (8 in.) above the engine
compartment and release it. If the hood is
still not fully closed, lift and release the
hood again. After closing the hood, make sure it is securely locked.
If you notice while driving that the hood is not securely locked, stop the vehicle at
once and close the hood.
Right after driving the support rod may be hot, so only touch the part coated with nylon.
After inserting the rod into the slot,
make sure the rod supports the
hood securely from falling down on
to your head or body.
When closing the hood, be careful
not to get your hands caught be-
tween the hood and the vehicle
body.
NOTICE
Do not press on the hood, or you may deform the hood.
! CAUTION
Page 38 of 198

37
The SRS (Supplemental Restraint Sys-
tem) airbags are designed to provide
further protection to the driver and
front passenger when added to the pri-
mary protection provided by the seatbelts.
In response to a severe frontal impact, the
SRS airbags work together with the seat
belts to help preventing or reduce injury by
inflating, in order to decrease the likeli-
hood of the driver's or front passenger's
head or chest directly hitting the steering
wheel or dashboard. The passenger air-
bag is activated even with no passenger
in the front seat.This indicator comes on when the
ignition key is turned to the ACCº or
ONº position. It goes off after about 6
seconds. This means the SRS airbags
are operating properly.
The SRS airbag warning light system
monitors the airbag sensor assembly, in-
flators, warning light, interconnecting wir-
ing and power sources.The SRS airbag system is designeed
to activate in response to a severe
frontal impact within the shaded area
between the arrows in the illustration.
The SRS airbags will deploy if the severity
of the impact is above the designed
threshold level, comparable to an approxi-
mate 20 km/h (14 mph) collision when im-
pacting straight into a fixed barrier that
does not move or deform.
If the severity of the impact is below the
above threshold level, the SRS airbags
may not deploy.
SRS airbags
Page 135 of 198
135
If your engine coolant temperature
gauge indicates overheating, if you
experience a loss of power, or if you
hear a
loud knocking or pinging noise,
the engine has probably overheated.
You should follow this procedure 0
1. Pull safely off the road, stop the ve- hicle and turn on your emergency
flashers. Put the transmission in Pº
(automatic) or neutral (manual) and
apply the parking brake. Turn off the
air conditioning if it is being used.
2. If coolant or steam is boiling out of the radiator or reservoir, stop the engine.
Wait until the steam subsides before
opening the hood. If there is no coolant
boiling over or steam, leave the engine
running and make sure the electric
cooling fan is operating. If it is not, turn
the ignition off.
To help avoid personal injury, keep
the hood closed until there is no steam. Escaping steam or coolant is
a sign of very high pressure. CAUTION
! 3. Look for obvious coolant leaks from
the radiator, hoses, and under the ve-
hicle. However, note that water drain- ing from the air conditioning is normal if it has been used.
When the engine is running, keep
hands and clothing away from the
moving fan and engine drive belts. CAUTION
!
4. If the coolant is leaking, stop the en- gine immediately. Call a Toyota dealer
for assistance.
5. If there are no obvious leaks, check the coolant reservoir. If it is dry, add
coolant to the reservoir while the en-
gine is running. Fill it about half full.
Do not attempt to remove the radia-
tor cap when the engine and radiator
are hot. Serious injury could result
from scalding hot fluid and steam
blown out under pressure. CAUTION
! 6. After the engine coolant temperature
has cooled to normal, again check the
coolant level in the reservoir. If
necessary, bring it up to half full again.
Serious coolant loss indicates a leak in
the system. You should have it
checked as soon as possible at your
Toyota dealer.
If your vehicle overheats
Page 155 of 198
157
Tire surface and wheel nuts Check the tires carefully
for cuts, damage
or excessive wear. See Chapter 7-2 for
additional information. When checking the tires, make sure no nuts are missing,
and check the nuts for looseness. T ighten
them if necessary.
Tire rotation
Rotate the tires every 12000 km (7500
miles). See Chapter 7-2 for additional in-formation.
Fluid leaks Check underneath for leaking fuel, oil, wa-
ter or other fluid after the vehicle has been
parked for a while. If you smell fuel fumes
or notice any leak, have the cause found
and corrected immediately. Doors and engine hood Check that all doors and back door oper-
ate smoothly and all latches lock securely. Make sure the engine hood secondary latch secures the hood from opening
when the primary latch is released. INSIDE THE VEHICLE Items listed below should be checked
regularly, e.g. while performing peri-
odic services, cleaning the vehicle,etc. Lights Make sure the headlights, stop lights, tail lights, turn signal lights, and other lights are all working. Check headlight aim. Service reminder indicators and
warn-
ing buzzers Check that all service reminder indicators
and warning buzzers function properly. Steering wheel
Check that it has the specified freeplay.
Be alert for changes in steering condition,such as hard steering or strange noise. Seats Check that all seat controls such as seat
adjusters, seatback recliner, etc. operate
smoothly and that all latches lock securely
in any position. For folding-up rear
seat-backs, check that the latches lock
securely. Seat belts
Check that the seat belt system such as
buckles, retractors and anchors operate
properly
and smoothly. Make sure the belt
webbing is not cut, frayed, worn or dam-aged. Accelerator pedal Check the pedal for smooth operation and
uneven pedal effort or catching. Clutch pedal Check the pedal for smooth operation. Brake pedal Check the pedal for smooth operation and
that the pedal has the proper clearance. Check the brake booster function. Brakes
At a safe place, check that the brakes do not pull to one side when applied. Parking brake Check that the lever has the proper travel and that, on a safe incline, your vehicle is
held securely with only the parking brake applied.
Page 162 of 198
165
Be sure that the ignition is off if
you work near the electric cooling
fans or radiator grille. With the
ignition on, the electric cooling
fans will automatically start to run
if the engine coolant temperature
is high and/or the air conditioning
is on.
Use eye protection whenever you
work on or under you vehicle
where you may be exposed to fly-
ing or falling material, fluid spray,etc.
Used engine oil contains poten-
tially harmful contaminants which
may cause skin disorders such as
inflammation or skin cancer, so
care should be taken to avoid pro-
longed and repeated contact with
it. To remove used engine oil from
your skin, wash thoroughly with
soap and water.
Do not leave used oil within the reach of children.Dispose of used oil and filter only
in a safe and acceptable manner.
Do not dispose of used oil and fil-
ter in household trash, in sewers
or onto the ground. Call your deal- er or a service station for informa-
tion concerning recycling or dis- posal.
Remember that battery and igni- tion cable carry high currents or
voltages. Be careful of accidental-
ly causing a short circuit.
Add only demineralized or dis- tilled water to fill the radiator. And
if you spill some of the coolant, be sure to wash it off with water to
prevent it from damaging theparts or paint.
Do not allow dirt or anything elseto fall through the spark plug
holes.
Do not pry the outer electrode of aspark plug against the center elec-
trode.
Use only spark plugs of the speci- fied type. Using other types will
cause engine damage, loss of per-
formance or radio noise.
NOTICE
Do not overfill automatic trans-
mission fluid and transfer oil or
the transmission and transfercould be damaged.
Do not drive with the air cleaner fil-
ter removed, or excessive enginewear could result. Also backfiringcould cause a fire in the engine
compartment.
Be careful not to scratch the glasssurface with the wiper frame.
When closing the engine hood,
check to see that you have not for-
gotten any tools, rags, etc.
Page 183 of 198
187
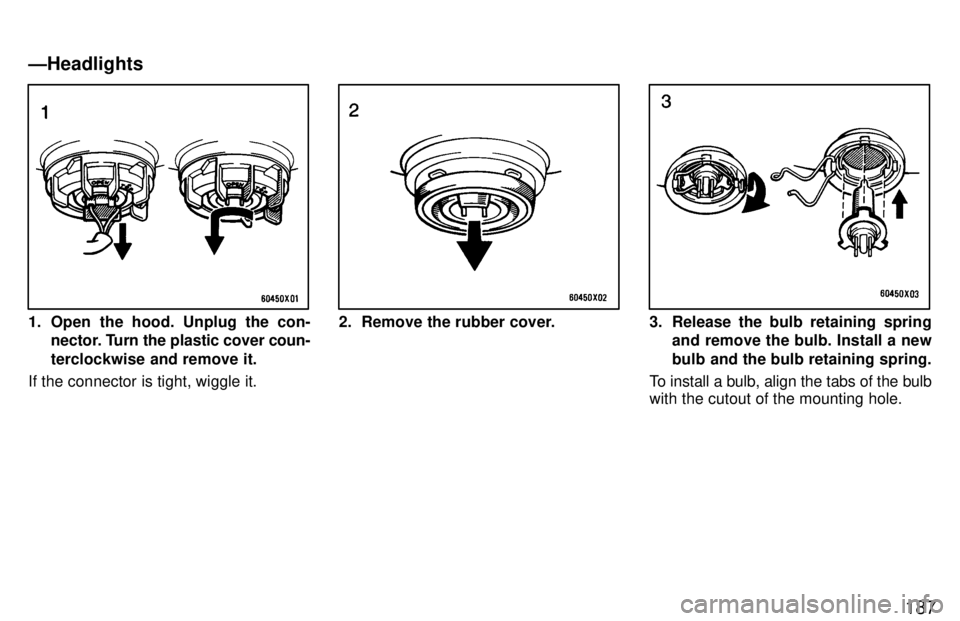
1. Open the hood. Unplug the con-nector. Turn the plastic cover coun-
terclockwise and remove it.
If the connector is tight, wiggle it.2. Remove the rubber cover.3. Release the bulb retaining spring and remove the bulb. Install a new
bulb and the bulb retaining spring.
To install a bulb, align the tabs of the bulb with the cutout of the mounting hole.
ÐHeadlights