drain TOYOTA RAV4 2006 Service Owner's Guide
[x] Cancel search | Manufacturer: TOYOTA, Model Year: 2006, Model line: RAV4, Model: TOYOTA RAV4 2006Pages: 2000, PDF Size: 45.84 MB
Page 710 of 2000
2GR-FE ENGINE MECHANICAL – ENGINE UNITEM–73
EM
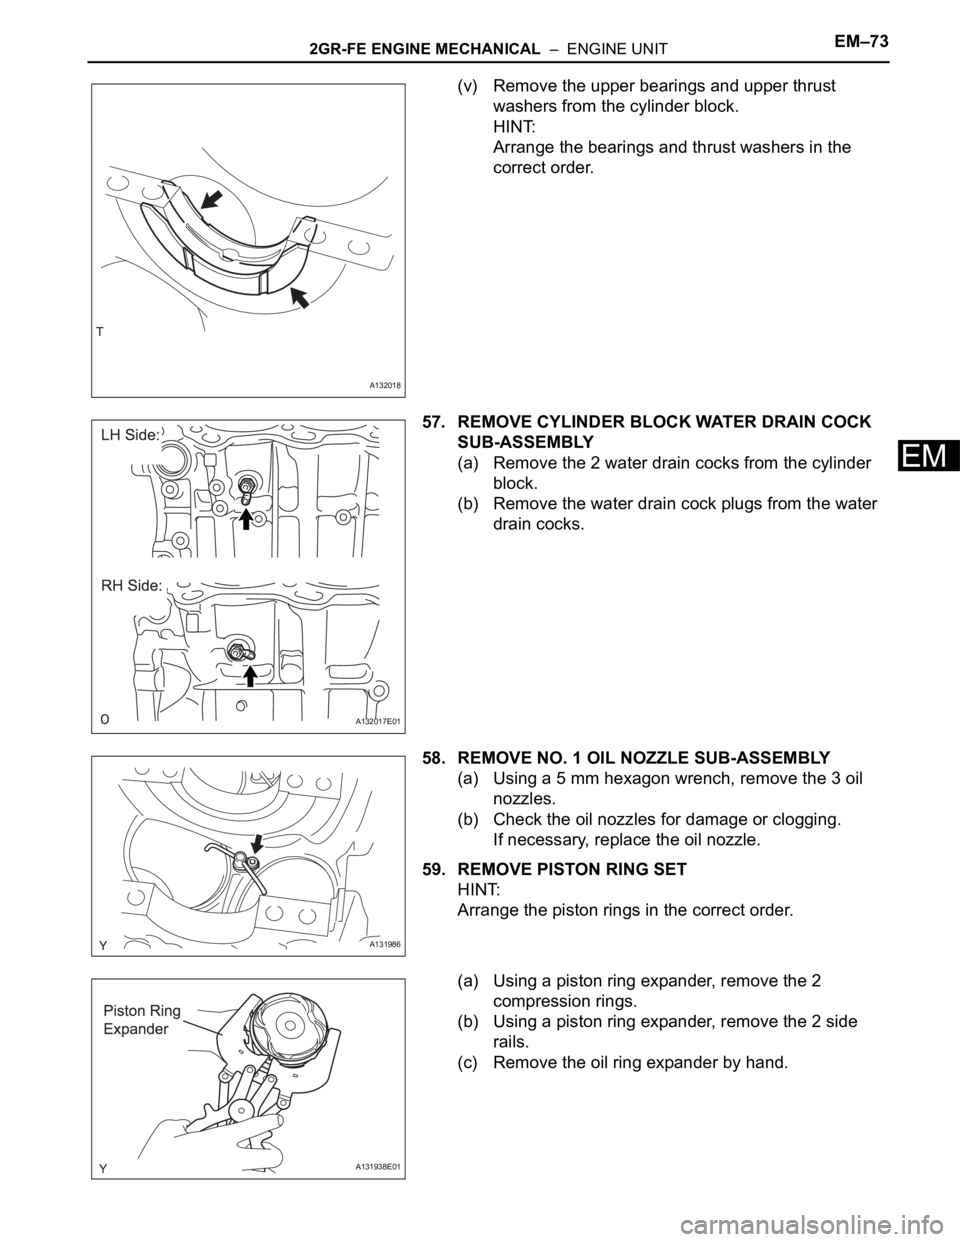
(v) Remove the upper bearings and upper thrust
washers from the cylinder block.
HINT:
Arrange the bearings and thrust washers in the
correct order.
57. REMOVE CYLINDER BLOCK WATER DRAIN COCK
SUB-ASSEMBLY
(a) Remove the 2 water drain cocks from the cylinder
block.
(b) Remove the water drain cock plugs from the water
drain cocks.
58. REMOVE NO. 1 OIL NOZZLE SUB-ASSEMBLY
(a) Using a 5 mm hexagon wrench, remove the 3 oil
nozzles.
(b) Check the oil nozzles for damage or clogging.
If necessary, replace the oil nozzle.
59. REMOVE PISTON RING SET
HINT:
Arrange the piston rings in the correct order.
(a) Using a piston ring expander, remove the 2
compression rings.
(b) Using a piston ring expander, remove the 2 side
rails.
(c) Remove the oil ring expander by hand.
A132018
A132017E01
A131986
A131938E01
Page 742 of 2000
2GR-FE ENGINE MECHANICAL – ENGINE UNITEM–105
EM
REASSEMBLY
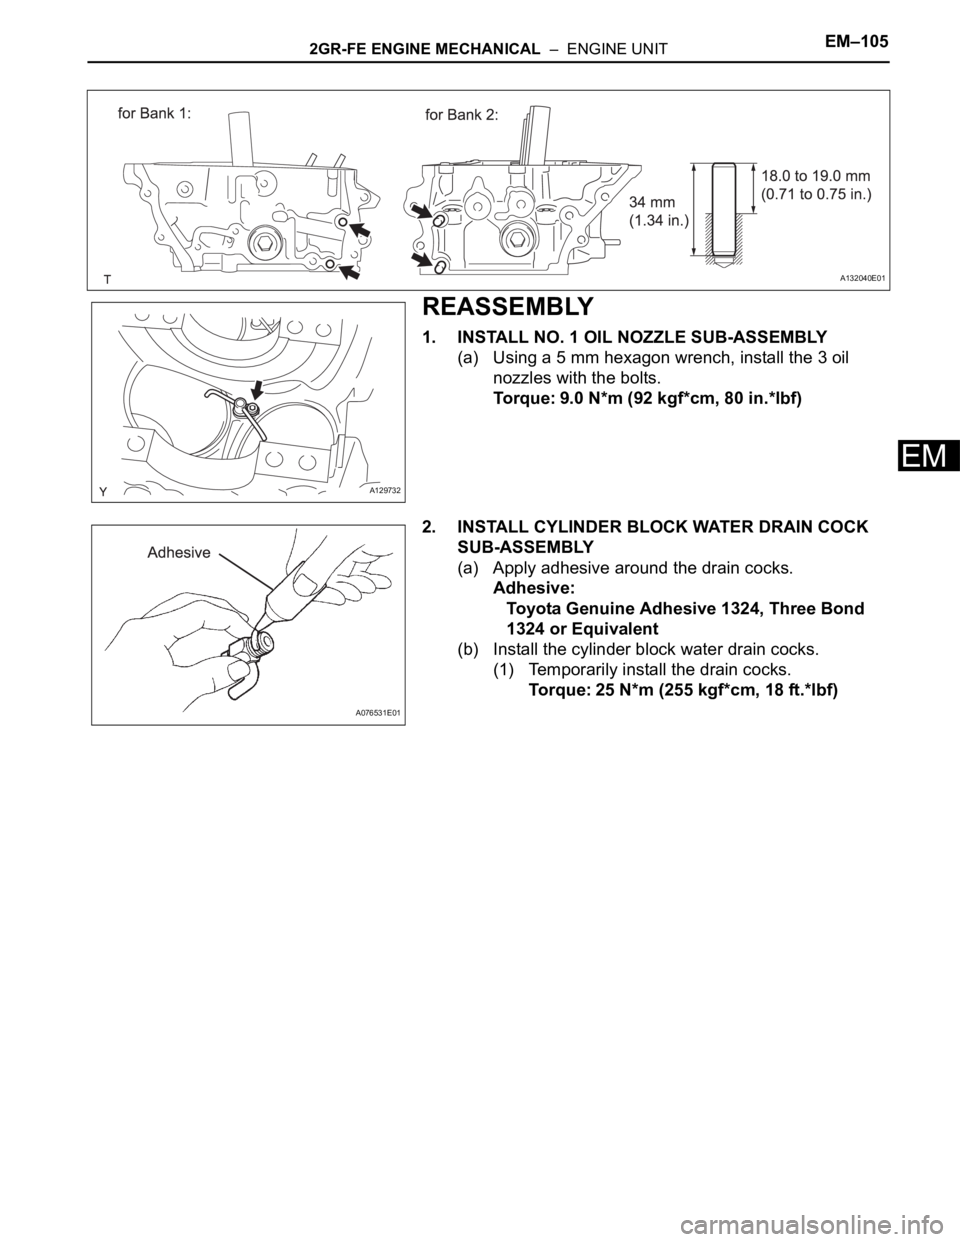
1. INSTALL NO. 1 OIL NOZZLE SUB-ASSEMBLY
(a) Using a 5 mm hexagon wrench, install the 3 oil
nozzles with the bolts.
Torque: 9.0 N*m (92 kgf*cm, 80 in.*lbf)
2. INSTALL CYLINDER BLOCK WATER DRAIN COCK
SUB-ASSEMBLY
(a) Apply adhesive around the drain cocks.
Adhesive:
Toyota Genuine Adhesive 1324, Three Bond
1324 or Equivalent
(b) Install the cylinder block water drain cocks.
(1) Temporarily install the drain cocks.
Torque: 25 N*m (255 kgf*cm, 18 ft.*lbf)
A132040E01
A129732
A076531E01
Page 743 of 2000
EM–1062GR-FE ENGINE MECHANICAL – ENGINE UNIT
EM
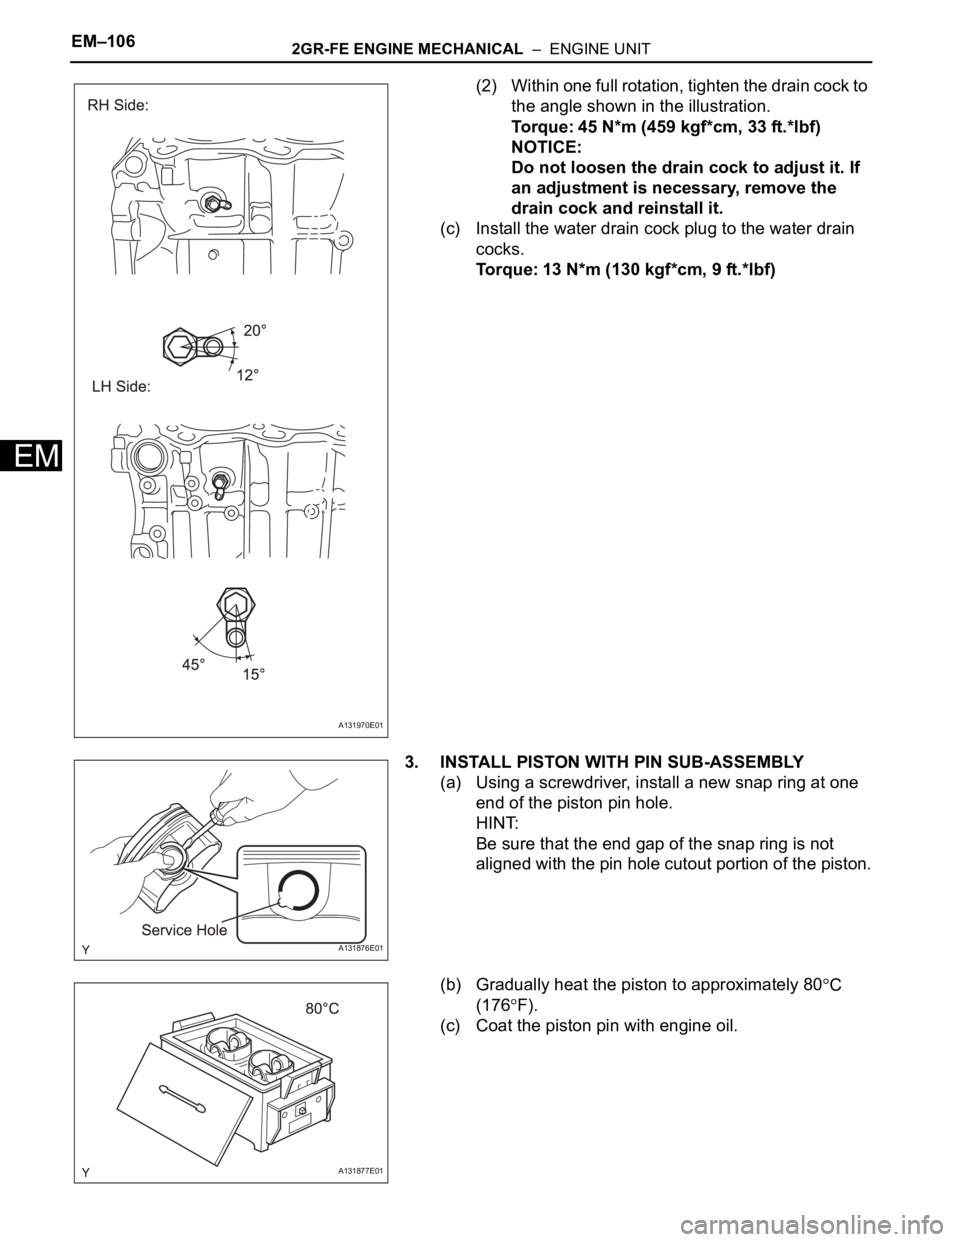
(2) Within one full rotation, tighten the drain cock to
the angle shown in the illustration.
Torque: 45 N*m (459 kgf*cm, 33 ft.*lbf)
NOTICE:
Do not loosen the drain cock to adjust it. If
an adjustment is necessary, remove the
drain cock and reinstall it.
(c) Install the water drain cock plug to the water drain
cocks.
Torque: 13 N*m (130 kgf*cm, 9 ft.*lbf)
3. INSTALL PISTON WITH PIN SUB-ASSEMBLY
(a) Using a screwdriver, install a new snap ring at one
end of the piston pin hole.
HINT:
Be sure that the end gap of the snap ring is not
aligned with the pin hole cutout portion of the piston.
(b) Gradually heat the piston to approximately 80
C
(176
F).
(c) Coat the piston pin with engine oil.
A131970E01
A131876E01
A131877E01
Page 770 of 2000
FU–102AZ-FE FUEL – FUEL INJECTOR
FU
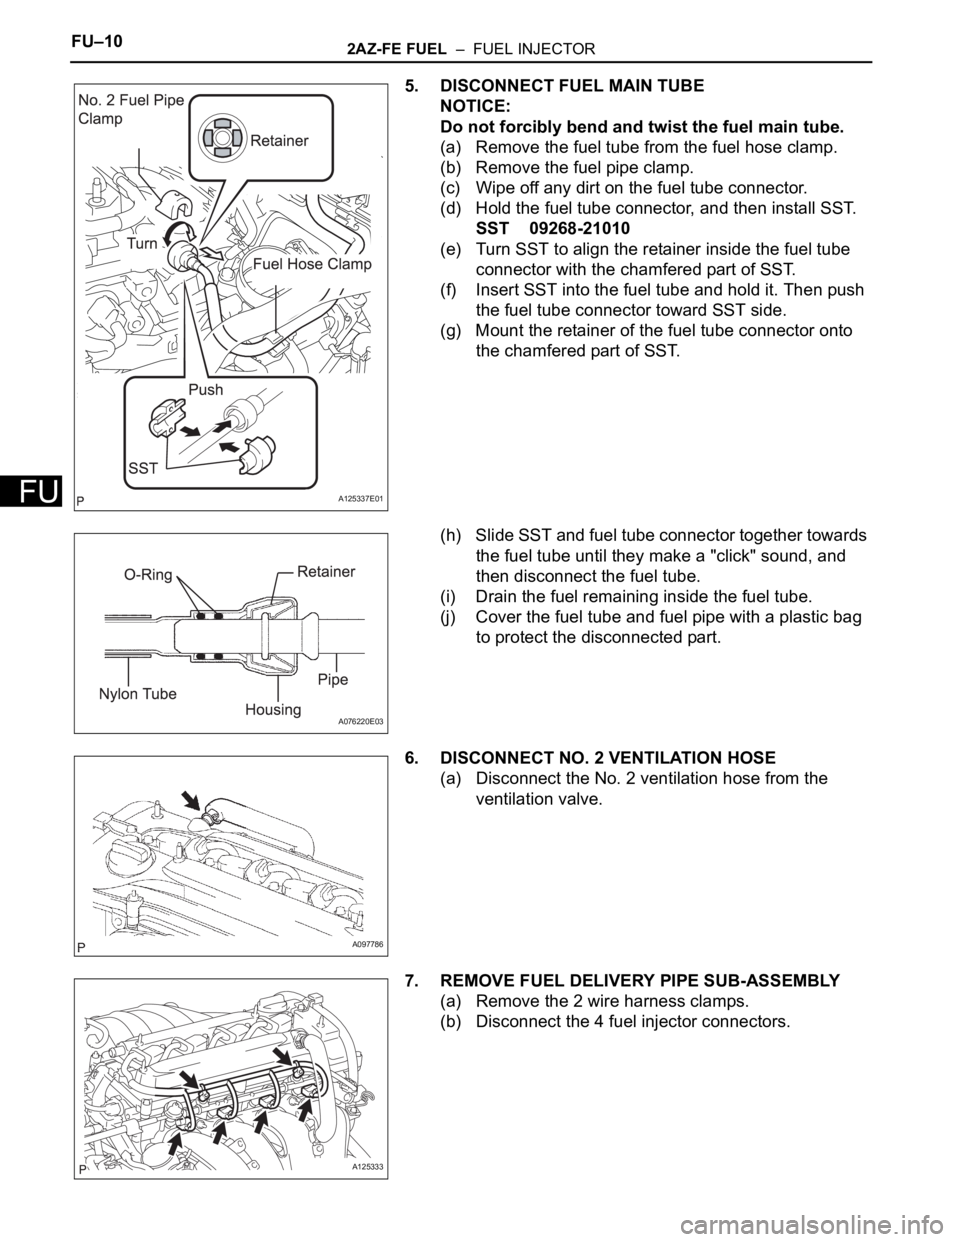
5. DISCONNECT FUEL MAIN TUBE
NOTICE:
Do not forcibly bend and twist the fuel main tube.
(a) Remove the fuel tube from the fuel hose clamp.
(b) Remove the fuel pipe clamp.
(c) Wipe off any dirt on the fuel tube connector.
(d) Hold the fuel tube connector, and then install SST.
SST 09268-21010
(e) Turn SST to align the retainer inside the fuel tube
connector with the chamfered part of SST.
(f) Insert SST into the fuel tube and hold it. Then push
the fuel tube connector toward SST side.
(g) Mount the retainer of the fuel tube connector onto
the chamfered part of SST.
(h) Slide SST and fuel tube connector together towards
the fuel tube until they make a "click" sound, and
then disconnect the fuel tube.
(i) Drain the fuel remaining inside the fuel tube.
(j) Cover the fuel tube and fuel pipe with a plastic bag
to protect the disconnected part.
6. DISCONNECT NO. 2 VENTILATION HOSE
(a) Disconnect the No. 2 ventilation hose from the
ventilation valve.
7. REMOVE FUEL DELIVERY PIPE SUB-ASSEMBLY
(a) Remove the 2 wire harness clamps.
(b) Disconnect the 4 fuel injector connectors.
A125337E01
A076220E03
A097786
A125333
Page 841 of 2000
2AZ-FE COOLING – WATER PUMPCO–11
CO
REMOVAL
1. DISCONNECT CABLE FROM NEGATIVE BATTERY
TERMINAL
CAUTION:
Wait at least 90 seconds after disconnecting the
cable from the negative (-) battery terminal to
prevent airbag and seat belt pretensioner activation.
2. REMOVE NO. 1 ENGINE UNDER COVER
3. REMOVE FRONT FENDER APRON RH
4. REMOVE RADIATOR SUPPORT OPENING COVER
5. DRAIN ENGINE COOLANT (See page CO-6)
6. REMOVE FRONT SUSPENSION MEMBER
REINFORCEMENT RH (See page EM-6)
7. REMOVE FAN AND GENERATOR V BELT (See page
EM-6)
8. REMOVE GENERATOR ASSEMBLY (See page CH-9)
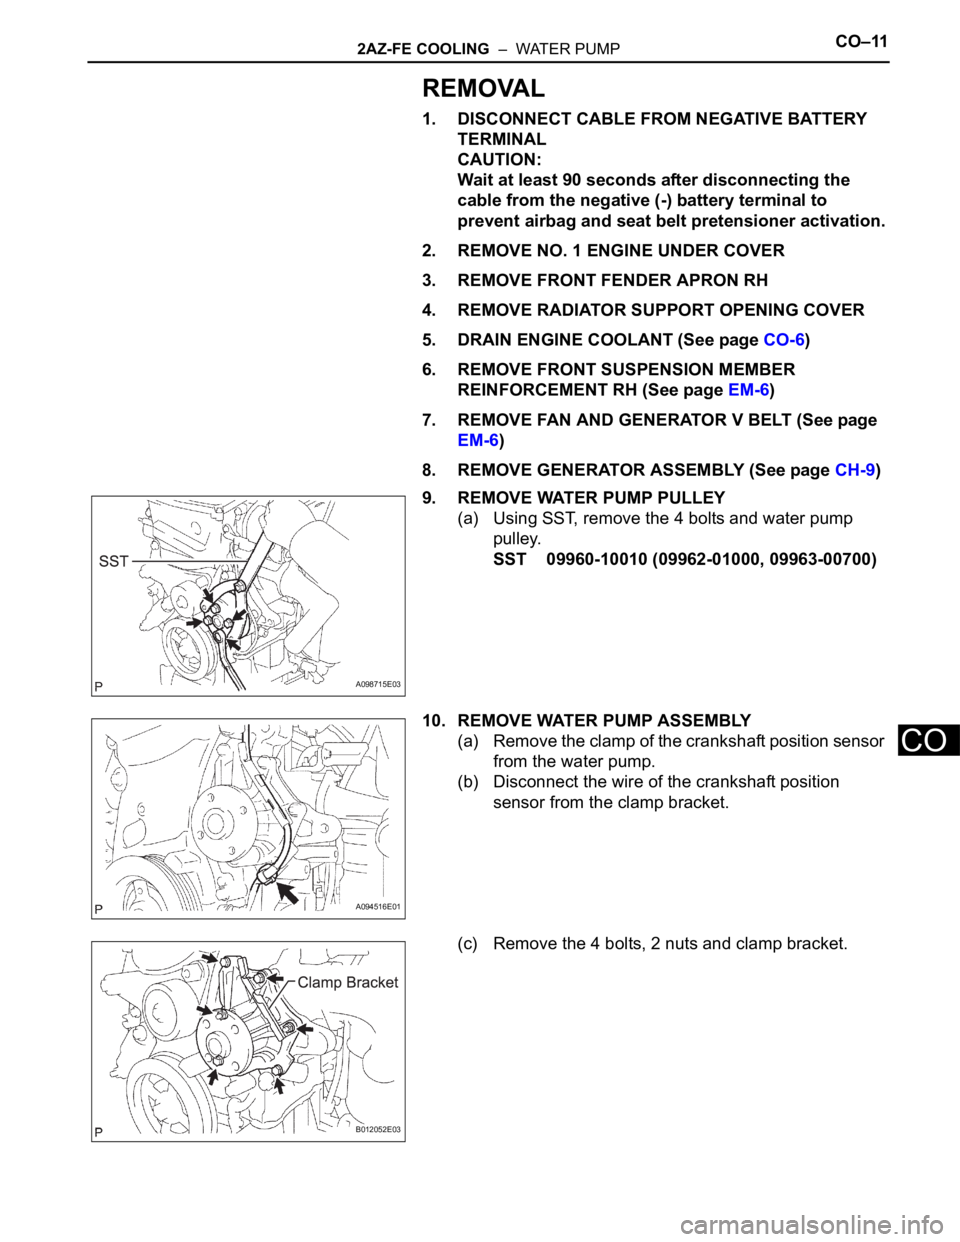
9. REMOVE WATER PUMP PULLEY
(a) Using SST, remove the 4 bolts and water pump
pulley.
SST 09960-10010 (09962-01000, 09963-00700)
10. REMOVE WATER PUMP ASSEMBLY
(a) Remove the clamp of the crankshaft position sensor
from the water pump.
(b) Disconnect the wire of the crankshaft position
sensor from the clamp bracket.
(c) Remove the 4 bolts, 2 nuts and clamp bracket.
A098715E03
A094516E01
B012052E03
Page 842 of 2000

CO–122AZ-FE COOLING – WATER PUMP
CO
(d) Using a screwdriver, pry between the water pump
and cylinder block, and then remove the water
pump.
NOTICE:
Be careful not to damage the contact surfaces of
the water pump and cylinder block.
INSPECTION
1. INSPECT WATER PUMP ASSEMBLY
(a) Visually check the drain hole for coolant leakage.
If leakage is found, replace the water pump
assembly.
(b) Turn the pulley, and then check that the water pump
bearing moves smoothly without making a "click"
noise.
If it does not move smoothly, replace the water
pump assembly.
B012053E04
A112198
Page 847 of 2000
2AZ-FE COOLING – RADIATORCO–29
CO
REMOVAL
1. DISCONNECT CABLE FROM NEGATIVE BATTERY
TERMINAL
CAUTION:
Wait at least 90 seconds after disconnecting the
cable from the negative (-) battery terminal to
prevent airbag and seat belt pretensioner activation.
2. REMOVE RADIATOR SUPPORT OPENING COVER
3. REMOVE BATTERY CLAMP
(a) Remove the bolt, nut and clamp.
4. REMOVE BATTERY
5. REMOVE NO. 1 ENGINE UNDER COVER
6. DRAIN ENGINE COOLANT (See page CO-6)
7. REMOVE RADIATOR GRILLE SUB-ASSEMBLY (See
page ET-6)
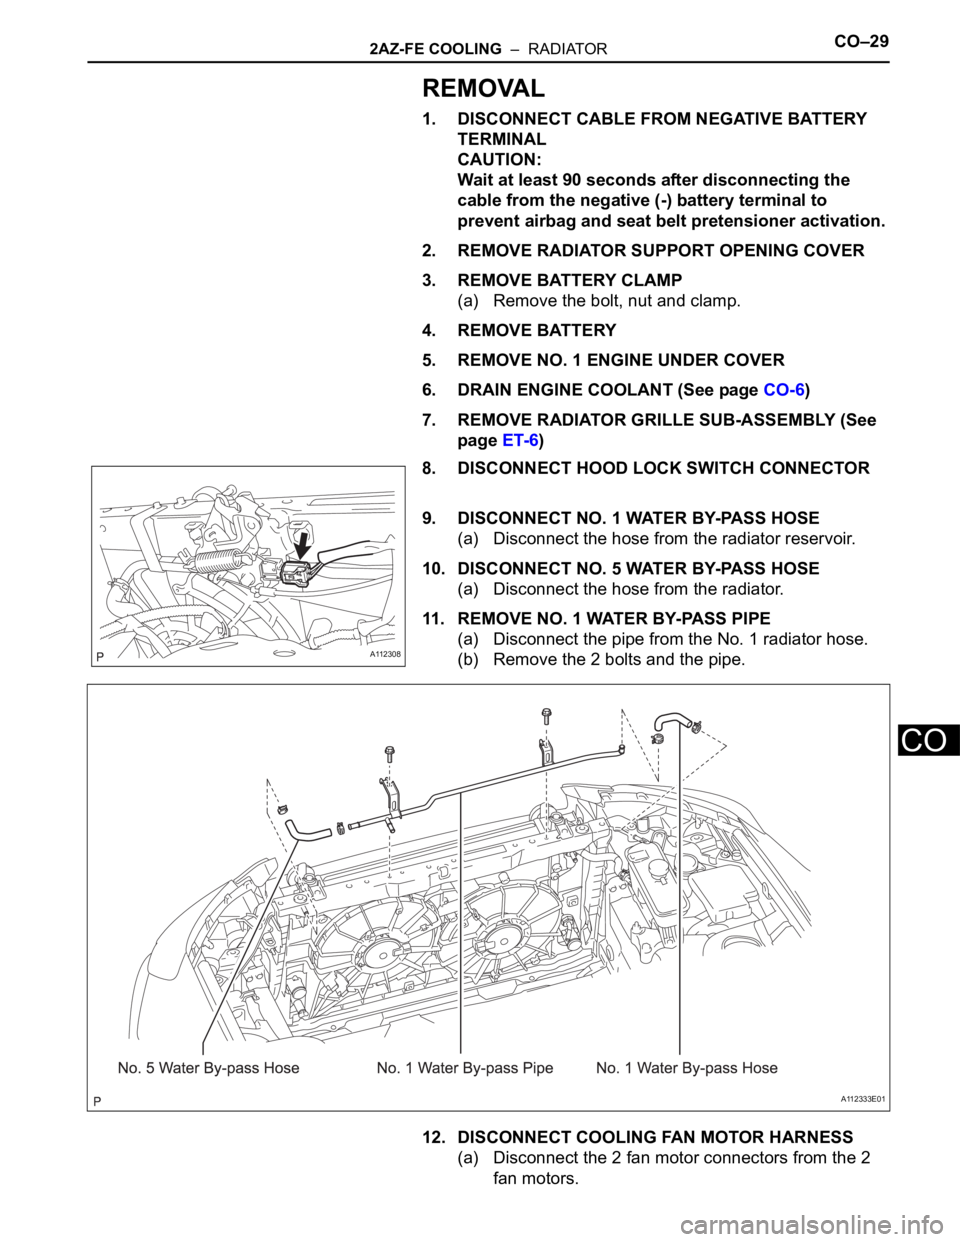
8. DISCONNECT HOOD LOCK SWITCH CONNECTOR
9. DISCONNECT NO. 1 WATER BY-PASS HOSE
(a) Disconnect the hose from the radiator reservoir.
10. DISCONNECT NO. 5 WATER BY-PASS HOSE
(a) Disconnect the hose from the radiator.
11. REMOVE NO. 1 WATER BY-PASS PIPE
(a) Disconnect the pipe from the No. 1 radiator hose.
(b) Remove the 2 bolts and the pipe.
12. DISCONNECT COOLING FAN MOTOR HARNESS
(a) Disconnect the 2 fan motor connectors from the 2
fan motors.
A112308
A112333E01
Page 856 of 2000

2GR-FE COOLING – WATER PUMPCO–13
CO
6. REMOVE NO. 2 IDLER PULLEY SUB-ASSEMBLY
(a) Remove the bolt, No. 2 idler pulley cover plate and
No. 2 idler pulley.
7. REMOVE V-RIBBED BELT TENSIONER ASSEMBLY
(a) Remove the 5 bolts and V-ribbed belt tensioner
assembly.
8. REMOVE WATER PUMP ASSEMBLY
(a) Remove the 16 bolts, water pump and water pump
gasket.
INSPECTION
1. INSPECT WATER PUMP ASSEMBLY
(a) Visually check the drain hole for coolant leakage.
If leakage is found, replace the water pump
assembly.
(b) Turn the pulley, and then check that the water pump
bearing moves smoothly without making a clicking
noise.
If it does not move smoothly, replace the water
pump assembly.
INSTALLATION
1. INSTALL WATER PUMP ASSEMBLY
(a) Install a new water pump gasket and the water
pump with the 16 bolts.
Torque: 21 N*m (214 kgf*cm, 15 ft.*lbf) for bolt A
9.1 N*m (93 kgf*cm, 81 in.*lbf) for bolt B
and C
A132445
A138913
A132448
A096655E01
A132448E01
Page 859 of 2000
2GR-FE COOLING – THERMOSTATCO–19
CO
REMOVAL
1. REMOVE FRONT WHEEL RH
2. REMOVE NO. 1 ENGINE UNDER COVER (See page
EM-21)
3. REMOVE ENGINE UNDER COVER REAR RH (See
page EM-21)
4. REMOVE FRONT SUSPENSION MEMBER
REINFORCEMENT RH (See page EM-7)
5. DRAIN ENGINE COOLANT (See page CO-8)
6. REMOVE V-BANK COVER SUB-ASSEMBLY (See
page EM-21)
7. REMOVE RADIATOR SUPPORT OPENING COVER
(See page EM-22)
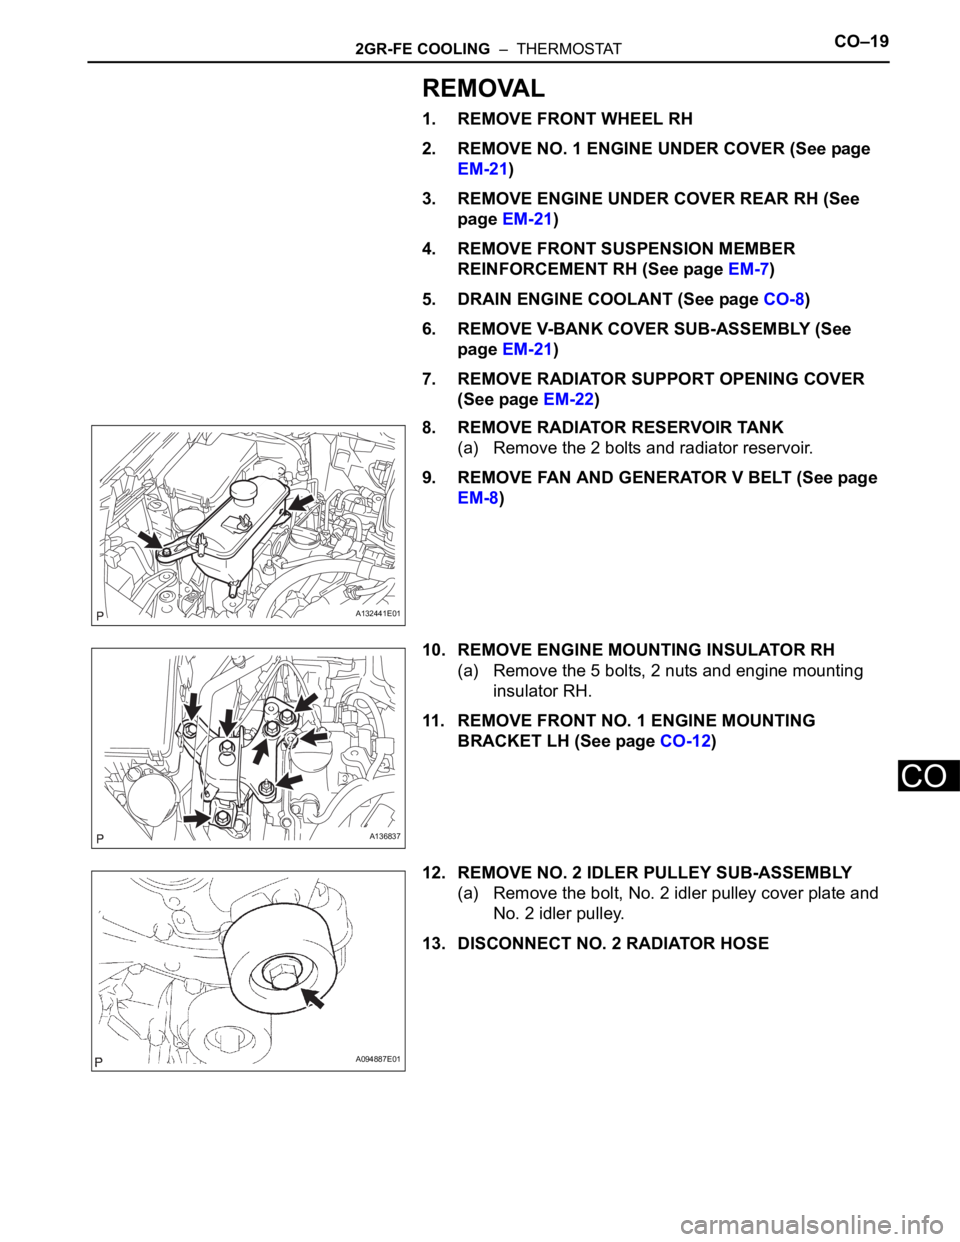
8. REMOVE RADIATOR RESERVOIR TANK
(a) Remove the 2 bolts and radiator reservoir.
9. REMOVE FAN AND GENERATOR V BELT (See page
EM-8)
10. REMOVE ENGINE MOUNTING INSULATOR RH
(a) Remove the 5 bolts, 2 nuts and engine mounting
insulator RH.
11. REMOVE FRONT NO. 1 ENGINE MOUNTING
BRACKET LH (See page CO-12)
12. REMOVE NO. 2 IDLER PULLEY SUB-ASSEMBLY
(a) Remove the bolt, No. 2 idler pulley cover plate and
No. 2 idler pulley.
13. DISCONNECT NO. 2 RADIATOR HOSE
A132441E01
A136837
A094887E01
Page 865 of 2000

CO–362GR-FE COOLING – RADIATOR
CO
REMOVAL
1. DISCONNECT CABLE FROM NEGATIVE BATTERY
TERMINAL
CAUTION:
Wait at least 90 seconds after disconnecting the
cable from the negative (-) battery terminal to
prevent airbag activation.
2. REMOVE BATTERY CLAMP SUB-ASSEMBLY (See
page ST-6)
3. REMOVE BATTERY INSULATOR
4. REMOVE BATTERY
5. REMOVE NO. 1 ENGINE UNDER COVER (See page
EM-21)
6. DRAIN ENGINE COOLANT (See page CO-8)
7. REMOVE V-BANK COVER SUB-ASSEMBLY (See
page EM-21)
8. REMOVE RADIATOR SUPPORT OPENING COVER
(See page EM-22)
9. REMOVE RADIATOR GRILLE SUB-ASSEMBLY (See
page ET-6)
10. DISCONNECT HOOD LOCK SWITCH CONNECTOR
11. DISCONNECT NO. 1 WATER BY-PASS HOSE
(a) Disconnect the hose from the radiator reservoir.
12. DISCONNECT NO. 5 WATER BY-PASS HOSE
(a) Disconnect the hose from the radiator.
13. REMOVE NO. 1 WATER BY-PASS PIPE
(a) Disconnect the pipe from the No. 1 radiator hose.
A112308