drain TOYOTA RAV4 2006 Service Owner's Manual
[x] Cancel search | Manufacturer: TOYOTA, Model Year: 2006, Model line: RAV4, Model: TOYOTA RAV4 2006Pages: 2000, PDF Size: 45.84 MB
Page 388 of 2000
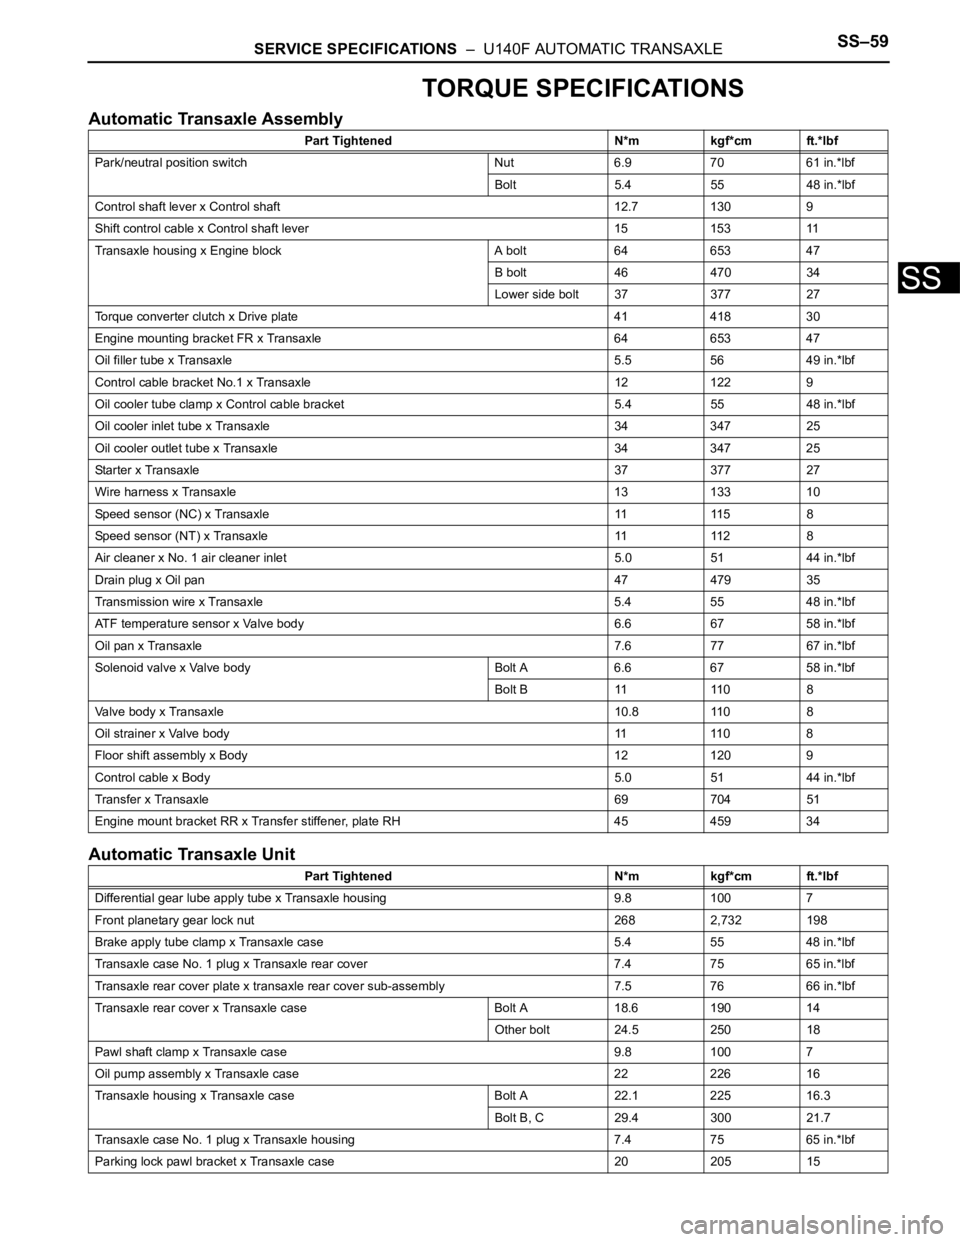
SERVICE SPECIFICATIONS – U140F AUTOMATIC TRANSAXLESS–59
SS
TORQUE SPECIFICATIONS
Automatic Transaxle Assembly
Automatic Transaxle Unit
Part Tightened N*m kgf*cm ft.*lbf
Park/neutral position switch Nut 6.9 70 61 in.*lbf
Bolt 5.4 55 48 in.*lbf
Control shaft lever x Control shaft 12.7 130 9
Shift control cable x Control shaft lever 15 153 11
Transaxle housing x Engine block A bolt 64 653 47
B bolt 46 470 34
Lower side bolt 37 377 27
Torque converter clutch x Drive plate 41 418 30
Engine mounting bracket FR x Transaxle 64 653 47
Oil filler tube x Transaxle 5.5 56 49 in.*lbf
Control cable bracket No.1 x Transaxle 12 122 9
Oil cooler tube clamp x Control cable bracket 5.4 55 48 in.*lbf
Oil cooler inlet tube x Transaxle 34 347 25
Oil cooler outlet tube x Transaxle 34 347 25
Starter x Transaxle37 377 27
Wire harness x Transaxle 13 133 10
Speed sensor (NC) x Transaxle 11 115 8
Speed sensor (NT) x Transaxle 11 112 8
Air cleaner x No. 1 air cleaner inlet 5.0 51 44 in.*lbf
Drain plug x Oil pan47 479 35
Transmission wire x Transaxle 5.4 55 48 in.*lbf
ATF temperature sensor x Valve body 6.6 67 58 in.*lbf
Oil pan x Transaxle7.6 77 67 in.*lbf
Solenoid valve x Valve body Bolt A 6.6 67 58 in.*lbf
Bolt B 11 110 8
Valve body x Transaxle 10.8 110 8
Oil strainer x Valve body 11 110 8
Floor shift assembly x Body 12 120 9
Control cable x Body5.0 51 44 in.*lbf
Transfer x Transaxle69 704 51
Engine mount bracket RR x Transfer stiffener, plate RH 45 459 34
Part Tightened N*m kgf*cm ft.*lbf
Differential gear lube apply tube x Transaxle housing 9.8 100 7
Front planetary gear lock nut 268 2,732 198
Brake apply tube clamp x Transaxle case 5.4 55 48 in.*lbf
Transaxle case No. 1 plug x Transaxle rear cover 7.4 75 65 in.*lbf
Transaxle rear cover plate x transaxle rear cover sub-assembly 7.5 76 66 in.*lbf
Transaxle rear cover x Transaxle case Bolt A 18.6 190 14
Other bolt 24.5 250 18
Pawl shaft clamp x Transaxle case 9.8 100 7
Oil pump assembly x Transaxle case 22 226 16
Transaxle housing x Transaxle case Bolt A 22.1 225 16.3
Bolt B, C 29.4 300 21.7
Transaxle case No. 1 plug x Transaxle housing 7.4 75 65 in.*lbf
Parking lock pawl bracket x Transaxle case 20 205 15
Page 390 of 2000
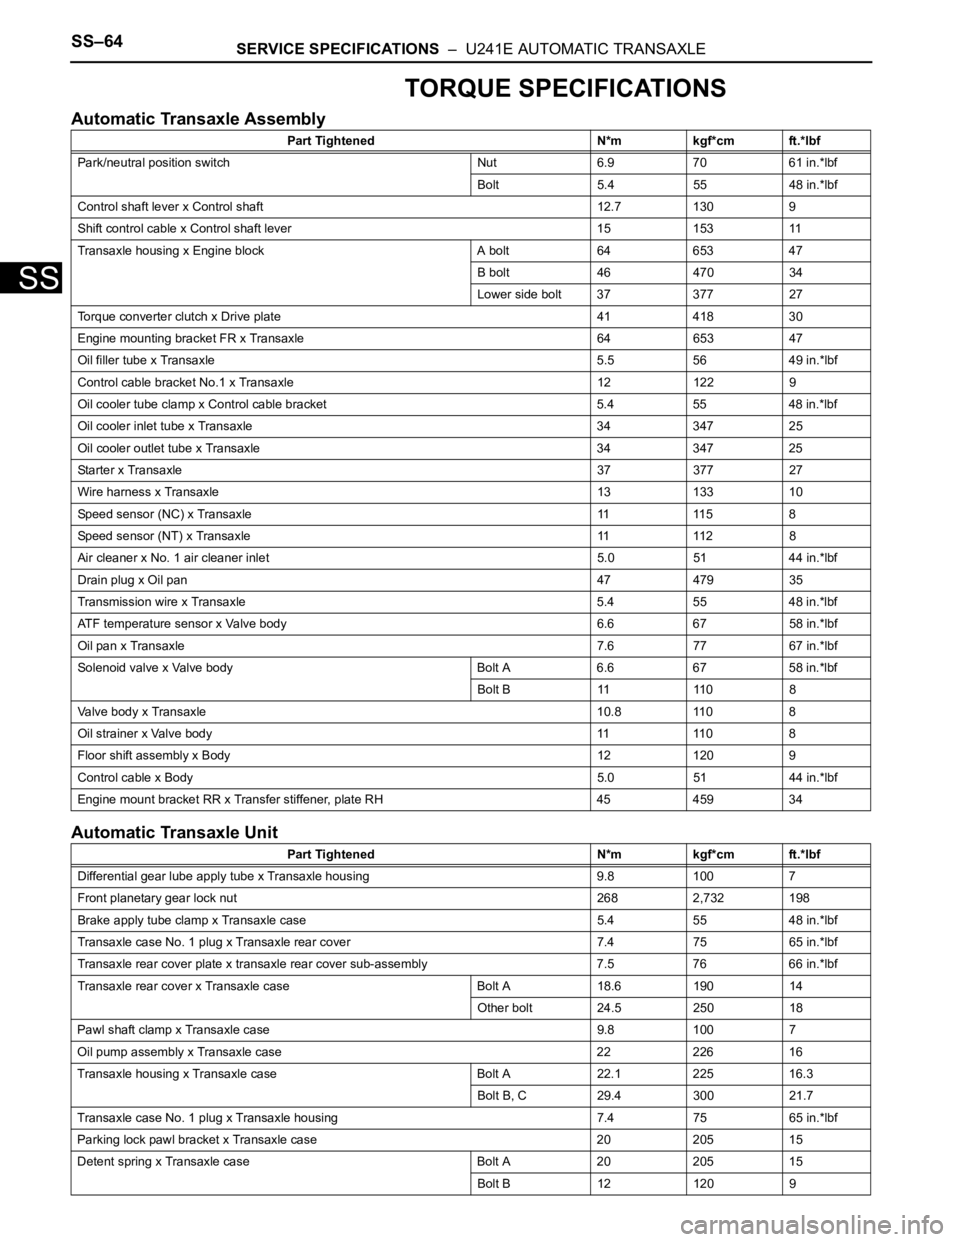
SS–64SERVICE SPECIFICATIONS – U241E AUTOMATIC TRANSAXLE
SS
TORQUE SPECIFICATIONS
Automatic Transaxle Assembly
Automatic Transaxle Unit
Part Tightened N*m kgf*cm ft.*lbf
Park/neutral position switch Nut 6.9 70 61 in.*lbf
Bolt 5.4 55 48 in.*lbf
Control shaft lever x Control shaft 12.7 130 9
Shift control cable x Control shaft lever 15 153 11
Transaxle housing x Engine block A bolt 64 653 47
B bolt 46 470 34
Lower side bolt 37 377 27
Torque converter clutch x Drive plate 41 418 30
Engine mounting bracket FR x Transaxle 64 653 47
Oil filler tube x Transaxle 5.5 56 49 in.*lbf
Control cable bracket No.1 x Transaxle 12 122 9
Oil cooler tube clamp x Control cable bracket 5.4 55 48 in.*lbf
Oil cooler inlet tube x Transaxle 34 347 25
Oil cooler outlet tube x Transaxle 34 347 25
Starter x Transaxle37 377 27
Wire harness x Transaxle 13 133 10
Speed sensor (NC) x Transaxle 11 115 8
Speed sensor (NT) x Transaxle 11 112 8
Air cleaner x No. 1 air cleaner inlet 5.0 51 44 in.*lbf
Drain plug x Oil pan47 479 35
Transmission wire x Transaxle 5.4 55 48 in.*lbf
ATF temperature sensor x Valve body 6.6 67 58 in.*lbf
Oil pan x Transaxle7.6 77 67 in.*lbf
Solenoid valve x Valve body Bolt A 6.6 67 58 in.*lbf
B o l t B 11 11 0 8
Valve body x Transaxle 10.8 110 8
Oil strainer x Valve body 11 110 8
Floor shift assembly x Body 12 120 9
Control cable x Body5.0 51 44 in.*lbf
Engine mount bracket RR x Transfer stiffener, plate RH 45 459 34
Part Tightened N*m kgf*cm ft.*lbf
Differential gear lube apply tube x Transaxle housing 9.8 100 7
Front planetary gear lock nut 268 2,732 198
Brake apply tube clamp x Transaxle case 5.4 55 48 in.*lbf
Transaxle case No. 1 plug x Transaxle rear cover 7.4 75 65 in.*lbf
Transaxle rear cover plate x transaxle rear cover sub-assembly 7.5 76 66 in.*lbf
Transaxle rear cover x Transaxle case Bolt A 18.6 190 14
Other bolt 24.5 250 18
Pawl shaft clamp x Transaxle case 9.8 100 7
Oil pump assembly x Transaxle case 22 226 16
Transaxle housing x Transaxle case Bolt A 22.1 225 16.3
Bolt B, C 29.4 300 21.7
Transaxle case No. 1 plug x Transaxle housing 7.4 75 65 in.*lbf
Parking lock pawl bracket x Transaxle case 20 205 15
Detent spring x Transaxle case Bolt A 20 205 15
Bolt B 12 120 9
Page 392 of 2000
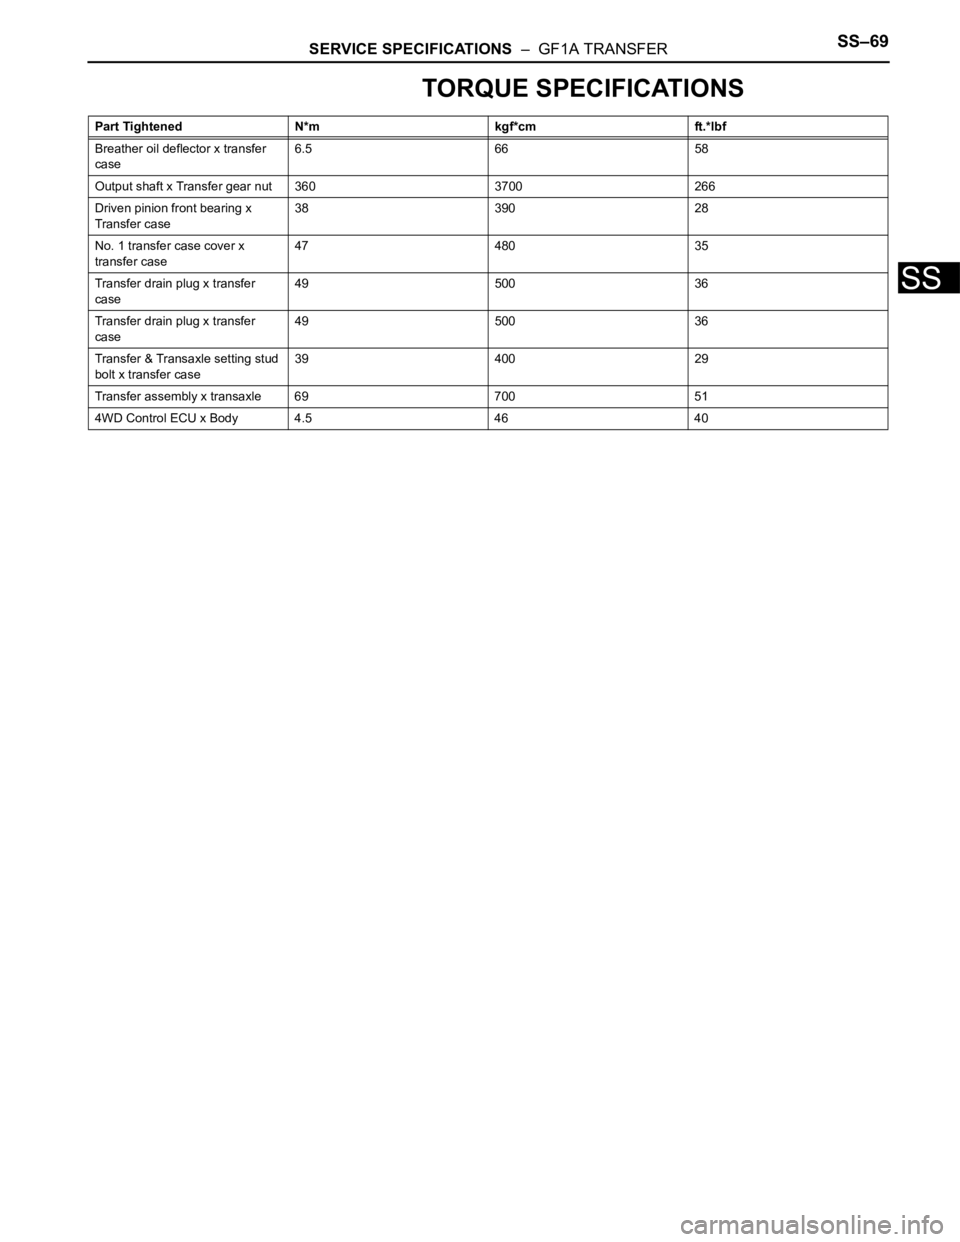
SERVICE SPECIFICATIONS – GF1A TRANSFERSS–69
SS
TORQUE SPECIFICATIONS
Part Tightened N*m kgf*cm ft.*lbf
Breather oil deflector x transfer
case6.5 66 58
Output shaft x Transfer gear nut 360 3700 266
Driven pinion front bearing x
Transfer case38 390 28
No. 1 transfer case cover x
transfer case47 480 35
Transfer drain plug x transfer
case49 500 36
Transfer drain plug x transfer
case49 500 36
Transfer & Transaxle setting stud
bolt x transfer case39 400 29
Transfer assembly x transaxle 69 700 51
4WD Control ECU x Body 4.5 46 40
Page 401 of 2000
DIFFERENTIAL – REAR DIFFERENTIAL SIDE GEAR SHAFT OIL SEALDF–7
DF
REMOVAL
1. DRAIN DIFFERENTIAL OIL (See page DF-10)
2. REMOVE TAILPIPE ASSEMBLY
(a) Remove the tailpipe (see page EX-2).
3. REMOVE CENTER EXHAUST ASSEMBLY
(a) Remove the center pipe (see page EX-2).
4. REMOVE PROPELLER WITH CENTER BEARING
SHAFT ASSEMBLY (See page PR-3)
5. REMOVE REAR DIFFERENTIAL CARRIER SUB-
ASSEMBLY (See page DF-18)
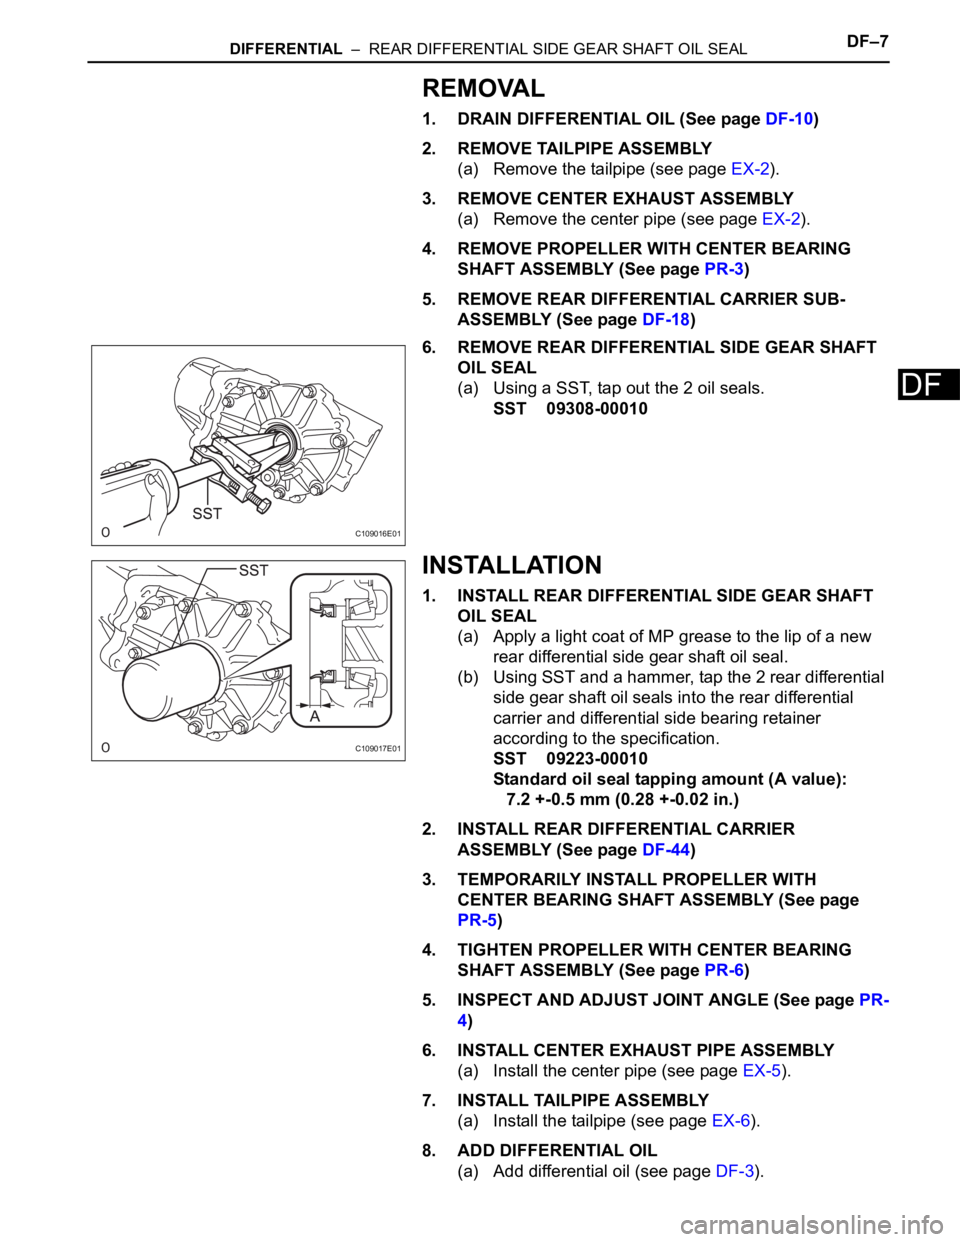
6. REMOVE REAR DIFFERENTIAL SIDE GEAR SHAFT
OIL SEAL
(a) Using a SST, tap out the 2 oil seals.
SST 09308-00010
INSTALLATION
1. INSTALL REAR DIFFERENTIAL SIDE GEAR SHAFT
OIL SEAL
(a) Apply a light coat of MP grease to the lip of a new
rear differential side gear shaft oil seal.
(b) Using SST and a hammer, tap the 2 rear differential
side gear shaft oil seals into the rear differential
carrier and differential side bearing retainer
according to the specification.
SST 09223-00010
Standard oil seal tapping amount (A value):
7.2 +-0.5 mm (0.28 +-0.02 in.)
2. INSTALL REAR DIFFERENTIAL CARRIER
ASSEMBLY (See page DF-44)
3. TEMPORARILY INSTALL PROPELLER WITH
CENTER BEARING SHAFT ASSEMBLY (See page
PR-5)
4. TIGHTEN PROPELLER WITH CENTER BEARING
SHAFT ASSEMBLY (See page PR-6)
5. INSPECT AND ADJUST JOINT ANGLE (See page PR-
4)
6. INSTALL CENTER EXHAUST PIPE ASSEMBLY
(a) Install the center pipe (see page EX-5).
7. INSTALL TAILPIPE ASSEMBLY
(a) Install the tailpipe (see page EX-6).
8. ADD DIFFERENTIAL OIL
(a) Add differential oil (see page DF-3).
C109016E01
C109017E01
Page 404 of 2000
AXLE – FRONT AXLE HUBAH–7
AH
REMOVAL
(2005/11-2006/01)
HINT:
• Use the same procedures for the RH side and LH side.
• The procedures listed below are for the LH side.
1. REMOVE FRONT WHEEL
2. DRAIN AUTOMATIC TRANSAXLE FLUID
(a) Drain the automatic transaxle fluid for U140F (see
page AX-147).
(b) Drain the automatic transaxle fluid for U241E (see
page AX-146).
3. DISCONNECT CABLE FROM NEGATIVE BATTERY
TERMINAL
CAUTION:
Wait at least 90 seconds after disconnecting the
cable from the negative (-) battery terminal to
prevent airbag and seat belt pretensioner activation.
4. REMOVE FRONT AXLE HUB NUT
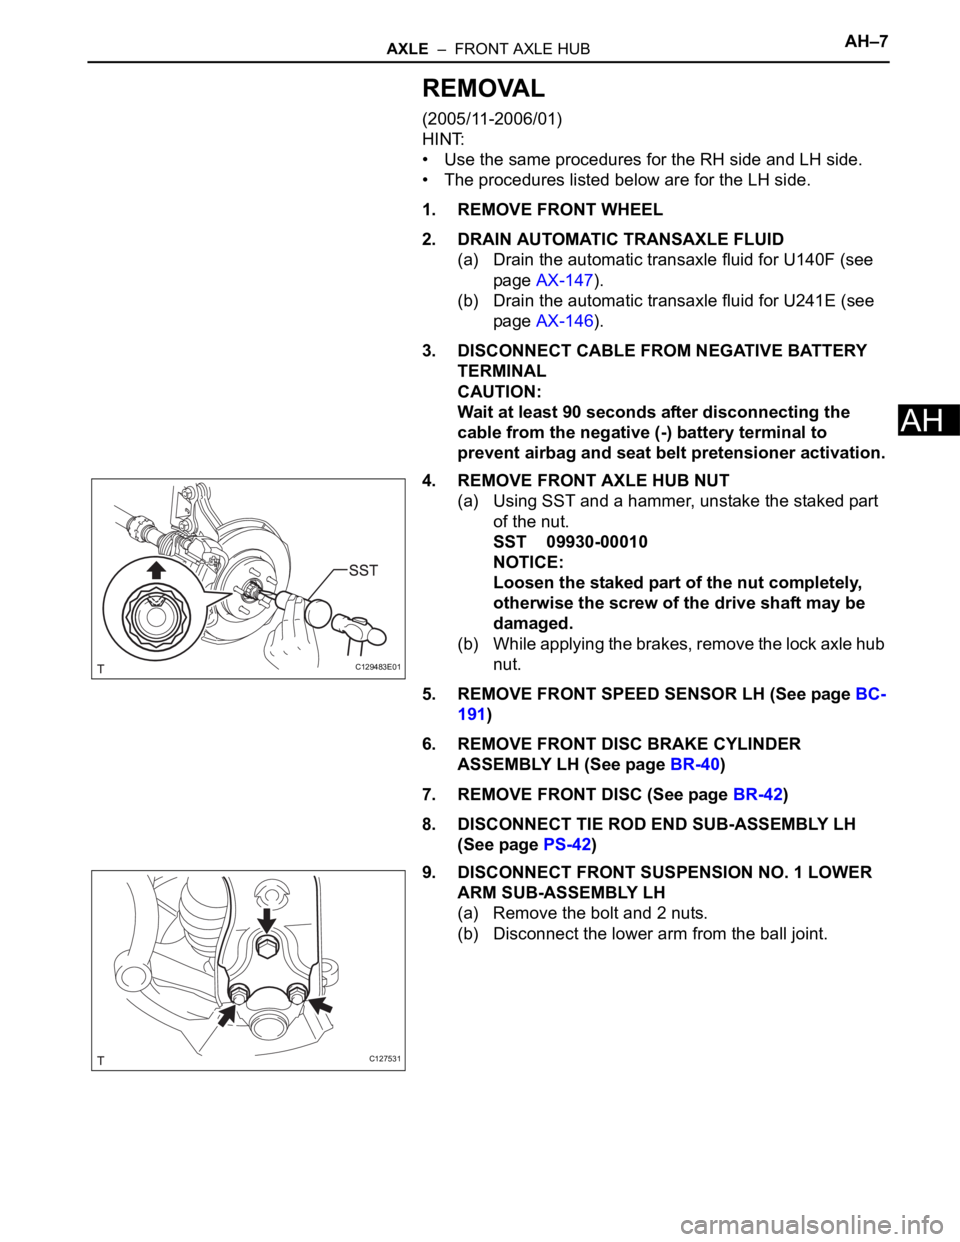
(a) Using SST and a hammer, unstake the staked part
of the nut.
SST 09930-00010
NOTICE:
Loosen the staked part of the nut completely,
otherwise the screw of the drive shaft may be
damaged.
(b) While applying the brakes, remove the lock axle hub
nut.
5. REMOVE FRONT SPEED SENSOR LH (See page BC-
191)
6. REMOVE FRONT DISC BRAKE CYLINDER
ASSEMBLY LH (See page BR-40)
7. REMOVE FRONT DISC (See page BR-42)
8. DISCONNECT TIE ROD END SUB-ASSEMBLY LH
(See page PS-42)
9. DISCONNECT FRONT SUSPENSION NO. 1 LOWER
ARM SUB-ASSEMBLY LH
(a) Remove the bolt and 2 nuts.
(b) Disconnect the lower arm from the ball joint.
C129483E01
C127531
Page 579 of 2000
EM–222AZ-FE ENGINE MECHANICAL – TIMING CHAIN
EM
REMOVAL
1. DISCONNECT CABLE FROM NEGATIVE BATTERY
TERMINAL
CAUTION:
Wait at least 90 seconds after disconnecting the
cable from the negative (-) battery terminal to
prevent airbag and seat belt pretensioner activation.
2. REMOVE RADIATOR SUPPORT OPENING COVER
3. REMOVE FRONT WHEEL RH
4. REMOVE NO. 1 ENGINE UNDER COVER
5. REMOVE FRONT FENDER APRON RH
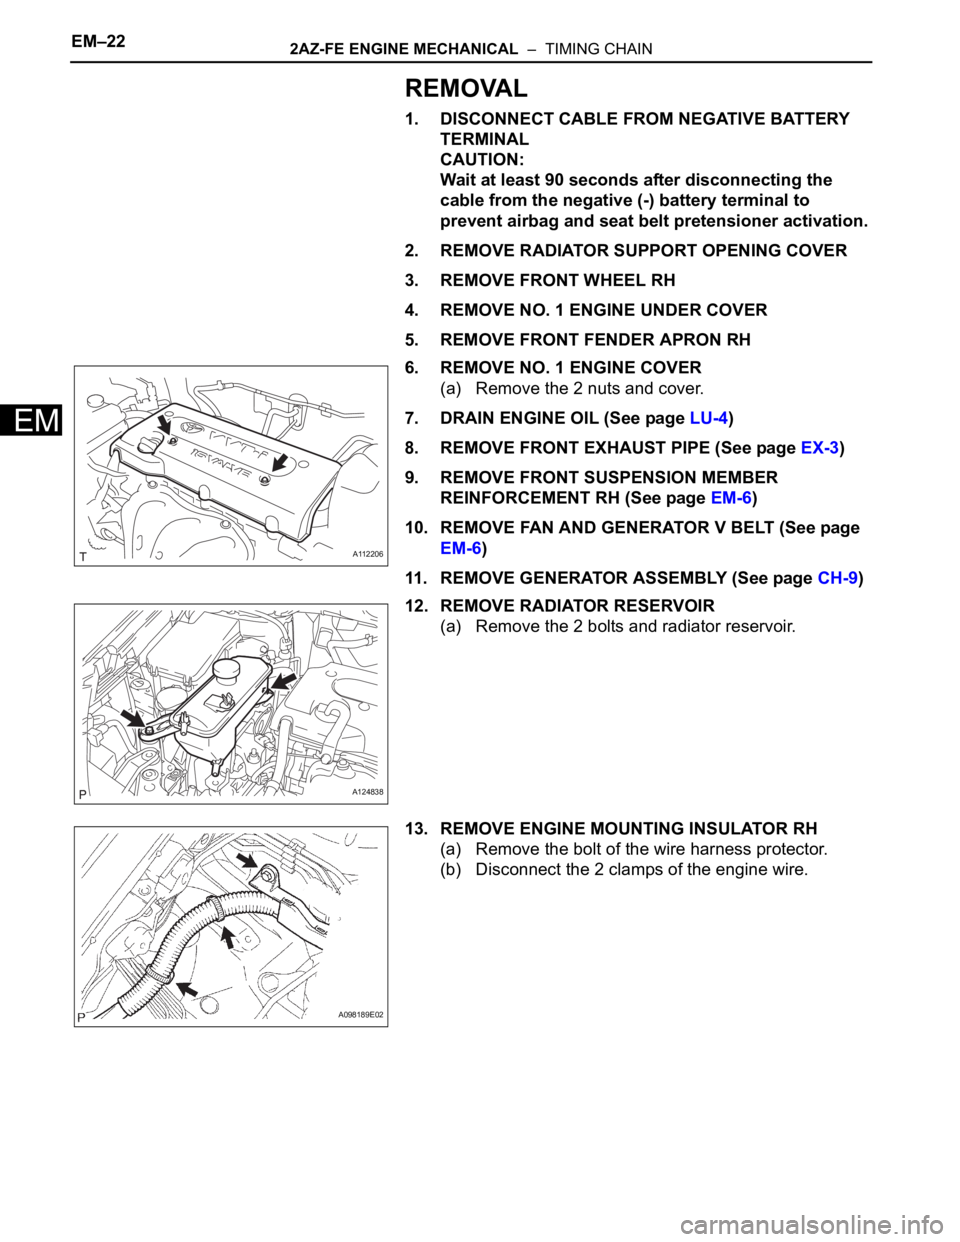
6. REMOVE NO. 1 ENGINE COVER
(a) Remove the 2 nuts and cover.
7. DRAIN ENGINE OIL (See page LU-4)
8. REMOVE FRONT EXHAUST PIPE (See page EX-3)
9. REMOVE FRONT SUSPENSION MEMBER
REINFORCEMENT RH (See page EM-6)
10. REMOVE FAN AND GENERATOR V BELT (See page
EM-6)
11. REMOVE GENERATOR ASSEMBLY (See page CH-9)
12. REMOVE RADIATOR RESERVOIR
(a) Remove the 2 bolts and radiator reservoir.
13. REMOVE ENGINE MOUNTING INSULATOR RH
(a) Remove the bolt of the wire harness protector.
(b) Disconnect the 2 clamps of the engine wire.
A112206
A124838
A098189E02
Page 601 of 2000
2AZ-FE ENGINE MECHANICAL – CYLINDER HEADEM–57
EM
REMOVAL
1. DISCHARGE FUEL SYSTEM PRESSURE (See page
FU-9)
2. DISCONNECT CABLE FROM NEGATIVE BATTERY
TERMINAL
CAUTION:
Wait at least 90 seconds after disconnecting the
cable from the negative (-) battery terminal to
prevent airbag and seat belt pretensioner activation.
3. REMOVE RADIATOR SUPPORT OPENING COVER
4. REMOVE FRONT WHEEL RH
5. REMOVE NO. 1 ENGINE UNDER COVER
6. REMOVE FRONT FENDER APRON RH
7. REMOVE NO. 1 ENGINE COVER (See page EM-22)
8. DRAIN ENGINE COOLANT (See page CO-6)
9. DRAIN ENGINE OIL (See page LU-4)
10. REMOVE AIR CLEANER CAP (See page ES-411)
11. REMOVE THROTTLE BODY (See page ES-412)
12. REMOVE FUEL DELIVERY PIPE SUB-ASSEMBLY
(See page FU-10)
13. REMOVE INTAKE MANIFOLD (See page ES-419)
14. REMOVE INTAKE MANIFOLD INSULATOR (See page
ES-420)
15. REMOVE FRONT EXHAUST PIPE (See page EX-3)
16. REMOVE OIL DIPSTICK
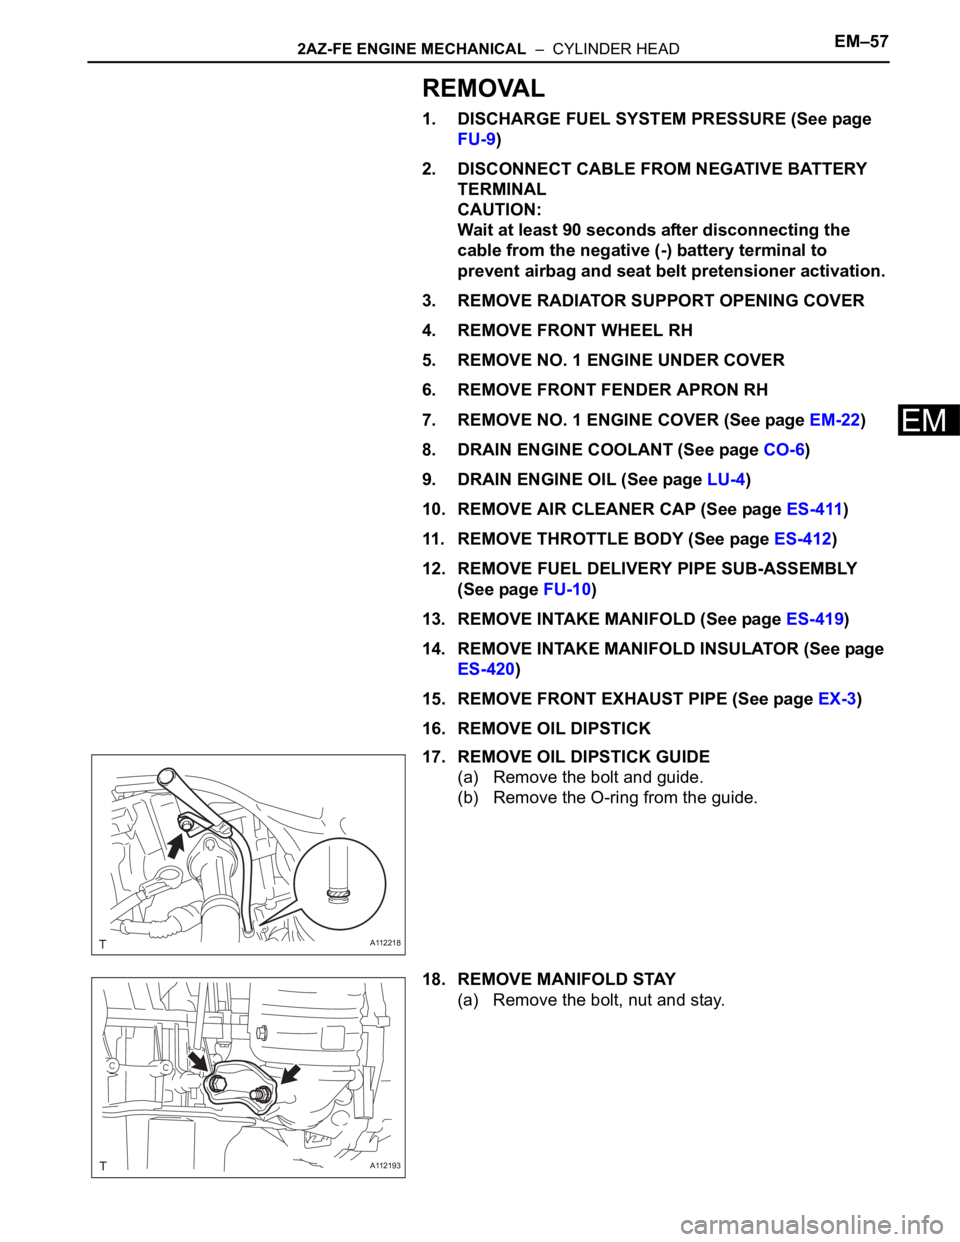
17. REMOVE OIL DIPSTICK GUIDE
(a) Remove the bolt and guide.
(b) Remove the O-ring from the guide.
18. REMOVE MANIFOLD STAY
(a) Remove the bolt, nut and stay.
A112218
A112193
Page 633 of 2000
EM–982AZ-FE ENGINE MECHANICAL – ENGINE ASSEMBLY
EM
REMOVAL
1. DISCHARGE FUEL SYSTEM PRESSURE (See page
FU-9)
2. DISCONNECT CABLE FROM NEGATIVE BATTERY
TERMINAL
CAUTION:
Wait at least 90 seconds after disconnecting the
cable from the negative (-) battery terminal to
prevent airbag and seat belt pretensioner activation.
3. REMOVE HOOD SUB-ASSEMBLY (See page ED-4)
4. REMOVE RADIATOR SUPPORT OPENING COVER
5. REMOVE BATTERY CLAMP SUB-ASSEMBLY
(a) Loosen the bolt and nut, and remove the battery
clamp.
6. REMOVE BATTERY
7. REMOVE BATTERY TRAY
8. REMOVE FRONT WHEEL
9. REMOVE NO. 1 ENGINE UNDER COVER
10. REMOVE NO. 2 ENGINE UNDER COVER
11. REMOVE FRONT FENDER APRON RH
12. REMOVE NO. 1 ENGINE COVER (See page EM-22)
13. DRAIN ENGINE COOLANT (See page CO-6)
14. DRAIN AUTOMATIC TRANSAXLE FLUID
(a) Drain automatic transaxle fluid for U241E (2WD)
(see page AX-146).
(b) Drain automatic transaxle fluid for U140F (4WD)
(see page AX-147).
15. REMOVE RADIATOR ASSEMBLY
(a) Remove the radiator (see page CO-29).
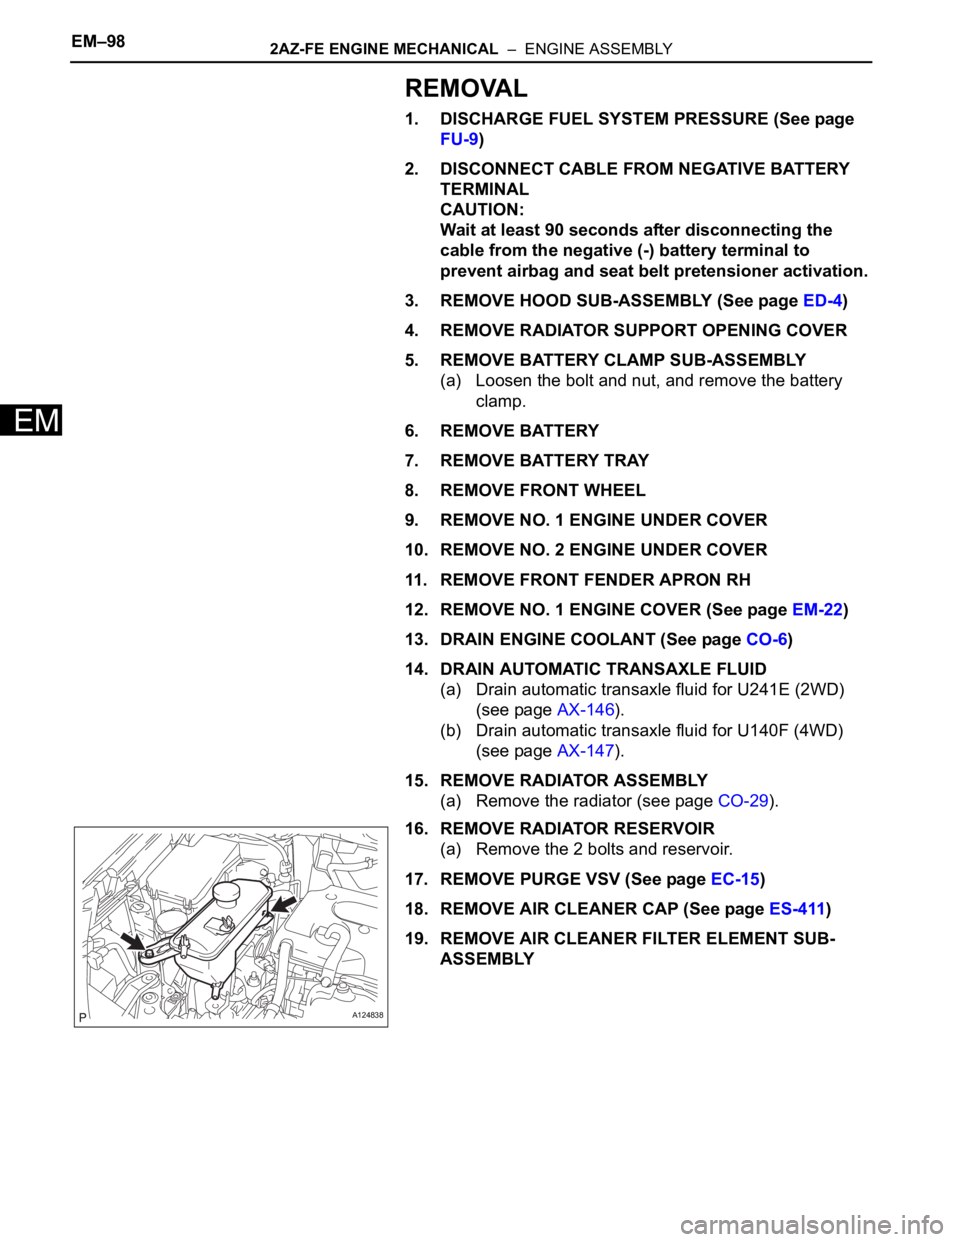
16. REMOVE RADIATOR RESERVOIR
(a) Remove the 2 bolts and reservoir.
17. REMOVE PURGE VSV (See page EC-15)
18. REMOVE AIR CLEANER CAP (See page ES-411)
19. REMOVE AIR CLEANER FILTER ELEMENT SUB-
ASSEMBLY
A124838
Page 652 of 2000
2AZ-FE ENGINE MECHANICAL – ENGINE UNITEM–125
EM
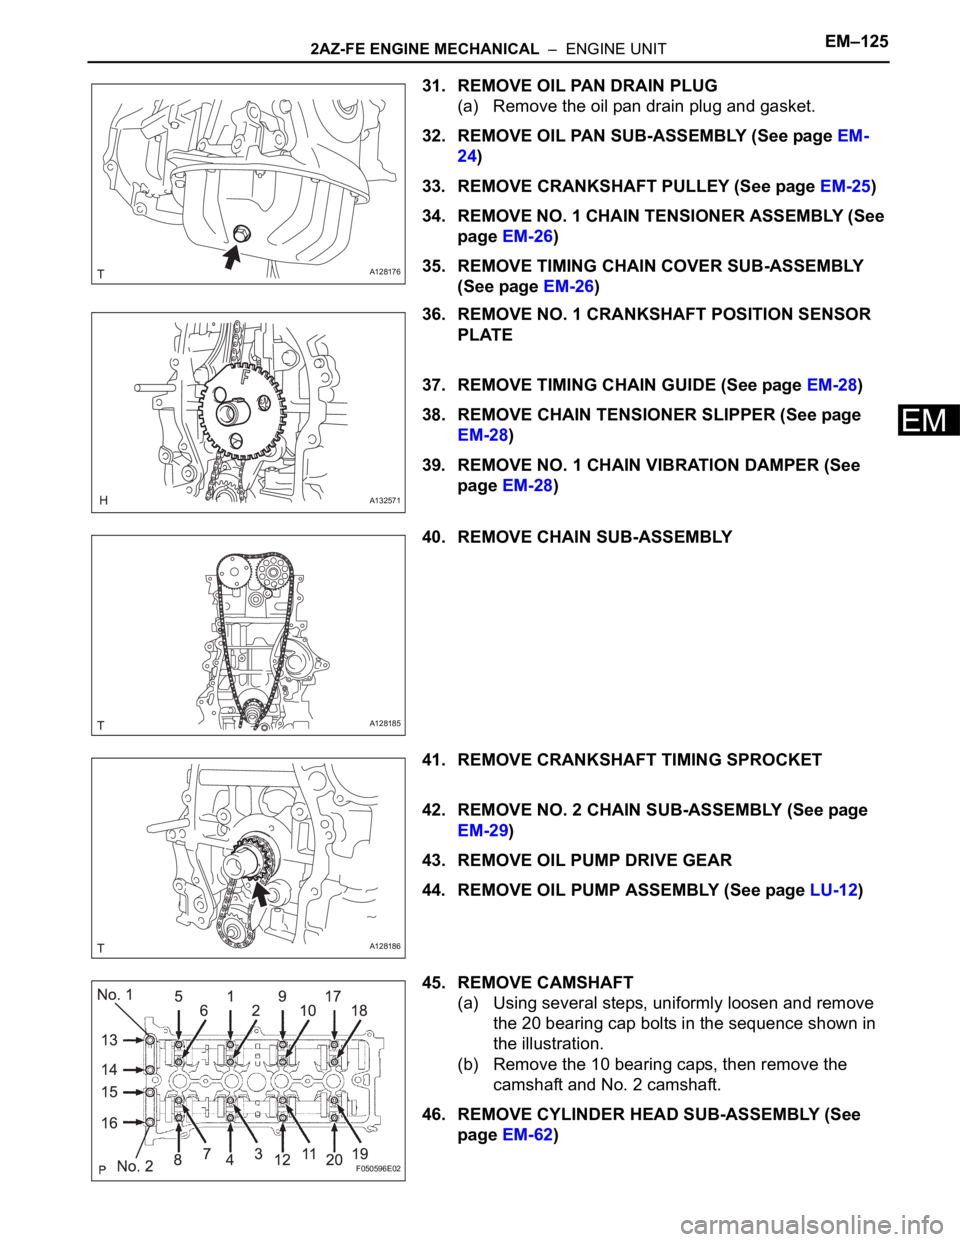
31. REMOVE OIL PAN DRAIN PLUG
(a) Remove the oil pan drain plug and gasket.
32. REMOVE OIL PAN SUB-ASSEMBLY (See page EM-
24)
33. REMOVE CRANKSHAFT PULLEY (See page EM-25)
34. REMOVE NO. 1 CHAIN TENSIONER ASSEMBLY (See
page EM-26)
35. REMOVE TIMING CHAIN COVER SUB-ASSEMBLY
(See page EM-26)
36. REMOVE NO. 1 CRANKSHAFT POSITION SENSOR
PLATE
37. REMOVE TIMING CHAIN GUIDE (See page EM-28)
38. REMOVE CHAIN TENSIONER SLIPPER (See page
EM-28)
39. REMOVE NO. 1 CHAIN VIBRATION DAMPER (See
page EM-28)
40. REMOVE CHAIN SUB-ASSEMBLY
41. REMOVE CRANKSHAFT TIMING SPROCKET
42. REMOVE NO. 2 CHAIN SUB-ASSEMBLY (See page
EM-29)
43. REMOVE OIL PUMP DRIVE GEAR
44. REMOVE OIL PUMP ASSEMBLY (See page LU-12)
45. REMOVE CAMSHAFT
(a) Using several steps, uniformly loosen and remove
the 20 bearing cap bolts in the sequence shown in
the illustration.
(b) Remove the 10 bearing caps, then remove the
camshaft and No. 2 camshaft.
46. REMOVE CYLINDER HEAD SUB-ASSEMBLY (See
page EM-62)
A128176
A132571
A128185
A128186
F050596E02
Page 653 of 2000
EM–1262AZ-FE ENGINE MECHANICAL – ENGINE UNIT
EM
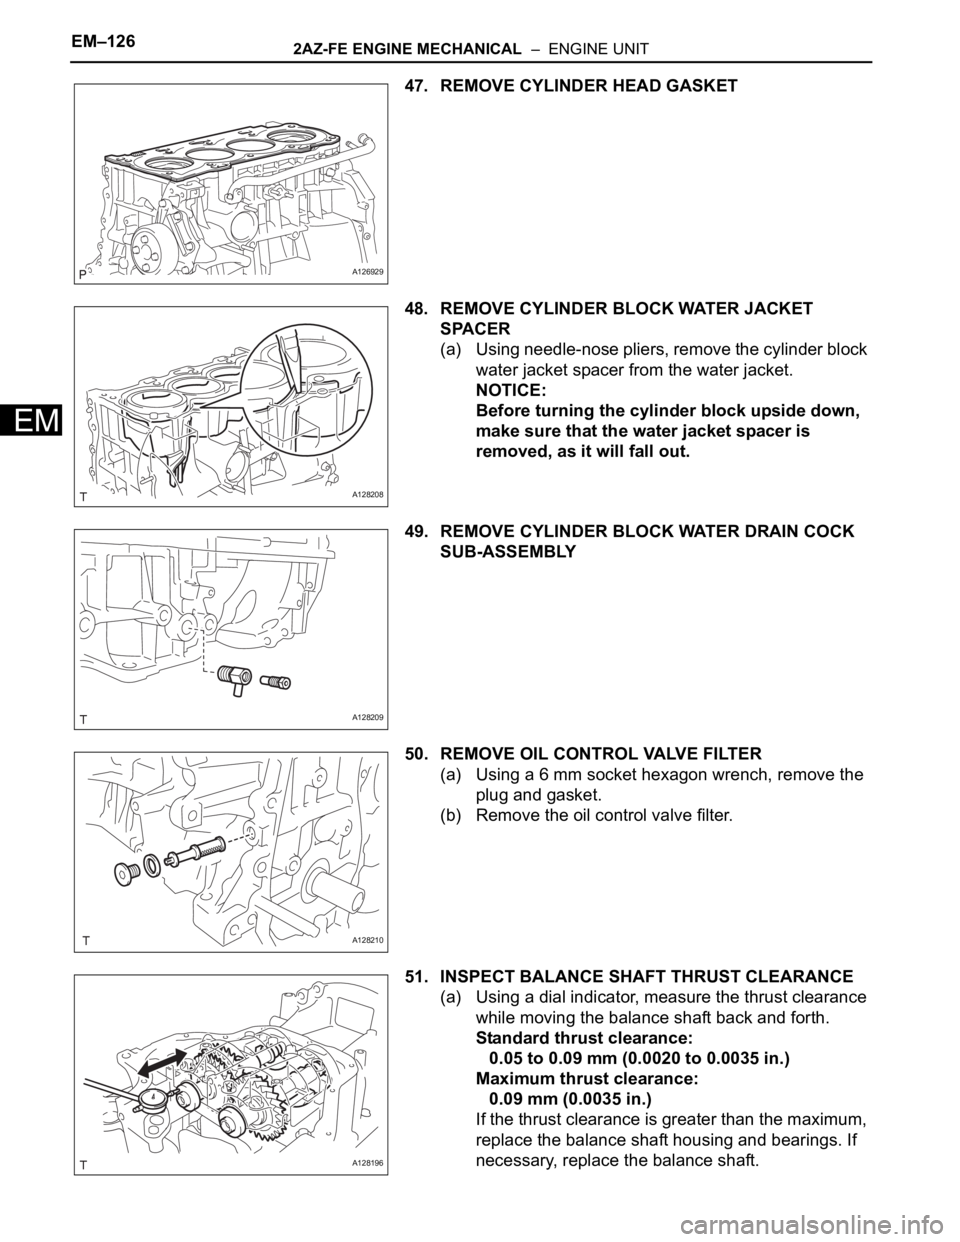
47. REMOVE CYLINDER HEAD GASKET
48. REMOVE CYLINDER BLOCK WATER JACKET
SPACER
(a) Using needle-nose pliers, remove the cylinder block
water jacket spacer from the water jacket.
NOTICE:
Before turning the cylinder block upside down,
make sure that the water jacket spacer is
removed, as it will fall out.
49. REMOVE CYLINDER BLOCK WATER DRAIN COCK
SUB-ASSEMBLY
50. REMOVE OIL CONTROL VALVE FILTER
(a) Using a 6 mm socket hexagon wrench, remove the
plug and gasket.
(b) Remove the oil control valve filter.
51. INSPECT BALANCE SHAFT THRUST CLEARANCE
(a) Using a dial indicator, measure the thrust clearance
while moving the balance shaft back and forth.
Standard thrust clearance:
0.05 to 0.09 mm (0.0020 to 0.0035 in.)
Maximum thrust clearance:
0.09 mm (0.0035 in.)
If the thrust clearance is greater than the maximum,
replace the balance shaft housing and bearings. If
necessary, replace the balance shaft.
A126929
A128208
A128209
A128210
A128196