height adjustment TOYOTA RAV4 2020 Owners Manual (in English)
[x] Cancel search | Manufacturer: TOYOTA, Model Year: 2020, Model line: RAV4, Model: TOYOTA RAV4 2020Pages: 736, PDF Size: 30.79 MB
Page 134 of 736
1343-3. Adjusting the seats
3-3.Adjusting the seats
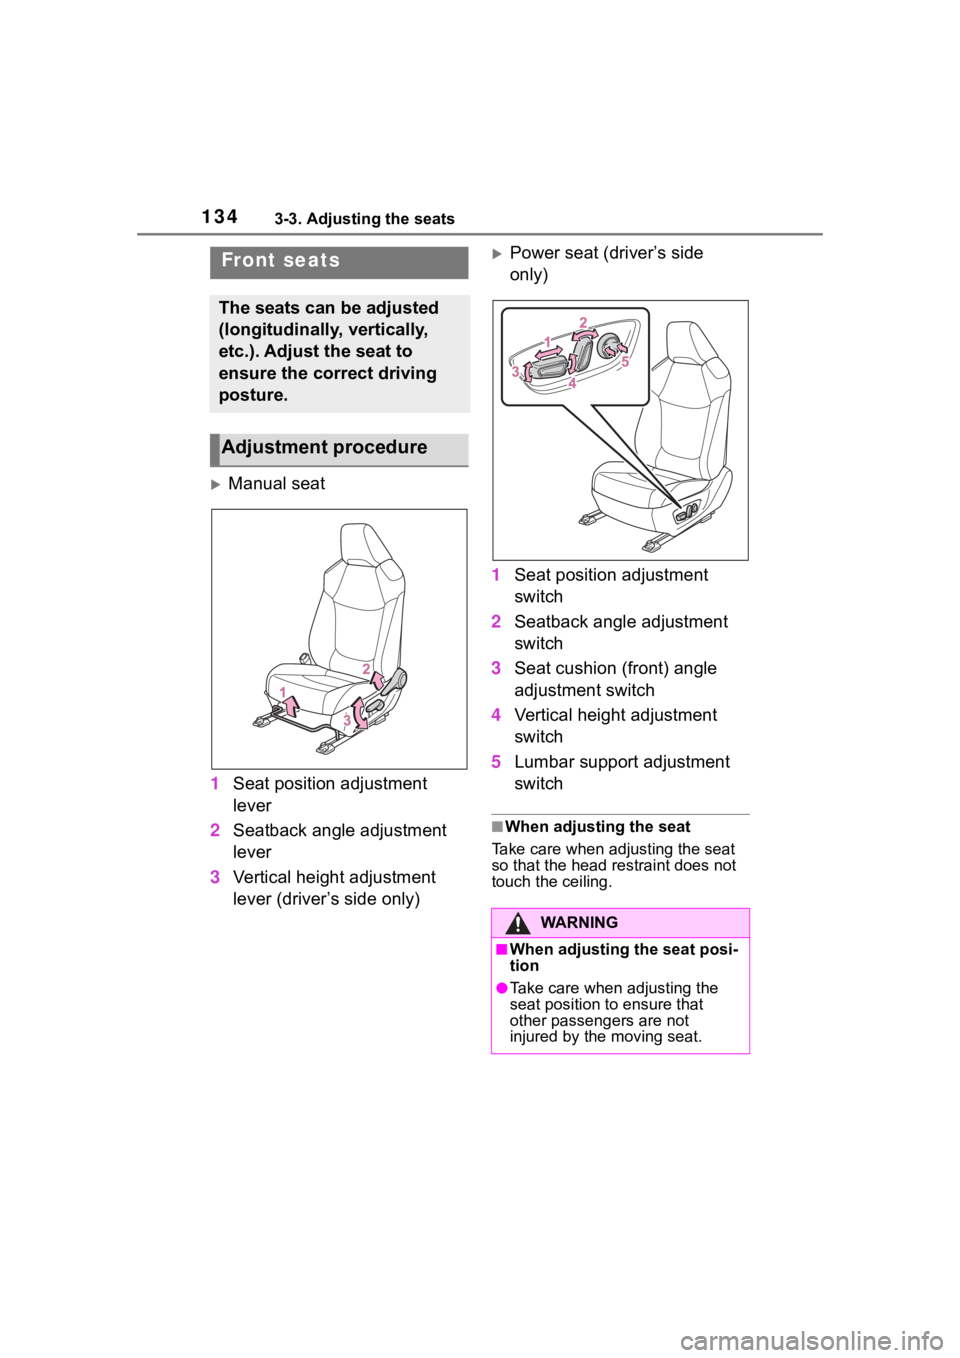
Manual seat
1 Seat position adjustment
lever
2 Seatback angle adjustment
lever
3 Vertical height adjustment
lever (driver’s side only)
Power seat (driver’s side
only)
1 Seat position adjustment
switch
2 Seatback angle adjustment
switch
3 Seat cushion (front) angle
adjustment switch
4 Vertical height adjustment
switch
5 Lumbar support adjustment
switch
■When adjusting the seat
Take care when adjusting the seat
so that the head restraint does not
touch the ceiling.
Front seats
The seats can be adjusted
(longitudinally, vertically,
etc.). Adjust the seat to
ensure the correct driving
posture.
Adjustment procedure
WA R N I N G
■When adjusting the seat posi-
tion
●Take care when adjusting the
seat position to ensure that
other passengers are not
injured by the moving seat.
Page 140 of 736
1403-3. Adjusting the seats
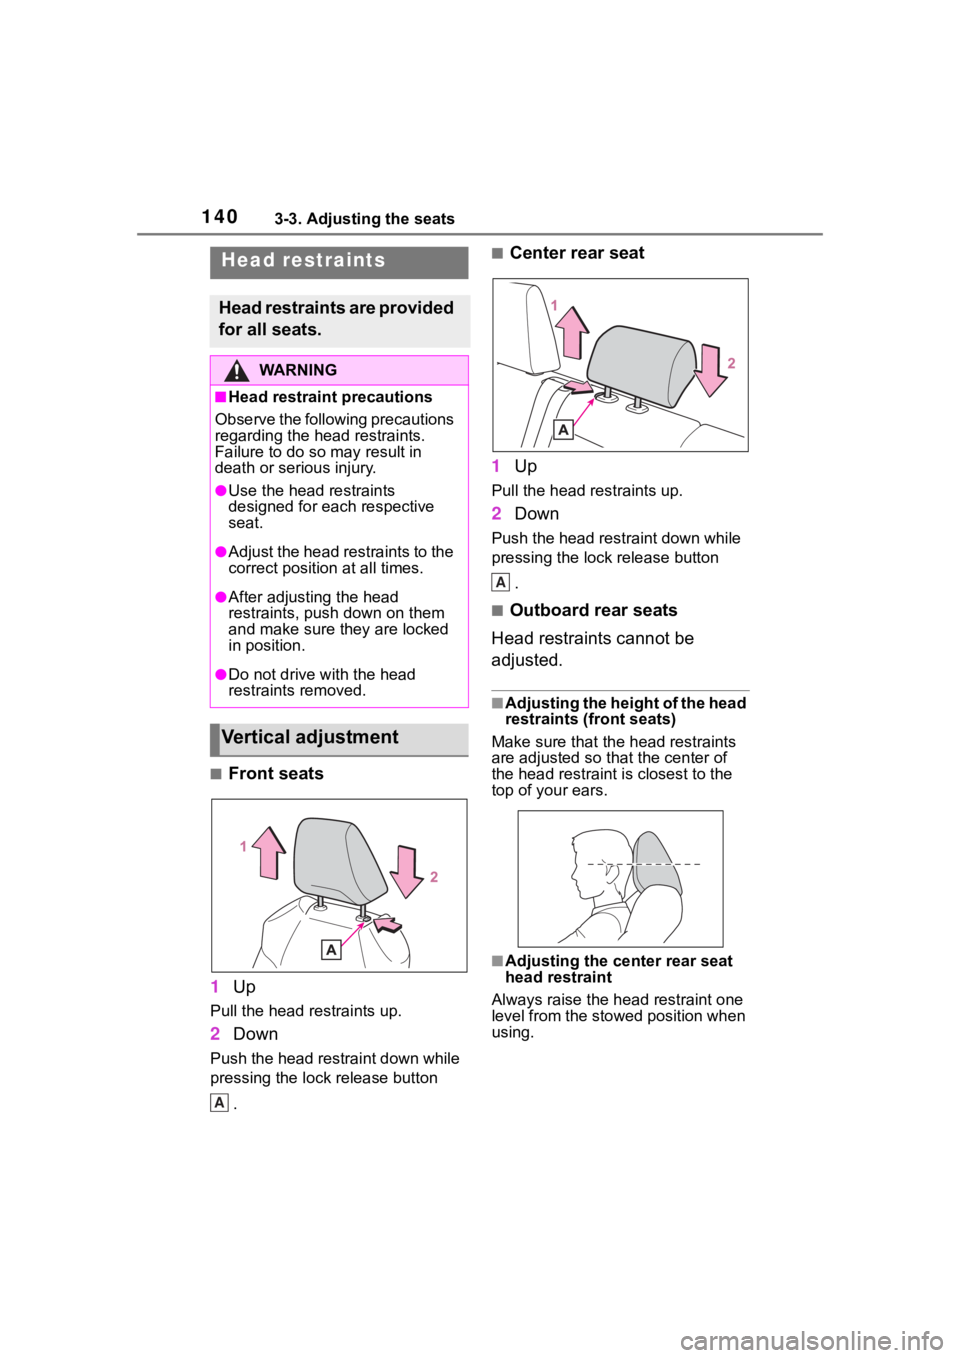
■Front seats
1 Up
Pull the head restraints up.
2Down
Push the head restraint down while
pressing the lock release button
.
■Center rear seat
1 Up
Pull the head restraints up.
2Down
Push the head restraint down while
pressing the lock release button
.
■Outboard rear seats
Head restraints cannot be
adjusted.
■Adjusting the height of the head
restraints (front seats)
Make sure that the head restraints
are adjusted so that the center of
the head restraint i s closest to the
top of your ears.
■Adjusting the center rear seat
head restraint
Always raise the head restraint one
level from the stowed position when
using.
Head restraints
Head restraints are provided
for all seats.
WA R N I N G
■Head restraint precautions
Observe the following precautions
regarding the head restraints.
Failure to do so m ay result in
death or serious injury.
●Use the head restraints
designed for each respective
seat.
●Adjust the head restraints to the
correct position at all times.
●After adjusting the head
restraints, push down on them
and make sure they are locked
in position.
●Do not drive with the head
restraints removed.
Vertical adjustment
A
A
Page 146 of 736
1463-4. Adjusting the steering wheel and mirrors
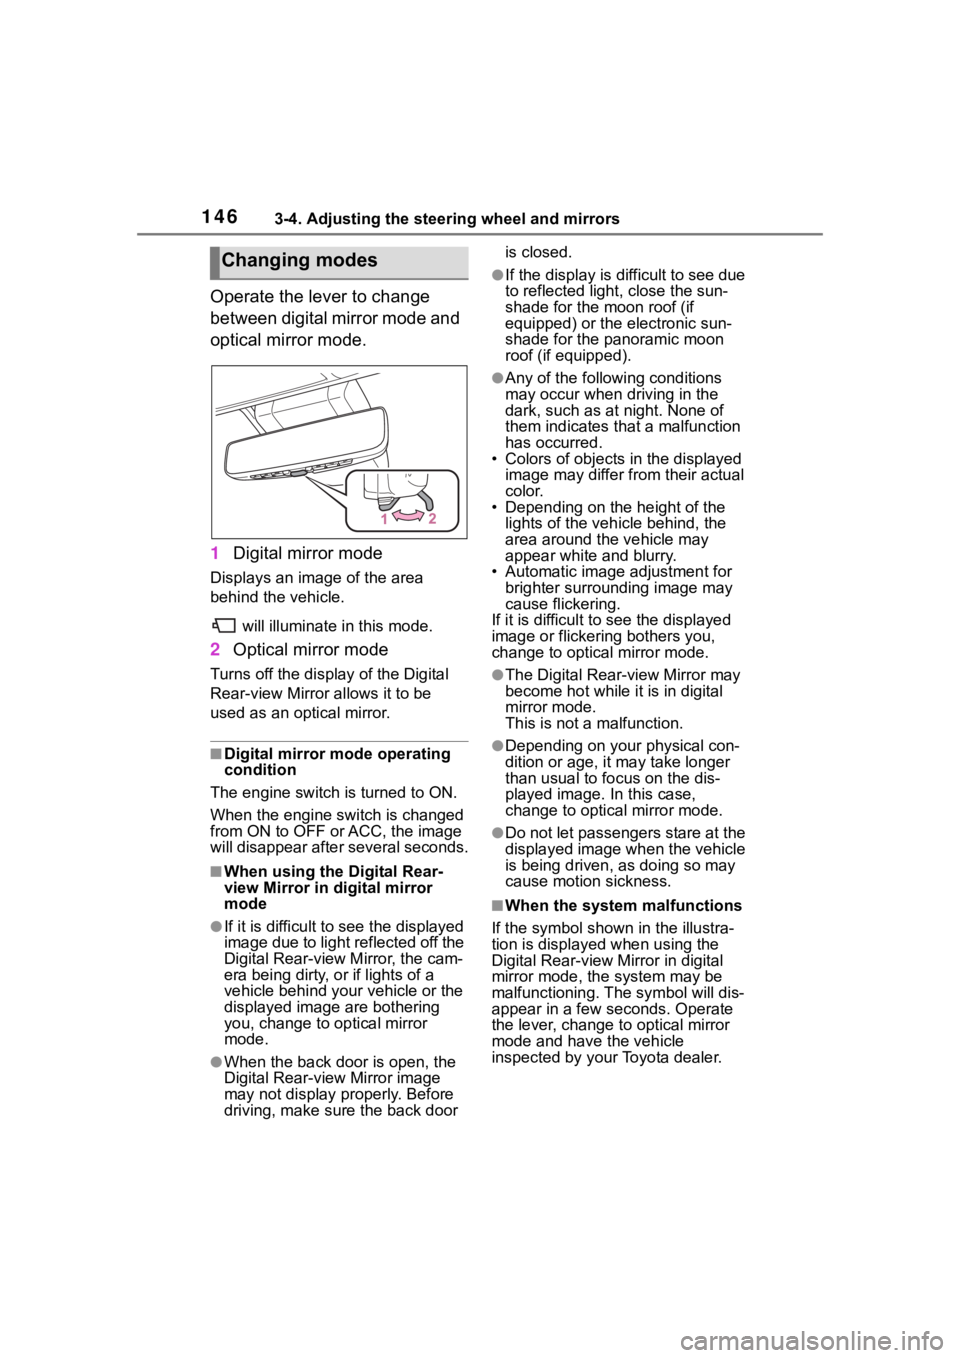
Operate the lever to change
between digital mirror mode and
optical mirror mode.
1Digital mirror mode
Displays an image of the area
behind the vehicle.
will illuminate in this mode.
2Optical mirror mode
Turns off the display of the Digital
Rear-view Mirror allows it to be
used as an optical mirror.
■Digital mirror mode operating
condition
The engine switch is turned to ON.
When the engine switch is changed
from ON to OFF or ACC, the image
will disappear afte r several seconds.
■When using the Digital Rear-
view Mirror in digital mirror
mode
●If it is difficult to see the displayed
image due to light reflected off the
Digital Rear-view M irror, the cam-
era being dirty, or if lights of a
vehicle behind your vehicle or the
displayed image are bothering
you, change to optical mirror
mode.
●When the back door is open, the
Digital Rear-view Mirror image
may not display properly. Before
driving, make sure the back door is closed.
●If the display is difficult to see due
to reflected light
, close the sun-
shade for the moon roof (if
equipped) or the electronic sun-
shade for the panoramic moon
roof (if equipped).
●Any of the following conditions
may occur when driving in the
dark, such as at night. None of
them indicates that a malfunction
has occurred.
• Colors of objects in the displayed
image may differ from their actual
color.
• Depending on the height of the
lights of the vehicle behind, the
area around the vehicle may
appear white and blurry.
• Automatic image adjustment for brighter surrounding image may
cause flickering.
If it is difficult to see the displayed
image or flickering bothers you,
change to optical mirror mode.
●The Digital Rear-view Mirror may
become hot while it is in digital
mirror mode.
This is not a malfunction.
●Depending on your physical con-
dition or age, it may take longer
than usual to fo cus on the dis-
played image. In this case,
change to optical mirror mode.
●Do not let passengers stare at the
displayed image when the vehicle
is being driven, as doing so may
cause motion sickness.
■When the system malfunctions
If the symbol shown in the illustra-
tion is displayed when using the
Digital Rear-view Mirror in digital
mirror mode, the system may be
malfunctioning. The symbol will dis-
appear in a few seconds. Operate
the lever, change to optical mirror
mode and have the vehicle
inspected by your Toyota dealer.
Changing modes
Page 727 of 736
Alphabetical Index727
Function ............................... 229
Warning light ........................ 630
Warning message ........ 227, 641
Projection button (Menu screen) ............................................... 377
R
Radar cruise control Dynamic radar cruise control with full-speed range .......... 250
Radiator ................................... 577
Radio ....................................... 425
Rarking lights Light switch .......................... 209
RCTA (Rear Cross Traffic Alert) RCTA Function ............. 260, 267
Warning message ................ 262
Rear Cross Traffic Alert (RCTA) ............................................... 260
Rear passengers’ seat belt reminder light ....................... 635
Rear seat Folding down the rear seatbacks........................................... 136
Head restraints ..................... 140
Seat heaters ......................... 522
Rear seat heaters ................... 522
Rear side marker lights Light switch .......................... 209
Replacing light bulbs ............ 609
Rear turn signal lights Replacing light bulbs ............ 609
Turn signal lever ................... 202
Wattage ................................ 670
Rear view mirror Digital Rear-view Mirror........ 145
Inside rear view mirror.......... 143
Outside rear view mirrors ..... 154
Rear view monitor system ..... 292 Driving precautions .............. 292
Rear view monitor system pre-cautions .............................. 294 Screen description................293
Things you should know .......298
Rear window defogger ... 511, 517
Rear window wiper .................218
Receiving a cal l using the Blue-
tooth
® hands-free system....473
Refueling ............ .....................220
Capacity ...............................666
Fuel types .....................666, 676
Opening the fuel tank cap ....221
Registering/Connecting a Blue-
tooth
® device ........................390
Profiles .................................393
Registering a Bluetooth
® audio
player for the first time ........392
Registering a Bluetooth
® phone
for the first time...................390
Remote Connect .....................502
Replacing Electronic key battery ...........604
Fuses....................................607
Light bulbs ............................609
Tires......................................642
Wiper insert ..........................601
Wireless remote control battery...........................................604
Reporting safety defects for U.S. owners ...................................702
Resetting the message indicat- ing maintenance is required 565
Road Sign Assist ....................247
Rock & Dirt mode ...................353
RSA (Road Sign Assist) .........247
S
Screen adjustment . ................388
Seat belt reminder light..........635
Seat belts...................................29 Adjusting the seat belt shoulder anchor height........................31
Automatic Locking Retractor ..31