engine TOYOTA RAV4 2022 Owners Manual
[x] Cancel search | Manufacturer: TOYOTA, Model Year: 2022, Model line: RAV4, Model: TOYOTA RAV4 2022Pages: 748, PDF Size: 22.93 MB
Page 582 of 748
5827-3. Do-it-yourself maintenance
■When rotating the tires (vehi-
cles with tire pressure warning
system)
Make sure that the engine switch is
OFF. If the tires are rotated while
the engine switch i s in ON, the tire
position informa tion will not be
updated. If this accidentally occurs,
either turn the engine switch to OFF
and then to ON, or initialize the sys-
tem after checking that the tire pres-
sure is properly adjusted.
Your vehicle is equipped with a
tire pressure warning system
that uses tire pressure warning
valves and transmitters to detect
low tire inflation pressure before
serious problems arise.
If the tire pressure drops
below a predetermined level,
the driver is warned by a
screen display and a warning
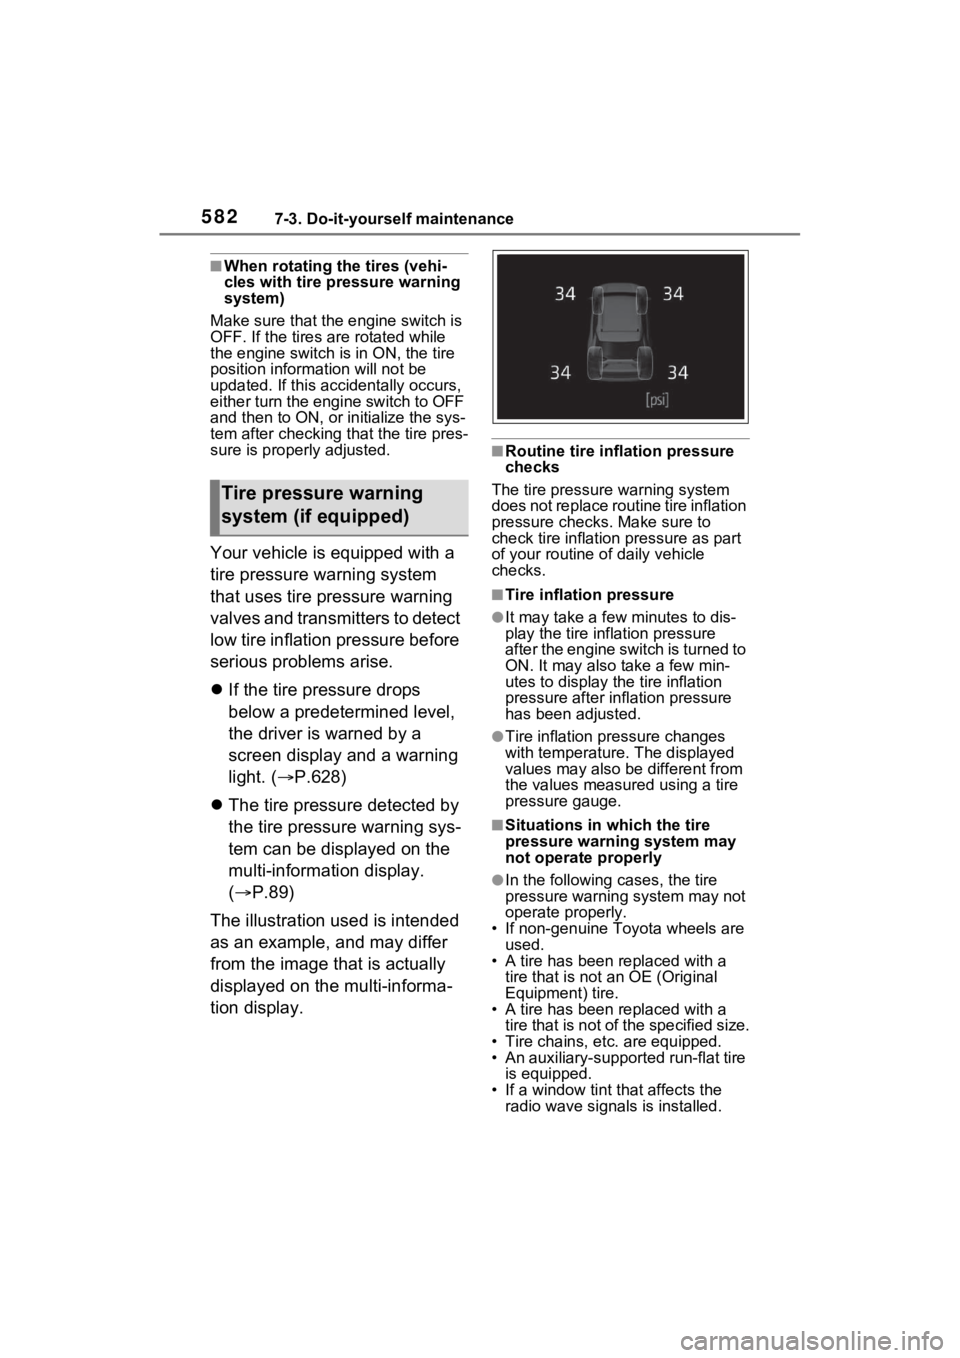
light. ( P.628)
The tire pressure detected by
the tire pressure warning sys-
tem can be displayed on the
multi-information display.
( P.89)
The illustration used is intended
as an example, and may differ
from the image that is actually
displayed on the multi-informa-
tion display.
■Routine tire inflation pressure
checks
The tire pressure warning system
does not replace routine tire inflation
pressure checks . Make sure to
check tire inflation pressure as part
of your routine o f daily vehicle
checks.
■Tire inflation pressure
●It may take a few minutes to dis-
play the tire inflation pressure
after the engine switch is turned to
ON. It may also take a few min-
utes to display the tire inflation
pressure after infl ation pressure
has been adjusted.
●Tire inflation pressure changes
with temperature. The displayed
values may also be different from
the values measured using a tire
pressure gauge.
■Situations in which the tire
pressure warning system may
not operate properly
●In the following cases, the tire
pressure warning system may not
operate properly.
• If non-genuine Toyota wheels are used.
• A tire has been replaced with a tire that is not an OE (Original
Equipment) tire.
• A tire has been replaced with a tire that is not of the specified size.
• Tire chains, etc. are equipped.
• An auxiliary-support ed run-flat tire
is equipped.
• If a window tint that affects the radio wave signals is installed.
Tire pressure warning
system (if equipped)
Page 584 of 748
5847-3. Do-it-yourself maintenance
■The tire pressure warning
system must be initialized
in the following circum-
stances:
When rotating the tires.
When changing the tire.
After registering the ID codes.
( P.586)
When the tire pressure warning
system is initialized, the current
tire inflation pressure is set as
the benchmark pressure.
■How to initialize the tire
pressure warning system
1 Park the vehicle in a safe
place and stop the engine for
20 minutes or more.
Initialization cannot be performed
while the vehicle is moving.
2Adjust the tire inflation pres-
sure to the specified cold tire
inflation pressure level.
( P.667)
Make sure to adjust the tire pres-
sure to the specifie d cold tire infla-
tion pressure level. The tire
pressure warning system will oper-
ate based on this pressure level.
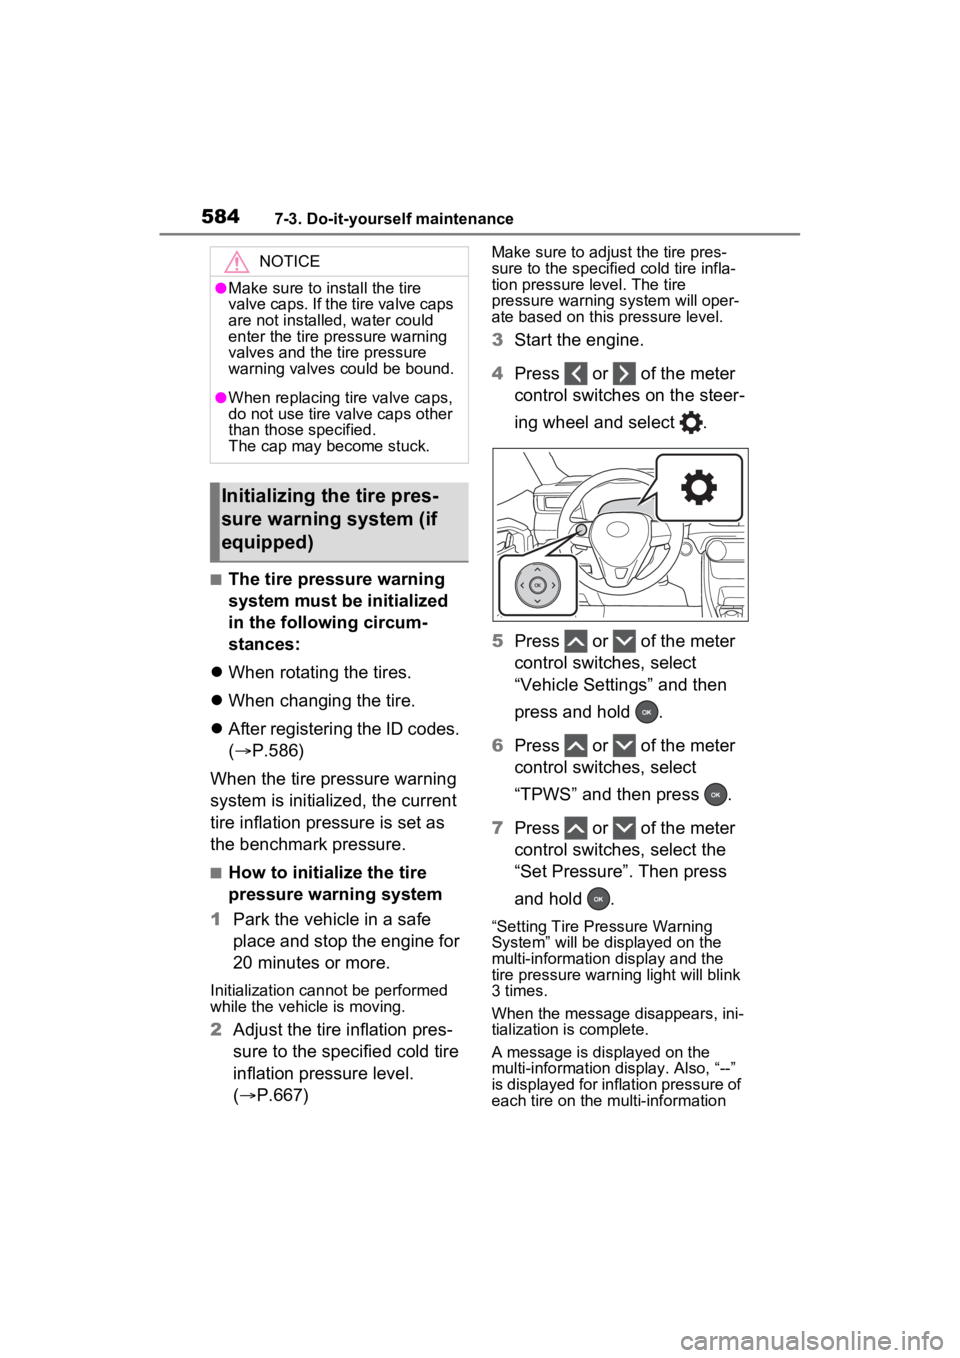
3Start the engine.
4 Press or of the meter
control switches on the steer-
ing wheel and select .
5 Press or of the meter
control switches, select
“Vehicle Settings” and then
press and hold .
6 Press or of the meter
control switches, select
“TPWS” and then press .
7 Press or of the meter
control switches, select the
“Set Pressure”. Then press
and hold .
“Setting Tire Pressure Warning
System” will be displayed on the
multi-information display and the
tire pressure warning light will blink
3 times.
When the message disappears, ini-
tialization is complete.
A message is displayed on the
multi-information di splay. Also, “--”
is displayed for inflation pressure of
each tire on the m ulti-information
NOTICE
●Make sure to install the tire
valve caps. If the tire valve caps
are not installed, water could
enter the tire pressure warning
valves and the tire pressure
warning valves could be bound.
●When replacing tire valve caps,
do not use tire valve caps other
than those specified.
The cap may become stuck.
Initializing the tire pres-
sure warning system (if
equipped)
Page 585 of 748

5857-3. Do-it-yourself maintenance
7
Maintenance and care
display while the tire pressure
warning system determines the
position.
8Drive straight (with occa-
sional left and right turns) at
approximately 25mph (40
km/h) or more for approxi-
mately 10 to 30 minutes.
When initialization is complete, the
inflation pressure of each tire will be
displayed on the multi-information
display.
Even if the vehicle is not driven at
approximately 25 mph (40 km/h) or
more, initializat ion can be com-
pleted by driving for a long time.
However, if initia lization does not
complete after driving for 1 hour or
more, park the vehicle in a safe
place for approximately 20 minutes
and then drive th e vehicle again.
■When initializing
●Initialization is performed while
driving at a vehicle speed of
approximately 25 mph (40 km/h)
or more.
●Make sure to carry out initializa-
tion after adjusting the tire inflation
pressure. Also, make sure the
tires are cold before carrying out
initialization or tir e inflation pres-
sure adjustment.
●The tire pressure warning system
can be initialized by yourself, but
depending on the driving condi-
tions and driving environment, ini-
tialization may take some time to
complete.
■The initialization operation
●If you have accidentally turned the
engine switch to OFF during ini-
tialization, it is not necessary to
restart the initia lization again as
initialization will restart automati-
cally when the engine switch has
been turned to ON for the next
time.
●If you accidentally perform the ini-
tialization when initialization is not
necessary, adjust the tire inflation
pressure to the s pecified level
when the tires are cold, and con-
duct initialization again.
●While the position of each tire is
being determined and the inflation
pressures are not being displayed
on the multi-information display, if
the inflation pressure of a tire
drops, the tire pressure warning
light will come on.
■If the tire pressure warning sys-
tem is not initia lized properly
●In the following situations, initial-
ization may take longer than usual
to be completed or may not be
possible. Normally, initialization
completes within approximately
30 minutes.
• Vehicle is not driven at approxi- mately 25 mph (40 km/h) or more
• Vehicle is driven on unpaved roads
• Vehicle is driven near other vehi-
cles and system cannot recog-
nize tire pressure warning valve
and transmitters o f your vehicle
over those of other vehicles.
• If the vehicle is driven in heavy traffic or another situation where
other vehicles are driven close by,
it may take time f or the system to
recognize the ti re pressure warn-
ing valve and transmitters of your
vehicle over those of other vehi-
cles.
If initialization does not complete
after driving for 1 hour or more, park
the vehicle in a safe place for
approximately 20 minutes and then
drive the vehicle again.
●If the vehicle is reversed during
initialization, the data up to that
point is reset, so p erform the ini-
tialization procedure again from
the beginning.
●In the following situations, initial-
ization will not be started or was
not completed properly and the
Page 586 of 748
5867-3. Do-it-yourself maintenance
system will not ope rate properly.
Perform the initialization proce-
dure again.
• If, when attempting to start initial- ization, the tire pressure warning
light does not blink 3 times.
• If, when the vehicle has been driven for about 20 minutes after
performing initialization, the tire
pressure warning light blinks for
approximately 1 minute and then
illuminates.
If the inflation pressure of each tire
is still not displayed, have the vehi-
cle inspected by your Toyota dealer.
Every tire pressure warning
valve and transmitter has a
unique ID code. When replacing
a tire pressure warning valve
and transmitter, it is necessary
to register the ID code.
When registering the ID codes,
perform the following procedure.
1 Park the vehicle in a safe
place, wait for approximately
20 minutes, and then start
the engine. 2
Press or of the meter
control switches on the steer-
ing wheel and select .
3 Press or of the meter
control switches and select
“Vehicle Settings”, and then
press and hold .
4 Press or of the meter
control switches and select
“TPWS”, and then press .
5 Press or of the meter
control switches and select
“Change Wheel”. Then press
and hold until the tire
pressure warning light starts
slowly blinking 3 times.
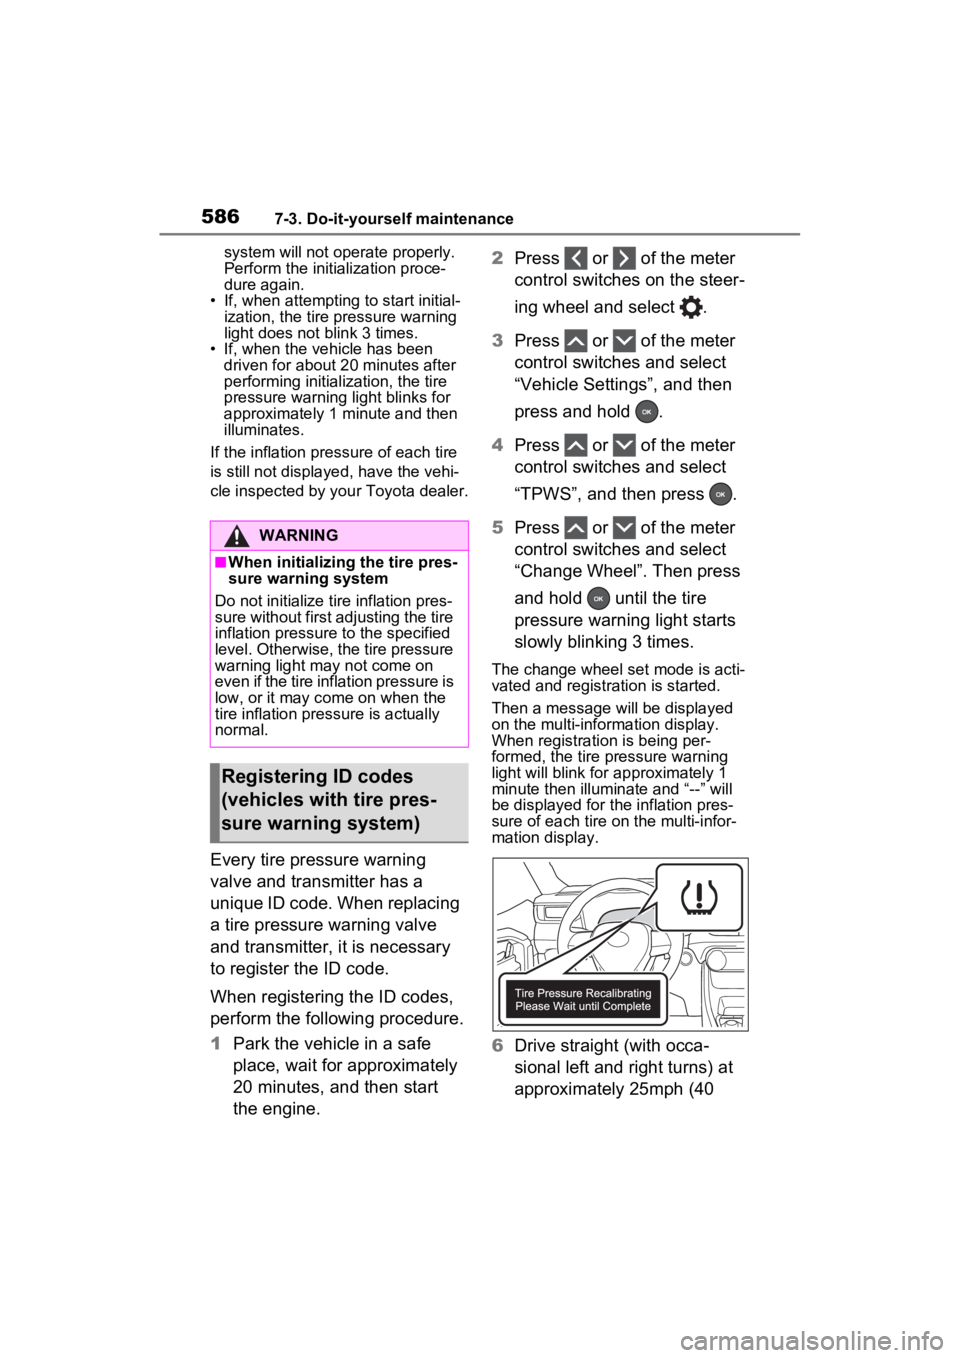
The change wheel set mode is acti-
vated and registra tion is started.
Then a message will be displayed
on the multi-information display.
When registration is being per-
formed, the tire pressure warning
light will blink for approximately 1
minute then illuminate and “--” will
be displayed for the inflation pres-
sure of each tire on the multi-infor-
mation display.
6 Drive straight (with occa-
sional left and right turns) at
approximately 25mph (40
WARNING
■When initializing the tire pres-
sure warning system
Do not initialize tire inflation pres-
sure without first adjusting the tire
inflation pressure to the specified
level. Otherwise, the tire pressure
warning light may not come on
even if the tire inflation pressure is
low, or it may c ome on when the
tire inflation pressure is actually
normal.
Registering ID codes
(vehicles with tire pres-
sure warning system)
Page 587 of 748

5877-3. Do-it-yourself maintenance
7
Maintenance and care
km/h) or more for approxi-
mately 10 to 30 minutes.
When registration is completed, the
tire pressure warning light will go off
and the inflation pressure of each
tire will be displayed on the multi-
information display.
Even if the vehicle is not driven at
approximately 25 mph (40 km/h) or
more, registration can be com-
pleted by driving for a long time.
However, if registration does not
complete after driving for 1 hour or
more, perform the procedure again
from the beginning.
7 Initialize the tire pressure
warning system. ( P.584)
■When registering ID codes
●ID code registration is performed
while driving at a vehicle speed of
approximately 25 mph (40 km/h)
or more.
●Before performin g ID code regis-
tration, make sure that no wheels
with tire pressur e warning valve
and transmitters installed are near
the vehicle.
●Make sure to initialize the tire
pressure warning system after
registering the ID codes. If the
system is initializ ed before regis-
tering the ID codes, the initialized
values will be invalid.
●ID codes can be registered by
yourself, but depending on the
driving conditions and driving
environment, registration may
take some time to complete.
●As the tires will be warm when
registration is completed, make
sure to allow the tires to cool
before performing initialization.
■Canceling ID code registration
●To cancel ID code registration
after it has been started, turn the
engine switch to OFF before driv-
ing the vehicle. If the vehicle is driven after ID code registration is
started, to cancel registration, per-
form the ID code registration start
procedure again and turn the
engine switch to OFF before driv-
ing.
●If ID code registration has been
canceled, the tire pressure warn-
ing light will blin
k for approxi-
mately 1 minute when the engine
switch is turned to ON and then
illuminate. The tire pressure warn-
ing system will be operational
when the tire pressure warning
light turns off.
●If the warning lig ht does not turn
off even after several minutes
have elapsed, ID code registration
may not have been canceled cor-
rectly. To cancel registration, per-
form the ID code registration start
procedure again and then turn the
engine switch to OFF before driv-
ing.
■If ID codes are not registered
properly
In the following situations, ID code
registration may take longer than
usual to be completed or may not be
possible. Norma lly, registration
completes within approximately 30
minutes.
If ID code registration is not com-
plete after driving for approximately
30 minutes, continue driving for a
while.
• Vehicle is not pa rked for approxi-
mately 20 minutes or more before
driving
• Vehicle is not driven at approxi- mately 25 mph (40 km/h) or more
• Vehicle is driven on unpaved roads
• Vehicle is driven near other vehi- cles and system cannot recog-
nize tire pressure warning valve
and transmitters o f your vehicle
over those of other vehicles
• Wheel with tire p ressure warning
valve and transmitter installed is
Page 592 of 748
5927-3. Do-it-yourself maintenance
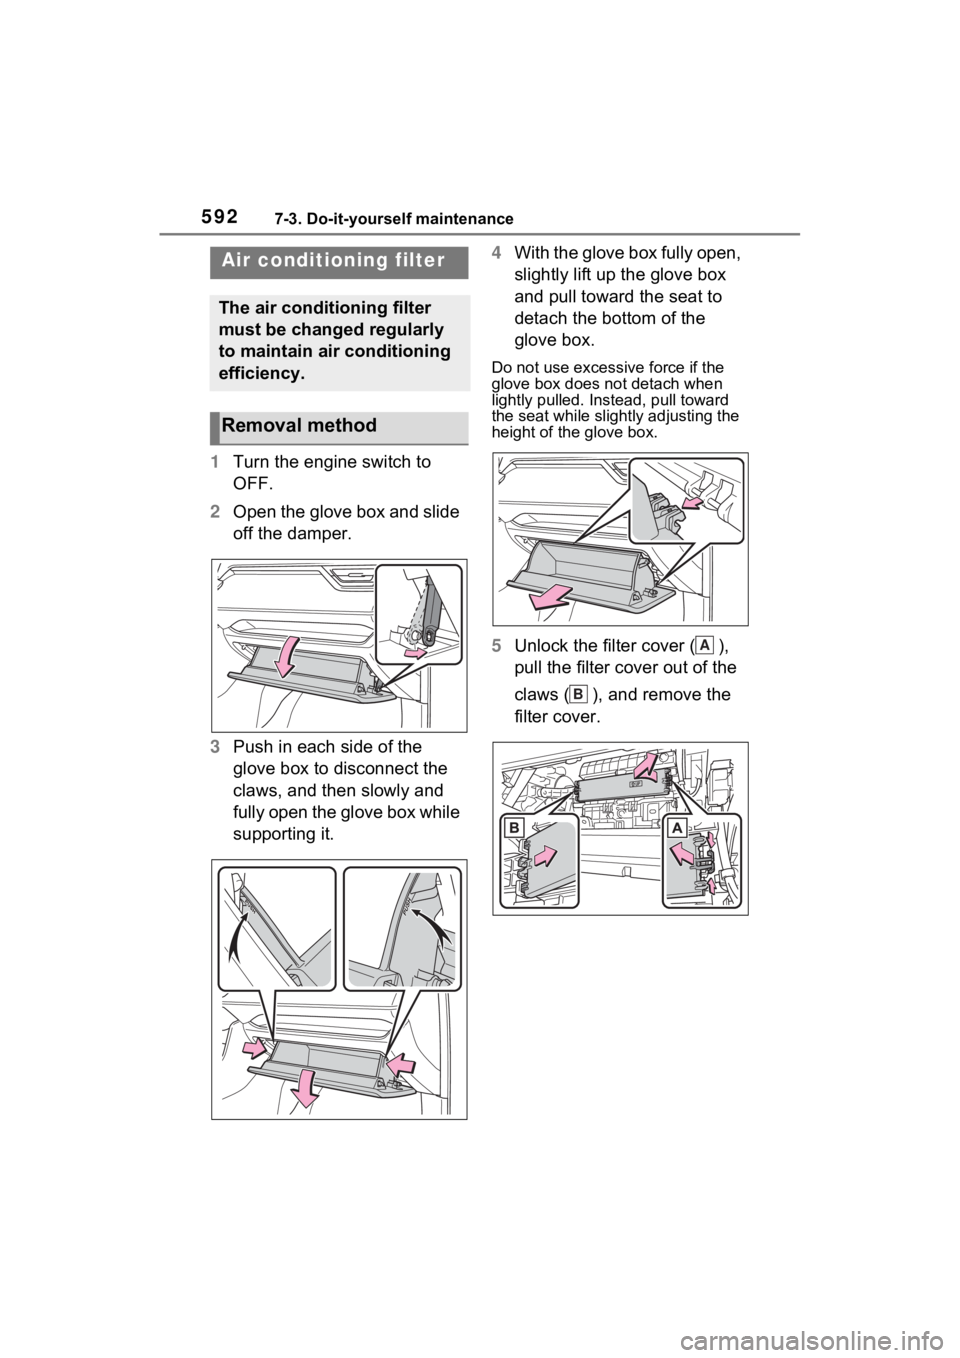
1Turn the engine switch to
OFF.
2 Open the glove box and slide
off the damper.
3 Push in each side of the
glove box to disconnect the
claws, and then slowly and
fully open the glove box while
supporting it. 4
With the glove box fully open,
slightly lift up the glove box
and pull toward the seat to
detach the bottom of the
glove box.
Do not use excessi ve force if the
glove box does not detach when
lightly pulled. Ins tead, pull toward
the seat while slightly adjusting the
height of the glove box.
5 Unlock the filter cover ( ),
pull the filter cover out of the
claws ( ), and remove the
filter cover.
Air condition ing filter
The air conditioning filter
must be changed regularly
to maintain air conditioning
efficiency.
Removal method
A
B
Page 600 of 748
6007-3. Do-it-yourself maintenance
1Turn the engine switch to
OFF.
2 Open the fuse box cover.
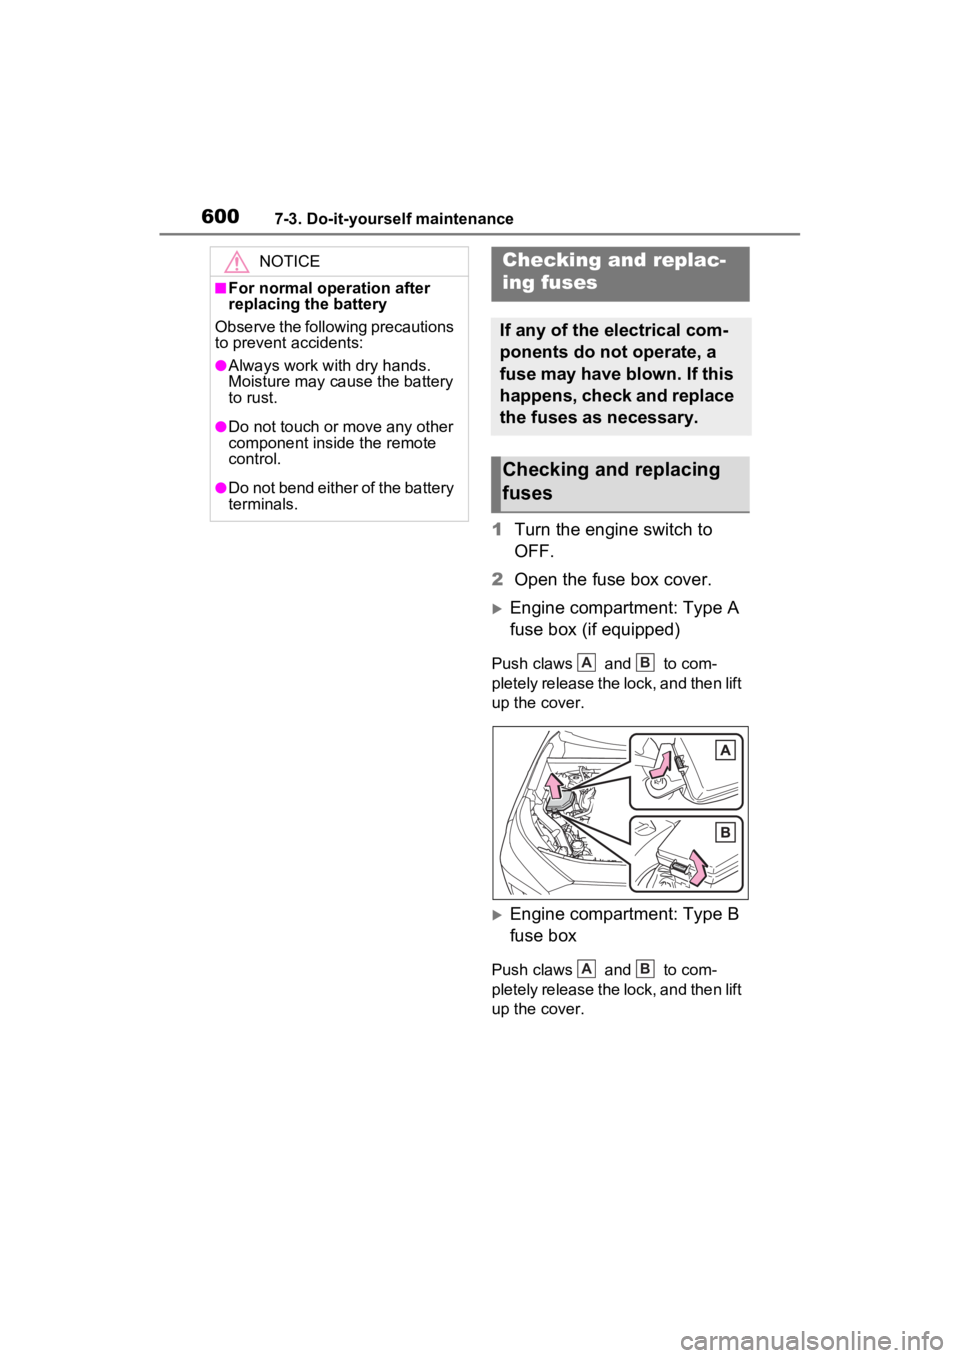
Engine compartment: Type A
fuse box (if equipped)
Push claws and to com-
pletely release the lock, and then lift
up the cover.
Engine compartment: Type B
fuse box
Push claws and to com-
pletely release the lock, and then lift
up the cover.
NOTICE
■For normal operation after
replacing the battery
Observe the following precautions
to prevent accidents:
●Always work with dry hands.
Moisture may cau se the battery
to rust.
●Do not touch or move any other
component inside the remote
control.
●Do not bend either of the battery
terminals.
Checking and replac-
ing fuses
If any of the electrical com-
ponents do not operate, a
fuse may have blown. If this
happens, check and replace
the fuses as necessary.
Checking and replacing
fuses
AB
AB
Page 602 of 748
6027-3. Do-it-yourself maintenance
■After a fuse is replaced
●When installing the lid, make sure
that the tab is installed securely.
●If the lights do not turn on even
after the fuse has been replaced,
a bulb may need replacement.
( P.604)
●If the replaced fuse blows again,
have the vehicle inspected by
your Toyota dealer.
■If there is an overload in a cir-
cuit
The fuses are designed to blow,
protecting the wiring harness from
damage.
WARNING
■To prevent system break-
downs and vehicle fire
Observe the following precau-
tions.
Failure to do so may cause dam-
age to the vehicle, and possibly a
fire or injury.
●Never use a fuse of a higher
amperage rating than that indi-
cated, or use any other object in
place of a fuse.
●Always use a genuine Toyota
fuse or equivalent.
Never replace a fuse with a
wire, even as a temporary fix.
●Do not modify the fuses or fuse
boxes.
NOTICE
■Before replacing fuses
Have the cause of electrical over-
load determined and repaired by
your Toyota dealer as soon as
possible.
■To prevent damage to the
engine compartment fuse box
cover
When opening the fuse box, com-
pletely release the claw locks
before lifting up the cover. Other-
wise, the claws may be damaged.
Page 611 of 748

611
8
8
When trouble arises
When trouble arises
8-1. Essential informationEmergency flashers .... 612
If your vehicle has to be stopped in an emergency.................................. 612
If the vehicle is submerged or water on the road is ris-
ing ............................. 613
8-2. Steps to take in an emer- gency
If your vehicle needs to be towed......................... 615
If you think something is wrong ........................ 620
Fuel pump shut off system .................................. 621
If a warning light turns on or a warning buzzer sounds.................................. 622
If a warning message is dis- played........................ 633
If you have a flat tire.... 637
If the engine will not start .................................. 646
If you lose your keys ... 648
If the electronic key does not operate properly (vehi-
cles with smart key sys-
tem) ........................... 648
If the vehicle battery is dis- charged ..................... 650
If your vehicle overheats .................................. 654If the vehicle becomes stuck
.................................. 656
Page 612 of 748
6128-1. Essential information
8-1.Essential information
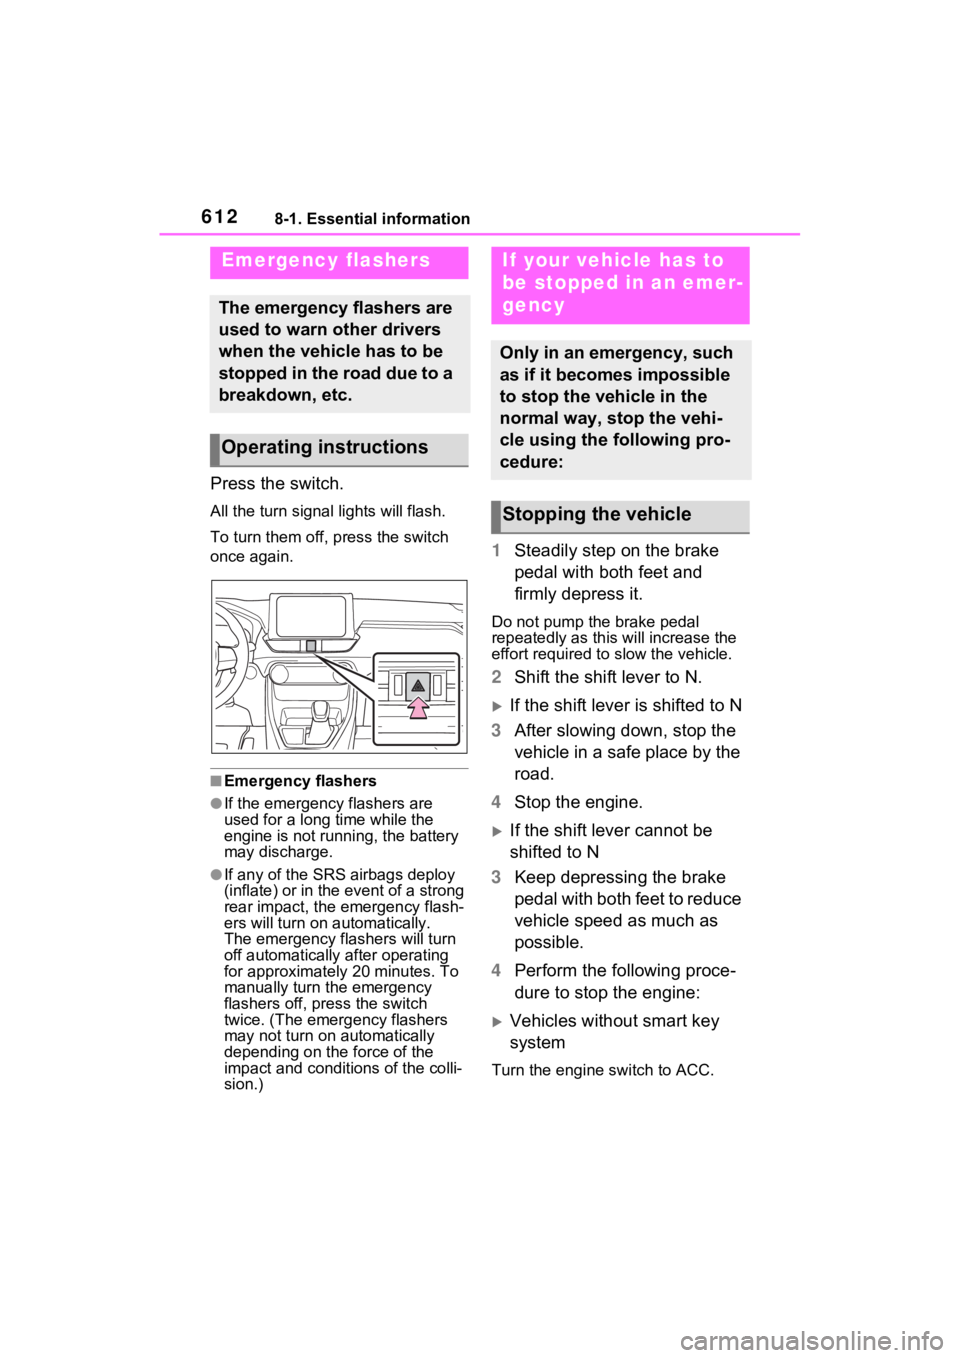
Press the switch.
All the turn signal lights will flash.
To turn them off, press the switch
once again.
■Emergency flashers
●If the emergency flashers are
used for a long time while the
engine is not running, the battery
may discharge.
●If any of the SRS airbags deploy
(inflate) or in the event of a strong
rear impact, the emergency flash-
ers will turn on automatically.
The emergency flashers will turn
off automatically after operating
for approximatel y 20 minutes. To
manually turn t he emergency
flashers off, press the switch
twice. (The emergency flashers
may not turn on automatically
depending on the force of the
impact and conditions of the colli-
sion.)
1 Steadily step on the brake
pedal with both feet and
firmly depress it.
Do not pump the brake pedal
repeatedly as this will increase the
effort required to slow the vehicle.
2Shift the shift lever to N.
If the shift lever is shifted to N
3 After slowing down, stop the
vehicle in a safe place by the
road.
4 Stop the engine.
If the shift lever cannot be
shifted to N
3 Keep depressing the brake
pedal with both feet to reduce
vehicle speed as much as
possible.
4 Perform the following proce-
dure to stop the engine:
Vehicles without smart key
system
Turn the engine switch to ACC.
Emergency flashers
The emergency flashers are
used to warn other drivers
when the vehicle has to be
stopped in the road due to a
breakdown, etc.
Operating instructions
If your vehicle has to
be stopped in an emer-
gency
Only in an emergency, such
as if it becomes impossible
to stop the vehicle in the
normal way, stop the vehi-
cle using the following pro-
cedure:
Stopping the vehicle