USB TOYOTA RAV4 EV 2012 1.G Navigation Manual
[x] Cancel search | Manufacturer: TOYOTA, Model Year: 2012, Model line: RAV4 EV, Model: TOYOTA RAV4 EV 2012 1.GPages: 296, PDF Size: 4.04 MB
Page 7 of 296
7
1
2
3
4
5
6
7
8
1. PHONE OPERATION .................... 122
QUICK REFERENCE .......................... 122
PHONE (HANDS-FREE SYSTEM FOR CELLULAR PHONE)......................... 124
REGISTER A Bluetooth
® PHONE ....... 128
CALL ON THE Bluetooth® PHONE ..... 132
RECEIVE ON THE Bluetooth
® PHONE ........................... 138
TALK ON THE Bluetooth® PHONE ..... 139
Bluetooth® PHONE MESSAGE
FUNCTION........................................ 141
2. SETUP ........................................... 144
PHONE SETTINGS ............................. 144
Bluetooth® SETTINGS ........................ 164
1. AUDIO SYSTEM OPERATION ................................ 176
QUICK REFERENCE .......................... 176
SOME BASICS .................................... 177
RADIO OPERATION ........................... 182
HD Radio™ TECHNOLOGY
INFORMATION ................................. 186
RADIO OPERATION (XM Satellite Radio BROADCAST) ... 190
RADIO OPERATION (INTERNET RADIO BROADCAST) ...................... 195
USB MEMORY OPERATION .............. 196
iPod OPERATION ............................... 201
Bluetooth
® AUDIO OPERATION ......... 205
AUDIO REMOTE CONTROLS (STEERING SWITCHES) ................. 213
AUDIO SYSTEM OPERATING HINTS ......................... 214
2. SETUP ........................................... 220
AUDIO SETTINGS .............................. 220
1. VOICE COMMAND SYSTEM OPERATION................................ 224
VOICE COMMAND SYSTEM .............. 224
NATURAL SPEECH INFORMATION
(ENGLISH ONLY) ............................. 230
EXPANDED VOICE COMMANDS....... 231
COMMAND LIST ................................. 232
1. INFORMATION DISPLAY ............. 236
MAP DATABASE VERSION AND COVERAGE AREA ........................... 236
2. XM FUNCTION-O VERVIEW ......... 238
XM SERVICES .................................... 238
3. XM FUNCTION OPERATION ....... 239
XM Sports ............................................ 239
XM Stocks ............................................ 242
XM NavWeather™ ............................... 244
XM NavTraffic
®.................................... 247
4. SETUP........................................... 250
XM SETTINGS..................................... 250
4PHONE
5AUDIO SYSTEM
6VOICE COMMAND SYSTEM
7INFORMATION
Page 174 of 296
174
1. QUICK REFERENCE .................. 176
2. SOME BASICS ............................ 177
VOICE COMMAND SYSTEM .............. 177
AUDIO SPLIT SCREEN DISPLAY ....... 177
TURNING THE SYSTEM ON AND OFF..................................... 177
SWITCHING BETWEEN FUNCTIONS ...................................... 178
DSP CONTROL ................................... 178
TONE AND BALANCE ......................... 179
AUX PORT ........................................... 180
USB PORT ........................................... 181
3. RADIO OPERATION ... ................ 182
LISTENING TO THE RADIO ................ 182
PRESETTING A STATION .................. 183
SELECTING A STATION ..................... 183
RADIO BROADCAST
DATA SYSTEM ................................. 184
TRAFFIC ANNOUNCEMENT .............. 185
4. HD Radio™ TECHNOLOGY INFORMATION ......................... 186
USING HD Radio™ TECHNOLOGY.... 186
AVAILABLE HD Radio™
TECHNOLOGY.................................. 187
TROUBLESHOOTING GUIDE ............. 188
1AUDIO SYSTEM OPERATION
5
AUDIO SYSTEM
Page 175 of 296
5
175
1
2
3
4
5
6
7
8
5. RADIO OPERATION(XM Satellite Radio
BROADCAST) ........... ................ 190
HOW TO SUBSCRIBE TO AN
XM Satellite Radio............................. 190
DISPLAYING THE RADIO ID .............. 190
LISTENING TO SATELLITE RADIO ... 191
CHANNEL CATEGORY ...................... 191
PRESETTING A CHANNEL ................ 191
SELECTING A CHANNEL ................... 192
DISPLAYING THE TITLE AND NAME ................................................ 192
IF THE SATELLITE RADIO TUNER MALFUNCTIONS .............................. 193
6. RADIO OPERATION (INTERNET RADIO BROADCAST)............... 195
LISTENING TO INTERNET RADIO .... 195
7. USB MEMORY OPERATION ...... 196
CONNECTING A USB MEMORY ....... 196
PLAYING A USB MEMORY ................ 197
8. iPod OPERATION ....................... 201
CONNECTING iPod ............................ 201
PLAYING iPod ..................................... 202
9. Bluetooth® AUDIO
OPERATION ............................. 205
CONNECTING A Bluetooth®
AUDIO PLAYER ................................ 207
PLAYING Bluetooth
® AUDIO ............... 209
10. AUDIO REMOTE CONTROLS (STEERING SWITCHES) .......... 213
11. AUDIO SYSTEM OPERATING HINTS.................. 214
RADIO RECEPTION............................ 214
iPod ...................................................... 215
USB MEMORY .................................... 215
MP3/WMA FILES ................................. 215
TERMS ................................................ 217
1. AUDIO SETTINGS ...................... 220
HD Radio™ SYSTEM SETTINGS ....... 220
iPod SETTINGS ................................... 221
2SETUP
AUDIO SYSTEM
Page 178 of 296
178
1. AUDIO SYSTEM OPERATION
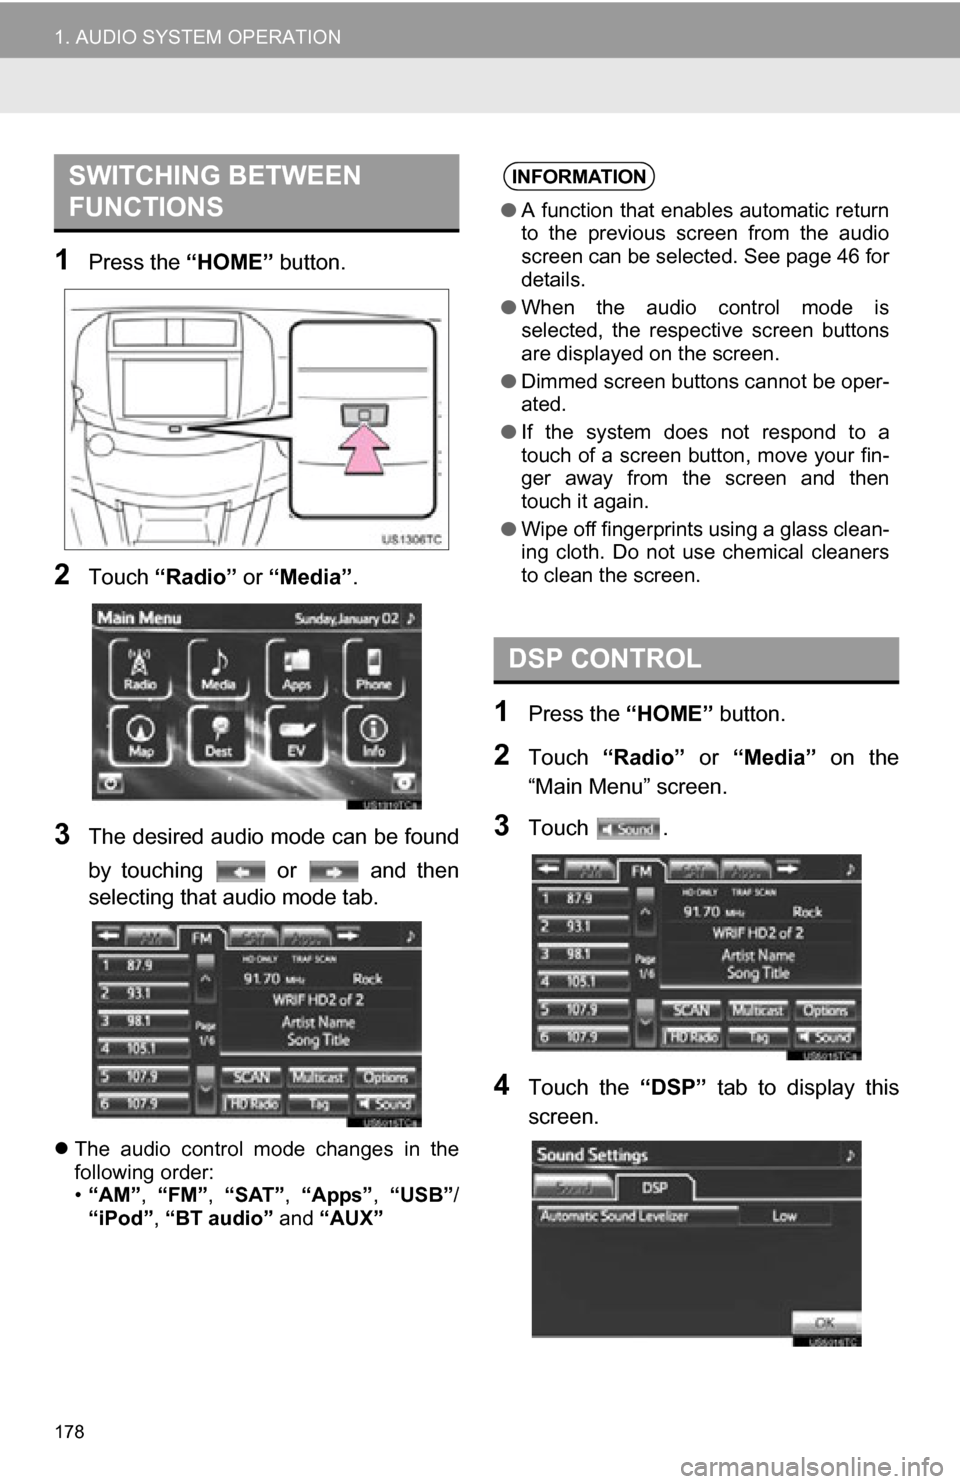
1Press the “HOME” button.
2Touch “Radio” or “Media”.
3The desired audio mode can be found
by touching or and then
selecting that audio mode tab.
The audio control mode changes in the
following order:
•“AM”, “FM”, “SAT”, “Apps” , “USB” /
“iPod” , “BT audio” and “AUX”
1Press the “HOME” button.
2Touch “Radio” or “Media” on the
“Main Menu” screen.
3Touch .
4Touch the “DSP” tab to display this
screen.
SWITCHING BETWEEN
FUNCTIONSINFORMATION
● A function that enables automatic return
to the previous screen from the audio
screen can be selected. See page 46 for
details.
● When the audio control mode is
selected, the respective screen buttons
are displayed on the screen.
● Dimmed screen buttons cannot be oper-
ated.
● If the system does not respond to a
touch of a screen button, move your fin-
ger away from the screen and then
touch it again.
● Wipe off fingerprints using a glass clean-
ing cloth. Do not use chemical cleaners
to clean the screen.
DSP CONTROL
Page 181 of 296
181
1. AUDIO SYSTEM OPERATION
5
AUDIO SYSTEM
1Press the “HOME” button and touch
“Media” to display the audio screen.
Touch the “USB” or “iPod” tab.
USB PORT
A USB memory/iPod can be connect-
ed to the USB port. For details, see
“CONNECTING A USB MEMORY” on
page 196 and “CONNECTING iPod”
on page 201.
INFORMATION
●When a USB memory/iPod is not con-
nected with the USB port, the tab will be
dimmed.
Page 195 of 296
195
1. AUDIO SYSTEM OPERATION
5
AUDIO SYSTEM
6. RADIO OPERATION (INTERNET RADIO BROADCAST)
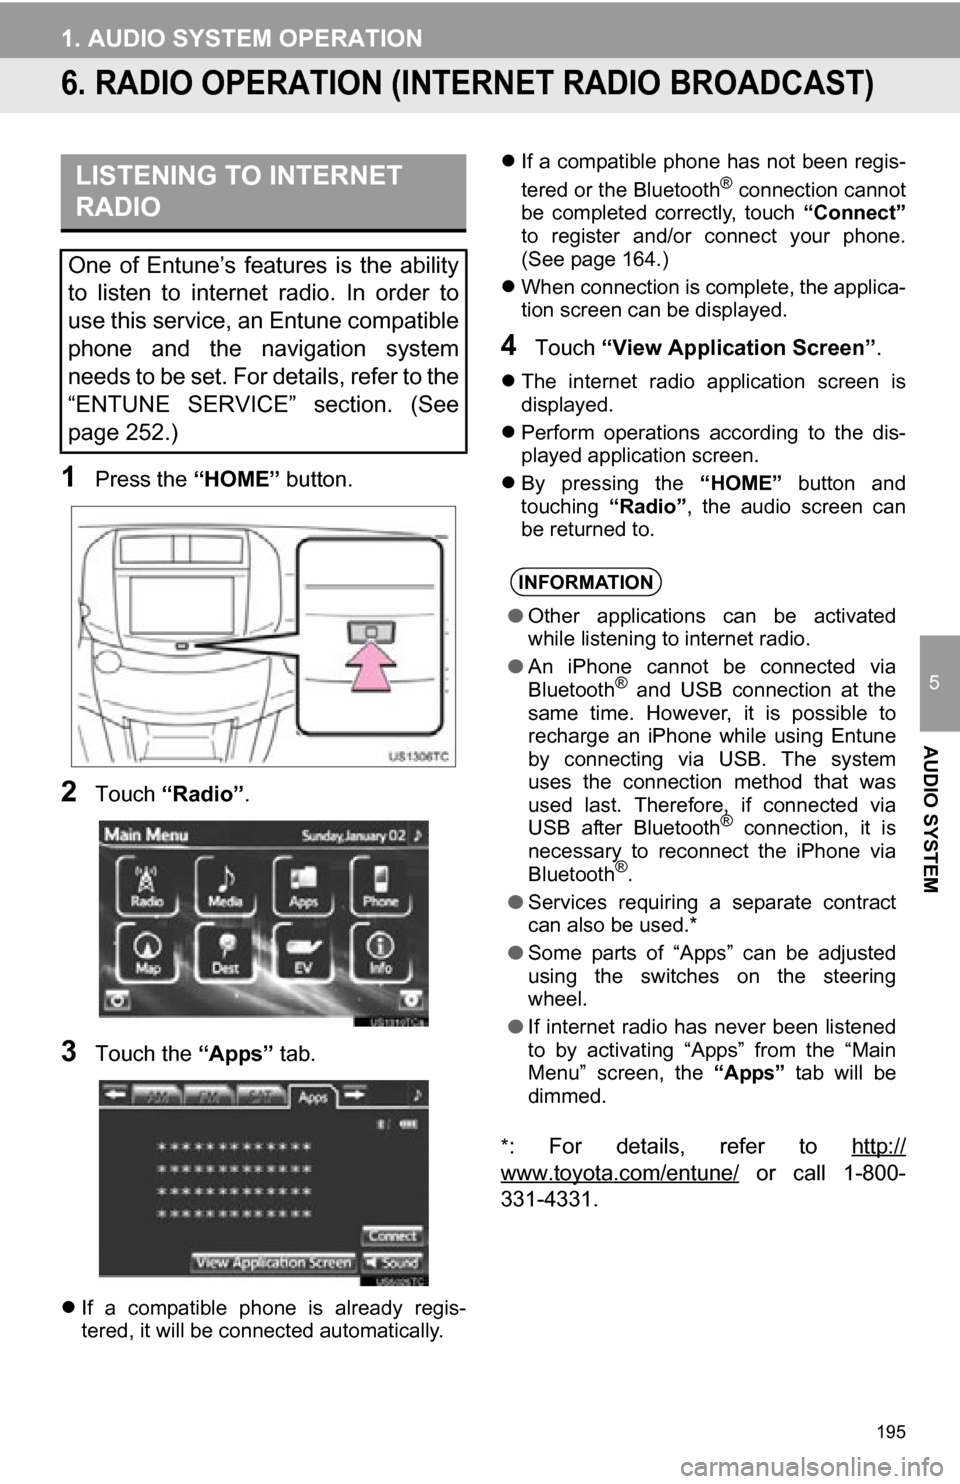
1Press the “HOME” button.
2Touch “Radio” .
3Touch the “Apps” tab.
If a compatible phone is already regis-
tered, it will be connected automatically.
If a compatible phone has not been regis-
tered or the Bluetooth
® connection cannot
be completed correctly, touch “Connect”
to register and/or connect your phone.
(See page 164.)
When connection is complete, the applica-
tion screen can be displayed.
4Touch “View Application Screen” .
The internet radio application screen is
displayed.
Perform operations according to the dis-
played application screen.
By pressing the “HOME” button and
touching “Radio”, the audio screen can
be returned to.
*
: For details, refer to http://
www.toyota.com/entune/ or call 1-800-
331-4331.
LISTENING TO INTERNET
RADIO
One of Entune’s features is the ability
to listen to internet radio. In order to
use this service, an Entune compatible
phone and the navigation system
needs to be set. For details, refer to the
“ENTUNE SERVICE” section. (See
page 252.)
INFORMATION
● Other applications can be activated
while listening to internet radio.
● An iPhone cannot be connected via
Bluetooth
® and USB connection at the
same time. However, it is possible to
recharge an iPhone while using Entune
by connecting via USB. The system
uses the connection method that was
used last. Therefore, if connected via
USB after Bluetooth
® connection, it is
necessary to reconnect the iPhone via
Bluetooth
®.
● Services requiring a separate contract
can also be used.*
● Some parts of “Apps” can be adjusted
using the switches on the steering
wheel.
● If internet radio has never been listened
to by activating “Apps” from the “Main
Menu” screen, the “Apps” tab will be
dimmed.
Page 196 of 296
196
1. AUDIO SYSTEM OPERATION
7. USB MEMORY OPERATION
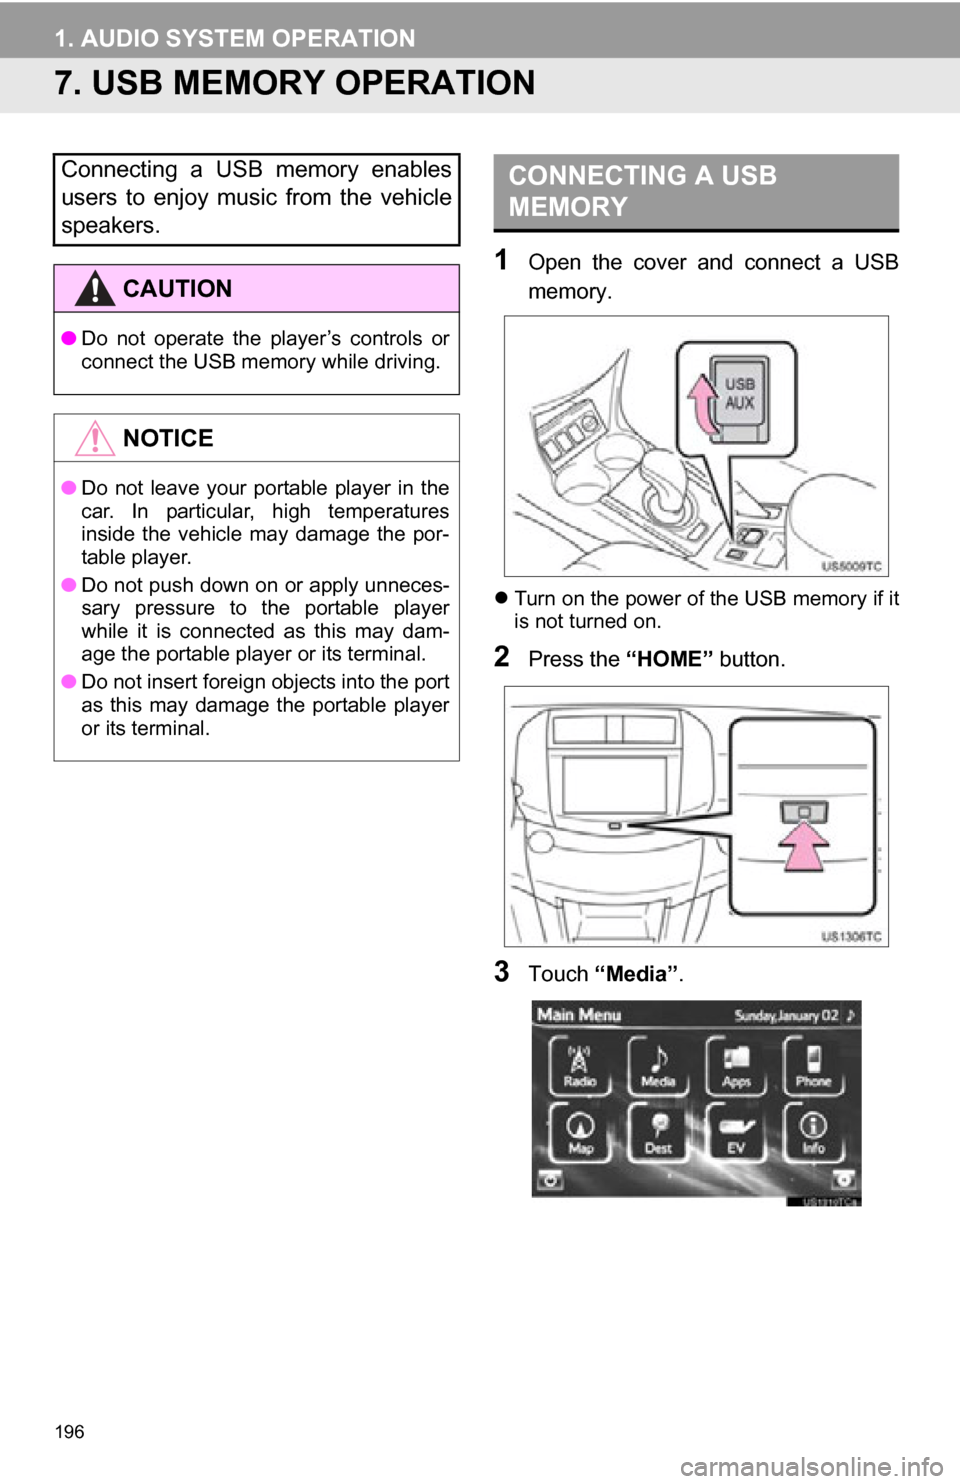
1Open the cover and connect a USB
memory.
Turn on the power of the USB memory if it
is not turned on.
2Press the “HOME” button.
3Touch “Media”.
Connecting a USB memory enables
users to enjoy music from the vehicle
speakers.
CAUTION
●Do not operate the player’s controls or
connect the USB memory while driving.
NOTICE
●Do not leave your portable player in the
car. In particular, high temperatures
inside the vehicle may damage the por-
table player.
● Do not push down on or apply unneces-
sary pressure to the portable player
while it is connected as this may dam-
age the portable player or its terminal.
● Do not insert foreign objects into the port
as this may damage the portable player
or its terminal.
CONNECTING A USB
MEMORY
Page 197 of 296
197
1. AUDIO SYSTEM OPERATION
5
AUDIO SYSTEM
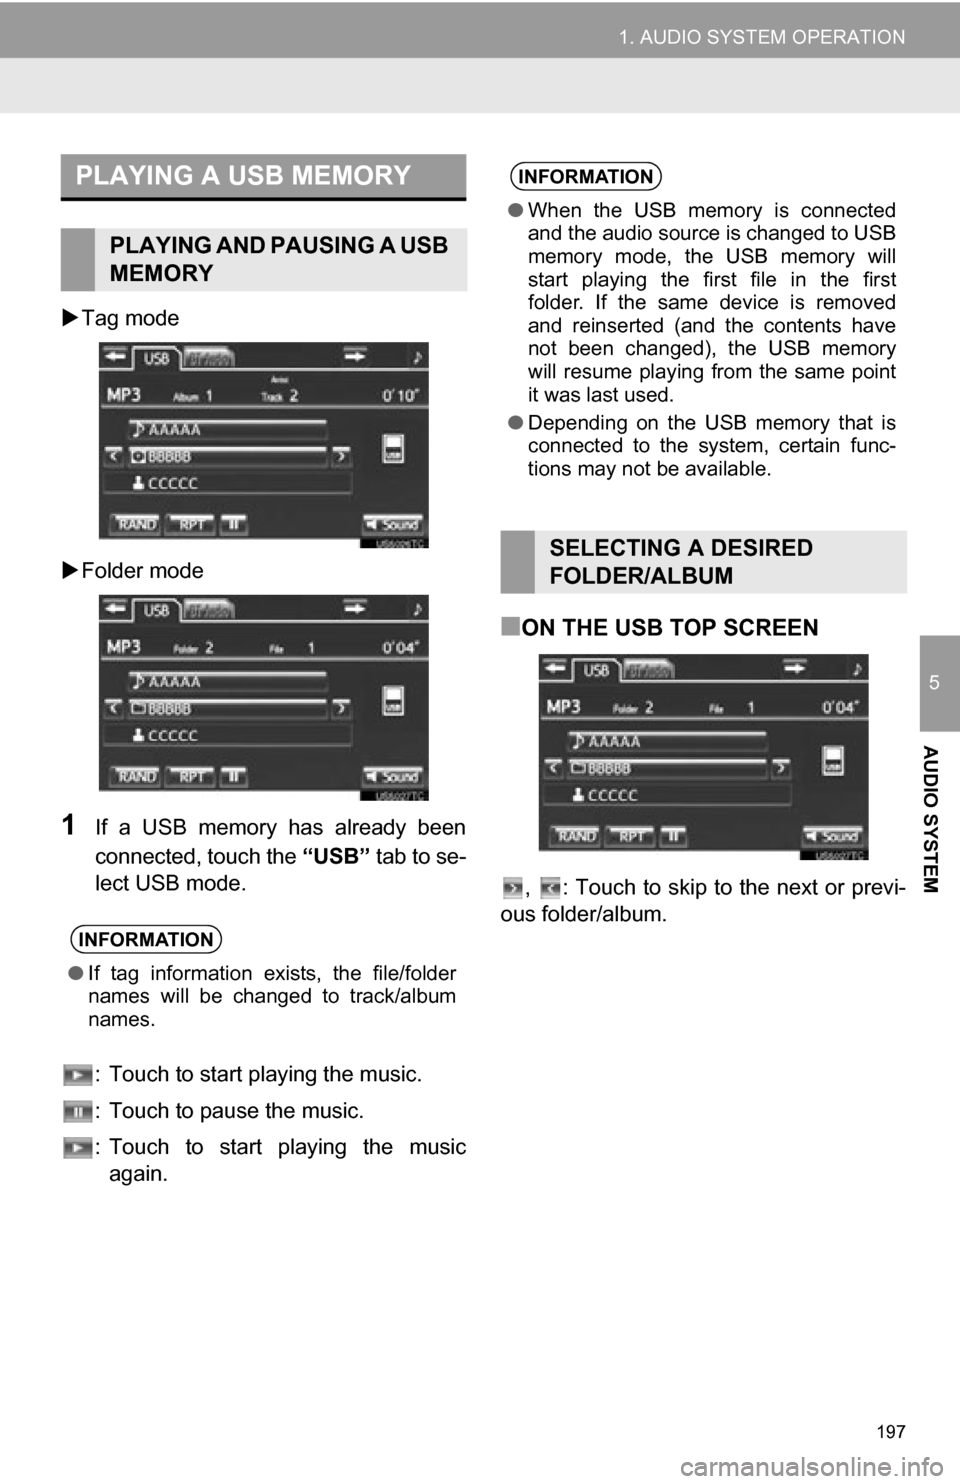
Tag mode
Folder mode
1If a USB memory has already been
connected, touch the “USB” tab to se-
lect USB mode.
: Touch to start playing the music.
: Touch to pause the music.
: Touch to start playing the music again.
■ON THE USB TOP SCREEN
, : Touch to skip to the next or previ-
ous folder/album.
PLAYING A USB MEMORY
PLAYING AND PAUSING A USB
MEMORY
INFORMATION
● If tag information exists, the file/folder
names will be changed to track/album
names.
INFORMATION
●When the USB memory is connected
and the audio source is changed to USB
memory mode, the USB memory will
start playing the first file in the first
folder. If the same device is removed
and reinserted (and the contents have
not been changed), the USB memory
will resume playing from the same point
it was last used.
● Depending on the USB memory that is
connected to the system, certain func-
tions may not be available.
SELECTING A DESIRED
FOLDER/ALBUM
Page 198 of 296
198
1. AUDIO SYSTEM OPERATION
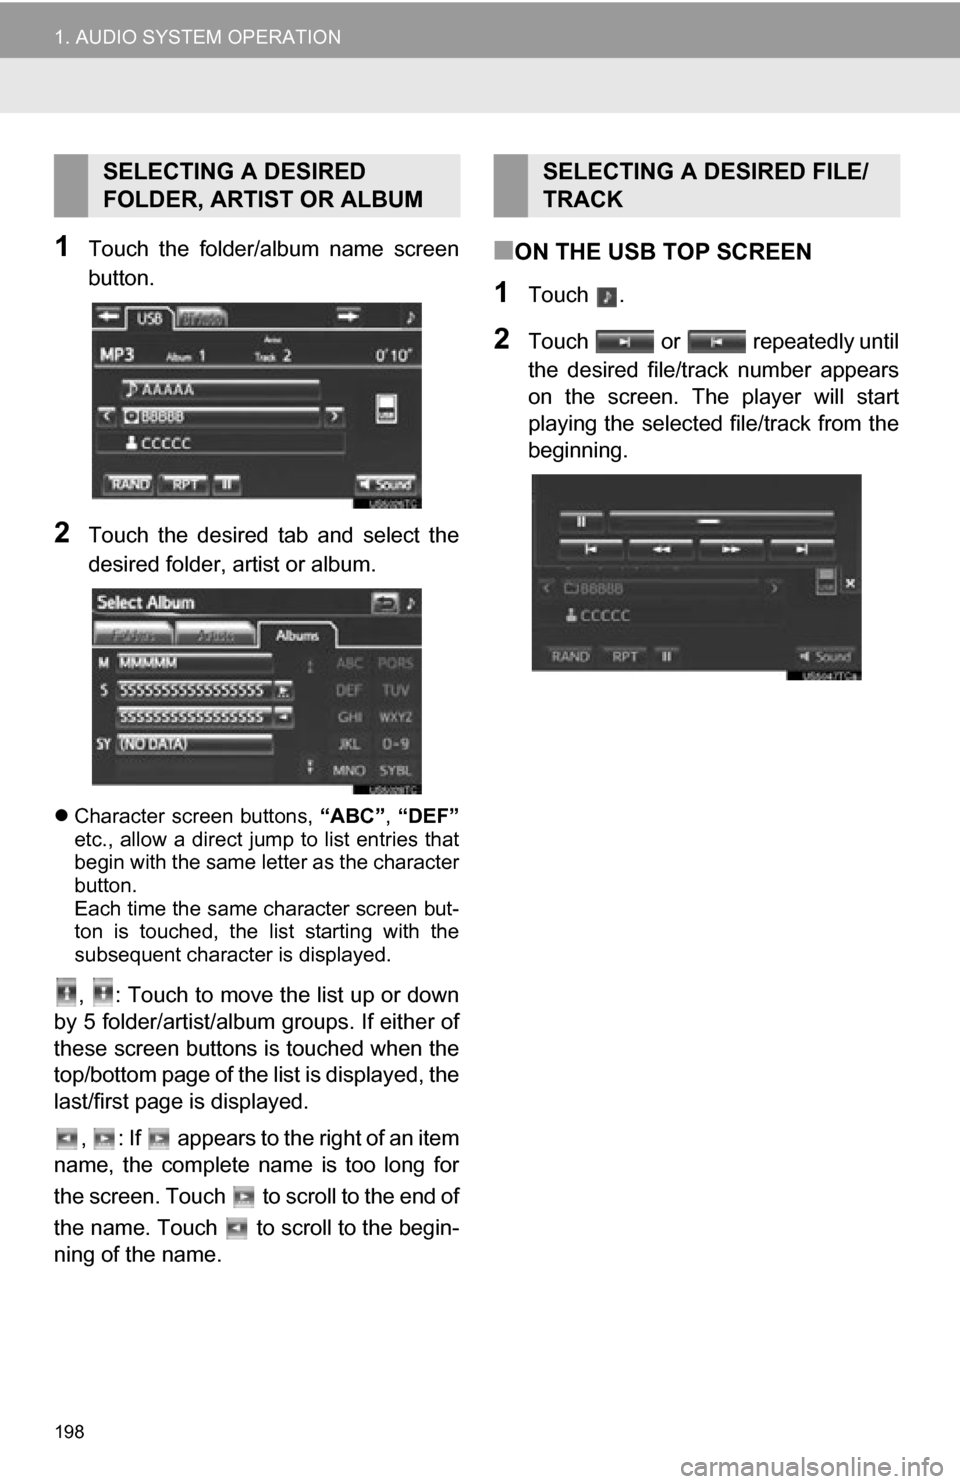
1Touch the folder/album name screen
button.
2Touch the desired tab and select the
desired folder, artist or album.
Character screen buttons, “ABC”, “DEF”
etc., allow a direct jump to list entries that
begin with the same letter as the character
button.
Each time the same character screen but-
ton is touched, the list starting with the
subsequent character is displayed.
, : Touch to move the list up or down
by 5 folder/artist/album groups. If either of
these screen buttons is touched when the
top/bottom page of the lis t is displayed, the
last/first page is displayed.
, : If appears to the right of an item
name, the complete name is too long for
the screen. Touch to scroll to the end of
the name. Touch to scroll to the begin-
ning of the name.
■ON THE USB TOP SCREEN
1Touch .
2Touch or repeatedly until
the desired file/track number appears
on the screen. The player will start
playing the selected file/track from the
beginning.
SELECTING A DESIRED
FOLDER, ARTIST OR ALBUMSELECTING A DESIRED FILE/
TRACK
Page 213 of 296
213
1. AUDIO SYSTEM OPERATION
5
AUDIO SYSTEM
10. AUDIO REMOTE CONTROLS (STEERING SWITCHES)
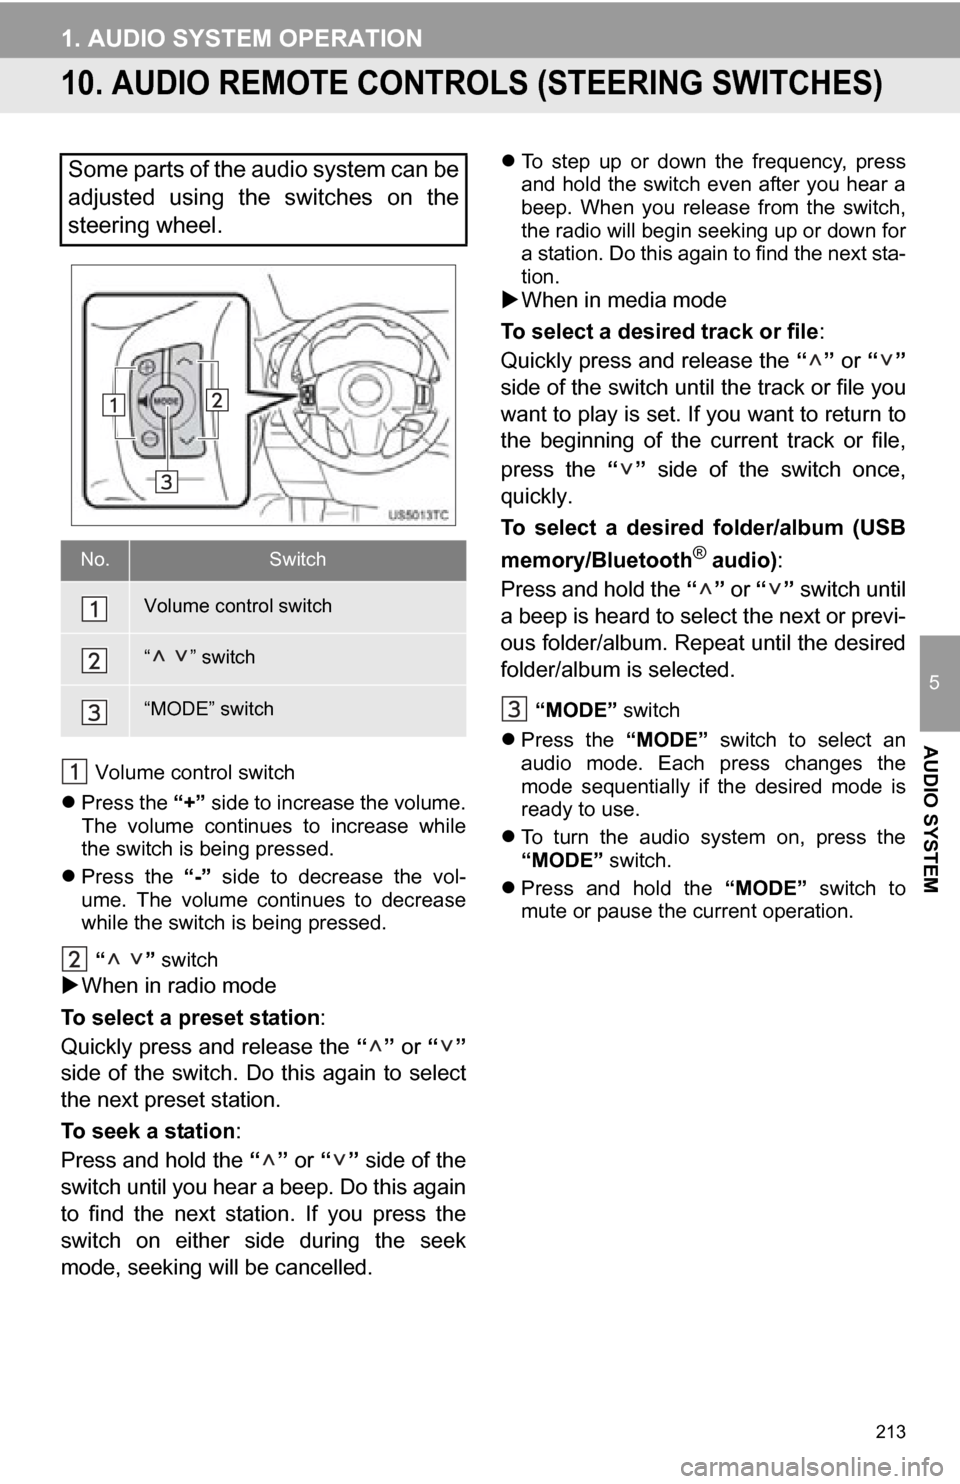
Volume control switch
Press the “+” side to increase the volume.
The volume continues to increase while
the switch is being pressed.
Press the “-” side to decrease the vol-
ume. The volume continues to decrease
while the switch is being pressed.
“ ” switch
When in radio mode
To select a preset station:
Quickly press and release the “” or “”
side of the switch. Do this again to select
the next preset station.
To seek a station :
Press and hold the “” or “” side of the
switch until you hear a beep. Do this again
to find the next station. If you press the
switch on either side during the seek
mode, seeking will be cancelled.
To step up or down the frequency, press
and hold the switch even after you hear a
beep. When you release from the switch,
the radio will begin seeking up or down for
a station. Do this again to find the next sta-
tion.
When in media mode
To select a desired track or file :
Quickly press and release the “” or “”
side of the switch until the track or file you
want to play is set. If you want to return to
the beginning of the current track or file,
press the “” side of the switch once,
quickly.
To select a desired folder/album (USB
memory/Bluetooth
® audio) :
Press and hold the “” or “” switch until
a beep is heard to select the next or previ-
ous folder/album. Repeat until the desired
folder/album is selected.
“MODE” switch
Press the “MODE” switch to select an
audio mode. Each press changes the
mode sequentially if the desired mode is
ready to use.
To turn the audio system on, press the
“MODE” switch.
Press and hold the “MODE” switch to
mute or pause the current operation.
Some parts of the audio system can be
adjusted using the switches on the
steering wheel.
No.Switch
Volume control switch
“ ” switch
“MODE” switch