ESP TOYOTA RAV4 EV 2013 1.G Navigation Manual
[x] Cancel search | Manufacturer: TOYOTA, Model Year: 2013, Model line: RAV4 EV, Model: TOYOTA RAV4 EV 2013 1.GPages: 296, PDF Size: 6.47 MB
Page 130 of 296
130
1. PHONE OPERATION
When the “POWER” switch is in ACCES-
SORY or ON mode, the system searches
for a nearby registered cellular phone.
The system will connect with the phone
that was last connected, if it is nearby.
When “Display Phone Status” is set to
“On” , the connection status is displayed.
(See “Bluetooth
® DEVICE CONNEC-
TION STATUS DISPLAY SETTINGS” on
page 173.)
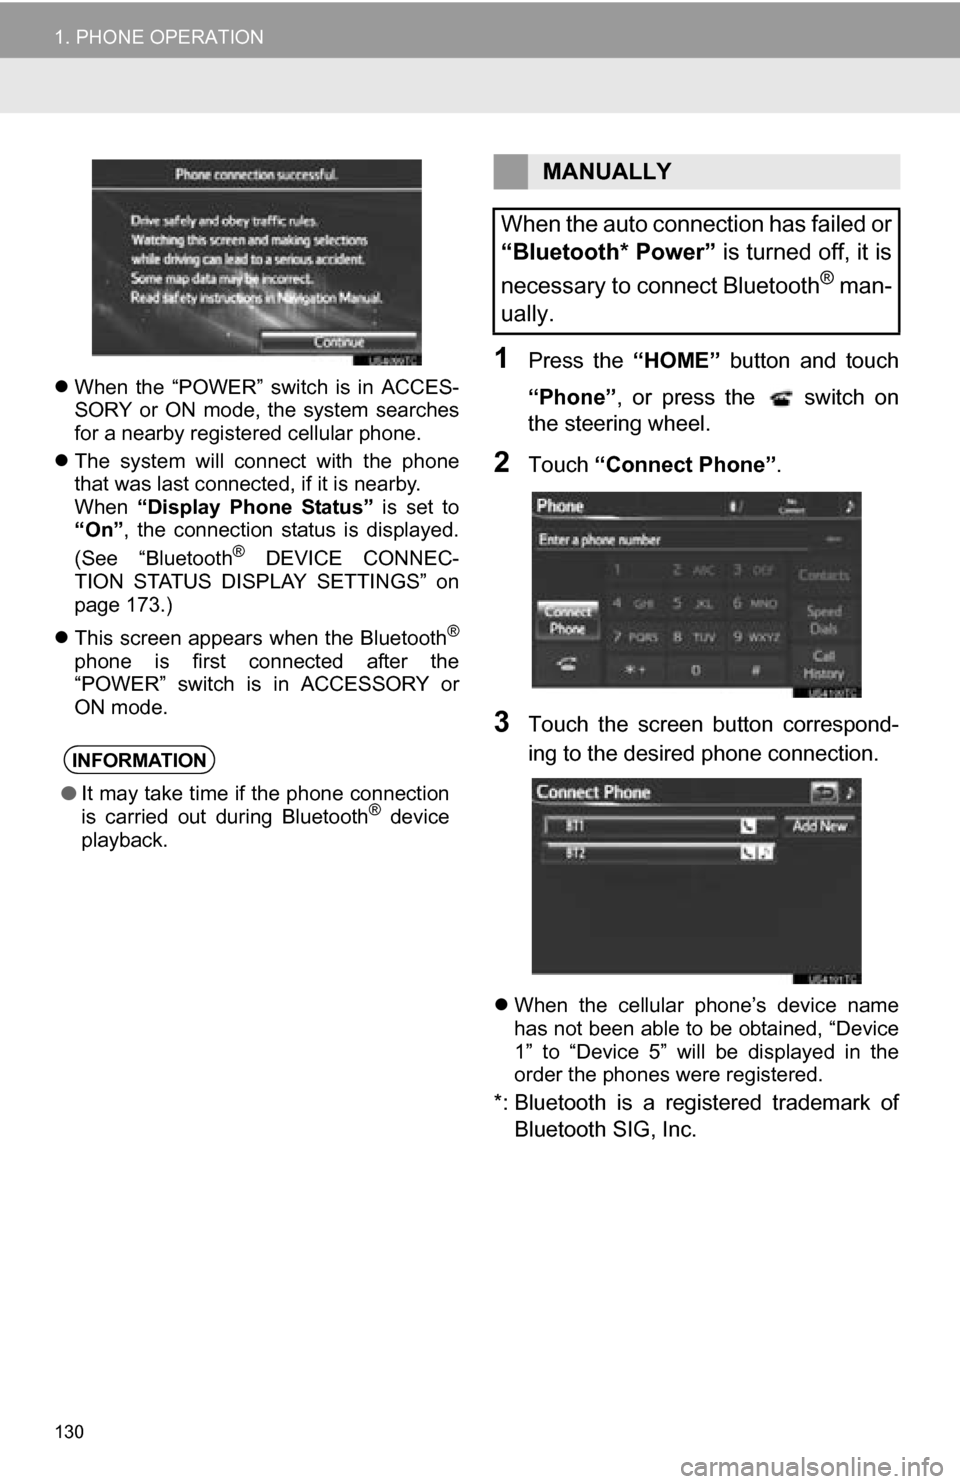
This screen appears when the Bluetooth
®
phone is first connected after the
“POWER” switch is in ACCESSORY or
ON mode.
1Press the “HOME” button and touch
“Phone” , or press the switch on
the steering wheel.
2Touch “Connect Phone” .
3Touch the screen button correspond-
ing to the desired phone connection.
When the cellular phone’s device name
has not been able to be obtained, “Device
1” to “Device 5” will be displayed in the
order the phones were registered.
*: Bluetooth is a registered trademark of
Bluetooth SIG, Inc.
INFORMATION
● It may take time if the phone connection
is carried out during Bluetooth® device
playback.
MANUALLY
When the auto connection has failed or
“Bluetooth* Power” is turned off, it is
necessary to connect Bluetooth
® man-
ually.
Page 141 of 296
141
1. PHONE OPERATION
4
PHONE
7. Bluetooth® PHONE MESSAGE FUNCTION
1Press the “HOME” button and touch
“Phone” , or press the switch on
the steering wheel.
2Touch “Messages” .
When “Message Transfer” is set to
“Off” , a confirmation screen will be dis-
played. Touch “Yes”.
3Touch the screen button correspond-
ing to the desired message.
Messages are displayed in the appropri-
ate connected Bluetooth® phone’s regis-
tered mail address folder. Touch the tab of
the desired folder to be displayed.
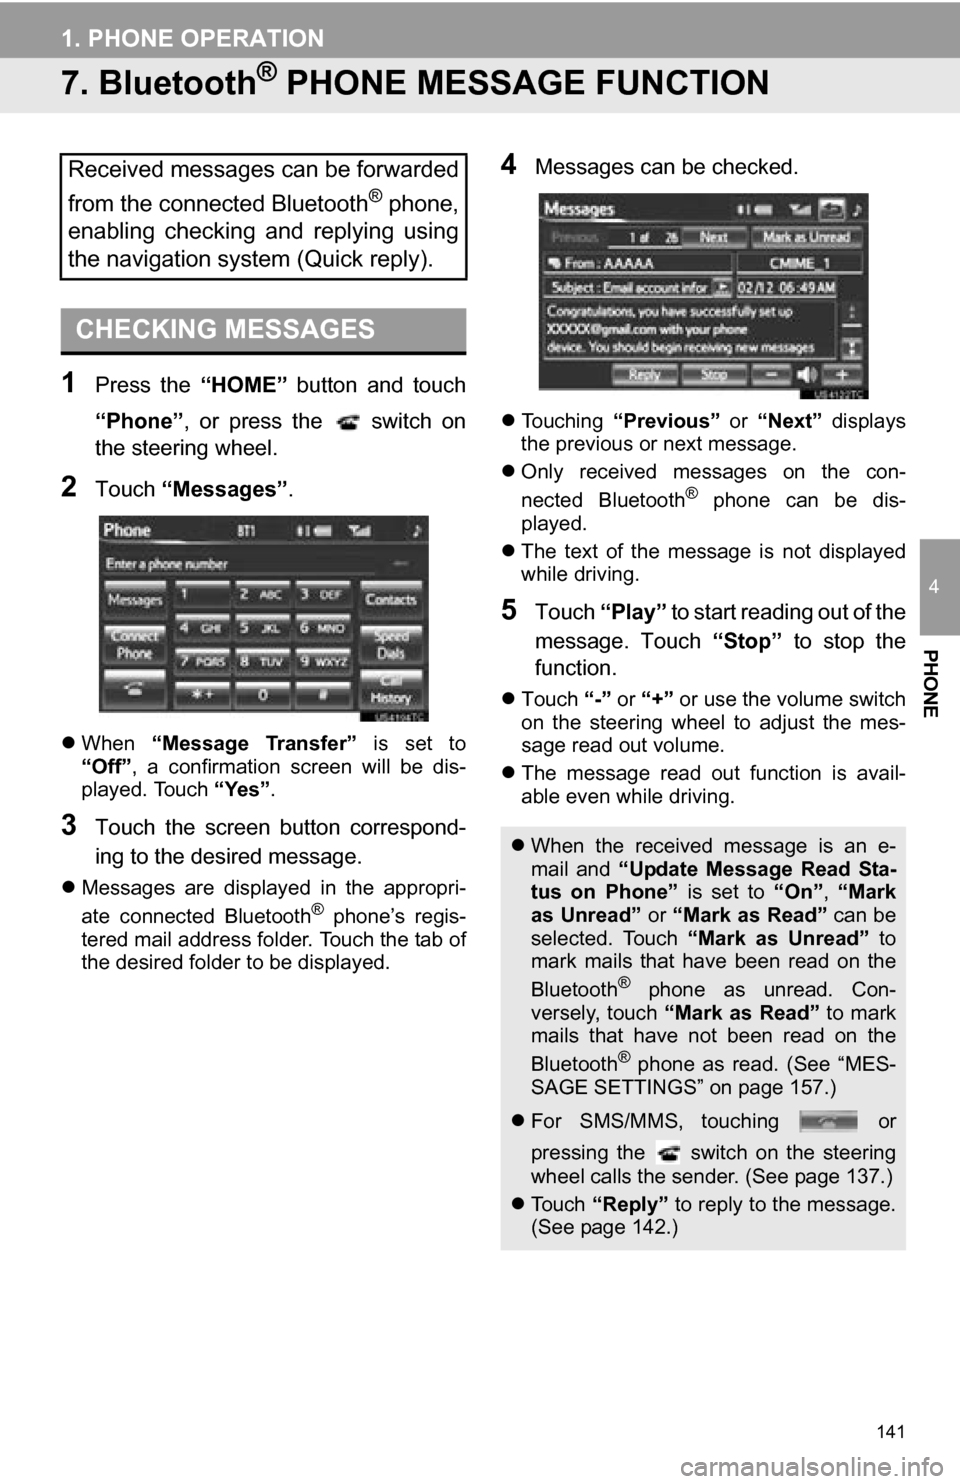
4Messages can be checked.
Touching “Previous” or “Next” displays
the previous or next message.
Only received messages on the con-
nected Bluetooth
® phone can be dis-
played.
The text of the message is not displayed
while driving.
5Touch “Play” to start reading out of the
message. Touch “Stop” to stop the
function.
Touch “-” or “+” or use the volume switch
on the steering wheel to adjust the mes-
sage read out volume.
The message read out function is avail-
able even while driving.
Received messages can be forwarded
from the connected Bluetooth
® phone,
enabling checking and replying using
the navigation system (Quick reply).
CHECKING MESSAGES
When the received message is an e-
mail and “Update Message Read Sta-
tus on Phone” is set to “On”, “Mark
as Unread” or “Mark as Read” can be
selected. Touch “Mark as Unread” to
mark mails that have been read on the
Bluetooth
® phone as unread. Con-
versely, touch “Mark as Read” to mark
mails that have not been read on the
Bluetooth
® phone as read. (See “MES-
SAGE SETTINGS” on page 157.)
For SMS/MMS, touching or
pressing the switch on the steering
wheel calls the sender. (See page 137.)
To u c h “Reply” to reply to the message.
(See page 142.)
Page 142 of 296
142
1. PHONE OPERATION
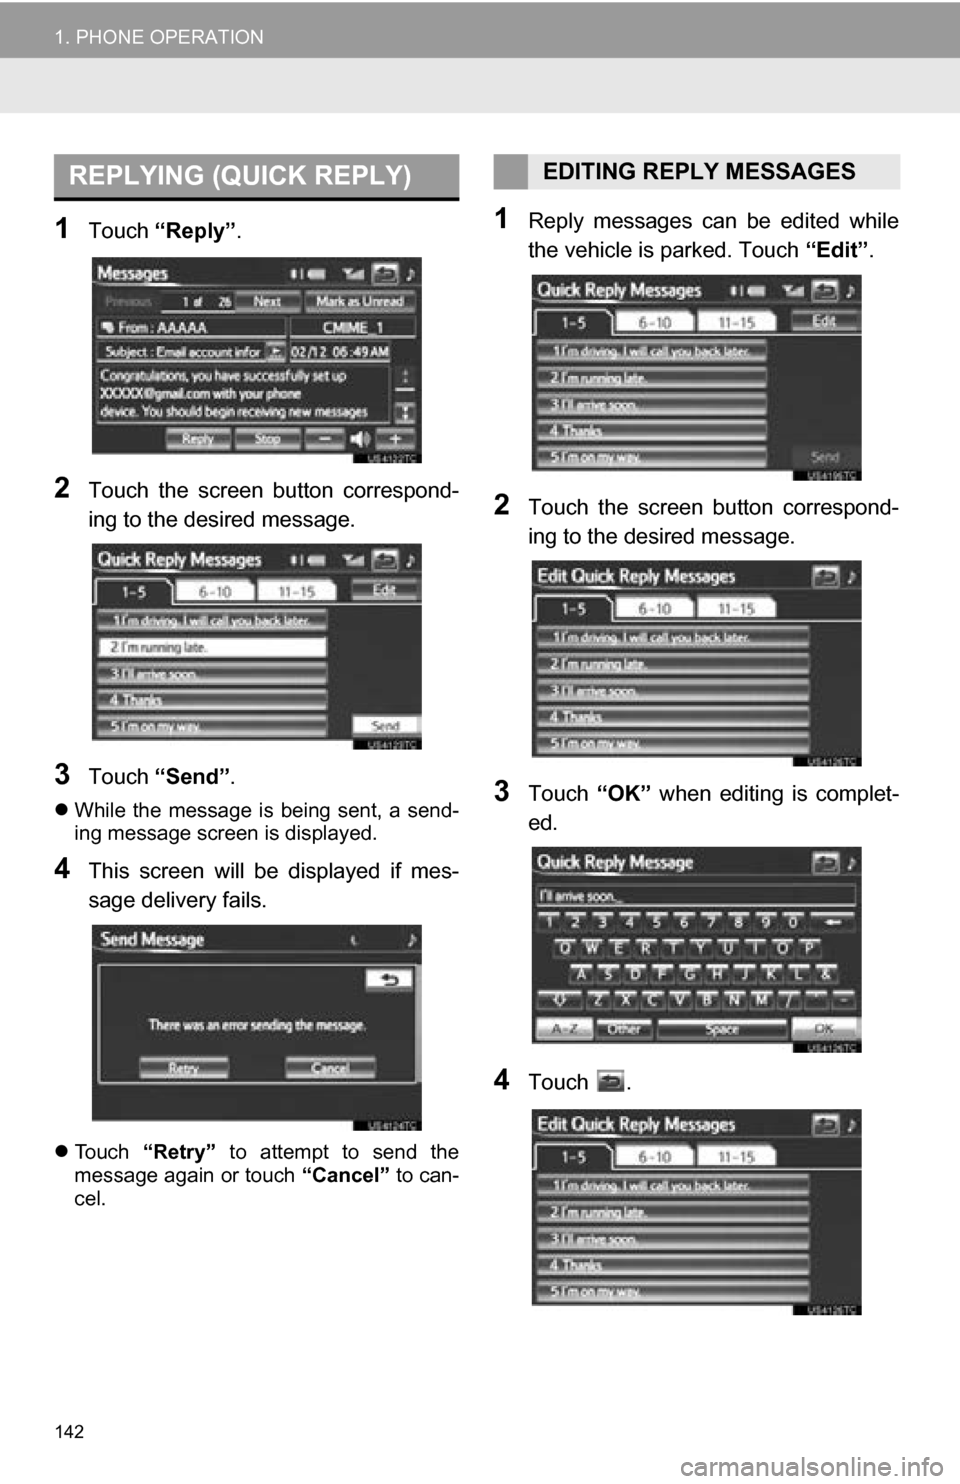
1Touch “Reply”.
2Touch the screen button correspond-
ing to the desired message.
3Touch “Send” .
While the message is being sent, a send-
ing message screen is displayed.
4This screen will be displayed if mes-
sage delivery fails.
Touch “Retry” to attempt to send the
message again or touch “Cancel” to can-
cel.
1Reply messages can be edited while
the vehicle is parked. Touch “Edit”.
2Touch the screen button correspond-
ing to the desired message.
3Touch “OK” when editing is complet-
ed.
4Touch .
REPLYING (QUICK REPLY)EDITING REPLY MESSAGES
Page 145 of 296
145
2. SETUP
4
PHONE
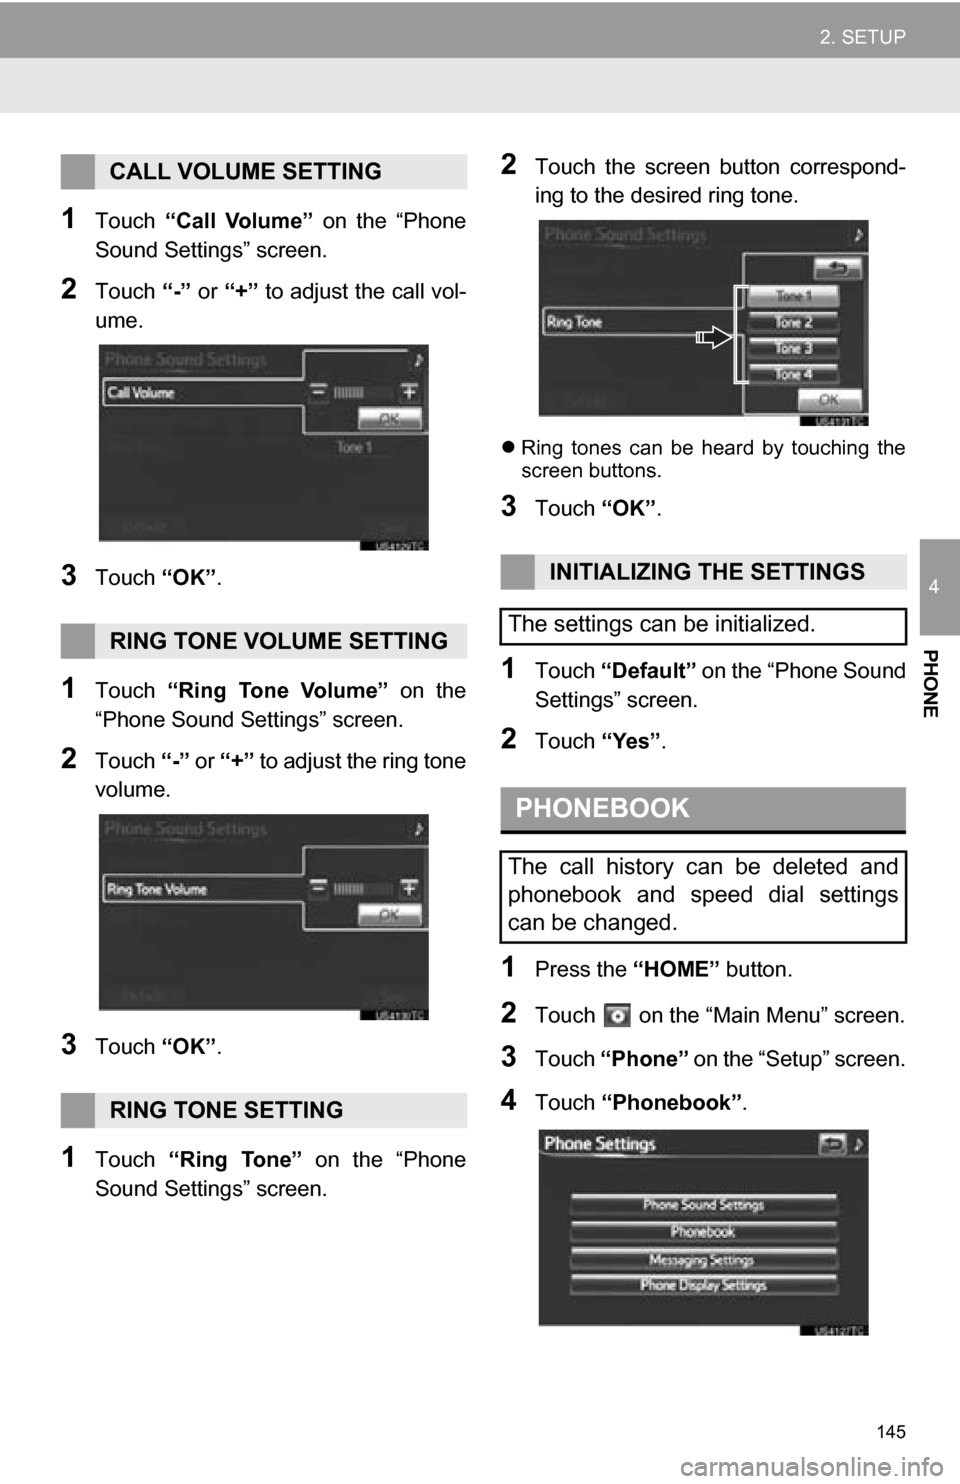
1Touch “Call Volume” on the “Phone
Sound Settings” screen.
2Touch “-” or “+” to adjust the call vol-
ume.
3Touch “OK”.
1Touch “Ring Tone Volume” on the
“Phone Sound Settings” screen.
2Touch “-” or “+” to adjust the ring tone
volume.
3Touch “OK”.
1Touch “Ring Tone” on the “Phone
Sound Settings” screen.
2Touch the screen button correspond-
ing to the desired ring tone.
Ring tones can be heard by touching the
screen buttons.
3Touch “OK”.
1Touch “Default” on the “Phone Sound
Settings” screen.
2Touch “Yes”.
1Press the “HOME” button.
2Touch on the “Main Menu” screen.
3Touch “Phone” on the “Setup” screen.
4Touch “Phonebook” .
CALL VOLUME SETTING
RING TONE VOLUME SETTING
RING TONE SETTING
INITIALIZING THE SETTINGS
The settings can be initialized.
PHONEBOOK
The call history can be deleted and
phonebook and speed dial settings
can be changed.
Page 160 of 296
160
2. SETUP
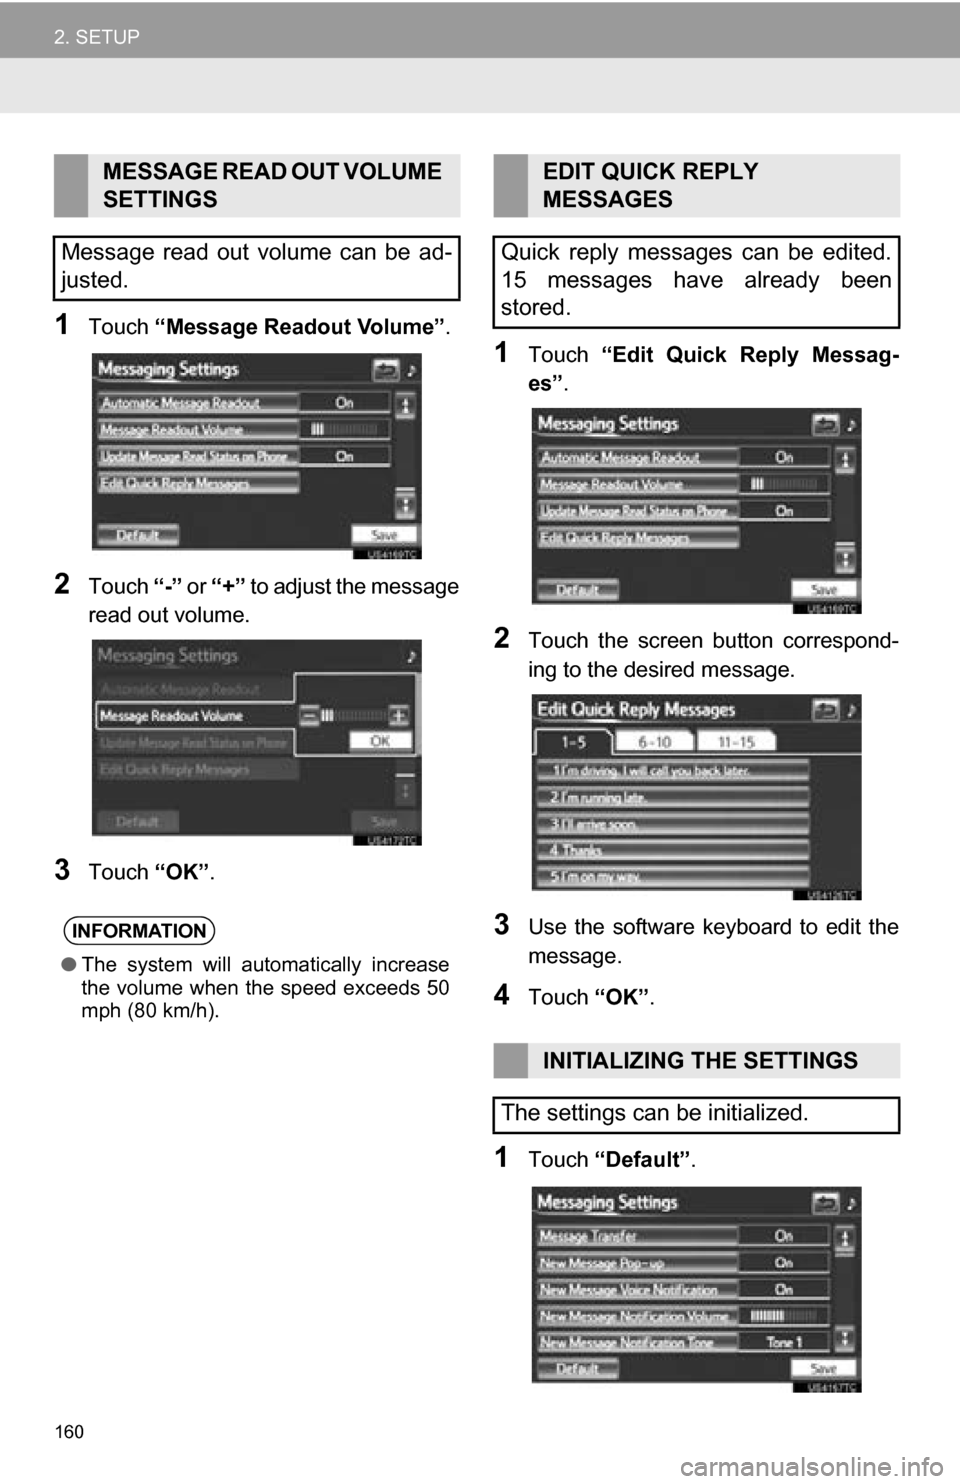
1Touch “Message Readout Volume” .
2Touch “-” or “+” to adjust the message
read out volume.
3Touch “OK”.
1Touch “Edit Quick Reply Messag-
es” .
2Touch the screen button correspond-
ing to the desired message.
3Use the software keyboard to edit the
message.
4Touch “OK”.
1Touch “Default” .
MESSAGE READ OUT VOLUME
SETTINGS
Message read out volume can be ad-
justed.
INFORMATION
● The system will automatically increase
the volume when the speed exceeds 50
mph (80 km/h).
EDIT QUICK REPLY
MESSAGES
Quick reply messages can be edited.
15 messages have already been
stored.
INITIALIZING THE SETTINGS
The settings can be initialized.
Page 165 of 296
165
2. SETUP
4
PHONE
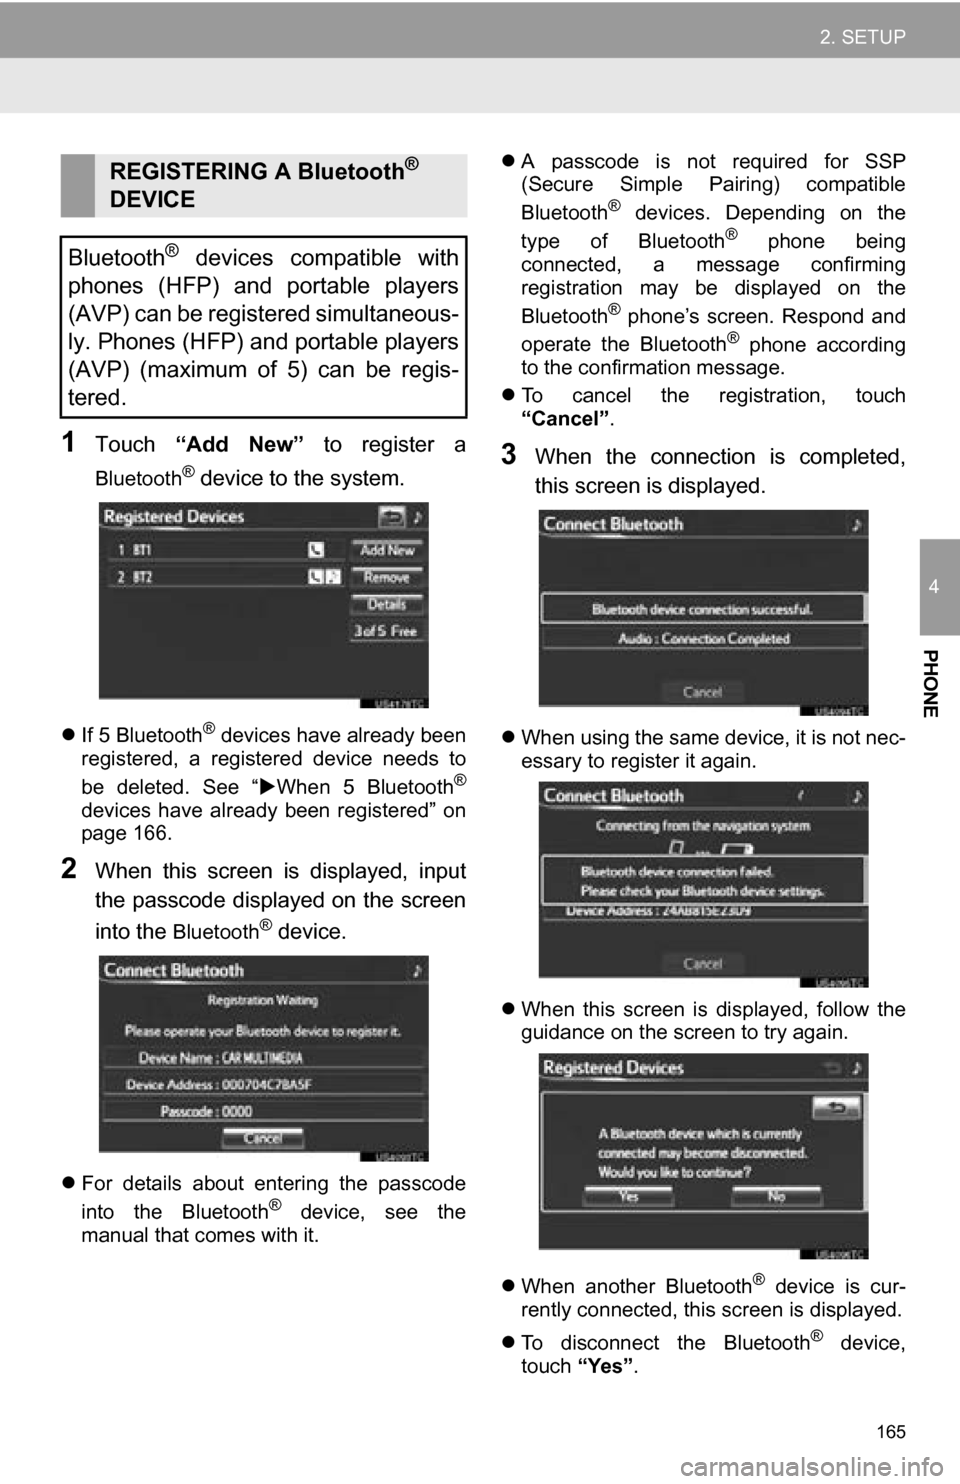
1Touch “Add New” to register a
Bluetooth® device to the system.
If 5 Bluetooth® devices have already been
registered, a registered device needs to
be deleted. See “ When 5 Bluetooth
®
devices have already been registered” on
page 166.
2When this screen is displayed, input
the passcode displayed on the screen
into the
Bluetooth® device.
For details about entering the passcode
into the Bluetooth® device, see the
manual that comes with it.
A passcode is not required for SSP
(Secure Simple Pairing) compatible
Bluetooth
® devices. Depending on the
type of Bluetooth® phone being
connected, a message confirming
registration may be displayed on the
Bluetooth
® phone’s screen. Respond and
operate the Bluetooth® phone according
to the confirmation message.
To cancel the registration, touch
“Cancel” .
3When the connection is completed,
this screen is displayed.
When using the same device, it is not nec-
essary to register it again.
When this screen is displayed, follow the
guidance on the screen to try again.
When another Bluetooth
® device is cur-
rently connected, this screen is displayed.
To disconnect the Bluetooth
® device,
touch “Yes”.
REGISTERING A Bluetooth®
DEVICE
Bluetooth
® devices compatible with
phones (HFP) and portable players
(AVP) can be registered simultaneous-
ly. Phones (HFP) and portable players
(AVP) (maximum of 5) can be regis-
tered.
Page 178 of 296
178
1. AUDIO SYSTEM OPERATION
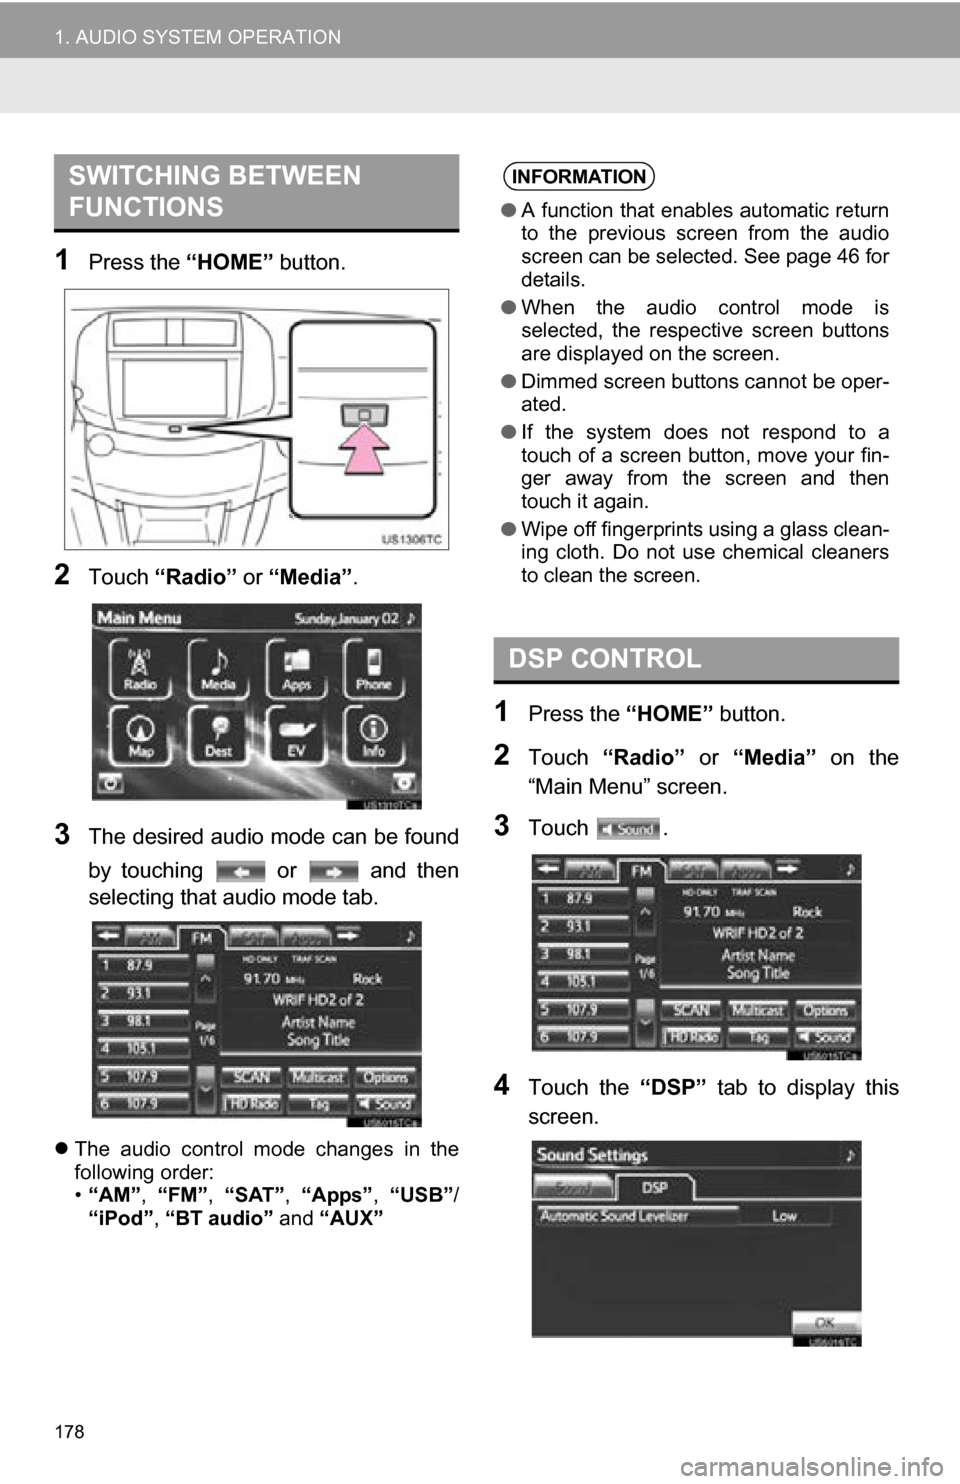
1Press the “HOME” button.
2Touch “Radio” or “Media”.
3The desired audio mode can be found
by touching or and then
selecting that audio mode tab.
The audio control mode changes in the
following order:
•“AM”, “FM”, “SAT”, “Apps” , “USB” /
“iPod” , “BT audio” and “AUX”
1Press the “HOME” button.
2Touch “Radio” or “Media” on the
“Main Menu” screen.
3Touch .
4Touch the “DSP” tab to display this
screen.
SWITCHING BETWEEN
FUNCTIONSINFORMATION
● A function that enables automatic return
to the previous screen from the audio
screen can be selected. See page 46 for
details.
● When the audio control mode is
selected, the respective screen buttons
are displayed on the screen.
● Dimmed screen buttons cannot be oper-
ated.
● If the system does not respond to a
touch of a screen button, move your fin-
ger away from the screen and then
touch it again.
● Wipe off fingerprints using a glass clean-
ing cloth. Do not use chemical cleaners
to clean the screen.
DSP CONTROL
Page 190 of 296
190
1. AUDIO SYSTEM OPERATION
5. RADIO OPERATION (XM Satellite Radio BROADCAST)
If “CH 000” is selected using the or
on the audio control screen, the ID
code, which is 8 alphanumeric characters,
will be displayed. If another channel is
selected, the ID code will no longer be dis-
played. The channel (000) alternates
between displaying the radio ID and the
specific radio code.
HOW TO SUBSCRIBE TO AN
XM Satellite Radio
To listen to a satellite radio broadcast
in the vehicle, a subscription to the XM
Satellite Radio service is necessary.
An XM Satellite Radio is a tuner de-
signed exclusively to receive broad-
casts provided under a separate
subscription. Availability is limited to
the 48 contiguous U.S. states and
some Canadian provinces.
HOW TO SUBSCRIBE
It is necessary to enter into a separate
service agreement with XM Satellite
Radio in order to receive satellite
broadcast programming in the vehicle.
Additional activation and service sub-
scription fees apply that are not includ-
ed in the purchase price of the vehicle
and digital satellite tuner.
For complete information on subscrip-
tion rates and terms, or to subscribe to
XM Satellite Radio:
U.S.A.
Refer to www.siriusxm.com
or call
1-800-967-2346.
Canada
Refer to www.xmradio.ca
or call
1-877-209-0079.
INFORMATION
● XM Satellite Radio is solely responsible
for the quality, availability and content of
the satellite radio services provided,
which are subject to the terms and con-
ditions of the XM Satellite Radio cus-
tomer service agreement.
● Customers should have their radio ID
ready; the radio ID can be found by tun-
ing to “CH 000” on the radio. For details,
see “DISPLAYING THE RADIO ID”
below.
● All fees and programming are the
responsibility of XM Satellite Radio and
are subject to change.
SATELLITE TUNER
TECHNOLOGY NOTICE
Toyota’s satellite radio tuners are
awarded Type Approval Certificates
from XM Satellite Radio Inc. as proof of
compatibility with the services offered
by XM Satellite Radio.
DISPLAYING THE RADIO ID
Each XM tuner is identified with a
unique radio ID. The radio ID is re-
quired when activating an XM service
or when reporting a problem.
Page 194 of 296
194
1. AUDIO SYSTEM OPERATION
NOTICE
●This equipment has been tested and
found to comply with the limits for a
class B digital device, pursuant to Part
15 of the FCC Rules. These limits are
designed to provide reasonable protec-
tion against harmful interference in a
residential installation. This equipment
generates, uses and can radiate radio
frequency energy and, if not installed
and used in accordance with the instruc-
tions, may cause harmful interference to
radio communications. However, there
is no guarantee that interference will not
occur in a particular installation.
● If this equipment does cause harmful
interference to radio or television recep-
tion, which can be determined by turning
the equipment off and on, the user is
encouraged to try to correct the interfer-
ence by one or more of the following
measures:
• Reorient or relocate the receiving
antenna.
• Increase the separation between the equipment and receiver.
• Connect the equipment into an outlet on a circuit different from that to
which the receiver is connected.
• Consult the dealer or an experienced radio/TV technician for help.
● Information to user
• Alternation or modifications carried
out without appropriate authorization
may invalidate the user’s right to
operate the equipment.
INFORMATION
● This XM tuner supports “Audio Services”
(Music and Talk) of only XM Satellite
Radio and “Text Information*” linked to
the respective “Audio Services”.
*: Text Information includes, Station
Name, (Artist) Name, (Song) Title and
Category Name.
Page 206 of 296
206
1. AUDIO SYSTEM OPERATION
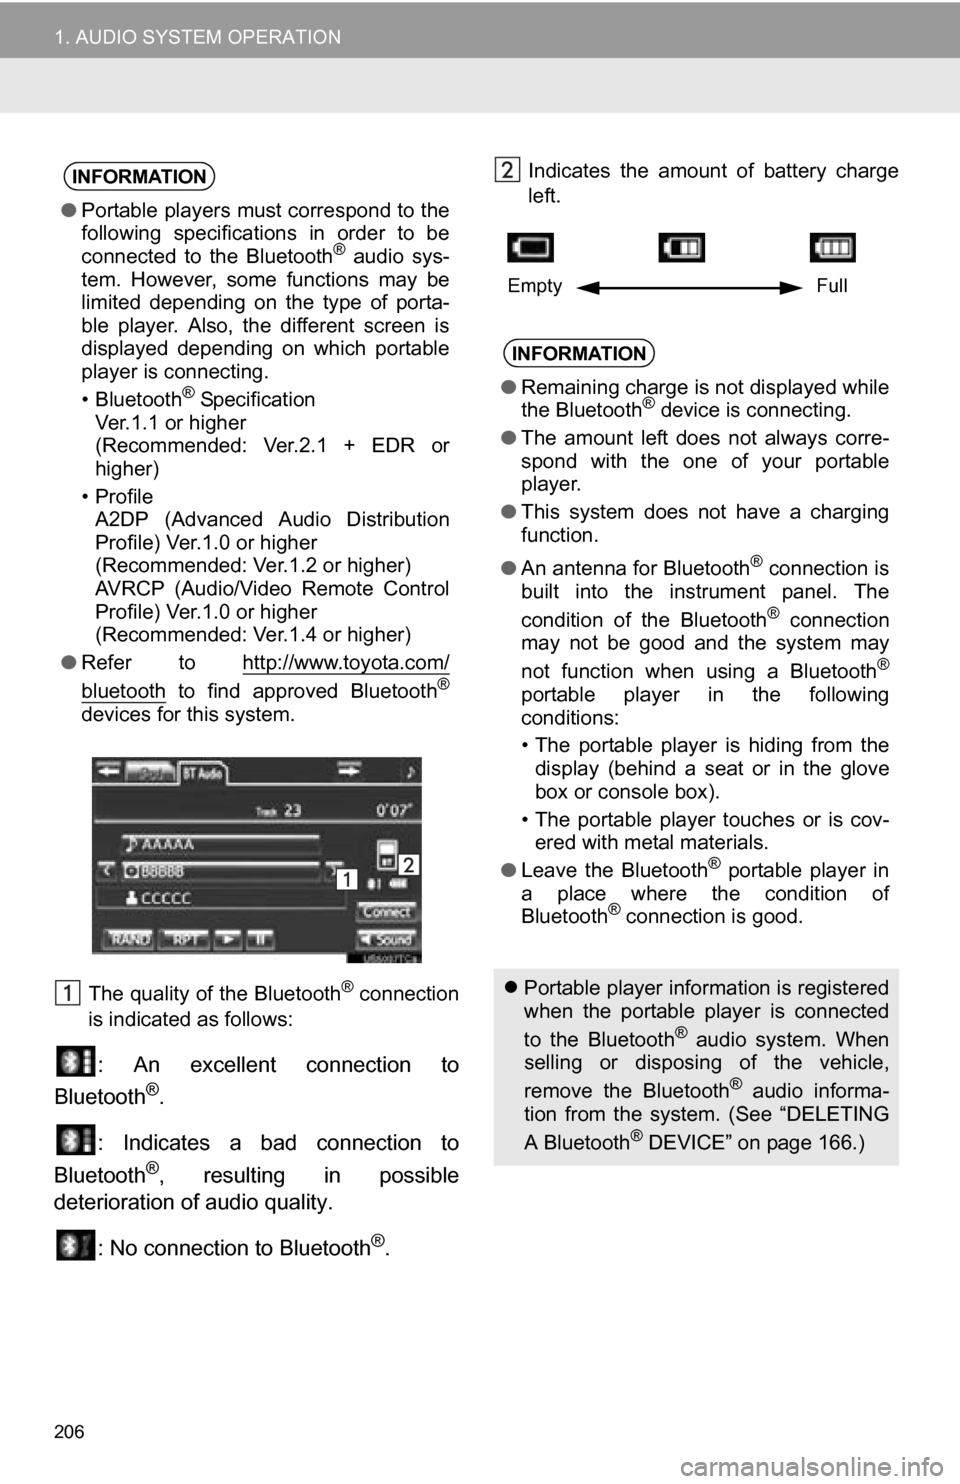
The quality of the Bluetooth® connection
is indicated as follows:
: An excellent connection to
Bluetooth®.
: Indicates a bad connection to
Bluetooth
®, resulting in possible
deterioration of audio quality.
: No connection to Bluetooth
®.
Indicates the amount of battery charge
left. INFORMATION
●Portable players must correspond to the
following specifications in order to be
connected to the Bluetooth
® audio sys-
tem. However, some functions may be
limited depending on the type of porta-
ble player. Also, the different screen is
displayed depending on which portable
player is connecting.
• Bluetooth
® Specification
Ver.1.1 or higher
(Recommended: Ver.2.1 + EDR or
higher)
•Profile A2DP (Advanced Audio Distribution
Profile) Ver.1.0 or higher
(Recommended: Ver.1.2 or higher)
AVRCP (Audio/Video Remote Control
Profile) Ver.1.0 or higher
(Recommended: Ver.1.4 or higher)
● Refer to http://www.toyota.com/
bluetooth to find approved Bluetooth®
devices for this system.
INFORMATION
●Remaining charge is not displayed while
the Bluetooth® device is connecting.
● The amount left does not always corre-
spond with the one of your portable
player.
● This system does not have a charging
function.
● An antenna for Bluetooth
® connection is
built into the instrument panel. The
condition of the Bluetooth
® connection
may not be good and the system may
not function when using a Bluetooth
®
portable player in the following
conditions:
• The portable player is hiding from the
display (behind a seat or in the glove
box or console box).
• The portable player touches or is cov- ered with metal materials.
● Leave the Bluetooth
® portable player in
a place where the condition of
Bluetooth
® connection is good.
Portable player information is registered
when the portable player is connected
to the Bluetooth
® audio system. When
selling or disposing of the vehicle,
remove the Bluetooth
® audio informa-
tion from the system. (See “DELETING
A Bluetooth
® DEVICE” on page 166.)
Empty Full