key TOYOTA RAV4 EV 2013 1.G Navigation Manual
[x] Cancel search | Manufacturer: TOYOTA, Model Year: 2013, Model line: RAV4 EV, Model: TOYOTA RAV4 EV 2013 1.GPages: 296, PDF Size: 6.47 MB
Page 8 of 296

TABLE OF CONTENTS
8
1. ENTUNE-OVERVIEW .................... 252
ENTUNE SERVICE ............................. 252
BEFORE USING ENTUNE .................. 254
2. ENTUNE OPERATION .................. 255
ACTIVATING “Apps” ............................ 255
LINKING “Apps” AND NAVIGATION LOCAL FUNCTION ........................... 258
INPUTTING KEYWORD OPERATION ..................................... 260
ALPHABETICAL INDEX ................... 264
8APPS
INDEX
Page 22 of 296
22
3. QUICK REFERENCE
1. “Destination” SCREEN
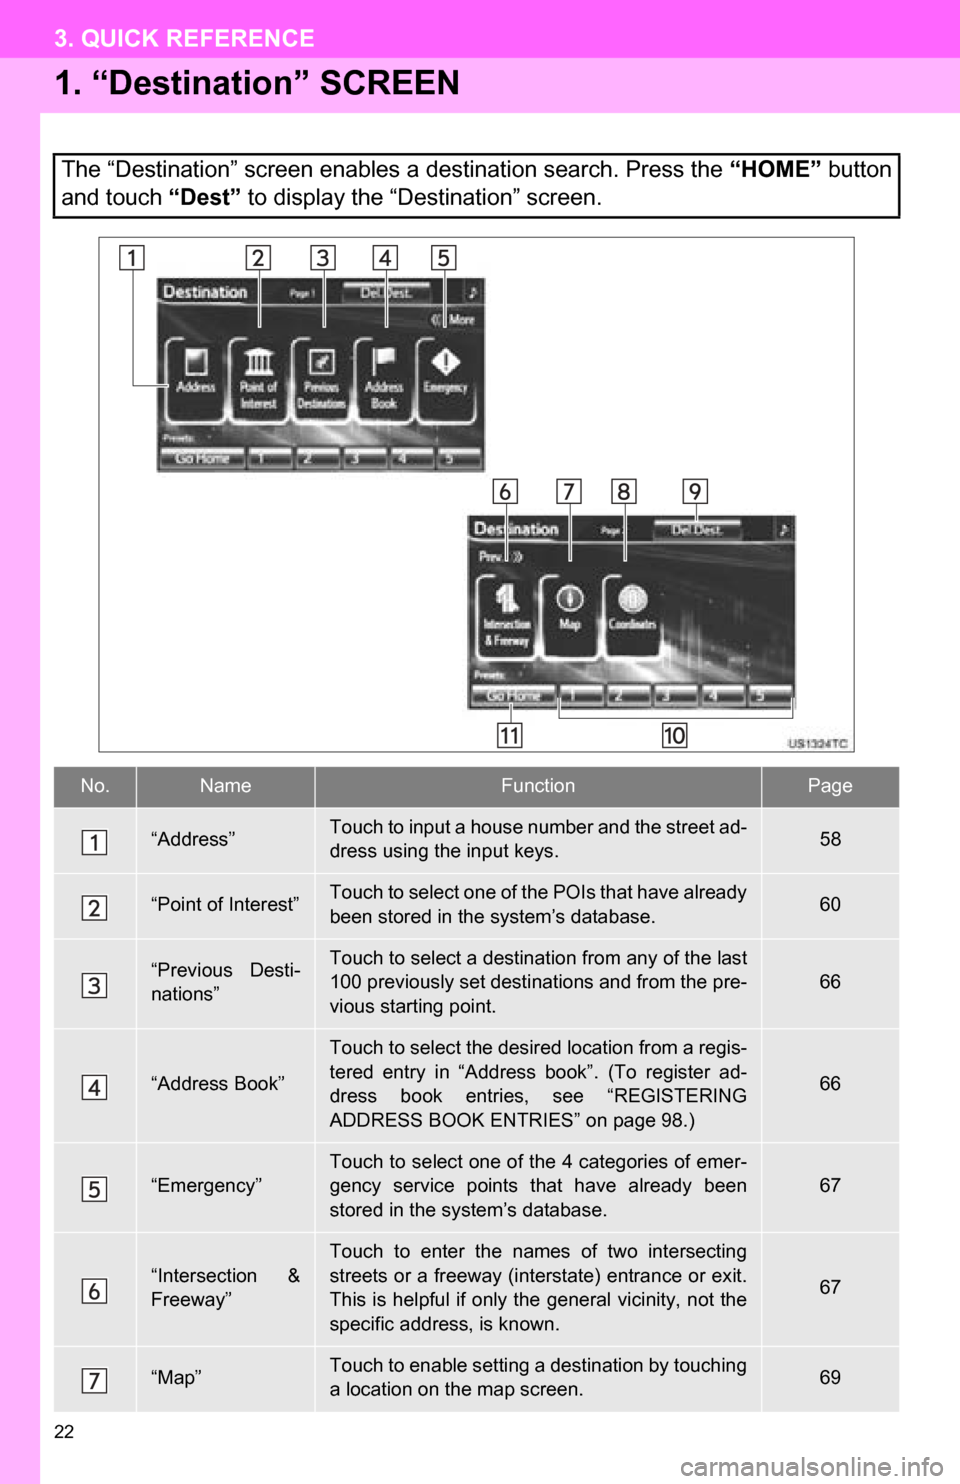
The “Destination” screen enables a destination search. Press the “HOME” button
and touch “Dest” to display the “Destination” screen.
No.NameFunctionPage
“Address”Touch to input a house number and the street ad-
dress using the input keys.58
“Point of Interest”Touch to select one of the POIs that have already
been stored in the system’s database.60
“Previous Desti-
nations”Touch to select a destination from any of the last
100 previously set destinations and from the pre-
vious starting point.
66
“Address Book”
Touch to select the desired location from a regis-
tered entry in “Address book”. (To register ad-
dress book entries, see “REGISTERING
ADDRESS BOOK ENTRIES” on page 98.)
66
“Emergency”
Touch to select one of the 4 categories of emer-
gency service points that have already been
stored in the system’s database.
67
“Intersection &
Freeway”
Touch to enter the names of two intersecting
streets or a freeway (interstate) entrance or exit.
This is helpful if only the general vicinity, not the
specific address, is known.
67
“Map”Touch to enable setting a destination by touching
a location on the map screen.69
Page 32 of 296
32
1. BASIC INFORMATION BEFORE OPERATION
3. INPUTTING LETTERS AND NUMBERS/LIST SCREEN OPERATION
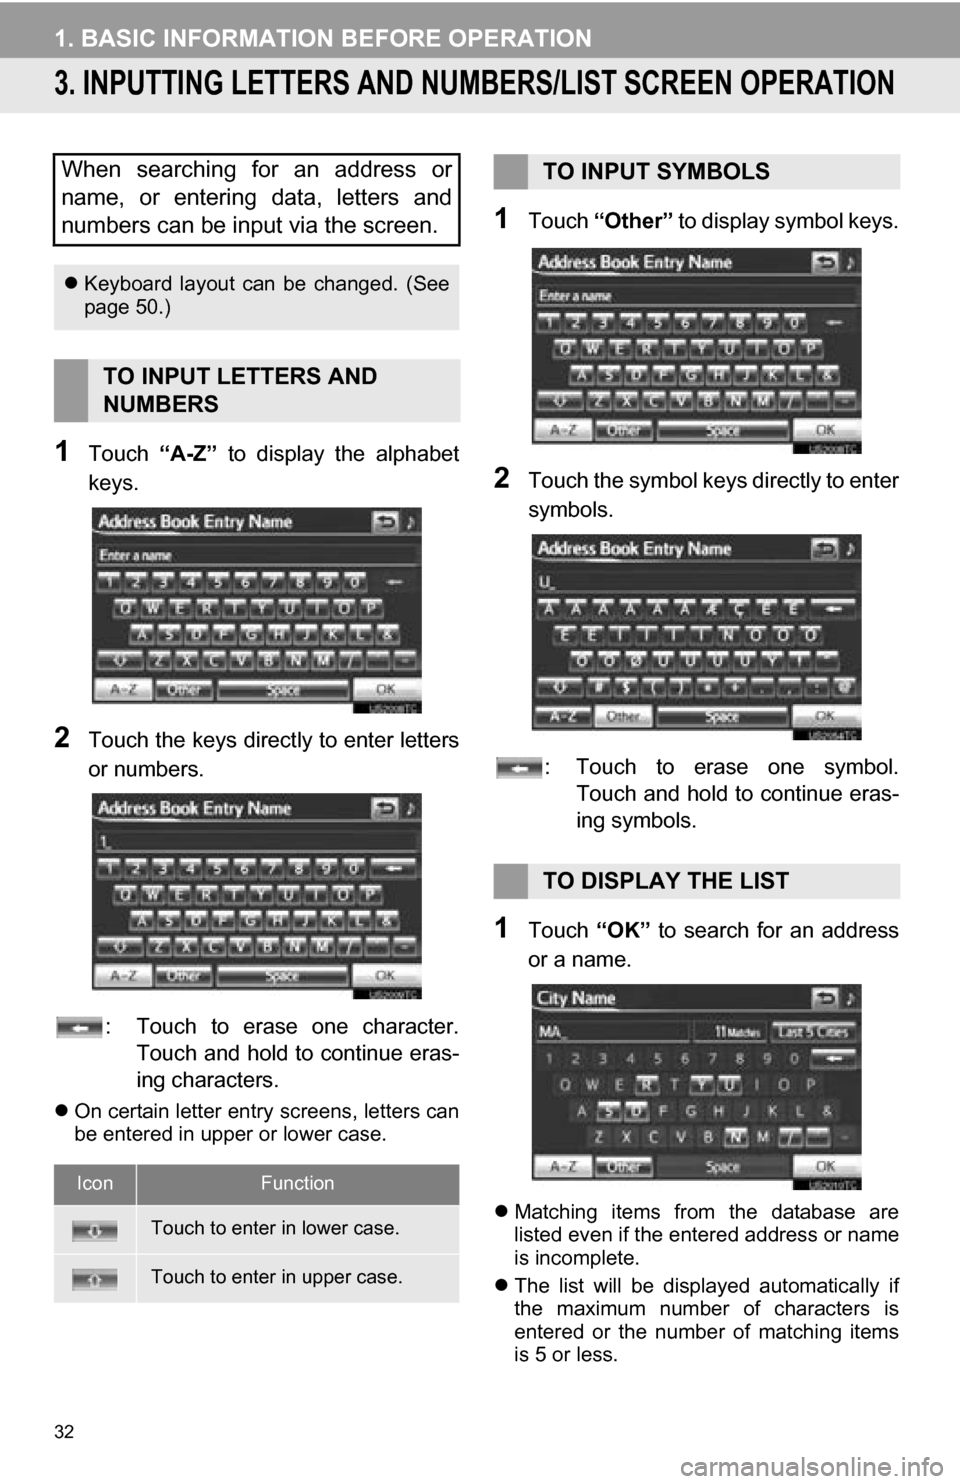
1Touch “A-Z” to display the alphabet
keys.
2Touch the keys direct ly to enter letters
or numbers.
: Touch to erase one character. Touch and hold to continue eras-
ing characters.
On certain letter entry screens, letters can
be entered in upper or lower case.
1Touch “Other” to display symbol keys.
2Touch the symbol keys directly to enter
symbols.
: Touch to erase one symbol. Touch and hold to continue eras-
ing symbols.
1Touch “OK” to search for an address
or a name.
Matching items from the database are
listed even if the entered address or name
is incomplete.
The list will be displayed automatically if
the maximum number of characters is
entered or the number of matching items
is 5 or less.
When searching for an address or
name, or entering data, letters and
numbers can be input via the screen.
Keyboard layout can be changed. (See
page 50.)
TO INPUT LETTERS AND
NUMBERS
IconFunction
Touch to enter in lower case.
Touch to enter in upper case.
TO INPUT SYMBOLS
TO DISPLAY THE LIST
Page 46 of 296
46
2. SETUP
1. GENERAL SETTINGS
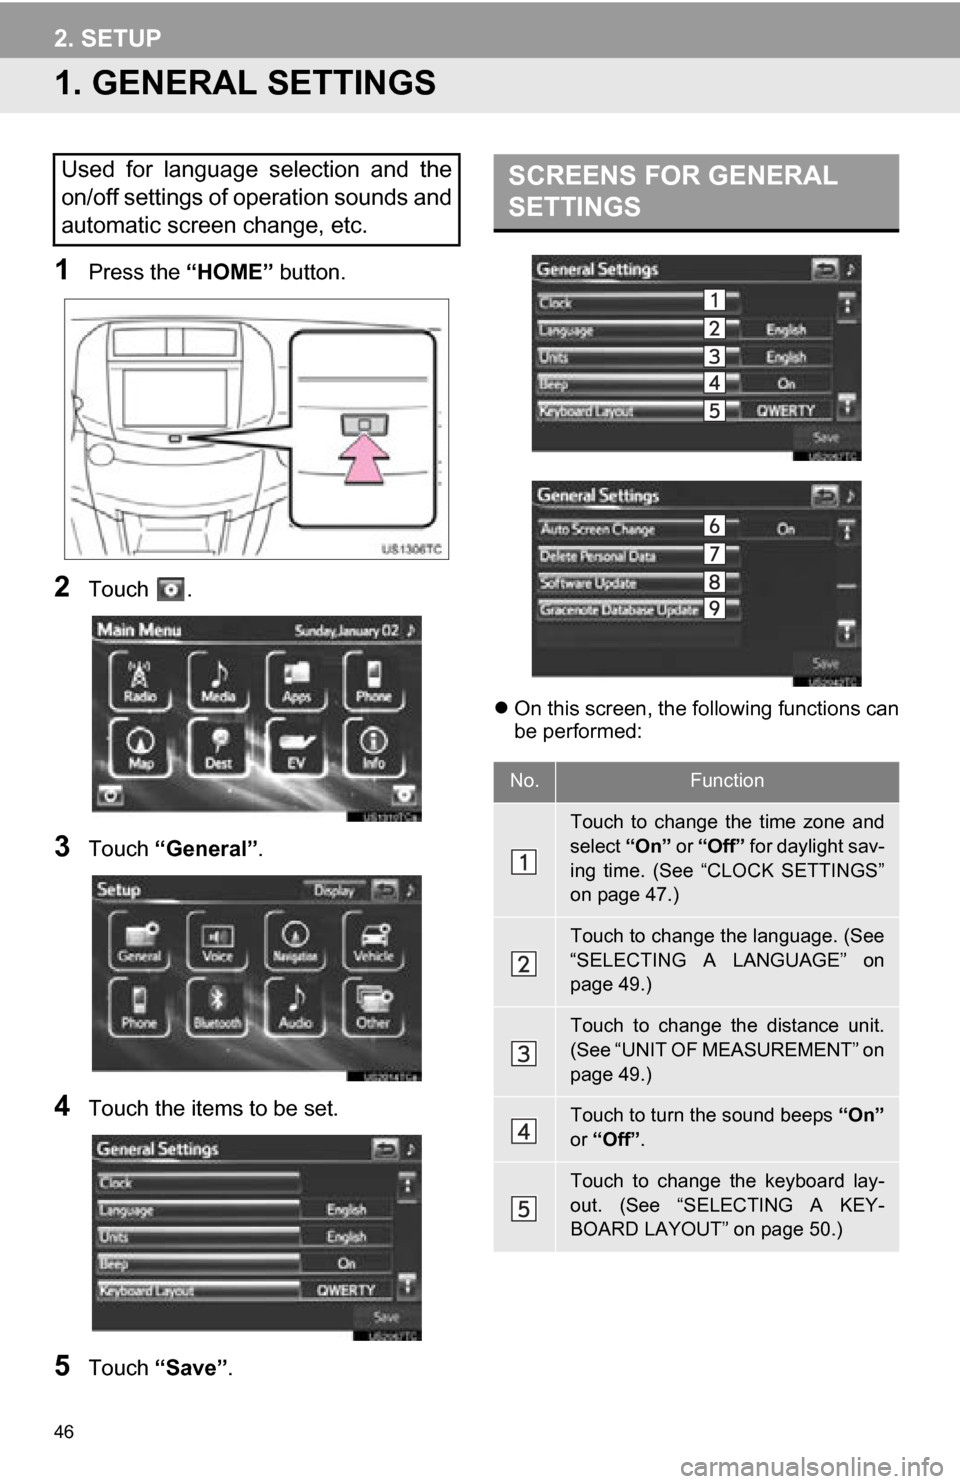
1Press the “HOME” button.
2Touch .
3Touch “General” .
4Touch the items to be set.
5Touch “Save” .
On this screen, the following functions can
be performed:
Used for language selection and the
on/off settings of operation sounds and
automatic screen change, etc.SCREENS FOR GENERAL
SETTINGS
No.Function
Touch to change the time zone and
select “On” or “Off” for daylight sav-
ing time. (See “CLOCK SETTINGS”
on page 47.)
Touch to change the language. (See
“SELECTING A LANGUAGE” on
page 49.)
Touch to change the distance unit.
(See “UNIT OF MEASUREMENT” on
page 49.)
Touch to turn the sound beeps “On”
or “Off” .
Touch to change the keyboard lay-
out. (See “SELECTING A KEY-
BOARD LAYOUT” on page 50.)
Page 50 of 296
50
2. SETUP
1Press the “HOME” button.
2Touch on the “Main Menu” screen.
3Touch “General” on the “Setup”
screen.
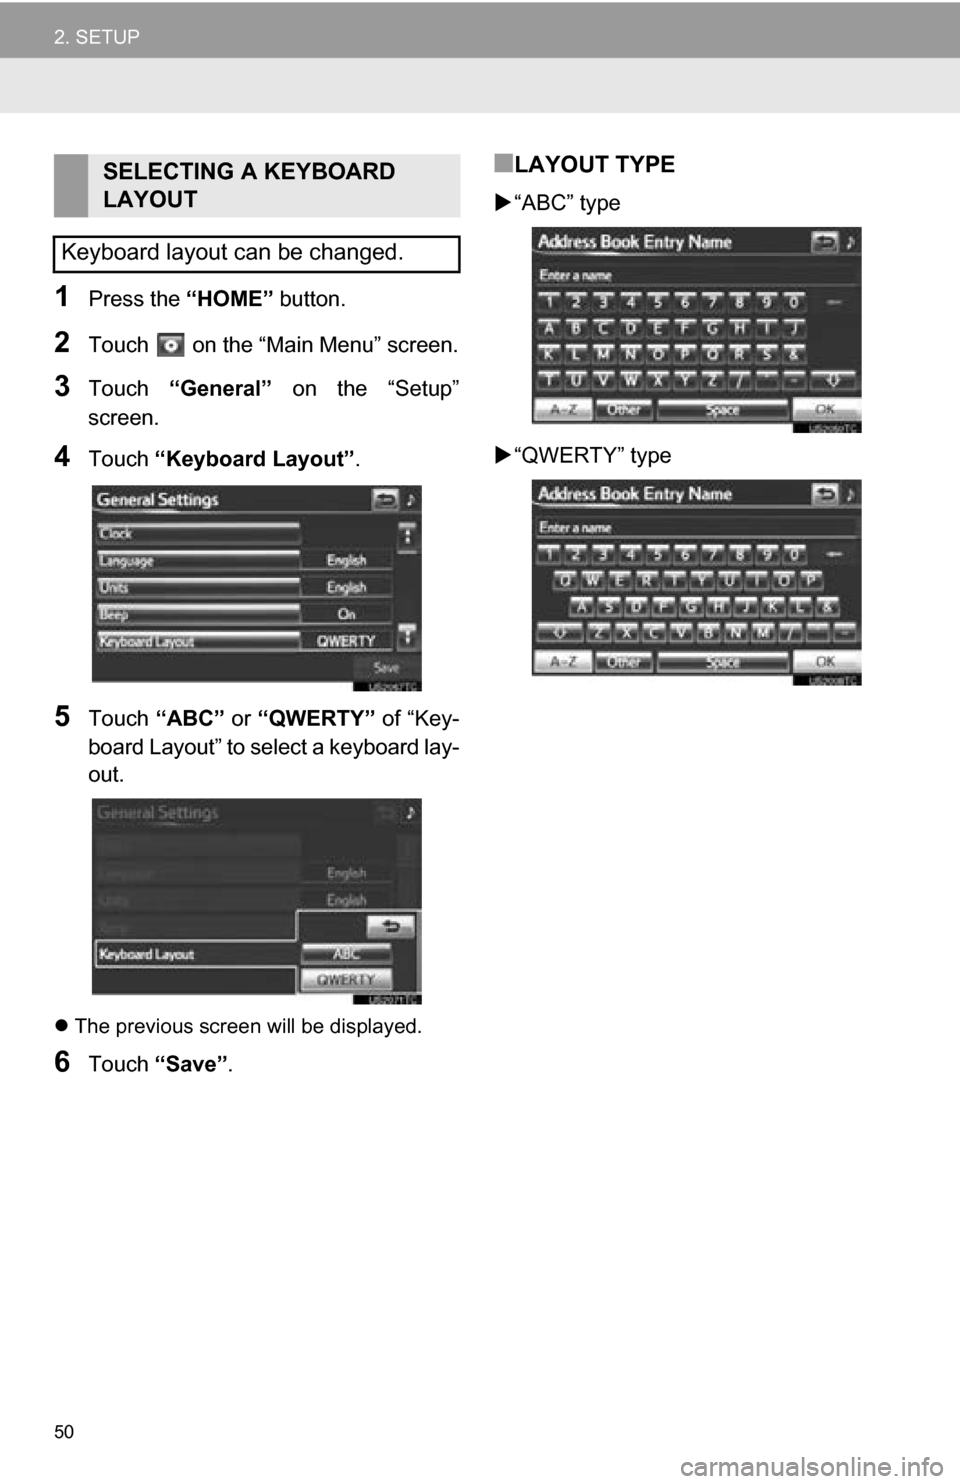
4Touch “Keyboard Layout” .
5Touch “ABC” or “QWERTY” of “Key-
board Layout” to select a keyboard lay-
out.
The previous screen will be displayed.
6Touch “Save” .
■LAYOUT TYPE
“ABC” type
“QWERTY” type
SELECTING A KEYBOARD
LAYOUT
Keyboard layout can be changed.
Page 100 of 296
100
3. ADDRESS BOOK
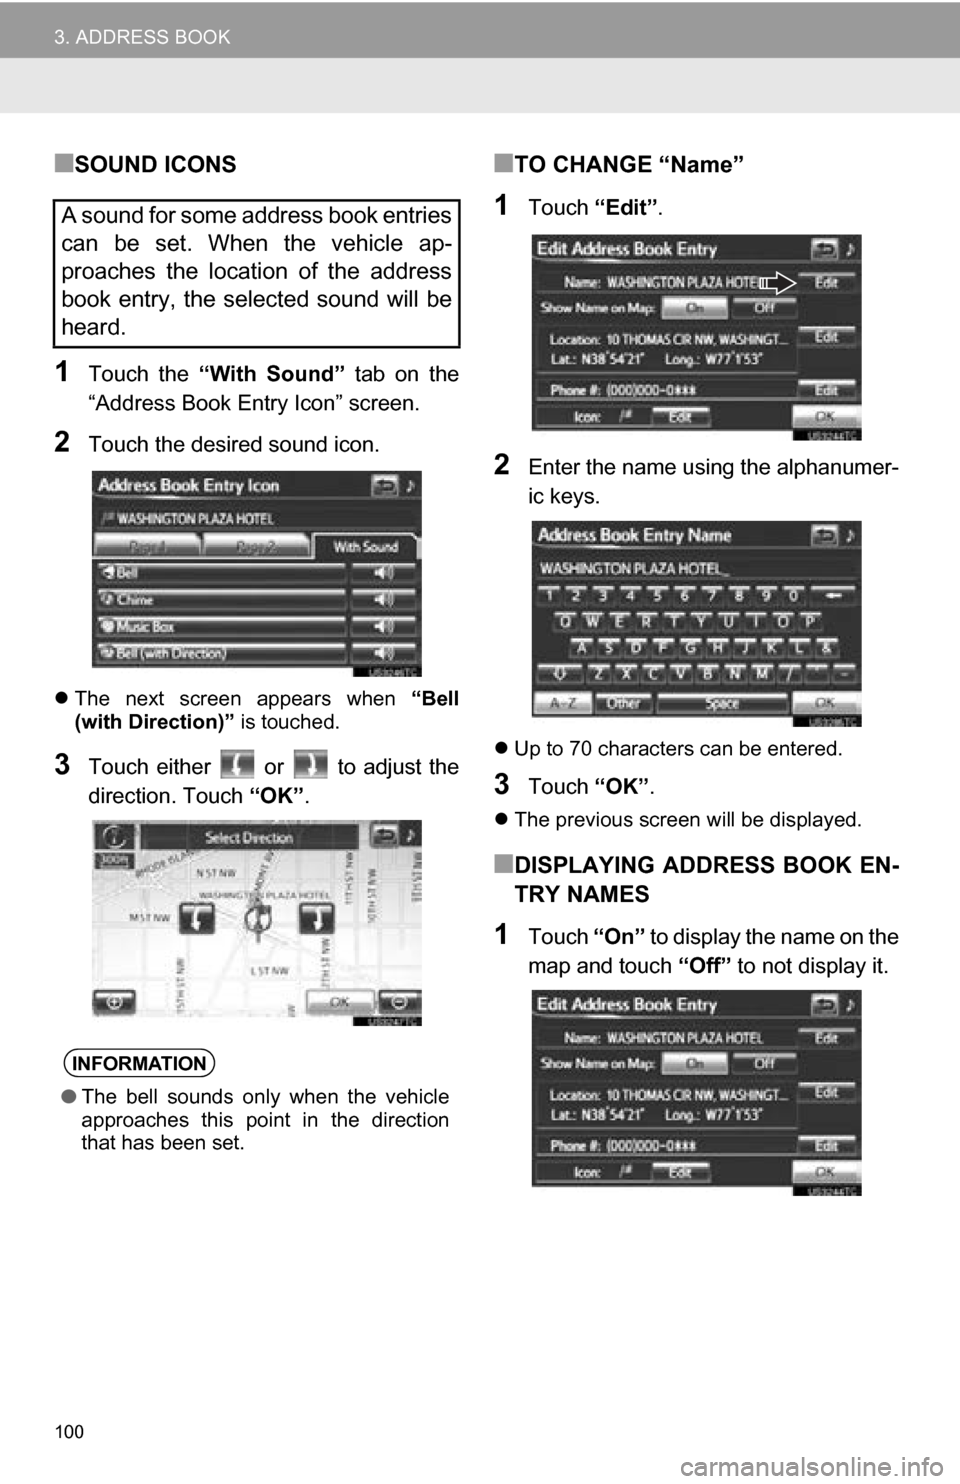
■SOUND ICONS
1Touch the “With Sound” tab on the
“Address Book Entry Icon” screen.
2Touch the desired sound icon.
The next screen appears when “Bell
(with Direction)” is touched.
3Touch either or to adjust the
direction. Touch “OK”.
■TO CHANGE “Name”
1Touch “Edit”.
2Enter the name using the alphanumer-
ic keys.
Up to 70 characters can be entered.
3Touch “OK”.
The previous screen will be displayed.
■DISPLAYING ADDRESS BOOK EN-
TRY NAMES
1Touch “On” to display the name on the
map and touch “Off” to not display it.
A sound for some address book entries
can be set. When the vehicle ap-
proaches the location of the address
book entry, the selected sound will be
heard.
INFORMATION
●The bell sounds only when the vehicle
approaches this point in the direction
that has been set.
Page 101 of 296
101
3. ADDRESS BOOK
3
NAVIGATION SYSTEM
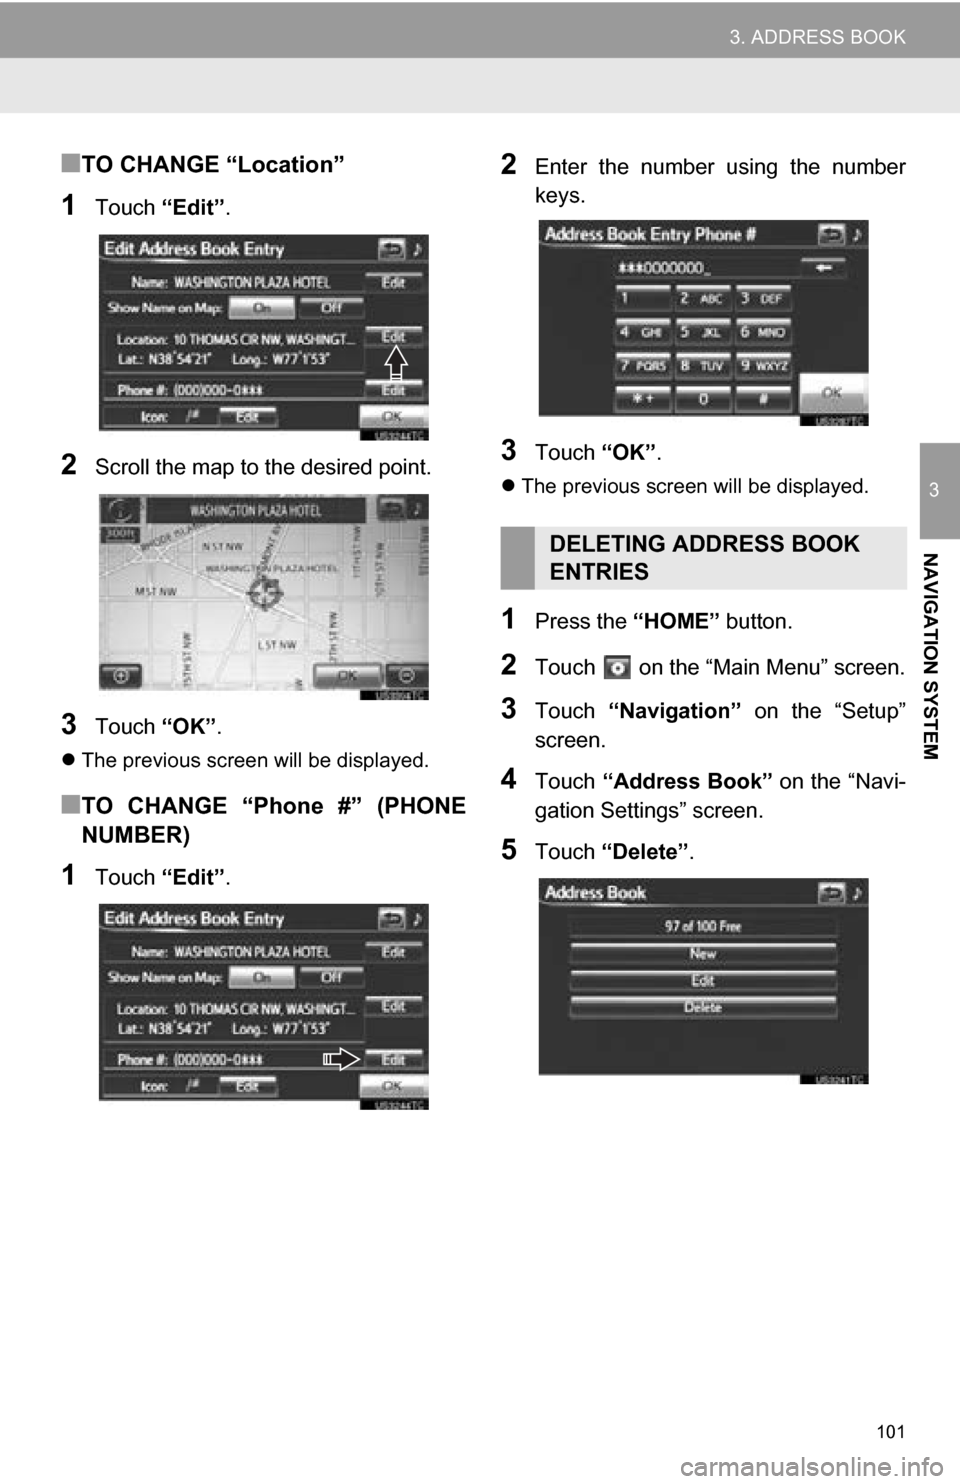
■TO CHANGE “Location”
1Touch “Edit”.
2Scroll the map to the desired point.
3Touch “OK”.
The previous screen will be displayed.
■TO CHANGE “Phone #” (PHONE
NUMBER)
1Touch “Edit”.
2Enter the number using the number
keys.
3Touch “OK”.
The previous screen will be displayed.
1Press the “HOME” button.
2Touch on the “Main Menu” screen.
3Touch “Navigation” on the “Setup”
screen.
4Touch “Address Book” on the “Navi-
gation Settings” screen.
5Touch “Delete” .
DELETING ADDRESS BOOK
ENTRIES
Page 104 of 296
104
3. ADDRESS BOOK
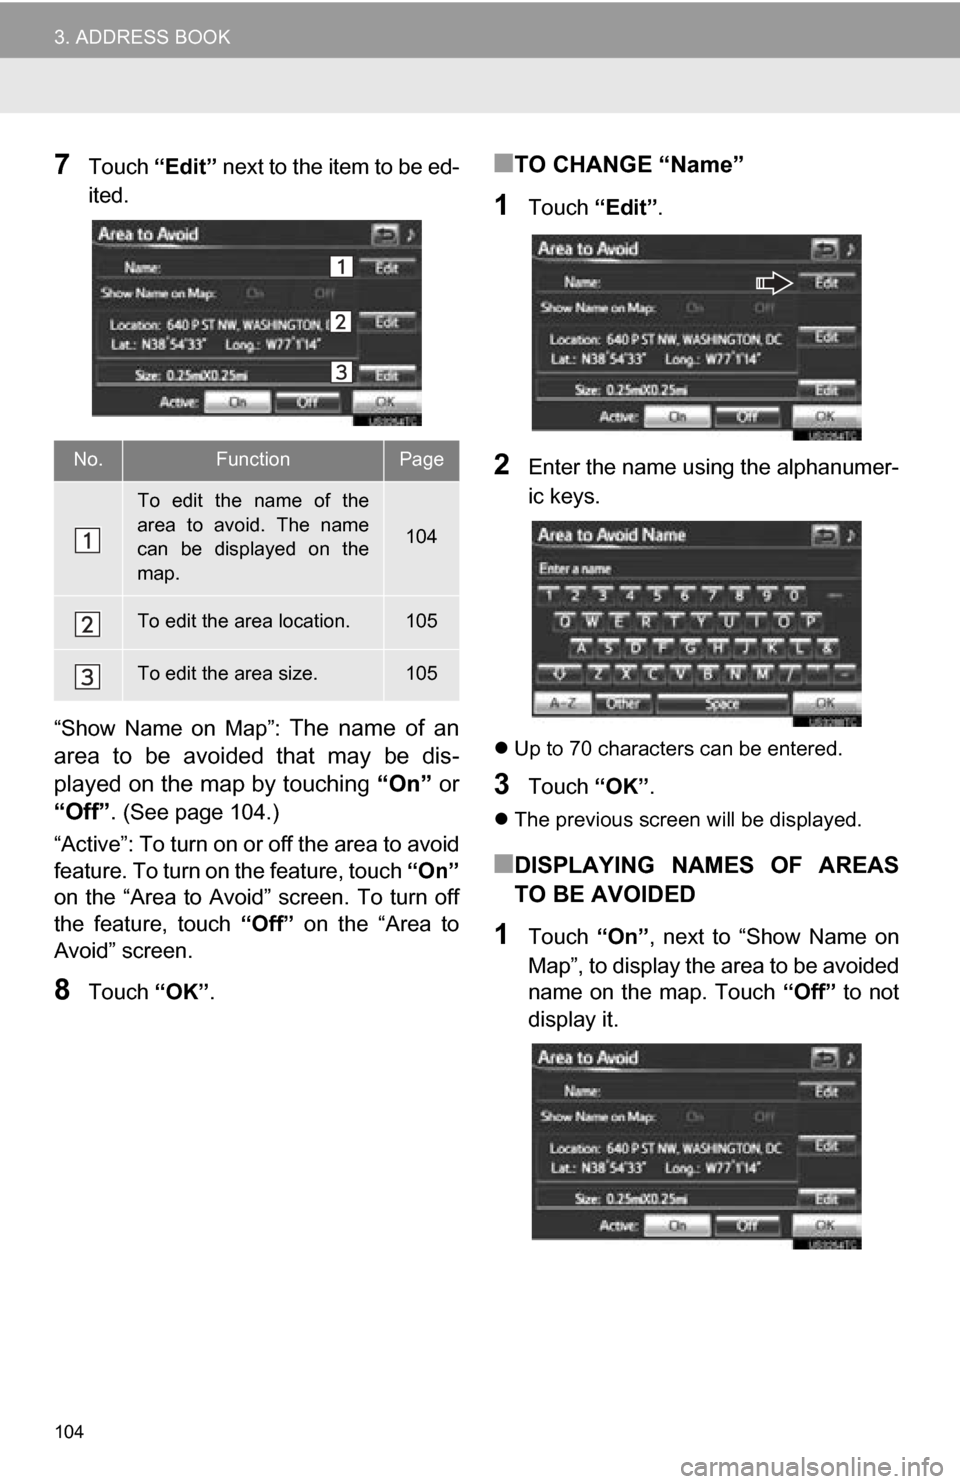
7Touch “Edit” next to the item to be ed-
ited.
“Show Name on Map”:
The name of an
area to be avoided that may be dis-
played on the map by touching “On” or
“Off”.
(See page 104.)
“Active”: To turn on or off the area to avoid
feature. To turn on the feature, touch “On”
on the “Area to Avoid” screen. To turn off
the feature, touch “Off” on the “Area to
Avoid” screen.
8Touch “OK”.
■TO CHANGE “Name”
1Touch “Edit”.
2Enter the name using the alphanumer-
ic keys.
Up to 70 characters can be entered.
3Touch “OK”.
The previous screen will be displayed.
■DISPLAYING NAMES OF AREAS
TO BE AVOIDED
1Touch “On”, next to “Show Name on
Map”, to display the area to be avoided
name on the map. Touch “Off” to not
display it.
No.FunctionPage
To edit the name of the
area to avoid. The name
can be displayed on the
map.
104
To edit the area location.105
To edit the area size.105
Page 117 of 296
117
4. SETUP
3
NAVIGATION SYSTEM
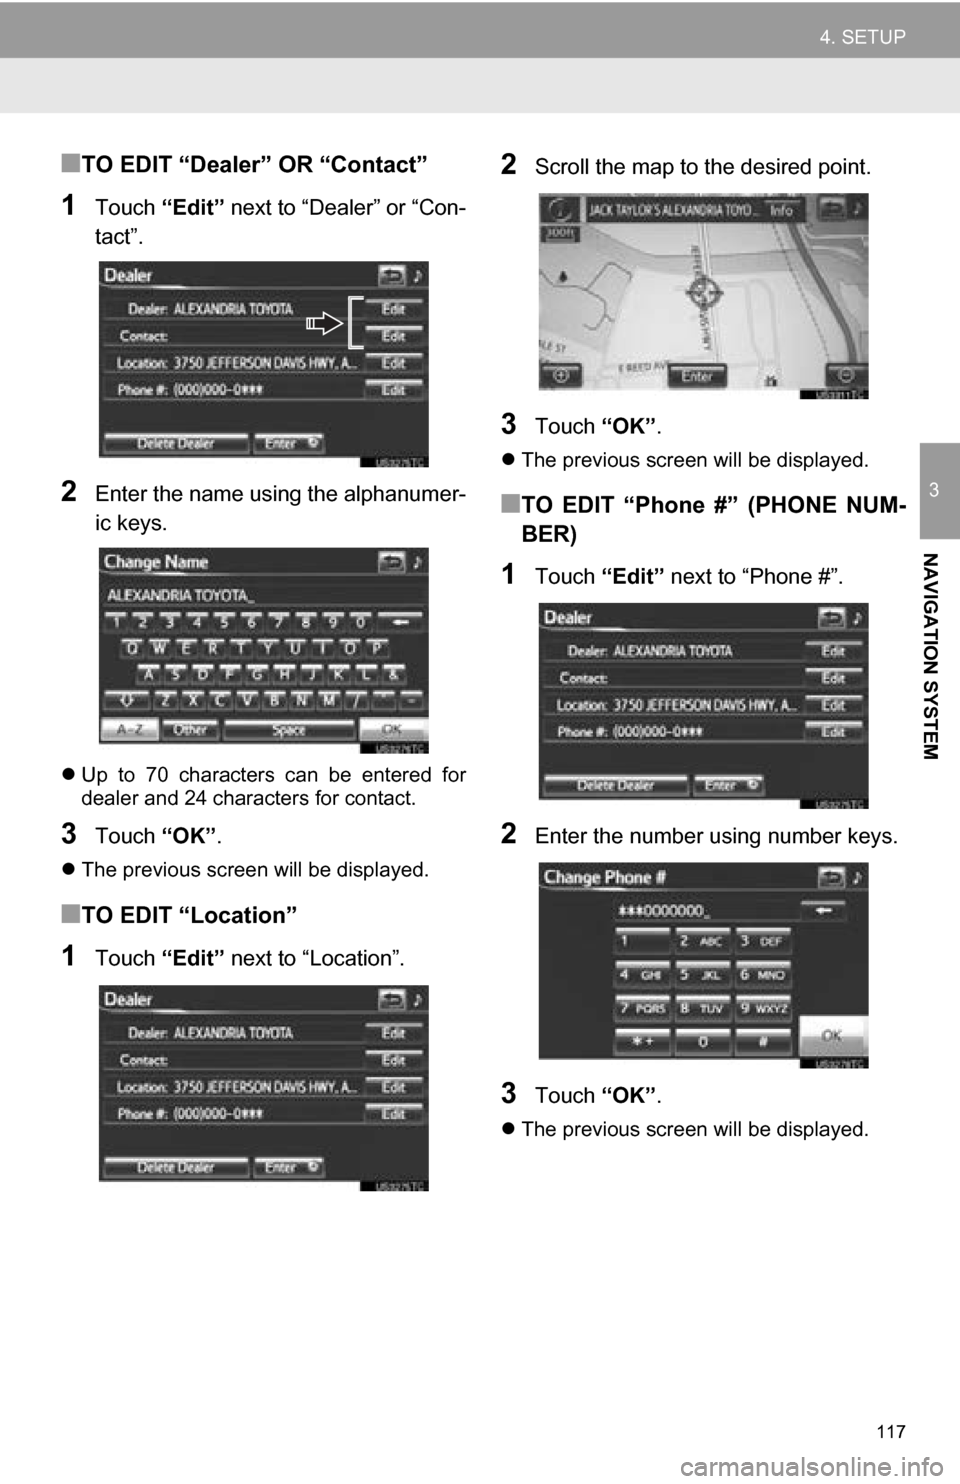
■TO EDIT “Dealer” OR “Contact”
1Touch “Edit” next to “Dealer” or “Con-
tact”.
2Enter the name using the alphanumer-
ic keys.
Up to 70 characters can be entered for
dealer and 24 characters for contact.
3Touch “OK”.
The previous screen will be displayed.
■TO EDIT “Location”
1Touch “Edit” next to “Location”.
2Scroll the map to the desired point.
3Touch “OK”.
The previous screen will be displayed.
■TO EDIT “Phone #” (PHONE NUM-
BER)
1Touch “Edit” next to “Phone #”.
2Enter the number using number keys.
3Touch “OK”.
The previous screen will be displayed.
Page 132 of 296
132
1. PHONE OPERATION
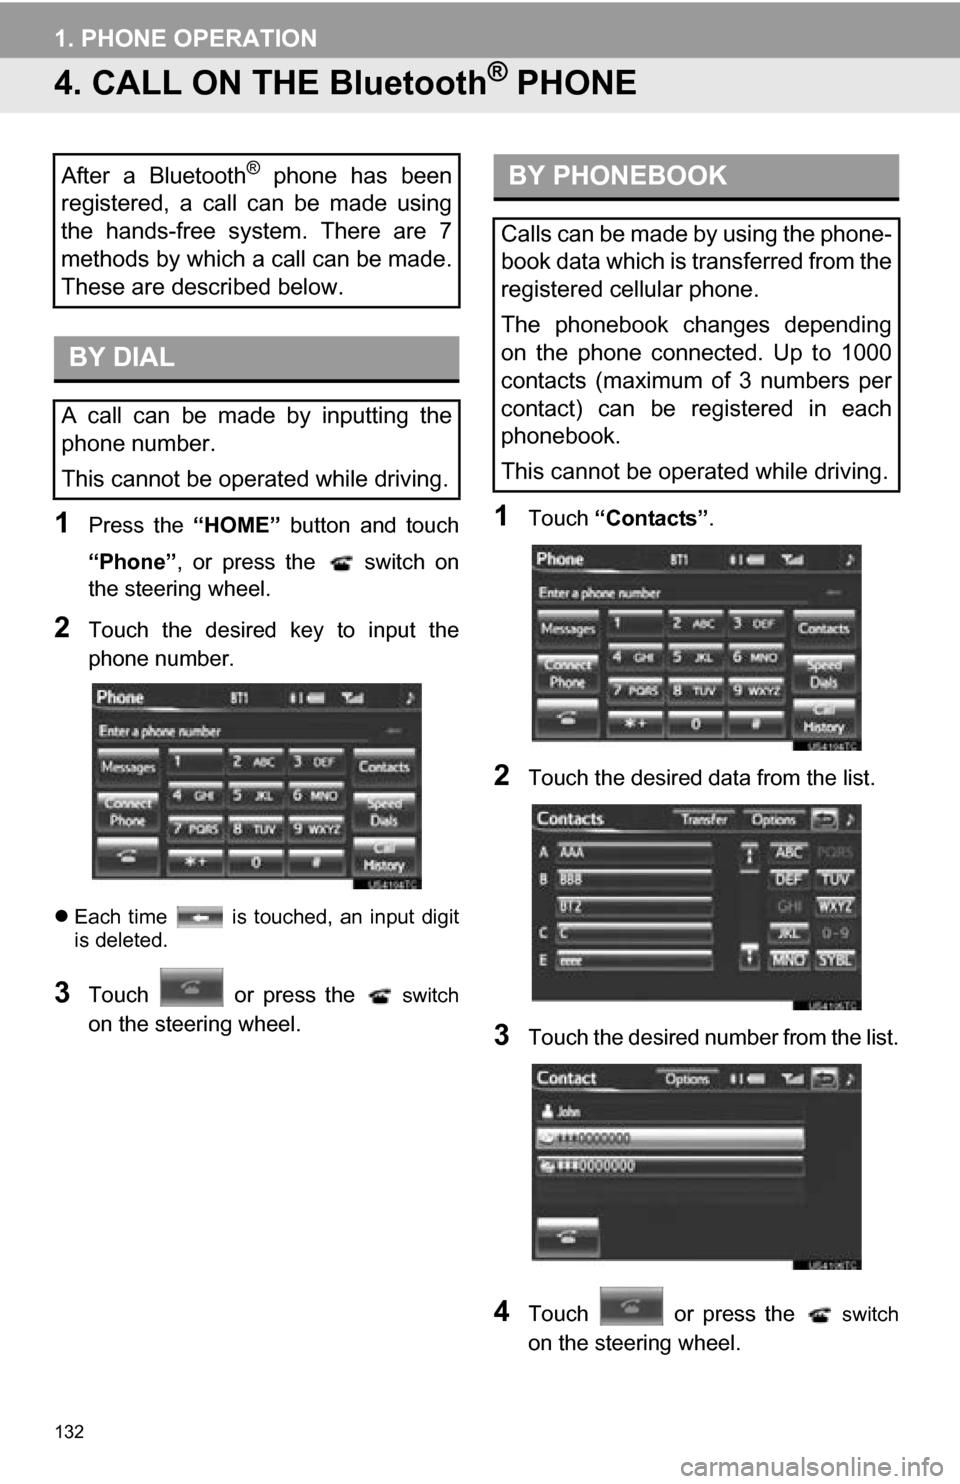
4. CALL ON THE Bluetooth® PHONE
1Press the “HOME” button and touch
“Phone” , or press the switch on
the steering wheel.
2Touch the desired key to input the
phone number.
Each time is touched, an input digit
is deleted.
3Touch or press the switch
on the steering wheel.
1Touch “Contacts” .
2Touch the desired data from the list.
3Touch the desired number from the list.
4Touch or press the switch
on the steering wheel.
After a Bluetooth® phone has been
registered, a call can be made using
the hands-free system. There are 7
methods by which a call can be made.
These are described below.
BY DIAL
A call can be made by inputting the
phone number.
This cannot be operated while driving.
BY PHONEBOOK
Calls can be made by using the phone-
book data which is transferred from the
registered cellular phone.
The phonebook changes depending
on the phone connected. Up to 1000
contacts (maximum of 3 numbers per
contact) can be registered in each
phonebook.
This cannot be operated while driving.