TOYOTA RAV4 EV 2014 1.G Owners Manual
RAV4 EV 2014 1.G
TOYOTA
TOYOTA
https://www.carmanualsonline.info/img/14/6729/w960_6729-0.png
TOYOTA RAV4 EV 2014 1.G Owners Manual
Trending: horn, battery water pump, TPMS, brake fluid, warning, stop start, wheel size
Page 391 of 521
390 4-3. Do-it-yourself maintenance
12 ABS 130 A Anti-lock brake system
13 ECB 1 50 AElectronically controlled brake sys-
tem
14 ECB 2 50 AElectronically controlled brake sys-
tem
15 W/P-IGCT 50 A P/T W/P, BATT W/P 1, BATT W/P 2
16 EPS 60 A Electric power steering
17 P/I 60 AIGCT-D, HORN, parking control
system, IG2
18 MAIN 60 AH-LP MAIN, DRL, ODS, smart key
system, ABS 2, steering lock sys-
tem, PM-B, ECU-B MAIN
19 CONTACTOR 15 A Traction battery, charging system
20 IG2 15 A Starting system
21
HORN 10 A Horn
22 IGCT-D 7.5 A Thermal control system, power
management ECU, parking control
system, multiplex communication
system
23 PM-IGCT 7.5 A Power management system
24 P CNT-IGCT 7.5 A Parking control system
25 A/C-IGCT 10 A Air conditioning system
26 FAN-IGCT 7.5 A Electric cooling fans
FuseAmpereCircuit
Page 392 of 521
391
4-3. Do-it-yourself maintenance
4
Maintenance and care
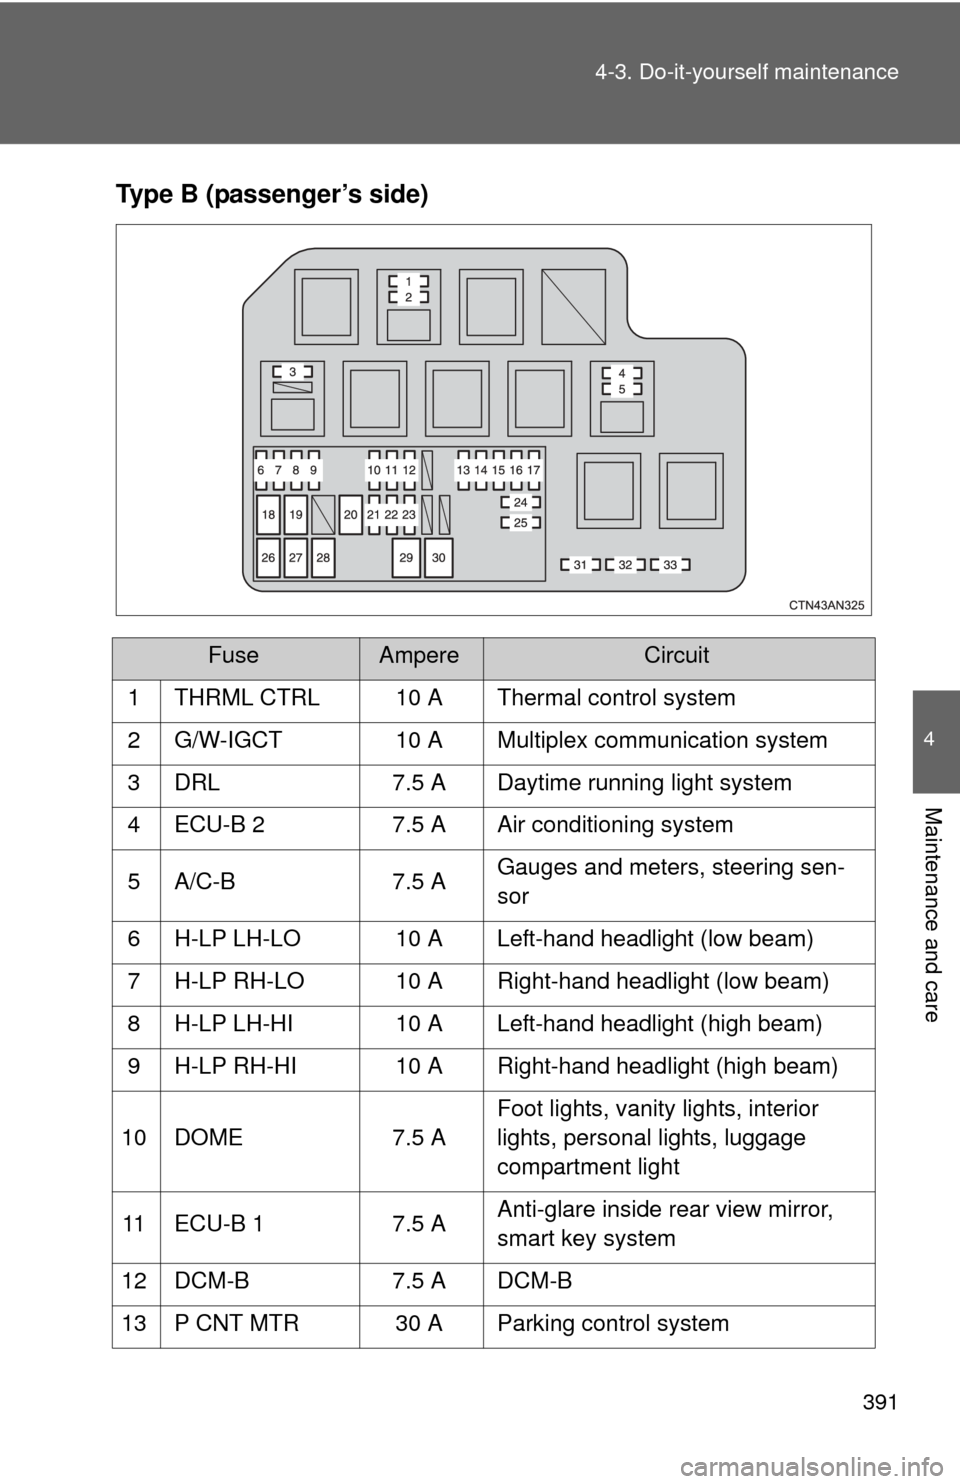
Type B (passenger’s side)
FuseAmpereCircuit
1 THRML CTRL 10 A Thermal control system
2 G/W-IGCT 10 A Multiplex communication system
3 DRL 7.5 A Daytime running light system
4 ECU-B 2 7.5 A Air conditioning system
5 A/C-B 7.5 A Gauges and meters, steering sen-
sor
6 H-LP LH-LO 10 A Left-hand headlight (low beam)
7 H-LP RH-LO 10 A Right-hand headlight (low beam)
8 H-LP LH-HI 10 A Left-hand headlight (high beam)
9 H-LP RH-HI 10 A Right-hand headlight (high beam)
10 DOME 7.5 A Foot lights, vanity lights, interior
lights, personal lights, luggage
compartment light
11 ECU-B 1 7.5 A Anti-glare inside rear view mirror,
smart key system
12 DCM-B 7.5 A DCM-B
13 P CNT MTR 30 A Parking control system
Page 393 of 521
392 4-3. Do-it-yourself maintenance
14 SMART7.5 A Smart key system
15 STRG LOCK 20 A Steering lock system
16 AM2 7.5 A Starting system
17 ABS 2 7.5 A Anti-lock brake system
18 PTC HTR 2 50 A Air conditioning system
19 PTC HTR 1 50 A Air conditioning system
20 PTC HTR 3 50 A Air conditioning system
21 CHARGER 5 A Charging system
22 IGCT 2 20 A THRML CTRL, G/W-IGCT
23 HV BATT 10 A Traction battery
24 PM-B 7.5 A Power management system
25 ODS 7.5 A Occupant classification system
26 HTR 50 A Air conditioning system
27 FAN 1 50 A Electric cooling fans
28 FAN 2 50 A Electric cooling fans
29 H-LP MAIN 40 A H-LP LH-LO, H-LP RH-LO, H-LP
LH-HI, H-LP RH-HI, manual head-
light leveling system, daytime run-
ning light system
30 ECU-B MAIN 30 A ECU-B 2, A/C-B
31 SPARE 5 A Spare fuse
32 SPARE 10 A Spare fuse
33 SPARE 20 A Spare fuse
FuseAmpereCircuit
Page 394 of 521
393
4-3. Do-it-yourself maintenance
4
Maintenance and care
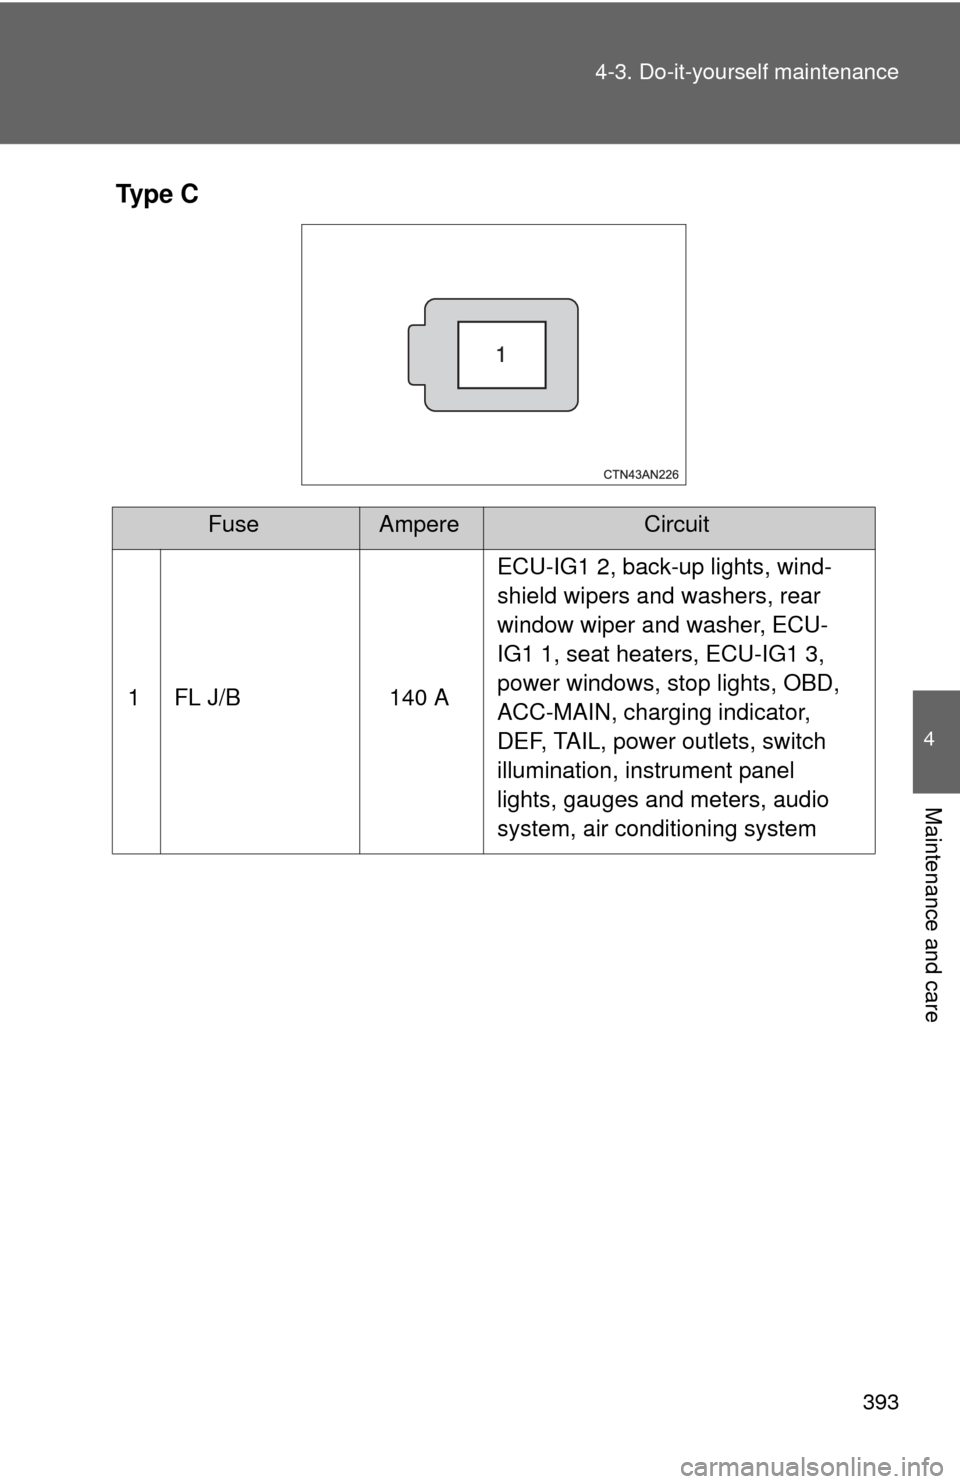
Ty p e C
FuseAmpereCircuit
1 FL J/B 140 A ECU-IG1 2, back-up lights, wind-
shield wipers and washers, rear
window wiper and washer, ECU-
IG1 1, seat heaters, ECU-IG1 3,
power windows, stop lights, OBD,
ACC-MAIN, charging indicator,
DEF, TAIL, power outlets, switch
illumination, instrument panel
lights, gauges and meters, audio
system, air conditioning system
Page 395 of 521
394 4-3. Do-it-yourself maintenance
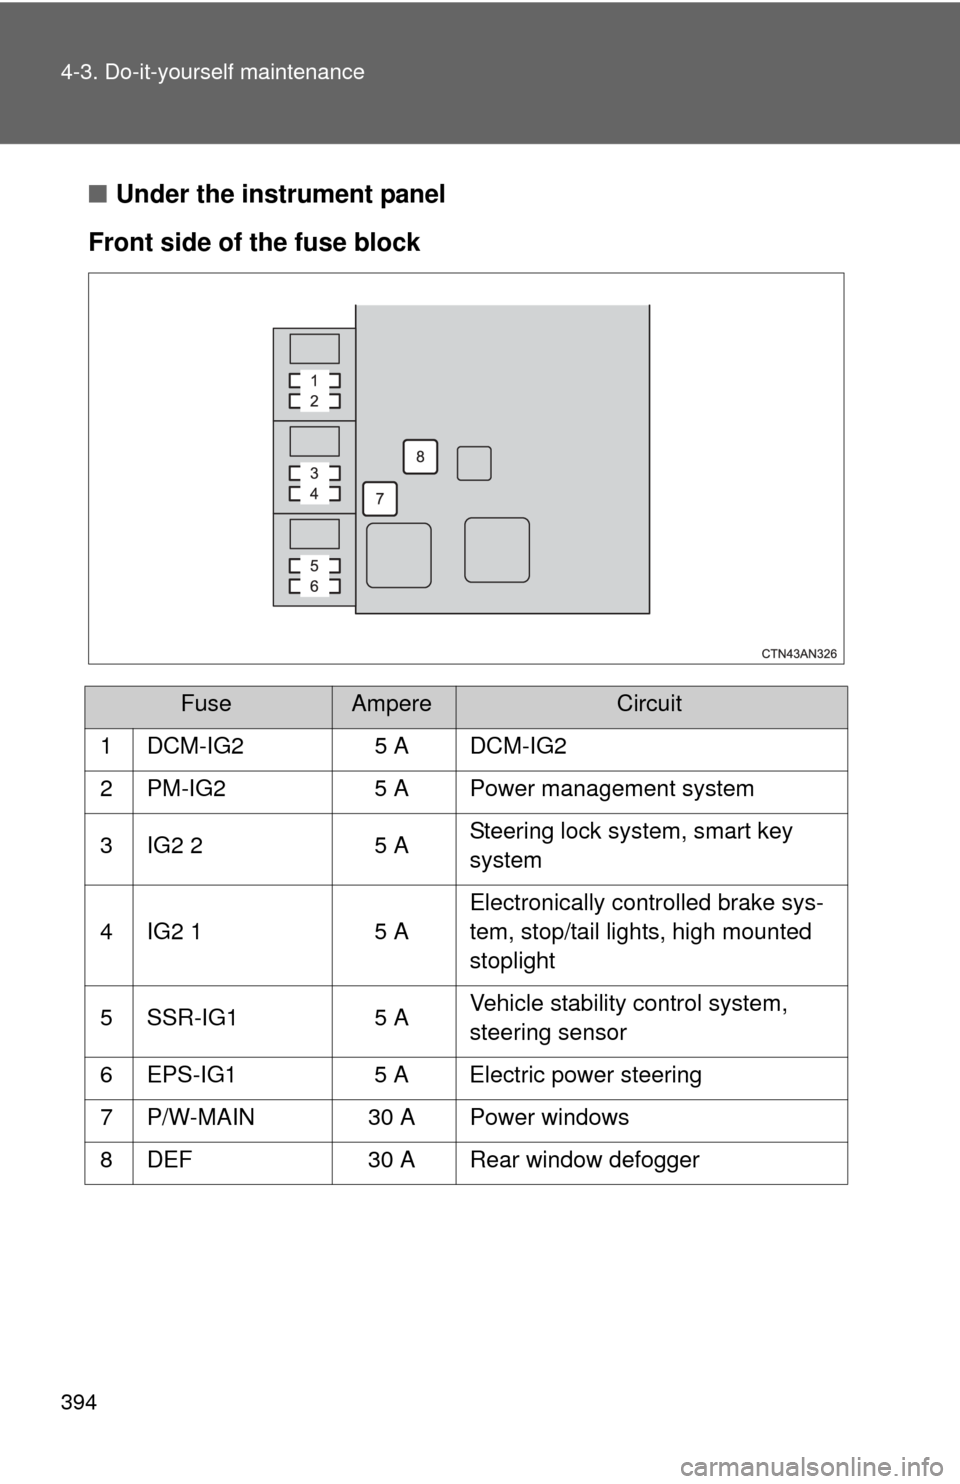
■Under the instrument panel
Front side of the fuse block
FuseAmpereCircuit
1 DCM-IG2 5 A DCM-IG2
2 PM-IG2 5 A Power management system
3 IG2 2 5 A Steering lock system, smart key
system
4 IG2 1 5 A Electronically controlled brake sys-
tem, stop/tail lights, high mounted
stoplight
5 SSR-IG1 5 A Vehicle stability control system,
steering sensor
6 EPS-IG1 5 A Electric power steering
7 P/W-MAIN 30 A Power windows
8 DEF 30 A Rear window defogger
Page 396 of 521
395
4-3. Do-it-yourself maintenance
4
Maintenance and care
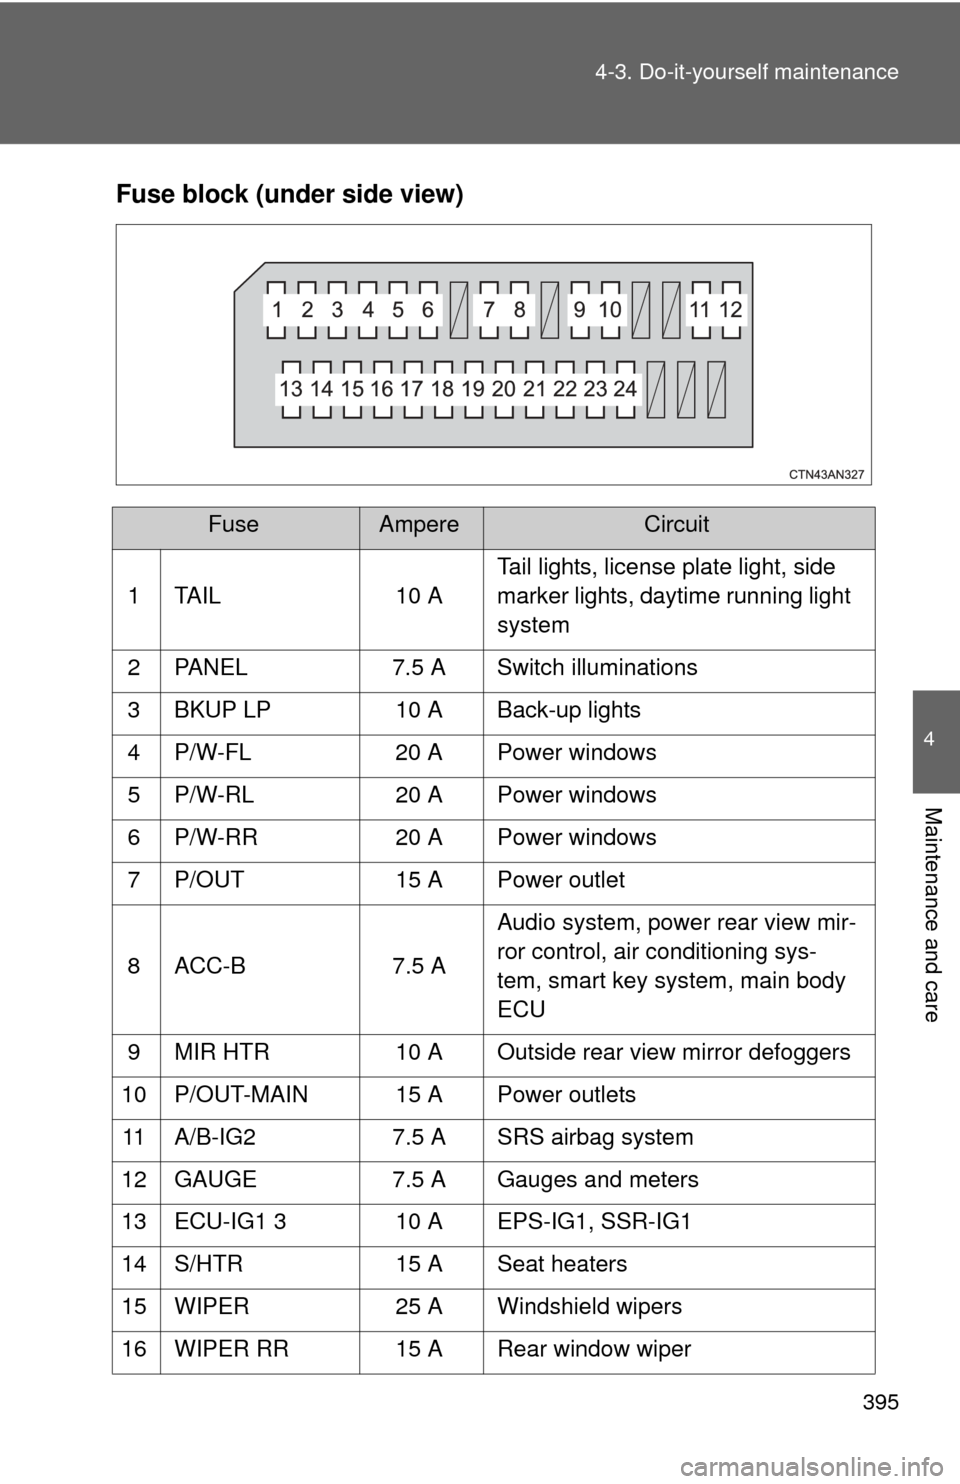
Fuse block (under side view)
FuseAmpereCircuit
1 TAIL 10 A Tail lights, license plate light, side
marker lights, daytime running light
system
2 PANEL 7.5 A Switch illuminations
3 BKUP LP 10 A Back-up lights
4 P/W-FL 20 A Power windows
5 P/W-RL 20 A Power windows
6 P/W-RR 20 A Power windows
7 P/OUT 15 A Power outlet
8 ACC-B 7.5 A Audio system, power rear view mir-
ror control, air conditioning sys-
tem, smart key system, main body
ECU
9 MIR HTR 10 A Outside rear view mirror defoggers
10 P/OUT-MAIN 15 A Power outlets 11 A/B-IG2 7.5 A SRS airbag system
12 GAUGE 7.5 A Gauges and meters
13 ECU-IG1 3 10 A EPS-IG1, SSR-IG1
14 S/HTR 15 A Seat heaters
15 WIPER 25 A Windshield wipers
16 WIPER RR 15 A Rear window wiper
Page 397 of 521
396 4-3. Do-it-yourself maintenance
17 WASHER15 AWindshield washer, rear window
washer
18 ECU-IG1 1 10 A Electronically controlled brake sys-
tem, tire pressure warning system,
air conditioning system, main body
ECU, anti-glare inside rear view
mirror, Vehicle Proximity Notifica-
tion System, navigation system
19 ECU-IG1 2 10 A Emergency flashers, rear window
defogger, air conditioning system
20 OBD 7.5 A On-board diagnosis system
21 STOP 10 AStop/tail lights, high mounted stop-
light
22 CHRG IND 7.5 A Charging indicator
23 DOOR 25 A Power windows
24 ACC-MAIN 25 A ACC-B, P/OUT, DCM
FuseAmpereCircuit
Page 398 of 521
397
4-3. Do-it-yourself maintenance
4
Maintenance and care
■
After a fuse is replaced
●If the lights do not turn on even after the fuse has been replaced, a bulb
may need replacement. ( P. 400)
● If the replaced fuse blows again, have the vehicle inspected by your
Toyota dealer.
■ If there is an overload in a circuit
The fuses are designed to blow, protecting the wiring harness from damage.
■ When replacing light bulbs
Toyota recommends that you use genuine Toyota products designed for this
vehicle.
Because certain bulbs are connected to circuits designed to prevent over-
load, non-genuine parts or parts not designed for this vehicle may be unus-
able.
CAUTION
■To prevent system breakdowns and vehicle fire
Observe the following precautions.
Failure to do so may cause damage to the vehicle, and possibly a fire or
injury.
●Never use a fuse of a higher amperage rating than that indicated, or use
any other object in place of a fuse.
● Always use a genuine Toyota fuse or equivalent.
Never replace a fuse with a wire, even as a temporary fix.
● Do not modify the fuses or fuse boxes.
NOTICE
■Before replacing fuses
Have the cause of electrical overload determined and repaired by your
Toyota dealer as soon as possible.
Page 399 of 521
398
4-3. Do-it-yourself maintenance
Headlight aim
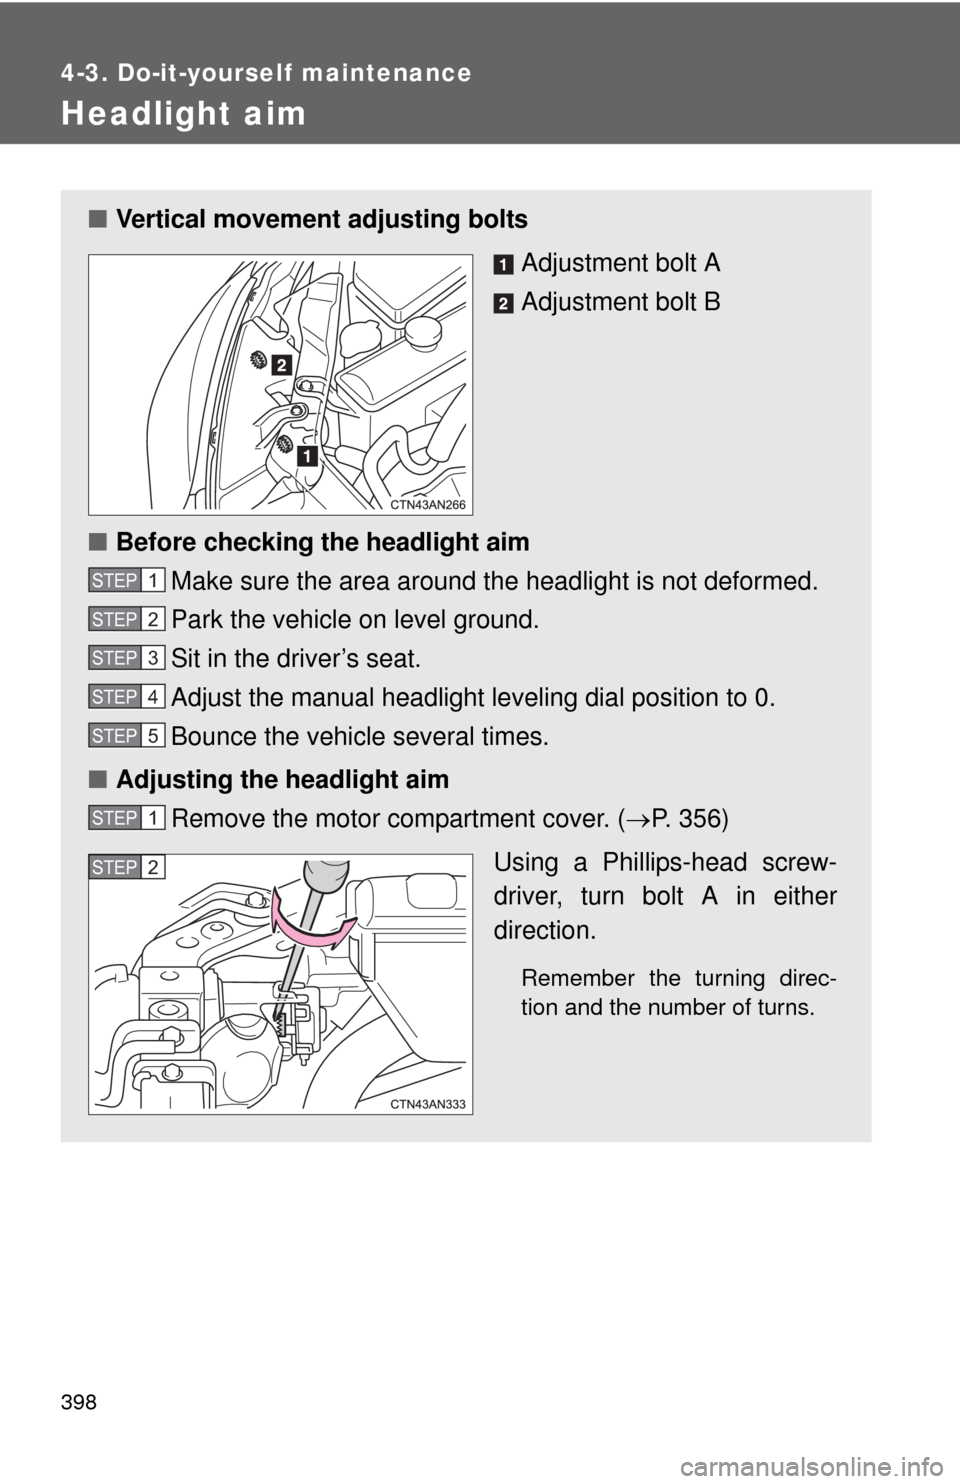
■Vertical movement adjusting bolts
Adjustment bolt A
Adjustment bolt B
■ Before checking the headlight aim
Make sure the area around the headlight is not deformed.
Park the vehicle on level ground.
Sit in the driver’s seat.
Adjust the manual headlight leveling dial position to 0.
Bounce the vehicle several times.
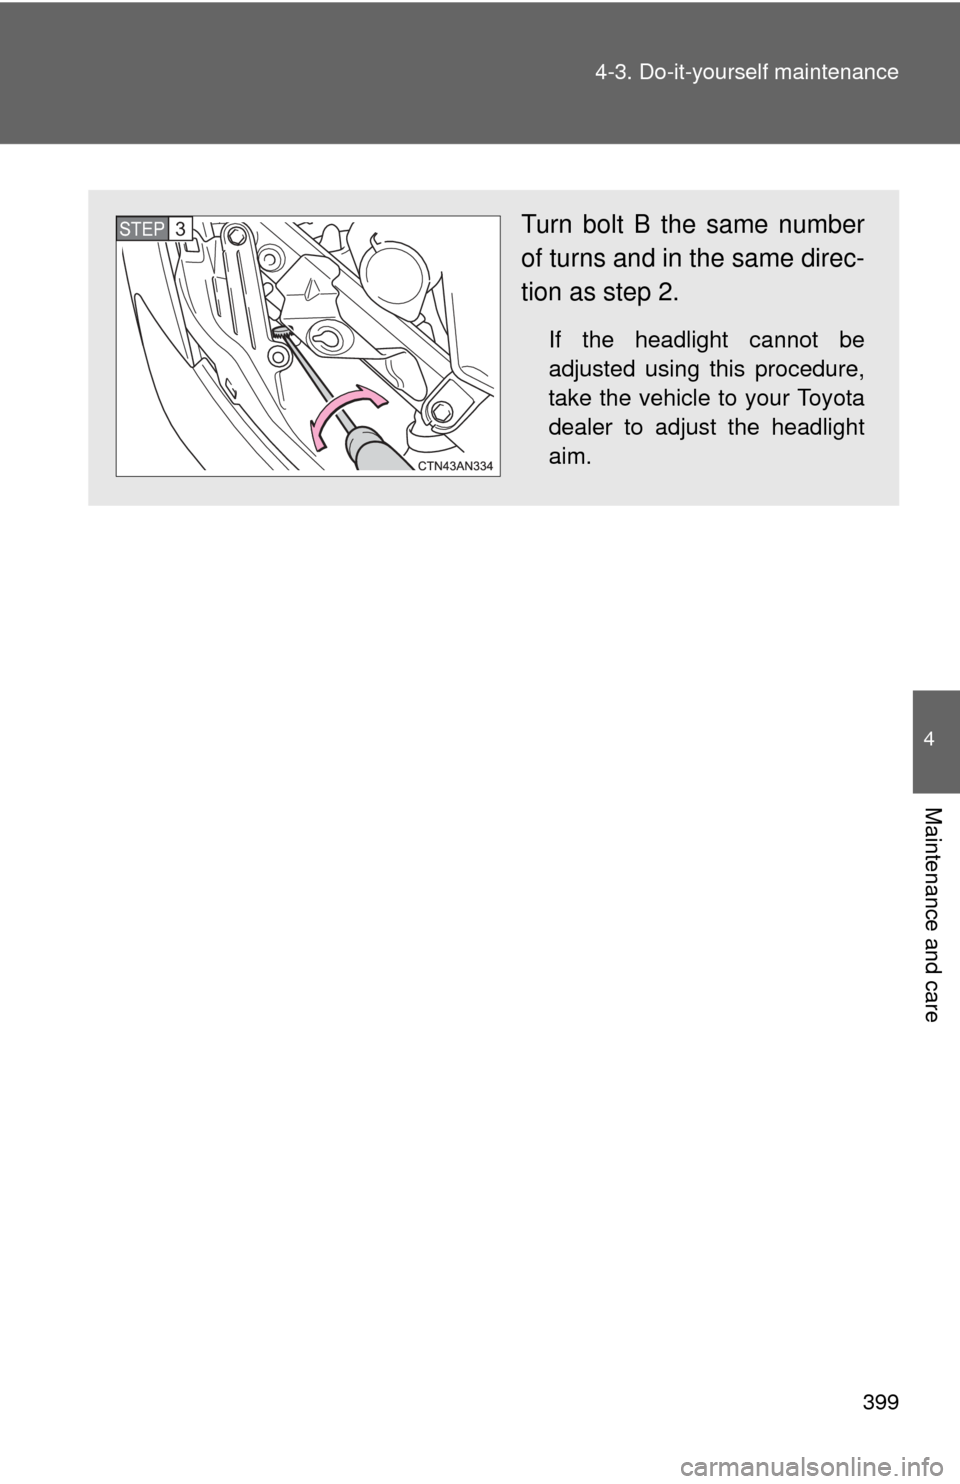
■ Adjusting the headlight aim
Remove the motor compartment cover. ( P. 356)
Using a Phillips-head screw-
driver, turn bolt A in either
direction.
Remember the turning direc-
tion and the number of turns.
STEP 1
STEP 2
STEP 3
STEP 4
STEP 5
STEP 1
STEP 2
Page 400 of 521
399
4-3. Do-it-yourself maintenance
4
Maintenance and care
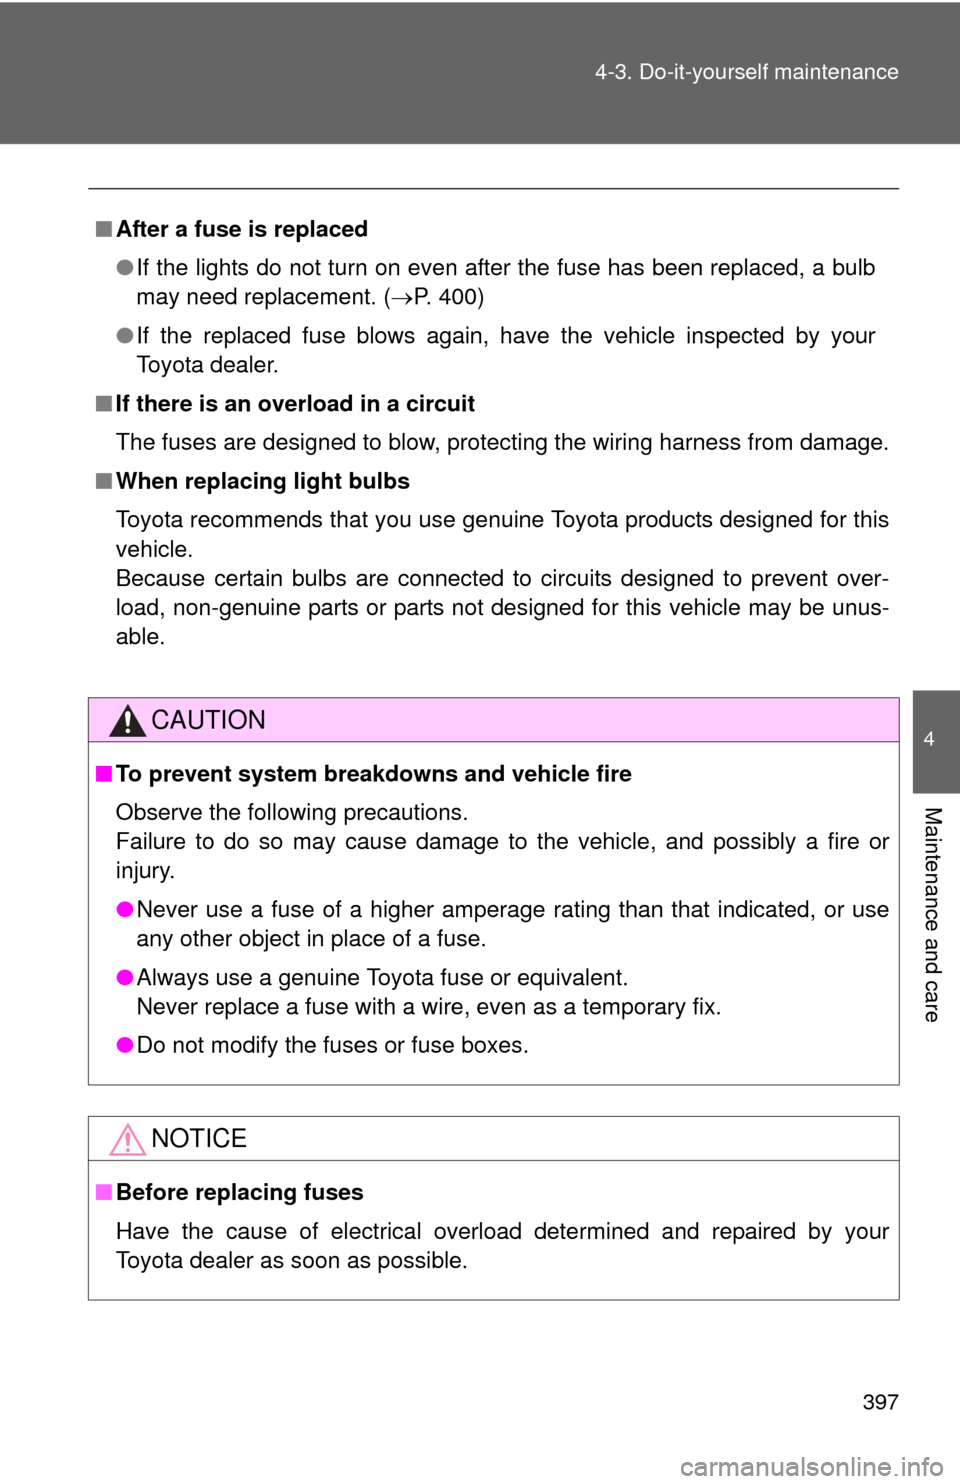
Turn bolt B the same number
of turns and in the same direc-
tion as step 2.
If the headlight cannot be
adjusted using this procedure,
take the vehicle to your Toyota
dealer to adjust the headlight
aim.
STEP 3
Trending: service interval, reset, emergency towing, coolant reservoir, automatic transmission, brake, fuses

