ev drive mode TOYOTA RAV4 HYBRID 2021 User Guide
[x] Cancel search | Manufacturer: TOYOTA, Model Year: 2021, Model line: RAV4 HYBRID, Model: TOYOTA RAV4 HYBRID 2021Pages: 752, PDF Size: 31.25 MB
Page 147 of 752
1473-2. Opening, closing and locking the doors
3
Before driving
*: If equipped
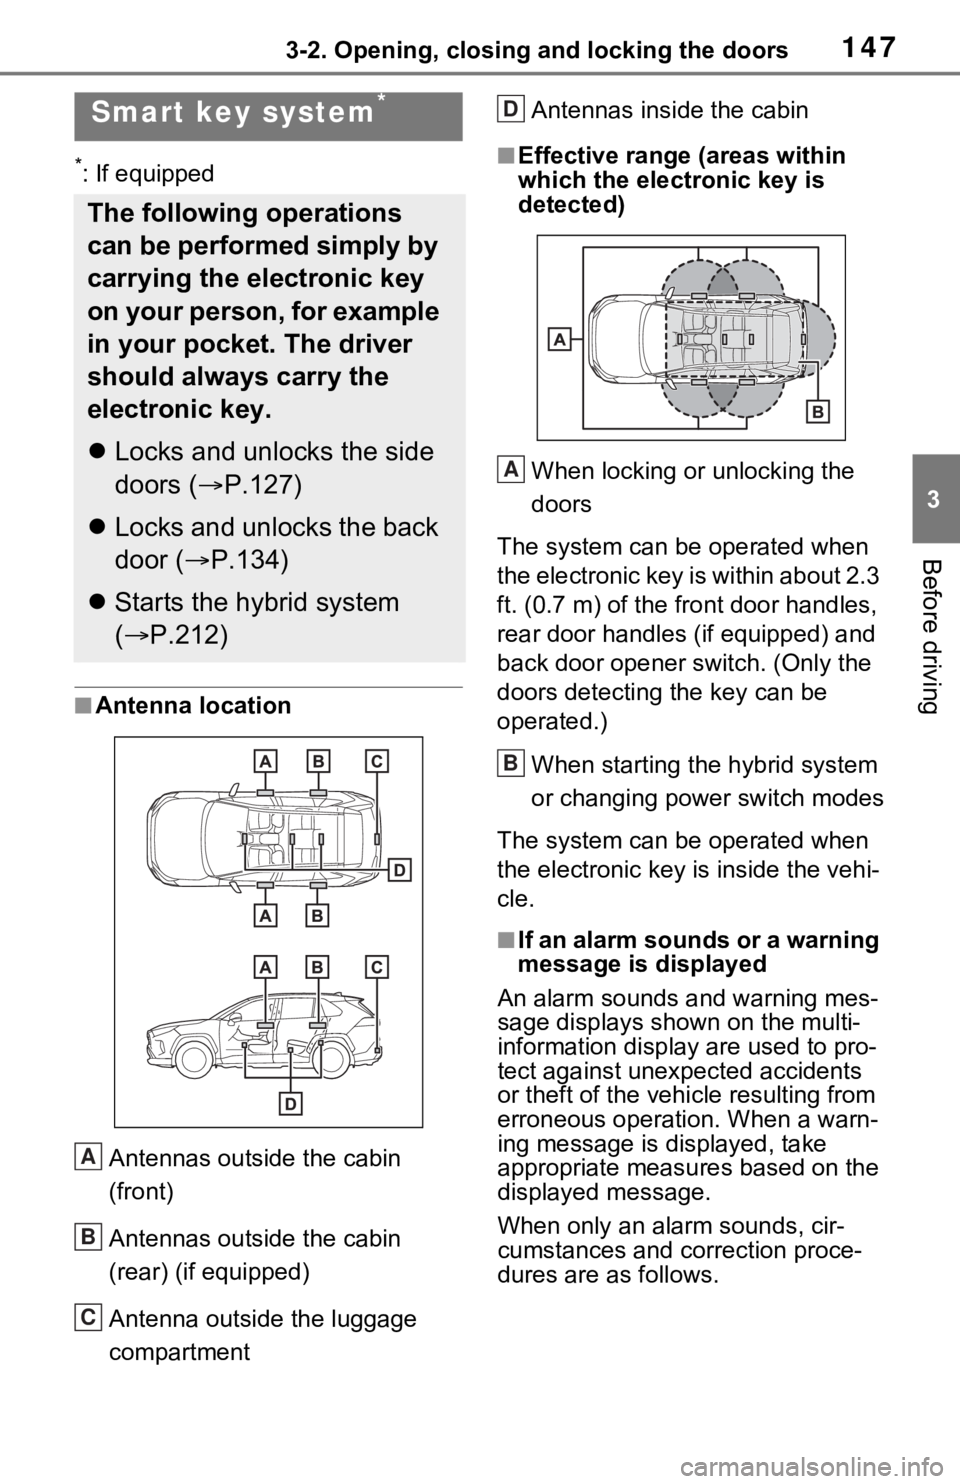
■Antenna location
Antennas outside the cabin
(front)
Antennas outside the cabin
(rear) (if equipped)
Antenna outside the luggage
compartment Antennas inside the cabin
■Effective range
(areas within
which the electronic key is
detected)
When locking or unlocking the
doors
The system can be operated when
the electronic key is within about 2.3
ft. (0.7 m) of the fro nt door handles,
rear door handles (if equipped) and
back door opener s witch. (Only the
doors detecting the key can be
operated.)
When starting the hybrid system
or changing power switch modes
The system can be operated when
the electronic key i s inside the vehi-
cle.
■If an alarm sounds or a warning
message is displayed
An alarm sounds and warning mes-
sage displays shown on the multi-
information display are used to pro-
tect against unexpected accidents
or theft of the vehicl e resulting from
erroneous operation. When a warn-
ing message is displayed, take
appropriate measures based on the
displayed message.
When only an alarm sounds, cir-
cumstances and correction proce-
dures are as follows.
Smart key system*
The following operations
can be performed simply by
carrying the electronic key
on your person, for example
in your pocket. The driver
should always carry the
electronic key.
Locks and unlocks the side
doors ( P.127)
Locks and unlocks the back
door ( P.134)
Starts the hybrid system
( P.212)
A
B
C
D
A
B
Page 148 of 752
1483-2. Opening, closing and locking the doors
●When an exterior alarm sounds
once for 5 seconds
●When an interior alarm pings con-
tinuously
■Battery-saving function
The battery-saving function will be
activated in order to prevent the
electronic key battery and the 12-
volt battery from being discharged
while the vehicle is not in operation
for a long time.
●In the following situations, the
smart key system may take some
time to unlock the doors.
• The electronic key has been left in an area of approximately 6 ft. (2
m) of the outside of the vehicle for
10 minutes or longer.
• The smart key system has not been used for 5 days or longer.
●If the smart key system has not
been used for 14 days or longer,
the doors canno t be unlocked at
any doors except the driver’s
door. In this case, take hold of the
driver’s door handle, or use the
wireless remote control or the mechanical key, to unlock the
doors.
■Turning an electronic key to
battery-saving mode
●When battery-saving mode is set,
battery depletion is minimized by
stopping the electronic key from
receiving radio waves.
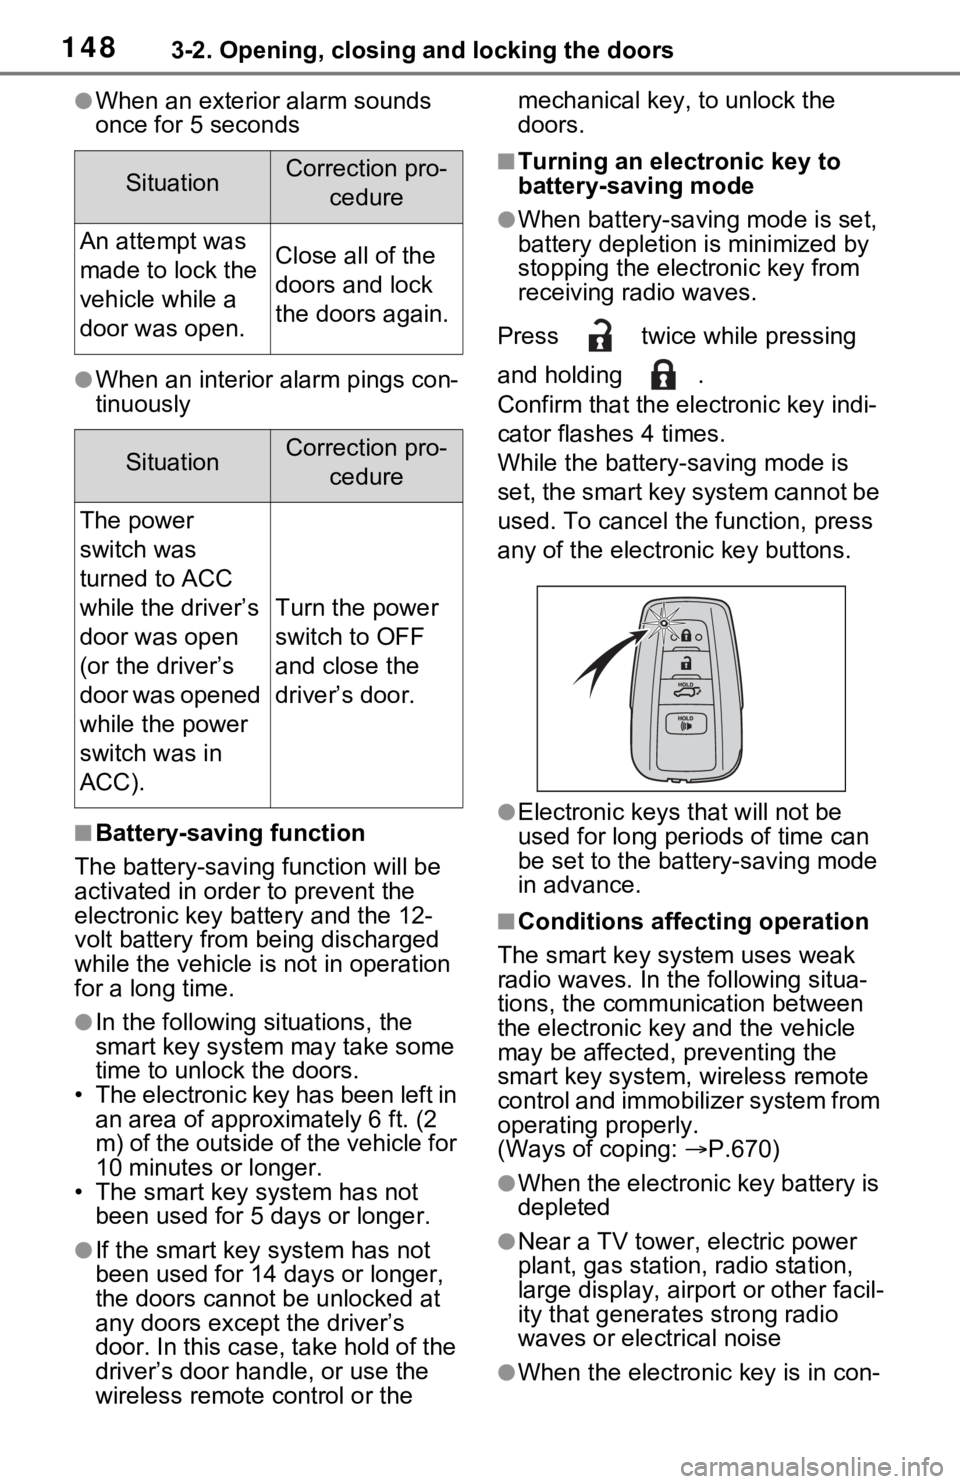
Press twice while pressing
and holding .
Confirm that the ele ctronic key indi-
cator flashes 4 times.
While the battery-saving mode is
set, the smart key system cannot be
used. To cancel the function, press
any of the electronic key buttons.
●Electronic keys that will not be
used for long periods of time can
be set to the battery-saving mode
in advance.
■Conditions affecting operation
The smart key system uses weak
radio waves. In the following situa-
tions, the communication between
the electronic key and the vehicle
may be affected, preventing the
smart key system, wireless remote
control and immobilizer system from
operating properly.
(Ways of coping: P.670)
●When the electronic key battery is
depleted
●Near a TV tower, electric power
plant, gas station, radio station,
large display, airpo rt or other facil-
ity that generates strong radio
waves or electrical noise
●When the electronic key is in con-
SituationCorrection pro-
cedure
An attempt was
made to lock the
vehicle while a
door was open.Close all of the
doors and lock
the doors again.
SituationCorrection pro-cedure
The power
switch was
turned to ACC
while the driver’s
door was open
(or the driver’s
door was opened
while the power
switch was in
ACC).
Turn the power
switch to OFF
and close the
driver’s door.
Page 150 of 752

1503-2. Opening, closing and locking the doors
the effective range, the door may
lock and unlock repeatedly. In that
case, follow the fo llowing correc-
tion procedures to wash the vehi-
cle:
• Place the electronic key in a loca- tion 6 ft. (2 m) or more away from
the vehicle. (Take care to ensure
that the key is not stolen.)
• Set the electronic key to battery-
saving mode to disable the smart
key system. ( P.148)
●If the electronic key is inside the
vehicle and a door handle
becomes wet during a car wash, a
message may be shown on the
multi-informatio n display and a
buzzer will sound outside the vehi-
cle. To turn off the alarm, lock all
the doors.
●The lock sensor may not work
properly if it com es into contact
with ice, snow, mud, etc. Clean
the lock sensor and attempt to
operate it again, or use the lock
sensor on the lower part of the
door handle.
●A sudden approac h to the effec-
tive range or door handle may pre-
vent the doors from being
unlocked. In this case, return the
door handle to the original position
and check that the doors unlock
before pulling the door handle
again.
●If there is another electronic key in
the detection area, it may take
slightly longer to unlock the doors
after the door handle is gripped.
■When the vehicle is not driven
for extended periods
●To prevent theft of the vehicle, do
not leave the electronic key within
6 ft. (2 m) of the vehicle.
●The smart key system can be
deactivated in advance. ( P.710)
●Battery-saving mode can reduce
the power consumption of elec-
tronic keys. ( P.148)
■To operate the system properly
Make sure to carry the electronic
key when operating the system. Do
not get the electronic key too close
to the vehicle when operating the
system from the out side of the vehi-
cle.
Depending on the position and hold-
ing condition of the electronic key,
the key may not be detected cor-
rectly and the system may not oper-
ate properly. (The alarm may go off
accidentally, or the door lock pre-
vention may not operate.)
■If the smart key system does
not operate properly
●Locking and unlocking the doors:
Use the mechanical key.
( P.670)
●Starting the hybrid system:
P.671
■Customization
Settings (e.g. smart key system)
can be changed.
(Customizable features: P.709)
If the smart key system has been
deactivated in a customized setting,
refer to the explanations for the fol-
lowing operations.
●Locking and unlocking the doors:
Use the wireless remote control or
mechanical key. ( P.127, 670)
●Starting the hybr id system and
changing power switch modes:
P.671
●Stopping the hybrid system:
P.214
Page 165 of 752
1653-4. Adjusting the steering wheel and mirrors
3
Before driving
*: If equipped
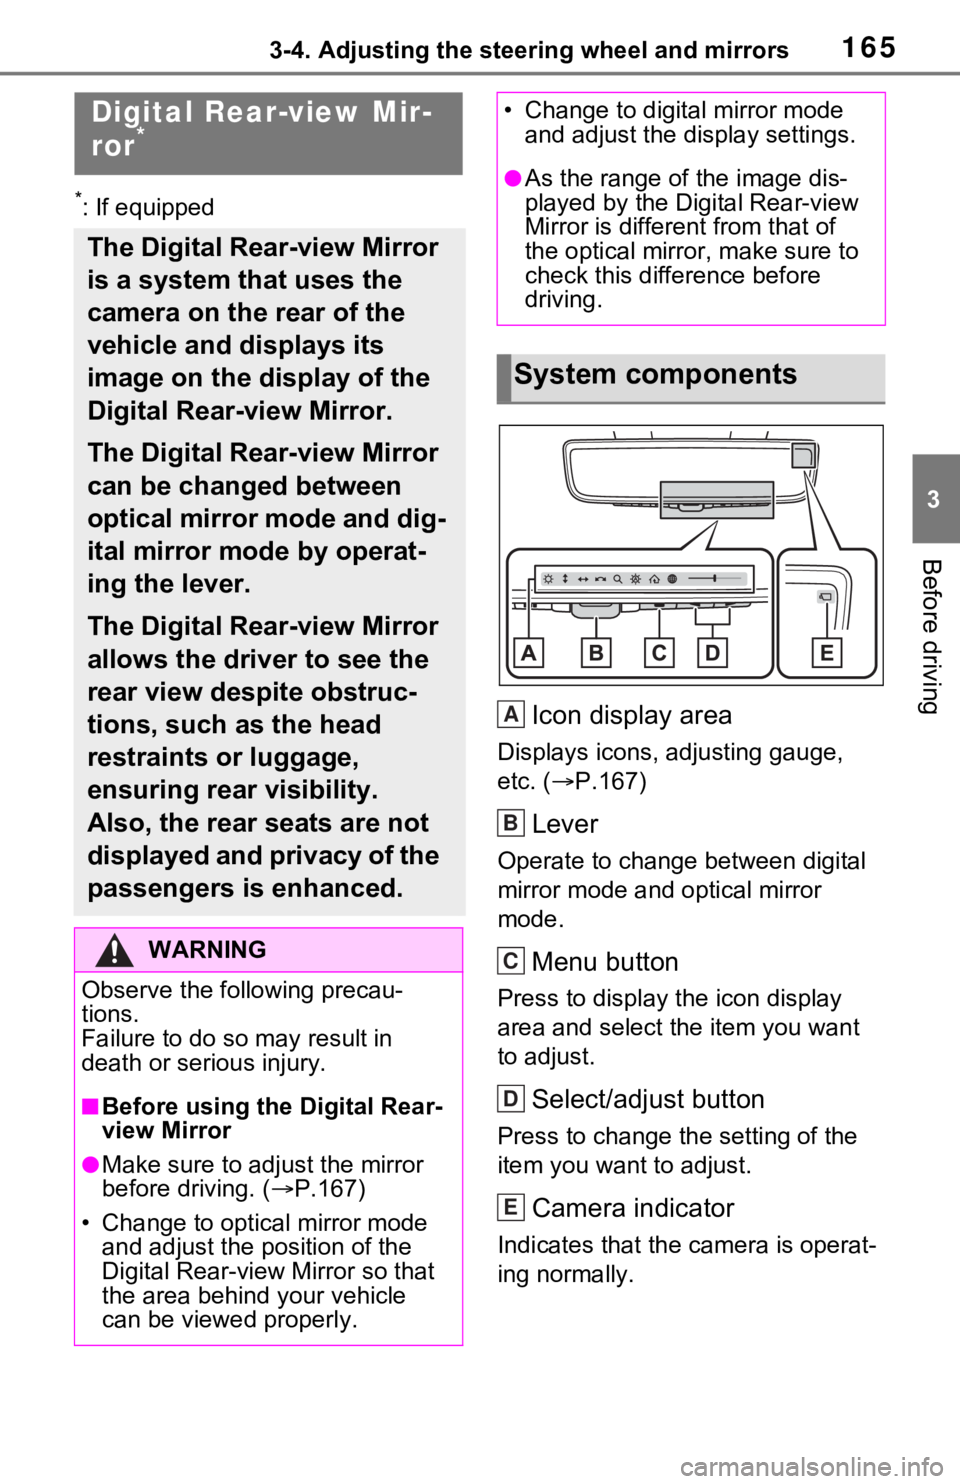
Icon display area
Displays icons, adjusting gauge,
etc. (P.167)
Lever
Operate to change between digital
mirror mode and optical mirror
mode.
Menu button
Press to display the icon display
area and select the item you want
to adjust.
Select/adjust button
Press to change the setting of the
item you want to adjust.
Camera indicator
Indicates that the camera is operat-
ing normally.
Digital Rear-view Mir-
ror*
The Digital Rear-view Mirror
is a system that uses the
camera on the rear of the
vehicle and displays its
image on the display of the
Digital Rear-view Mirror.
The Digital Rear-view Mirror
can be changed between
optical mirror mode and dig-
ital mirror mode by operat-
ing the lever.
The Digital Rear-view Mirror
allows the driver to see the
rear view despite obstruc-
tions, such as the head
restraints or luggage,
ensuring rear visibility.
Also, the rear seats are not
displayed and privacy of the
passengers is enhanced.
WARNING
Observe the following precau-
tions.
Failure to do so m ay result in
death or serious injury.
■Before using the Digital Rear-
view Mirror
●Make sure to adjust the mirror
before driving. ( P.167)
• Change to optical mirror mode and adjust the position of the
Digital Rear-view Mirror so that
the area behind your vehicle
can be viewed properly.
• Change to digital mirror mode and adjust the display settings.
●As the range of the image dis-
played by the Digital Rear-view
Mirror is different from that of
the optical mirror, make sure to
check this difference before
driving.
System components
A
B
C
D
E
Page 166 of 752
1663-4. Adjusting the steering wheel and mirrors
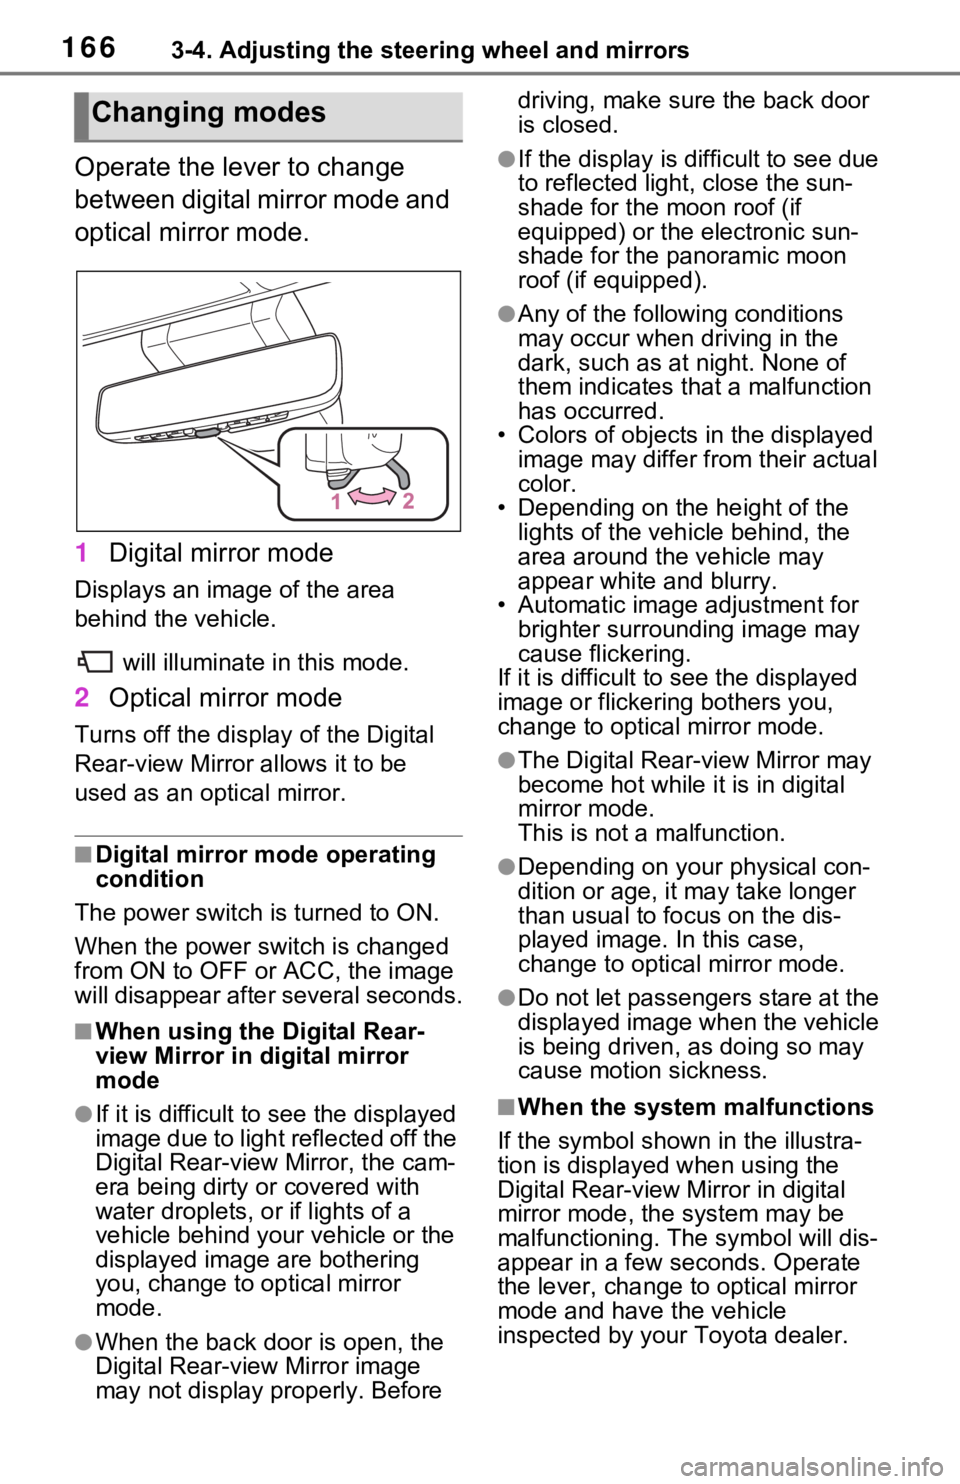
Operate the lever to change
between digital mirror mode and
optical mirror mode.
1Digital mirror mode
Displays an image of the area
behind the vehicle.
will illuminate in this mode.
2Optical mirror mode
Turns off the disp lay of the Digital
Rear-view Mirror allows it to be
used as an optical mirror.
■Digital mirror mode operating
condition
The power switch is turned to ON.
When the power switch is changed
from ON to OFF or ACC, the image
will disappear afte r several seconds.
■When using the Digital Rear-
view Mirror in digital mirror
mode
●If it is difficult to see the displayed
image due to light reflected off the
Digital Rear-view Mirror, the cam-
era being dirty or covered with
water droplets, or if lights of a
vehicle behind your vehicle or the
displayed image are bothering
you, change to optical mirror
mode.
●When the back door is open, the
Digital Rear-view Mirror image
may not display properly. Before driving, make sure the back door
is closed.
●If the display is difficult to see due
to reflected light
, close the sun-
shade for the moon roof (if
equipped) or the electronic sun-
shade for the panoramic moon
roof (if equipped).
●Any of the following conditions
may occur when driving in the
dark, such as at night. None of
them indicates that a malfunction
has occurred.
• Colors of objects in the displayed
image may differ from their actual
color.
• Depending on the height of the
lights of the vehicle behind, the
area around the vehicle may
appear white and blurry.
• Automatic image adjustment for
brighter surrounding image may
cause flickering.
If it is difficult to see the displayed
image or flickering bothers you,
change to optical mirror mode.
●The Digital Rear-view Mirror may
become hot while it is in digital
mirror mode.
This is not a malfunction.
●Depending on your physical con-
dition or age, it may take longer
than usual to fo cus on the dis-
played image. In this case,
change to optical mirror mode.
●Do not let passengers stare at the
displayed image when the vehicle
is being driven, as doing so may
cause motion sickness.
■When the system malfunctions
If the symbol shown in the illustra-
tion is displayed when using the
Digital Rear-view Mirror in digital
mirror mode, the system may be
malfunctioning. The symbol will dis-
appear in a few seconds. Operate
the lever, change to optical mirror
mode and have the vehicle
inspected by your Toyota dealer.
Changing modes
Page 169 of 752
1693-4. Adjusting the steering wheel and mirrors
3
Before driving
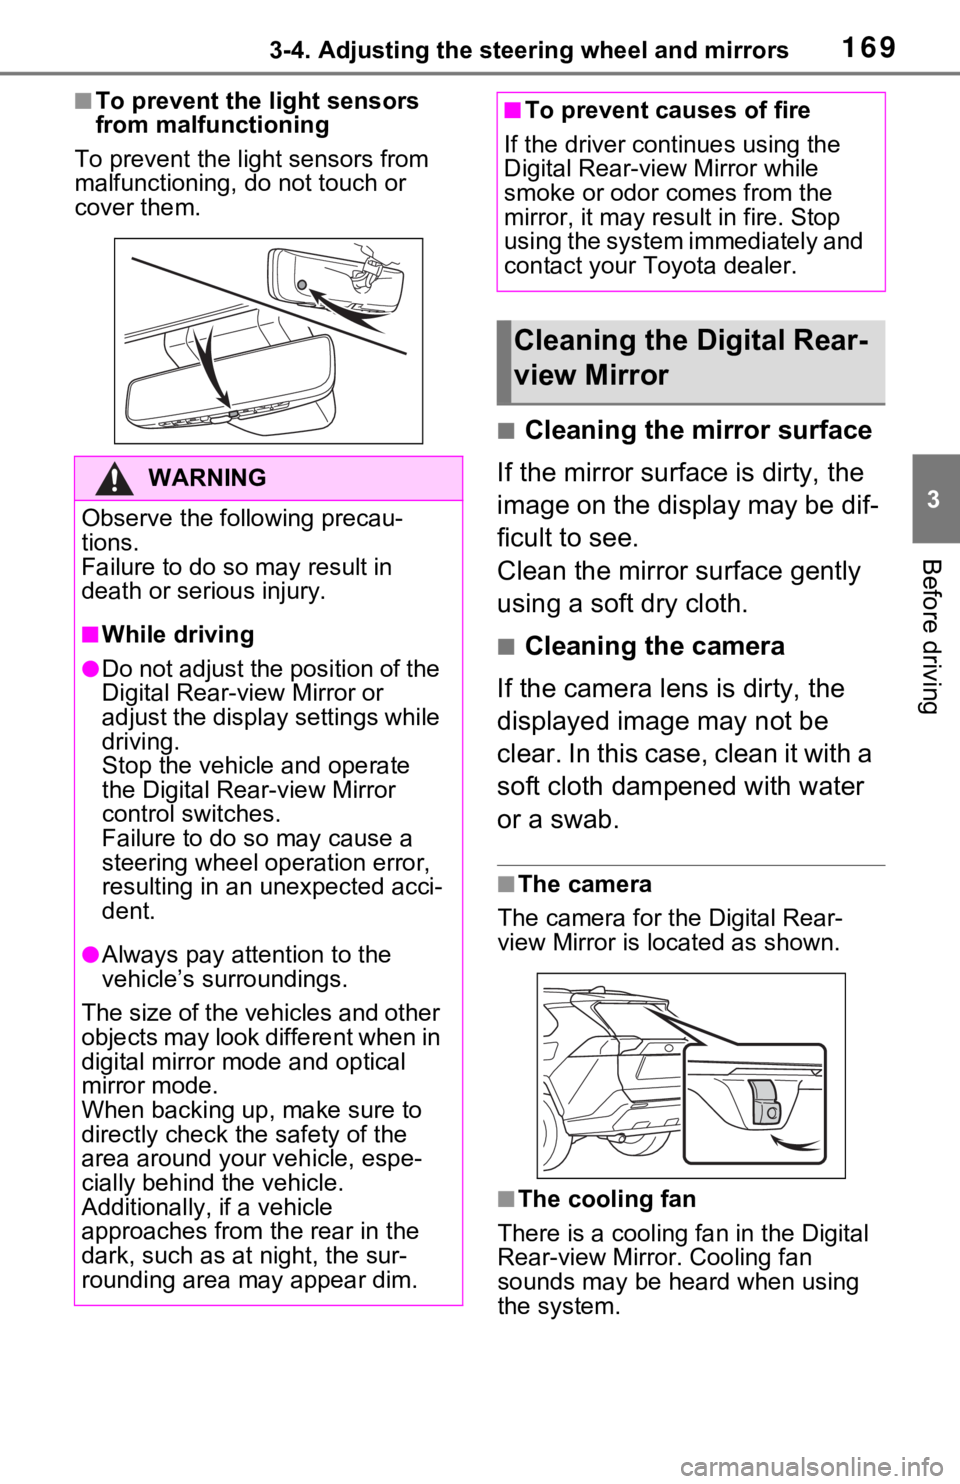
■To prevent the light sensors
from malfunctioning
To prevent the light sensors from
malfunctioning, do not touch or
cover them.
■Cleaning the mirror surface
If the mirror surface is dirty, the
image on the display may be dif-
ficult to see.
Clean the mirror surface gently
using a soft dry cloth.
■Cleaning the camera
If the camera lens is dirty, the
displayed image may not be
clear. In this case, clean it with a
soft cloth dampened with water
or a swab.
■The camera
The camera for the Digital Rear-
view Mirror is located as shown.
■The cooling fan
There is a cooling fan in the Digital
Rear-view Mirror. Cooling fan
sounds may be he ard when using
the system.
WARNING
Observe the following precau-
tions.
Failure to do so m ay result in
death or serious injury.
■While driving
●Do not adjust the position of the
Digital Rear-v iew Mirror or
adjust the display settings while
driving.
Stop the vehicle and operate
the Digital Rear -view Mirror
control switches.
Failure to do so may cause a
steering wheel operation error,
resulting in an unexpected acci-
dent.
●Always pay attention to the
vehicle’s surroundings.
The size of the vehicles and other
objects may look different when in
digital mirror mode and optical
mirror mode.
When backing up, make sure to
directly check the safety of the
area around your vehicle, espe-
cially behind the vehicle.
Additionally, if a vehicle
approaches from the rear in the
dark, such as at night, the sur-
rounding area may appear dim.
■To prevent causes of fire
If the driver continues using the
Digital Rear-view Mirror while
smoke or odor comes from the
mirror, it may result in fire. Stop
using the system immediately and
contact your Toyota dealer.
Cleaning the Digital Rear-
view Mirror
Page 187 of 752
187
4
4
Driving
Driving
4-1. Before drivingDriving the vehicle....... 189
Cargo and luggage ..... 196
Vehicle load limits ....... 199
Trailer towing .............. 200
Dinghy towing ............. 209
4-2. Driving procedures Power (ignition) switch (vehicles without smart key
system)...................... 210
Power (ignition) switch (vehicles with smart key
system)...................... 212
EV drive mode ............ 217
Hybrid transmission .... 219
Turn signal lever ......... 223
Parking brake .............. 224
Brake Hold .................. 227
4-3. Operating the lights and wipers
Headlight switch .......... 229
AHB (Automatic High Beam)........................ 232
Fog light switch ........... 235
Windshield wipers and washer....................... 236
Rear window wiper and washer....................... 239
4-4. Refueling Opening the fuel tank cap.................................. 2414-5. Using the dr
iving support
systems
Toyota Safety Sense 2.0 .................................. 244
PCS (Pre-Collision System) .................................. 250
LTA (Lane Tracing Assist) .................................. 258
RSA (Road Sign Assist) .................................. 268
Dynamic radar cruise con- trol with full-speed range.................................. 271
BSM (Blind Spot Monitor) .................................. 282
Intuitive parking assist . 291
PKSB (Parking Support Brake) ........................ 298
Parking Support Brake func- tion (static objects) .... 303
Parking Support Brake func- tion (rear-crossing vehi-
cles) ........................... 309
Rear view monitor system .................................. 313
Toyota parking assist moni- tor .............................. 321
Panoramic view monitor .................................. 334
Driving mode select switch .................................. 366
Trail Mode ................... 367
Driving assist systems. 369
Page 189 of 752
1894-1. Before driving
4
Driving
4-1.Before driving
■Starting the hybrid system
P.210, 212
■Driving
1 With the brake pedal
depressed, shift the shift
lever to D. ( P.219)
2 Release the parking brake.
( P.224)
If the parking brake is in automatic
mode, the parking brake is
released automatically when shift-
ing the shift lever to any position
other than P. ( P.224)
3 Gradually release the brake
pedal and gently depress the
accelerator pedal to acceler-
ate the vehicle.
■Stopping
1 With the shift lever in D,
depress the brake pedal.
2 If necessary, set the parking
brake. ( P.224)
If the vehicle is to be stopped for an
extended period of time, shift the
shift lever to P. ( P.219)
■Parking the vehicle
1 With the shift lever in D,
depress the brake pedal. 2
Set the parking brake
( P.224), and shift the shift
lever to P ( P.219).
3 Turn the power switch to
OFF to stop the hybrid sys-
tem.
4 Lock the door, making sure
that you have the key on your
person.
If parking on a hill, block the wheels
as needed.
■Starting off on a steep
uphill
1 With the brake pedal
depressed, shift the shift
lever to D. ( P.219)
2 Pull the parking brake switch
and parking brake is set
manually. ( P.224)
3 Release the brake pedal and
gently depress the accelera-
tor pedal to accelerate the
vehicle.
Parking brake automatic release
function ( P.225)
■When starting off on a uphill
The hill-start assist control will acti-
vate. ( P.369)
■For fuel-efficient driving
Keep in mind that hybrid vehicles
are similar to conventional vehicles,
and it is necessary to refrain from
activities such as sudden accelera-
tion, etc. Refer to “Hybrid vehicle
driving tips”. ( P.376)
■Driving in the rain
●Drive carefully whe n it is raining,
because visibility will be reduced,
the windows may become fogged-
up, and the road could be slip-
Driving the vehicle
The following procedures
should be observed to
ensure safe driving:
Driving procedure
Page 190 of 752

1904-1. Before driving
pery.
●Drive carefully when it starts to
rain, as the road surface could be
especially slippery.
●Refrain from high speeds when
driving on an expressway in the
rain, because there may be a
layer of water between the tires
and the road surface, preventing
the steering and brakes from
operating properly.
■ECO Accelerator Guidance
( P.105)
It is easier to drive in an Eco-friendly
manner by driving while referring to
the ECO Accelerator Guidance dis-
play. Also, by using the ECO Accel-
erator Guidance it is easier to
increase the “Eco Score” evaluation.
●When starting off:
While staying within the ECO
Accelerator Guidance range,
gradually depress the accelerator
pedal and accelerate to the
desired speed. If excessive accel-
eration is avoid ed, the “Start”
score will increase.
●When driving:
After accelerating to the desired
speed, release the accelerator
pedal and drive at a stable speed
within the ECO Acce lerator Guid-
ance range. By keeping the vehi-
cle within the E CO Accelerator
Guidance range, the “Cruise”
score will increase.
●When stopping:
When stopping the vehicle, early
releasing the accelerator pedal
will cause the “Stop” score to
increase.
■Restraining the hybrid system
output (Brake Override System)
●When the accelerator and brake
pedals are depressed at the same
time, the hybrid system output
may be restrained.
●A warning message is displayed
on the multi-information display
while the system is operating. (
P.648)
■Restraining sudden start (Drive-
Start Control)
●When the following unusual oper-
ation is performed, the hybrid sys-
tem output may b e restrained.
• When the shift lever is shifted from
R to D, D to R, N to R, P to D
*, or
P to R* (D includes S) with the
accelerator pedal depressed, a
warning message appears on the
multi-information display. If a
warning message is shown on the
multi-information d isplay, read the
message and follow the instruc-
tions.
• When the accelerator pedal is depressed too much while the
vehicle is in reverse.
*: Depending on the situation, the
shift lever may not be changed.
●While Drive-Start Control is being
activated, your v ehicle may have
trouble escaping from the mud or
fresh snow. In such case, deacti-
vate TRAC ( P.370) to cancel
Drive-Start Cont rol so that the
vehicle may be able to escape
from the mud o r fresh snow.
●Drive-Start Contro l does not work
when Trail Mode is turned on.
■Breaking in your new Toyota
To extend the life of the vehicle,
observing the following precautions
is recommended:
●For the first 200 miles (300 km):
Avoid sudden stops.
●For the first 500 miles (800 km):
Do not tow a trailer.
●For the first 600 miles (1000 km):
• Do not drive at extremely high speeds.
• Avoid sudden acceleration.
• Do not drive continuously in low
gears.
• Do not drive at a constant speed
for extended periods.
Page 208 of 752

2084-1. Before driving
4Apply the parking brake
firmly.
5 Shift into P and turn off the
hybrid system.
When restarting after parking
on a slope:
1 With the transmission in P,
start the hybrid system. Be
sure to keep the brake pedal
depressed.
2 Shift into a forward gear. If
reversing, shift into R.
3 If the parking brake is in man-
ual mode, release the park-
ing brake. ( P.224)
4 Release the brake pedal, and
slowly pull or back away from
the wheel blocks. Stop and
apply the brakes.
5 Have someone retrieve the
blocks.
■Break-in schedule
If your vehicle is new or equipped
with any new power train compo-
nents (such as an engine, transmis-
sion, differential or wheel bearing),
Toyota recommends that you do not
tow a trailer unt il the vehicle has
been driven for over 500 miles (800
km).
After the vehicle has been driven for
over 500 miles (800 km), you can
start towing. However, for the next
500 miles (800 km), drive the vehi-
cle at a speed of less than 45 mph
(72 km/h) when towing a trailer, and
avoid full throttle acceleration.
■Maintenance
●If you tow a traile r, your vehicle
will require more f requent mainte-
nance due to the additional load. (See “Scheduled Maintenance
Guide” or “Owner
’s Manual Sup-
plement”.)
●Retighten the fixing bolts of the
towing ball and bracket after
approximately 600 miles (1000
km) of tra iler towing.
■If trailer sway occurs
One or more factors (crosswinds,
passing vehicles, rough roads, etc.)
can adversely affect handling of
your vehicle and t railer, causing
instability.
●If trailer swaying occurs:
• Firmly grip the steering wheel. Steer straight ahead.
Do not try to contr ol trailer sway-
ing by turning the steering wheel.
• Begin releasing the accelerator pedal immediately but very gradu-
ally to reduce speed.
Do not increase speed. Do not
apply vehicle brakes.
If you make no extreme correction
with the steering or brakes, your
vehicle and trailer should stabilize (if
enabled, Trailer Sway Control can
also help to stabilize the vehicle and
trailer.).
●After the trailer swaying has
stopped:
• Stop in a safe place. Get all occu- pants out of the vehicle.
• Check the tires of the vehicle and
the trailer.
• Check the load in the trailer. Make sure the load has not
shifted.
Make sure the tongue weight is
appropriate, if possible.
• Check the load in the vehicle. Make sure the vehicle is not over-
loaded after occupants get in.
If you cannot find any problems, the
speed at which trailer swaying
occurred is beyond the limit of your
particular vehicle-trailer combina-
tion. Drive at a lower speed to pre-
vent instability. Remember that