TOYOTA RAV4 HYBRID 2021 Owners Manual
Manufacturer: TOYOTA, Model Year: 2021, Model line: RAV4 HYBRID, Model: TOYOTA RAV4 HYBRID 2021Pages: 752, PDF Size: 31.25 MB
Page 361 of 752
3614-5. Using the driving support systems
4
Driving
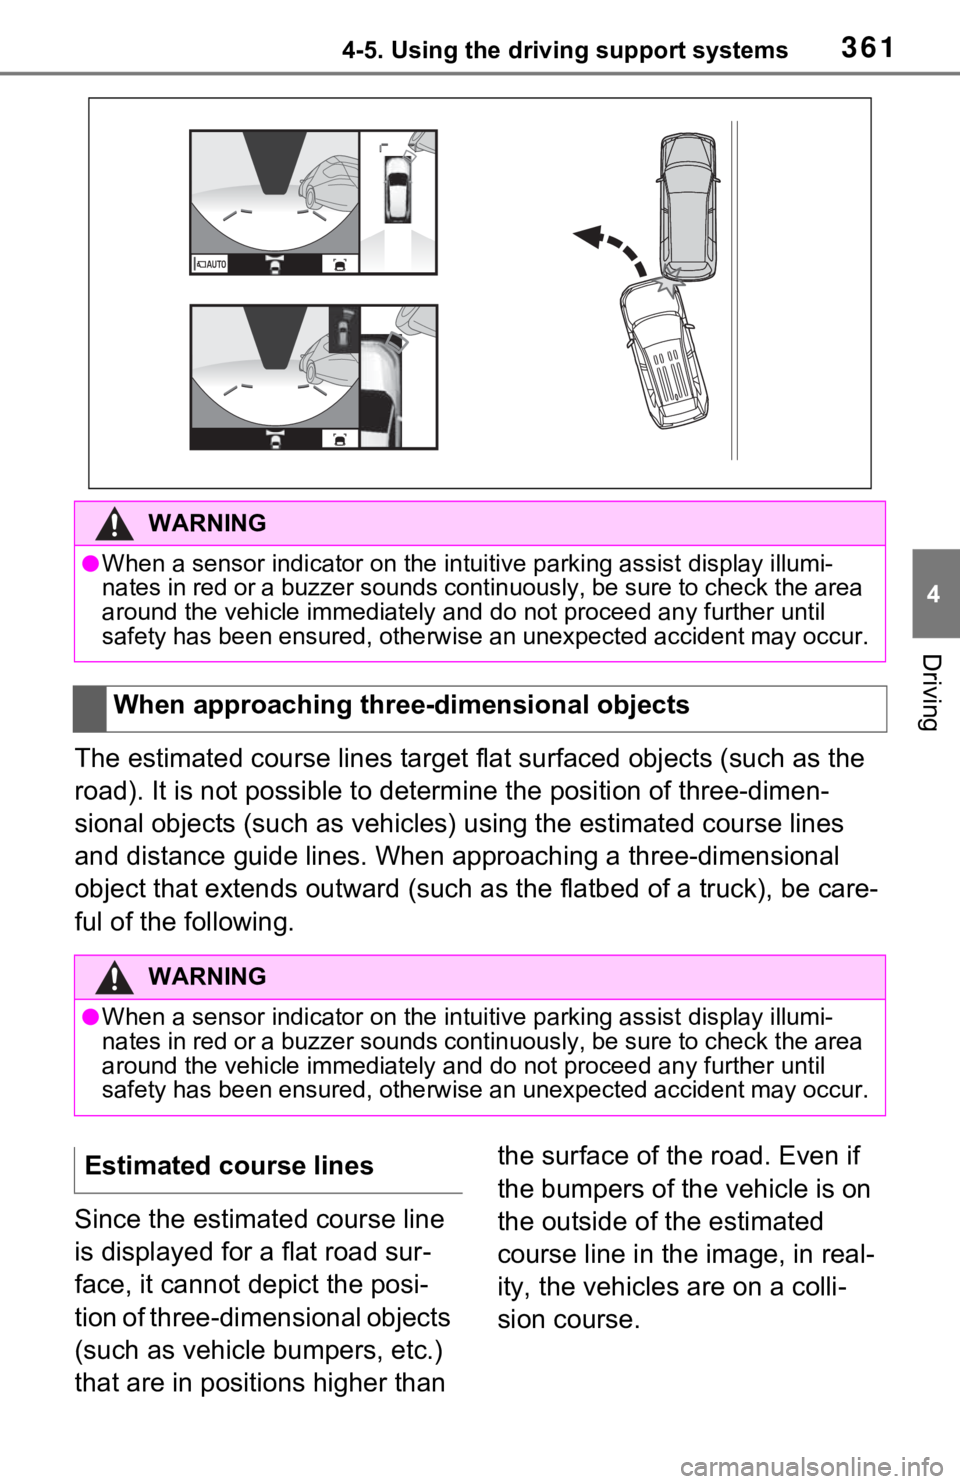
The estimated course lines target flat surfaced objects (such as the
road). It is not possible to determine the position of three-dimen-
sional objects (such as vehicles ) using the estimated course lines
and distance guide lines. When app roaching a three-dimensional
object that extends outward (such as the flatbed of a truck), b e care-
ful of the following.
Since the estimated course line
is displayed for a flat road sur-
face, it cannot depict the posi-
tion of three-dimensional objects
(such as vehicle bumpers, etc.)
that are in positions higher than the surface of the road. Even if
the bumpers of the vehicle is on
the outside of the estimated
course line in the image, in real-
ity, the vehicles are on a colli-
sion course.
WARNING
●When a sensor indicator on the intuitive parking assist display
illumi-
nates in red or a buzzer sounds continuously, be sure to check the area
around the vehicle immediately a nd do not proceed any further until
safety has been ensured, otherwise an unexpected accident may o ccur.
When approaching three-dimensional objects
WARNING
●When a sensor indicator on the intuitive parking assist display illumi-
nates in red or a buzzer sounds continuously, be sure to check the area
around the vehicle immediately a nd do not proceed any further until
safety has been ensured, otherwise an unexpected accident may o ccur.
Estimated course lines
Page 362 of 752
3624-5. Using the driving support systems
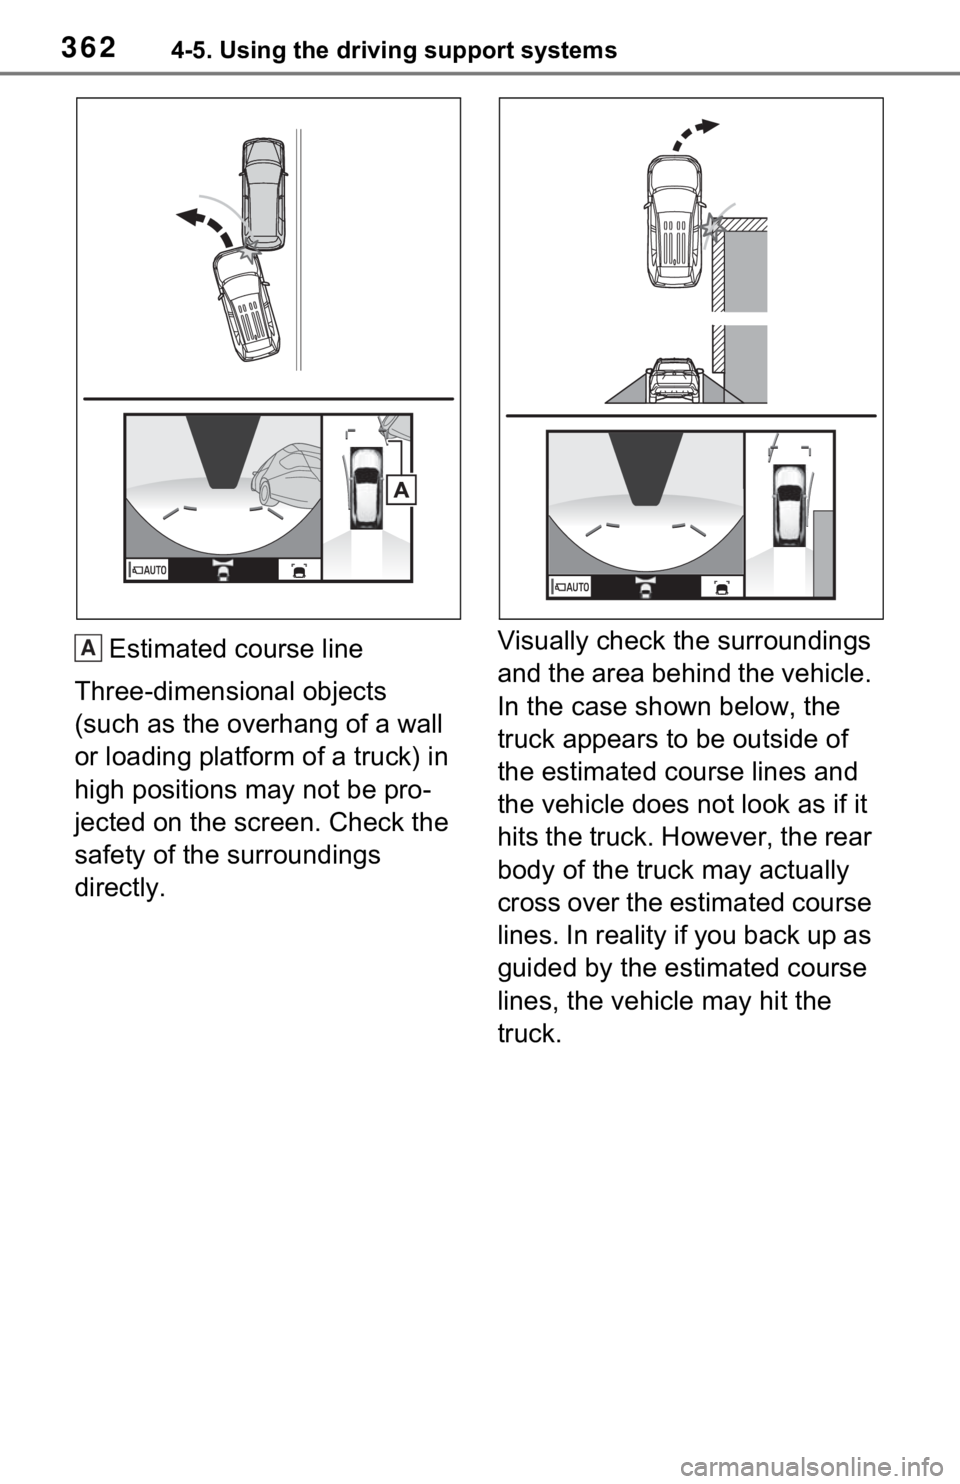
Estimated course line
Three-dimensional objects
(such as the overhang of a wall
or loading platform of a truck) in
high positions may not be pro-
jected on the screen. Check the
safety of the surroundings
directly. Visually check the surroundings
and the area behind the vehicle.
In the case shown below, the
truck appears to be outside of
the estimated course lines and
the vehicle does not look as if it
hits the truck. However, the rear
body of the truck may actually
cross over the estimated course
lines. In reality if you back up as
guided by the estimated course
lines, the vehicle may hit the
truck.A
Page 363 of 752
3634-5. Using the driving support systems
4
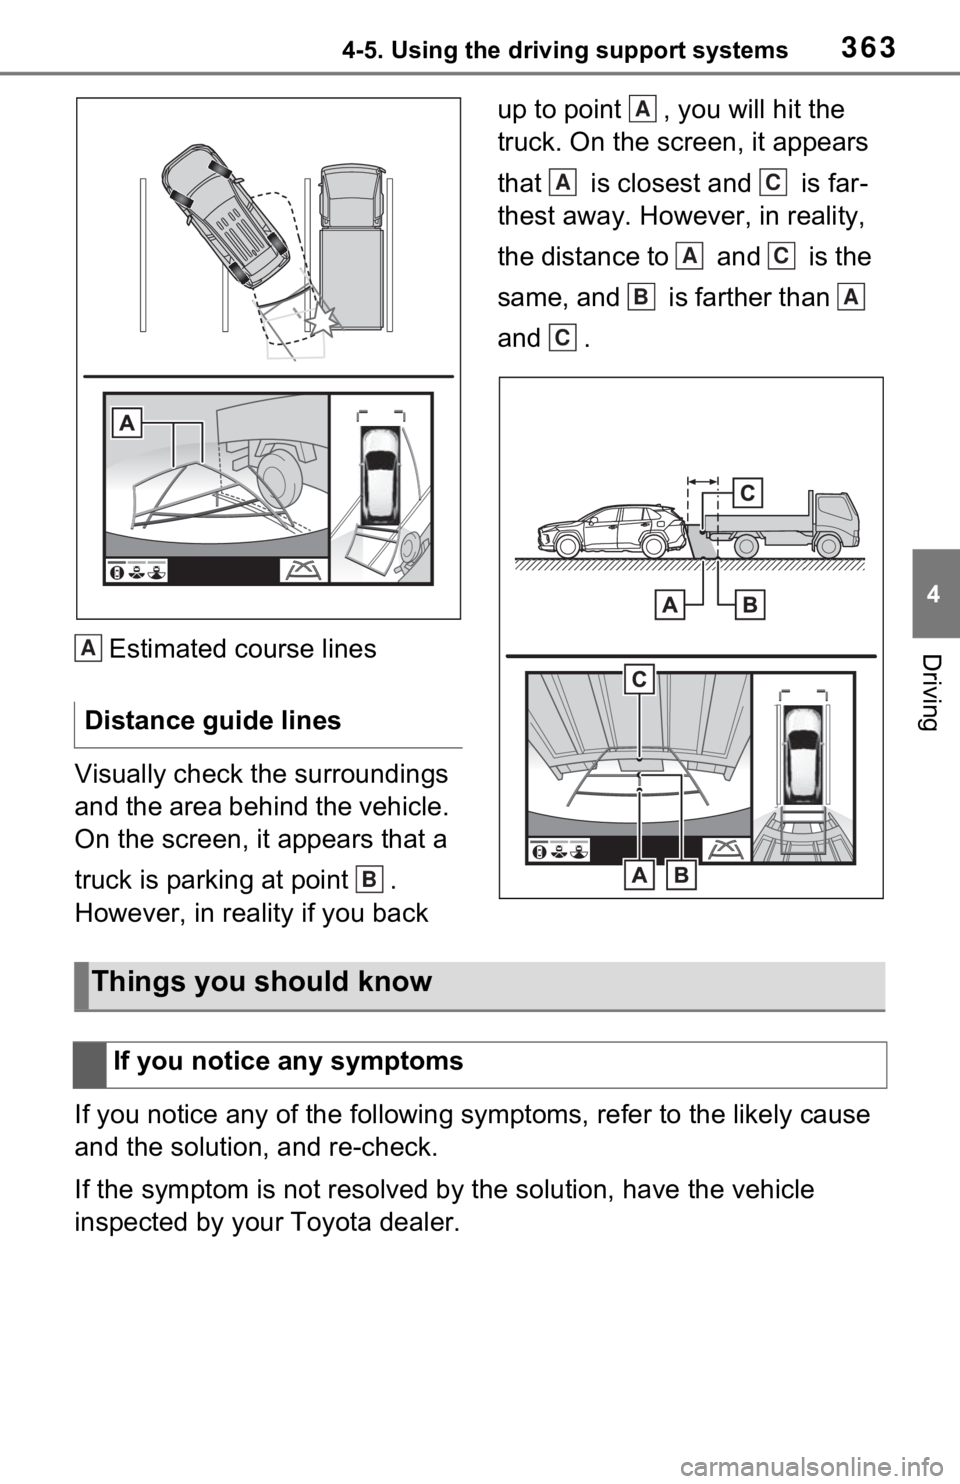
DrivingEstimated course lines
Visually check the surroundings
and the area behind the vehicle.
On the screen, it appears that a
truck is parking at point .
However, in reality if you back up to point , you will hit the
truck. On the screen, it appears
that is closest and is far-
thest away. However, in reality,
the distance to and is the
same, and is farther than
and .
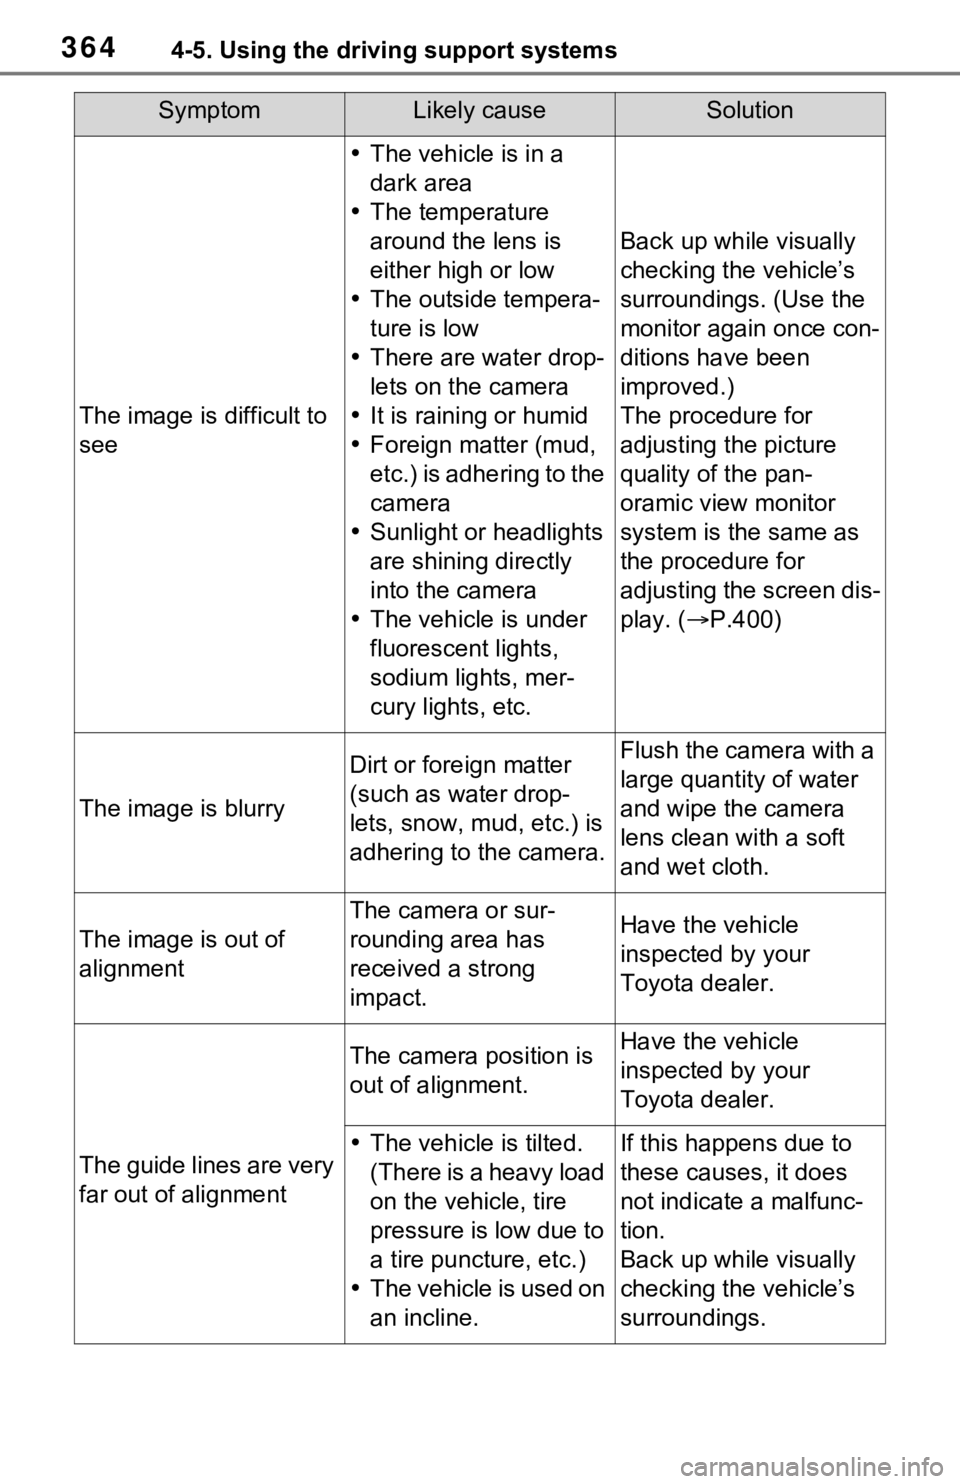
If you notice any of the following symptoms, refer to the likely cause
and the solution, and re-check.
If the symptom is not resolved by the solution, have the vehicl e
inspected by your Toyota dealer. Distance guide linesA
B
A
AC
AC
BA
C
Things you should know
If you notice any symptoms
Page 364 of 752
3644-5. Using the driving support systems
SymptomLikely causeSolution
The image is difficult to
see
The vehicle is in a
dark area
The temperature
around the lens is
either high or low
The outside tempera-
ture is low
There are water drop-
lets on the camera
It is raining or humid
Foreign matter (mud,
etc.) is adhering to the
camera
Sunlight or headlights
are shining directly
into the camera
The vehicle is under
fluorescent lights,
sodium lights, mer-
cury lights, etc.
Back up while visually
checking the vehicle’s
surroundings. (Use the
monitor again once con-
ditions have been
improved.)
The procedure for
adjusting the picture
quality of the pan-
oramic view monitor
system is the same as
the procedure for
adjusting the screen dis-
play. ( P.400)
The image is blurry
Dirt or fore ign matter
(such as water drop-
lets, snow, mud, etc.) is
adhering to the camera.Flush the camera with a
large quantity of water
and wipe the camera
lens clean with a soft
and wet cloth.
The image is out of
alignment
The camera or sur-
rounding area has
received a strong
impact.Have the vehicle
inspected by your
Toyota dealer.
The guide lines are very
far out of alignment
The camera position is
out of alignment.Have the vehicle
inspected by your
Toyota dealer.
The vehicle is tilted.
(There is a heavy load
on the vehicle, tire
pressure is low due to
a tire puncture, etc.)
The vehicle is used on
an incline.If this happens due to
these causes, it does
not indicate a malfunc-
tion.
Back up while visually
checking the vehicle’s
surroundings.
Page 365 of 752
3654-5. Using the driving support systems
4
Driving
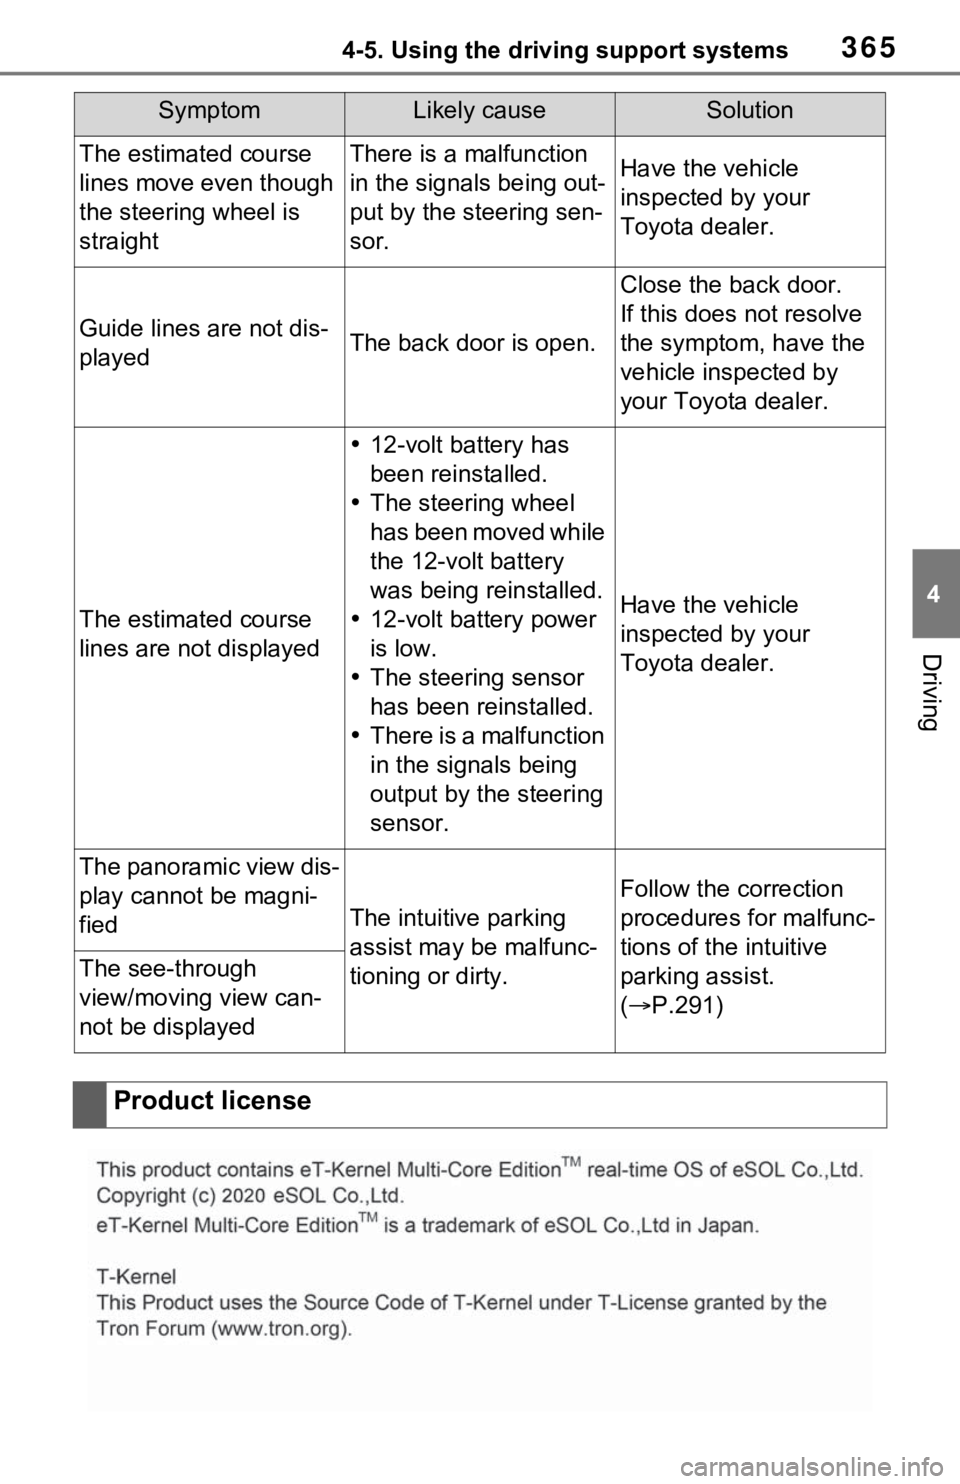
The estimated course
lines move even though
the steering wheel is
straightThere is a malfunction
in the signals being out-
put by the steering sen-
sor.Have the vehicle
inspected by your
Toyota dealer.
Guide lines are not dis-
playedThe back door is open.
Close the back door.
If this does not resolve
the symptom, have the
vehicle inspected by
your Toyota dealer.
The estimated course
lines are not displayed
12-volt battery has
been reinstalled.
The steering wheel
has been moved while
the 12-volt battery
was being reinstalled.
12-volt battery power
is low.
The steering sensor
has been reinstalled.
There is a malfunction
in the signals being
output by the steering
sensor.
Have the vehicle
inspected by your
Toyota dealer.
The panoramic view dis-
play cannot be magni-
fied
The intuitive parking
assist may be malfunc-
tioning or dirty.
Follow the correction
procedures for malfunc-
tions of the intuitive
parking assist.
( P.291)
The see-through
view/moving view can-
not be displayed
Product license
SymptomLikely causeSolution
Page 366 of 752
3664-5. Using the driving support systems
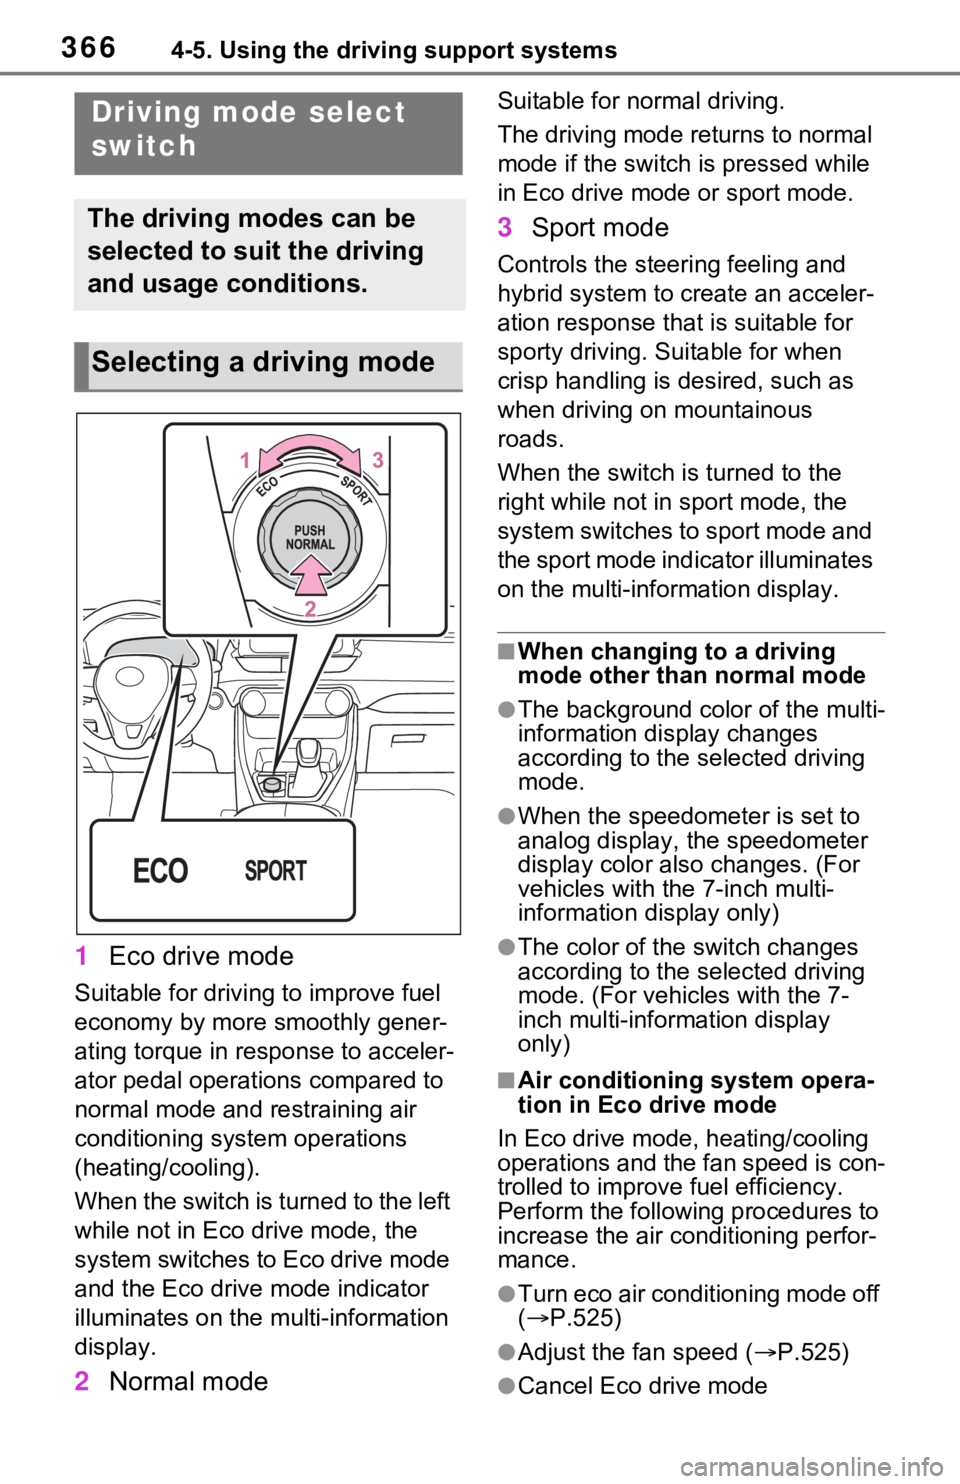
1Eco drive mode
Suitable for driving to improve fuel
economy by more smoothly gener-
ating torque in response to acceler-
ator pedal operations compared to
normal mode and restraining air
conditioning system operations
(heating/cooling).
When the switch is turned to the left
while not in Eco drive mode, the
system switches to Eco drive mode
and the Eco drive mode indicator
illuminates on the mu lti-information
display.
2 Normal mode
Suitable for n ormal driving.
The driving mode returns to normal
mode if the switch i s pressed while
in Eco drive mode or sport mode.
3 Sport mode
Controls the steering feeling and
hybrid system to create an acceler-
ation response tha t is suitable for
sporty driving. Suitable for when
crisp handling is desired, such as
when driving on mountainous
roads.
When the switch is turned to the
right while not in sport mode, the
system switches to sport mode and
the sport mode indicator illuminates
on the multi-information display.
■When changing to a driving
mode other than normal mode
●The background color of the multi-
information display changes
according to the selected driving
mode.
●When the speedometer is set to
analog display, the speedometer
display color also changes. (For
vehicles with the 7-inch multi-
information di splay only)
●The color of the switch changes
according to the selected driving
mode. (For vehicles with the 7-
inch multi-information display
only)
■Air conditioning system opera-
tion in Eco drive mode
In Eco drive mode, heating/cooling
operations and the fan speed is con-
trolled to improve fuel efficiency.
Perform the following procedures to
increase the air conditioning perfor-
mance.
●Turn eco air conditioning mode off
( P.525)
●Adjust the fan speed ( P.525)
●Cancel Eco drive mode
Driving mode select
switch
The driving modes can be
selected to suit the driving
and usage conditions.
Selecting a driving mode
Page 367 of 752
3674-5. Using the driving support systems
4
Driving
■Canceling a driving mode
●Sport mode is automatically can-
celed and the driving mode
returns to normal mode when the
power switch is turned off.
●Normal mode and Eco drive mode
are not canceled until another
driving mode is sel ected. (Even if
the power switch is turned off, nor-
mal mode and Eco drive mode will
not be automatically canceled).
Press the Trail Mode switch
When the switch is pressed, Trail
Mode turns on and the Trail Mode
indicator illuminates on the multi-
information display.
When the switch is pressed again,
the Trail Mode indicator turns off.
Trail Mode
Trail Mode is a system that
performs integrated control
for the AWD, brake and
drive force control systems
to assist the drive power on
bumpy roads, etc.
WARNING
■Before using Trail Mode
Make sure to observe the follow-
ing precautions. Failure to
observe these precautions may
result in an unexp ected accident.
●Check that the Trail Mode indi-
cator is illuminated before driv-
ing. Trail Mode will not operate
when the indicator is off.
●Trail Mode is not intended to
expand the limits of the vehicle.
Thoroughly check the road con-
ditions and drive with caution.
●Thoroughly check the road con-
ditions before driving. As Trail
Mode is suitable for driving on
bumpy roads, such as those
where the tire on one side
spins, there is a chance that
Trail Mode may not be the most
appropriate for other road con-
ditions.
Turning Trail Mode on
Page 368 of 752
3684-5. Using the driving support systems
■Trail Mode
●Trail Mode is intended for use
when driving on bumpy rough
roads. Do not turn the switch on in
other situations.
●Trail Mode controls the vehicle so
that it can use the maximum
amount of drive force when driving
on bumpy roads.
●If Trail Mode is continuously used
for a long period of time, the load
on related parts increases and the
system may be un able to operate
effectively.
■When Trail Mode is canceled
In the following situations, Trail
Mode is automatically canceled
even if it is turned on.
●When the driving mode is
changed (P.366)
●When the power switch is turned
off
■During Trail Mode operation
The following types of situations
may occur, but they are not mal-
functions.
●Vibrations may be felt throughout
the vehicle or steering wheel
●Operating noise may be heard
from the engine compartment
■When an inspection at your
Toyota dealer is necessary
In the following si tuations, the sys-
tem may be malfunctioning. Have
the vehicle insp ected by your
Toyota dealer immediately.
●When the slip indica tor light illumi-
nates while Trail Mode is on
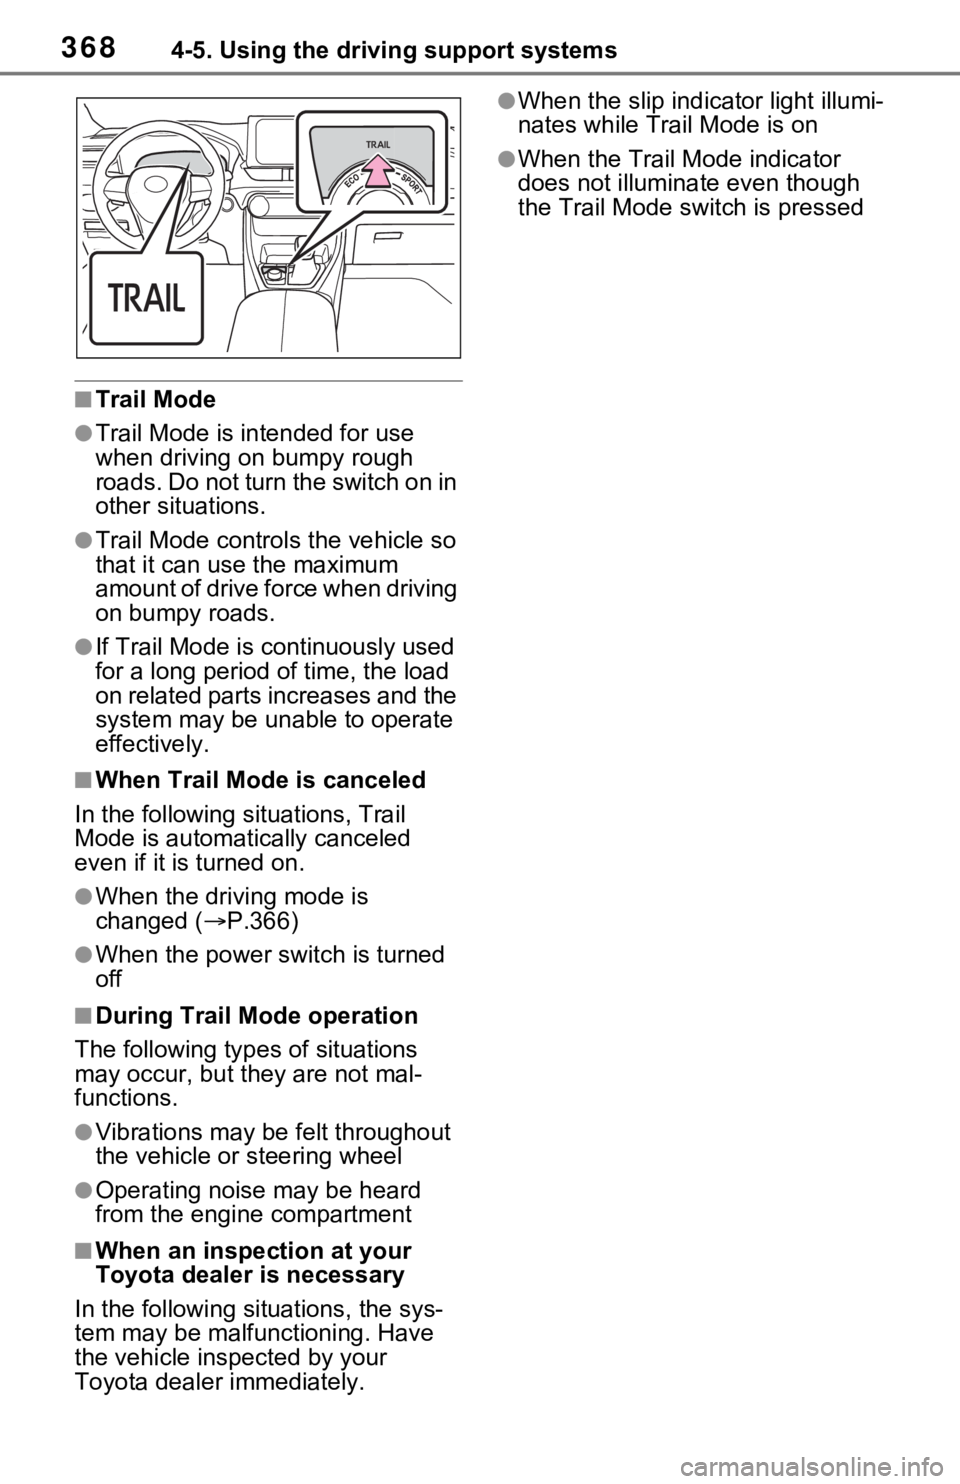
●When the Trail Mode indicator
does not illuminat e even though
the Trail Mode switch is pressed
Page 369 of 752
3694-5. Using the driving support systems
4
Driving■ECB (Electronically Con-
trolled Brake System)
The electronically controlled
system generates braking force
corresponding to the brake
operation
■ABS (Anti-lock Brake Sys-
tem)
Helps to prevent wheel lock
when the brakes are applied
suddenly, or if the brakes are
applied while driving on a slip-
pery road surface
■Brake assist
Generates an increased level of
braking force after the brake
pedal is depressed when the
system detects a panic stop sit-
uation
■VSC (Vehicle Stability Con-
trol)
Helps the driver to control skid-
ding when swerving suddenly or
turning on slippery road sur-
faces.
■Enhanced VSC (Enhanced
Vehicle Stability Control)
Provides cooperative control of
the ABS, TRAC, VSC and EPS.
Helps to maintain directional
stability when swerving on slip-
pery road surfaces by con-
trolling steering performance.
■Trailer Sway Control
Helps the driver to control trailer
sway by selectively applying
brake pressure for individual
wheels and reducing driving
torque when trailer sway is
detected.
■TRAC (Traction Control)
Helps to maintain drive power
and prevent the drive wheels
from spinning when starting the
vehicle or accelerating on slip-
pery roads
■Active Cornering Assist
(ACA)
Helps to prevent the vehicle
from drifting to the outer side by
performing inner wheel brake
control when attempting to
accelerate while turning
■Hill-start assist control
Helps to reduce the backward
Driving assist systems
To keep driving safety and
performance, the following
systems operate automati-
cally in response to various
driving situations. Be
aware, however, that these
systems are supplementary
and should not be relied
upon too heavily when oper-
ating the vehicle.
Summary of the driving
assist systems
Page 370 of 752
3704-5. Using the driving support systems
movement of the vehicle when
starting on an uphill
■EPS (Electric Power Steer-
ing)
Employs an electric motor to
reduce the amount of effort
needed to turn the steering
wheel
■E-Four (Electronic On-
Demand AWD system)
Automatically switches from
front wheel drive to all-wheel
drive (AWD) according to the
driving conditions, helping to
ensure reliable handling and
stability. Examples of condi-
tions where the system will
switch to AWD are when corner-
ing, going uphill, starting off or
accelerating, and when the road
surface is slippery due to snow,
rain, etc.
■The Secondary Collision
Brake
When the SRS airbag sensor
detects a collision and the sys-
tem operates, the brakes and
brake lights are automatically
controlled to reduce the vehicle
speed and help reduce the pos-
sibility of further damage due to
a secondary collision.
■When the
TRAC/VSC/ABS/Trailer Sway
Control systems are operating
The slip indicator light will flash
while the TRAC/VSC/ABS/Trailer
Sway Control systems are operat-
ing.
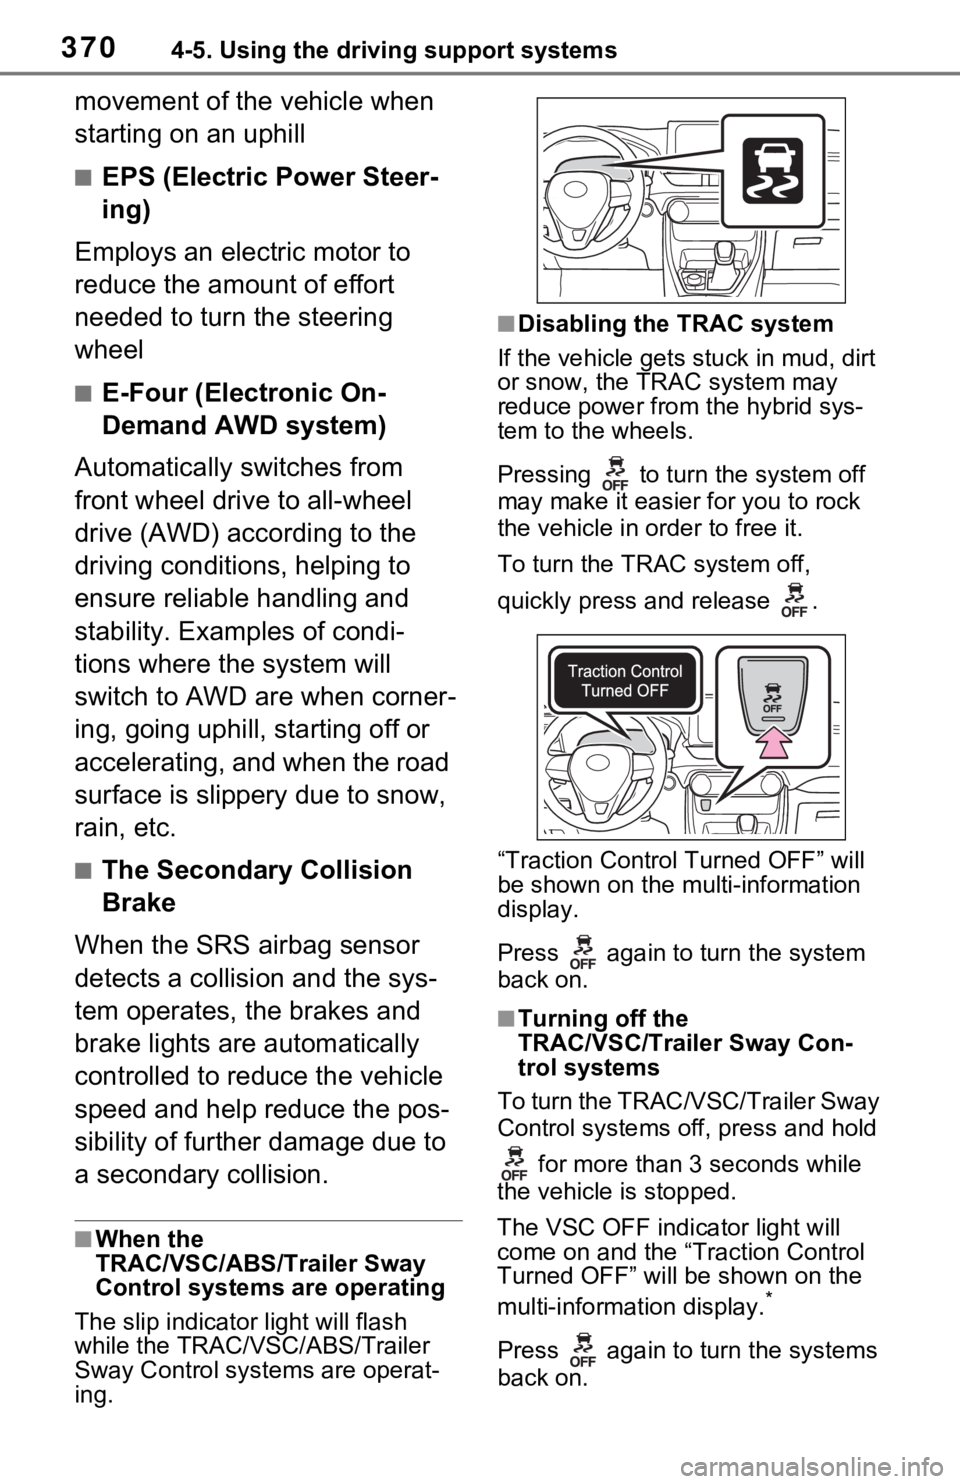
■Disabling the TRAC system
If the vehicle gets stuck in mud, dirt
or snow, the TRAC system may
reduce power from the hybrid sys-
tem to the wheels.
Pressing to turn the system off
may make it easier for you to rock
the vehicle in order to free it.
To turn the TRAC system off,
quickly press and release .
“Traction Contro l Turned OFF” will
be shown on the mu lti-information
display.
Press again to turn the system
back on.
■Turning off the
TRAC/VSC/Trailer Sway Con-
trol systems
To turn the TRAC/VSC/Trailer Sway
Control systems of f, press and hold
for more than 3 seconds while
the vehicle is stopped.
The VSC OFF indicator light will
come on and the “Traction Control
Turned OFF” will be shown on the
multi-informat ion display.
*
Press again to turn the systems
back on.