windshield wipers TOYOTA RAV4 HYBRID 2022 User Guide
[x] Cancel search | Manufacturer: TOYOTA, Model Year: 2022, Model line: RAV4 HYBRID, Model: TOYOTA RAV4 HYBRID 2022Pages: 752, PDF Size: 23.11 MB
Page 234 of 752
2344-3. Operating the lights and wipers
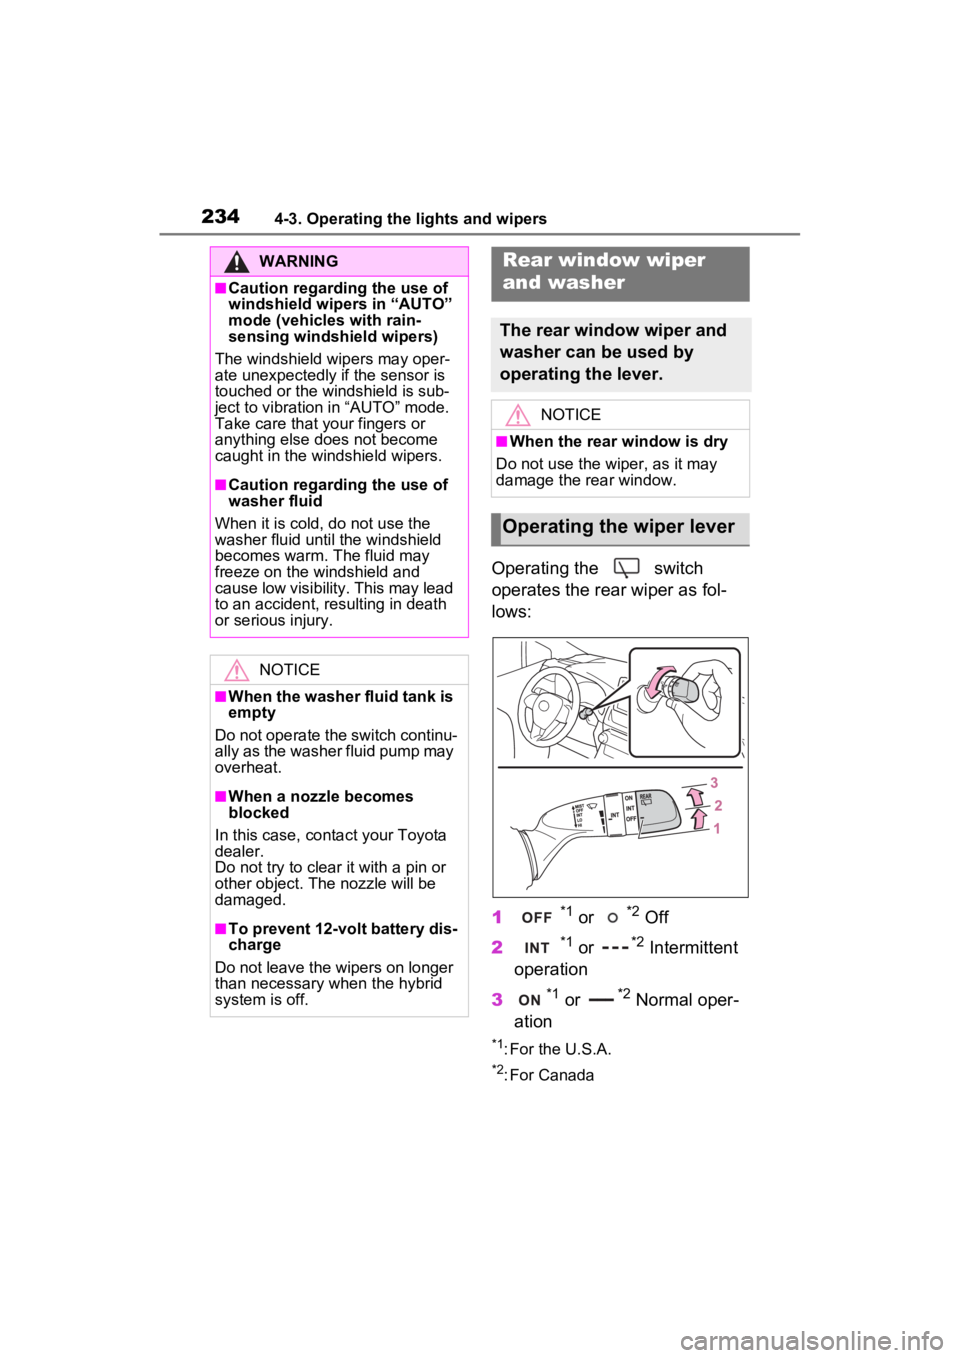
Operating the switch
operates the rear wiper as fol-
lows:
1
*1 or *2 Off
2
*1 or *2 Intermittent
operation
3
*1 or *2 Normal oper-
ation
*1: For the U.S.A.
*2: For Canada
WARNING
■Caution regarding the use of
windshield wipers in “AUTO”
mode (vehicles with rain-
sensing windshield wipers)
The windshield wipers may oper-
ate unexpectedly if the sensor is
touched or the windshield is sub-
ject to vibration in “AUTO” mode.
Take care that y our fingers or
anything else does not become
caught in the windshield wipers.
■Caution regarding the use of
washer fluid
When it is cold, do not use the
washer fluid until the windshield
becomes warm. The fluid may
freeze on the windshield and
cause low visibility. This may lead
to an accident, resulting in death
or serious injury.
NOTICE
■When the washer fluid tank is
empty
Do not operate the switch continu-
ally as the washer fluid pump may
overheat.
■When a nozzle becomes
blocked
In this case, conta ct your Toyota
dealer.
Do not try to clear it with a pin or
other object. The nozzle will be
damaged.
■To prevent 12-volt battery dis-
charge
Do not leave the wipers on longer
than necessary when the hybrid
system is off.
Rear window wiper
and washer
The rear window wiper and
washer can be used by
operating the lever.
NOTICE
■When the rear window is dry
Do not use the wiper, as it may
damage the rear window.
Operating the wiper lever
Page 240 of 752
2404-5. Using the driving support systems
WARNING
■To avoid malfunction of the
radar sensor
Observe the following precau-
tions.
Otherwise, the radar sensor may
not operate properly, possibly
leading to an accident resulting in
death or serious injury.
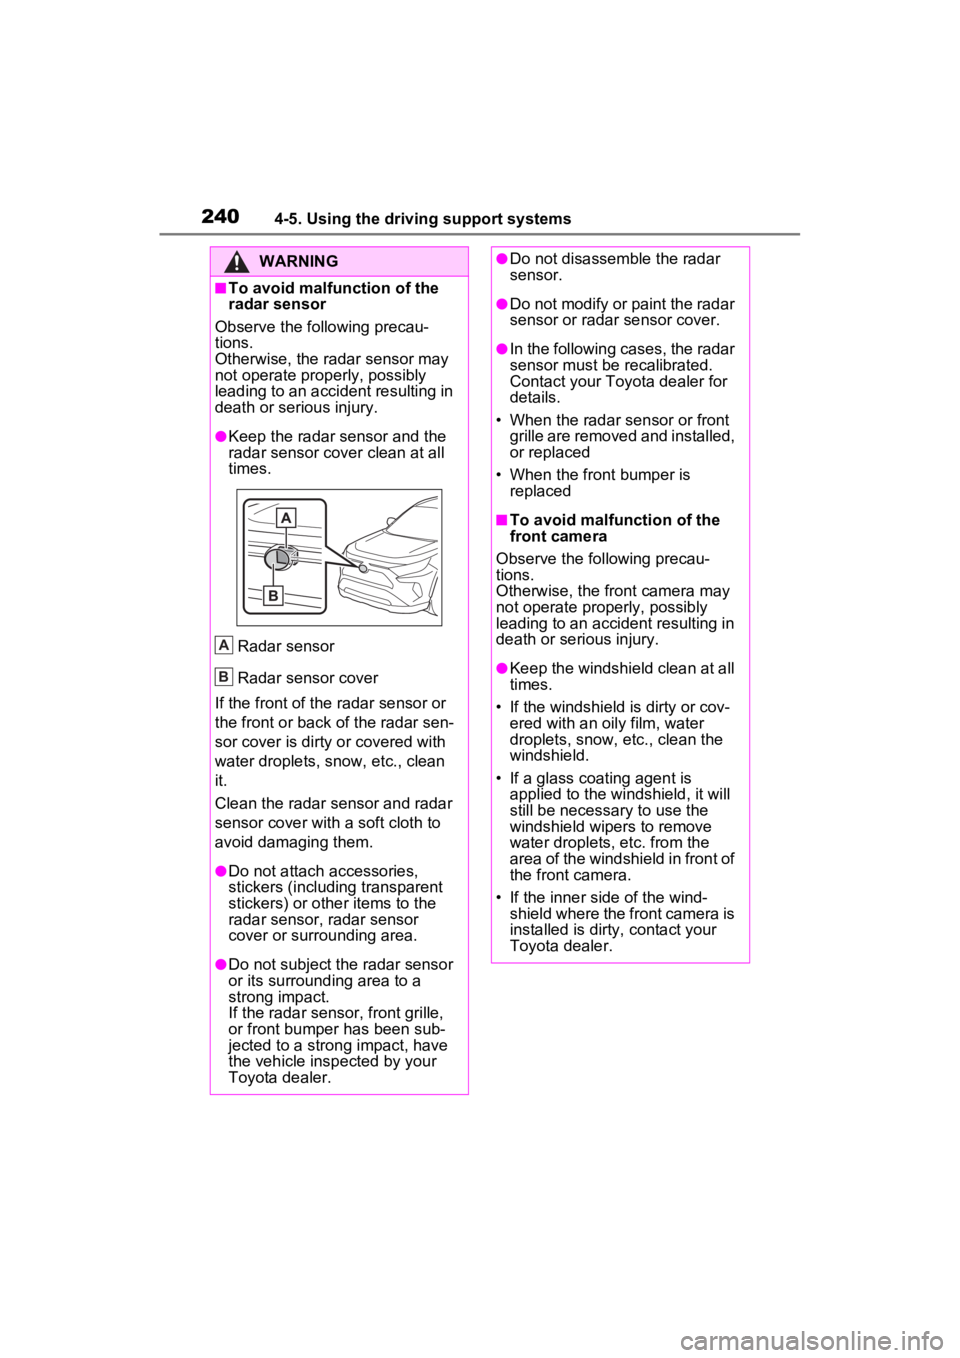
●Keep the radar sensor and the
radar sensor cover clean at all
times.
Radar sensor
Radar sensor cover
If the front of the r adar sensor or
the front or back of the radar sen-
sor cover is dirty or covered with
water droplets, snow, etc., clean
it.
Clean the radar sensor and radar
sensor cover with a soft cloth to
avoid damaging them.
●Do not attach accessories,
stickers (including transparent
stickers) or other items to the
radar sensor, radar sensor
cover or surrounding area.
●Do not subject the radar sensor
or its surrounding area to a
strong impact.
If the radar sensor, fron t grille,
or front bumper has been sub-
jected to a strong impact, have
the vehicle insp ected by your
Toyota dealer.
A
B
●Do not disassemble the radar
sensor.
●Do not modify or paint the radar
sensor or radar sensor cover.
●In the following cases, the radar
sensor must be recalibrated.
Contact your Toyota dealer for
details.
• When the radar s ensor or front
grille are removed and installed,
or replaced
• When the front bumper is replaced
■To avoid malfunction of the
front camera
Observe the following precau-
tions.
Otherwise, the f ront camera may
not operate properly, possibly
leading to an accident resulting in
death or serious injury.
●Keep the windshield clean at all
times.
• If the windshield is dirty or cov-
ered with an o ily film, water
droplets, snow, etc., clean the
windshield.
• If a glass coating agent is applied to the windshield, it will
still be necessary to use the
windshield wipers to remove
water droplets, etc. from the
area of the windshield in front of
the front camera.
• If the inner side of the wind- shield where the front camera is
installed is dirty, contact your
Toyota dealer.
Page 241 of 752
2414-5. Using the driving support systems
4
Driving
WARNING
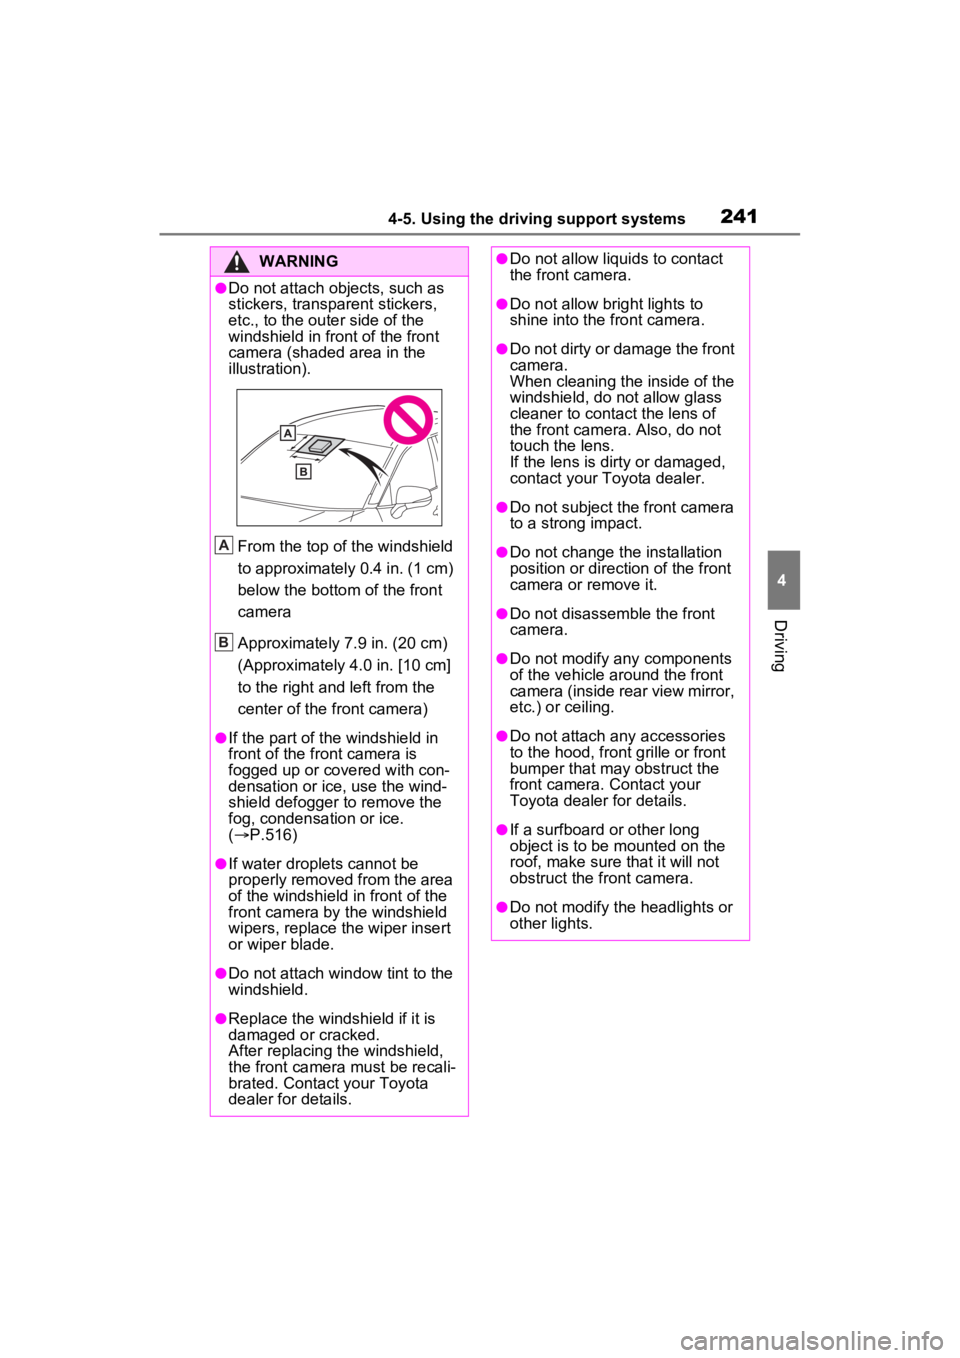
●Do not attach objects, such as
stickers, transparent stickers,
etc., to the outer side of the
windshield in fr ont of the front
camera (shaded area in the
illustration).
From the top of the windshield
to approximately 0.4 in. (1 cm)
below the bottom of the front
camera
Approximately 7.9 in. (20 cm)
(Approximately 4.0 in. [10 cm]
to the right and left from the
center of the front camera)
●If the part of the windshield in
front of the front camera is
fogged up or covered with con-
densation or ice, use the wind-
shield defogger to remove the
fog, condensation or ice.
( P.516)
●If water droplets cannot be
properly removed from the area
of the windshield in front of the
front camera by the windshield
wipers, replace the wiper insert
or wiper blade.
●Do not attach win dow tint to the
windshield.
●Replace the windshield if it is
damaged or cracked.
After replacing the windshield,
the front camera must be recali-
brated. Contact your Toyota
dealer for details.
A
B
●Do not allow liquids to contact
the front camera.
●Do not allow bright lights to
shine into the front camera.
●Do not dirty or damage the front
camera.
When cleaning the inside of the
windshield, do not allow glass
cleaner to contact the lens of
the front camera . Also, do not
touch the lens.
If the lens is dirty or damaged,
contact your Toyota dealer.
●Do not subject the front camera
to a strong impact.
●Do not change the installation
position or direction of the front
camera or remove it.
●Do not disassemble the front
camera.
●Do not modify any components
of the vehicle around the front
camera (inside rear view mirror,
etc.) or ceiling.
●Do not attach any accessories
to the hood, front grille or front
bumper that may obstruct the
front camera. Contact your
Toyota dealer for details.
●If a surfboard or other long
object is to be mounted on the
roof, make sure that it will not
obstruct the front camera.
●Do not modify the headlights or
other lights.
Page 555 of 752
5557-1. Maintenance and care
7
Maintenance and care
parking the vehicle after it is
washed, drive slowly and apply the
brakes several times to dry the
parts.
■Bumpers
Do not scrub with abrasive cleaners.
■Plated portions
If dirt cannot be removed, clean the
parts as follows:
●Use a soft cloth dampened with
an approximately 5% solution of
neutral detergent and water to
clean the dirt off.
●Wipe the surface with a dry, soft
cloth to remove any remaining
moisture.
●To remove oily deposits, use alco-
hol wet wipes or a similar product.
WARNING
■When washing the vehicle
Do not apply water to the inside of
the engine compartment. Doing
so may cause the electrical com-
ponents, etc. to catch fire.
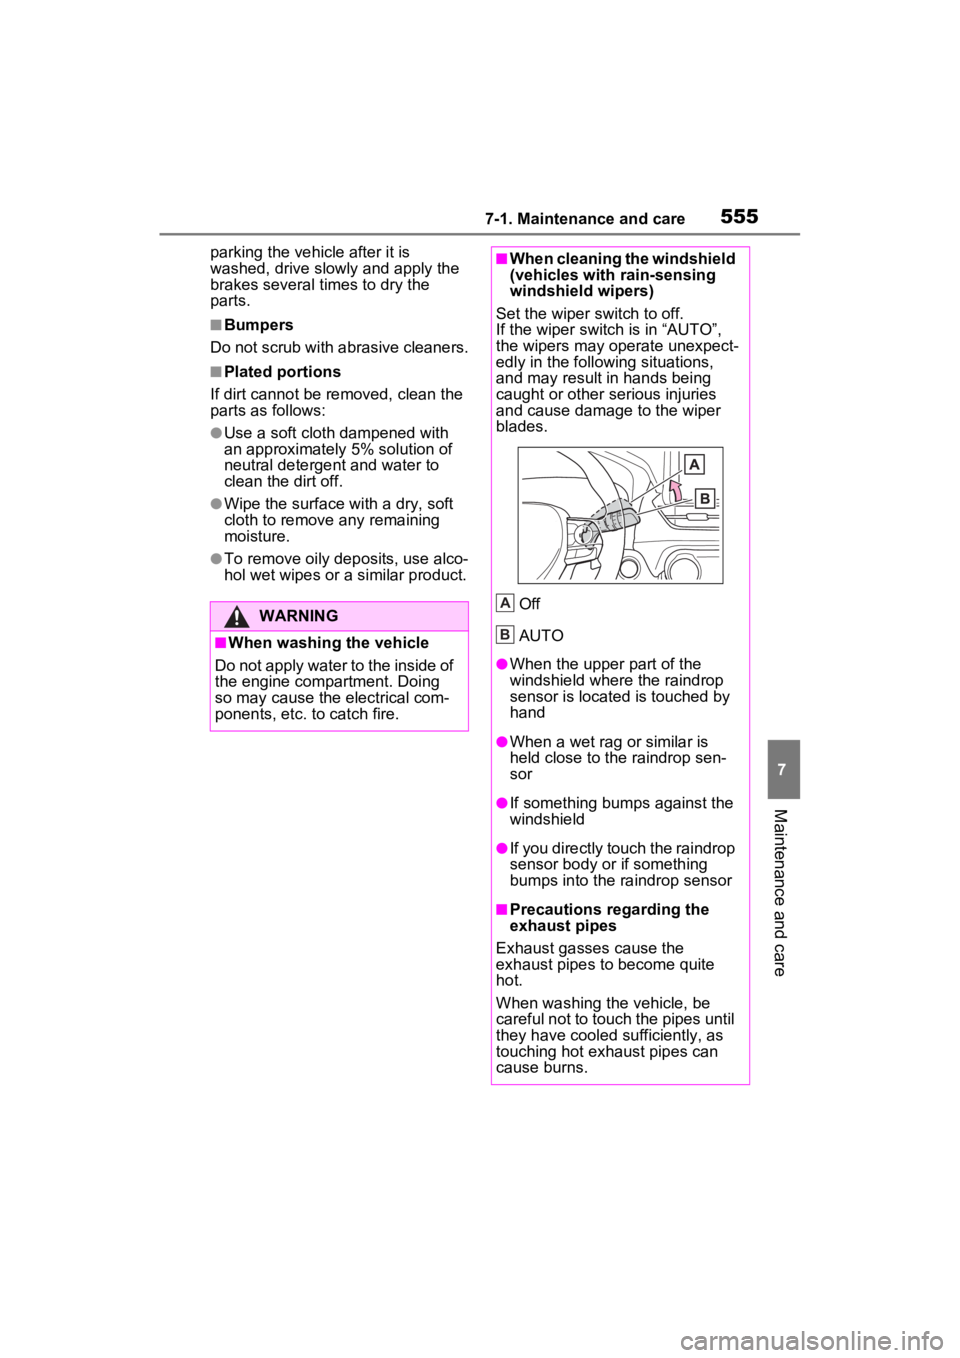
■When cleaning the windshield
(vehicles with rain-sensing
windshield wipers)
Set the wiper switch to off.
If the wiper switch is in “AUTO”,
the wipers may operate unexpect-
edly in the following situations,
and may result in hands being
caught or other serious injuries
and cause damage to the wiper
blades.
Off
AUTO
●When the upper part of the
windshield where the raindrop
sensor is located is touched by
hand
●When a wet rag or similar is
held close to the raindrop sen-
sor
●If something bumps against the
windshield
●If you directly touch the raindrop
sensor body or if something
bumps into the ra indrop sensor
■Precautions regarding the
exhaust pipes
Exhaust gasses cause the
exhaust pipes to become quite
hot.
When washing the vehicle, be
careful not to touch the pipes until
they have cooled sufficiently, as
touching hot exhaust pipes can
cause burns.
A
B
Page 556 of 752
5567-1. Maintenance and care
WARNING
■Precaution regarding the rear
bumper with Blind Spot Moni-
tor (if equipped)
If the paint of the rear bumper is
chipped or scratched, the system
may malfunction. If this occurs,
consult your Toyota dealer.
NOTICE
■To prevent paint deterioration
and corrosion on the body
and components (aluminum
wheels, etc.)
●Wash the vehicle immediately in
the following cases:
• After driving near the sea coast
• After driving on salted roads
• If coal tar or tre e sap is present
on the paint surface
• If dead insects, insect droppings or bird droppings are present on
the paint surface
• After driving in an area contami- nated with soot, oily smoke,
mine dust, iron powder or chem-
ical substances
• If the vehicle becomes heavily soiled with dust or mud
• If liquids such as benzene and gasoline are spilled on the paint
surface
●If the paint is chipped or
scratched, have it repaired
immediately.
●To prevent the wheels from cor-
roding, remove any dirt and
store in a place with low humid-
ity when storing the wheels.
■Cleaning the exterior lights
●Wash carefully. Do not use
organic substances or scrub
with a hard brush.
This may damage the surfaces
of the lights.
●Do not apply wax to the sur-
faces of the lights.
Wax may cause damage to the
lenses.
■When using an automatic car
wash (vehicles with rain-
sensing windshield wipers)
Set the wiper switch to off posi-
tion.
If the wiper switch is in “AUTO”,
the wipers may operate and the
wiper blades may be damaged.
■When using a high pressure
car wash
●When washing the vehicle, do
not let water from the high-pres-
sure washer directly hit the
camera or the area around the
camera. Due to the shock from
the high pressure water, it is
possible that the device may not
operate normally.
●Do not spray water directly on
the radar which is equipped
behind the emblem. Otherwise
it may cause the device to be
damaged.
●Do not bring the nozzle tip close
to boots (rubber or resin manu-
factured cover), or connectors
or the following parts.
The parts may be damaged if
they come into contact with
high-pressure water.
• Traction re lated parts
• Steering parts
• Suspension parts
• Brake parts
Page 563 of 752
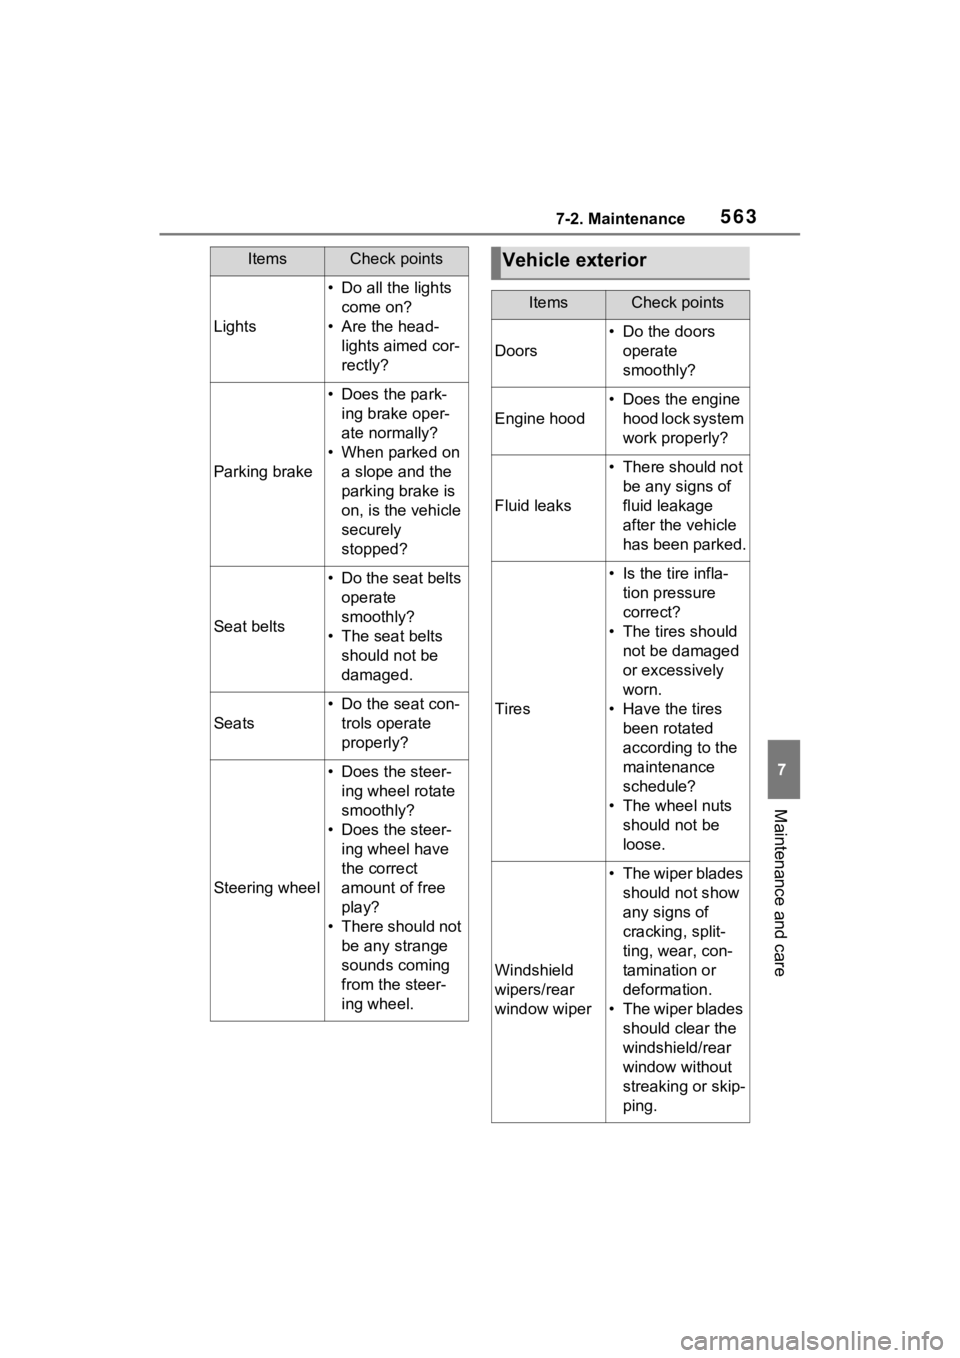
5637-2. Maintenance
7
Maintenance and care
Lights
• Do all the lights come on?
• Are the head- lights aimed cor-
rectly?
Parking brake
• Does the park-ing brake oper-
ate normally?
• When parked on a slope and the
parking brake is
on, is the vehicle
securely
stopped?
Seat belts
• Do the seat belts operate
smoothly?
• The seat belts should not be
damaged.
Seats
• Do the seat con-trols operate
properly?
Steering wheel
• Does the steer-ing wheel rotate
smoothly?
• Does the steer- ing wheel have
the correct
amount of free
play?
• There should not be any strange
sounds coming
from the steer-
ing wheel.
ItemsCheck pointsVehicle exterior
ItemsCheck points
Doors
• Do the doors operate
smoothly?
Engine hood
• Does the engine hood lock system
work properly?
Fluid leaks
• There should not be any signs of
fluid leakage
after the vehicle
has been parked.
Tires
• Is the tire infla-tion pressure
correct?
• The tires should not be damaged
or excessively
worn.
• Have the tires been rotated
according to the
maintenance
schedule?
• The wheel nuts should not be
loose.
Windshield
wipers/rear
window wiper
• The wiper blades should not show
any signs of
cracking, split-
ting, wear, con-
tamination or
deformation.
• The wiper blades should clear the
windshield/rear
window without
streaking or skip-
ping.
Page 597 of 752
5977-3. Do-it-yourself maintenance
7
Maintenance and care
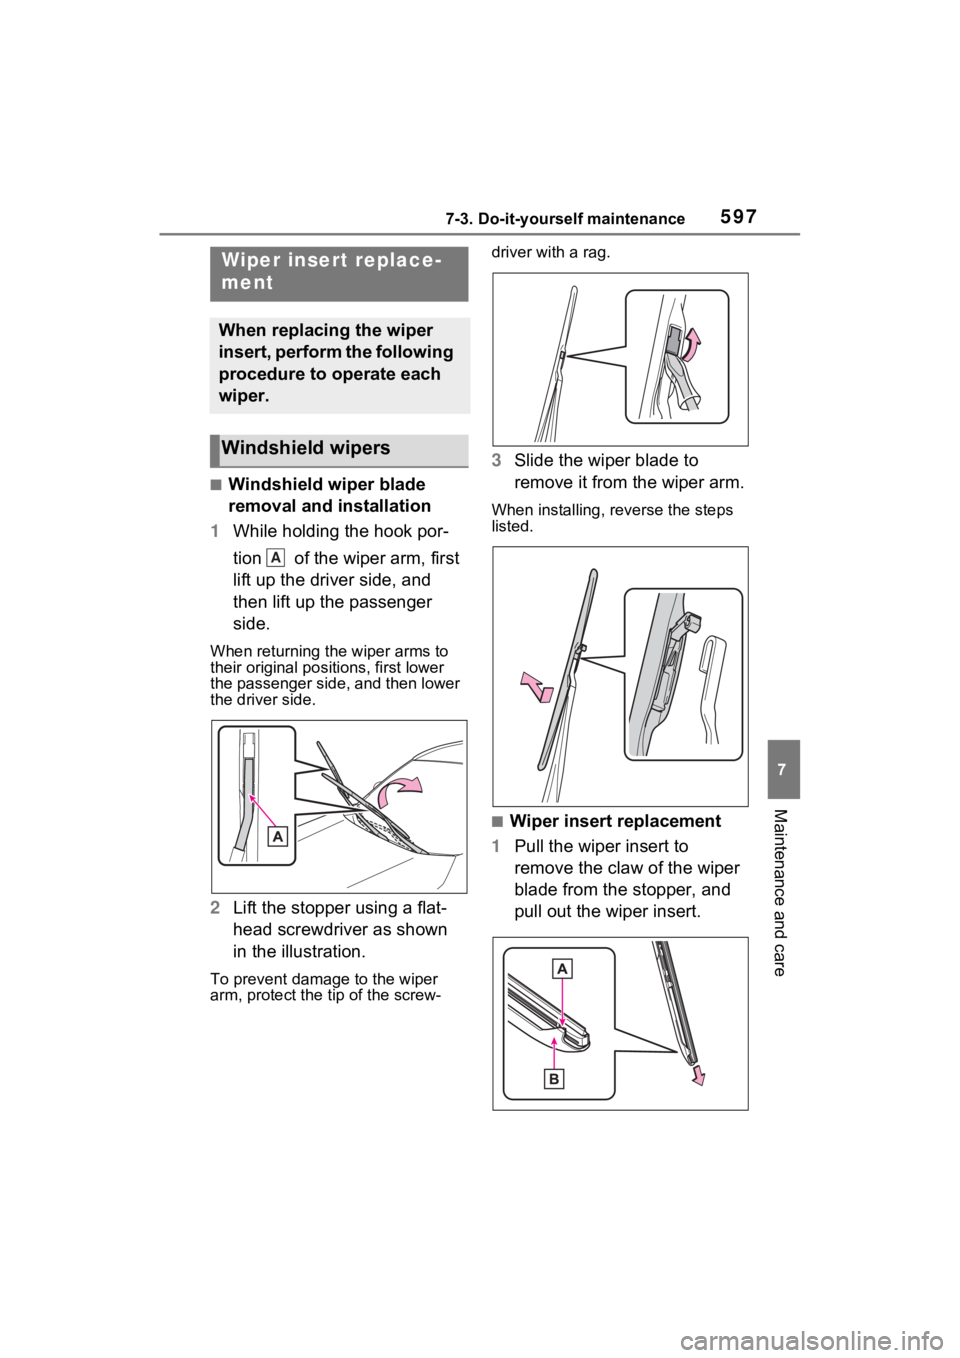
■Windshield wiper blade
removal and installation
1 While holding the hook por-
tion of the wiper arm, first
lift up the driver side, and
then lift up the passenger
side.
When returning the wiper arms to
their original positions, first lower
the passenger side, and then lower
the driver side.
2Lift the stopper using a flat-
head screwdriver as shown
in the illustration.
To prevent damag e to the wiper
arm, protect the t ip of the screw- driver with a rag.
3
Slide the wiper blade to
remove it from the wiper arm.
When installing, reverse the steps
listed.
■Wiper insert replacement
1 Pull the wiper insert to
remove the claw of the wiper
blade from the stopper, and
pull out the wiper insert.
Wiper insert replace-
ment
When replacing the wiper
insert, perform the following
procedure to operate each
wiper.
Windshield wipers
A
Page 599 of 752
5997-3. Do-it-yourself maintenance
7
Maintenance and care
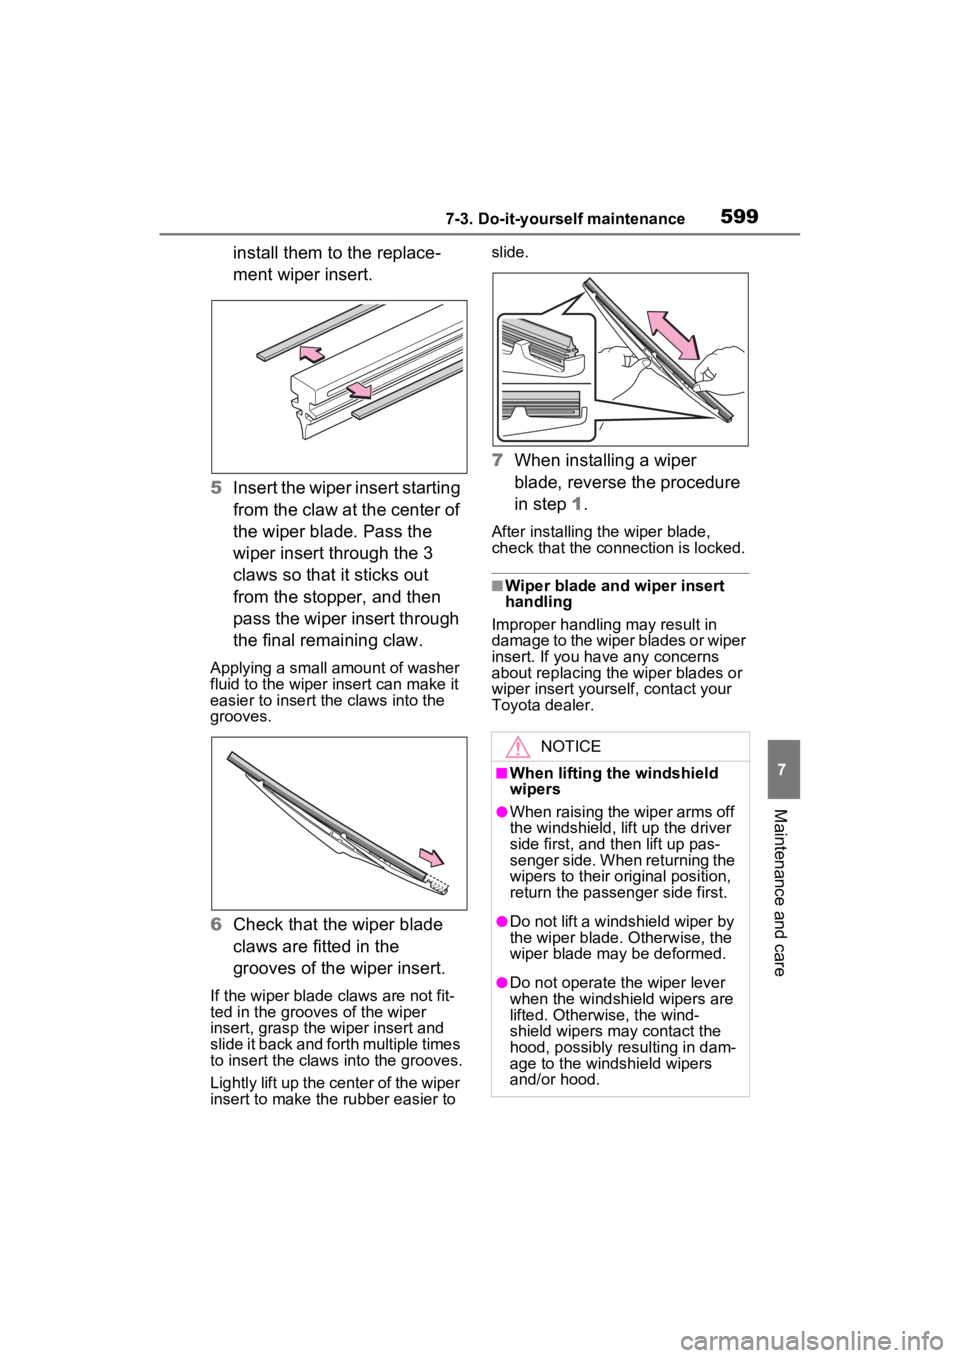
install them to the replace-
ment wiper insert.
5 Insert the wiper insert starting
from the claw at the center of
the wiper blade. Pass the
wiper insert through the 3
claws so that it sticks out
from the stopper, and then
pass the wiper insert through
the final remaining claw.
Applying a small amount of washer
fluid to the wiper insert can make it
easier to insert the claws into the
grooves.
6Check that the wiper blade
claws are fitted in the
grooves of the wiper insert.
If the wiper blade claws are not fit-
ted in the grooves of the wiper
insert, grasp the wiper insert and
slide it back and fo rth multiple times
to insert the claws into the grooves.
Lightly lift up the center of the wiper
insert to make the rubber easier to slide.
7
When installing a wiper
blade, reverse the procedure
in step 1.
After installing the wiper blade,
check that the connection is locked.
■Wiper blade and wiper insert
handling
Improper handling may result in
damage to the wiper blades or wiper
insert. If you have any concerns
about replacing the wiper blades or
wiper insert yourself, contact your
Toyota dealer.
NOTICE
■When lifting the windshield
wipers
●When raising the wiper arms off
the windshield, lift up the driver
side first, and then lift up pas-
senger side. When returning the
wipers to their original position,
return the passenger side first.
●Do not lift a windshield wiper by
the wiper blade. Otherwise, the
wiper blade may be deformed.
●Do not operate the wiper lever
when the windshield wipers are
lifted. Otherwise, the wind-
shield wipers may contact the
hood, possibly resulting in dam-
age to the windshield wipers
and/or hood.
Page 730 of 752

730Alphabetical Index
Profiles ................................. 395
Registering a Bluetooth
® audio
player for the first time........ 394
Registering a Bluetooth
® phone
for the first time .................. 392
Remote Connect ..................... 506
Replacing Electronic key battery ........... 600
Fuses ................................... 603
Light bulbs ............................ 607
Tires ..................................... 640
Wiper insert .......................... 597
Wireless remote control battery........................................... 600
Reporting safety defects for Canadian owners ................. 703
Reporting safety defects for U.S. owners................................... 702
Resetting the message indicat- ing maintenance is required 561
Road accident cautions ........... 77
Road Sign Assist .................... 262
RSA (Road Sign Assist) ......... 262
S
Screen adjustment ................. 390
Seat belt reminder light ......... 631
Seat belts .................................. 31 Adjusting the seat belt shoulder anchor height ....................... 33
Automatic Locking Retractor .. 33
Child restraint system installation ............................................. 56
Cleaning and maintaining the seat belt.............................. 557
Emergency Locking Retractor 33
How to wear your seat belt..... 32
How your child should wear the seat belt................................ 32
Pregnant women, proper seat belt use................................. 31 Reminder light and buzzer ...631
Seat belt extender ..................32
Seat belt instructions for Cana-
dian owners ........................703
Seat belt pretensioners ..........34
SRS warning light .................626
Seat heaters ............................521
Seating capacity .....................193
Seat position memory ............151
Seats Adjustment precautions 148, 149
Adjustment ...................148, 149
Child seats/child restraint system installation ............................52
Cleaning ...............................557
Driving position memory .......151
Folding down the rear seatbacks ...........................................150
Head restraint .......................154
Properly sitting in the seat ......29
Seat heaters ....... ..................521
Seat position memory...........151
Seat ventilators.....................521
Seat ventilators .. .....................521
Secondary Collision Brake ....362
Sensor Automatic headlight system .225
Automatic High Beam system...........................................227
BSM (Blind Spot M onitor) .....280
Digital Rear-view Mirror ........164
Inside rear view mirror ..........159
Intuitive parking assist ..........287
LTA (Lane Traci ng Assist) ....252
Parking Support Brake function (rear-crossing vehicles) ......280
Parking Support Brake function (static objects) ....................287
Rain-sensing windshield wipers ...........................................233
RCTA ....................................280
Toyota Safety Sense 2.0 ......239
Page 732 of 752

732Alphabetical Index
Outside rear view mirror switches ............................. 169
Panoramic moon roof switches ........................................... 177
Parking brake switch ............ 218
PKSB (Parking Support Brake) ........................................... 296
Power back door switch133, 134
Power door lock switch ........ 127
Power switch ................ 204, 206
Power window switch ........... 171
RCTA ................................... 277
Rear window and outside rear view mirror defoggers switch........................................... 516
Rear window wipe r and washer
switch ................................. 234
Seat heater switches .... 521, 522
Seat ventilator switches ....... 522
Tire pressure warning reset switch ................................. 583
Vehicle-to-vehicle distance switch ................................. 265
VSC OFF switch................... 362
Window lock switch .............. 173
Windshield defogger switch . 516
Windshield wiper de-icer switch ........................................... 519
Windshield wipers and washer switch ................................. 231
Wireless charger switch ....... 539
T
Tail lights Light switch .......................... 224
Replacing light bulbs ............ 607
Talking on the Bluetooth
®
hands-free system ............... 478 Call screen operation ........... 478
Incoming call waiting ............ 480
Sending tones ...................... 479 Transmit volume setting .......479
Theft deterrent system Alarm ......................................82
Immobilizer system .................81
Tire inflation pressure Maintenance data .................672
Tire inflation pressure display function ...............................581
Warning light ........................630
Tire information ......................677 Glossary ...............................681
Size ......................................679
Tire identification number .....678
Tire section names ...............679
Tire pressure warning system Function................................581
Initializing..............................583
Installing tire p ressure warning
valves and transmitters ......582
Registering ID codes ............585
Warning light ........................630
Tires .........................................578 Chains ..................................371
Checking ..............................578
Glossary ...............................681
If you have a flat tire .............640
Inflation pressure ..................587
Information ......... ..................677
Replacing .............................640
Rotating tires ........................580
Size ......................................672
Snow tires.............................369
Spare tire ..............................640
Tire identification number .....678
Tire inflation pressure display function ...............................581
Tire pressure warning system ...........................................581
Uniform Tire Qua lity Grading 680
Warning light ........................630
Tools ........................................641
Top tether strap ........................63