child seat TOYOTA RAV4 PHEV 2021 Owner's Manual
[x] Cancel search | Manufacturer: TOYOTA, Model Year: 2021, Model line: RAV4 PHEV, Model: TOYOTA RAV4 PHEV 2021Pages: 666, PDF Size: 161.28 MB
Page 61 of 666
59
1
1-2. Child safety
For safety and security
The child restraint systems mentioned in the table may not be a vailable out-
side the EU area.
When securing some types of child
restraint systems in rear seat, it
may not be possible to properly use
the seat belts in positions next to
the child restraint without interfering
with it or affecti ng seat belt effec-
tiveness. Be sure you r seat belt fits
snugly across your shoulder and
low on your hips. If it does not, or if
it interferes with the child restraint,
move to a different position. Failure
to do so may result in death or seri -
ous injury.
When installing a child restraint
in the rear seats, adjust the front
seat so that it does not interfere
with the child or child restraint
system.
When installing a child seat with
support base, if the child seat
interferes with the seatback
when latching it into the support
base, adjust the seatback rear -
ward until there is no interfer -
ence.
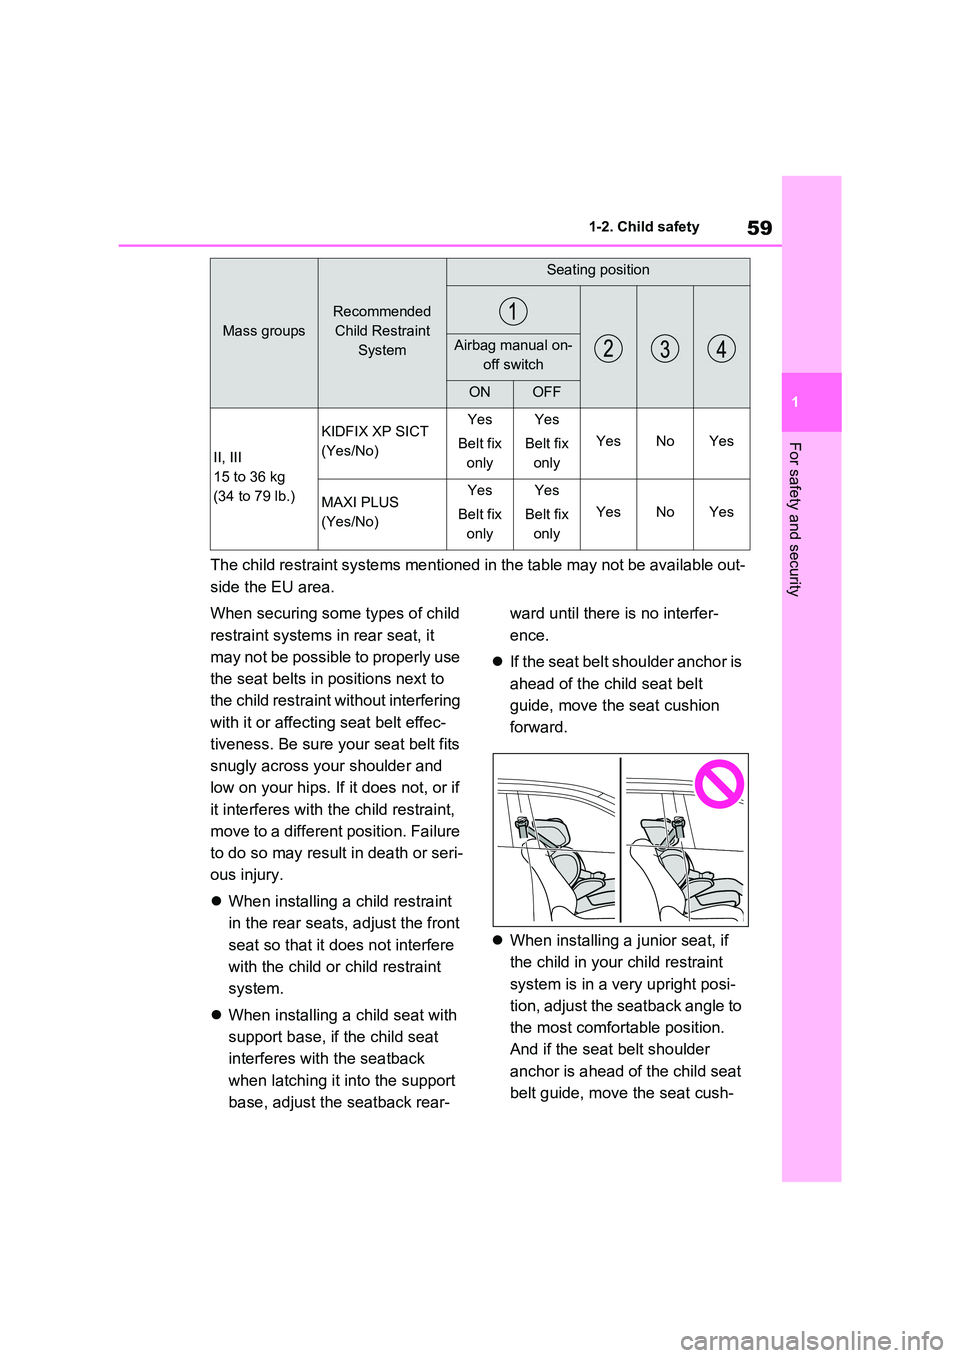
If the seat belt shoulder anchor is
ahead of the child seat belt
guide, move the seat cushion
forward.
When installing a junior seat, if
the child in your child restraint
system is in a very upright posi -
tion, adjust the seatback angle to
the most comfortable position.
And if the seat belt shoulder
anchor is ahead of the child seat
belt guide, move the seat cush -
II, III
15 to 36 kg
(34 to 79 lb.)
KIDFIX XP SICT
(Yes/No)
Yes
Belt fix
only
Yes
Belt fix
only
YesNoYes
MAXI PLUS
(Yes/No)
Yes
Belt fix
only
Yes
Belt fix
only
YesNoYes
Mass groups
Recommended
Child Restraint
System
Seating position
Airbag manual on-
off switch
ONOFF
Page 62 of 666
601-2. Child safety
ion forward.
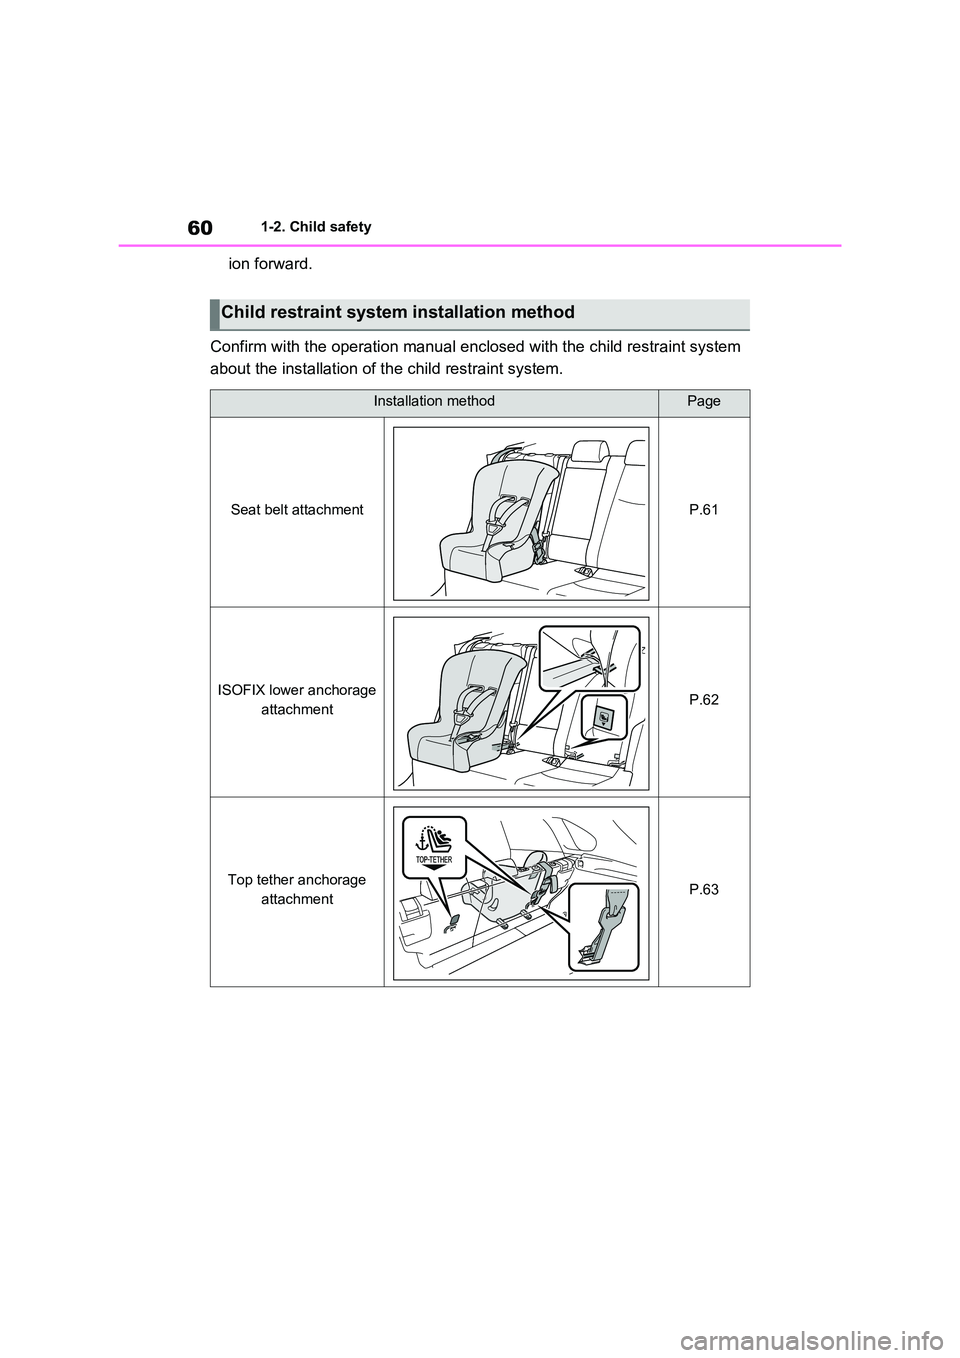
Confirm with the operation manua l enclosed with the child restraint system
about the installation of th e child restraint system.
Child restraint system installation method
Installation methodPage
Seat belt attachmentP.61
ISOFIX lower anchorage
attachmentP.62
Top tether anchorage
attachmentP.63
Page 63 of 666
61
1
1-2. Child safety
For safety and security
■Installing child restraint sys -
tem using a seat belt
Install the child restraint system in
accordance to the operation man -
ual enclosed with the child restraint
system.
If the child restraint system on hand
is not within the “universal” cate -
gory (or the necessary information
is not in the tabl e), refer to the
“Vehicle List” provided by the child
restraint system maker for various
possible installation positions, or
check the compatibility after asking
the retailer of the child seat.
( →P.55, 56)
1 If installing the child restraint
system to the front passenger
seat is unavoidable, refer to
P.52 for the front passenger
seat adjustment.
2 Adjust the seatback angle to the
most upright position. When
installing a forward-facing child
seat, if there is a gap between
the child seat a nd the seatback,
adjust the seatback angle until
good contact is achieved.
3 If the head restraint interferes
with the child restraint system
installation and the head
restraint can be removed,
remove the head restraint. Oth-
erwise, put the head restraint in
the upper most position.
( →P.276)
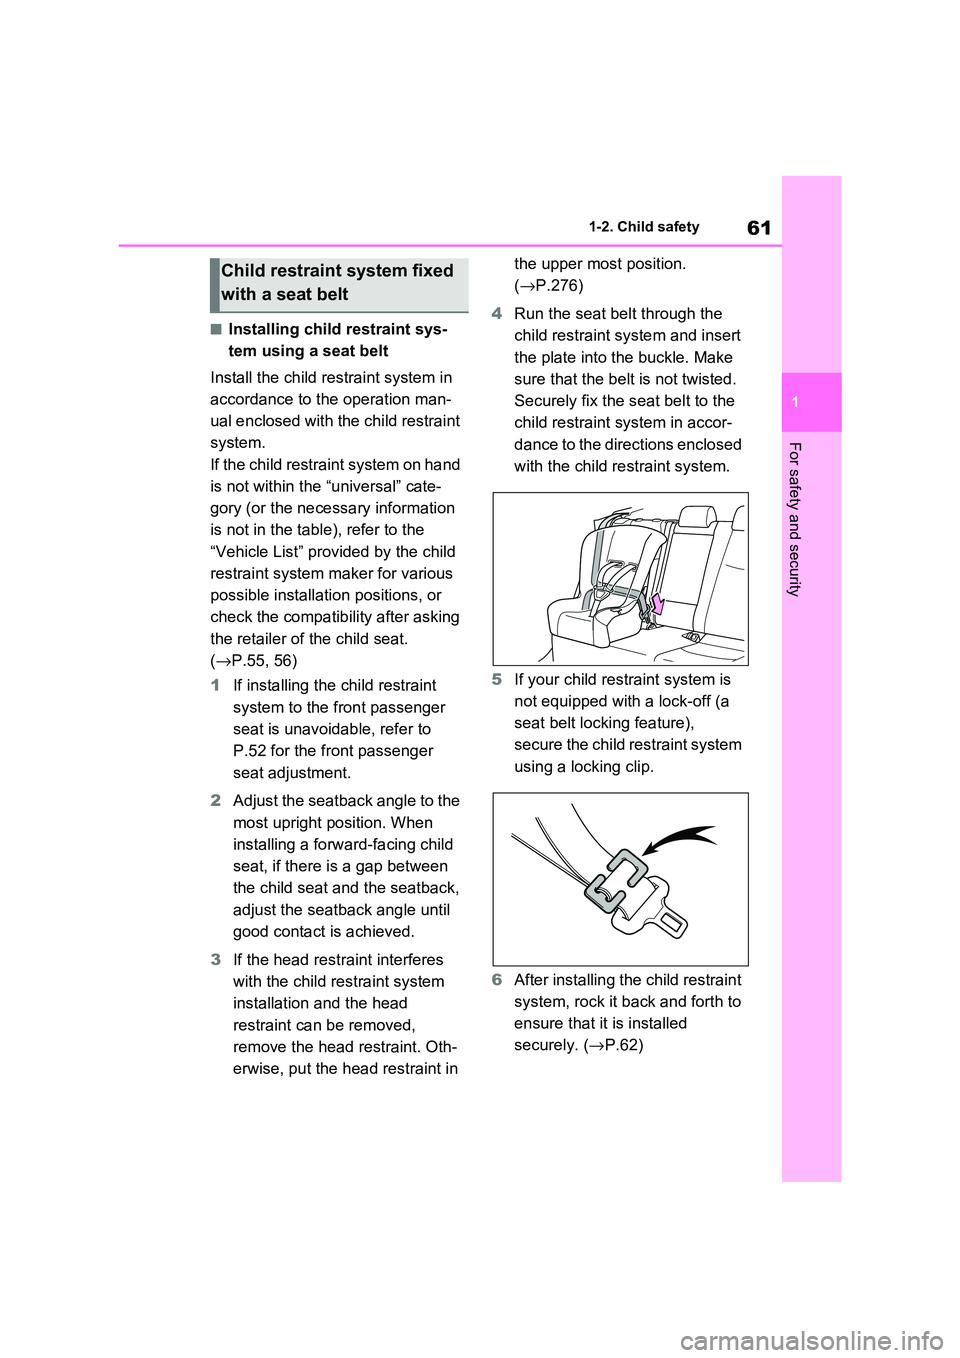
4 Run the seat belt through the
child restraint system and insert
the plate into the buckle. Make
sure that the belt is not twisted.
Securely fix the s eat belt to the
child restraint system in accor -
dance to the directions enclosed
with the child restraint system.
5 If your child restraint system is
not equipped with a lock-off (a
seat belt locking feature),
secure the child restraint system
using a locking clip.
6 After installing the child restraint
system, rock it back and forth to
ensure that it is installed
securely. ( →P.62)
Child restraint system fixed
with a seat belt
Page 64 of 666
621-2. Child safety
■Removing a child restraint
system installed with a seat
belt
Press the buckle release button
and fully retract the seat belt.
When releasing the buckle, the child
restraint system may spring up due to
the rebound of the seat cushion.
Release the buckle while holding down
the child restraint system.
Since the seat belt automatically reels
itself, slowly return it to the stowing
position.
■When installing a child restraint
system
You may need a locking clip to install the child restraint s ystem. Follow the
instructions provided by the manufac -
turer of the system. If your child restraint system does not provide a locking clip,
you can purchase the following item
from any authorized Toyota retailer or Toyota authorized repairer, or any reli -
able repairer: Locking clip for child
restraint system (Part No. 73119-22010)
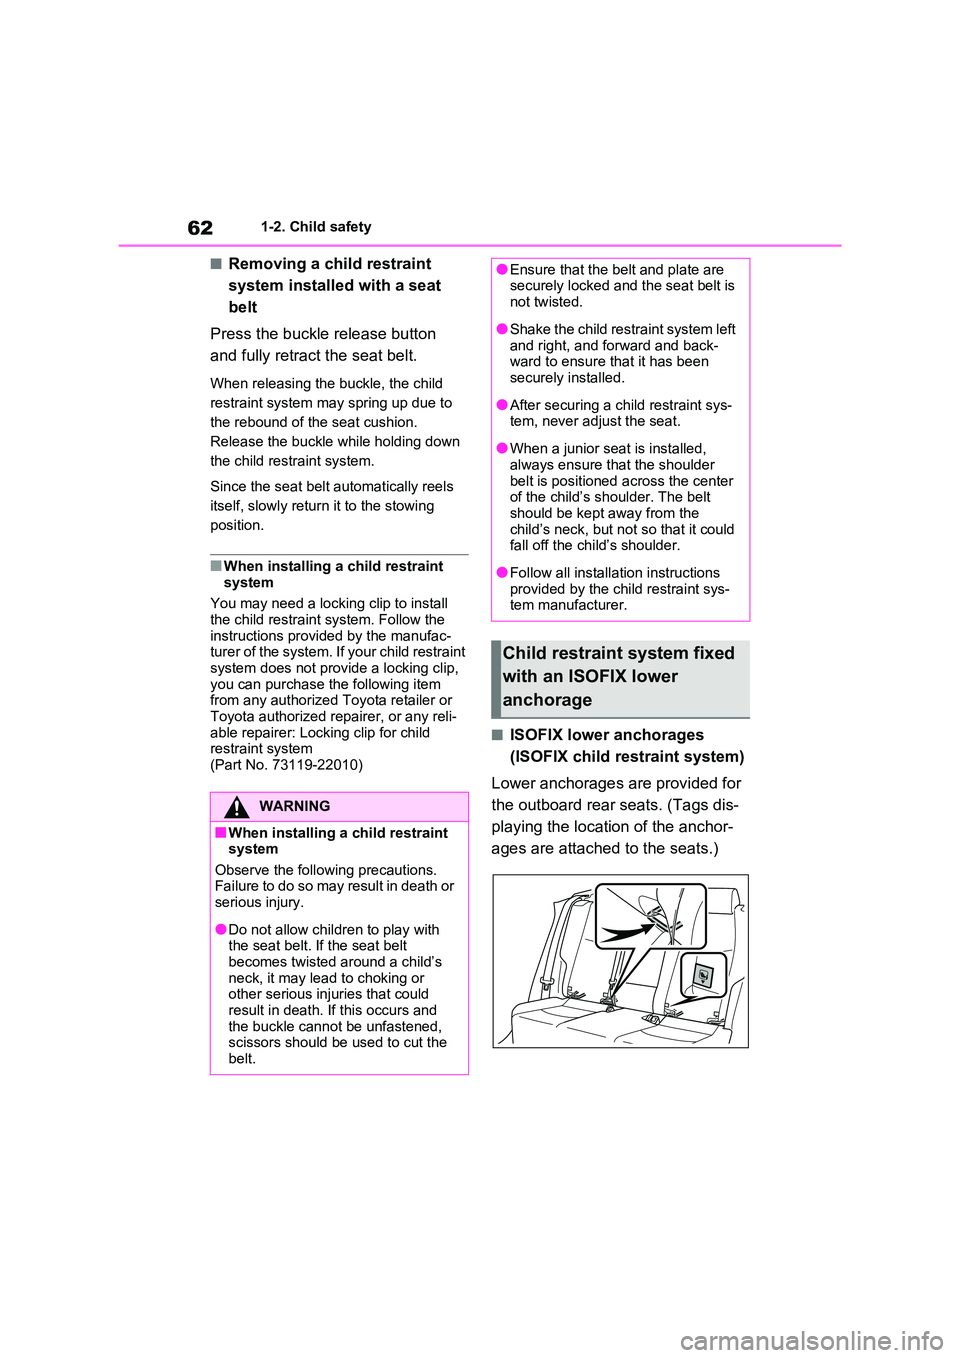
■ISOFIX lower anchorages
(ISOFIX child restraint system)
Lower anchorages are provided for
the outboard rear seats. (Tags dis -
playing the location of the anchor -
ages are attached to the seats.)
WARNING
■When installing a child restraint
system
Observe the following precautions. Failure to do so may result in death or
serious injury.
●Do not allow children to play with
the seat belt. I f the seat belt
becomes twisted around a child’s neck, it may lead to choking or
other serious injuries that could
result in death. If this occurs and the buckle cannot be unfastened,
scissors should be used to cut the
belt.
●Ensure that the bel t and plate are securely locked and the seat belt is
not twisted.
●Shake the child restraint system left
and right, and forward and back -
ward to ensure that it has been securely installed.
●After securing a ch ild restraint sys- tem, never adjust the seat.
●When a junior seat is installed, always ensure that the shoulder
belt is positioned a cross the center
of the child’s shoulder. The belt should be kept away from the
child’s neck, but not so that it could
fall off the chil d’s shoulder.
●Follow all installation instructions
provided by the child restraint sys - tem manufacturer.
Child restraint system fixed
with an ISOFIX lower
anchorage
Page 65 of 666
63
1
1-2. Child safety
For safety and security
■Installation with ISOFIX lower
anchorage (ISOFIX child
restraint system)
Install the child restraint system in
accordance to the operation man -
ual enclosed with the child restraint
system.
If the child restraint system on hand
is not within the “universal” cate -
gory (or the necessary information
is not in the tabl e), refer to the
“Vehicle List” provided by the child
restraint system maker for various
possible installation positions, or
check the compatibility after asking
the retailer of the child seat.
( →P.55, 56)
1 Adjust the seatback angle to the
most upright position. When
installing a forward-facing child
seat, if there is a gap between
the child seat a nd the seatback,
adjust the seatback angle until
good contact is achieved.
2 If the head restraint interferes
with the child restraint system
installation and the head
restraint can be removed,
remove the head restraint. Oth-
erwise, put the head restraint in
the upper most position.
( →P.276)
3 Check the positions of the exclu-
sive fixing bars, and install the
child restraint system to the
seat.
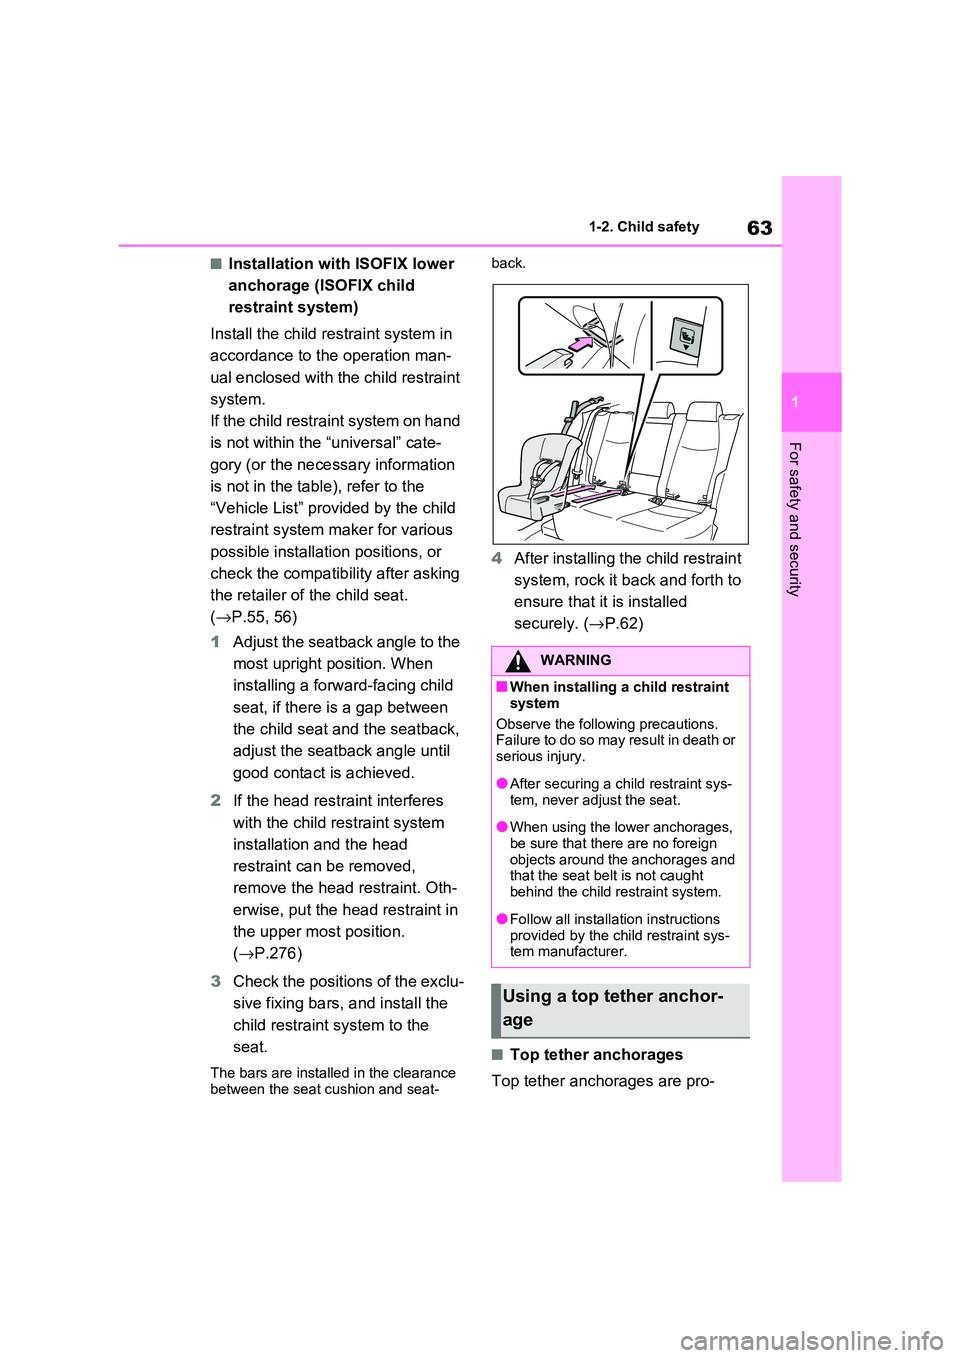
The bars are installed in the clearance
between the seat cushion and seat -
back.
4 After installing the child restraint
system, rock it back and forth to
ensure that it is installed
securely. ( →P.62)
■Top tether anchorages
Top tether anchorages are pro -
WARNING
■When installing a child restraint
system
Observe the following precautions. Failure to do so may result in death or
serious injury.
●After securing a ch ild restraint sys-
tem, never adjust the seat.
●When using the lower anchorages,
be sure that there are no foreign
objects around the anchorages and that the seat belt is not caught
behind the child restraint system.
●Follow all installation instructions
provided by the child restraint sys -
tem manufacturer.
Using a top tether anchor -
age
Page 66 of 666
641-2. Child safety
vided for the outboard rear seats.
Use top tether anchorages when
fixing the top strap.
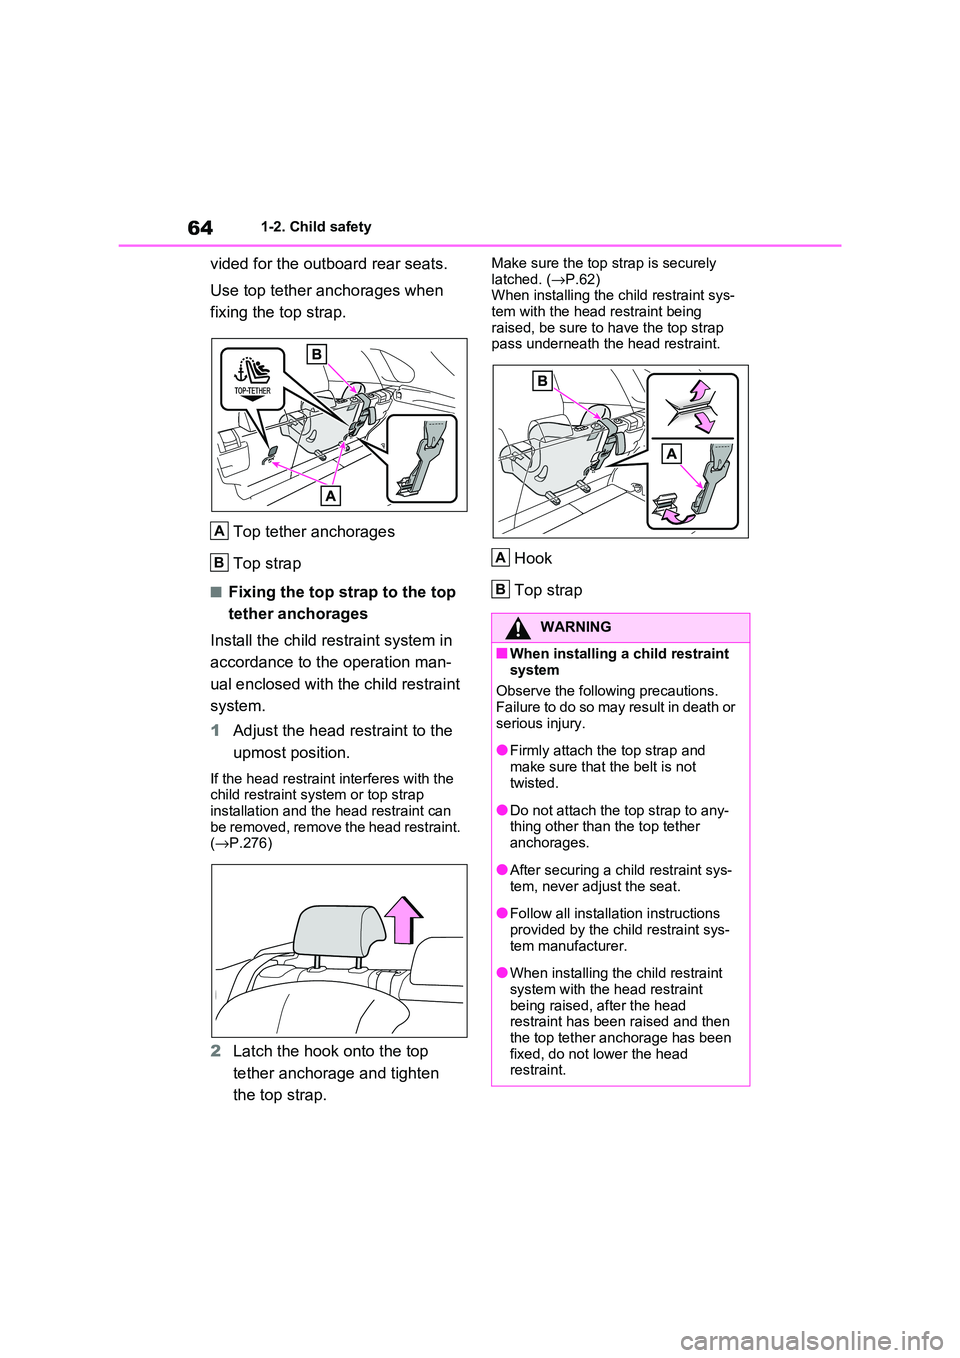
Top tether anchorages
Top strap
■Fixing the top strap to the top
tether anchorages
Install the child restraint system in
accordance to the operation man -
ual enclosed with the child restraint
system.
1 Adjust the head restraint to the
upmost position.
If the head restraint interferes with the
child restraint system or top strap installation and the head restraint can
be removed, remove the head restraint.
( →P.276)
2Latch the hook onto the top
tether anchorage and tighten
the top strap.
Make sure the top strap is securely
latched. ( →P.62) When installing the child restraint sys-
tem with the head restraint being
raised, be sure to have the top strap pass underneath the head restraint.
Hook
Top strap
A
B
WARNING
■When installing a child restraint
system
Observe the following precautions. Failure to do so may result in death or
serious injury.
●Firmly attach the top strap and
make sure that the belt is not
twisted.
●Do not attach the top strap to any-
thing other than the top tether anchorages.
●After securing a ch ild restraint sys- tem, never adjust the seat.
●Follow all installation instructions provided by the child restraint sys -
tem manufacturer.
●When installing the child restraint
system with the head restraint
being raised, after the head restraint has been raised and then
the top tether anchorage has been
fixed, do not lower the head restraint.
A
B
Page 209 of 666
207
4
4-2. Opening, closing and locking the doors
Before driving
■Setting the alarm (if equipped)
Locking the doors will set the alarm sys - tem. ( →P.78)
■Conditions affecting the operation
of the smart entry & start system or
wireless remote control
→ P.225
■If the smart entry & start system or
the wireless remote control does
not operate properly
●Use the mechanical key to lock and
unlock the doors. ( →P.604)
●Replace the key battery with a new
one if it is depleted. ( →P.543)
■If the 12-volt battery is discharged
The doors cannot be locked and
unlocked using the smart entry & start
system or wireless rem ote control. Lock or unlock the doors using the mechani -
cal key. ( →P.604)
■Rear seat reminder function
●In order to remind you not to forget
luggage, etc. in the rear seat, when
the power switch i s turned to OFF after any of the fo llowing conditions
are met, a buzzer will sound and a
message will be displayed on the multi-information di splay for approxi-
mately 6 seconds.
• The hybrid system is started within 10 minutes after opening and closing a
rear door.
• A rear door has been opened and closed after the hy brid system was
started.
However, if a rear door is opened and
then closed within approximately 2 sec-
onds, the rear seat reminder function
may not operate.
●The rear seat reminder function deter - mines that luggage, etc. has been
placed in a rear seat based on open -
ing and closing of a rear door. There - fore, depending on t he situation, the
rear seat reminder function may not
operate and you may still forget lug - gage, etc. in the rear seat, or it may
operate unnecessarily.
●The rear seat reminder function can
be enabled/disabled. ( →P.629)
■Customization
Settings (e.g. unlocking function using a key) can be changed.
(Customizable features: →P.633)
WARNING
■To prevent an accident
Observe the following precautions while driving the vehicle.
Failure to do so may result in a door
opening and an occupant could be thrown out of the v ehicle, resulting in
death or serious injury.
●Ensure that all doo rs are properly closed.
●Do not pull the in side handle of the doors while driving.
Be especially care ful for the front
doors, as the doors may be opened even if the inside lock buttons are in
locked position.
●Set the rear door child-protector
locks when childre n are seated in
the rear seats.
■When opening or closing a door
Check the surroundings of the vehicle such as whether the vehicle is on an
incline, whether there is enough
space for a door to open and whether a strong wind is blowing. When open -
ing or closing the door, hold the door
handle tightly to prepare for any unpredictable movement.
Page 275 of 666
273
4
4-3. Adjusting the seats
Before driving
*: If equipped
■Recording procedure
1 Check that the shift lever is in P.
2 Turn the power switch to ON.
3 Adjust the driver’s seat to the
desired positions.
4 While pressing the “SET” but-
ton, or within 3 seconds after the
“SET” button is pressed, press
button “1” or “2” until the buzzer
sounds.
If the selected butt on has already been preset, the previously recorded position
WARNING
●Do not allow chil dren to enter the
luggage compartment.
●Do not operate the rear seat if it is
occupied.
●Be careful not to get feet or hands
caught in the moving parts or joints
of the seats dur ing operation.
●Do not allow children to operate the
seat.
■After returning the rear seatback
to the upright position
●Make sure that the seatback is securely locked in position by lightly
pushing it back and forth.
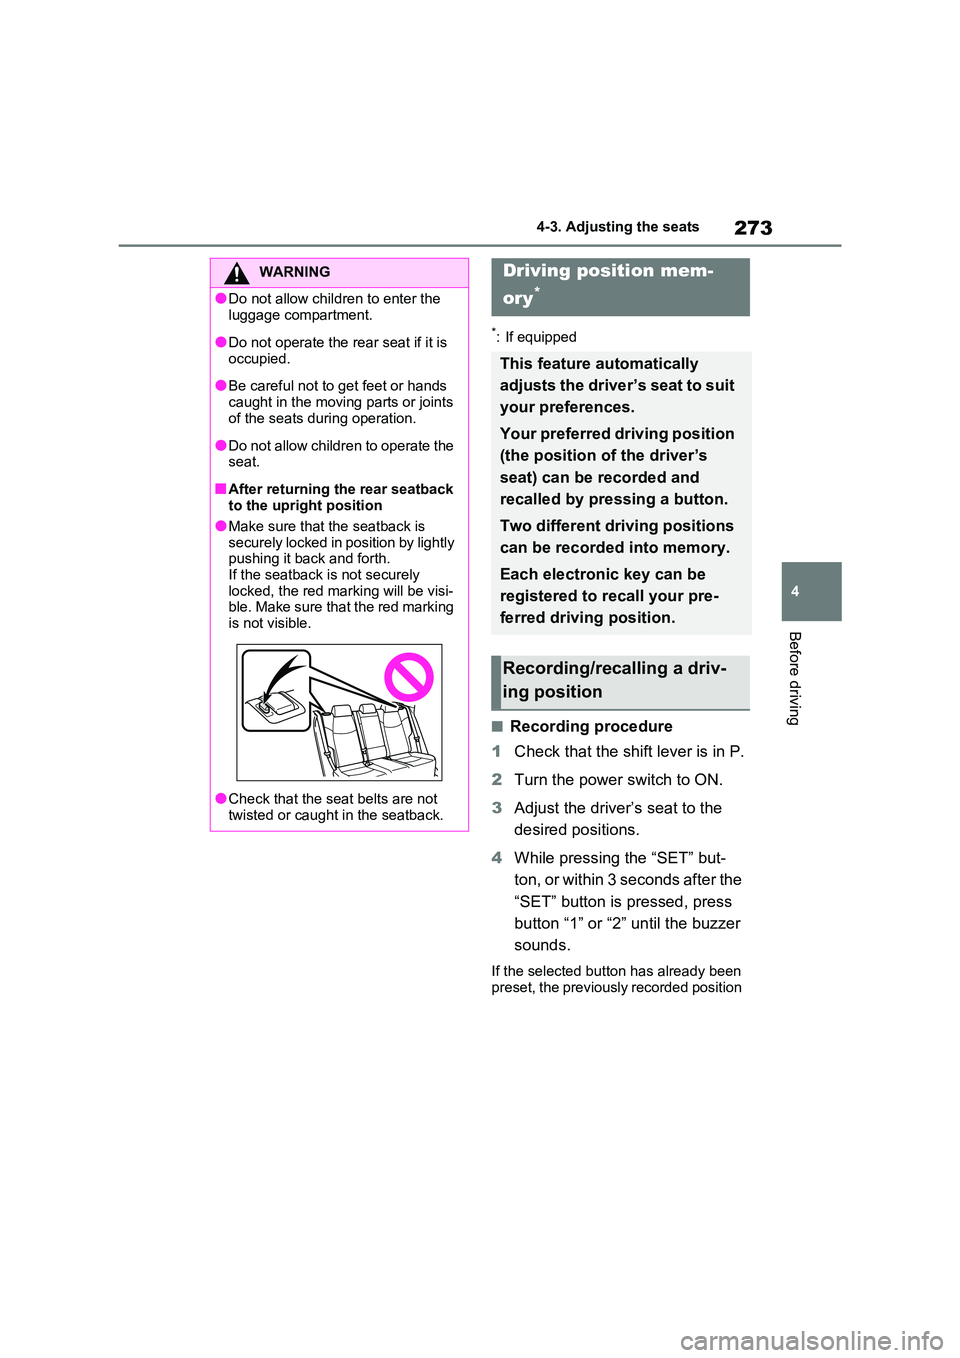
If the seatback is not securely locked, the red marking will be visi -
ble. Make sure that the red marking
is not visible.
●Check that the sea t belts are not
twisted or caught in the seatback.
Driving position mem-
ory*
This feature automatically
adjusts the driver’s seat to suit
your preferences.
Your preferred driving position
(the position of the driver’s
seat) can be recorded and
recalled by pr essing a button.
Two different driving positions
can be recorded into memory.
Each electronic key can be
registered to recall your pre -
ferred driving position.
Recording/recalling a driv -
ing position
Page 330 of 666
3285-2. Driving procedures
●The driver is wearing the seat belt
●The shift lever is in a forward or
reverse position.
●The malfunction indicator lamp or
brake system warning light is not illu -
minated
If the automatic release function does
not operate, release the parking brake
manually.
■If “Parking Brake Temporarily Unavailable” is displayed on the
multi-information display
If the parking brake is operated repeat - edly over a short period of time, the sys -
tem may restrict oper ation to prevent
overheating. If this happens, refrain from operating the parking brake. Normal
operation will return after about 1 min-
ute.
■If “Parking Brake Unavailable” is displayed on the multi-information
display
Operate the parking brake switch. If the message does not di sappear after oper-
ating the switch several times, the sys -
tem may be malfunctioning. Have the vehicle inspected by any authorized
Toyota retailer or Toyota authorized
repairer, or any reliable repairer.
■Parking brake operation sound
When the parking brake operates, a
motor sound (whirring sound) may be
heard. This does not indicate a malfunc - tion.
■Parking brake indicator light
●Depending on the power switch mode, the parking brake in dicator light will
turn on and stay on as described
below:
ON: Comes on until the parking brake is released.
Not in ON: Stays on for approximately
15 seconds.
●When the power switch is turned off
with the parking brake set, the parking brake indicator li ght will stay on for
about 15 seconds. This does not indi -
cate a malfunction.
■When the parking brake switch
malfunctions
Automatic mode (automatic brake set -
ting and releasing) will be turned on
automatically.
■Parking the vehicle
→ P.300
■Parking brake engaged warning
buzzer
A buzzer will sound if the vehicle is driven with the pa rking brake engaged.
“Parking Brake ON” is displayed on the
multi-information display (with the vehi - cle reaching a speed of 5 km/h [3 mph]).
■If the brake system warning light
comes on
→ P.568
■Usage in winter time
→ P.446
WARNING
■When parking the vehicle
Do not leave a child in the vehicle
alone. The parking brake may be released unintentionally by a child
and there is the dang er of the vehicle
moving that may lead to an accident resulting in death or serious injury.
■Parking brake switch
Do not set any objects near the park -
ing brake switch. Objects may inter-
fere with the switch and may lead the parking brake to unexpectedly oper -
ate.
NOTICE
■When parking the vehicle
Before you leave the vehicle, shift the
shift lever to P, set the parking brake
and make sure that the vehicle does not move.
Page 363 of 666
361
5
5-5. Using the driving support systems
Driving
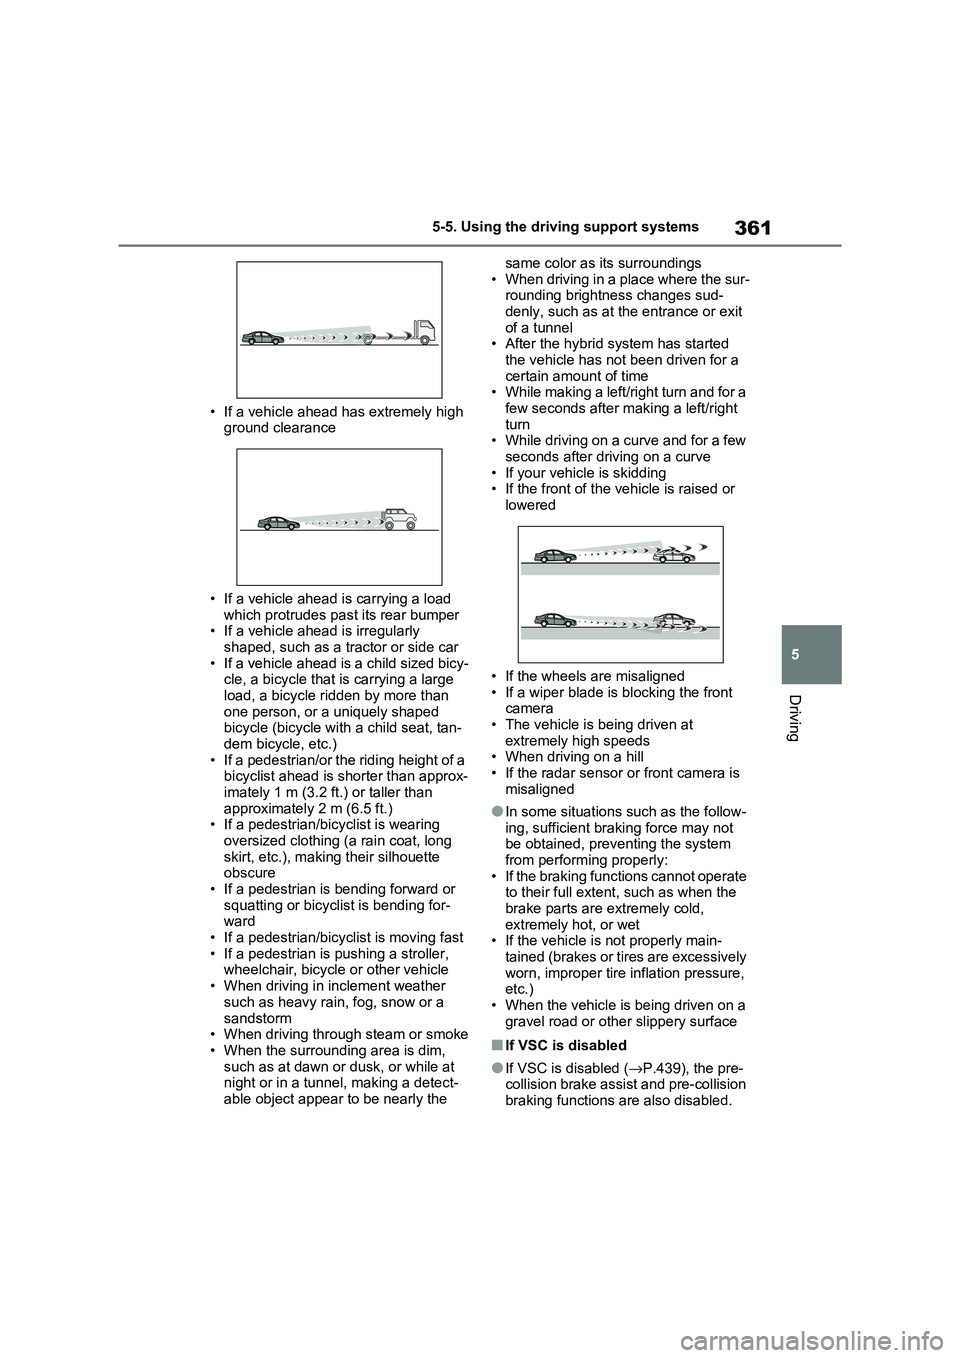
• If a vehicle ahead has extremely high
ground clearance
• If a vehicle ahead is carrying a load
which protrudes pa st its rear bumper • If a vehicle ahead is irregularly
shaped, such as a tractor or side car
• If a vehicle ahead is a child sized bicy - cle, a bicycle that is carrying a large
load, a bicycle ridden by more than
one person, or a uniquely shaped bicycle (bicycle with a child seat, tan-
dem bicycle, etc.)
• If a pedestrian/or the riding height of a bicyclist ahead is shorter than approx -
imately 1 m (3.2 ft.) or taller than
approximately 2 m (6.5 ft.) • If a pedestrian/bi cyclist is wearing
oversized clothing (a rain coat, long
skirt, etc.), maki ng their silhouette obscure
• If a pedestrian is bending forward or
squatting or bicyclist is bending for - ward
• If a pedestrian/bicy clist is moving fast
• If a pedestrian is pushing a stroller, wheelchair, bicycle or other vehicle
• When driving in inclement weather
such as heavy rain , fog, snow or a
sandstorm • When driving through steam or smoke
• When the surrounding area is dim,
such as at dawn or dusk, or while at night or in a tunnel, making a detect -
able object appear to be nearly the
same color as its surroundings
• When driving in a place where the sur - rounding brightness changes sud -
denly, such as at the entrance or exit
of a tunnel • After the hybrid system has started
the vehicle has not been driven for a
certain amount of time • While making a left/right turn and for a
few seconds after making a left/right
turn • While driving on a curve and for a few
seconds after driving on a curve
• If your vehicle is skidding • If the front of the v ehicle is raised or
lowered
• If the wheels are misaligned
• If a wiper blade is blocking the front
camera • The vehicle is being driven at
extremely high speeds
• When driving on a hill • If the radar sensor or front camera is
misaligned
●In some situations such as the follow -
ing, sufficient braking force may not
be obtained, preventing the system from performing properly:
• If the braking functions cannot operate
to their full extent, such as when the brake parts are extremely cold,
extremely hot, or wet
• If the vehicle is not properly main - tained (brakes or ti res are excessively
worn, improper tire i nflation pressure,
etc.)
• When the vehicle is being driven on a gravel road or other slippery surface
■If VSC is disabled
●If VSC is disabled (→P.439), the pre- collision brake assist and pre-collision
braking functions are also disabled.