isofix TOYOTA RAV4 PLUG-IN HYBRID 2021 Owners Manual
[x] Cancel search | Manufacturer: TOYOTA, Model Year: 2021, Model line: RAV4 PLUG-IN HYBRID, Model: TOYOTA RAV4 PLUG-IN HYBRID 2021Pages: 666, PDF Size: 161.28 MB
Page 53 of 666
51
1
1-2. Child safety
For safety and security
• Fixed with an ISOFIX lower
anchorage: P.62
• Using a top tether anchorage:
P.63
Prioritize and observe the warn-
ings, as well as the laws and reg -
ulations for child restraint
systems.
Use a child restraint system until
the child becomes large enough
to properly wear the vehicle’s
seat belt.
Choose a child restraint system
appropriate to the age and size
of the child.
Note that not all child restraint
systems can fit in all vehicles.
Before using or purchasing a
child restraint system, check the
compatibility of the child restraint
system with seat positions.
( →P.54)
Points to remember
WARNING
■When a child is riding
Observe the following precautions.
Failure to do so may result in death or
serious injury.
●For effective protection in automo -
bile accidents and sudden stops, a child must be properly restrained,
using a seat belt or child restraint
system which is corre ctly installed. For installation details, refer to the
operation manual enclosed with the
child restraint system. General installation instructions are pro -
vided in this manual.
●Toyota strongly urges the use of a proper child restraint system that
conforms to the weight and size of
the child, installed on the rear seat. According to accident statistics, the
child is safer when properly
restrained in the rear seat than in the front seat.
●Holding a child in your or someone else’s arms is not a substitute for a
child restraint system. In an acci-
dent, the child can be crushed against the windshield or between
the holder and the interior of the
vehicle.
■Handling the child restraint sys -
tem
If the child restra int system is not
properly fixed in place, the child or
other passengers may be seriously injured or even killed in the event of
sudden braking, sudden swerving, or
an accident.
●If the vehicle were to receive a
strong impact from an accident, etc., it is possible that the child
restraint system has damage that is
not readily visible. In such cases, do not reuse the restraint system.
●Depending on the child restraint system, installation may be difficult
or impossible. In those cases,
check whether the child restraint system is suitable f or installment in
the vehicle ( →P.54). Be sure to
install and observe the usage rules after carefully reading the child
restraint system fixing method in
this manual, as we ll as the opera- tion manual enclosed with the child
restraint system.
●Keep the child restraint system properly secured on the seat even if
it is not in use. Do not store the
child restraint syst em unsecured in the passenger compartment.
Page 58 of 666
561-2. Child safety
depending on the product.
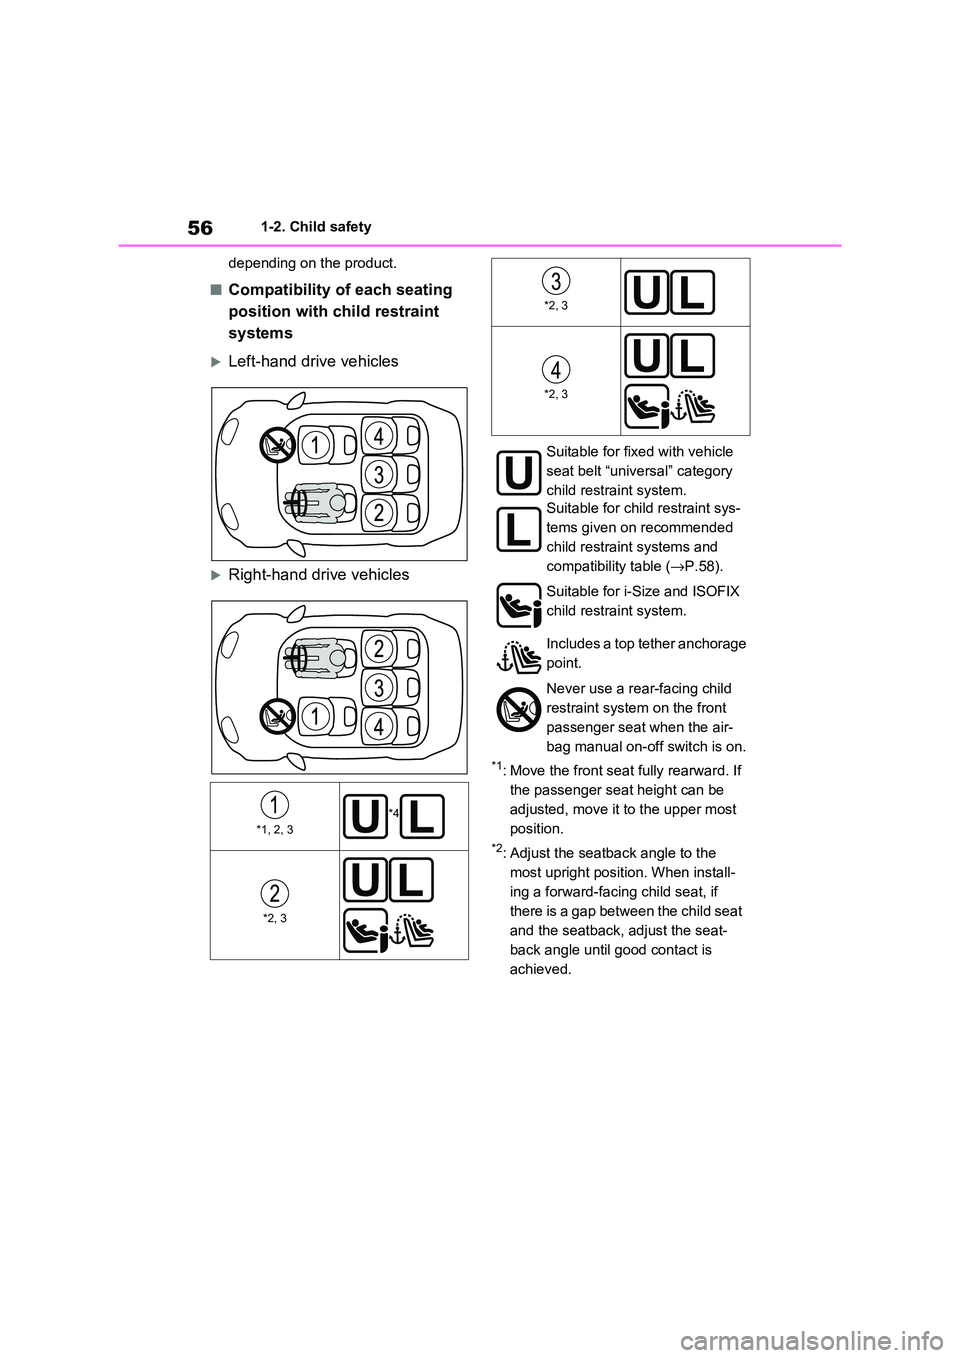
■Compatibility of each seating
position with child restraint
systems
Left-hand drive vehicles
Right-hand drive vehicles
*1: Move the front seat fully rearward. If
the passenger seat height can be
adjusted, move it to the upper most
position.
*2: Adjust the seatback angle to the
most upright position. When install -
ing a forward-facing child seat, if
there is a gap between the child seat
and the seatback, adjust the seat -
back angle until good contact is
achieved.
*1, 2, 3*4
*2, 3
*2, 3
*2, 3
Suitable for fixed with vehicle
seat belt “unive rsal” category
child restraint system.
Suitable for child restraint sys -
tems given on recommended
child restraint systems and
compatibility table ( →P.58).
Suitable for i-Size and ISOFIX
child restraint system.
Includes a top tether anchorage
point.
Never use a rear-facing child
restraint system on the front
passenger seat when the air -
bag manual on-off switch is on.
Page 59 of 666
57
1
1-2. Child safety
For safety and security
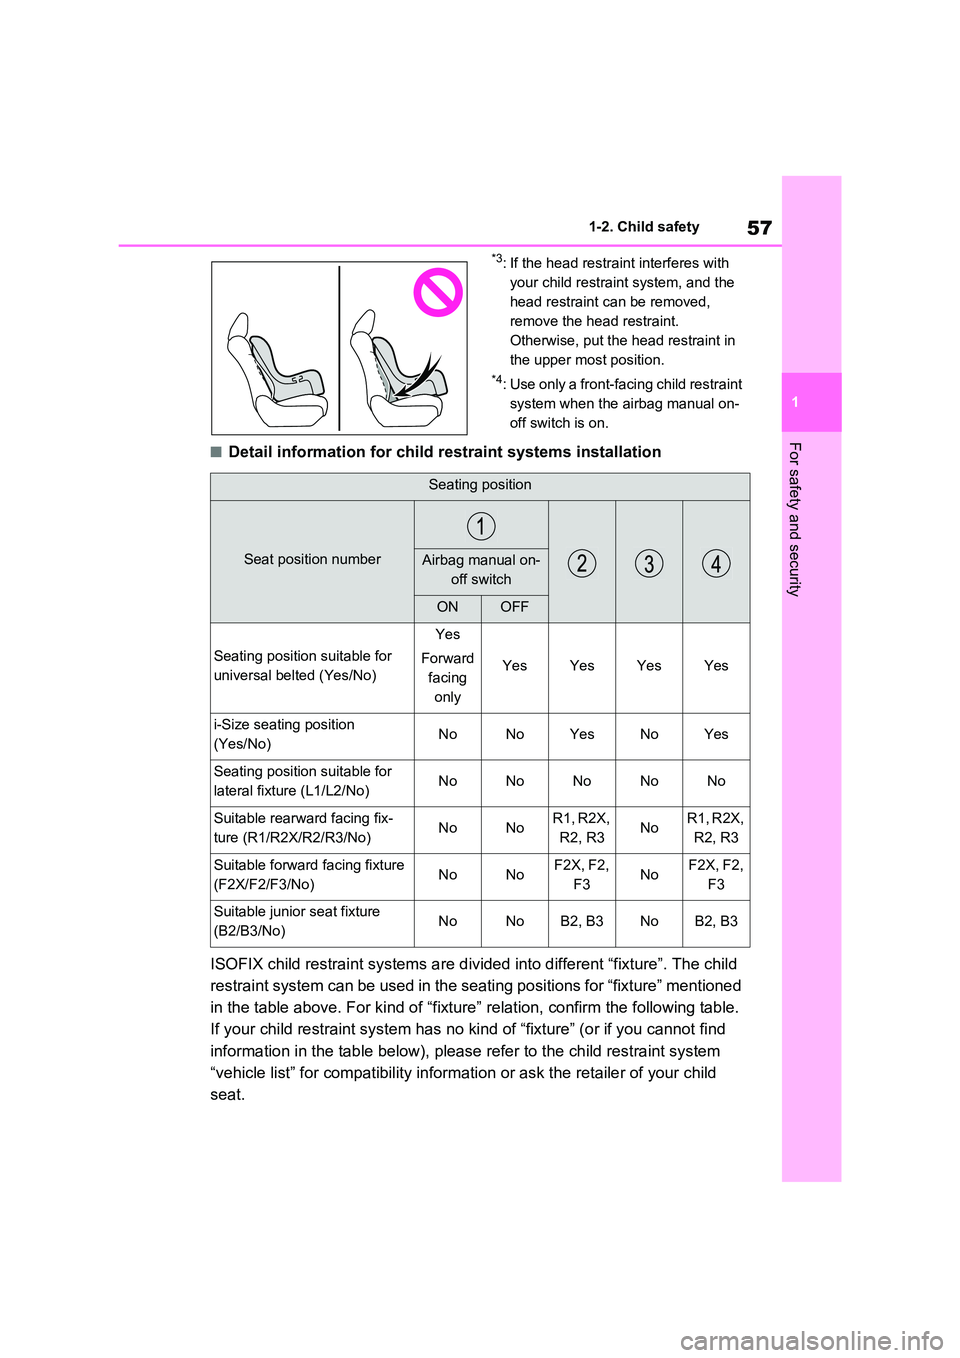
*3: If the head restraint interferes with
your child restrai nt system, and the
head restraint can be removed,
remove the head restraint.
Otherwise, put the head restraint in
the upper most position.
*4: Use only a front-facing child restraint
system when the airbag manual on-
off switch is on.
■Detail information for child r estraint systems installation
ISOFIX child restraint systems a re divided into different “fixture”. The child
restraint system can be used in the seating positions for “fixt ure” mentioned
in the table above. For kind of “ fixture” relation, confirm the following table.
If your child restraint system has no kind of “fixture” (or if you cannot find
information in the tab le below), please refer to the child restraint system
“vehicle list” for compatibilit y information or ask the retailer of your child
seat.
Seating position
Seat position numberAirbag manual on-
off switch
ONOFF
Seating position suitable for
universal belted (Yes/No)
Yes
Forward
facing
only
YesYesYesYes
i-Size seating position
(Yes/No)NoNoYesNoYes
Seating position suitable for
lateral fixture (L1/L2/No)NoNoNoNoNo
Suitable rearward facing fix -
ture (R1/R2X/R2/R3/No)NoNoR1, R2X,
R2, R3NoR1, R2X,
R2, R3
Suitable forward facing fixture
(F2X/F2/F3/No)NoNoF2X, F2,
F3NoF2X, F2,
F3
Suitable junior seat fixture
(B2/B3/No)NoNoB2, B3NoB2, B3
Page 62 of 666
601-2. Child safety
ion forward.
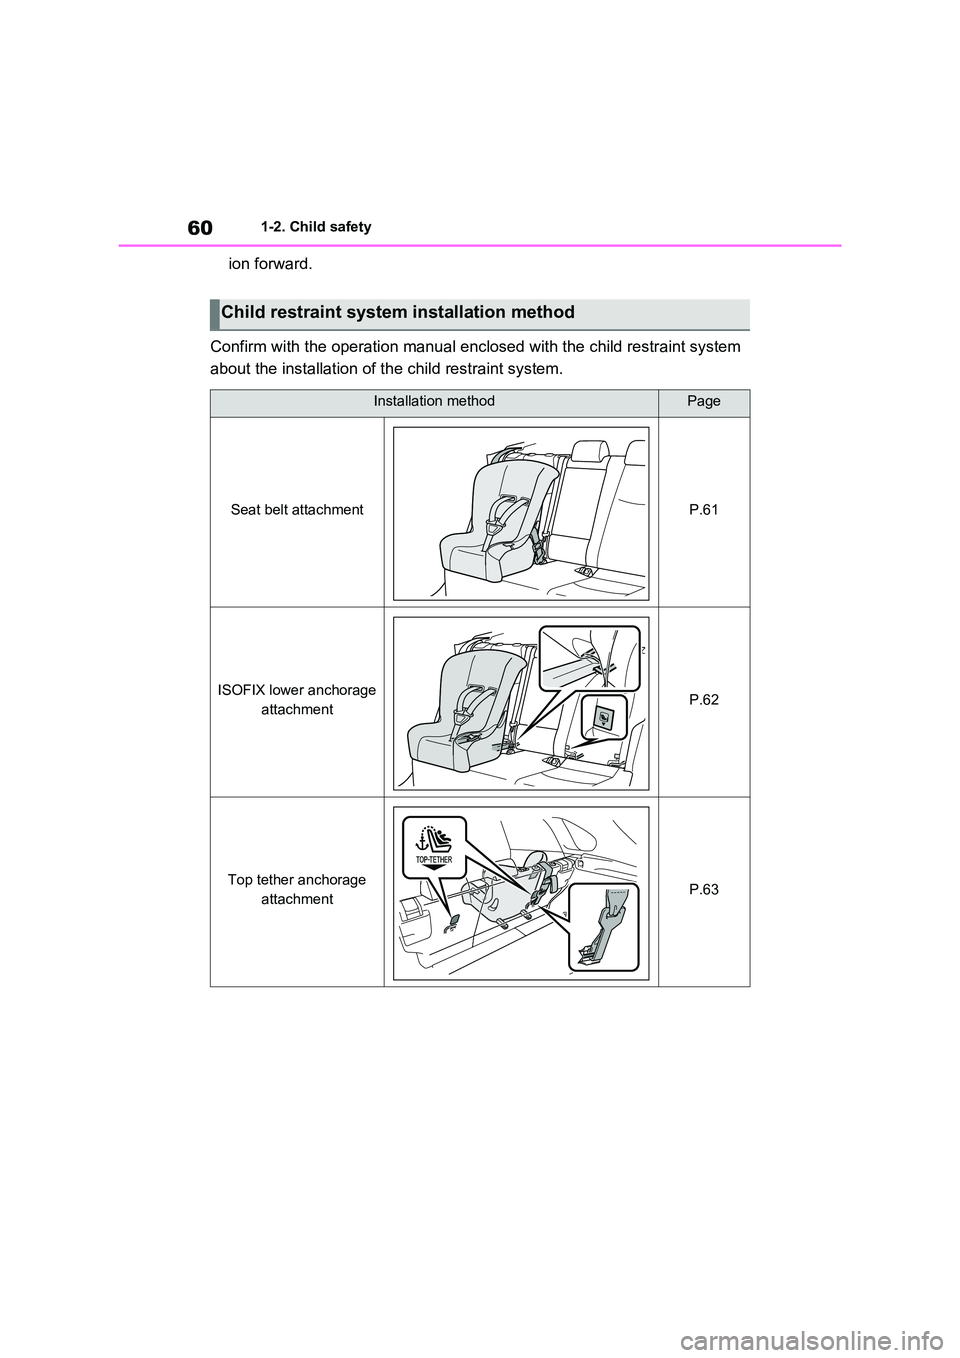
Confirm with the operation manua l enclosed with the child restraint system
about the installation of th e child restraint system.
Child restraint system installation method
Installation methodPage
Seat belt attachmentP.61
ISOFIX lower anchorage
attachmentP.62
Top tether anchorage
attachmentP.63
Page 64 of 666
621-2. Child safety
■Removing a child restraint
system installed with a seat
belt
Press the buckle release button
and fully retract the seat belt.
When releasing the buckle, the child
restraint system may spring up due to
the rebound of the seat cushion.
Release the buckle while holding down
the child restraint system.
Since the seat belt automatically reels
itself, slowly return it to the stowing
position.
■When installing a child restraint
system
You may need a locking clip to install the child restraint s ystem. Follow the
instructions provided by the manufac -
turer of the system. If your child restraint system does not provide a locking clip,
you can purchase the following item
from any authorized Toyota retailer or Toyota authorized repairer, or any reli -
able repairer: Locking clip for child
restraint system (Part No. 73119-22010)
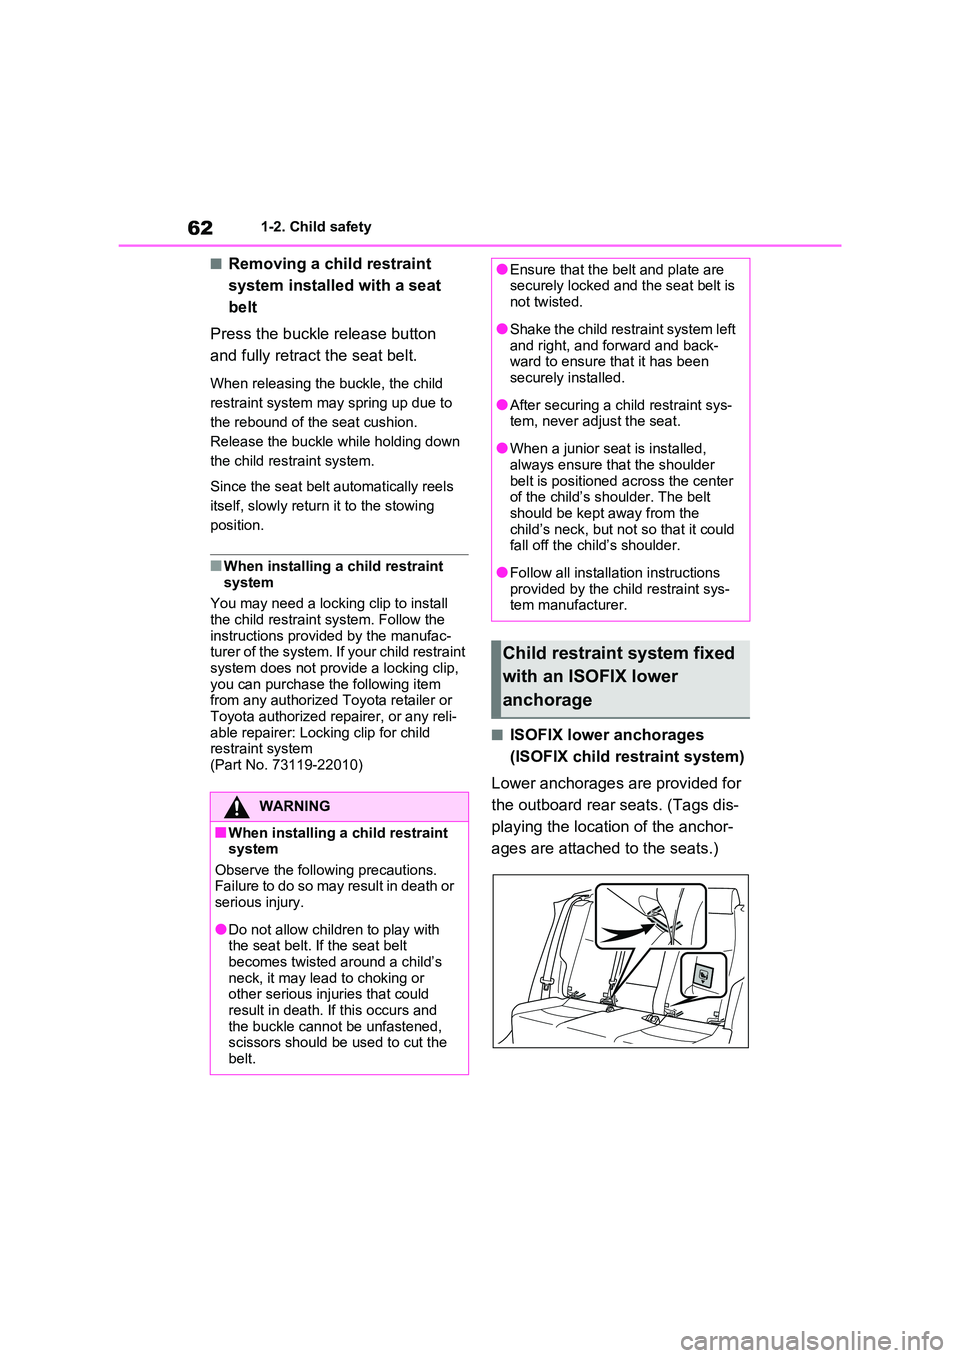
■ISOFIX lower anchorages
(ISOFIX child restraint system)
Lower anchorages are provided for
the outboard rear seats. (Tags dis -
playing the location of the anchor -
ages are attached to the seats.)
WARNING
■When installing a child restraint
system
Observe the following precautions. Failure to do so may result in death or
serious injury.
●Do not allow children to play with
the seat belt. I f the seat belt
becomes twisted around a child’s neck, it may lead to choking or
other serious injuries that could
result in death. If this occurs and the buckle cannot be unfastened,
scissors should be used to cut the
belt.
●Ensure that the bel t and plate are securely locked and the seat belt is
not twisted.
●Shake the child restraint system left
and right, and forward and back -
ward to ensure that it has been securely installed.
●After securing a ch ild restraint sys- tem, never adjust the seat.
●When a junior seat is installed, always ensure that the shoulder
belt is positioned a cross the center
of the child’s shoulder. The belt should be kept away from the
child’s neck, but not so that it could
fall off the chil d’s shoulder.
●Follow all installation instructions
provided by the child restraint sys - tem manufacturer.
Child restraint system fixed
with an ISOFIX lower
anchorage
Page 65 of 666
63
1
1-2. Child safety
For safety and security
■Installation with ISOFIX lower
anchorage (ISOFIX child
restraint system)
Install the child restraint system in
accordance to the operation man -
ual enclosed with the child restraint
system.
If the child restraint system on hand
is not within the “universal” cate -
gory (or the necessary information
is not in the tabl e), refer to the
“Vehicle List” provided by the child
restraint system maker for various
possible installation positions, or
check the compatibility after asking
the retailer of the child seat.
( →P.55, 56)
1 Adjust the seatback angle to the
most upright position. When
installing a forward-facing child
seat, if there is a gap between
the child seat a nd the seatback,
adjust the seatback angle until
good contact is achieved.
2 If the head restraint interferes
with the child restraint system
installation and the head
restraint can be removed,
remove the head restraint. Oth-
erwise, put the head restraint in
the upper most position.
( →P.276)
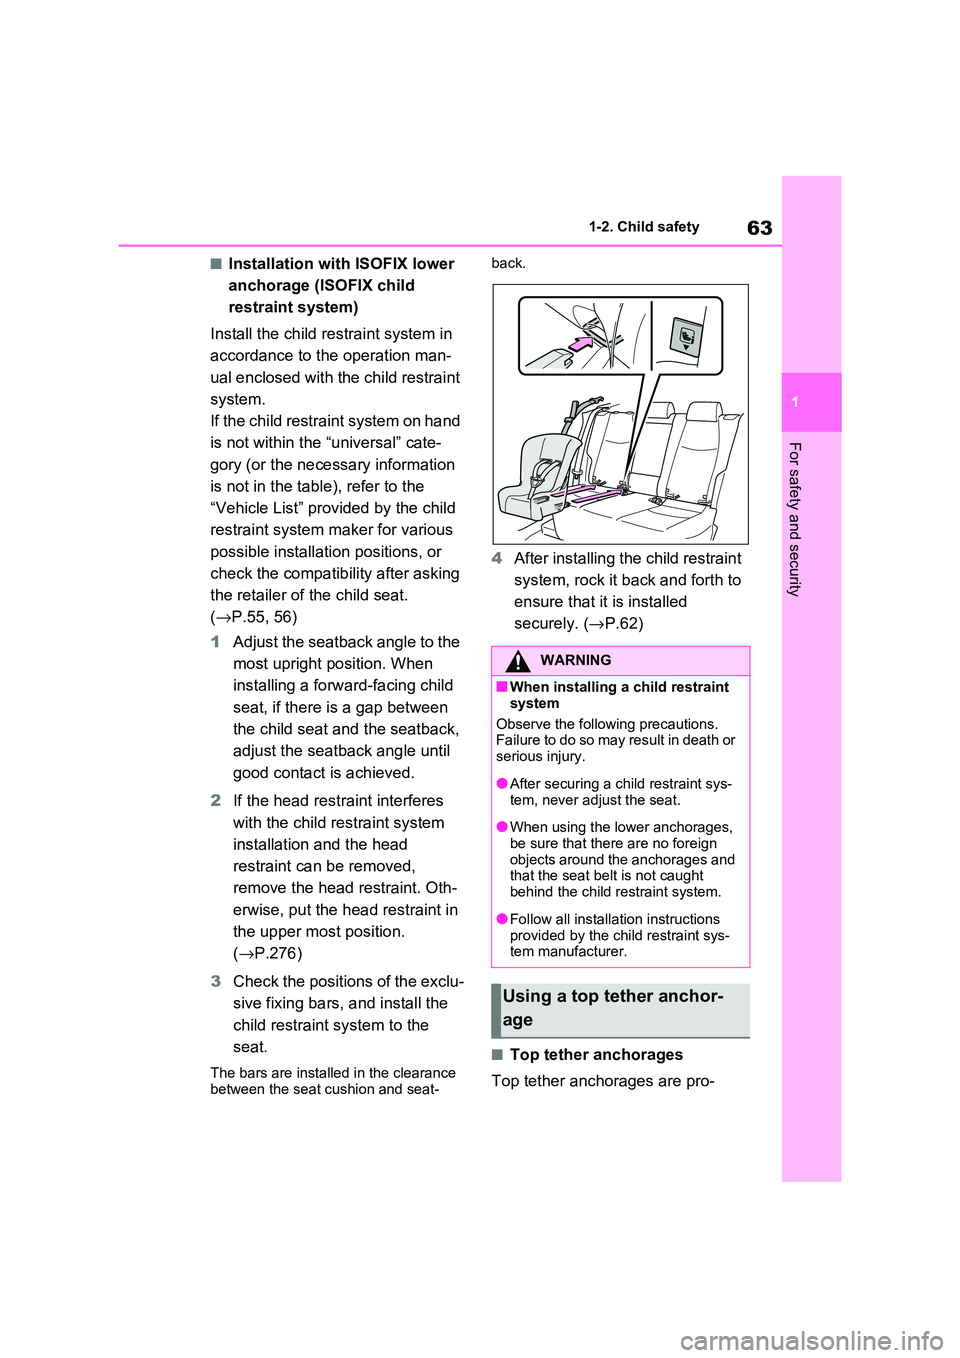
3 Check the positions of the exclu-
sive fixing bars, and install the
child restraint system to the
seat.
The bars are installed in the clearance
between the seat cushion and seat -
back.
4 After installing the child restraint
system, rock it back and forth to
ensure that it is installed
securely. ( →P.62)
■Top tether anchorages
Top tether anchorages are pro -
WARNING
■When installing a child restraint
system
Observe the following precautions. Failure to do so may result in death or
serious injury.
●After securing a ch ild restraint sys-
tem, never adjust the seat.
●When using the lower anchorages,
be sure that there are no foreign
objects around the anchorages and that the seat belt is not caught
behind the child restraint system.
●Follow all installation instructions
provided by the child restraint sys -
tem manufacturer.
Using a top tether anchor -
age
Page 653 of 666

651Alphabetical Index
When charging cannot be carried
out ............................................ 156
Charging port ................................ 105
If the charging port lid does not open
................................................. 121
Locking and unlocking ............... 121
Opening and closing .................. 106
Child-protector.............................. 209
Child restraint system .................... 50
Child restraint syst em installation
method....................................... 60
Fixed with a seat belt ................... 61
Fixed with an ISOFIX lower anchor -
age ............................................. 62
Points to remember...................... 51
Riding with children ...................... 49
Using a top tether anchorage....... 63
Child safety ..................................... 49
12-volt battery precautions. 507, 610
Airbag precautions ....................... 43
Back door precautions ............... 210
Charging precautions ................. 133
Heated steering wheel and seat
heater precautions ................... 462
How your child should wear the seat
belt ............................................. 36
Panoramic moon roof precautions
................................................. 296
Power window lock switch ......... 293
Power window precautions ........ 292
Rear door child-protectors ......... 209
Seat belt precautions ................... 35
Seat heater precautions ............. 462
Cleaning ................................ 488, 491
Aluminum wheels ....................... 488
DC/DC Converter air intake vent 536
Exterior....................................... 488
Front camera.............................. 345
Interior ........................................ 491
Radar sensor .......... ................... 345
Seat belts ................................... 491
Water-repellent coating .............. 489
Clock ..............................................179
Coat hooks .................................... 484
Condenser .....................................504
Console box .................................. 469
Consumption screen .................... 195
Coolant
Capacity .....................................622
Checking .................................... 503
Preparing and ch ecking before win-
ter ............................................. 445
Warning light ..............................569
Cooling system .............................503
Engine overheating .................... 611
Hybrid system overh eating.........613
Cruise control
Cruise control .............................388
Dynamic radar cruise control with
full-speed range .......................376
Cup holders ...................................470
Current fuel consumption ............198
Current fuel economy................... 181
Curtain shield airbags .................... 39
Customizable features ................. 629
D
Daytime running light system ..... 332
Replacing light bulbs ..................548
DC/DC converter air intake vent .... 98
Cleaning .....................................536
Deck board .................................... 472
Deck under tray.............................473
Defogger
Outside rear view mirrors ........... 454
Rear window ..............................454
Windshield.................................. 453
Digital Rear-view Mirror ...............280
Dimensions ...................................618
Display
BSM (Blind Spot Monitor)........... 393
Consumption screen ..................195
Page 657 of 666
655Alphabetical Index
HV mode .......................................... 85
Hybrid battery ( traction battery)
Charging .................................... 135
Location ....................................... 94
Specification............................... 621
Hybrid battery ( traction battery)
charge mode ................................. 85
Hybrid system
ACCESSORY mode .................. 320
Acoustic Vehicle Alerting System 92
Brake Override System .............. 301
Drive-Start Control ..................... 301
Emergency shut off system.......... 98
Energy monitor/consumption screen
................................................. 195
High voltage components ............ 94
How to start the hybrid system... 317
Hybrid System Indicator ............. 174
If the hybrid system will not start 601
If your vehicle has to be stopped in
an emergency .......................... 560
Ignition switch (power switch) .... 317
Overheating ............................... 611
Plug-in hybrid system precautions94
Plug-in hybrid vehicle driving tips. 99
Power (ignition) switch ............... 317
Regenerative brakin g ................... 90
Starting the hybrid system ......... 317
Hybrid System Indica tor .............. 174
Hybrid transmission ..................... 321
I
Identification
Engine ........................................ 619
Vehicle ....................................... 618
Ignition switch (pow er switch) .... 317
Auto power off function .............. 320
Changing the powe r switch modes
................................................. 320
If your vehicle has to be stopped in
an emergency .......................... 560
Starting the hybrid system..........317
Illuminated entry system.............. 466
Immobilizer system ........................ 76
Indicators....................................... 168
Initialization
Items to initialize......................... 643
Panoramic moon roof ................. 295
Power back door ........................218
Power windows ........ ..................291
Tire pressure war ning system ....523
Inside rear view mirror ......... 279, 280
Installing a child restraint system to
a front passenger seat ................. 52
Instrument cluster light control... 178
Interior lights ................................. 465
Switch.........................................465
Wattage ......................................626
Intrusion sensor.............................. 79
ISOFIX lower anchorages .............. 62
J
Jack
Positioning a floor jack ...............499
Vehicle-equipped jack ........ 583, 594
Jack handle ...........................583, 594
Jam protection function
Electronic sunshade ................... 295
Panoramic moon roof ................. 295
Power back door opener and closer
.................................................216
Power windows ........ ..................291
K
Keyless entry
Smart entry & star t system .........223
Wireless remote control .............203
Keys ............................................... 202
Battery-saving function...............224
Electronic key .............................202
If the electronic key does not operate