lock TOYOTA RAV4 PRIME 2021 (in English) Owner's Guide
[x] Cancel search | Manufacturer: TOYOTA, Model Year: 2021, Model line: RAV4 PRIME, Model: TOYOTA RAV4 PRIME 2021Pages: 616, PDF Size: 34.66 MB
Page 124 of 616
1242-2. Charging
Device) on a hook or equivalent.
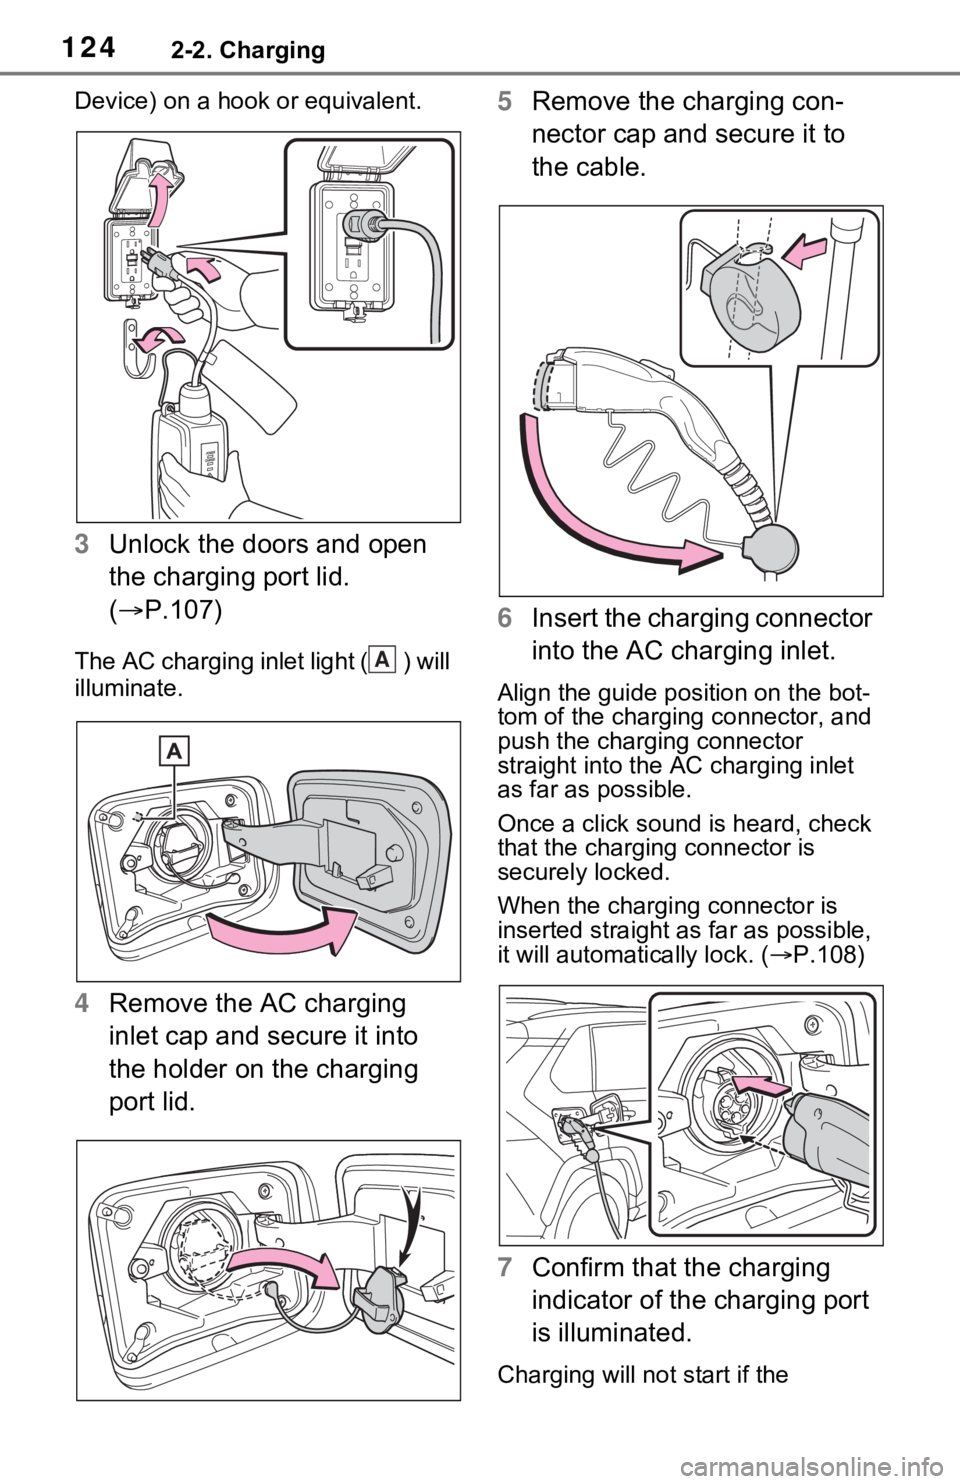
3Unlock the doors and open
the charging port lid.
( P.107)
The AC charging inlet light ( ) will
illuminate.
4Remove the AC charging
inlet cap and secure it into
the holder on the charging
port lid. 5
Remove the charging con-
nector cap and secure it to
the cable.
6 Insert the charging connector
into the AC charging inlet.
Align the guide position on the bot-
tom of the charging connector, and
push the charging connector
straight into the AC charging inlet
as far as possible.
Once a click sound is heard, check
that the charging connector is
securely locked.
When the charging connector is
inserted straight as far as possible,
it will automatically lock. ( P.108)
7 Confirm that the charging
indicator of the charging port
is illuminated.
Charging will not start if the
A
Page 128 of 616
1282-2. Charging
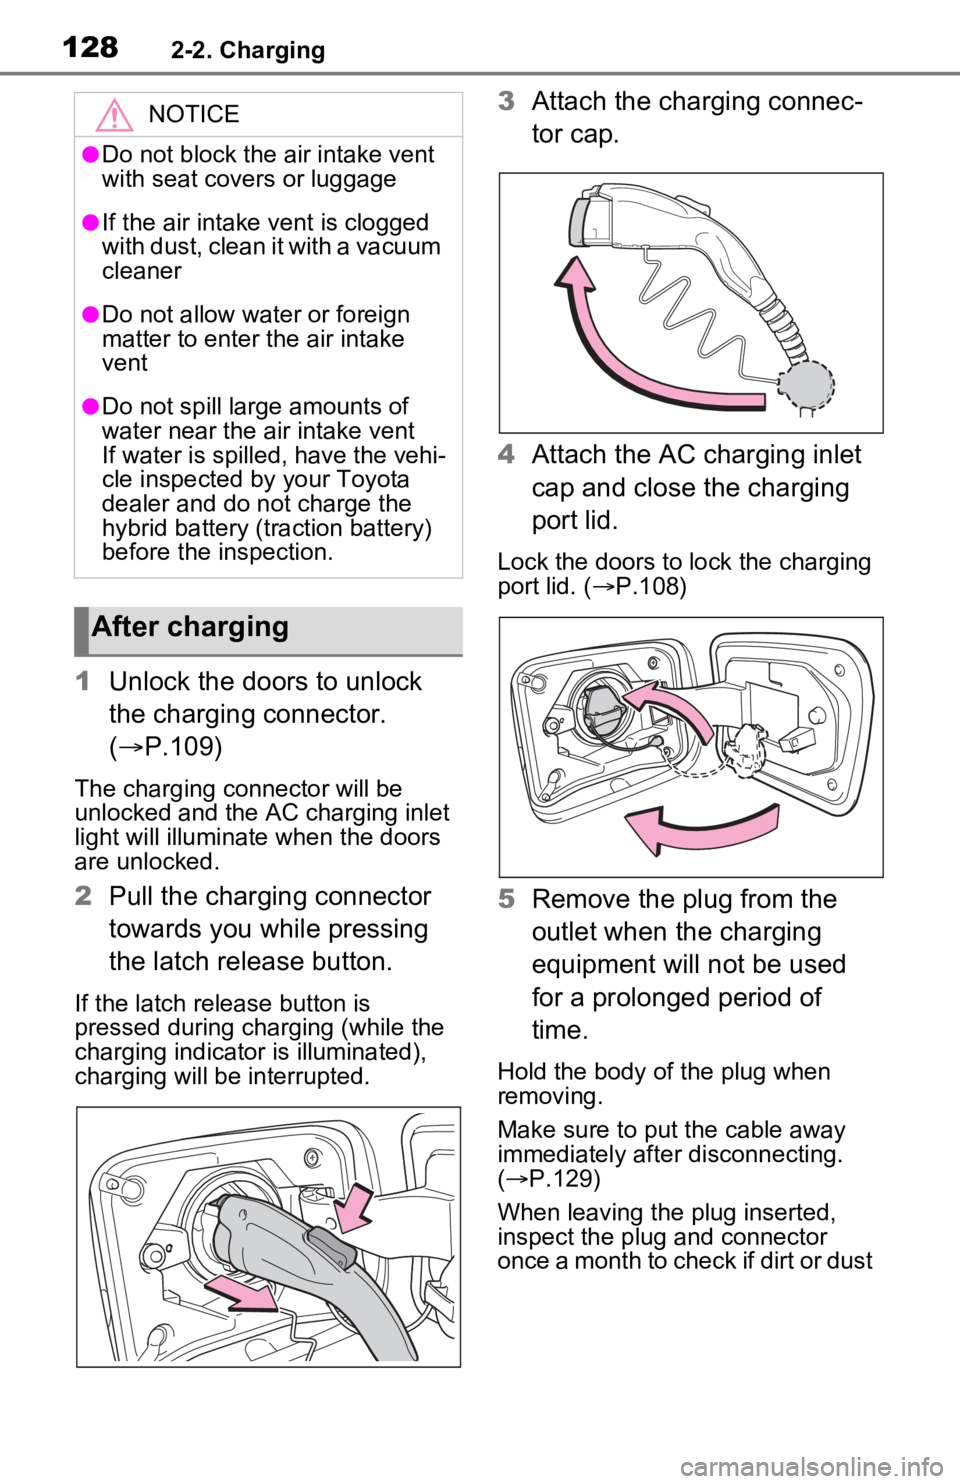
1Unlock the doors to unlock
the charging connector.
( P.109)
The charging co nnector will be
unlocked and the AC charging inlet
light will illuminate when the doors
are unlocked.
2 Pull the charging connector
towards you while pressing
the latch release button.
If the latch release button is
pressed during charging (while the
charging indicator is illuminated),
charging will be interrupted.
3Attach the charging connec-
tor cap.
4 Attach the AC charging inlet
cap and close the charging
port lid.
Lock the doors to lock the charging
port lid. ( P.108)
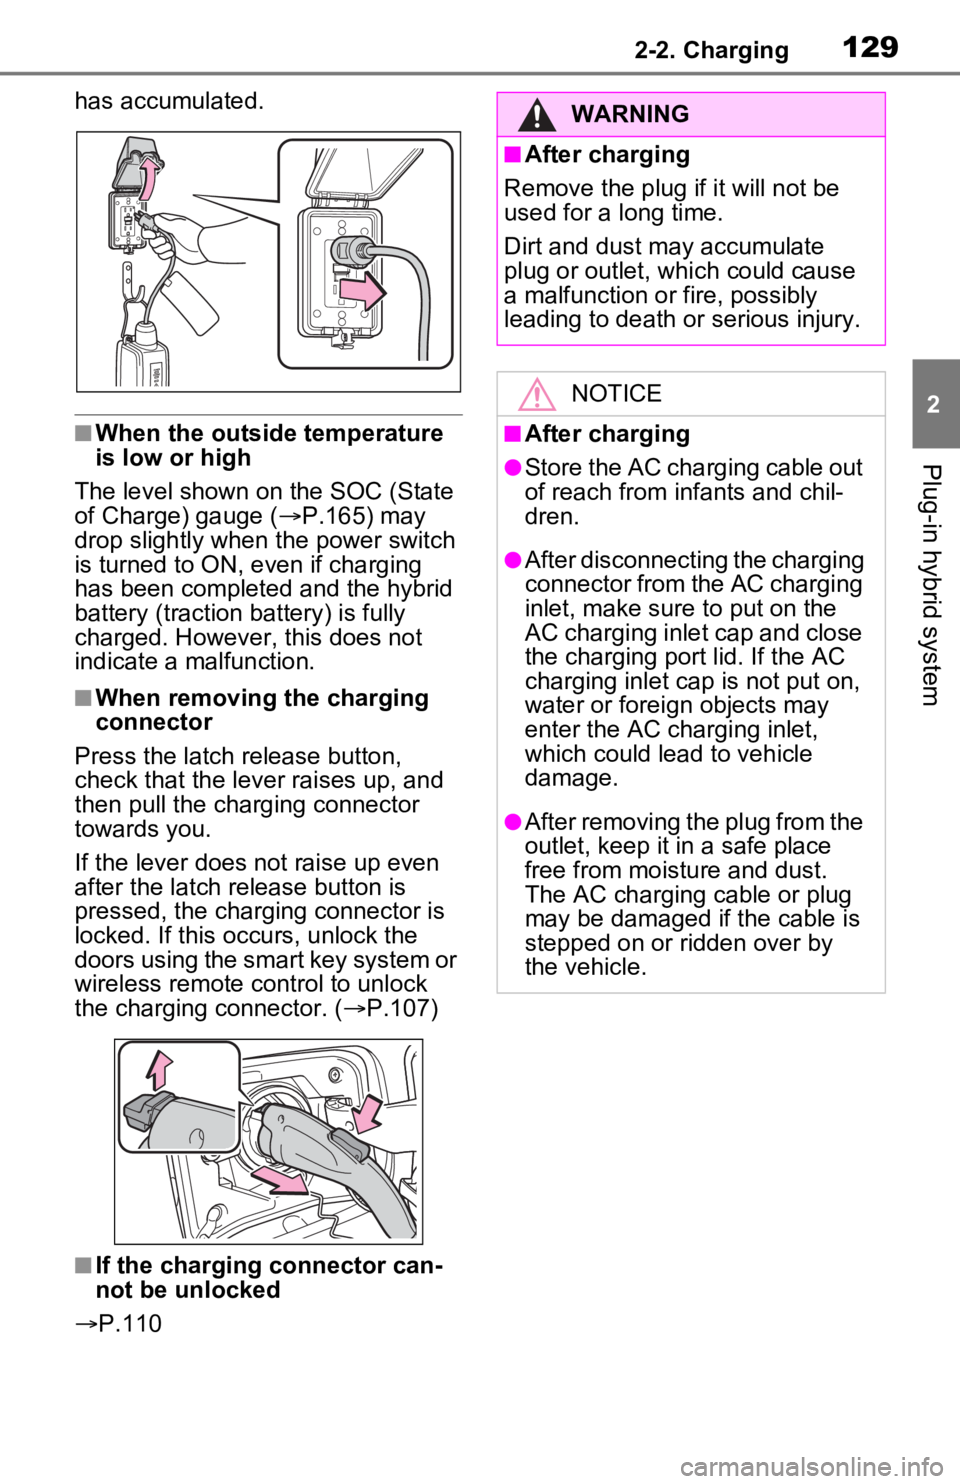
5 Remove the plug from the
outlet when the charging
equipment will not be used
for a prolonged period of
time.
Hold the body of the plug when
removing.
Make sure to put the cable away
immediately after disconnecting.
( P.129)
When leaving the plug inserted,
inspect the plug and connector
once a month to check if dirt or dust
NOTICE
●Do not block the air intake vent
with seat covers or luggage
●If the air intake vent is clogged
with dust, clean it with a vacuum
cleaner
●Do not allow water or foreign
matter to enter t he air intake
vent
●Do not spill large amounts of
water near the air intake vent
If water is spilled, have the vehi-
cle inspected by your Toyota
dealer and do not charge the
hybrid battery (traction battery)
before the inspection.
After charging
Page 129 of 616
1292-2. Charging
2
Plug-in hybrid system
has accumulated.
■When the outside temperature
is low or high
The level shown on the SOC (State
of Charge) gauge ( P.165) may
drop slightly when the power switch
is turned to ON, e ven if charging
has been completed and the hybrid
battery (traction battery) is fully
charged. However, this does not
indicate a malfunction.
■When removing the charging
connector
Press the latch release button,
check that the lever raises up, and
then pull the charging connector
towards you.
If the lever does not raise up even
after the latch release button is
pressed, the charging connector is
locked. If this occurs, unlock the
doors using the smart key system or
wireless remote control to unlock
the charging connector. ( P.107)
■If the charging connector can-
not be unlocked
P.110
WARNING
■After charging
Remove the plug if it will not be
used for a long time.
Dirt and dust may accumulate
plug or outlet, which could cause
a malfunction or fire, possibly
leading to death or serious injury.
NOTICE
■After charging
●Store the AC charging cable out
of reach from infants and chil-
dren.
●After disconnecting the charging
connector from the AC charging
inlet, make sure to put on the
AC charging inlet cap and close
the charging port lid. If the AC
charging inlet cap is not put on,
water or foreign objects may
enter the AC cha rging inlet,
which could lead to vehicle
damage.
●After removing the plug from the
outlet, keep it in a safe place
free from moisture and dust.
The AC charging cable or plug
may be damaged if the cable is
stepped on or ridden over by
the vehicle.
Page 130 of 616

1302-2. Charging
■Calendar settings
Current date and time information is
automatically set using GPS. How-
ever, if GPS calibra tion of clock is
turned off in the multimedia system
settings, the date needs to be set on
the multi-inform ation display.
If the calendar settings check
screen is displayed when an
attempt was made to register a
charge schedule, check that the cor-
rect date is set. If it is incorrect, be
sure to correct it.
If the calendar information is wrong,
the charging sche dule function will
not operate normally.
When registering the charging
schedule, the following settings
can be changed.
■Select the charging mode
One of the two following
charging modes can be
selected.
“Start”
Starts charging at the set time
*1
and finishes charging when fully
charged.
*2
“Departure”
Starts charging to finish at the
set time.
*3, 4
When this setting is selected,
the air conditioning-linked func-
tion can be used.
*1: Charging schedule function is performed in accordance with
the clock in the multi-information
display. Before registering the
charging schedule, check the
clock settings to the proper time.
*2: There might be a slight error in the timing when charging starts
due to the state of the hybrid bat-
tery (traction battery).
*3: When the system determines that there is no time to finish
charging by the set scheduled
departure time, it starts charging.
Check the charging schedules.
*4: If sudden changes in tempera-ture or changes in the condition
of the power source occur while
charging, charging may not end
exactly at the time estimated by
the system.
■Repeated setting
The periodic charging schedule
can be set by selecting your
desired day of the week. (If no
days are selected, charging is
only carried out once.)
Using the charging
schedule function
Charging can be carried out
at the desired time by regis-
tering the charging sched-
ule. Also, it is possible to
set the charging schedule to
one’s preferences, such as
having charging complete
by a certain departure time
or be carried out at the
same time on certain days.
Settings of the charging
schedule function
Page 132 of 616
1322-2. Charging
■To make sure that the charging
schedule function operates cor-
rectly
Check the following items.
●A d j u s t t h e c l o c k t o t h e c o r r e c t t i m e
( P.169)
●The calendar is set to the correct
date ( P.177)
●Check that the power switch is
turned off
●After registering the charging
schedule, connect the AC
charging cable
The charging sta rt time is deter-
mined based on the charging
schedule at the time that the AC
charging cable was connected.
●After connecting the AC charging
cable, check that the charging
indicator of the charging port
flashes ( P.100)
●Do not use an ou tlet that has a
power cut off function (including a
timer function)
Use an outlet that constantly sup-
plies electricity. For outlets where
the power is cut off due to a timer
function, etc., charging may not be
carried out according to plan if the
power is cut off during the set
time.
■When the AC charging cable
remains connected to the vehi-
cle
Even if multiple consecutive
charging schedules are registered,
the next charge will not be carried
out according to the charging
schedule until the AC charging
cable is removed and reconnected
after charging completes. Also,
when the hybrid battery (traction
battery) is fully charged, charging
according to the charging schedule
will not be carried out.
■“Climate Prep”
●When the air conditioning-linked
setting is turned on, the air condi-
tioning operates until the set departure time. Therefore, the air
conditioning will co
nsume electric-
ity and charging may not complete
by the set departure time.
●If the hybrid batte ry (traction bat-
tery) is fully charged, charging will
not be carried o ut, even if the
charging schedule is set. How-
ever, if “Climate Prep” is turned
on, the air conditioning will oper-
ate only once when it nears the
time set in “Departure”. If this
occurs, the air conditioning will
consume electricity and the
remaining charge of the hybrid
battery (traction battery) when
departing may be decreased.
●When the doors are unlocked, the
air conditioning system does not
operate.
■Smartphone-linked operation
(vehicles with Premium Audio)
After applying to Toyota Apps, it is
possible to use the smartphone
application to change charging
schedule settings.
For details about Toyota Apps, refer
to
http://www.toyota.com/connectedse
rvices in the United States and
http://www.toyota.ca/connected
in
Canada.
■When charging schedules are
ignored
When the following operations are
performed while the charging
schedule is on standby, charging
schedule is temporarily canceled
and charging is started.
●When the Remote Air Condition-
ing System ( P.405) is operated
●When turning “My Room Mode”
on ( P.144)
●When turning “Charge Now” on
( P.137, 142)
●When an operation that temporar-
ily cancel charging using the
charging schedule ( P.125)
Page 149 of 616
1492-2. Charging
2
Plug-in hybrid system
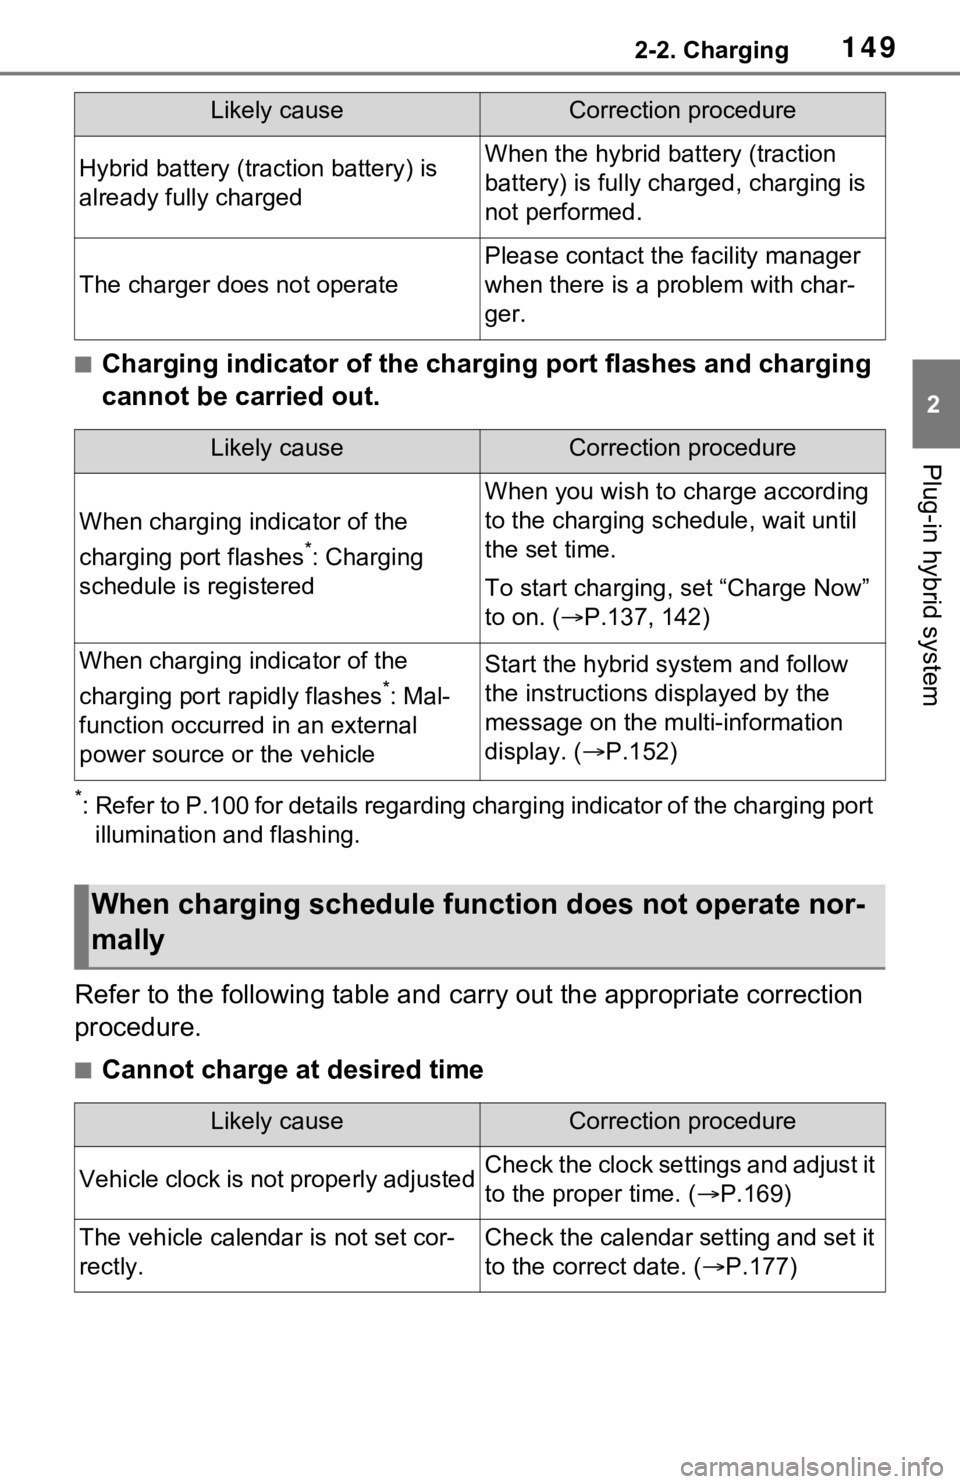
■Charging indicator of the charging port flashes and charging
cannot be carried out.
*: Refer to P.100 for details regarding charging indicator of the charging port
illumination and flashing.
Refer to the following table and carry out the appropriate correction
procedure.
■Cannot charge at desired time
Hybrid battery (traction battery) is
already fully chargedWhen the hybrid battery (traction
battery) is fully char ged, charging is
not performed.
The charger does not operate
Please contact the facility manager
when there is a problem with char-
ger.
Likely causeCorrection procedure
When charging indicator of the
charging port flashes
*: Charging
schedule is registered
When you wish to charge according
to the charging schedule, wait until
the set time.
To start charging, set “Charge Now”
to on. ( P.137, 142)
When charging indicator of the
charging port rapidly flashes
*: Mal-
function occurred in an external
power source or the vehicle
Start the hybrid system and follow
the instructions displayed by the
message on the m ulti-information
display. ( P.152)
When charging schedule func tion does not operate nor-
mally
Likely causeCorrection procedure
Vehicle clock is not properly adjustedCheck the clock settings and adjust it
to the proper time. ( P.169)
The vehicle calendar is not set cor-
rectly.Check the calendar setting and set it
to the correct date. ( P.177)
Likely causeCorrection procedure
Page 165 of 616
1653-1. Instrument cluster
3
Vehicle status information and indicators
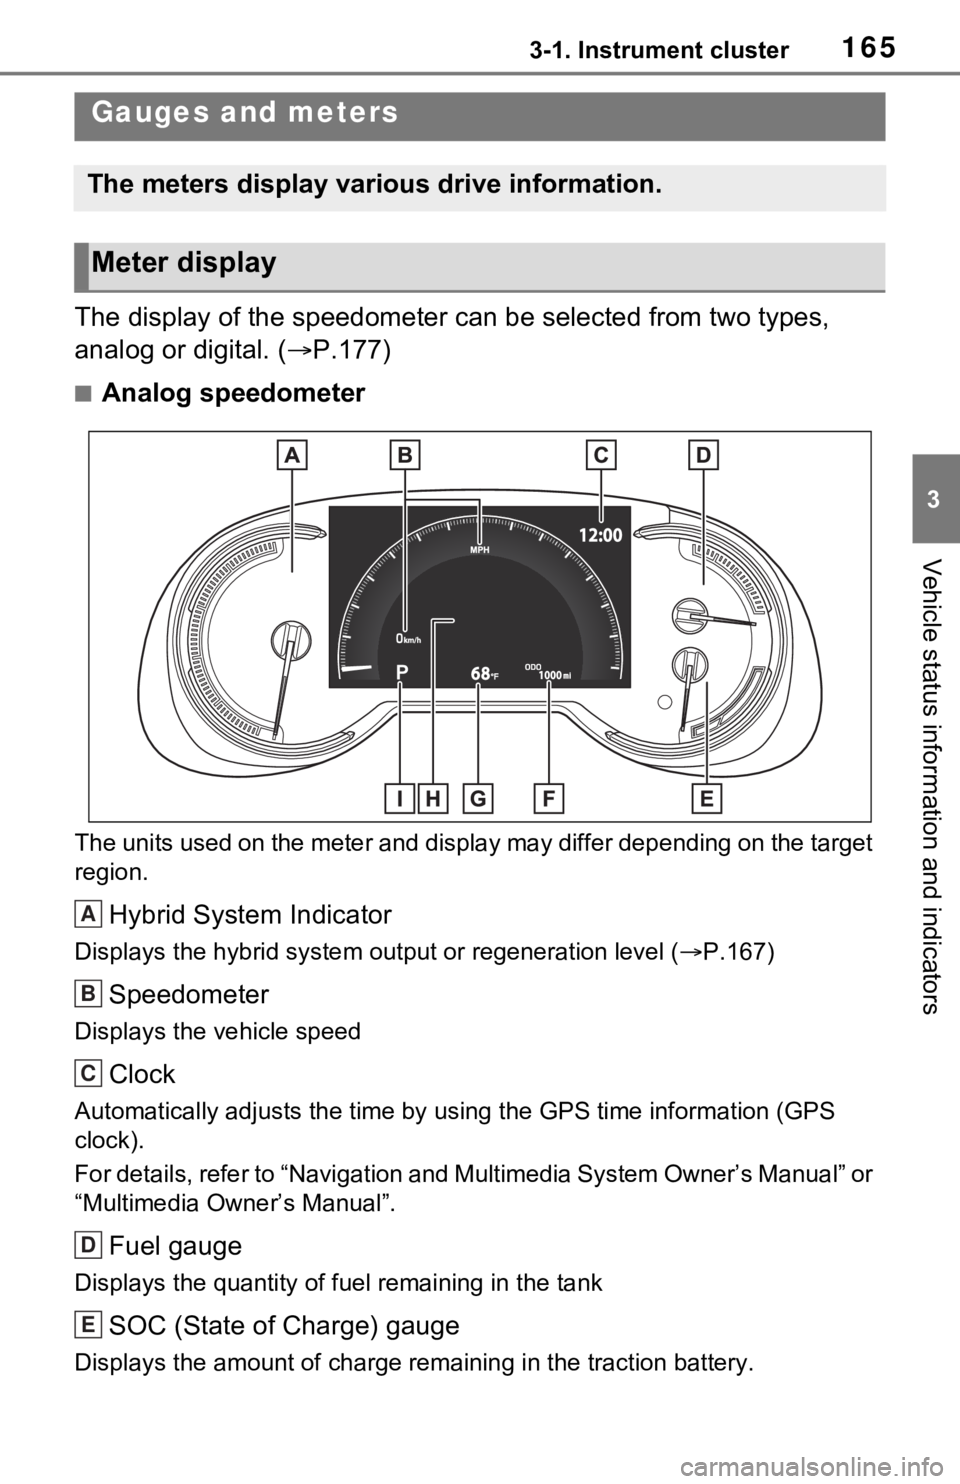
The display of the speedometer can be selected from two types,
analog or digital. ( P.177)
■Analog speedometer
The units used on the meter and display may differ depending on the target
region.
Hybrid System Indicator
Displays the hybrid system output or regeneration level ( P.167)
Speedometer
Displays the vehicle speed
Clock
Automatically adjusts the time by using the GPS time informatio n (GPS
clock).
For details, refer to “Navigation and Multimedia System Owner’s Manual” or
“Multimedia Owner’s Manual”.
Fuel gauge
Displays the quantity of fu el remaining in the tank
SOC (State of Charge) gauge
Displays the amount of charge rem aining in the traction battery.
Gauges and meters
The meters display various drive information.
Meter display
A
B
C
D
E
Page 166 of 616
1663-1. Instrument cluster
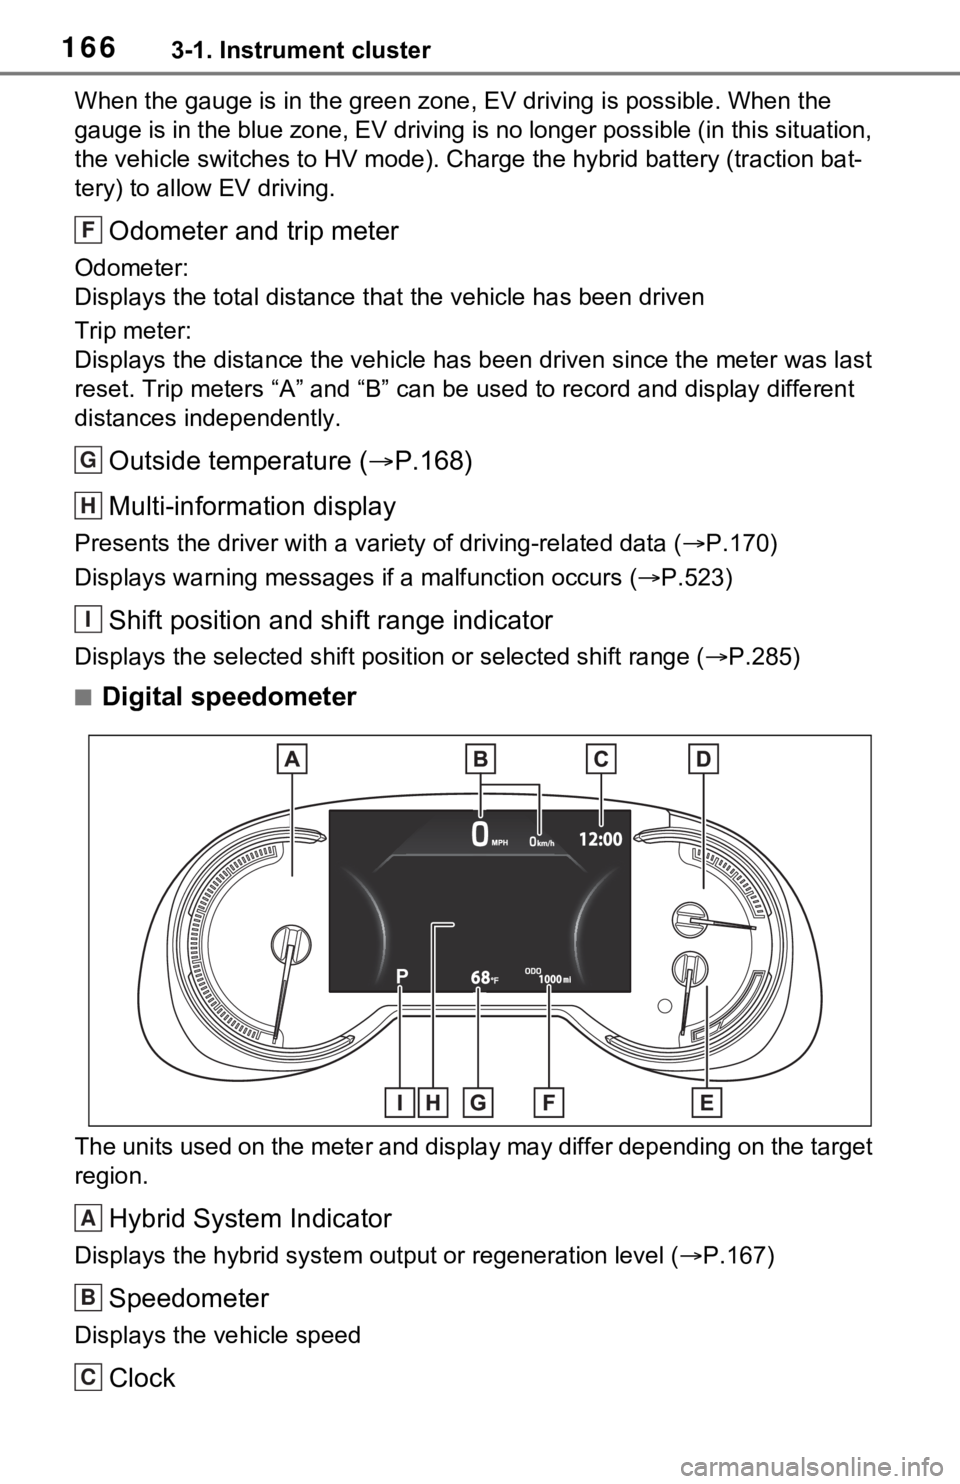
When the gauge is in the green zone, EV driving is possible. When the
gauge is in the blue zone, EV driving is no longer possible (in this situation,
the vehicle switches to HV mode) . Charge the hybrid battery (traction bat-
tery) to allow EV driving.
Odometer and trip meter
Odometer:
Displays the total distance th at the vehicle has been driven
Trip meter:
Displays the distance the vehicle has been driven since the meter was last
reset. Trip meters “A” and “B” c an be used to record and display different
distances independently.
Outside temperature ( P.168)
Multi-information display
Presents the driver with a variety of driving-related data ( P.170)
Displays warning messages if a malfunction occurs (P.523)
Shift position and shift range indicator
Displays the selected shift posit ion or selected shift range (P.285)
■Digital speedometer
The units used on the meter and display may differ depending on the target
region.
Hybrid System Indicator
Displays the hybrid system output or regeneration level ( P.167)
Speedometer
Displays the vehicle speed
Clock
F
G
H
I
A
B
C
Page 167 of 616
1673-1. Instrument cluster
3
Vehicle status information and indicators
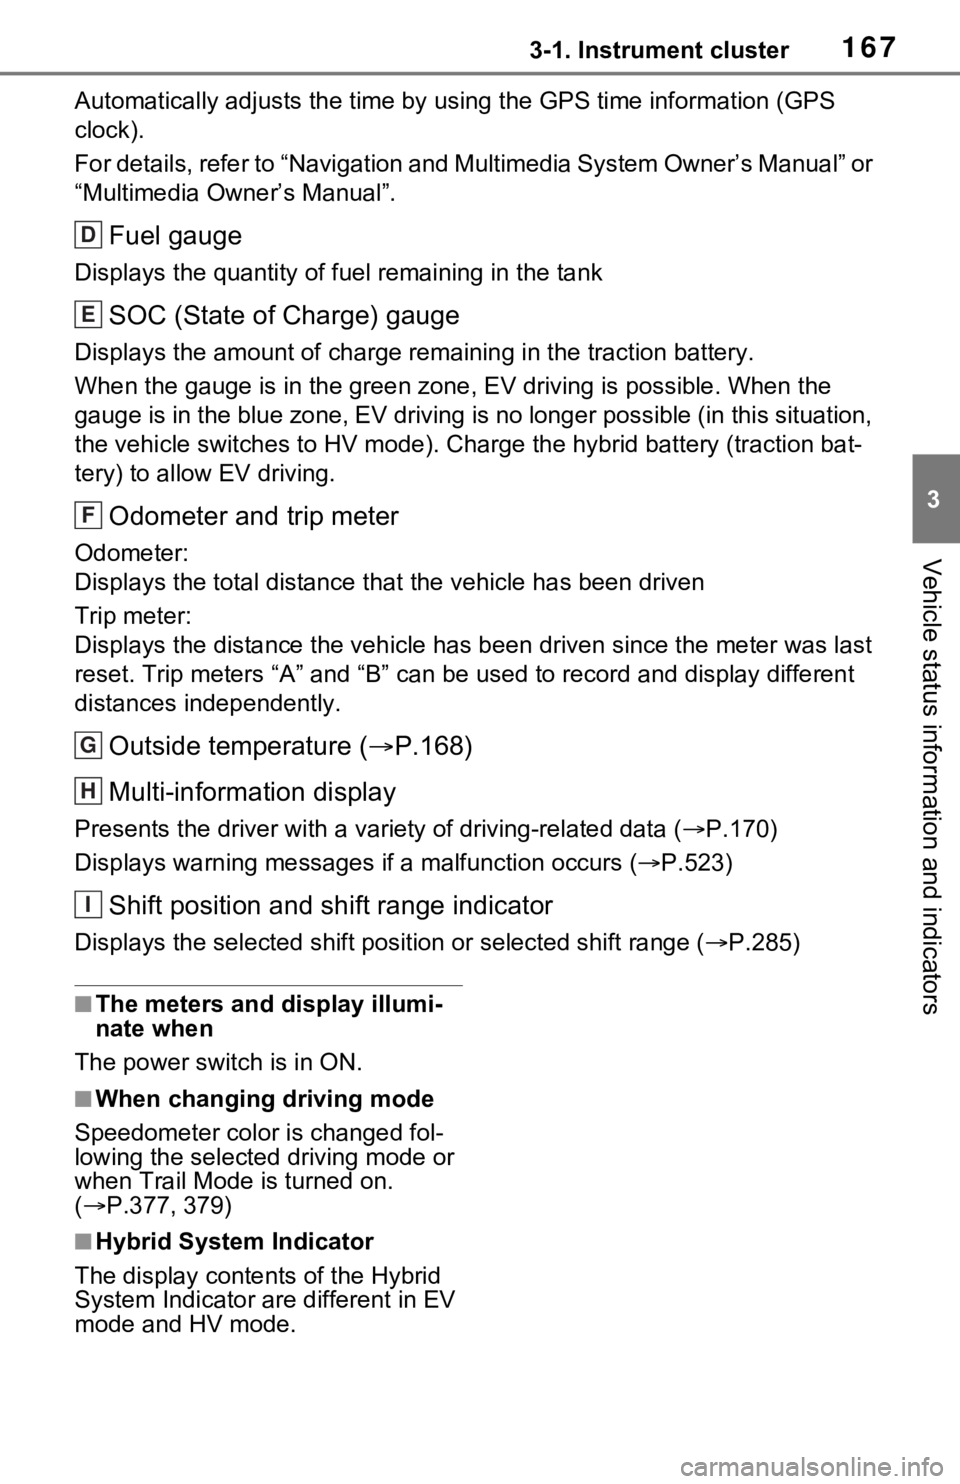
Automatically adjusts the time by using the GPS time informatio n (GPS
clock).
For details, refer to “Navigation and Multimedia System Owner’s Manual” or
“Multimedia Owner’s Manual”.
Fuel gauge
Displays the quantity of fu el remaining in the tank
SOC (State of Charge) gauge
Displays the amount of charge rem aining in the traction battery.
When the gauge is in the green zo ne, EV driving is possible. When the
gauge is in the blue zone, EV driving is no longer possible (in this situation,
the vehicle switches to HV mode) . Charge the hybrid battery (traction bat-
tery) to allow EV driving.
Odometer and trip meter
Odometer:
Displays the total distance th at the vehicle has been driven
Trip meter:
Displays the distance the vehicle has been driven since the meter was last
reset. Trip meters “A” and “B” c an be used to record and display different
distances independently.
Outside temperature ( P.168)
Multi-information display
Presents the driver with a variety of driving-related data ( P.170)
Displays warning messages if a malfunction occurs (P.523)
Shift position and shift range indicator
Displays the selected shift posit ion or selected shift range (P.285)
■The meters and display illumi-
nate when
The power swit ch is in ON.
■When changing driving mode
Speedometer color is changed fol-
lowing the selected driving mode or
when Trail Mode is turned on.
( P.377, 379)
■Hybrid System Indicator
The display content s of the Hybrid
System Indicator are different in EV
mode and HV mode.
D
E
F
G
H
I
Page 170 of 616
1703-1. Instrument cluster
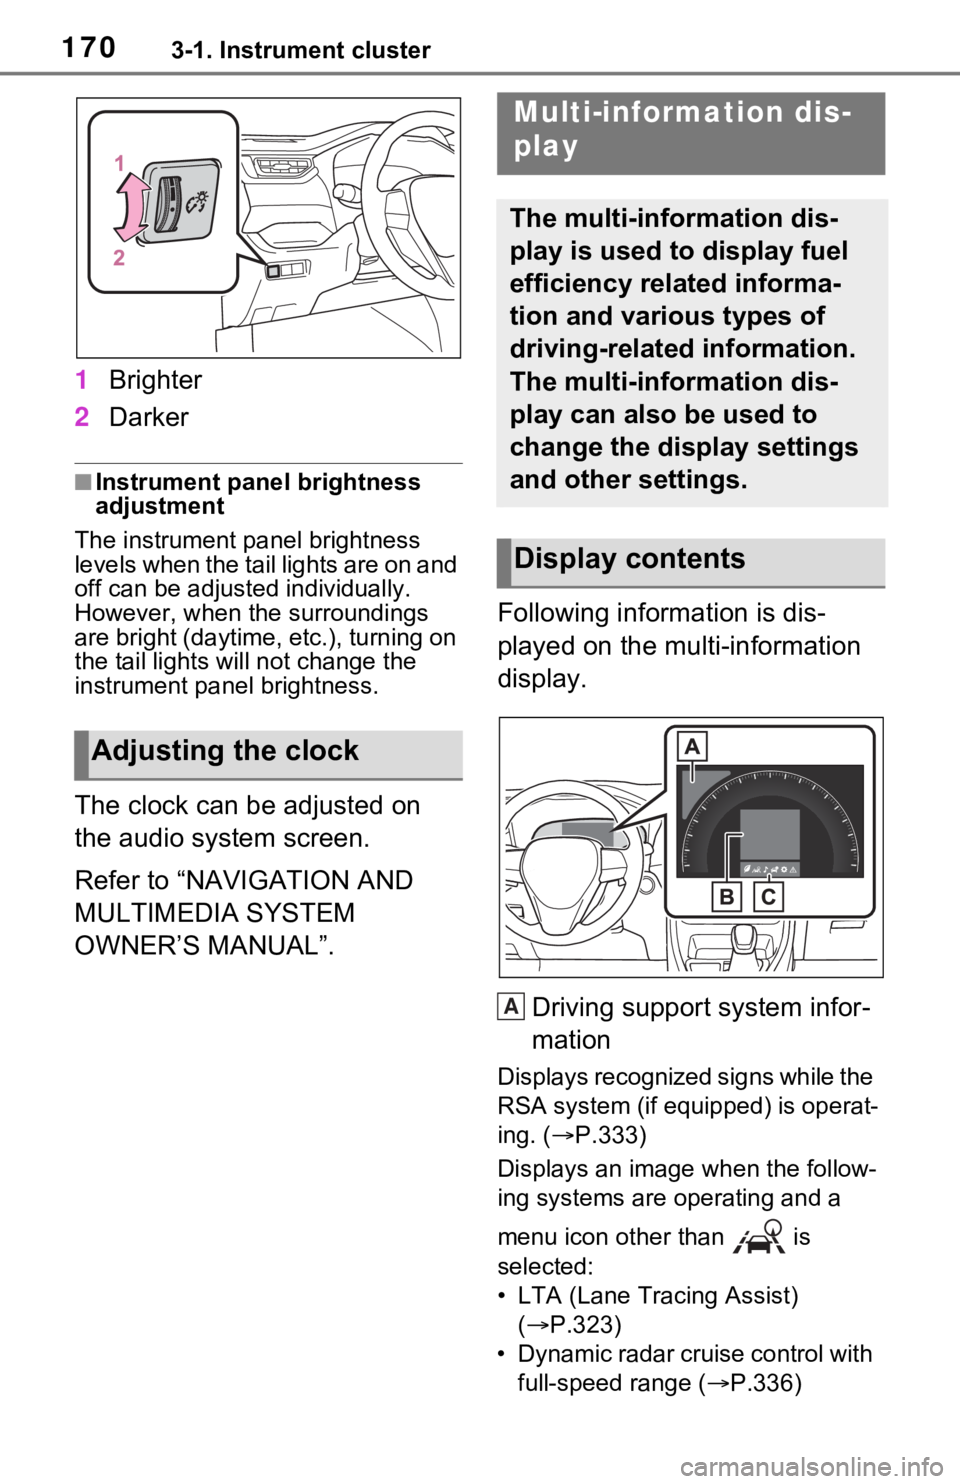
1Brighter
2 Darker
■Instrument panel brightness
adjustment
The instrument panel brightness
levels when the tail lights are on and
off can be adjusted individually.
However, when the surroundings
are bright (daytime, etc.), turning on
the tail lights will not chan ge the
instrument panel brightness.
The clock can be adjusted on
the audio system screen.
Refer to “NAVIGATION AND
MULTIMEDIA SYSTEM
OWNER’S MANUAL”. Following information is dis-
played on the multi-information
display.
Driving support system infor-
mation
Displays recognized signs while the
RSA system (if equipped) is operat-
ing. ( P.333)
Displays an image when the follow-
ing systems are operating and a
menu icon other than is
selected:
• LTA (Lane Tracing Assist) ( P.323)
• Dynamic radar cruise control with full-speed range ( P.336)
Adjusting the clock
Multi-information dis-
play
The multi-information dis-
play is used to display fuel
efficiency related informa-
tion and various types of
driving-related information.
The multi-information dis-
play can also be used to
change the display settings
and other settings.
Display contents
A